Author Archives: Craig Anderton
Varispeed-Type Formant Changes
Back in the days of tape, when dinosaurs ruled the earth and gas station attendants checked your oil, variable-speed tape recorders allowed changing the pitch of all the tracks with a single control. This was useful for many applications. The most common were speeding up masters a bit to make them a little brighter and tighter, doing tape flanging, and perhaps the most popular, changing vocal formants. If you transposed the recorder’s pitch down a little bit, recorded a vocal as you sang along with the lower pitch, and then transposed back up again on playback, the vocal formant would be higher and brighter. Similarly, for a darker, warmer sound, you could transpose up, sing along with that, and transpose back down again. The same principle worked with other instruments, but vocals were the most popular candidates for this technique.
The main limitation (although it could also be an advantage in some situations) is that the tempo and pitch were interdependent—a higher pitch meant a faster speed, and a lower pitch, a slower speed. This was useful for masters, because you could speed up and brighten a track by upping the speed by 2% or so. The Friday tip for June 8, 2018 covered how to emulate true, variable speed tape effects when working on a final stereo mix.
A major advantage of today’s digital audio technology is that pitch and tempo can be independent, and one of Studio One’s attributes is that the audio engine retains its sound quality with reasonable pitch changes (e.g., a few semitones). This makes it very easy to do the old tape trick of changing vocal formants; here’s how.
- First, create a premix of your existing tracks with the Export Mixdown function. In the dialog box, check Import to Track and Close after Export (Fig. 1).
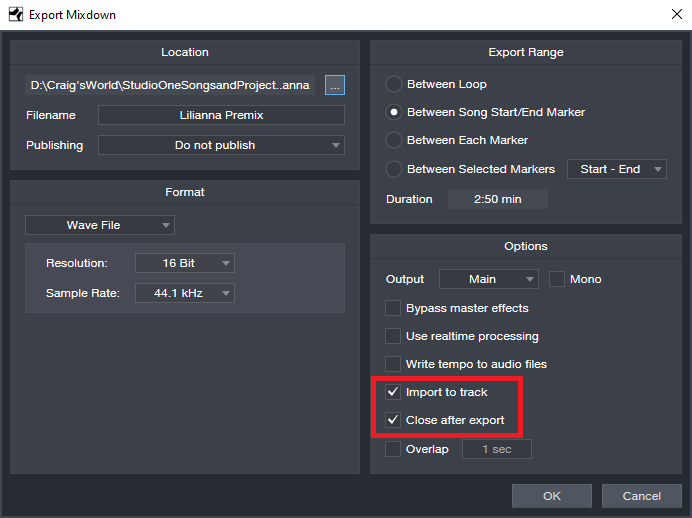
Figure 1: Use the Export Mixdown function to create a premix.
- After the premix is imported, mute all other tracks except for the Imported premix track.
- Select the premixed track, and right-click on it (Fig. 2), or open its Inspector (F4), to access the Transpose and Tune parameters.
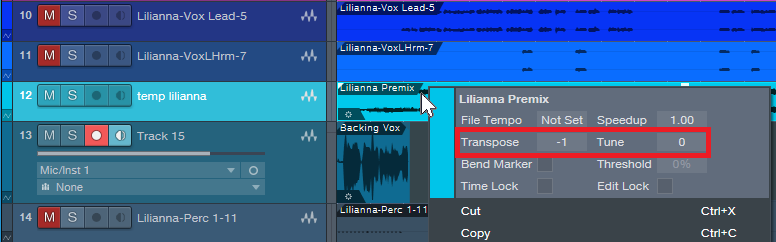
Figure 2: You can access the Transpose and Tune parameters by right-clicking on the premix.
- To brighten the vocal formant, use the Tune and/or Transpose function to lower the pitch.
- Record the vocal track as you listen to the premix.
- After recording the vocal track, right-click on the vocal Event, or open its Inspector, and tune it up by as much as you tuned the premix track down. For example, if you tuned the premix down a semitone, tune the vocal track up a semitone.
- Delete the premix (or mute it if you plan to do more formant-shifted tracks), unmute the other tracks, and enjoy your formant-shifted vocal.
This is especially useful when doubling parts, because the double can have a slightly different timbre. And with background vocals, shift some formants up, and some formants down, for a bigger, more interesting sound. And of course, if you just can’t quite hit that high note…you’re covered. I promise I won’t tell.
I also like using this with guitar and other instruments. I’ve gotten away with pitching guitar up 7 semitones for a bright sound that splits the difference between a standard guitar sound, and one that’s more like “Nashville” tuning (as described in the Friday Tip for December 1, 2019). At the other end of the tonal spectrum, playing along with the premix tuned up, and pitching back down, is like using a low tuning on a guitar—great for those massive metal guitar sounds.
—————————————
As we enter 2020, thank you very much for your support of these blog posts, and your comments. Also, thank you for supporting the Studio One book series that I’m writing. When I wrote the first book, I wondered if there would be any demand for it, or whether I was just wasting my time. Well, you’ve answered that question… so now I’m working on book #5 of the series, about how to record great guitar sounds with Studio One. It won’t be done for a while, but it wouldn’t have been done at all without your support (or the great-sounding new amp sims, for that matter).
Finally, let’s all thank Ryan Roullard and Chad Schoonmaker, who wrangle the blog and social media each week to get this blog posted and promoted. It’s not like they don’t already have enough to do at PreSonus, which makes their involvement just that much more appreciated. Thanks guys!
Bi-Amping the Ampire
I’m still wrapping my head around PreSonus giving us amp sims that are light years beyond the original Ampire in a free update…and also making them available for use in other programs. But now that they’re here, let’s take advantage of them before PreSonus’s accounting department changes its mind.
The new amp sims do not supplement the old Ampire, but replace it. New Studio One owners will have only the new amps; existing users will find that the legacy presets were removed. If you need to get the older presets back because you used them in pre-4.6 projects, simply install the Ampire XT Classics extension—but I’d recommend redoing any presets with the new amps, because they sound so much better. (The Ampire XT Metal Pack works with the new Ampire, but you may need to re-install it.) The PreSonus Knowledge Base has an article with everything you need to know about making the conversion from the old Ampire to the shiny new Ampire XT.
Why Bi-Amp?
Bi-amping a guitar amp is useful for the same reason that most studio monitors are bi-amped—just as you can optimize the speakers for high and low frequencies, you can optimize the amps for high and low frequencies. For example, with heavily-distorted chords, the high strings will be equally distorted and relatively indistinct. With bi-amping, the lower notes can have a big, beefy distortion sound, while the high notes ring out on top—which is the subject of this Friday tip.
Let’s take a bi-amped preset apart to find out how it works. This preset is available on the PreSonus Exchange, so if you just want a cool, crunchy rhythm sound, go ahead and download it. But the real value here is learning how to make your own presets, because this preset was made using my guitar, pickups, strings, playing style, pick, and follows my musical tastes. It’s unlikely you play guitar in exactly the same way, so it’s worth tailoring any amp sim preset—not just this one—to your own playing style and gear.
Recording the Guitar
Guitars are mono, but to play stereo games, we need to convert a mono track to dual mono. This allows using processors like the Binaural Pan.
- Record a mono guitar track with Channel Mode set to Mono.
- Change Channel Mode to Stereo.
- Select what you recorded.
- Choose Bounce Selection (ctrl+B). Now your guitar part is dual mono (e.g., the same part in both the left and right channels), so Studio One recognizes it as stereo.
The FX Chain Multipreset
Fig. 1 shows the FX Chain “block diagram.” The Splitter is doing a Frequency split; frequencies below 924.7 Hz go to the left split, while frequencies above that go to the right split.

Figure 1: Bi-amp Multipreset block diagram.
Next up is choosing the amps, and setting their parameters (Fig. 2). The left split uses the MCM 800, a revered British amp that can marshall its resources to give big, beefy sounds. The right split’s VC30 amp is known amongst the vox populi for its bright, ringing high end, so the two amps are ideal for delivering the desired result.
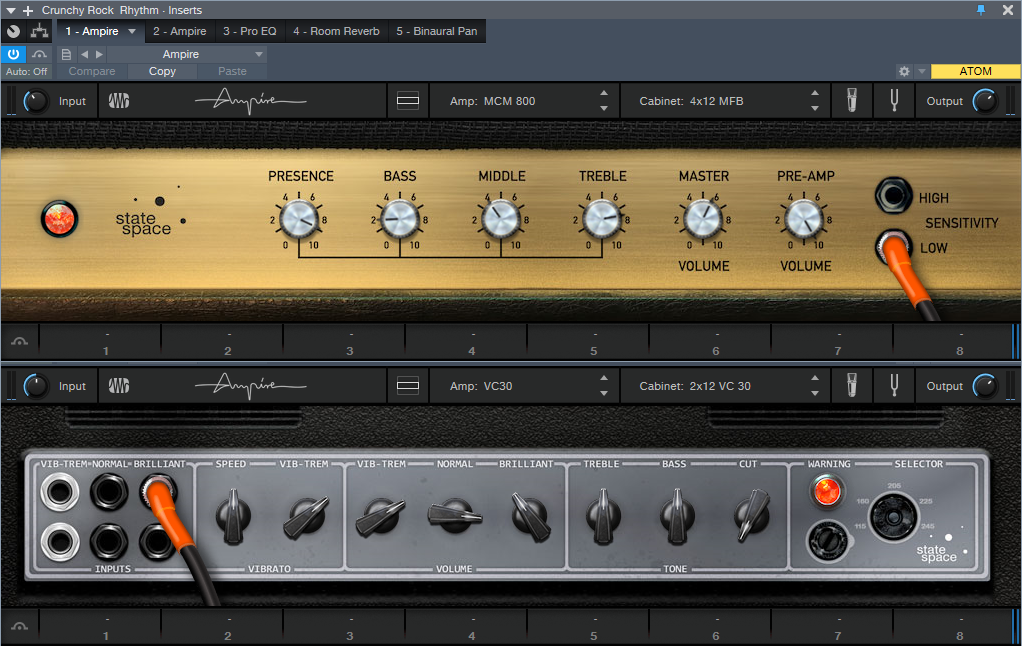
Figure 2: Left split (on top), right split (below).
Now let’s enhance the amp sound with some EQ, reverb, and stereo imaging to spread out the reverb a bit more (Fig. 3).
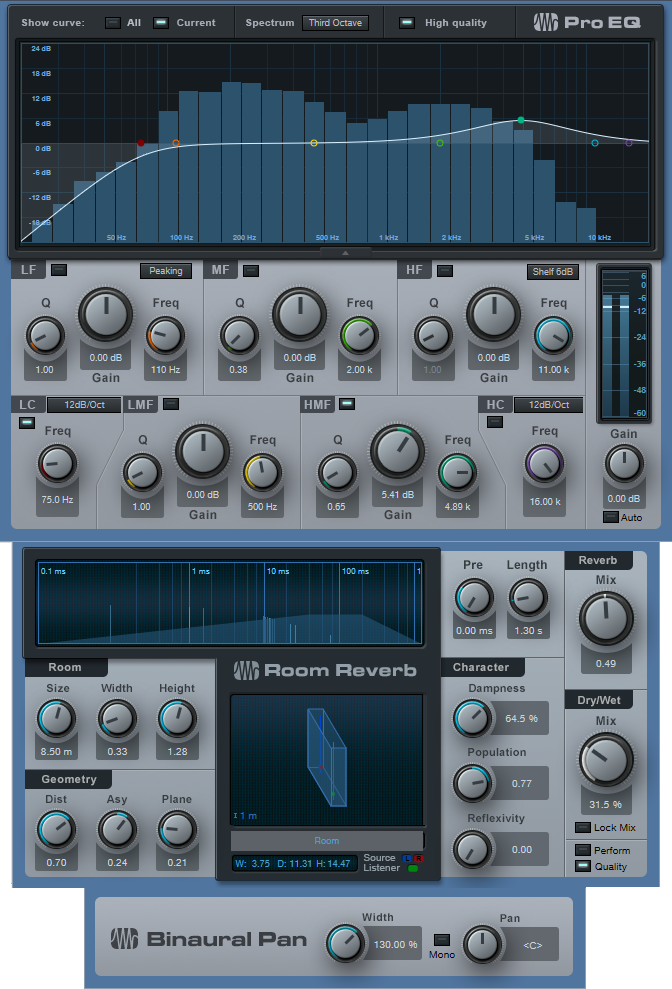
Figure 3: Final touches for the bi-amp multipreset.
The EQ adds the equivalent of an amp’s “bright” switch. With a non-bi-amped preset, you have to be very careful about adding brightness because it can emphasize any artifacts caused by intermodulation distortion. But that’s not an issue here, because of the VC30’s a clean high end. The gentle low-frequency roll off simulates more of an open-back cabinet sound. The reverb is sort of a cross between a spring and room sound, while the Binaural Pan spreads out the reverb signal for a wider stereo image. The pan setting is fairly conservative; feel free to widen things further.
This multipreset makes an excellent template for further adventures with bi-amplification. Of course, this just scratches the surface of what’s possible with these new amps—so stay tuned to the Friday Tip of the Week for more applications.
Download the Crunchy Rock Rhythm preset here!
The Vinyliser FX Chain
Nostalgic for vinyl? Miss the glorious sound of dragging a rock through yards of plastic, the wild frequency response gyrations of analog RIAA curve filters, the surface noise from recycled vinyl, scratches and pops from dust particles, inner groove distortion, sound quality deterioration over time, and warpage from records not being stored properly?
Well, I don’t miss it at all. But, recently I needed to sample a loop from a song that had been recorded with (of course) pristine quality in Studio One, and apply a trashification process to make it sound like the loop was taken from an old, abused, and never cleaned vinyl record. The object was not to come up with an FX Chain like the existing plug-ins that aim to emulate vinyl’s better qualities, but instead, something that could emulate some of vinyl’s worst qualities.
Now, you might think it would be easy-peasy to take something good and make it sound bad, but it’s not—because vinyl is/was a very specialized form of bad, and reproducing that inside of Studio One is a challenge. But we tackle the tough gigs here in the Friday Tip! Here’s what I learned.
Hissy that Fits

Figure 1: The Tone Generator’s white noise output is pretty much all we need for hiss, whether tape hiss or preamp hiss.
The really old vinyl stuff was pre-noise reduction, so we need some hiss. That’s easy: use Studio One’s Tone Generator (Fig. 1), set it for white noise, and keep the level down in the final routing.
Distortion
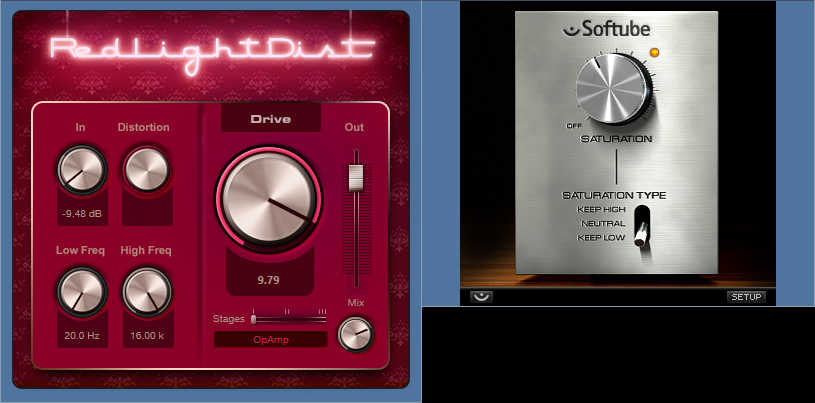
Figure 2: Each of these distortion processors gives a different kind of dirt flavor…try them both.
Simulating inner groove distortion isn’t necessarily easy, but we have a couple options (Fig. 2). The Softube Saturation Knob, set for Keep Low and a fair amount of distortion, will do the job when you’re in a hurry. If you have time to tweak, RedlightDist has much to offer. I like one stage of OpAmp distortion as shown, but you can also increase the distortion, or try different flavors. Some timbres even come close to tape-based distortion.
Warp that Record!

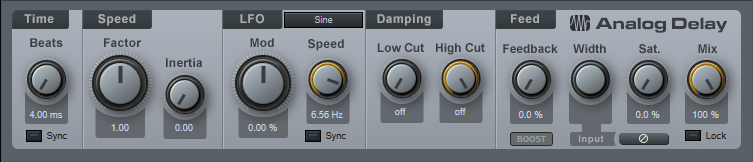
Figure 3: Setting the Analog Delay for vibrato, with no dry signal, emulates the pitch variations caused by a warped record.
The Analog Delay (Fig. 3) is ideal for warpage, because of its ability to do a slow vibrato. Choose a Sine wave speed of 1.33 Hz for a 33-1/3 LP, or 1.80 Hz for a 45 RPM single. Set Feedback to 0.0%, Width to Mono, and 100% for the Mix.
With 1.75 ms of initial delay (a/k/a Time), pushing the Mod amount up to 50% seems like enough warpage for most rational people. However, if you left your record out in the sun, in a car, with the windows closed, while you were at the beach, you can warp the virtual vinyl even further by increasing the initial delay time.
The Analog Delay has a couple of extras that help our cause. Turning up Low Cut and turning down High Cut can give a more lo-fi effect, like the sound is playing back from a portable record player or the like. Turn up saturation as well, because for nasty vinyl sounds, you can never have enough distortion.
Vinyl Surface Noise
I tried, I really did, to do this exclusively within Studio One. The closest I came was following white noise from the Tone Generator with the Gate, setting its Attack/Release/Hold controls to minimum, and editing the Threshold to let through only the very highest, occasional noise peaks. Adding a little high-end shelving EQ helped, as did using X-Trem in pan mode to move the clicks and pops across the stereo field, but ultimately it sounded more like cooking mini digital popcorn than funky scratches.
Admitting defeat, I went to 99Sounds.org (a fine source for unusual, 100% royalty-free samples), and found a section with vinyl noise SFX recorded by Chia. There are 37 samples, a few of which are over-the-top scratchy, but samples #12 and #29 were good for what I needed.
Routing
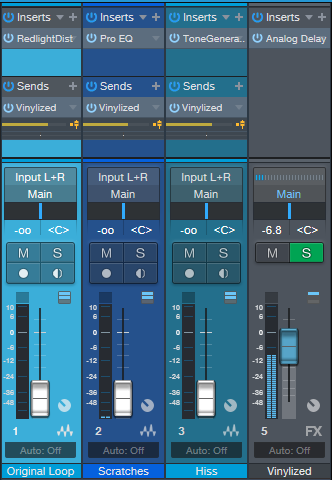
Figure 4: Routing for the Vinyliser effect.
For setup, the three different elements feed into a single FX Channel (Fig. 4), all through pre-fader sends. The original loop has the RedlightDist inserted to create the distortion; the vinyl surface noise samples have their own track (with a Pro EQ to boost the highs a bit); and the hiss has its own track as well. The Analog Delay in the FX Channel warps everything.
So does it sound any good? Of course not! But that’s the whole point…check out the audio examples, with before-and-after for a drum loop, and another for program material (with a more drastic effect than the drums).
Resonator FX Chain
This FX Chain complements the Tightener FX Chain presented in the October 25, 2019 Friday Tip. Whereas the Tightener reduces the presence of the key center in a piece of audio, the Resonator enhances the key center by adding resonance. The download at the end includes twelve Resonators—one for each key.
The heart of each Resonator FX Chain is two delay lines whose period correlates to a particular key, and are tuned an octave apart from each other. Mixing the delayed, resonant sound with the dry sound imparts a sense of pitch, which can be useful with unpitched instruments (such as percussion) to blend in better with melodic instruments. It can also help create a sense of pitch for drums that aren’t tuned properly, as well as emphasize any instrument’s key center.
For example, suppose it’s hard to get a shaker part to fit in a mix because its level is either too high and stands out, or is too low and sinks into the track. Adding a feeling of pitch may allow mixing the part a bit higher, while also having it blend into a mix more seamlessly. If taken to an extreme (and the FX Chain allows for that!), the Resonator has special effects potential for sounds like “cylon” voices, or tuning reverb.
The Controls
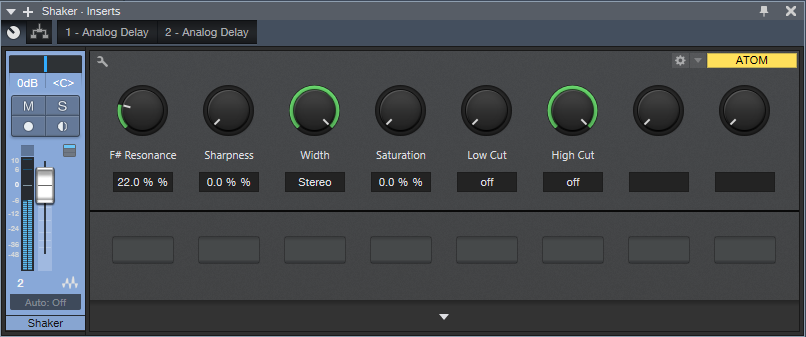
Figure 1: Each Resonator has six controls; the Resonance control is the most important one.
The controls (Fig. 1) are pretty straightforward, and cover the full travel of the Analog Delay controls. There’s no need to tweak any Transform curves.
- [key name] Resonance varies the mix of the resonant and dry sounds. Most of the time, mixing in even a bit of resonance may be all you need.
- Sharpness adds feedback to create more intense resonance.
- Width determines whether the resonance is stereo or mono. Most of the time, you’ll probably want to leave this control fully clockwise.
- Saturation, Low Cut, and High Cut controls are “because we can” controls. You may not use them much, but hey, an FX Chain allows for eight controls…so why not?
Striking the Right Chord
You can also use the Resonators to impart the sense of a chord by sending a sound to FX Channels, loaded with appropriate Resonators. Fig. 2 shows a shaker part acquiring a more melodic vibe via resonators for the keys of D, F#, and A. This produces a D major chord tonality.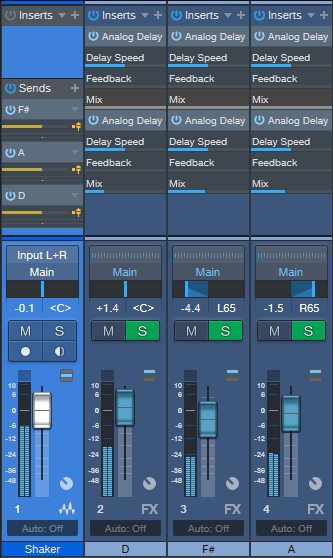
Figure 2: Sending the audio from a shaker to three FX Channels “tunes” the shaker to a D major chord.
Although I came up with this mostly to process unpitched sounds, I’ve found it has other uses as well. For example, with an acoustic guitar part, a Resonator can add a vibe that’s not unlike the drone strings on a sitar. The best implementation I’ve found for this is putting the Resonator in an FX Channel, and automating a send so that the resonance is added only in certain strategic parts. And of course, if you want to get crazee, you can always turn up the resonance and sharpness, and do cylon voices. Fun stuff!
Download the 12 Resonator FX Chains Here.
Track Matching with the Project Page
Okay, this is an unusual one. Please fasten your seat belts, and set your tray tables to the upright and locked positions.
Personal bias alert: With pop and rock music, for me it’s all about vocals, drums, and bass. Vocals tell the story, drums handle the rhythm, and bass holds down the low end. For a given collection of songs (formerly known as an “album”), I want all three elements to be relatively consistent from one song to the next—and that’s what this week’s tip is all about. Then the other instruments can weave in and out within the mix.
It’s fantastic that you can flip back and forth between the Project page and a Song that’s been added to the Project page, make tweaks to the Song, then migrate the updated Song back to the Project page. But it’s even better when you can make the most important changes earlier in the process, before you start down the final road of mastering.
Here’s a way to match bass and vocal levels in a collection of songs. This takes advantage of the Project page, but isn’t part of the mastering process itself. Instead, you’ll deploy this technique when the mix is in good shape—it has all the needed processing, automation, etc.—but you want a reality check before you begin mastering.
We’ll cover how to match vocal levels for the songs; bass works similarly, and in some ways, more effectively. Don’t worry, I’m not advocating robo-mixing. A mathematically correct level is not the same thing as an artistically correct level. So, you may still need to change levels later in the process—but this technique lets the voice and bass start from a “level” playing field. If you then need to go back and tweak a mix, you can keep the voice and bass where they are, and work the mix around them.
(Note that it’s important to know what the LUFS and LRA metering in the Project page represent. Rather than make this tip longer, for a complete explanation of LUFS and LRA, please check out this article I wrote for inSync magazine.)
- Create a test folder, and copy all your album’s Songs into it. Because this tip is about a diagnostic technique, you don’t want to overwrite your work-in-progress songs.
- Create a new test Project.
- Open a copied Song, remove any master bus processing, and Choose Add to Project for the test project. Add all the other songs on the album to the test project. Do not normalize the songs within the test project.
- Open the Loudness Information section for each song, and select the Post FX tab. Adjust each song’s individual level fader (not the master fader) so all songs have the same LUFS reading, then save the Project. The absolute LUFS value doesn’t matter; choose a target, like -20 LUFS. (When adjusting levels, 1 dB of level change alters the LUFS reading by 1. For example, if a song registers at -18.4 dB, decrease the level by 1.6 dB to reach -20 LUFS. Check and re-check by clicking on Update Loudness as needed until the LUFS readings are the same.)
- Choose a Song to edit (click on the wrench next to the song title). When the Song opens, solo only the vocal track. Then choose Song > Update Mastering File. Note: If a dialog box says the mastering file is already up to date, just change a fader on one of the non-soloed tracks, and try again. After updating, choose View > Projects to return to the test project.
- Repeat step 5 for each of the remaining Songs.
- Select all the tracks in the Project page, then click on Update Loudness.
- Check the Loudness Information for each song, which now consists of only the vocal (Fig. 1). For example, suppose the readings for six songs are (1) -24.7, (2) -23.8, (3) -24.5, (4) -22.7, (5) -23.1, and (6) -24.3. Those are all pretty close; we’ll consider -24.5 an average reading. The vocals on songs (1), (3), and (6) have consistent levels. (2) and (5) are a tad high, but song (4) is quite a bit higher. This doesn’t mean there’s a problem, but when you go back to using the original (not the copied) Songs and Project, try lowering the vocal on that song by 1 or 2 dB, and decide whether it fits in better with the other songs.
Figure 1: The songs in an album have had only their vocal tracks bounced over to the Project page, so they can be analyzed by the Project page’s analytics.
The waveforms won’t provide any kind of visual confirmation, because you adjusted the levels to make sure the songs themselves had a consistent LUFS reading. For example, if you had to attenuate one of the songs by quite a bit, visually the vocal might seem louder but remember, it’s being attenuated because it was part of a song that was louder.
Also try this technique with bass. Bass will naturally vary from song to song, but again, you may see a lager-than-expected difference, and it may be worth finding out why. In my most recent album, all the bass parts were played with keyboard bass and generated pretty much the same level, so it was easy to use this technique to match the bass levels in all the songs. Drums are a little dicier because they vary more anyway, but if the drum parts are generally similar from song to song, give it a try.
…But There’s More to the Story than LUFS
LRA is another important reading, because it indicates dynamic range—and this is where it gets really educational. After analyzing vocals on an album, I noticed that some of them had a wider dynamic range than others, which influences how loudness is perceived. So, you need to take both LUFS and LRA readings into account when looking for consistency.
For my projects, I collect all the songs I’ve worked on during a year, and release the completed project toward the end of the year. So it’s not too surprising that something mixed in February is going to sound different compared to something mixed in November, and doing something as simple as going back to song and taking a little compression off a vocal (or adding some in) is sometimes all that’s needed for a more consistent sound.
But let me emphasize this isn’t about looking for rules, but looking for clues. Your ears will be the final arbiter, because the context for a part within a song matters. If a level sounds right, it is right. It doesn’t matter what numbers say, because numbers can’t make subjective judgments.
However, don’t minimize the value of this technique, either. The reason I stumbled on it was because one particular song in my next album never seemed quite “right,” and I couldn’t figure out why. After checking it with this technique, the vocal was low compared to the other songs, so the overall mix was lower as well. Even though I could use dynamics processing to make the song reach the same LUFS reading as the other songs, this affected the dynamics within the song itself. After going back into the song, raising the vocal level, and re-focusing the mix around it, everything fell into place.
Friday Studio One Tip: Virtual “Nashville Tuning”
Nashville tuning is a popular sound for rhythm guitar parts, and not just in country music: a few hit songs with Nashville tuning include Wild Horses (Rolling Stones), Dust in the Wind (Kansas), Gimme Danger (Iggy Pop), Phase Dance (Pat Metheny), Hey You (Pink Floyd), Wicked Game (Chris Isaak), and many others. It’s not an alternate tuning in the standard sense, because the strings are still tuned (low to high) E A D G B E. Instead, it adapts a 12-string set of strings, or string sets dedicated to Nashville tuning, to a conventional six-string guitar. The first and second strings are the usual E and B respectively, but the lower four strings are tuned an octave higher than standard tuning.
So what does this have to do with Studio One? Well, the downside to Nashville tuning is that you really need to dedicate a guitar to it; you’ll have to adjust the intonation (maybe the truss rod too), and besides, you don’t want to have to change strings all the time. Granted, after playing with Nashville tuning, you might want to dedicate a guitar to it—but in the meantime, we can create a similar effect with Studio One. Although the sound isn’t technically the same, it produces much of the same result: a bright, present rhythm sound (somewhat like a 12-string, but less dense), that’s mostly layered with a companion guitar part. Here’s how to do it.
- Copy your rhythm guitar track, and select it.
- Type F4 to bring up the Inspector.
- Set Transpose to 12 (Fig. 1).

Figure 1: Tune your copied guitar part up an octave.
That’s pretty much all you need to do, but here are some notes on how to apply Nashville tuning.
- Studio One produces amazingly good octave-above sound quality, but it’s not perfect. Another issue is that with physical Nashville tuning, the 1st and 2nd strings aren’t transposed up an octave. This shouldn’t really matter much, because if you can hear the Nashville-tuned guitar prominently, you’re missing the point—it’s to add texture. However, you might want to roll off the highs somewhat, and give a little upper midrange boost, so the sound sits a bit better in a mix (Fig. 2).
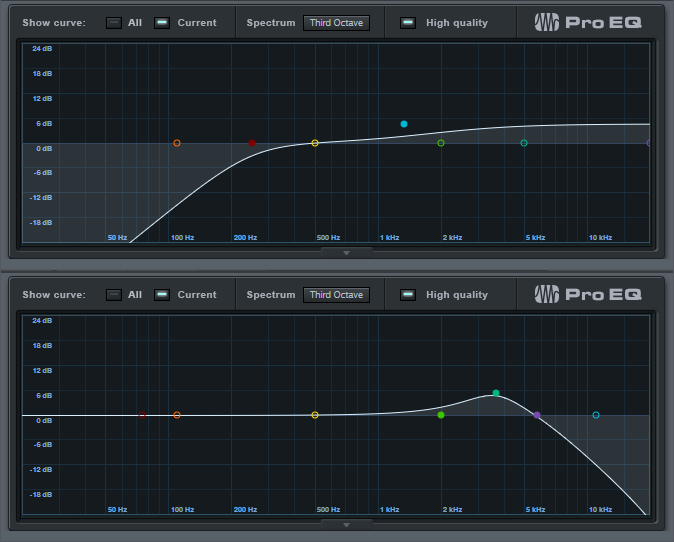
Figure 2: Optional EQ settings for the Nashville-tuned track.
- Often, Nashville tuning is layered with a standard guitar part. Due to slight detunings between two different guitars, you’ll sometimes hear some “shimmer,” like with a 12-string guitar or by adding a chorus unit. However, because the Nashville-tuned track in Studio One is a copy of the original guitar track, the layering is perfect. If you don’t want perfect layering, raise the Inspector’s Tune control by around 10 or 15 cents to add some detuning. (For some reason, I find tuning slightly sharp sounds better than tuning slightly flat).
It’s really that simple, and the bright sound can add a lot to a mix—listen to the audio example, which plays a rhythm guitar part, and then layers the virtual Nashville-tuned guitar part. The copied part is mixed a little than usual to get the point across, but even so, it still sounds pretty cool:
The Studio One Stereo Separator
A couple previous tips dealt with how to give mono instruments, like guitar, a stereo image that won’t degrade when collapsed to mono. Widen Your Mono Guitar—Sans Problems used delay, but in a way that minimized phase issues. Delay-Free Stereo from Mono used two Multiband Dynamics, set for no compression, to separate the audio into bands that you could then pan left or right.
This tip takes the process even further—it’s versatile, relatively simple, easily customizable, and also, has no phase issues when collapsed to mono. I’ve even used it to create a subtle, artificial stereo image from old mono records.
The Stereo Separator is particularly effective with power chords and rhythm guitar, especially as an alternative to layering parts in search of a “bigger” sound—you can obtain a stereo spread with a single track, so the sound is more defined compared to using multiple layers. And of course, if you scroll to the end there’s a downloadable FX Chain, so you can start playing with this immediately.
This example assumes a mono, distorted guitar track, like what you’d obtain by using a single mic on an amp. To create a stereo image, we first need need to convert this to a stereo track. So, set the track’s Channel Mode to stereo, and bounce the track to itself (Ctrl+B) to convert it into a dual mono (i.e., stereo, but with the same audio in the left and right channels). Now we can start playing with the stereo imaging.
- Open the track’s Channel Editor, and select the Routing Window. Drag a Splitter into the Channel Editor. Choose 5 splits, and Frequency Split for the Split Mode. The defaults split frequencies are fine, at least for now.
- Add a Dual Pan processor to the four high-frequency splits. You usually want the bass frequencies centered, so we’ll forego a split in the lowest-frequency split. You now have a Channel Editor that looks like Fig. 1.
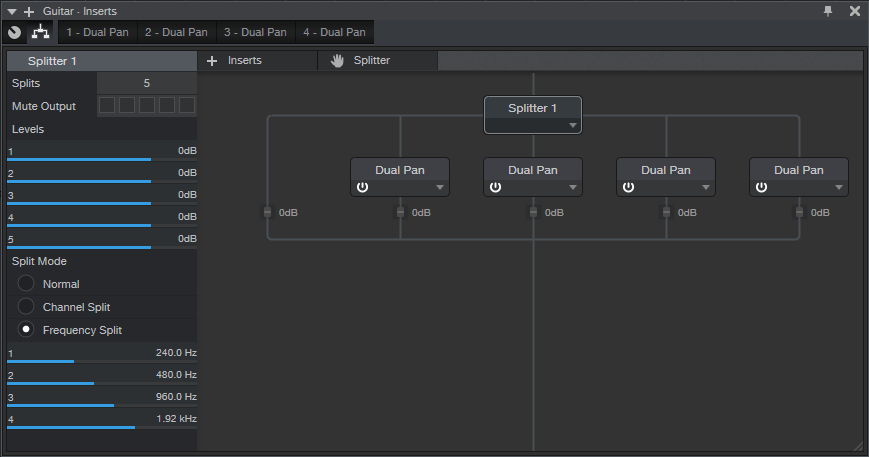
Figure 1: The Channel Editor, with Frequency Split selected, and the Dual Pan effects inserted.
- Fig. 2 shows the macro control assignments. It’s pretty straightforward—the four pairs of knobs are for the Low (L), Low Mid (LM), High Mid (HM), and High (H) frequencies. Each section has left and right Pan controls, which are assigned to the Pan knobs. The left Pan knob is also assigned to the linked Width control, and the right Pan knob ties to the linked Pan control as well. Each section’s buttons are assigned to Link and Bypass.

Figure 2: The Macro control assignments.
- When Linked, the Left Pan knob becomes the Linked Width control, and the Right Pan knob becomes the Linked Pan control. The labels for the controls (Fig. 3) show the default control first, while the = sign shows the function when Link is enabled.
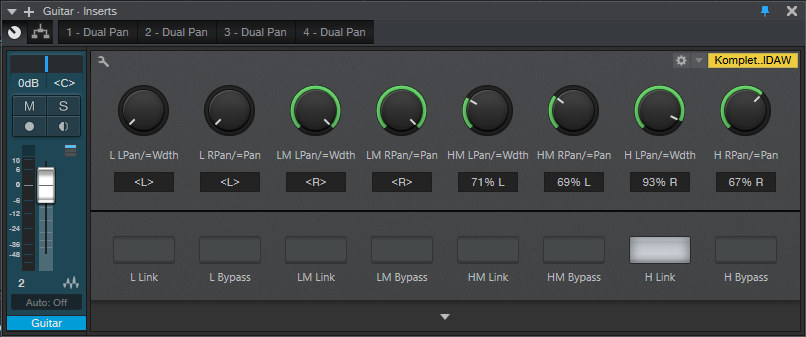
Figure 3: The Macro control panel. All the knobs and buttons are used.
And now, the fun begins! Play with the Pan controls to spread the different frequency bands in the stereo field—the audio example gives a good idea of the type of effect this FX Chain can do. The first example is mono, the second widens the image a bit, and the final example does a somewhat more radical stereo image.
Of course, you can go into the routing window, and change the levels of the various splits. Or, add FX in the splits…change the split frequencies…there’s enough to keep you busy for a while. Happy stereo!
Download the Stereo Separator.multipreset here!
How to Use FX Chain Transition Curves
FX Chains are a powerful Studio One feature, yet I can’t help but notice that when I write tips about FX Chains, some people are lost without a download…so I get the impression people might think that making FX chains is difficult. But it isn’t really, and your reward for creating one is a multi-effects processor that you can call up whenever you want, as well as assign controls that allow tweaking parameters without having to open up the effect GUIs themselves.
One of the most important aspects of mapping parameters to knobs is choosing the right Transition settings, so let’s delve deeper into how to make them do your bidding.
Transition Settings Explained
A great aspect of FX Chains is being able to map Macro knobs to multiple parameters and control them all simultaneously. For example, in the EZ Squeez tip for a one-knob compressor, a single Macro knob varied the Compressor Ratio, Release, Threshold, Knee, Attack, and Gain controls simultaneously. Because of this, when changes in the Ratio or Threshold parameter reduced the output, the Gain control could increase automatically to compensate.
When you map a parameter to a Macro knob, the default is for the knob to alter the parameter over its full range. But, you often don’t want to vary the parameter over its full range. For example, if you were creating a wah pedal effect with the Pro EQ, you wouldn’t want the filter to go from 20 Hz to 20 kHz. A more realistic range would be around 300 Hz to 2 kHz.
The Transition setting allows restricting the parameter range covered by a control. When you click on the small Transition graphic, a bigger view opens up where you can set the parameter’s upper and lower limits (Fig. 1).
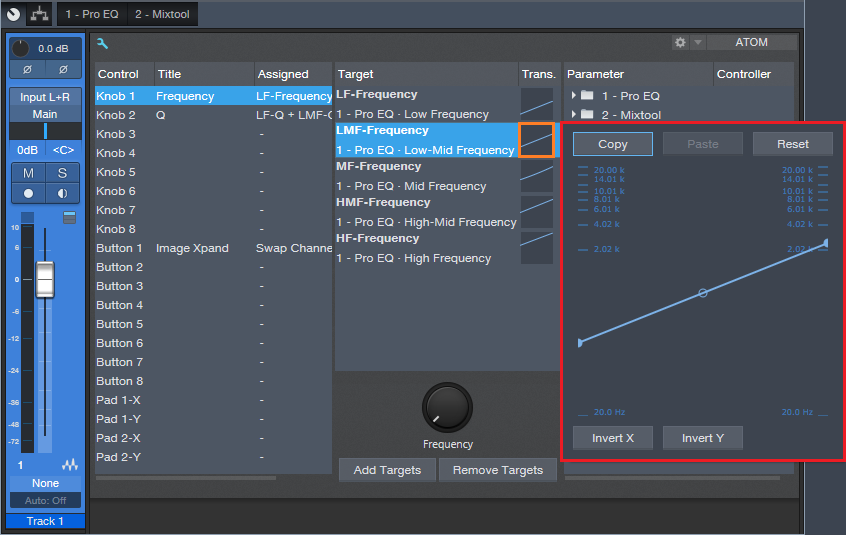
Figure 1: Click on the small graphic window (outlined in orange) to open up a bigger view (outlined in red).
However, the calibrations are sometimes difficult to read, so it can be challenging to create a precise change. Fortunately, there’s an easy solution.
Suppose you want to change the Pro EQ LMF frequency from exactly 150 Hz to 2.4 kHz (five octave range) by turning one of the Macro knobs. To do this:
- Open the Pro EQ GUI so you can see the LMF Freq knob, and “pin” the Pro EQ so that it remains visible.
- Click on the Knob icon in the Pro EQ’s upper left. The Macro Controls panel will appear (or the Macro Control Mappings window if it was opened up last). Since we want to use the Macro Control Mappings window, if the Macro Controls panel appears, click on its little wrench icon toward the upper left.
- Turn the knob at the bottom of the Macro Controls Mapping window fully counter-clockwise.
- Open the larger transition window for the LMF – Frequency parameter.
- Click on the transition line’s left node, and drag it while observing the LMF Freq knob in the Pro EQ. Stop dragging when it hits 150 Hz; you’ve now adjusted the knob’s lower limit. Note that it’s sometimes difficult to obtain a precise setting; you can’t, for example, type in direct value. You may want to temporarily slow down your mouse pointer speed (in the mouse section of your system properties) to make this easier.
- Now we need to set the upper-frequency limit. Turn the knob at the bottom of the Macro Controls Mapping window fully clockwise.
- Re-open the larger transition window for the LMF – Frequency parameter.
- Click on the transition line’s right node, and drag it while observing the LMF Freq knob in the Pro EQ. This time, stop dragging when the knob’s frequency readout shows 2.4 kHz. Note that you won’t be able to reach exactly 2.4 kHz; the closest I could come was 2.38 kHz…close enough. It’s not always possible to hit a value exactly, but most of the time, this doesn’t matter.
This kind of precision came in handy when creating the Imaging Phaser, where I wanted each frequency band in the Pro EQ to cover five octaves, and the bands had to be offset an octave from each other.
Bend Me, Shape Me
The Transition setting has another very useful feature—you can click the node in the middle to bend the curve into different shapes. For example, the Gain parameter in the EZ Squeez compressor needed to increase in level as the settings became more extreme, which squashed the signal more and brought down the level. Dragging the midpoint down a bit accelerated the amount of Gain as the single knob was turned higher (Fig. 2).
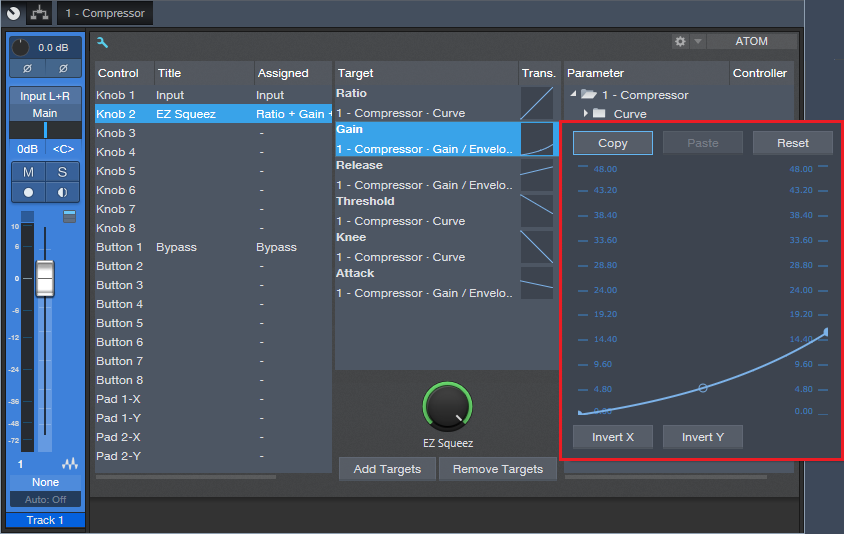
Figure 2: Bending the Transition line alters the “feel” of controls.
Where the Heck Are FX Chains Stored, Anyway?
Whenever a FX Chain tip provides a download link, there’s an inevitable comment in the Comments section along the lines of “Where do I store this after I download it”? The easiest way to find out is to go to the Browser, expand the FX Chains folder, expand a sub-folder if necessary, right-click on an FX Chain, and choose Show in Explorer (Windows) or Show in Finder (Mac). Now you’ll know where your FX Chains live. Note that you can also specify the location for your presets in Studio One > Options > Locations > User Data.
Sound Design? “Commitment” Recording? Say What?
Maybe it’s not a well-known feature, but Studio One allows inserting effects or FX Chains before a track, not just in a track. Open up the Input section, and you’ll see a place to insert effects. The only significant limitation compared to inserting an effect in a track is that Input section effects can’t expose their sidechain inputs.
This feature has multiple uses, but first, let’s touch on how it allows for “commitment” recording. Consider recording electric guitar. In the days before tape recorders had enough tracks to do re-amping, you had to commit to recording the final sound on a track. If you decided you should have used a different amp, you had to re-record the part because the track already had that amp sound, and it was unchangeable.
Amp sims (and re-amping) changed all that. You could record a dry guitar track and change the sound at any time, even up to the final mix. While that certainly offers possibilities, it can also cause “analysis paralysis” because some folks can’t just leave a track alone—so they tweak constantly in the hopes of finding something “better.” I’ve spoken with quite a few musicians who are nostalgic for the days when you had to commit to a part because not being tempted by endless tweaking accelerated the songwriting or recording process. Ultimately, some of them felt that the benefits of spontaneity outweighed the benefits of flexibility.
It’s easy to do commitment recording with your amp sim: put the amp sim in Studio One’s input section, not the track. You can also use the Input section’s Input Controls to adjust the gain and phase going in. Record-enable the track, and you’ll record the processed guitar sound into the track (Fig. 1).
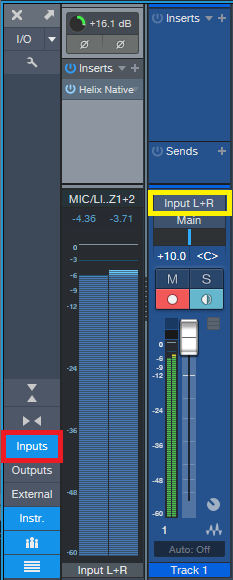
Figure 1: Click on Inputs (outlined in red) to see the input sections prior to the tracks. In this example, a Helix Native amp sim has been inserted into the L+R input. Track 1 is set to record from Input L+R (outlined in yellow), so it will record the processed sound.
This has other uses, like inserting the Virtual Pop Filter into the input section when recording vocal tracks. Of course, you can always insert the virtual pop filter in the track itself after recording, and render the changes. But it can save time and effort to nuke those stoopid pops before they’re recorded.
RE-AMPING MEETS TRACK-TO-TRACK RECORDING
Some amp sims use a lot of CPU, which can be problematic with projects that include tons of tracks. Of course, with Studio One you can always bounce or transform a track, which saves CPU—and you even have the option to revert and re-edit. However, an alternative technique, track-to-track (TTT) recording, allows one track to record the output of another track. For example, in Fig. 2 the guitar is going through AMR/Peavey’s ReValver amp sim in track 1, while track 2 is recording the processed output from track 1.
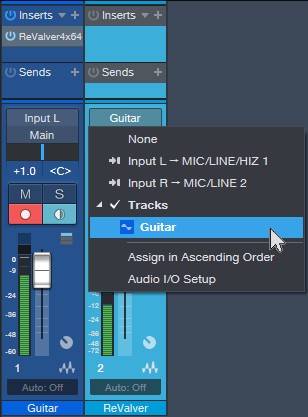
Figure 2: The dry and processed guitar sounds are being recorded simultaneously with this setup.
So, after doing your recording, track 2 will have recorded the sound of the guitar going through ReValver, not the dry sound. Meanwhile, track 1 will have recorded the dry sound. You can simply bypass the amp sim in track 1 to save CPU (instead of bouncing or transforming), and listen to the amp sim sound from track 2 instead of the dry sound from track 1.
If you want to experiment with different amp sounds in track 1, you know that you always have the recorded sound in track 2 as a fallback. Or, try a different amp sim, pan tracks 1 and 2 somewhat off-center with respect to each other, and now you’ll have a “stack” with a bigger stereo image.
INSTRUMENT TRACKS WITH TTT RECORDING
Here’s perhaps an even more important application for the TTT approach. Some synths have randomizing functions; you can also wire up a modular synth-like Voltage to do all kinds of randomized and sequenced effects. And of course, it’s possible to apply randomized modulation effects to almost any synth. By recording the instrument track’s output, you can capture the randomization of that moment in a track. If you don’t like the randomized effects, then just try again by re-recording the track.
SOUND DESIGN WITH TTT RECORDING
Sound design is all about creating novel, unusual sounds, and you often want real-time control over these sounds while you create them, especially if you’re using external hardware. This is another use for TTT recording. For example, I create a lot of FX sounds and sweeps for transitions and emphasis. Many of them involve the Tone Generator effect generating white or pink noise, followed by plug-in processing, and sometimes hardware effects inserted via Pipeline.
The workflow is simple: insert the white noise generator and plug-ins in the input section, as described above for commitment recording, and record the results in a track. Or, insert the white noise in a track, and use the TTT recording technique—the results are the same, except that TTT creates two tracks instead of one.
But wait—there’s more! The Tone Generator isn’t the only effect capable of making sounds you can record into a track. Several effects, when properly abused, can generate sounds. The internal noise and artifacts generated by these effects are often very low-level, but you can always add a maxed-out Compressor and a few Mixtools after the effect to boost their outputs. And of course, once you’ve recorded the effect on a track, you can normalize it to bring up the level.
- Flanger. Turn up the resonance, and boost the output level, for a variety of cool sci-fi effects.
- Rotor. Turn all the controls to maximum, and turn the power on and off for strange psycho-acoustic panning FX.
- Redlight Dist. This is the most versatile noise generator in Studio One. Oceans, rain, torrential storms…you got it.
- Tone Generator. We mentioned using this for noise, but super-low and super-high frequencies can have merit for sound design, especially when followed by other effects. I’ve gotten some great engine sounds with this and X-Trem.
- Bitcrusher. Think of this as a white noise generator currently serving multiple life sentences. It’s even nastier if you max out a couple Mixtools afterwards, and overdrive them.
The VoxTool FX Chain
Y’all seem to like FX Chains, so here’s one of my favorites—the VoxTool, a toolchest for bringing out the best in vocals and narration as quickly as possible. You’ll still need to add any desired time-based effects (doublers, reverbs, or whatever), or perhaps some compression, but this will help take care of pops, EQ, peaks/transients, and vibrato during the songwriting process. In fact, this FX Chain may even do the job all the way to the final mix.
You can download the FX Chain from the link at the end of this tip; but let’s cover how the various modules affect the sound, so that (if needed) you can tweak this FX Chain for your particular voice.
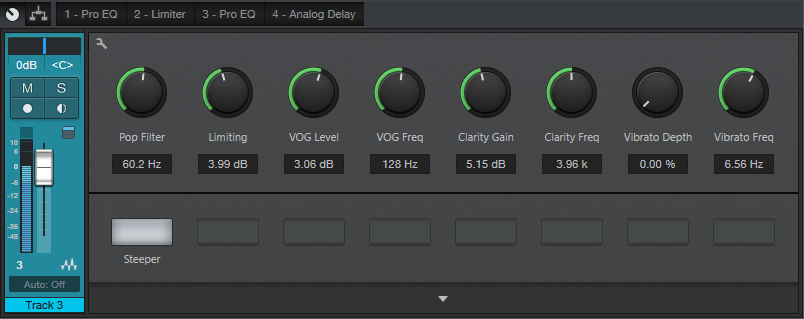
1. PRO EQ
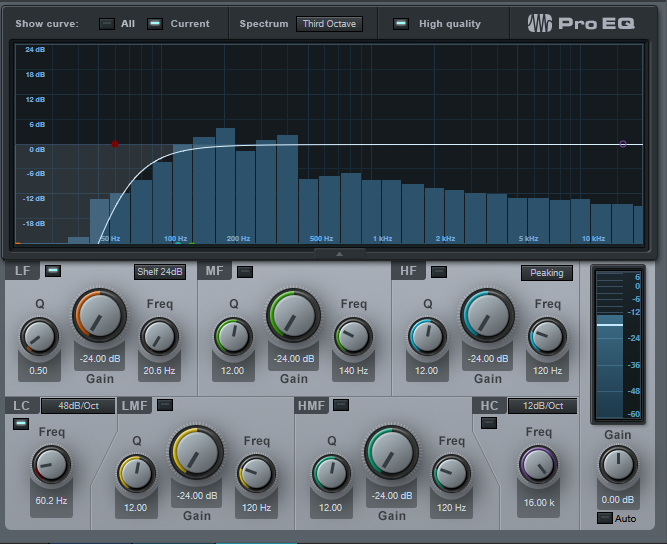
This stage uses the Low Cut Filter, set to 48 dB/octave, with the cutoff frequency controlled by the Pop Filter control. Turning up this control attenuates the low frequencies where pops occur. The Steeper button adds a bit more low-frequency attenuation, aimed specifically at subsonics, by enabling the LF stage.
2. LIMITER
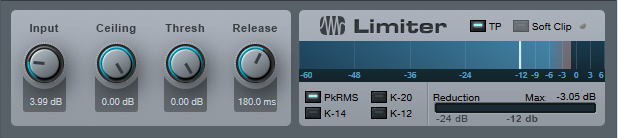
Now that the p-pops are reduced, we can add some limiting to tame any vocal peaks or transients. The Limiting control in the Macro Controls panel turns up the Limiter’s input control to increase the amount of gain reduction.
3. PRO EQ
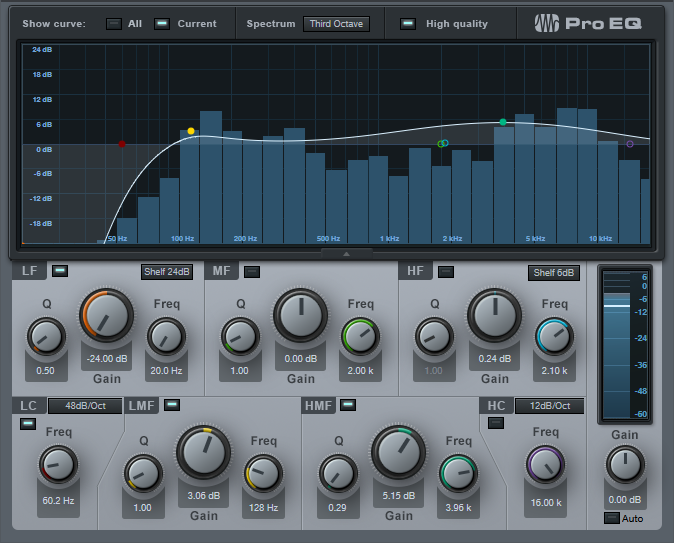
This link in the FX Chain uses four filter stages. Like the first Pro EQ, the Low Cut stage ties to the Pop Filter control for further attenuation of sub-vocal low frequencies, while the Steeper switch enables the LF stage for additional pop filtering. The LMF section provides the VOG effect (what narrators call “Voice of God”). This adds fullness to the bass, like an FM late-night DJ, which can also help restore some low-end depth in the vocal range if removing pops extends a bit into the vocal range. The HMF stage is the engine for the Clarity Gain and Clarity Frequency controls. Increasing Clarity Gain adds intelligibility and articulation to the vocals; vary the Clarity Frequency control to find what works best with your voice.
4. ANALOG DELAY
This provides a vibrato effect, with Vibrato Depth and Vibrato Frequency controls applied to the Analog Delay module. You likely won’t want to leave Vibrato Depth up, but instead, control it with automation, a footpedal, mod wheel, or whatever to add vibrato when needed.
That’s all there is to it! So download the VoxTool FX Chain, and bring your vocals up to speed—fast.