Monthly Archives: January 2024
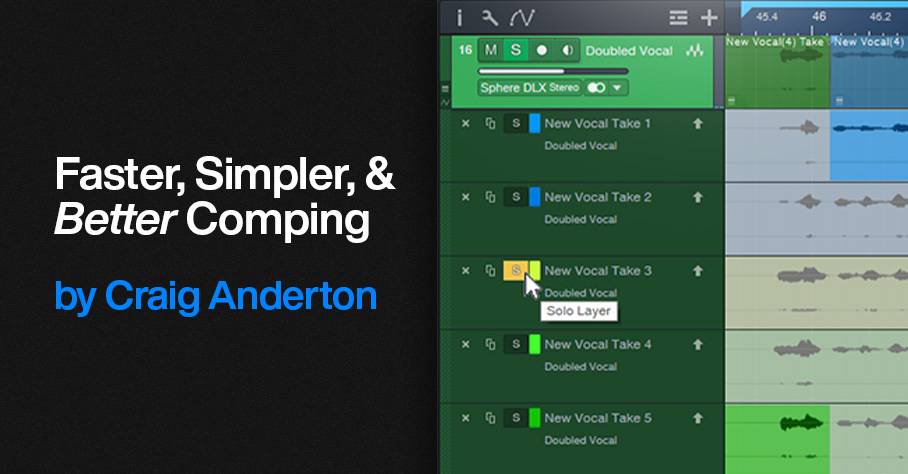
Faster, Simpler, and Better Comping
At first, this might not seem too exciting. But follow the directions below, and try comping using this method—I don’t think you’ll be disappointed. This tip shows how to:
- Audition, select sections of, and promote Takes while listening to the rest of the mix, at any level you want.
- Listen to the edited Parent track made up of the Takes you’ve promoted, at any time during the comping process. Again, this is in context with the mix.
- Do all of the above while looping, so there’s never a break in the editing process.
- Do comping with only the Arrow tool—you don’t need the Listen tool.
Preparation: Set Up Dim Solo
First, implement the Dim Solo function described in the blog post Super-Simple Dim Solo Functionality. Dim Solo allows soloing a track or tracks, while all the other tracks are at an adjustable lower level. The process works by assigning all tracks except for the one you want to solo (e.g., a vocal track with its Take layers) to a VCA channel. You can then “dim” all the non-soloed tracks with the VCA level fader to whatever level you want while you comp, and hear the Takes in context with the song. After auditioning and selecting the desired sections of your Takes, set the VCA fader back to 0.0 to return to the original mix levels. The minute or two it takes to set up Dim Solo is more than offset by the benefits it offers to comping. For more details, refer to this blog post for how to create the Dim Solo function.
Faster Take Auditioning, Selecting, and Promoting
After setting up Dim Solo and using the VCA Channel fader to adjust the level of the mix (which excludes the track being comped, because it isn’t part of the VCA group), here’s how to audition and select Takes:
1. Safe Solo (Shift+Click) the parent track with the Takes. This is important! It allows soloing the Parent track without muting the tracks that are playing back at the dimmed level.
2. Loop the section with the Takes you want to audition.
3. Click a Take’s Solo button to audition it while the song loops (fig. 1).
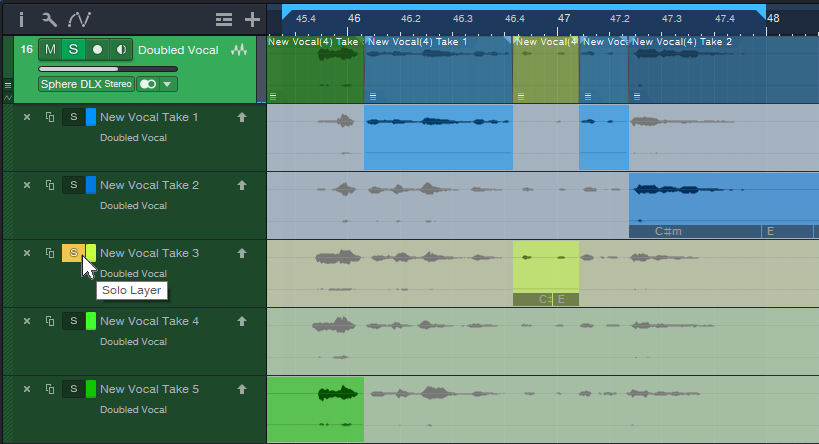
Figure 1: Take 3 is being soloed for auditioning, and for selecting sections to be promoted to the Parent track. Turning off the Take’s Solo would solo the Parent track, so you could audition the edited parent track and hear any Take sections that had been promoted.
4. If you hear a section in a Take you want to promote to the Parent track, use the Arrow tool (which turns into an I-beam cursor when hovering over a selected Take) to click+drag over the section.
5. Continue soloing Takes while the music loops, and select the sections you want to promote to the Parent track. If needed, alter the loop start and end points.
6. If at any time you want to hear the edited Parent Track with the Takes you’ve promoted up to that point, make sure no Take layers are in solo mode.
Better Music Through Better Comping
One reason I wrote up this tip is because of an interesting side effect. The Takes I selected as “best” when auditioned in the usual way were often not the same Takes chosen as “best” when listening to them in context with the music. A technically perfect Take is not necessarily the same thing as a Take with the best feel. Listening to, selecting, and promoting the Takes in context with the mix makes a big difference in helping to select Takes that fit the music like a glove.
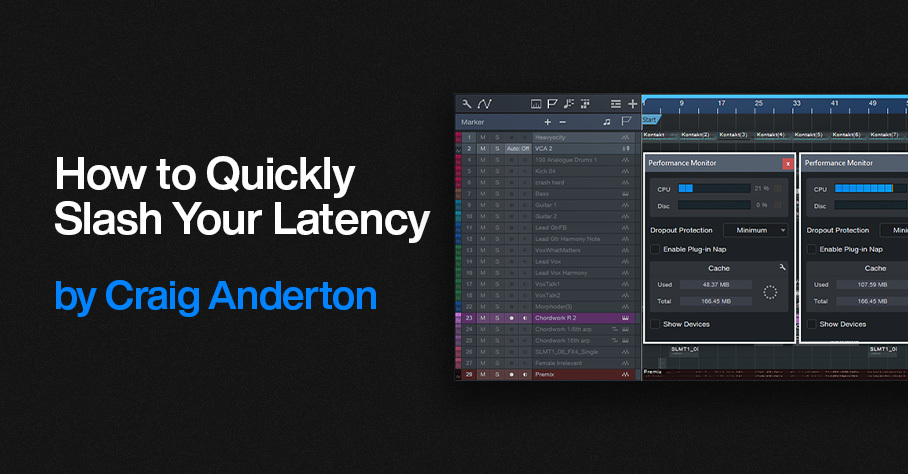
How to Quickly Slash Your Latency
You know the feeling: You’re tracking or doing an overdub with a virtual instrument or amp sim, but you’re frustrated by the excessive latency inherent in complex projects with lots of plugins. And with older computers, latency may be an annoying fact of life.
Of course, Studio One has clever low-latency native monitoring. However, there are some limitations: plugins can’t introduce more than 3 ms of latency, FX Chains can’t use Splitter devices, and external effects using the Pipeline plugin are a non-starter.
This tip’s universal technique has only one significant limitation: it’s oriented exclusively toward having the lowest latency when tracking or doing overdubs. Fortunately, most of the time that’s when low latency is most important. Latency doesn’t matter that much when mixing down.
Here’s the process:
1. Make a premix of all tracks except the one with the virtual instrument or amp sim you want to track with or overdub. Do this by exporting the mix (Song > Export Mixdown) and checking Import to Track (fig. 1). The imported track becomes a premix of your tracks. Note that if any of the tracks use Pipeline, the premix must be done in real time.
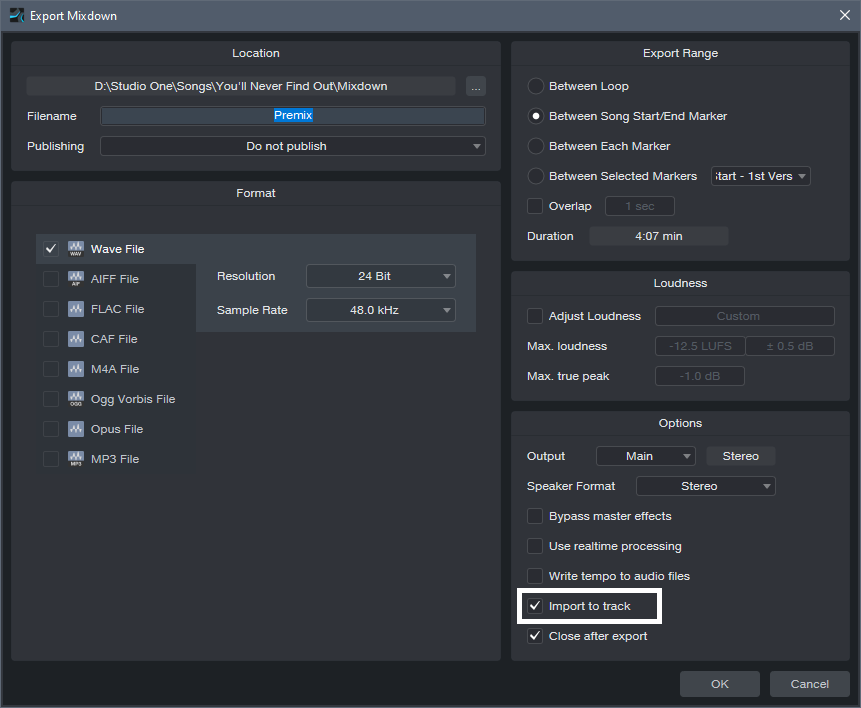
Figure 1: The first step is to create a Premix of all your tracks. Make sure you select Import to Track (outlined in white).
2. Select all tracks except for the Premix and the one with the virtual instrument or amp sim you want to use for your overdub.
3. In the Arrange view, right-click on the selected tracks. Choose Disable Selected Tracks (fig. 2).
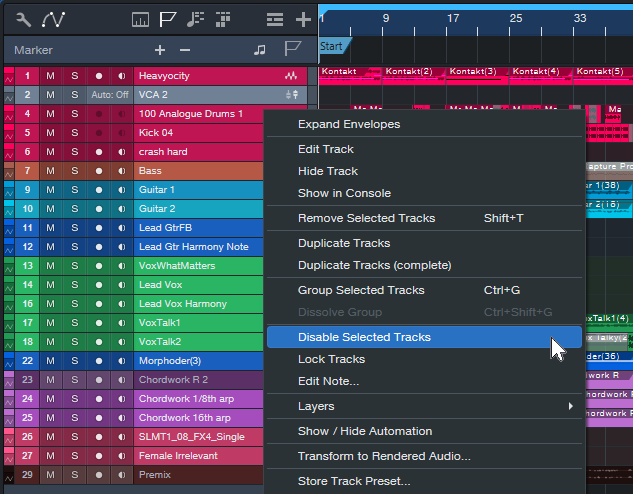
Figure 2: In this example, all the tracks are selected for disabling, except for the Mai Tai instance in Track 23 and the Premix.
4. Now you can overdub or track while listening to the premix. Because there’s now so little load on the CPU (fig. 3), you can reduce the Device Block Size and Dropout Protection (under Studio One > Options > Audio Setup) to lower the latency.
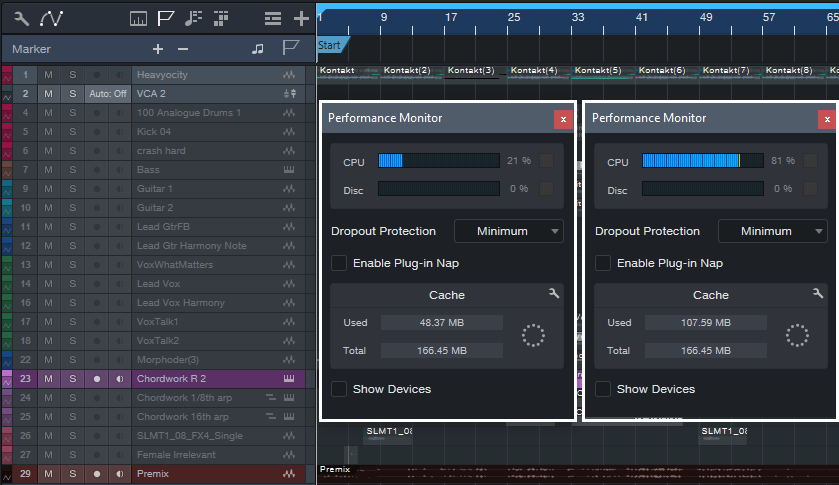
Figure 3: The Performance Meter on the left shows CPU consumption with all tracks except the Mai Tai and Premix disabled. The Performance Meter on the right shows CPU consumption with all the tracks enabled.
5. While listening to the premix as your reference track, you’ll be able to play your virtual instrument or through your amp sim with much lower latency.
6. When you’re done with your overdub or tracking, you can delete or mute the Premix, and return the latency to a higher setting that allows for mixing without dropouts or other problems.
How to Fix Phase Issues
Recording audio using more than one feed from the same source may create phase issues. For example, when miking a bass amp and taking a DI (dry) input, the DI’s audio arrives at your interface instantly. But because sound travels 12″ (30 cm) in 1 millisecond, the mic’s audio will arrive later due to the distance between the mic and speaker. This means it won’t be time-aligned with the direct sound, so there will be a phase difference.
Miking an acoustic guitar with two mics, or drum overheads that are a distance from the drum kit, may also lead to potential phase problems. Even partial phase cancellations can thin or weaken the sound.
It’s best to check for phase issues and fix them prior to mixing. One way to resolve phase issues is to look at the two waveforms on the timeline, and line them up visually. However, the waveforms may not look that similar (fig. 1), especially when comparing audio like a room mic with a close-miked sound.
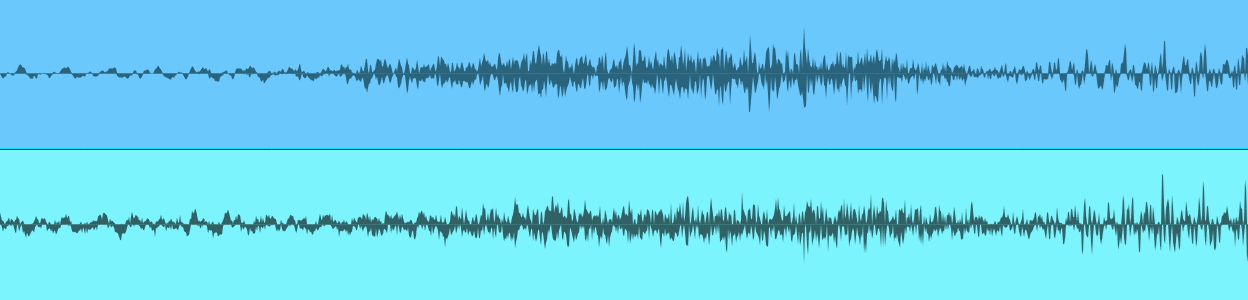
Figure 1: Despite being zoomed in, you wouldn’t necessarily know from the waveforms that they are at their point of maximum cancellation.
Another option is to sum the sources in mono, delay or advance one relative to the other, and listen for what sounds the strongest. That can work, but it’s not always easy to hear exactly when the waveforms are in phase. Let’s make the process more foolproof.
The Phase Correction Process
The goal is to find the alignment of the two waveforms where the audio sounds the strongest. However, it’s easier to hear phase cancellation than addition. So, by inverting the phase of one channel, we can align the tracks for maximum cancellation. Returning the phase to normal then gives the strongest sound. Here’s the process:
1. Solo the channels that may have a potential phase issue. Determine whether they do by listening for a thinner sound when they’re summed to mono, or both panned to center.
2. Match the channel levels as closely as possible.
3. Pan the two channels hard left and hard right.
4. Insert the Phase Meter plugin in the master bus.
5. Insert a Mixtool in one of the instrument channels. Invert the Mixtool’s phase. If a track uses stereo audio, invert the left and right channels.
6. Turn off Snap. This allows nudging an Event in 1 millisecond increments. Select the Event and type Alt+Right Arrow to move the track earlier by 1 ms, or Alt+Left Arrow to move the track later by 1 ms.
7. Nudge one of the tracks with respect to the other track until the Phase Meter shows the most negative correlation (i.e., the lower bar graph swings to the left as much as possible, as in fig. 2). This indicates maximum cancellation. Note: The time range for maximum cancellation is extremely narrow. One millisecond can make the difference between substantial cancellation and no cancellation. Be patient. Adjust 1 ms at a time.
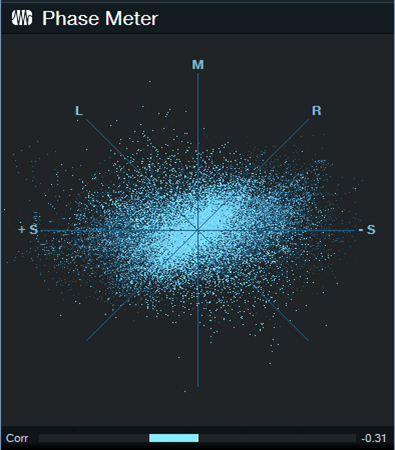
Figure 2: A negative correlation reading indicates that the two sources have phase differences.
8. You’ve now aligned the two tracks. Remove the Mixtool plugin so that the two signals are in phase.
Tip: For audible confirmation, in Step 7 listen as you make these tiny changes. If you enable the Mono button in the Main bus, aim for the thinnest possible sound. If you monitor in stereo, listen for the narrowest stereo image.
Super-Fine Tuning
1 ms is a significant time shift when trying to match two signals’ phase. Step 7 will isolate a 1 ms window where the two tracks are in phase (or at least close to it), but you may be able to do better.
Select Samples for the Timebase and turn off Snap. Zoom in far enough, and you’ll be able to click on the Event and drag it earlier or later in 1 sample increments (fig. 3). That can tighten the phase further, if needed.
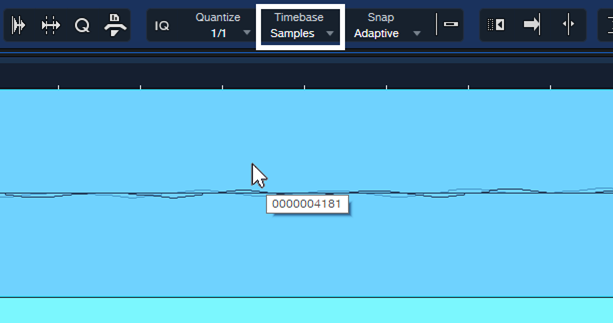
Figure 3: With Timebase set to Samples and Snap turned off, the resolution for moving an Event is 1 sample.
This may be overkill, but I know some of you are perfectionists 😊. Happy phase phixing!
Bigger, Wider Sounds: Try Stereo Miking
If you haven’t experimented yet with mid-side stereo miking, you’ll be in for a treat when you do. Here’s why:
- Record background singers with gorgeous stereo imaging
- Capture a guitar amp with stereo room sound
- Run synths and drum machines through a PA or amp, and obtain the vibe of recording electronic instruments in an acoustic space
- Capture full stereo with choirs, plays, podcasts, seminars…you name it
Even better, mid-side stereo miking collapses perfectly to mono, and Studio One Professional bends over backward to make the recording process easy.
Wait—Is This Déjà Vu?
The post Mid-Side Processing with Artist covered mid-side processing for Studio One Artist, and Mid-Side Processing Made Easy did the same for Studio One Professional. However, these were only about processing mid and sides audio extracted from an already recorded stereo track.
This post is about recording with mid-side miking, and monitoring the result as it’s being recorded. This lets you achieve optimum mic placement by hearing the results of changes in mic positioning, in real time. You don’t have to record the audio first, and then play it back to see if you got it right. And on playback, there’s no need to extract the mid and sides, because you already recorded them as separate tracks.
Mid-Side Recording? I’m Already Intimidated!
You needn’t be. You might have heard about mid-side recording requiring math, phase changes, encoding, decoding, a degree in physics, etc. Nope! As I said, Studio One Professional makes it easy.
There are many ways to record in stereo. The most common is X/Y miking, where one directional mic points toward the left, and one toward the right. But this technique is not ideal. Directional mics color sound coming in from outside the pickup pattern, and the two signals don’t play nice when collapsed to mono.
Mid-side miking uses a mic with a cardioid pickup pattern to capture the center of a stereo sound, and a mic with a bi-directional (aka figure-8) pickup pattern to capture the left and right sides. Ribbon mics inherently have a figure-8 pickup pattern, but there are also multi-pattern condenser mics that can be switched to a figure-8 pickup pattern. With this pickup pattern, the mic’s front and back pick up sound, while the sides don’t pick up any sound.
Fig. 1 shows how you’d set up the two mics for mid-side stereo recording. Pretend you’re a guitar amp looking at the mics. The top, figure-8 mic is mounted upside down because the diaphragms of the two mics need to be as close together as possible. The figure-8 mic’s side faces you. Its front faces to the left, and its rear faces to the right. Meanwhile, the cardioid mic is pointing at you.
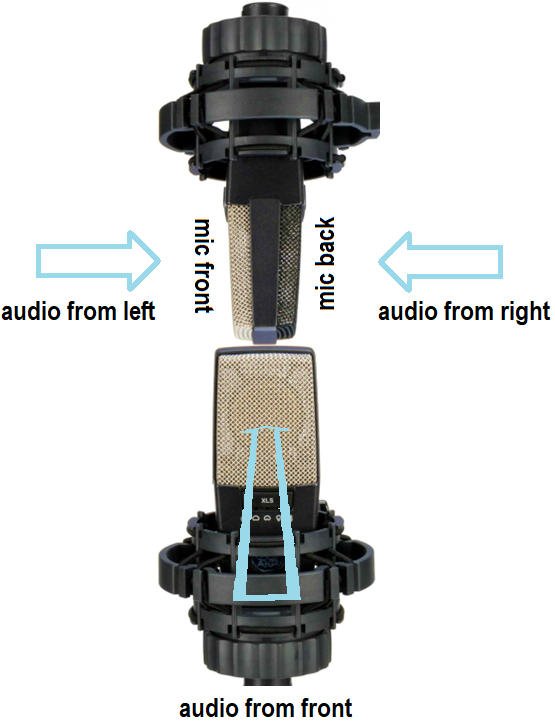
Figure 1: Mid-side miking setup. (Mic images courtesy Sweetwater Publishing)
The Studio One Connection
You need two tracks and mixer channels, one for the cardioid (mid) mic and one for the figure-8 (sides) mic. Record the two mics like you would any other mics. However, this is where many people get lost—it’s counterintuitive that the single mic cable coming from the figure-8 mic can turn into right and left channels in Studio One. Fortunately, Studio One knows how to do this.
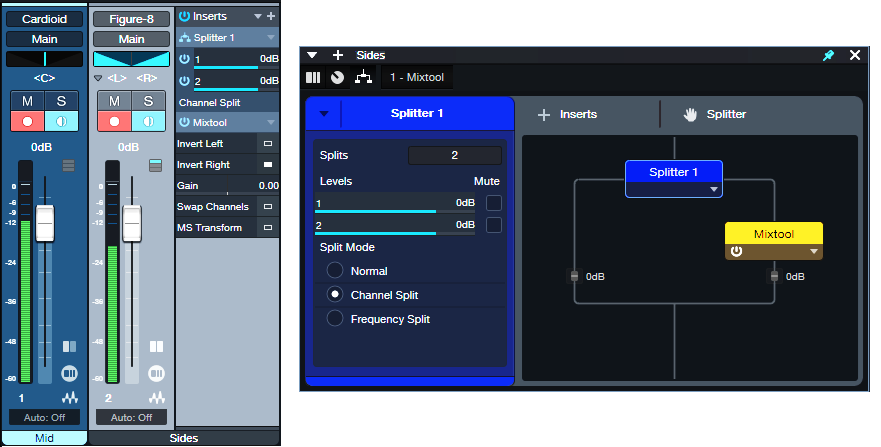
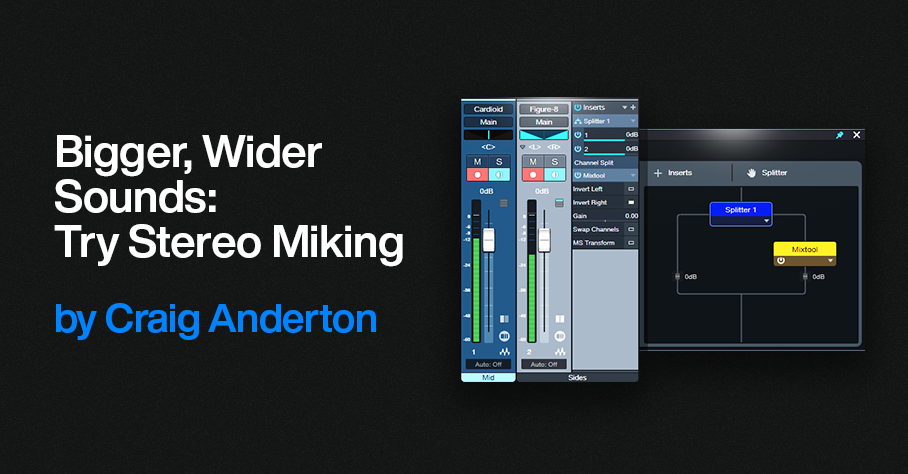
Figure 2: Studio One FX Chain for mid-side recording.
Fig.2 shows audio being recorded. Pan the Cardioid mic to center for your mid (center) audio. For the Sides mic, set the track input to mono, but set the track mode to stereo (important!). This combination allows recording in mono, but playing back in stereo.
A Splitter in Channel Split mode splits the mono audio into two paths. All the Mixtool plugin does is invert the right channel path’s polarity. Now the left and right channels are out-of-phase, so there’s a wide stereo spread. At the mixer, set the Sides channel’s Pan mode to Dual Pan. Pan the controls hard left and right. Now we have the Splitter’s left channel audio panned to the left, and the right channel’s audio panned to the right.
You might think “wait a second…if the left and right channels are out-of-phase, then if they play back in mono, they’ll cancel.” Exactly! And that’s why mid-side miking offers superb mono compatibility. When the sides cancel, you’re left with the mono audio from the cardioid mic, which also picks up sounds that are in front of the mic to the left and right. So, you’re not losing the audio that ends up being stereo—just the stereo imaging. And of course, mono audio has no problem being played back in mono.
Now, Here’s the Really Cool Part
You don’t have to understand how all this works, just create the setup described above. The Sides channel varies the level of the stereo image, and the Mid channel varies the mono center. So, you can make the stereo image wider by raising the level of the Sides channel, and lowering the level of the Mid channel. Or, lower the Sides channel for a narrower image. Or, process the two separately, and gain the advantages of mid-side stereo processing.
Go ahead—bathe your ears with stereo recording instead of mono. As long as you have one mic with a directional pickup pattern, one mic with a figure-8 pickup pattern, and two mic stands, you’re good to go. And there’s a bonus: if you start getting involved with Atmos mixing, having stereo audio gives you more fun options than mono.