Monthly Archives: August 2023
Superspeed Comping with Studio One 6.2
Studio One 6.2 reworked Layer and Take handling, and some of the new functionality is exceptionally useful. For example, suppose you want to record comp vocals for two choruses, and a harmony part for the second chorus. Previously, you had two options: set a comping range that covered both choruses, and then do a separate set of comped Takes for the harmony. Or, comp one verse, then stop. Set up to comp the next verse. After completing that, set up to comp the harmony.
With version 6.2, you can do all your Takes, for both choruses and the harmony, in a single comping operation. The same technique works for any parts in a song that occur more than once, like verses. The only constraint is that the sections need to have equal lengths. Here’s how the process works.
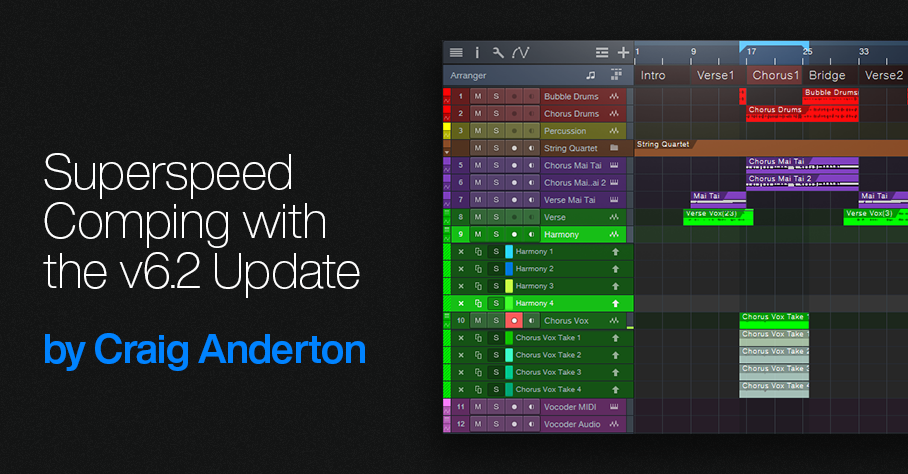
Fig. 1 shows the first chorus set up for comping. Below it are 12 Takes: 4 for the first chorus, 4 intended for the second chorus, and 4 intended for the second chorus harmony. (Personal bias alert: I try to avoid doing more than 4 comps for any given part. If I can’t nail a take in four tries, it’s probably time to move on and try again some other time.)
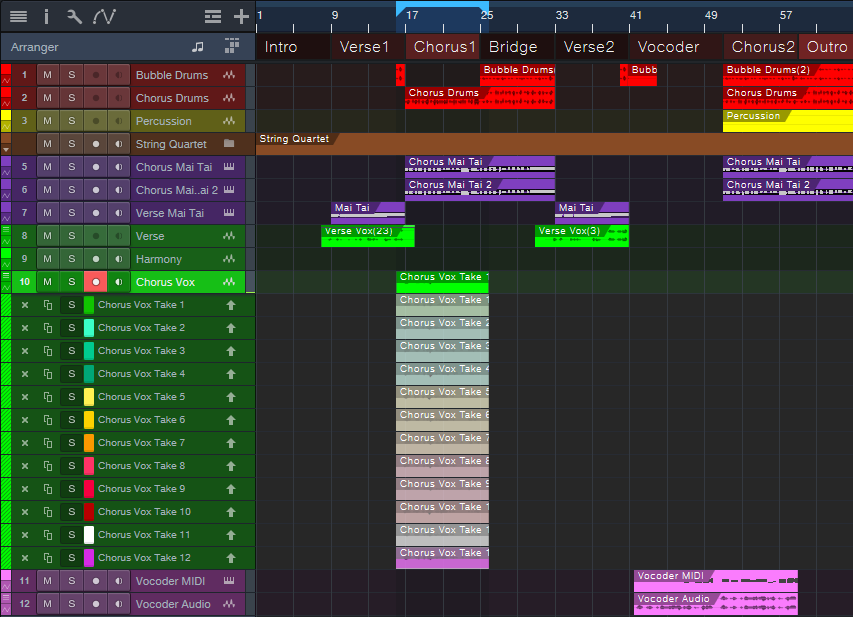
Figure 1: All the needed Takes have been recorded for both choruses and the harmony.
With v6.2, you can move layers around as easily as any other Event. Click on a layer while holding Ctrl/Cmd, and drag. Fig. 2 shows the second group of Takes moved to the second chorus.
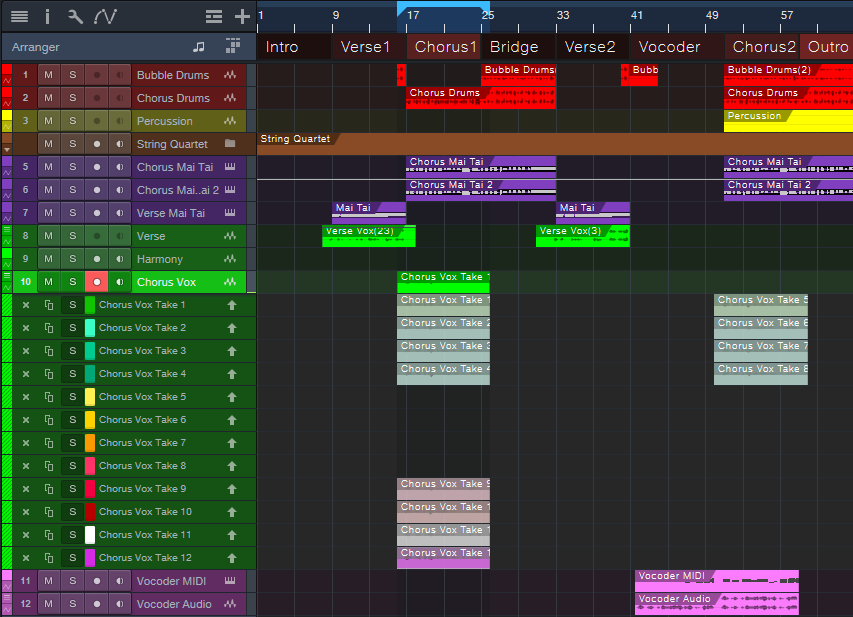
Figure 2: The next group of Takes has been moved to the second Chorus.
The four Harmony Takes need to go in the Harmony track instead of the original parent track. Creating four layers for the Harmony track provides a place to move the Harmony Takes (fig. 3). Now all the comps are in place, and ready for editing.
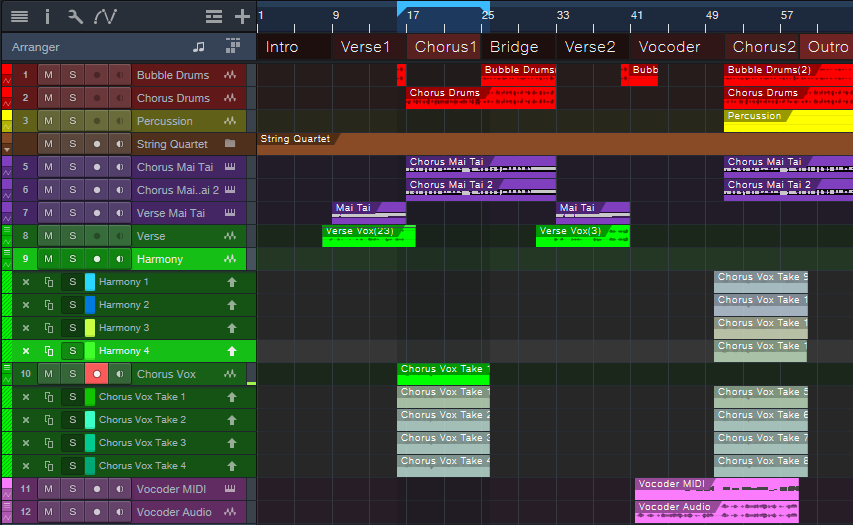
Figure 3: Adding four layers to the Harmony track provides a home for the harmony Takes.
Fig. 4 shows the final result: the edits are done for the two verses and the harmony. Complete the process by deleting the unneeded layers.
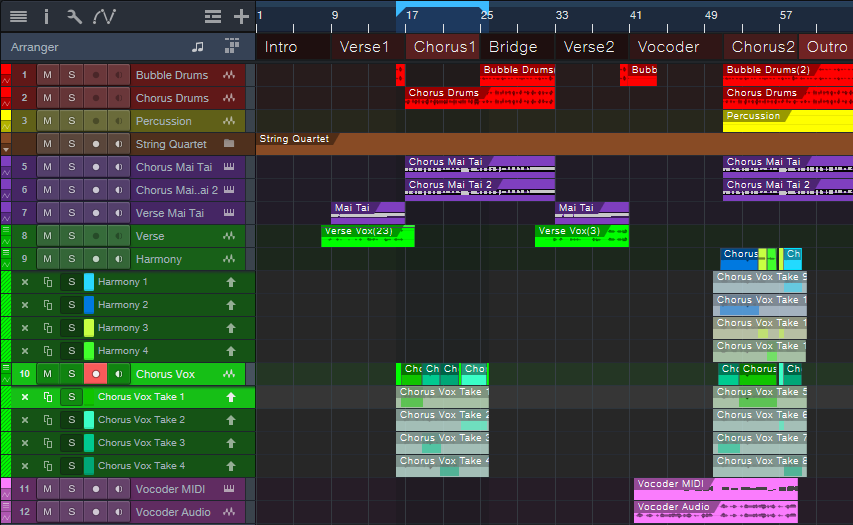
Figure 4: All the Takes have been edited to create the final composite vocals.
But Wait…There’s More!
This is only one application of Studio One 6.2’s enhanced layering. In the example above, suppose I messed up a word in the second chorus, but the first chorus had two Takes with a good version of the word. Previously, you needed to promote the alternate word to the parent track, move it, and then promote the original word. It’s now possible to select part of any layer with the Range tool, and unlike the Arrow tool, this avoids promoting the selection to the parent track. Click on the selected part while holding Ctrl/Cmd, and drag it out of its layer to use it elsewhere.
It’s great that comping and layers continue to improve, but don’t overlook the existing shortcuts and advanced techniques. If you haven’t checked out the Help section on comping and layers in a while, it’s worth re-visiting.
The PhaseTone Warper

We haven’t done a “boutique digital effect” for Studio One Professional in a while, so let’s use a plugin in a totally wrong way—yet end up with something cool. This unconventional tone control is based on phase interactions in different frequency bands. You’ll find a download link for the PhaseTone Warper FX Chain at the end of this post.
It’s a Feature…Not a Bug!
Like traditional analog filters, the Splitter’s frequency-splitting crossover produces varying amounts of phase shift at different frequencies. Normally, these phase shifts are not significant. However, mixing a dry signal in parallel with the Splitter, and changing the frequencies of the Splitter’s Frequency splits, creates phase additions and cancellations at various frequencies. The result is a novel tone shaper. I’ve used the PhaseTone Warper with synths, guitars, cymbals, amp sims, and more…it’s fun, and different. One application is creating subtle (or not-so-subtle!) timbral differences in the same instrument for different verses or choruses.
How It Works
The FX Chain starts with a Splitter in normal mode. It splits the incoming audio into a dry channel that incorporates a Mixtool, and a second Splitter in Frequency Split mode (fig. 1).
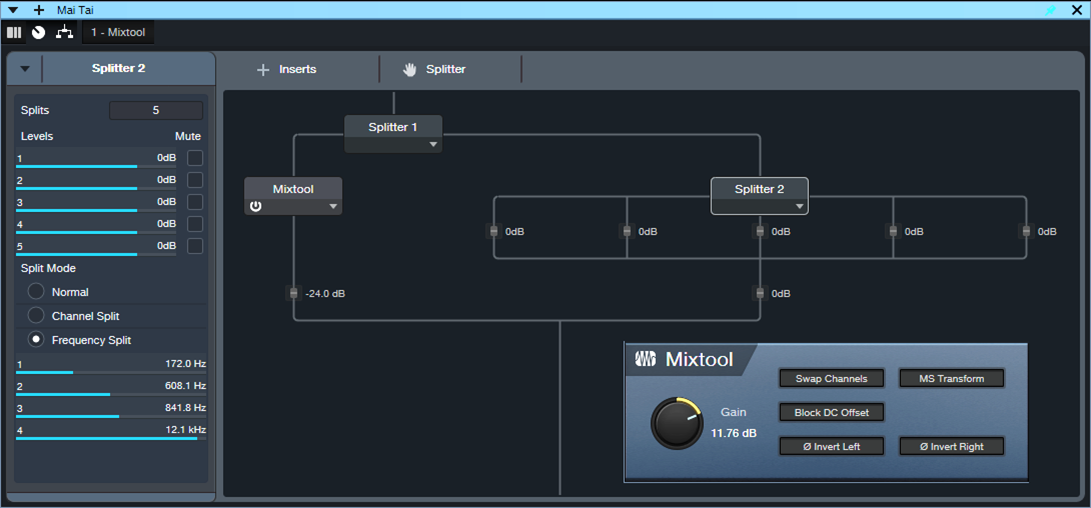
Figure 1: The FX Chain block diagram.
Varying Splitter 2’s frequencies produces a variety of unusual, phase-based equalization changes. They’re difficult to describe, and sound somewhat like a voicing control. The audio example gives some representative sounds, as applied to distorted guitar. The first phrase has no processing. Subsequent repetitions use various PhaseTone Warper settings.
Fig. 2 shows the control panel. The effect is most pronounced with Intensity turned up all the way. Turning it down gives more subtle effects. The buttons alter the stereo image in unpredictable ways.
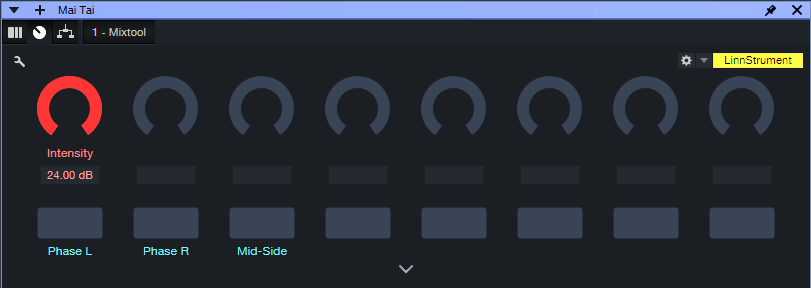
Figure 2: Channel Editor macro controls.
Unfortunately, Splitter 2’s frequency settings are not automatable and can’t be assigned to control panel parameters. So, you have two ways to access the Splitter’s four frequency parameters:
- Open up the Splitter 2 module in the FX Chain
- Expand Splitter 2 in a Mixer channel (fig. 3). This makes adjusting the parameters easy.
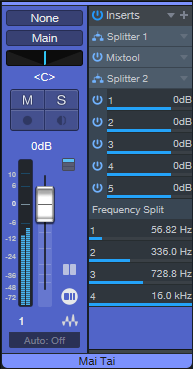
Figure 3: Expanding Splitter 2 makes the Frequency Split controls available for easy editing.
So…when you’re looking for that “sound-I-haven’t-gotten-before,” give the PhaseTone Warper a try. Although the demo shows it with a distorted guitar, also try synthesizer sounds with lots of harmonics, cymbals, noise, orchestral sounds, and more. (And don’t overlook dry guitar—you’ll hear an almost varitone-like effect.)
Download the PhaseTone Warper FX Chain
Improve MIDI Drum Loop Flow
MIDI drum loops have a bad rap, because some musicians consider them metronomic and boring. But they don’t have to be. Subtly leading or lagging the beat at strategic moments, like physical drummers do, can give a better “feel.” You can also introduce slight, random variations with Studio One’s humanize function.
This tip covers yet another option: pitch changes. Harder hits raise the pitch of acoustic drums. Sometimes, electronic drums are programmed to emulate this effect. Furthermore, pitch changes can go beyond subtlety to create special effects.
Impact XT responds to pitch bend, but bending affects all drums that trigger at the same time. This technique is more selective. It uses automation to vary the Tune parameter for Impact XT’s individual pads.
The following drum loop is for reference, prior to any automated pitch changes.
Creating Automation Data
You can automate individual pads in the Arrange View or Edit View. I prefer creating automation in the Edit View. This makes it easy to see the correlation between a pad’s notes and the associated automation data. Here’s how to add automation in the Edit View:
1. Click on the three dots … at the left of the controller labels in the Edit View’s Automation Lane. This brings up the Add/Remove automation dialog (fig. 1).
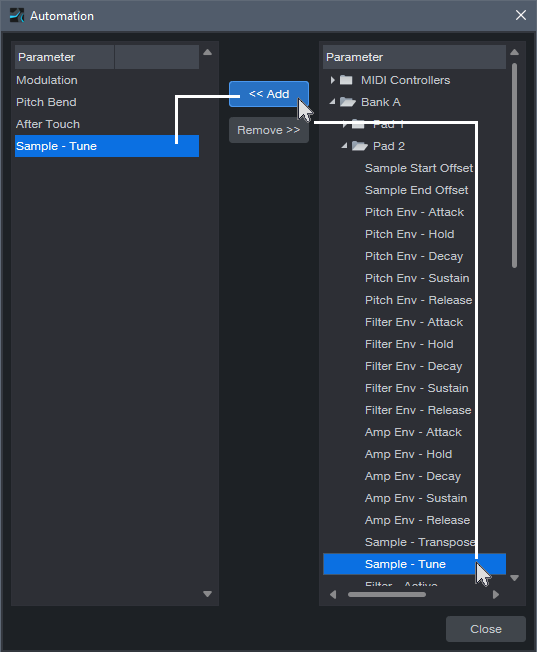
2. In the Parameter column on the right, locate the pad you want to automate. For example, in fig. 1 the snare is on Pad 2 in Bank A.
3. Click on the Sample – Tune parameter to select it.
4. Click on <<Add. The target parameter will appear in the left Parameter (automation type) column.
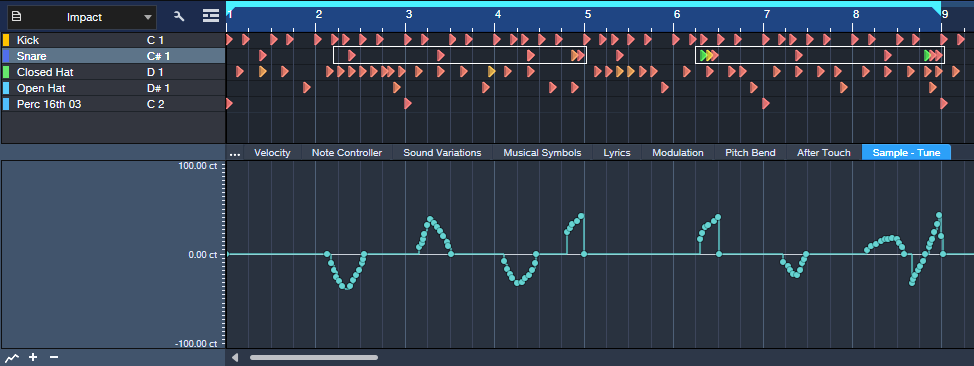
5. This adds a Sample – Tune tab to the Edit View’s existing controller lane options. Now you can click on this tab when you want to draw automation that changes the drum’s pitch (fig. 2).
Viewing Automation
As you add automation for more pads, you can view the automation in two ways:
- See the automation data for one pad at a time in the Edit View’s Automation Lane. As you add automation for the same parameter (e.g., Sample – Tune) in different pads, each new automation envelope adds its own tab for that controller. To switch among the different pads’ automation data, click on their associated tabs. However, this can be confusing because different pads that use the same type of controller have the same controller name for their tabs. You won’t know which pad a particular tab controls, unless you remember that tabs are added from left to right as you assign more automation.
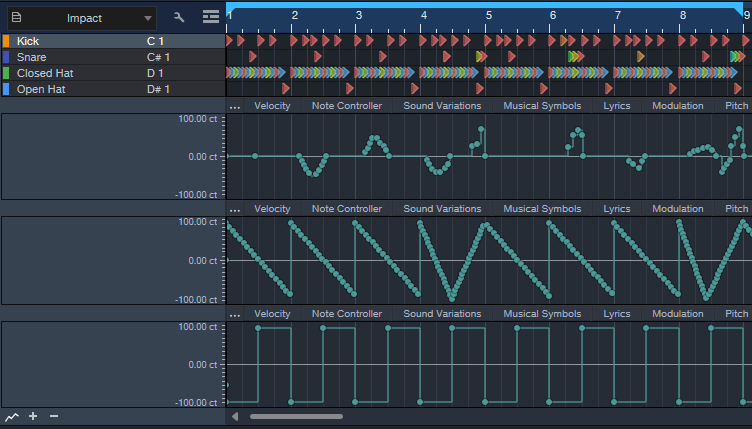
- Add multiple Automation Lanes so you can see the automation data for several pads at once (fig. 3). Again, you can’t see the target pad’s name in the Automation Lane, but you can see them all at the same time.
With the second option, the Edit view can become cluttered. So, after creating automation in the Edit view, I often use a third option:
1. Create an automation track in the Arrange View that’s the same as an Automation Lane in the Edit View.
2. Copy the automation in the Edit view.
3. Paste it into the Arrange view’s automation track. Note: Studio One recognizes a MIDI track’s start as its first piece of data. To paste automation data at the beginning of an Arrange View’s automation track, prior to copying the data, add a node at the beginning of the Edit View’s Automation Lane.
4. Delete the automation in the Edit View. Now the Edit View’s Automation Lane is available for displaying new automation data.
Transferring automation data in this way provides two main benefits:
- In the Arrange view, you can set Auto: Off to turn off existing automation data while you add new automation data in the Edit View.
- To show the full name of the target parameter being automated, right-click on the parameter name in the Automation Track.
Additional Creative Options
To change drum pitches in novel ways, try drawing automation waveforms (fig. 3) and sometimes, using the Transform tool. For example, draw a downward sawtooth for hi-hat automation, using 1-measure quantization. Now, the pitch descends over the course of a measure. With kick, use square wave automation to create a lower pitch for a measure’s first half, and a higher pitch for the second half. This gives a less static feel.
The following example includes the automation edits shown in fig. 3. This isn’t intended to showcase an ideal application, but demonstrates how subtle and selective changes can alter the loop’s sound. When mixed with other tracks, you “feel” the difference more than hear it as an obvious effect.
But of course, you don’t have to be subtle—automate Transposition instead of Tune, and you’ll have semitone changes. That can work well with hand percussion parts where the hits have short decays. In any case, automating pitch can add a new flavor to MIDI drum loops.
Mixing à la Studio One
Ask 100 recording engineers about their approach to mixing, and you’ll hear 100 different answers. Here’s mine, and how this approach relates to Studio One.
The Mix Is Not a Recording’s Most Important Aspect
If it was, recordings from the past with a primitive, unpolished sound wouldn’t have endured to this day. The most important aspect is tracking—the mix provides a home for the tracks. If you capture stellar instrument and vocal sounds, the mix will almost take care of itself. Granted, you can fix sounds in the mix. But because each track interacts with the other tracks to create the mix, changing any track changes its interactions with all the other tracks. If multiple tracks require major fixes, the mix may start to fall apart as different fixes conflict with each other.
So, a great mix starts with inspired tracks. When tracking and working with MIDI, enable Retrospective Recording (Preferences or Options, then Advanced/MIDI/Enable retrospective recording). If you play some dazzling MIDI part but hadn’t pressed record, no worries—Studio One will have stored what you played. For audio, create a template that lets you track audio quickly, before inspiration dissipates. It’s helpful if your audio interface has enough inputs so that you can leave your main instruments and mics always patched in. Then, simply record-enable a track, and you’re ready to record.
Start Mixing Without Plugins—But Do Any Needed DSP Fixes
Here’s one reason why you don’t want to start by adding plugins. Sound on Sound did a series called Mix Rescue where the editors would go to a home studio and give tips on how the person working there could obtain a better mix. One time the owner offered the editors some tea, and went into the kitchen to make it. Meanwhile, the SOS folks wanted to hear what the raw tracks sounded like, so they bypassed all the plugins. When the owner came back, his first question was “what did you do to make it sound so much better?” I assume the problem was that the person doing the mix started adding plugins to enhance individual tracks, without remembering the importance of all the tracks working together.
Using DSP to alter levels can optimize tracks, without altering their character the way most plugins do. For more consistent levels, particularly with vocals, use Gain Envelopes and/or selective normalizing. (Note that you can normalize Events in the Inspector.) Also, cut spaces between phrases to delete any residual noise. Edit tracks to remove sections that you may like, but don’t advance the song’s storyline. Then, the remaining parts will have more prominence.
My one exception to “no plugins at first” is if the plugins are essential to the final sound. For example, a guitar part may require an amp sim. Or, a synth arpeggio may require a dotted eighth-note delay when it’s part of the song’s rhythm section.
Obtain the Best Possible Balance of Your Tracks
While you work on the mix without plugins, get to know the song’s feel and the global context for the tracks. As you mix, you may hear sounds you want to fix. Avoid that temptation for now—keep trying to achieve the best possible balance until you can’t improve the balance any further. Personal bias alert: The more plugins you add to a track, the more they obscure the underlying sound. Sometimes this is good, sometimes it isn’t. But when mixing with a minimalist approach, you can always make additions later. If you make additions early on, they may not make sense in the context of changes that occur as you build toward the final mix.
Here’s another personal bias alert: Avoid using any master bus plugins until you’re ready to master your mix. Although master bus plugins can put a band-aid on problems while you mix, those underlying problems remain. I believe that if you aim for the best possible mix without any master bus plugins, then when you do add master bus plugins in the Project page to enhance the sound, they’ll make a great mix outstanding.
This way of working is unlike the “top-down” mixing technique that advocates mixing with master bus processors from the start. Proponents say that this not only encourages listening to the mix as a finished product, but since you’ll add master bus processors eventually, you might as well mix with them already in place. However, most top-down mixes still undergo mastering, so bus processors then become part of mixing and mastering. If that approach works for you, great! But my best mixes have separated mixing and mastering into two distinct processes. Mixing is about creating a balance among tracks. Mastering is about enhancing that balance into a refined, cohesive whole.
EQ Tracks Strategically
By now, mixing without plugins has established the song’s character. Next, it’s time to shift your focus from the forest to the trees. Identify problem areas where the tracks don’t quite gel. Use the Pro EQ to carve out sonic spaces for the tracks (fig. 1), so they don’t conflict with each other. For example, suppose the lower mids sound muddy, even though the balance sounds correct. Solo individual tracks until you identify the one that’s contributing the most “mud.” Then, use EQ to reduce its lower midrange a bit. Or, a vocal might have to be overly loud to be intelligible. In this case, a slight upper midrange boost can increase intelligibility without needing to raise the track’s overall level.
If a static boost or cut seems heavy-handed, the Pro EQ3’s dynamic equalization function introduces EQ only when needed, based on the audio’s dynamics. For more info, see the blog post Plug-In Matrimony: Pro EQ3 Weds Dynamics.
Some engineers like using a highpass filter on tracks that don’t have low-frequency energy anyway. Use the Pro EQ’s linear-phase stage, and then before adding any other effects to the track, render it to save CPU power. Traditional minimal-phase EQ can introduce phase shifts above the cutoff frequency.
Implement Needed Dynamics Control
Using EQ to help differentiate instruments means you may not need much dynamics processing. For example, after using EQ to make the vocals more intelligible, they might benefit more from light limiting than heavy compression. A little saturation on bass will give a higher average level, reduce peaks, and add harmonics. These enhancements allow the bass to stand out more without using conventional dynamics processors, or having to increase its level to where it conflicts with other instruments.
Be sparing with dynamics processing, at least initially. Mastering most pop/EDM/rock/country music involves using compression or limiting. This keeps the level in the same range as other songs that use master bus processing, and helps “glue” the tracks together. But remember, master bus processors—whether compression, EQ, maximization, or whatever—apply that processing to every track. If you’ve already done a lot of dynamics processing to individual tracks, adding more processing with mastering plugins could end up being excessive. (To be fair, this is a valid argument for top-down mixing. It’s not my preference, but it’s a technique that could work well for you.)
Studio One has the unique ability to jump between the mastering page and its associated multitrack projects. (I’m astonished that no other DAW has stolen—I mean, been inspired by—this architecture.) If after adding processors in the mastering page you decide individual tracks need changes to their amounts of dynamics processing, that’s easy to do.
Ear Candy: The Final Frontier
Now you have a clean,integratedmix that does justice to the vision you had when tracking the music. Keep an open mind about whether any little production touches could make it even better—an echo that spills over, an abrupt mute, a slight tempo change to help the song breathe (although it’s often best to apply this to the rendered stereo mix, prior to mastering), a tweak of a track’s stereo image—these can add those extra “somethings” that make a mix even more compelling.
Mastering
Mastering deserves its own blog post, because it involves a lot more than just slamming a maximizer on the output bus. If this post gets a good response, I’ll do a follow up on mastering.