Monthly Archives: April 2024
The Real-Time 6-to-12-String Guitar Converter
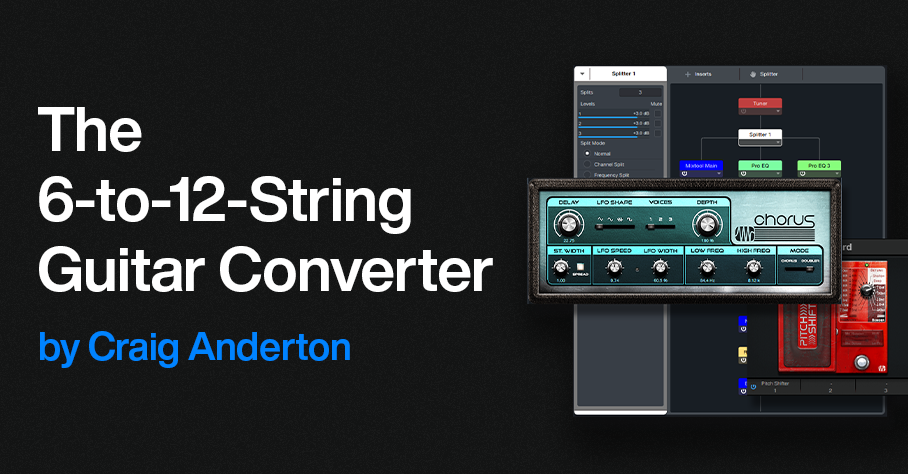
By Craig Anderton
With this technique, when you play a standard 6-string electric guitar, you’ll hear the rich, vibrant sound of a 12-string guitar. The proof is in the listening: The audio example’s first part features the raw 6-string guitar sound. The second part showcases the transformative nature of this tip’s approach.
How It Works
The guitar’s audio splits into three paths:
- The Main path is the straight guitar sound, with no processing.
- The Octave path uses a pitch shifter to transpose the audio up 12 semitones. This produces the sound of the octave-higher strings. However, a physical 12-string doesn’t double the top two strings, so they don’t create an octave effect. To reduce the octave-higher component in the higher notes, High Cut filters reduce high frequencies going into and coming out of the pitch-shifter plugin.
- The Chorus path emulates the doubling of a 12-string’s top two strings. In addition to using the Chorus in Doubler mode, a low-cut filter reduces the chorusing effect in the lower notes. This ensures that the effect is most prominent with the higher notes.
Although an Extended FX Chain is the most convenient implementation (there’s a download link at the end), Studio One Artist can use buses and sends to create this effect. In either case, when editing the three paths’ levels, set the Main path’s level first. Then, bring up enough of the Octave channel to create the 12-string effect on the lower strings. Finally, bring up the Chorus path to fill out the sound.
Choosing a Pitch Shifter
Fig. 1 shows two pitch shifting options. The Pitch Shifter in the Ampire High Density pack has low latency, which is why it can do real-time “whammy” effects. The Pitch Shifter plugin from Kilohearts.com (free when you create an account on their website) is also well-suited for this application. The downloadable FX Chain uses it, for the benefit of those who don’t have the High Density pack. The plugin introduces some latency. However, this is a feature, not a bug. With a physical 12-string, you hit the octave string slightly later than the fundamental one. Coincidentally, the latency gives this effect. The plugin is basic—all it does is shift pitch. So, the fidelity is quite good for a real-time processor.
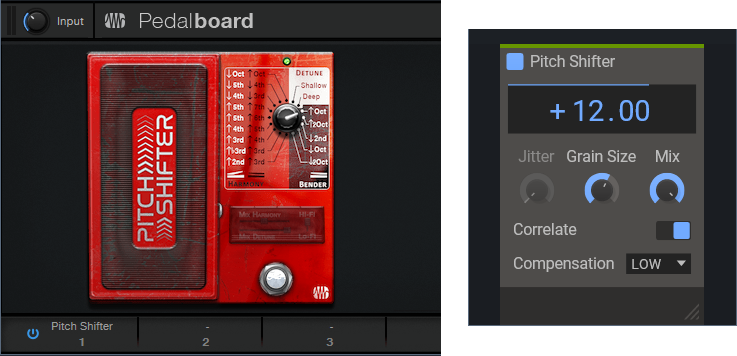
Figure 1: Two pitch shifter options. (left) PreSonus Pedalboard Pitch Shifter. (right) Kilohearts Pitch Shifter.
To use the High Density Pitch Shifter, insert a Pedalboard in place of the Kilohearts Pitch Shifter. Load the Pitch Shifter plugin into the Pedalboard, transpose the Pitch Shifter up an octave, and follow it with a 20 ms delay (delayed sound only).
Option 1: Artist Implementation
Fig. 2 shows the implementation for Studio One Artist. The Main guitar path has two sends, one to the Octave path and one to the Chorus path. All three paths assign their outputs to the Output channel. Its fader provides a master volume control for the three paths. So, once you’ve set your levels as desired , you can hide the Main, Octave, and Chorus paths to save space in the console.
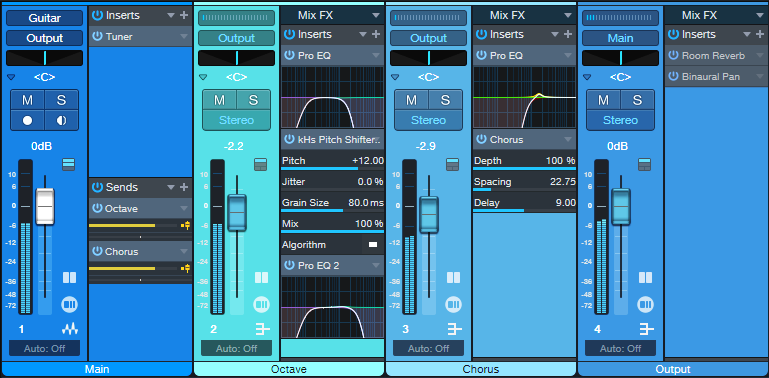
Figure 2: Configuration for Studio One Artist.
Fig. 3 shows the control settings for the three Pro EQ3 processors. Their other controls aren’t shown because they’re not used. Use these EQ settings regardless of which pitch shifter plugin you choose.
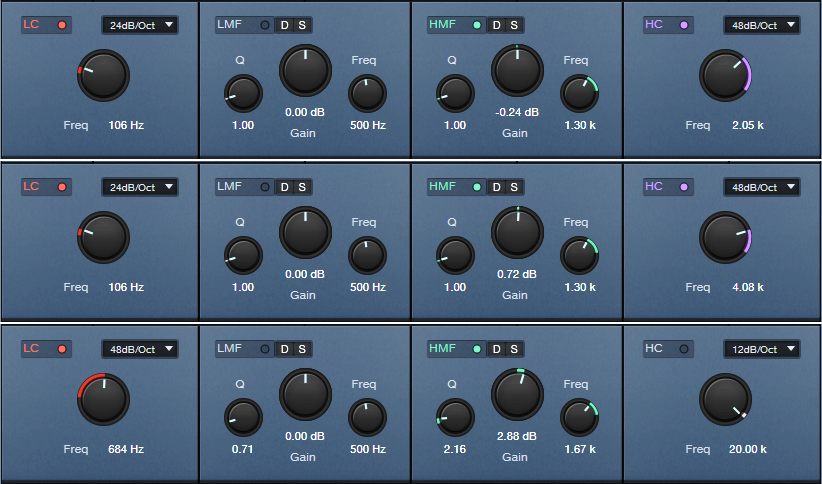
Figure 3: EQ settings. (Top) Pre-Pitch Shifter EQ. (Middle) Post-Pitch Shifter EQ. (Bottom) Pre-Chorus EQ.
Fig. 4 shows my preferred Chorus settings.
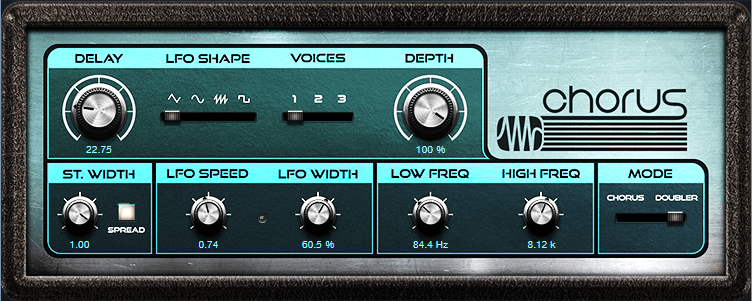
Figure 4: Chorus settings for the Chorus path.
The Output channel incorporates optional Room Reverb and Binaural Pan plugins.
When setting levels for the three paths, start by turning down their levels. Set the Main path level first. Then, bring up enough of the Octave channel to create the 12-string effect on the lower strings. Finally, turn up the Chorus path to fill out the sound.
Option 2: Extended FX Chain (Studio One+ and Professional)
Fig. 5’s Extended FX Chain incorporates the plugins shown in fig. 2, as well as Mixtools for each internal path. These link to the Macro Controls, which control the path levels.
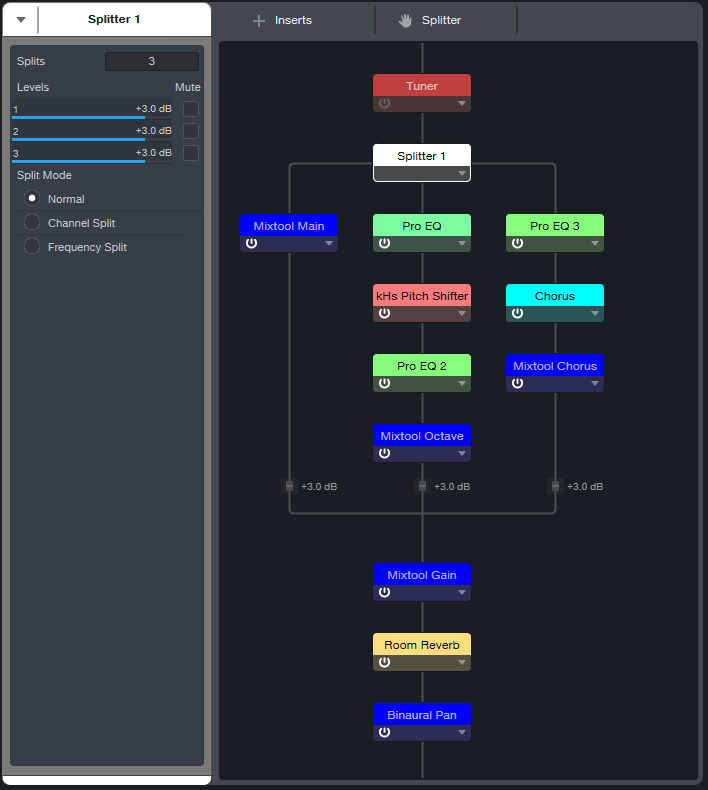
Figure 5: Extended FX Chain plugins.
Fig. 6 shows the Macro Controls panel.
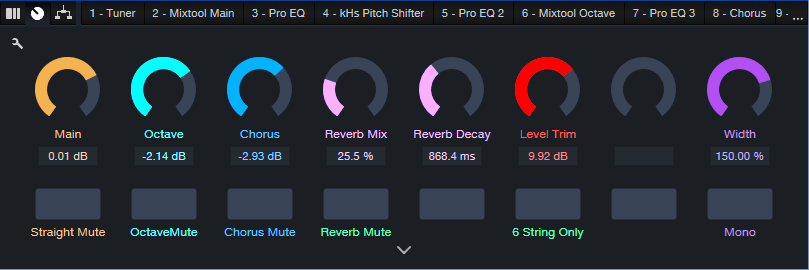
Figure 6: The Macro Controls panel provides flexible, hands-on control for the 6-to-12-string converter.
The controls do the following:
- Main, Octave, and Chorus are level controls for the three paths. Each path has a corresponding Mute button.
- Reverb Mix controls the Room Reverb Global dry/wet balance.
- Reverb Decay alters the Room Reverb Length parameter.
- Reverb Mute bypasses the reverb effect.
- Level Trim balances the level of the 6-to-12 string FX Chain effect to the non-processed track when the 12-string effect is bypassed.
- 6 String Only mutes the Octave and Chorus paths, but leaves the Main path and Room Reverb active.
- Width controls the Binaural Pan effect.
- Mono defeats the Binaural Pan’s widening effect. It’s useful to assign to a footswitch. Then, you can switch instantly between the wide stereo sound, and the tight mono sound.
Not only is the sound rich and convincing—you don’t have to tune 12 strings! Download the 6 to 12 String Converter.multipreset here.
Impact XT’s Secret Clip-Launching Talents
By Craig Anderton
Impact XT can launch clips, which is great for songwriting (see the blog post Songwriting with Impact XT). But few people realize that Impact XT can also launch scenes that trigger multiple clips simultaneously. You can even trigger and play back multiple scenes at the same time.
Although the functionality isn’t as deep as programs with dedicated clip launching, Impact XT offers features that other programs don’t have. So, this tip is uniquely suited to a variety of improvisational and compositional techniques.
Here’s a download link for CA Scene Launch Tip.song, a basic scene launching template for Studio One version 6.X. This will make it easy for you to become familiar with the process of launching scenes using Impact XT. Please note that this tip is compatible with Studio One Professional and Studio One+, but not Studio One Artist.
What Are Clip Launch Scenes?
Scenes trigger multiple clips. For example, one scene might launch a mixed drum loop, percussion loop, and bass line loop. A different scene could trigger the same clips, but add a rhythmic synth or guitar part. Another scene may be similar, but switch out the drum loop and bass line for different drum and bass loops. Choosing different scenes lets you build a set, or improvise a song structure in real time. You can also record your live improvisations. It’s a lot of fun, as well as inspirational.
The Clip Launch Scene Solution
The solution is using Chorder to trigger multiple Impact XT pads from a single keyboard key. This tip covers a way to launch four loops simultaneously per scene, with up to 7 different scenes. However, the principle is expandable for more complex clip launching (e.g., trigger more scenes, or more loops in each scene). Even better, this approach can play back several scenes simultaneously. As far as I know, no other program with a clip launcher can do this.
Getting Started
Suppose you want to be able to call up seven different loop combinations, building from simpler to more complex loop combinations. Start with kick and hi-hats. Then, trigger another scene that adds percussion, so triggering both scenes builds on the first scene. Different scenes could have different bass lines, synth pads, or whatever. So, you can build “loop orchestrations” in real time.
For my particular application, all the pads had the same triggering characteristics (fig. 1). Of course, you could instead have scenes whose pads have One Shot, Normal, or Toggle responses.
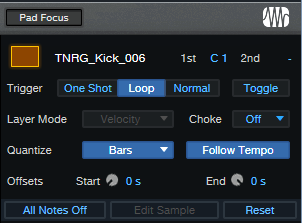
Figure 1: Initial pad setup. Loop and Follow Tempo are enabled, with Quantize set to Bars.
Pads, Meet Chorder
Next, assign the Impact XT pads to note triggers (fig. 2). Then, create a Chorder Note FX preset.
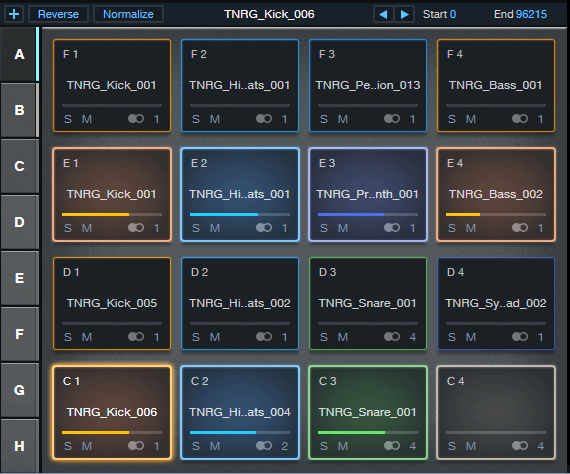
Figure 2: The trigger pad note assignments work in conjunction with Chorder. Note that two scenes are playing back at the same time.
I wanted to use only white keys as triggers, to keep the process simple for live improvisation. The bottom Impact XT row assigns pads to C1, C2, C3, and C4. The next row up assigns pads to D1, D2, D3, and D4. Each successive row assigns pads to the next higher note octaves on a keyboard, up to B1, B2, B3, and B4.
Chorder is programmed so that when you play a note on the keyboard, it plays notes on the octaves that trigger the clips in a scene (fig. 3).
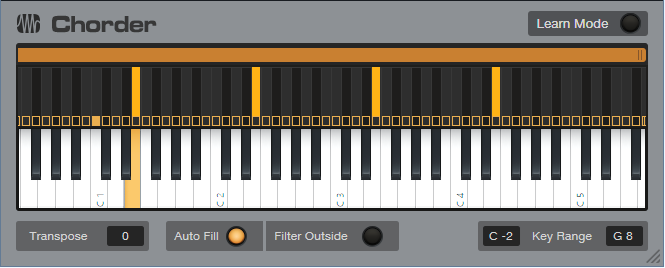
Figure 3: Playing E on a MIDI keyboard sends triggers on E1, E2, E3, and E4. This triggers four clips in a single row of pads.
Now we have a basic setup for triggering scenes from keyboard keys. An octave of white keys (C1 to B1) triggers 7 scenes. Including black keys could trigger 12 scenes from an octave of keyboard keys.
Going Further
This technique offers many options:
- Program Chorder to trigger up to 31 four-pad scenes, or 11 eight-pad scenes, if your keyboard can transpose over the range from C -2 to G8.
- Once Chorder is set up, you don’t need to interact any more with the pads. It’s not necessary to change banks to trigger scenes in different banks, or have the triggered bank be visible.
- However…interacting with the pads can be pretty cool. For example, you can Mute or Solo pads prior to triggering and alter what a scene plays back. If you have a touch screen or control surface, playing with parameters like pad Pitch while clips are looping is big fun.
- Bring mixing into the picture by assigning pads to specific Impact XT outputs. One application is assigning all bass loops or pads to the same mixer channel. Then, you can fade the bass or pad in and out without having to call up a different scene.
- This isn’t only an EDM technique. For rock, each scene can be drums and a couple different types of percussion loops for song sections like intro, verse, chorus, solo, bridge, outro, etc.
About the CA Scene Launch Tip.song File
This Song has a pre-programmed Chorder Note FX and Impact XT, ready to be loaded with your favorite loops. Connect your MIDI keyboard. C1, D1, E1, and F1 trigger the Bank A rows in Impact XT. G1, A1, and B1 trigger the bottom three rows in Bank B. Once you’ve loaded your loops on the Impact XT pads, you’re ready to start hitting keys and triggering scenes.
Download the CA Clip Launch Tip.song file here.
Make Better Mixes with “Selective EQ”
By Craig Anderton
Good mixes often depend on carving out a unique sonic space for each instrument, so you can hear them clearly. Sometimes carving out that space involves level, like making an instrument softer so that another instrument seems louder. A more sophisticated approach involves EQ, like dipping a piano’s midrange to make more room for the voice.
This tip dives deeper into using EQ to carve out space. It combines spectrum metering with either static or dynamic EQ to make sure two instruments support each other, rather than make one instrument subservient to another.
The four short audio examples have lead guitar and slide guitar playing together. I wanted the lead to be the highlight, but didn’t want to lose the importance of the fluid, aggressive slide guitar in the background. Here’s how I convinced them to coexist.
The first audio example plays the lead solo and slide guitar together. You can almost hear them fighting to try and be the top dog…but we’ll fix that.
Meet Team Spectrum Meter and Pro EQ
The top of Fig. 1 shows the spectrum analysis of the lead guitar part. Unlike the EQ’s spectrum meter, the plugin’s FFT mode can average the level, and retain an infinite hold time. This is key, because the curve unambiguously shows which frequencies are more prominent in the lead guitar part.
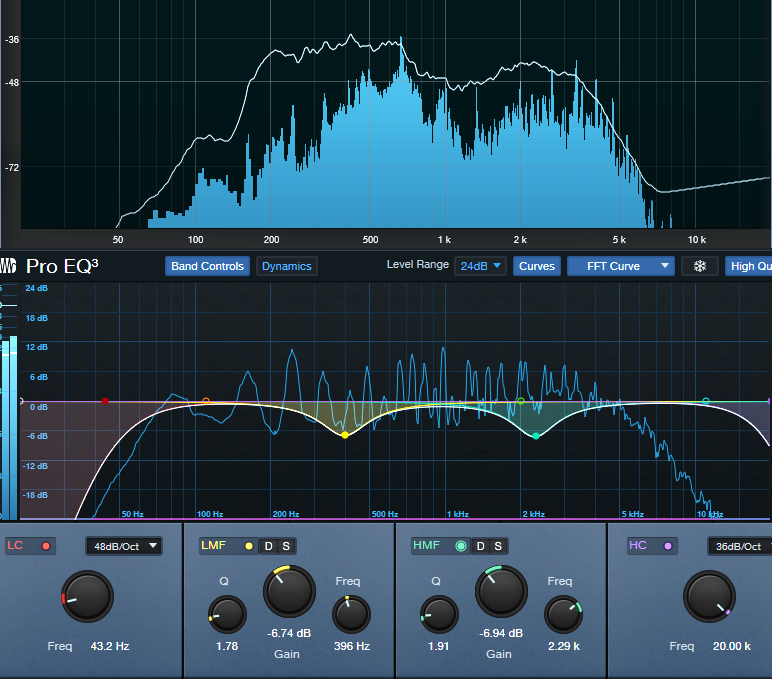
Figure 1: The top image shows the lead guitar’s spectral response. The lower image shows the compensation EQ curve applied to the underlying slide guitar part. The upper row of EQ controls isn’t shown, because its controls aren’t used.
The second audio example uses the static EQ curve in fig. 1 to reduce these frequencies in the slide part. This opens up space for the lead. Now there’s more differentiation between the lead and slide, but the slide still comes through well.
Next, we’ll take this further with dynamic EQ (fig. 2).

Figure 2: Settings for dynamic EQ. Again, the upper row of EQ controls isn’t shown, because its controls aren’t used.
The next audio example uses dynamic EQ, so the slide guitar becomes more prominent in the spaces between notes played by the lead guitar. Now instead of fighting with each other, the lead guitar and slide take turns sharing the spotlight.
Using dynamic EQ is not necessarily better than using static EQ. It depends on the musical context. If you want only the lead to be more prominent, the static EQ sounds better. Because I wanted both parts to be equally important—just better differentiated—I preferred the dynamic EQ.
The final audio example takes the old-school approach of simply lowering the slide guitar part’s level, without any EQ changes. The lead is more prominent, but the overall sound is less interesting and lively compared to how it sounds with EQ (especially dynamic EQ).
But Wait…There’s More!
There’s also a bonus audio example. I posted an Atmos binaural mix of the complete song (headphones only), and a conventional stereo mix (speakers or headphones), on my YouTube channel. These let you hear the tracks above in context, but the examples also provide a follow-up to previous posts about how modest home studios with no surround system can take advantage of Atmos.
The mix is denser than the previous Atmos vs. stereo example mentioned in the blog postRelease Your Music in Stereo and Immersive, and uses the technique described in Make Stereo Downmixes Feel More Immersive. If you haven’t taken advantage of Atmos yet, listen to the binaural Atmos version for headphones, then listen to the conventional stereo version. Despite my efforts to make the stereo version sound as much like the Atmos version as possible, the Atmos mix is fuller, bigger, and has more depth. Remember, all you need to get started with Atmos mixing is Studio One Professional and a set of headphones. Give it a shot!
Multitimbral Magic with MIDI Guitar
By Craig Anderton
MIDI guitars are a niche product, because the learning curve can be daunting for some guitar players. However, I’m surprised how many professionals have adopted MIDI guitar not as a guitar replacement, but as a creative, expressive voice that neither guitars nor keyboards can duplicate.
Thanks to ongoing controller improvements, and a better understanding of what MIDI guitar does best, I’m using it more than ever. But a big part of my renewed interest in MIDI guitar is Studio One’s MPE support, and the ability to let a single MIDI guitar serve as multiple simultaneous External Devices. Let’s dig deeper.
Most MIDI guitars offer two playing modes:
- Poly mode, where all data from all strings appears over 1 channel.
- Mono mode, where each string generates data over its own MIDI channel.
With multitimbral instruments, a MIDI guitar in mono mode can use each string to drive its own instrument. For example, the bottom three strings could drive a bass, while the upper three strings drive a polysynth sound. In theory, that’s cool—but there’s a drawback. In some applications, you might prefer to have the polysynth sound respond to all six strings. Yet, mono mode reserves three of those strings for bass.
Fortunately, Studio One has a simple solution: Create two MIDI guitar External Devices. Set up one for Mono mode, and the other for Poly mode (or if available, MPE mode—or even External Devices for all three modes). Then, drive the bass strings with the Mono mode external device, and the polysynth sound with the Poly or MPE mode device. Here’s how to do it.
Setting Up the External Devices
Creating the external devices for Mono and Poly modes is simple (fig. 1). The only difference is that the Mono mode device selects Split Channels, while the Poly device does not.
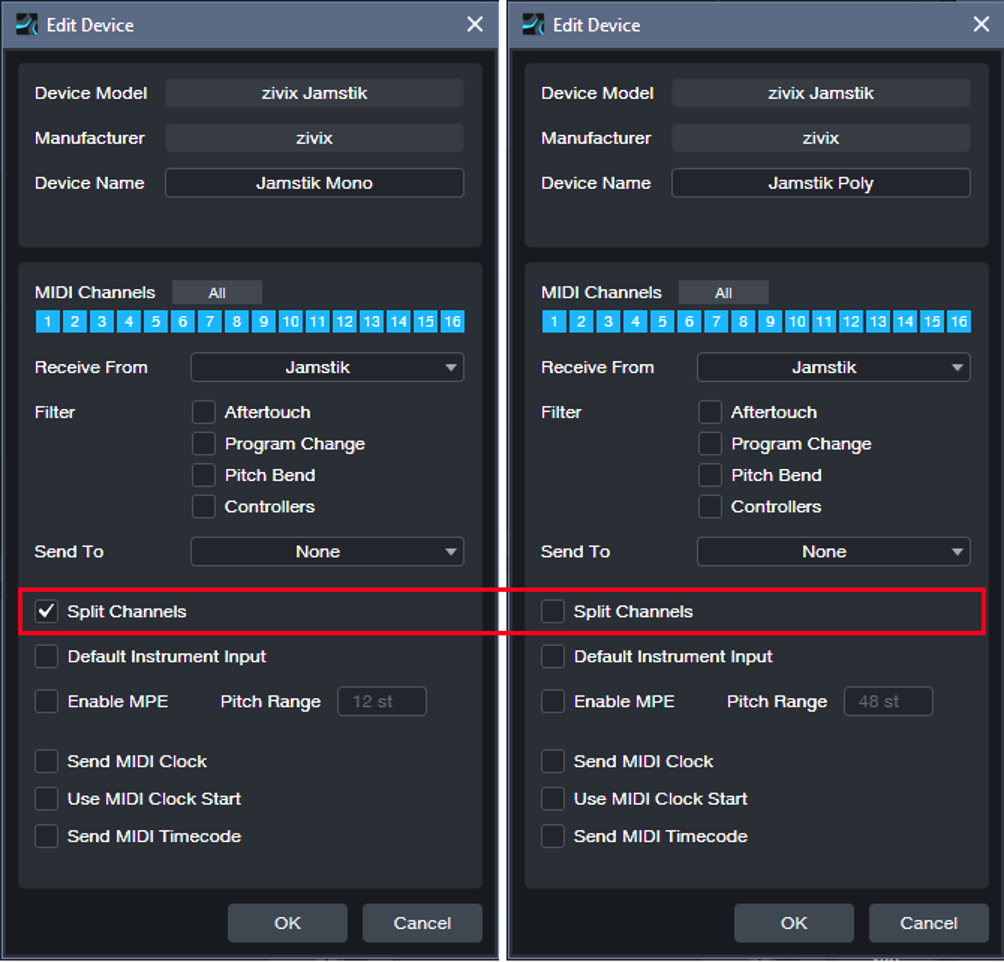
Figure 1: External Device setup for (left) Mono and (right) Poly mode MIDI guitar, using the Zivix Jamstik.
Fig. 2 shows the Studio One setup. SampleTank’s Polysynth responds to data over Channel 1. It also has three bass presets that respond to data over channels 4, 5, and 6.
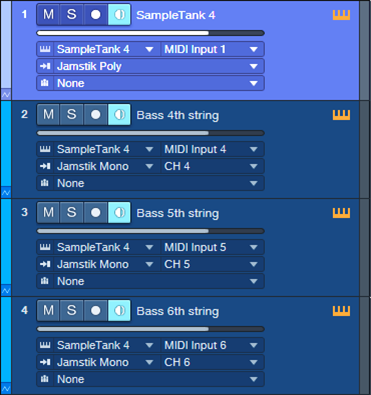
Figure 2: Track setup for driving a multitimbral synth with MIDI guitar.
Tracks 2, 3, and 4 use the Mono mode external device. These tracks accept data from channels 4, 5, and 6 respectively, which correspond to the guitar’s three bottom strings. The tracks output their data to the like-numbered SampleTank channels. That takes care of driving the bass presets.
Meanwhile, Track 1 uses the Poly mode external device. So, SampleTank’s Polysynth preset responds to all MIDI data coming in from all the guitar strings. Now we’ve layered chords played by the Polysynth with bass notes from the bass presets.
Enter MPE
My main guitar controller, the Jamstik Classic MIDI Guitar, offers an MPE mode in addition to Mono and Poly. Studio One’s MPE implementation doesn’t support using channelized multitimbral instruments with MIDI guitar. However, this is not an issue with Studio One’s bundled instruments, which aren’t multitimbral but support MPE. So, my third External Device for Jamstik is set up for MPE. External Device setup is like any other MPE controller. Tick the Enable MPE check box, choose the MIDI controller in Receive From, and select the appropriate Pitch Range (typically 48 semitones).
In the example given above, SampleTank doesn’t support MPE so it was necessary to use Poly mode to control its Polysynth sound. Poly mode has limitations, like not handling string bending for individual strings, and more tracking issues than Mono mode. But if we use the Jamstik’s MPE mode to drive the MPE-friendly Mai Tai, we can layer the Mai Tai’s polysynth presets with SampleTank’s bass sound. Compared to Poly mode, using MPE with the Mai Tai gives better tracking and per-string note bends that don’t influence other notes that are sounding. Fig. 3 shows the setup.
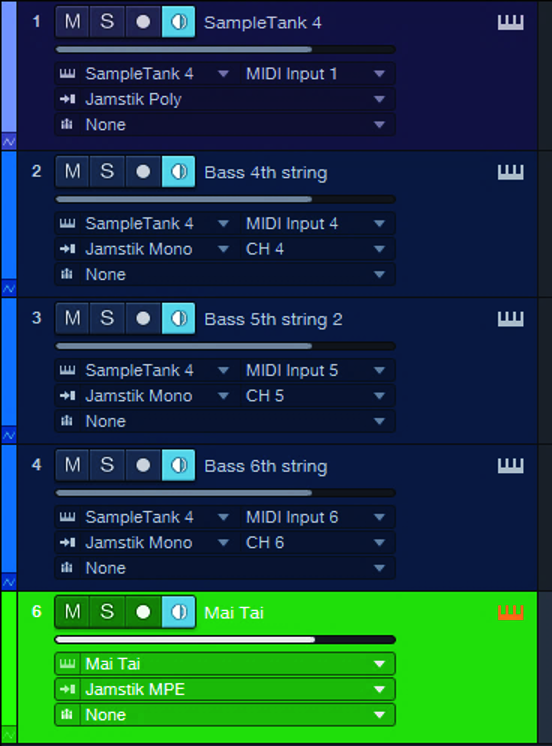
Figure 3: SampleTank and Mai Tai are layering bass sounds and a polysynth preset, respectively.
And here’s one more trick: Note that I’m still using the Poly External Device to drive SampleTank. Turning off pitch bend in SampleTank’s Polysynth eliminates most of the challenges involved with responding to Poly Mode, so the final sound becomes 3 individually articulated bass notes, 1 Mai Tai MPE synth for leads and rhythm with pitch bend articulations, and 1 layered SampleTank preset—thanks to optimized External Devices from a single MIDI guitar for each of them.
There’s no problem with using three External Devices from the same instrument. When you add another device with the same Receive From entry, Studio One will warn you that “Connecting multiple devices to the same port may lead to copied transmission of MIDI events.” You can safely ignore that, because we want copied transmission of MIDI events.
So, does it sound big? Listen to this short snippet recorded in real time with no editing, and decide for yourself.