How to Use FX Chain Transition Curves
FX Chains are a powerful Studio One feature, yet I can’t help but notice that when I write tips about FX Chains, some people are lost without a download…so I get the impression people might think that making FX chains is difficult. But it isn’t really, and your reward for creating one is a multi-effects processor that you can call up whenever you want, as well as assign controls that allow tweaking parameters without having to open up the effect GUIs themselves.
One of the most important aspects of mapping parameters to knobs is choosing the right Transition settings, so let’s delve deeper into how to make them do your bidding.
Transition Settings Explained
A great aspect of FX Chains is being able to map Macro knobs to multiple parameters and control them all simultaneously. For example, in the EZ Squeez tip for a one-knob compressor, a single Macro knob varied the Compressor Ratio, Release, Threshold, Knee, Attack, and Gain controls simultaneously. Because of this, when changes in the Ratio or Threshold parameter reduced the output, the Gain control could increase automatically to compensate.
When you map a parameter to a Macro knob, the default is for the knob to alter the parameter over its full range. But, you often don’t want to vary the parameter over its full range. For example, if you were creating a wah pedal effect with the Pro EQ, you wouldn’t want the filter to go from 20 Hz to 20 kHz. A more realistic range would be around 300 Hz to 2 kHz.
The Transition setting allows restricting the parameter range covered by a control. When you click on the small Transition graphic, a bigger view opens up where you can set the parameter’s upper and lower limits (Fig. 1).
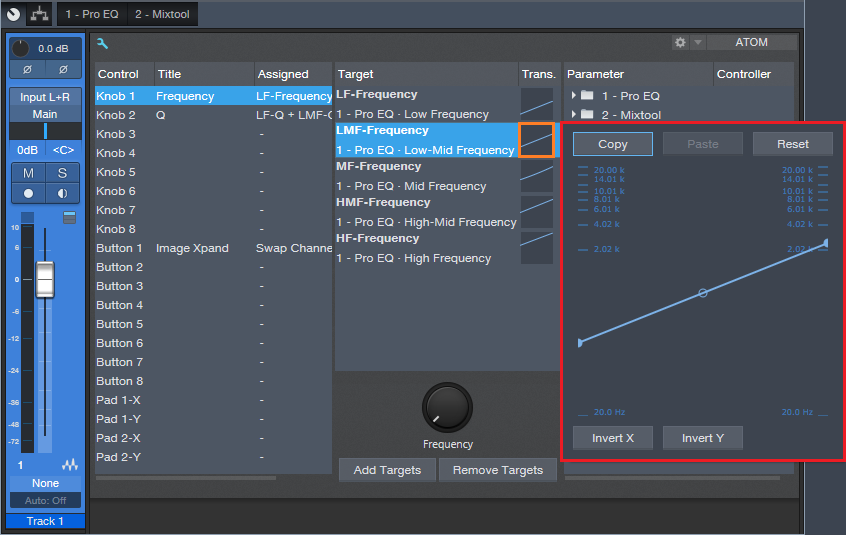
Figure 1: Click on the small graphic window (outlined in orange) to open up a bigger view (outlined in red).
However, the calibrations are sometimes difficult to read, so it can be challenging to create a precise change. Fortunately, there’s an easy solution.
Suppose you want to change the Pro EQ LMF frequency from exactly 150 Hz to 2.4 kHz (five octave range) by turning one of the Macro knobs. To do this:
- Open the Pro EQ GUI so you can see the LMF Freq knob, and “pin” the Pro EQ so that it remains visible.
- Click on the Knob icon in the Pro EQ’s upper left. The Macro Controls panel will appear (or the Macro Control Mappings window if it was opened up last). Since we want to use the Macro Control Mappings window, if the Macro Controls panel appears, click on its little wrench icon toward the upper left.
- Turn the knob at the bottom of the Macro Controls Mapping window fully counter-clockwise.
- Open the larger transition window for the LMF – Frequency parameter.
- Click on the transition line’s left node, and drag it while observing the LMF Freq knob in the Pro EQ. Stop dragging when it hits 150 Hz; you’ve now adjusted the knob’s lower limit. Note that it’s sometimes difficult to obtain a precise setting; you can’t, for example, type in direct value. You may want to temporarily slow down your mouse pointer speed (in the mouse section of your system properties) to make this easier.
- Now we need to set the upper-frequency limit. Turn the knob at the bottom of the Macro Controls Mapping window fully clockwise.
- Re-open the larger transition window for the LMF – Frequency parameter.
- Click on the transition line’s right node, and drag it while observing the LMF Freq knob in the Pro EQ. This time, stop dragging when the knob’s frequency readout shows 2.4 kHz. Note that you won’t be able to reach exactly 2.4 kHz; the closest I could come was 2.38 kHz…close enough. It’s not always possible to hit a value exactly, but most of the time, this doesn’t matter.
This kind of precision came in handy when creating the Imaging Phaser, where I wanted each frequency band in the Pro EQ to cover five octaves, and the bands had to be offset an octave from each other.
Bend Me, Shape Me
The Transition setting has another very useful feature—you can click the node in the middle to bend the curve into different shapes. For example, the Gain parameter in the EZ Squeez compressor needed to increase in level as the settings became more extreme, which squashed the signal more and brought down the level. Dragging the midpoint down a bit accelerated the amount of Gain as the single knob was turned higher (Fig. 2).
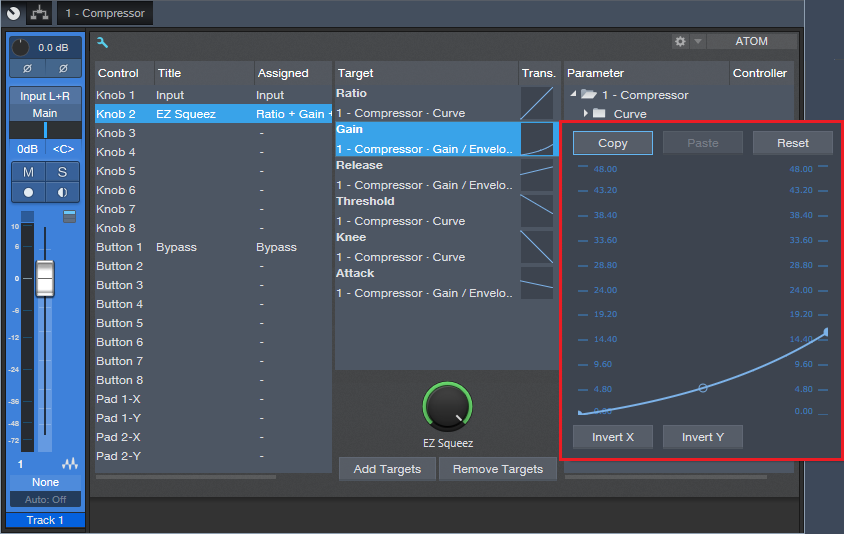
Figure 2: Bending the Transition line alters the “feel” of controls.
Where the Heck Are FX Chains Stored, Anyway?
Whenever a FX Chain tip provides a download link, there’s an inevitable comment in the Comments section along the lines of “Where do I store this after I download it”? The easiest way to find out is to go to the Browser, expand the FX Chains folder, expand a sub-folder if necessary, right-click on an FX Chain, and choose Show in Explorer (Windows) or Show in Finder (Mac). Now you’ll know where your FX Chains live. Note that you can also specify the location for your presets in Studio One > Options > Locations > User Data.