The Studio One Stereo Separator
A couple previous tips dealt with how to give mono instruments, like guitar, a stereo image that won’t degrade when collapsed to mono. Widen Your Mono Guitar—Sans Problems used delay, but in a way that minimized phase issues. Delay-Free Stereo from Mono used two Multiband Dynamics, set for no compression, to separate the audio into bands that you could then pan left or right.
This tip takes the process even further—it’s versatile, relatively simple, easily customizable, and also, has no phase issues when collapsed to mono. I’ve even used it to create a subtle, artificial stereo image from old mono records.
The Stereo Separator is particularly effective with power chords and rhythm guitar, especially as an alternative to layering parts in search of a “bigger” sound—you can obtain a stereo spread with a single track, so the sound is more defined compared to using multiple layers. And of course, if you scroll to the end there’s a downloadable FX Chain, so you can start playing with this immediately.
This example assumes a mono, distorted guitar track, like what you’d obtain by using a single mic on an amp. To create a stereo image, we first need need to convert this to a stereo track. So, set the track’s Channel Mode to stereo, and bounce the track to itself (Ctrl+B) to convert it into a dual mono (i.e., stereo, but with the same audio in the left and right channels). Now we can start playing with the stereo imaging.
- Open the track’s Channel Editor, and select the Routing Window. Drag a Splitter into the Channel Editor. Choose 5 splits, and Frequency Split for the Split Mode. The defaults split frequencies are fine, at least for now.
- Add a Dual Pan processor to the four high-frequency splits. You usually want the bass frequencies centered, so we’ll forego a split in the lowest-frequency split. You now have a Channel Editor that looks like Fig. 1.
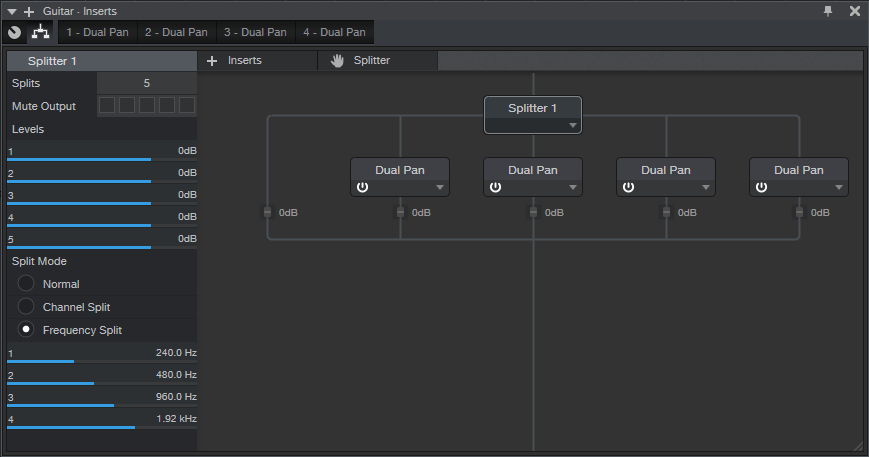
Figure 1: The Channel Editor, with Frequency Split selected, and the Dual Pan effects inserted.
- Fig. 2 shows the macro control assignments. It’s pretty straightforward—the four pairs of knobs are for the Low (L), Low Mid (LM), High Mid (HM), and High (H) frequencies. Each section has left and right Pan controls, which are assigned to the Pan knobs. The left Pan knob is also assigned to the linked Width control, and the right Pan knob ties to the linked Pan control as well. Each section’s buttons are assigned to Link and Bypass.

Figure 2: The Macro control assignments.
- When Linked, the Left Pan knob becomes the Linked Width control, and the Right Pan knob becomes the Linked Pan control. The labels for the controls (Fig. 3) show the default control first, while the = sign shows the function when Link is enabled.
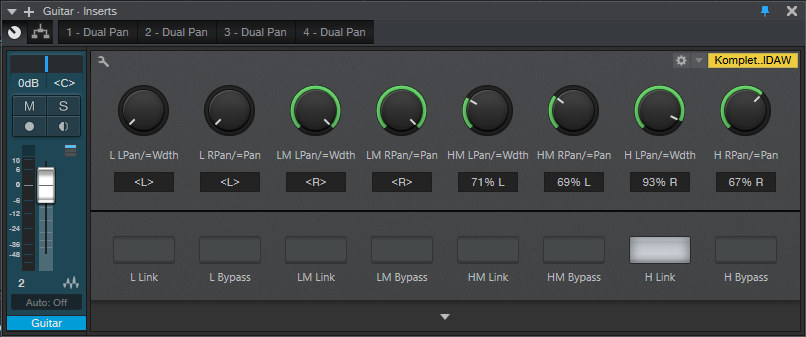
Figure 3: The Macro control panel. All the knobs and buttons are used.
And now, the fun begins! Play with the Pan controls to spread the different frequency bands in the stereo field—the audio example gives a good idea of the type of effect this FX Chain can do. The first example is mono, the second widens the image a bit, and the final example does a somewhat more radical stereo image.
Of course, you can go into the routing window, and change the levels of the various splits. Or, add FX in the splits…change the split frequencies…there’s enough to keep you busy for a while. Happy stereo!
Download the Stereo Separator.multipreset here!