Tag Archives: Studio One
A Dive Into Inside-Out Mixing
By Craig Anderton
There’s no “right” or “wrong” way to mix. For example, many successful engineers adjust individual tracks, and then mix groups of tracks. That’s fine, but as much as possible, I prefer to mix with sounds in context. I also no longer mix linearly, from start to finish, as was done with tape.
There’s a mixing technique that works well for me with typical songs that don’t have huge amounts of tracks. “Inside-out” mixing starts more in the middle of a song, and works its way out toward the beginning and end. This maintains a consistent sound quality through a song, and speeds up the mixing process. Maybe this method will work for you, too.
Part 1: Mix the “Big Chorus”
Start by placing a loop around the busiest, densest part of the song where the greatest number of tracks are playing at once (fig. 1). With a traditional mix, this will often be “the big chorus.” This is the “inside” part of inside-out mixing. In fig. 1, note that this loop (outlined in white) captures the drums, percussion, cymbals, bass, dual guitars, doubled lead vocals, harmony vocal, the first part of a solo that goes to the end, and dual keyboards.
Balancing all these crucial elements at once guarantees mixing in context. Also, if they work well together, they’ll almost certainly work well together with parts of the mix that are less dense. The objective is to tame the most difficult part of the mix early in the mixing process, which makes the rest of the mix flow more easily.
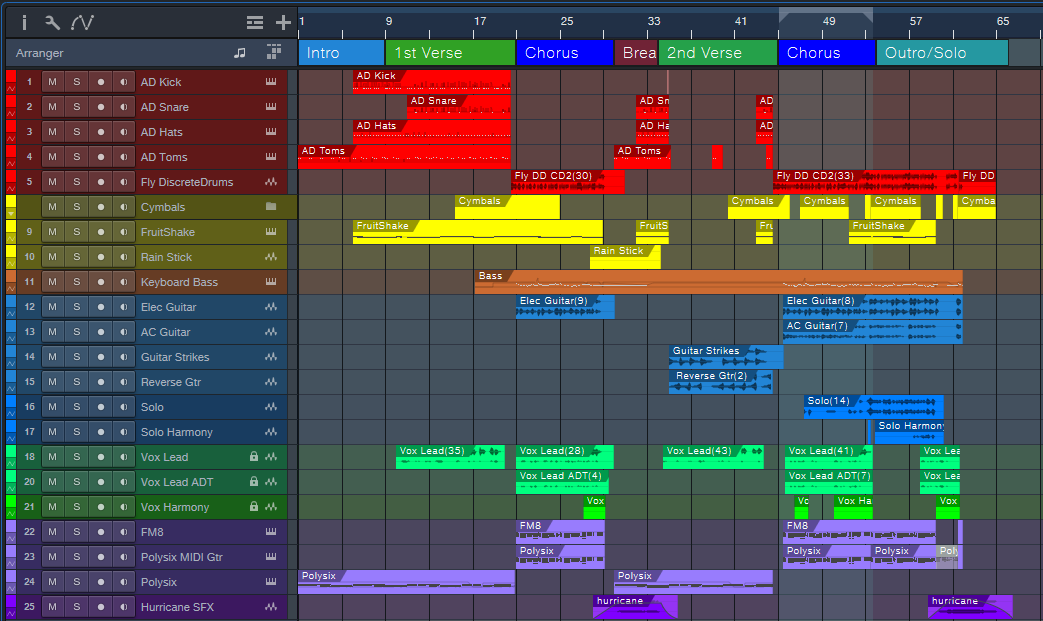
Figure 1: Tracks for my latest YouTube release, Inside the Eye of the Hurricane. The looped section that starts the mixing process is outlined in white.
Furthermore, I begin with minimal effects except for EQ. There are no sends or automation. The goal is to have a reference mix of as many tracks as possible that play simultaneously, yet be able to hear them all distinctly. (As usual, I start with everything panned to center. The reason why was described in a blog post from 2019, but the PreSonus archives no longer go back that far. You can find a revised version of the post on page 18 in The Huge Book of Studio One Tips & Tricks, 2nd Edition.)
After setting the reference levels, I add EQ and then re-adjust the levels. The looped section should now sound closer to what you want.
Part 2: Mix the Other Chorus(es)
Now loop an earlier chorus. It’s likely this will have a sparser arrangement, so that the later chorus can have more impact. The odds are excellent that the reference mix will still work for this chorus. If not, I usually use an Event envelope if any levels need to go up or down a bit. Automation doesn’t get added until the very end.
Part 3: Mix the Verse Between the Choruses
Next, loop the last measure or two of the previous chorus, the first two measures of the big chorus, and the verse between the choruses. Now you can mix the verse in context with coming out of the first chorus and going into the second one. This makes it easier to have a good flow from section to section.
Part 4: Loop Other Sections
Maybe there’s a bridge, a solo, another verse, whatever. By now, you get the idea: Loop sections of the song for mixing, and incorporate a little bit of what leads into the loop, as well as what follows it. I mix the beginning and end last, because with the rest of the song in place, it’s easy to figure out how to have them introduce and exit the song.
Part 5: Decorate the Mix with Ear Candy
At this point, you should have a solid, if not necessarily spectacular, mix. Insert some buses for reverb, delay, and various other effects, then route sends to them. Insert other processors, like dynamics, chorusing, more radical types of EQ, etc. Add the elements that make a mix interesting, and introduce elements of surprise.
Part 6: Automation
You’re in the home stretch. Now it’s time to think of the entire mix, not just the individual sections. For now, avoid the temptation to use master bus processing. Make the entire mix as wonderful as possible, and use master bus processing only for occasional reality checks.
Part 7: Finalize Your Mix
Finalize the mix with master bus processors if that’s your workflow, or transfer over to the Project Page to do your mastering.
About Some of the Ear Candy
The song “Inside the Eye of the Hurricane” also uses many of the techniques covered in previous blog posts. I thought you might enjoy hearing them in context.
Authentic ADT (Automatic Double-Tracking) is the only technique I use for double-tracking vocals because it sounds more like physical double-tracking than anything else I’ve found. It’s used on the choruses, but not the verses, so it’s easy to hear the difference.
Authentic 60s Flanger for Artist processes the crazy drum break, which also uses reversed audio. This happens just before the song’s second chorus.
A Guitar Solo Trick You’ve Never Heard Before was about solos, but this part of the song uses the reversed technique with chords to create pseudo-feedback effects.
Why I Don’t Use Compressors Anymore is certainly true here. The only compressor provides a special effect on the reversed guitar chords. There’s about 4 dB of limiting on vocals and 3 dB of drums. The vocal dynamics processing relies almost exclusively on phrase-by-phrase normalization and gain envelope dynamics. These techniques were also covered in blog posts that are no longer available. However, they’re described starting on page 484 in the eBook referenced above.
The techniques described in Fix Boring Acoustic Drum Loops is one reason why the acoustic drum loops in the choruses sound played instead of programmed. (The electronic drums in the verses are played in real time.)
Finally, there are two versions of the song posted online. One is conventional stereo. The other is binaural stereo that gives a more immersive sound when heard over headphones. Many people still don’t realize that you don’t need a surround system to take advantage of Atmos. As described in the blog post Easy Atmos: Grab Headphones, Mix, Have Fun, you can use Atmos to render your music in a binaural two-channel format designed for headphones. The sound is fuller and more satisfying than conventional stereo.
As just one example of what Atmos can do, there are synth filter sweeps in both versions of the song. However, the binaural version allows processing the filter spatially by making the sound more distant, and wider, as the filter cutoff increases. It’s a subtle effect, but far more expressive than simply turning up the filter’s cutoff frequency. For me, inside-out mixing also works well with Atmos. Because you’re mixing the densest part of the song first, you’re also creating a space that translates to the rest of the mix.
5 Session-Saving Tips for Studio One
By Craig Anderton
I admit it: the following tips are based on personally embarrassing experiences. I like to work fast to keep the creative juices flowing, but that can lead to occasional mistakes. Fortunately, these tips can help prevent a session from accidentally going south.
Track Lock
To lock track Events to their timeline positions, right-click on the track’s header and choose Time Lock (fig. 1). One application is locking tracks before mixing. Although the mixing console has full functionality, if you switch over to the Arrange window to set up loop points, confirm which tracks are in folders, and the like, a slip of the mouse won’t cause accidental edits.
I also use this with my “authentic ADT” technique, which requires placing two tracks at precise timeline positions. Locking both tracks maintains those positions. (Note: Even when locked, some non-critical editing functionality, like renaming, remains available.)

Figure 1: Right-click on a track and then choose to lock or unlock it. When locked, a lock symbol appears in the track header’s upper right.
Time Lock and Edit Lock
These are more granular locking options (fig. 2). Right-click on an Event or Events, and choose one or both:
- Time Lock prevents the Event from moving on the timeline. You can still do edits like alter fades.
- Edit Lock prevents making accidental edits.
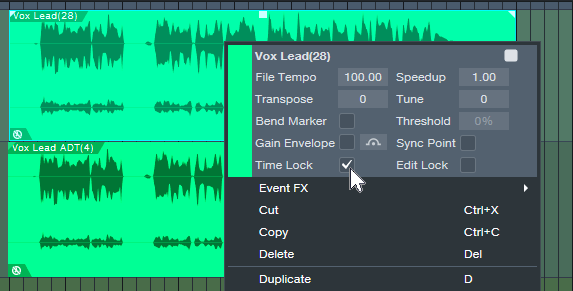
Figure 2: Protect an individual Event or Events from being edited, having timeline positions changed, or both.
Pseudo-Retrospective Recording for Audio
Although not as sophisticated as Retrospective Recording for MIDI Events, Studio One 3 introduced a similar function for audio. When enabled, Studio One is always listening to your audio inputs, and capturing the audio in buffers. When you start recording, the file includes audio that occurred before you clicked on record. After recording, you don’t see the captured audio. However, slip-editing the beginning of the audio to the left reveals the “pre-record” audio.
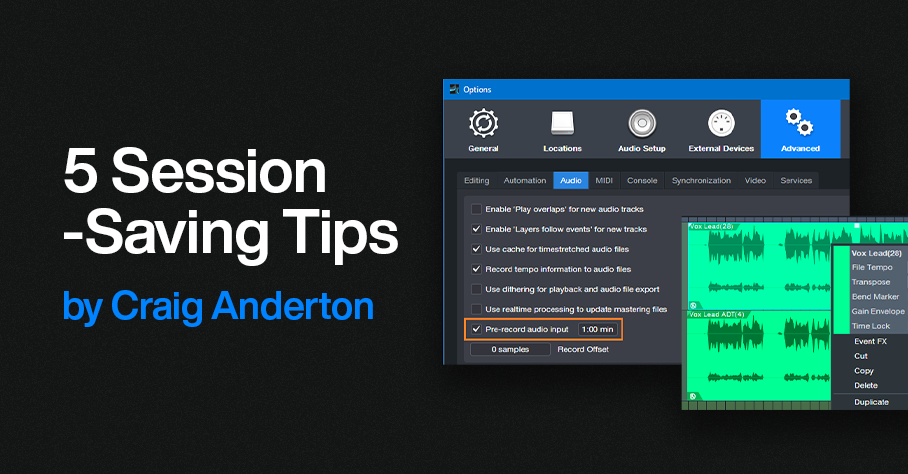
To set up Pre-Record audio, choose the Advanced Options, and select the Audio tab. Check Pre-Record Audio Input, and specify the number of seconds you want to capture (fig. 3). The maximum is one minute, but with lots of inputs this uses quite a bit of buffer memory. 10 or 15 seconds usually suffices.
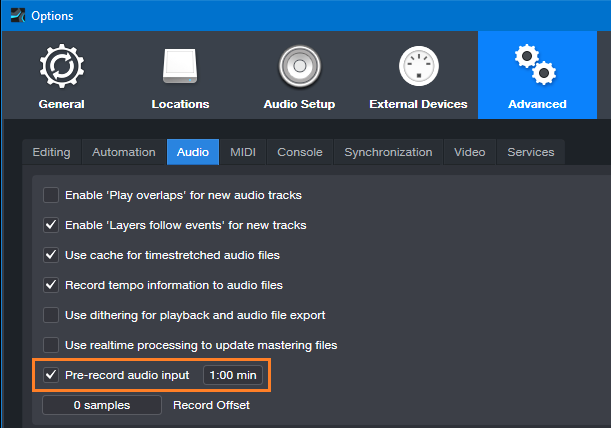
Figure 3: Missed the first few seconds of a take? Relax—you had Pre-Record Audio Input checked.
Two other cool features include:
- Pre-Record saves the audio for any track that’s record-enabled. So, suppose a drum set has five miked tracks, and the drummer plays some amazing intro but you were late clicking on record. You can slip-edit all five recorded tracks to recover the audio.
- Pre-Record can handle interruptions. Let’s assume a guitarist plays some great riff and then stops, but you missed it. So, you click on record, and pre-record captures the sound you missed. But then the guitarist says “hey, don’t record me yet, I’m not ready.” So, you click out of record, with the transport still going while you wait. Unexpectedly, the guitarist plays an even better version of the riff. So, you hit record again. Now the guitarist is settled in and plays for real. When you stop recording, the file will include both of the pre-record riffs, as long as the combined length didn’t exceed the buffer time.
Prevent Ripple Edit Mishaps
Ripple Editing allows edits like removing a section of a track, and having the track close up to fill the hole created by deletion. Or, insert an Event, and have it push the track later to make space for the addition. That’s cool, but if you leave Ripple Edit on accidentally, doing any subsequent cuts or pastes could mess up multiple Event positions in a song. Always disable Ripple Edit immediately after making your edit (fig. 4). Some people delete the keyboard shortcut, so that fat fingers can’t enable ripple editing accidentally.
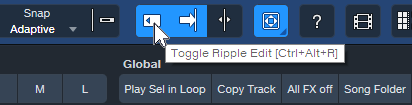
Figure 4: Be sure to toggle Ripple Editing off after you’ve made a ripple edit.
Lock Events to Video “Hit Points”
Time Lock locks Events to bars and beats. However, when working with video, you often want to lock a sound effect to an absolute time in hours and seconds. That way, even if the background music’s tempo needs to change, the intergalactic cosmic explosion will still happen at the exact frame in the video where the planet blows up.
Studio One can ‘t lock Events to the Seconds Timebase, but there’s a workaround. You can lock Markers to specific times by toggling from bars/beats to seconds in the Marker track (fig. 5), and then relate Events to Markers.
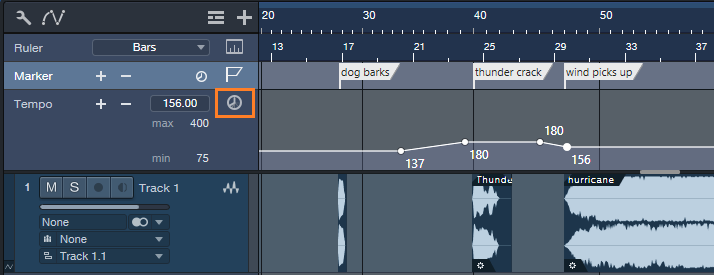
Figure 5: Toggling the Timebase button (outlined in orange) to Seconds locks the markers to minutes and seconds.
Name the Markers after the Events that need to conform to a hit point. If the tempo changes, move the Events to line up with their associated Markers.
I hope that at least one of these tips can help you save a session!
The Ultimate Creative Block Unlock
By Craig Anderton
You’ve probably seen ads for packs of MIDI chords that claim to help you write hits that will make your listeners’ jaws drop in amazement as they bask in the awesomeness of your musical talent. But save your money—Studio One’s Chord Track is a fantastic way to help sketch out songs, as well as smash creative blocks. Best of all, you don’t need to understand music theory like chords, harmonies, and intervals. All you need is ears and the ability to say “I like that” or “I don’t like that, so I’ll try something else.” Let’s explore one way to have the Chord Track work for you.
Setup
1. Create a new Song, and open the Chord track (fig. 1).
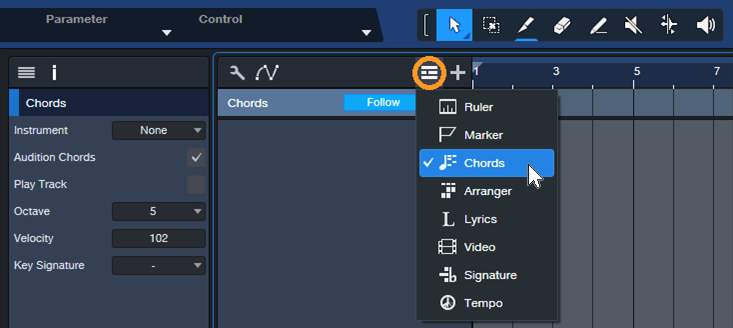
Figure 1: Click on the icon circled in orange and then choose Chords.
2. Choose the Paint tool. The goal is to fill the Chord Track with 1 measure chords. Click in each measure with the Paint tool to enter a C major chord (fig. 2). Tip: You can copy and paste the chords to fill the Chord Track faster.
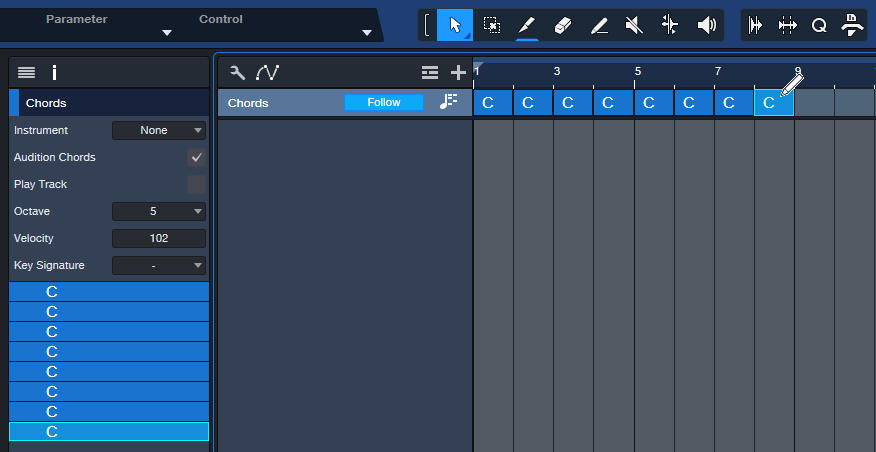
Figure 2: The Paint tool is entering a C chord. The Chord Track’s Inspector shows the chords that have been entered.
3. Insert an Instrument, like Mai Tai. This will be the playback engine for the chord progressions you create. Then, hit F4 to open the instrument’s Inspector and choose “Narrow” for Follow Chords (fig. 3).
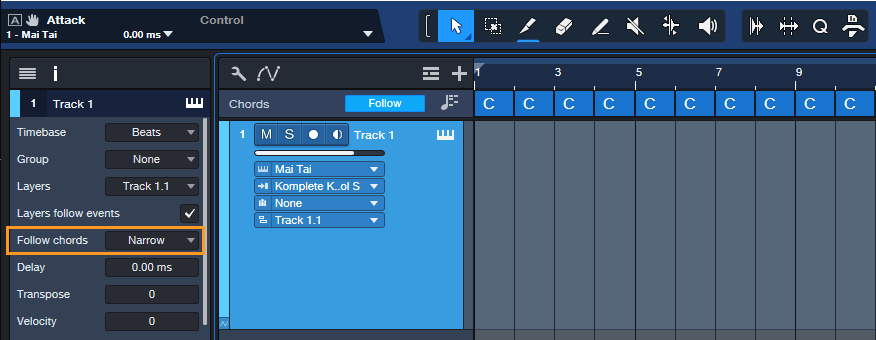
Figure 3: After entering an instrument to play the chords, choose Narrow for the Inspector’s Follow Chords parameter. Also try the Parallel follow mode at some point, which gives different voicings.
4. Drag the chords from the Chord Track into the Instrument track. Now each measure has a C major chord in it (fig. 4).
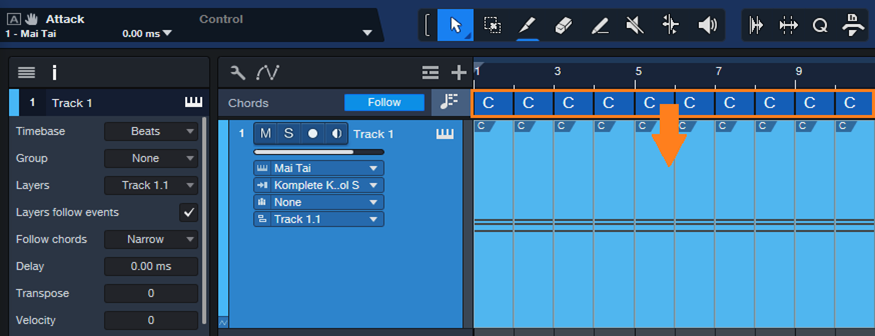
Figure 5: Drag the chords into the Instrument track to create MIDI data that corresponds to the chords.
Playing with Chords
Now we can play around with chord progressions.
5. Double-click on a chord in the Chord Track. When the Chord Selector opens, click on a chord. Fig. 5 shows adding an F Major 7 with an added 11th at the 5th measure. Note that you don’t need to know any theory, just click on options and see if you like the way they sound. And even if you do know theory, clicking around in a spirit of experimentation can free you from creative ruts.
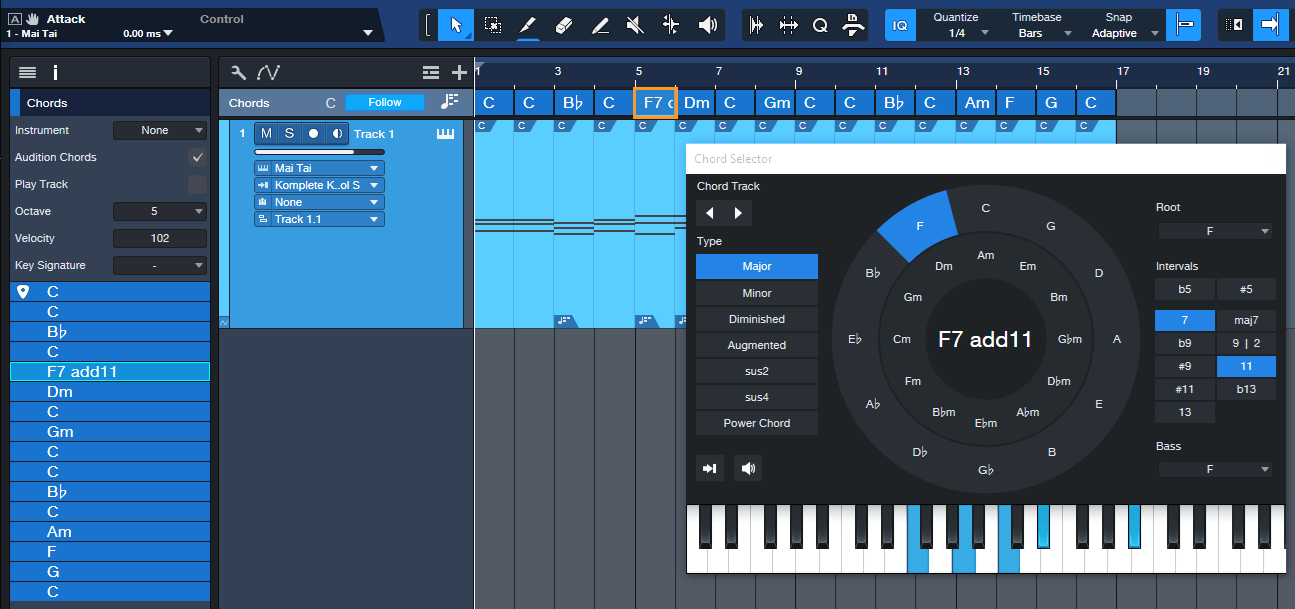
Figure 5: A C major chord is being replaced with an F7 Major Chord that includes an added 11th interval.
6. To move to the next chord, click on the Edit Next Chord arrow (fig. 6). The arrow to its left moves you to the previous chord. You can also modify any chord in the Chord Track just by double-clicking on it. After selecting the chord to edit, click on a new chord from the Chord Selector. Then, play back the progression to hear if you like the new chord. If not, choose a different one.
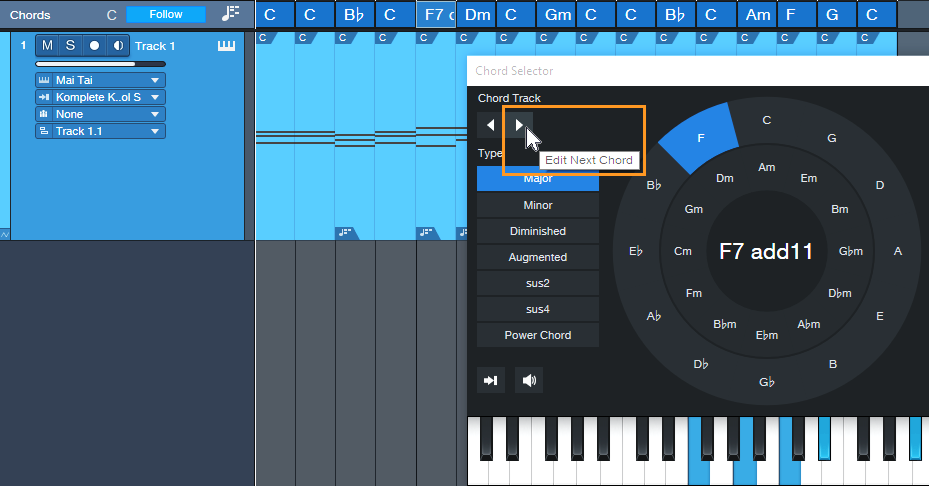
Figure 6: You can navigate through the chord progression by using the next/previous chord arrows.
7. Although the Instrument track notes show the chords from the Chord Track, the underlying notes remain the C major chords that were placed originally. To finalize your progression, select all the measures of MIDI notes, then type G to merge them into a single Event. Next, right-click on the Event and choose Musical Functions > Freeze Pitch (fig. 7). In the Inspector, turn off Follow Chords as it’s not needed anymore. The chord changes are now permanent.
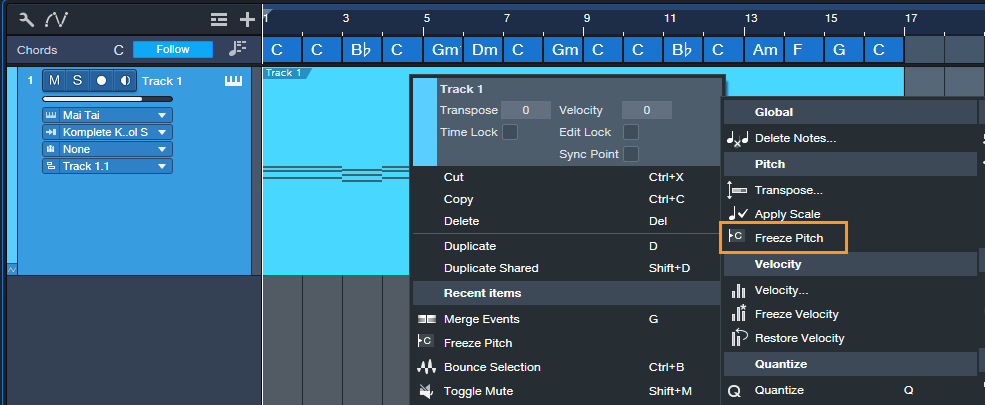
Figure 7: Freezing pitch preserves the Note Event pitches created by the Chord Track.
Additional Tips
- A measure might be too long for a chord change you want. If so, use the Split tool to create a shorter chord by splitting an existing chord. Split the Instrument track in the same place, so that the Event is the same duration as the shorter chord. Now you can change the shortened chord.
- The Chord Selector isn’t limited to major and minor chords. It has multiple chord types (diminished, augmented, etc.) as well as additional intervals if you want, for example, a G Major 6 instead of a standard G Major.
- If you’re a fan of crazy atonal chords, no problem. While the Chord Selector is open for a particular chord, click on any of the Chord Selector keyboard’s notes to add them to the chord.
Grab Cab Impulses for Ampire from Any Amp Sim
By Craig Anderton
Some of my favorite guitar sounds involve using Ampire’s amp, bypassing its cab, and adding a cab from the Helix Native plugin. Others involve creating custom cabs using the Pro EQ, or putting two cabs in parallel and throwing one out of phase. But loading an additional amp sim or EQ, or setting up parallel routings, and then dialing in the right settings is a hassle. It also wastes CPU power. So, I was glad to find an alternative. Thanks to the mysterious IR Maker utility plugin, it’s easy to create IRs for Ampire’s User Cab from other amp sim cabs, equalization, and stacked parallel cabs.
Make sure you download the free IR—the download link and description are at the bottom.
Meet IR Maker
Here’s the overview:
- Choose a mono amp sim cab or cab substitute (e.g., EQ).
- IR Maker’s output sends a frequency-sweep signal to the new cab’s input.
- The new cab’s output feeds the IR Maker’s input.
- IR Maker analyzes the frequency response characteristics of the processed sweep signal, crunches some numbers, automatically places the impulse in an impulse folder, and voilà—a Cab IR you can load in Ampire’s User Cab.
Song Setup
For this to work, a patch cable needs to connect an audio interface output to an audio interface input. It’s helpful to create a Song Setup specifically for grabbing impulses:
1. Export your current Song Setup so you can return to it after grabbing your impulses.
2. Create a new Song Setup. Dedicate a mono input and mono output to IR Maker (fig. 1).
3. Add an audio input for your guitar, and a Main stereo output, so you can test the impulses in Ampire.
4. Export this new Song Setup preset for future use.
5. Patch a physical patch cord between the audio interface input and output selected for the IR Maker (in this case, it’s input 3 and output 3).
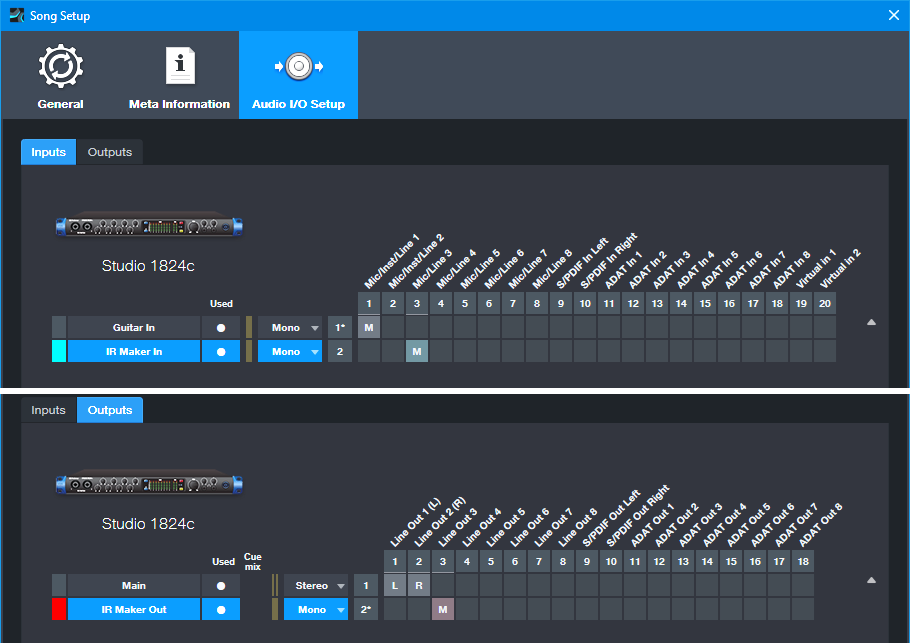
Figure 1: The IR Maker mono input comes from Mic/Line input 3. The IR Maker mono output goes to Line Out 3. An additional audio input allows testing the IRs by playing guitar through Ampire.
Mixer Channels Setup
1. Insert the amp sim or EQ-based cabinet you want to convert to an IR (fig. 2). Insert the IR Maker plugin after the cab. (The additional Pro EQ3 after the IR Maker is optional. We’ll cover that later.)
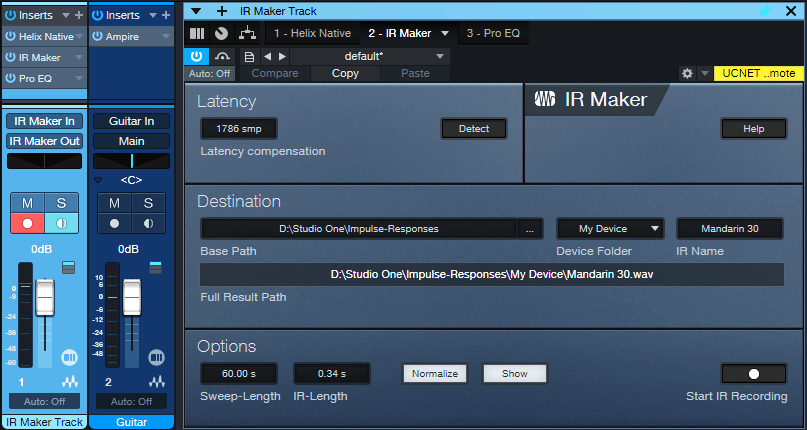
Figure 2: Channel setup and IR Maker UI. The setup is about to generate an IR from an edited Helix Native cab.
2. Assign the IR Maker channel input to IR Maker In, as created previously in Song Setup. Assign the IR Maker channel output to IR Maker Out, also created previously in Song Setup.
3. Record-enable the IR Maker trackand enable the input Monitor.
4. Open the IR Maker UI and test the setup. Click on Detect. If Latency shows 0, there’s a problem with either the physical patch cord, the input/output assignments, and/or the track not being record- and input monitor-enabled. Fix the issue, then proceed when Latency is a non-zero number.
5. Check the Normalize and Show boxes.
6. Options trades off calculation time and fidelity. For cabs, I use a 60 second sweep and 0.34 second IR time. This takes longer to create an IR compared to using a shorter sweep, but captures the best quality.
7. Destination shows where the impulses will be saved. Note: Because Show is selected, as soon as IR Maker creates the impulse, its associated folder opens. Then, you can just drag the impulse into Ampire’s user cab so you can hear what it sounds like.
Ready to Rock!
1. Test the levels. Click on Start IR Recording and check the sim’s or EQ’s input and output levels, as well as the IR Maker channel input. Avoid distortion. Any files are saved, so choose “Test” as an initial IR name. Then you can delete the “test” files easily after you’re finished testing levels. It may take a few tries to get the levels right.
2. Once the levels are set, give the IR a useful name (e.g., the cab’s name). Click on Start IR Recording. Wait for the calculations to complete, and your IR capture is done.
3. Drag the IR into Ampire’s User Cab graphic, and play guitar through the guitar track to hear the results.
About the Free IR Download
The free IR custom cab uses 12 stages of Pro EQ3. The IR is designed to give the VC 30 amp a more open sound, and works very well with power chords. Select the User Cab in Ampire, and drag the IR on top of the User Cab’s graphic.
Doing custom cabs with EQ usually needs more than one EQ’s worth of stages, so being able to preserve that as an IR is convenient. The IR is trimmed to 2048 so that it’s compatible with Helix Native as well as Ampire. I prefer the IR to the Helix Essex A30 amp’s default cab (2 x 12 Silver Bell).
Download the free CA VC 30 2048.wav IR here!
Comments
- The optional Pro EQ3 after the sweep shaves off the very highest frequencies (above 15 kHz, with a 24 dB/octave slope). This reduces high frequencies that could cause aliasing.
- The IR will be longer than needed. Ampire is tolerant of long IRs, but you can reduce the duration considerably. 50 ms is usually enough.
- This process may seem complicated, but it’s foolproof once the setup is correct. Just follow the steps above—and enjoy your alternate cabs!
Dynamics Processing for MIDI Velocity
By Craig Anderton
Sure, you can follow your virtual instrument with an audio compressor. But there’s a problem: an instrument’s dynamics and expressiveness depend on the notes’ velocities—not just the audio output. Velocity triggers different samples, alters filter settings, affects envelopes, and much more. An audio compressor can’t compress velocity. So, audio compression can help tame audio levels, but it can’t enhance an instrument’s expressiveness.
Fortunately, there’s an easy way to apply dynamics processing to MIDI velocity. The principle is the same as audio compression: Set a threshold, choose a ratio, and finally, add makeup “gain.”
Fig. 1 shows MIDI velocities from 1 to 127. Of course, this wouldn’t be a real part, but it’s the easiest way to show how MIDI compression affects velocities. Let’s set a threshold at MIDI velocity 80, and compress above that with a 2:1 ratio. Note where velocity 80 is in fig. 1.
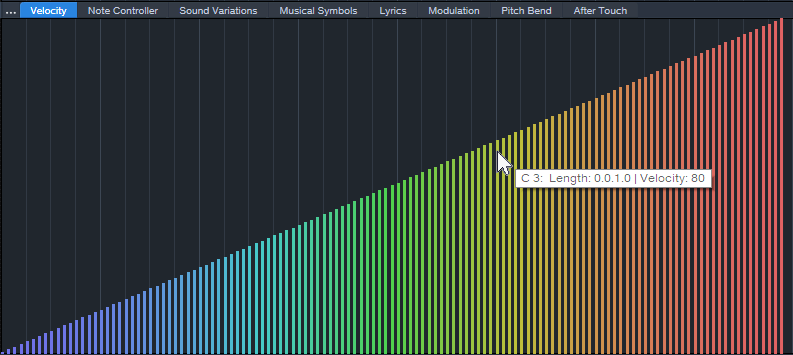
Figure 1: MIDI velocities from 1 to 127. We want to set the velocity compressor’s threshold to 80.
Select all the velocities above the threshold for processing (fig. 2).
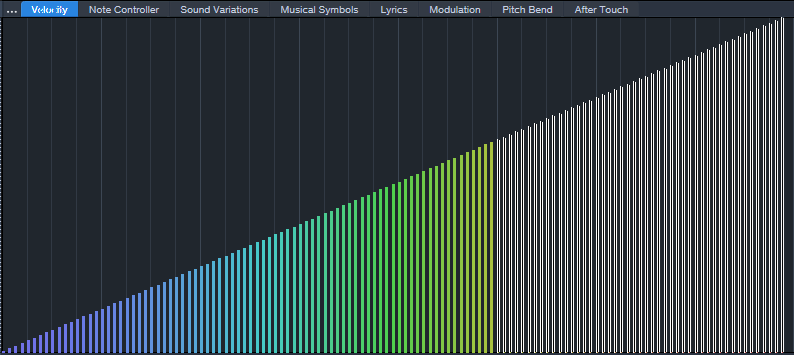
Figure 2: Velocities above the “threshold” are selected.
To compress the selected velocities by 2:1, choose Action > Velocity and multiply by 0.5. This is the same as a 2:1 ratio in an audio compressor (fig. 3).
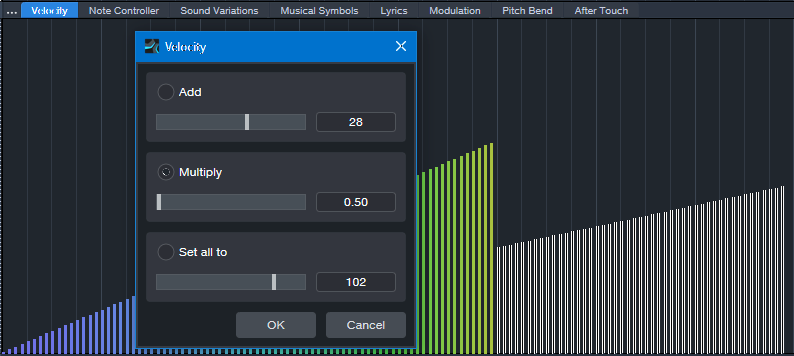
Figure 3: Velocities above the threshold are compressed by 2:1. Note how the slope is less steep.
Next, drag the selected velocity values up so that the compressed velocities line up with the velocities below the threshold. Because the velocities are still selected, you can just click on the left-most selected value, and then drag it up to its original velocity value of 80 (fig. 4). Now there’s a smooth transition at the threshold.
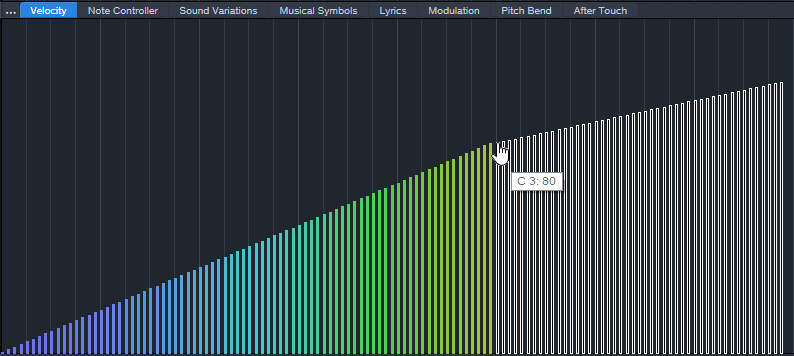
Figure 4: The compressed velocities pick up where the unprocessed velocities leave off.
Adding “makeup gain” is easy. The simplest option is to select all the velocities, and drag upward. Or, select all the velocities and choose Action > Add to add a constant. For example, after compression, the highest velocity is 103. So, adding 24 will raise all the velocities, with the highest one at 127 (fig. 5).
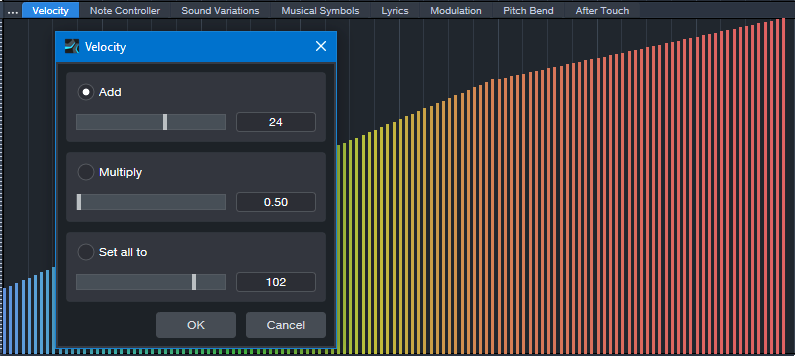
Figure 5: Like an audio compressor, the lower levels have been brought up, and the peaks have been reduced.
This is just one of the ways you can process MIDI velocity dynamics. You can also do expansion, limiting, and gating. If you’re interested in these types of processing as well, drop a note in the comments below.
Of course, you may want to compress the audio output as well. But in many cases, applying dynamics processing to an instrument’s MIDI data will give more expressive results than you can obtain with audio compression alone.
KOTA the Friend & RMB Justize | Studio One x TuneCore
Watch the independent artist and Wiz Khalifa producer cook up a song in a single day
Imagine meeting someone for the first time and making a song together. That’s what independent artist KOTA the Friend and Wiz Khalifa producer RMB Justize did, producing a complete track at PreSonus HQ in just one day – with Studio One as their “one-stop shop [for] production, vocal recording, [and] mastering,” and TuneCore to “release the music, put a cool picture on it, put our name on it, and let the world hear it.”
Watch the making of their track “She’s Gone” below, and read on for more behind the scenes content.
Everyone loves a good collaboration – but working with others can be a challenge, especially when you’re a fiercely independent artist like Kota the Friend: “I record myself, make my own beats a lot of the times, I even mix myself sometimes.” It’s a boldly autonomous philosophy that informs his artistic approach and extends to the process of getting his music out into the world: “I’ve been able to sustain success as an independent artist just by constantly putting out music, putting out content, feeding the fans, and really going out on the road, going out on tour. We go to Europe every year. You know, people listen to the music and they’re vibin’ with it all year – in their houses, in their cribs, in their cars, on their way to work. And so we try to be there for them.”
“I even mix myself sometimes,” he says, but even a fiercely independent philosophy has its limits: “then I send it off to somebody who can really get the job done.” Enter GRAMMY-nominated producer and in-house Taylor Gang engineer RMB Justize. In addition to his star-studded production credits, RMB Justize was also an early adopter of TuneCore: “I’ve been using TuneCore since 2013. Once I realized how simple it became to just release the music, put a cool picture on it, put your name on it, and let the world hear it – it got real.”

In just a few short hours, these total strangers came together to produce a vibey, low-key masterpiece – recording, mixing, and mastering in Studio one, and releasing it on TuneCore without a label ever being involved. For independent artists, the simplicity, efficiency, and financial incentives are simply unbeatable: “Because TuneCore exists, I was able to release music on my own without a record label. And for us, especially years and years ago, that was monumental. For us to be able to just upload and put out music and get some kind of money from it…they gave me the opportunity to monetize off of my music when that opportunity wasn’t really around. And as artists, sometimes we forget that that’s what it’s about. And now we have an opportunity to reach our fans and get some money, so shout out to TuneCore. It’s always love to TuneCore.”
“She’s Gone” by KOTA the Friend & RMB Justize now streaming everywhere.
Listen Now: Spotify, Apple Music
With the integration of TuneCore within Studio One, users can now get their music across the finish line and into TuneCore’s hands for distribution without ever closing out of their DAW. To learn more about how to effectively distribute your music with TuneCore, check out our Distribution 101 article. And for a limited time, all existing and new Studio One+ subscribers get 50% off their first year of TuneCore Rising, Breakout, or Professional plans. Learn more.
PreSonus products used: Studio One, PreSonus HD9 Professional Monitoring Headphones.
Studio One’s Keyswitching Secrets
By Craig Anderton
Announcement: The 2nd Edition of The Huge Book of Studio One Tips and Tricks is now available as a free download for owners of previous versions. The new edition includes more tips, improves older ones, adds Artist versions for many Studio One Pro tips, and has been rewritten to help address newer users as well as veterans. For new buyers, the eBook is available only from Sweetwater. However, PreSonus will honor updates for those who purchased the book while it was being carried in the PreSonus online shop.
Keyswitching: Potential vs. Reality
Key Switch keys, usually located at the keyboard’s lowest octave, choose different virtual instrument articulations. For example, hitting C0 might add tremolo on a string preset, while hitting D0 adds glisses.
However, presets with Key Switching often require at least a 5-octave keyboard. With a 4-octave keyboard, you usually have two choices: transpose down to cover the notes (which sacrifices the Key Switches), or transpose up to keep the Key Switches but give up some notes. Fortunately, PresenceXT and Studio One deal with this issue in a clever, practical way.
Studio One’s Keyswitch Solution
With PresenceXT, regardless of how you transpose the notes, the Key Switches can always occupy the same position on the keyboard. You can also map Key Switches as desired, and to free up more keys for notes, use only a subset of Key Switches.
To map Key Switches:
1. Open a note event’s Note Editor.
2. Open the Sound Variations panel (click on the Wrench icon at the bottom of the Note Editor’s vertical keyboard).
3. The Action menu (fig. 1) provides multiple shortcuts for altering Key Switch assignments:
- Reload the instrument’s native Key Switch map.
- Assign default Key Switches.
- Assign Key Switches to successive chromatic keys.
- Assign Key Switches to successive white keys.
- Shift (transpose) Key Switches by +1 octave, – 1 octave, +1 note, or -1 note. This function shifts only the Key Switches, so notes remain on the keyboard as assigned.
- Clear all Key Switches.
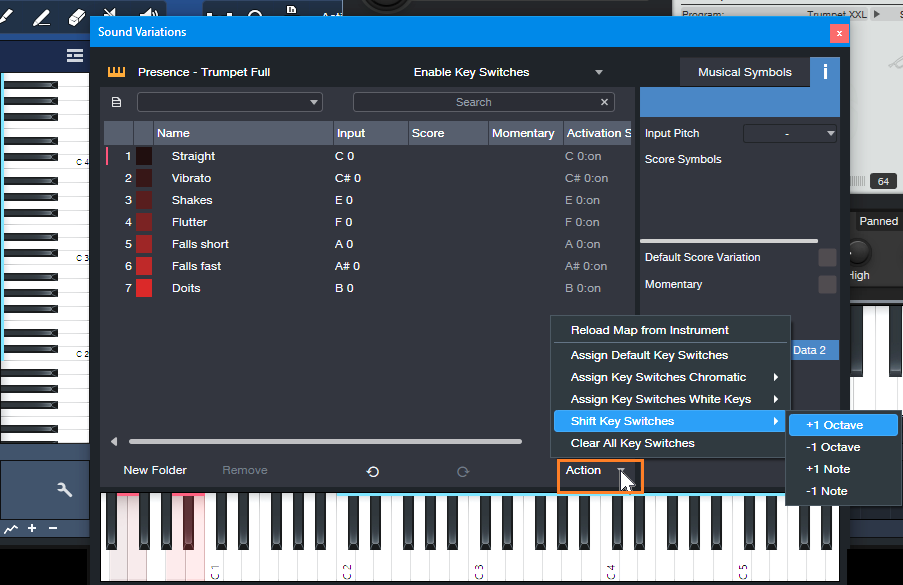
Figure 1: Click on Action (orange outline) to choose various ways to assign Key Switches.
A Practical Example
The PresenceXT Trumpet Full preset’s notes cover the range C2 through C6 (and even higher). The Key Switches cover the white keys from C0 to B0. You can’t fit 6 octaves of notes on a 4-octave keyboard, so here’s the solution:
1. There are no trumpet notes between C1 and B1. So, shifting the Key Switches to cover the range C1 to B1 avoids overlapping any notes.
2. From the Sound Variations panel, choose Action > Shift Key Switches > +1 octave. Now, the Key Switches cover the range from C1 to B1, with trumpet notes starting at C2 (fig. 2). This gives us three octaves of notes, and all the Key Switches. Compare this to fig. 1, which has different Input notes, and shows the Key Switches mapped from C0 to B0.
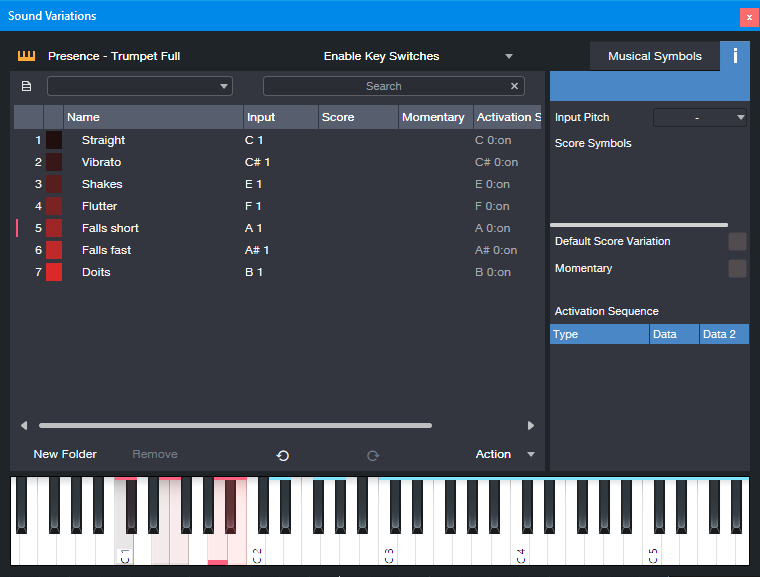
Figure 2: A four-octave keyboard can cover three octaves of notes and all the preset’s keyswitches.
3. If you instead want a higher range of trumpet notes that starts at C3, transpose the keyboard up an octave. Then, choose Action > Shift Key Switches > +1 octave again. Now the Key Switches cover the range from C2 to B2, with trumpet notes starting at C3.
Other Cool Key Switch Features
Some prefer having Key Switches on all white keys, because they’re easier targets to hit. Others prefer Key Switches on successive chromatic keys, so more keys are available for musical notes. The Action menu lets you choose either option. Furthermore, you can delete Key Switches simply by deleting the corresponding Input note in the list of Key Switch note assignments.
Note that both VSL and EastWest support Studio One Sound Variations natively, so they work the same way as PresenceXT. In addition to the features described above, when you load a preset, these instruments automatically transmit their Key Switch mapping (including names and symbols) to Studio One. This makes the process of using Studio One’s Key Switching talents even easier.
What About Other Instruments with Key Switches?
Some companies’ instruments (e.g., Kontakt, SampleTank) don’t support the Key Switching protocol that’s part of Studio One’s Sound Variations. But Studio One has a clever way to handle those instruments too—stay tuned for a future tip about this topic.
Finally, Sound Variations are about much more than just simplified Key Switching. To find out more, check out the clear, concise YouTube video by Lukas Ruschitzka.
Unlock New, Unique Vocoder Effects
By Craig Anderton
Usually, the Vocoder inserts into a track that provides the modulation, and the Vocoder’s sidechain receives the carrier. But why be normal? The same audio that provides the carrier can modulate itself. This technique unleashes a variety of processing options for drums, guitars, keyboards, percussion, and more. Even better, the Vocoder’s controls can tailor the results from subtle, to beautiful, to insane.
It’s difficult to explain the effect in words, so check out the audio examples. The first one has four measures of a loop without processing, then four measures of the loop vocoding itself.
The next audio example has one measure of a drum loop, then the drum loop vocoding itself.
The following example uses chorused guitar, with sawtooth Vocoder band automation to create a “rippling” effect. The vocoded sound goes through reverb as well.
The final example has two static Vocoder matrix settings with guitar. Static settings work well for instrument voicing, like changing the character of polysynth and pad sounds.
Channel Layout
Fig.1 shows the channel layout. This technique inserts the Vocoder in a bus, not a track. The audio track (in this case, Drums) has two pre-fader sends:
- One send goes to the Bus with the inserted Vocoder. This provides the Vocoder’s modulator.
- The other send goes to the Vocoder’s sidechain, to provide the carrier.
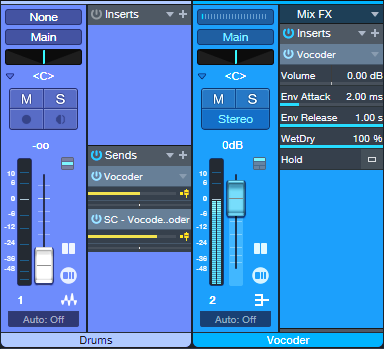
Figure 1: Channel layout. The Drums track provides the Vocoder’s modulator and carrier.
Vocoder Parameters
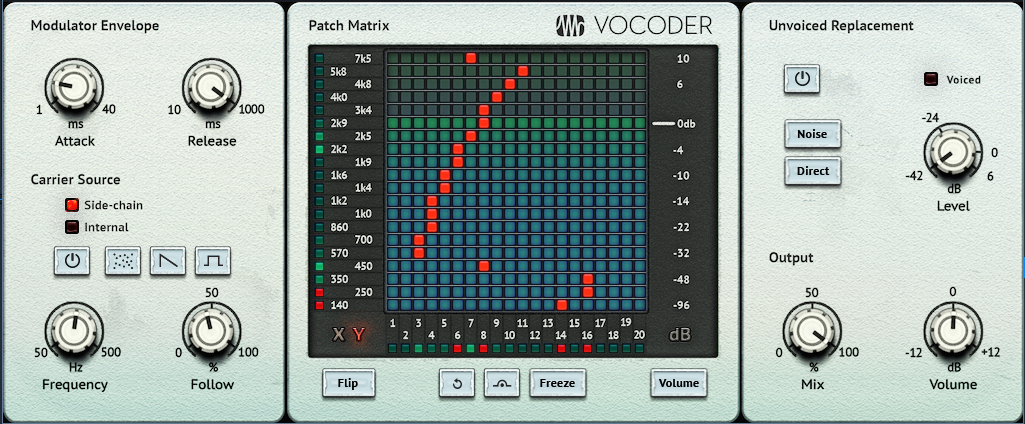
Figure 2: Typical Vocoder settings.
Start with the settings in fig. 2:
- The Carrier Source needs to be Side-chain.
- Shorter Release times add a percussive quality. Longer ones let the sound develop more.
- Mix sets the balance of the carrier and the modulated sound. Mix at 100 gives the most novel effects. Lower Mix values mix in more dry sound.
- Both Send levels from the Drums (or other audio track) affect the sound. Edit the sends to optimize the effect.
Automation, Too!
The vocoder matrix provides an almost unlimited tonal palette. The audio examples capture only a few of the options—just draw on the matrix, and listen to what happens. Also, note that automation can preserve your matrix doodling. Here are three examples of how to use automation:
- Automate the Flip button, and change it on the beat with drums and percussion loops. With the right settings, this can alternate between DJ-style “bottom” and “top” loops.
- Choose Write mode, and use the Vocoder matrix like an Etch-a-Sketch to create various tonal effects.
- Use the Paint tool to add periodic automation (square wave, sawtooth wave, etc.) to the matrix modulation tracks.
Whether used as a glorified tone control, a way to create rippling frequency changes, or to breathe new life into loops, vocoding a sound with itself is can give you new and surprising sounds.
A Guitar Solo Trick You’ve Never Heard Before
By Craig Anderton
Let’s get right to what this sounds like. It’s not quite feedback or tape reverse, it’s…well, listen to what it does in this blues guitar solo.
Even better, it’s ridiculously simple to create this effect:
1. Right-click on your guitar solo, and then choose Audio > Audio Bend > Split at Bend Markers.
2. Now each note is separated, as in the top of fig. 1.
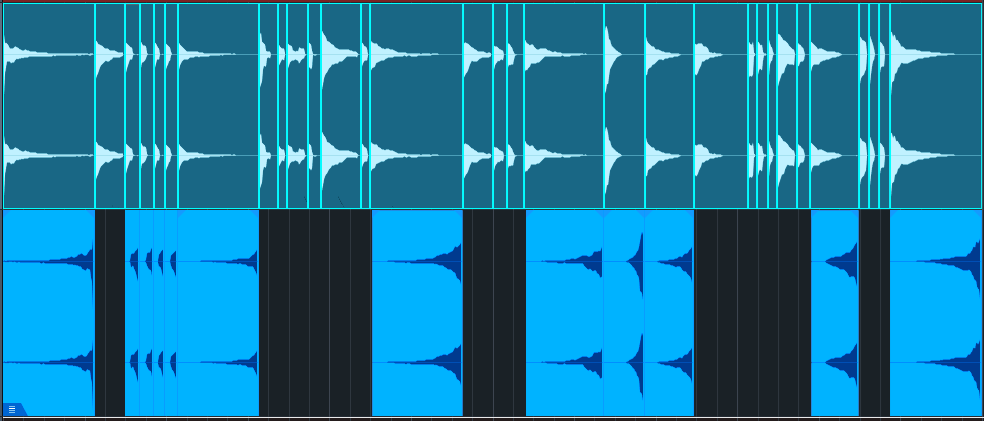
Figure 1: (Top) The original guitar solo in the audio example, after being split at bend markers. (Bottom) The track of reversed notes.
3. Create a new track.
4. Drag notes that decay to silence over a bit of time into the new track.
5. Select all the notes you copied to the new track. Choose Audio > Reverse Audio or type Ctrl/Cmd+R.
Additional Notes
- Adding reverb to only the reversed notes imparts an ethereal, feedback-type effect.
- When used selectively, this trick can also work extremely well with drum parts.
- Toward the beginning of the audio example, four short notes are also reversed. Doing so emphasizes these notes.
- The guitar sound in the audio example uses Ampire’s VC30 with the 2×12 VC 30 cab.
- So…am I crazy, or is this a really cool effect? Although I guess both could be true 😊
Add Punch & Snap to Drum Hits
By Craig Anderton
A Pro EQ3 stage’s gain can respond dynamically to incoming signal level, so that louder inputs kick the gain higher (or lower). But Studio One also has an Autofilter EQ, whose frequency responds to the incoming signal level. With a bandpass filter, louder signals can push the peak higher in frequency. This is particularly useful for adding “snap” to acoustic drum parts (especially snare and tom hits), for a more lively, animated feel—as you’ll hear in the audio example. The first half is an unprocessed drum loop. The second half uses the technique described in this tip.
This works with Studio One Artist, because all you need is the Autofilter. But this tip also includes an Extended FX Chain for Studio One Professional/+ users. The Macro Controls make editing a little more convenient.
Download the Extended FX Chain here
Initial Setup
1. The top Filter Type is Analog SVF 12. Set its slider to Bandpass. Bypass the lower filter.
2. To zero the Filter LFO sliders and the Resonance Env slider, ctrl+click on them. Set Env Attack to 5.00 ms and Env Release to 1.50 s. Make sure Auto is off.
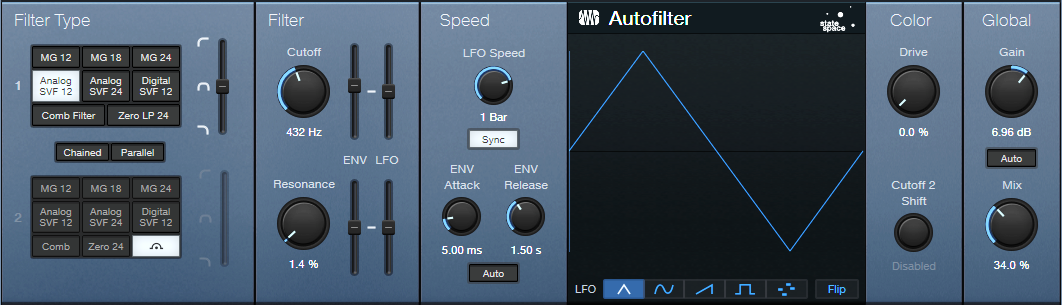
Figure 1: Typical Autofilter settings.
Tweak the Sound
It’s easiest to hear the results of your edits by temporarily turning the Resonance parameter to around 20% and the Mix control to 100%. This provides an exaggerated version of the filtered sound. However, note that the magic doesn’t happen until you mix this behind the dry audio. The effect’s goal is to reinforce the sound, not overwhelm it.
The Filter Cutoff and Cutoff Env slider interact. So, the best sound depends on getting a good relationship between the two. The optimum setting varies for different drums. Set the Filter Cutoff in the lower midrange, and use the Cutoff’s Env slider to add a little modulation. The Env slider is very sensitive, so you won’t need much modulation to vary the filter cutoff over a wide range. Be careful to avoid too much modulation. One advantage of using the FX Chain is that the Env control covers a small range of the envelope amount, which simplifies dialing in a setting.
Now you’ll hear a wah-like sound along with the drums. Next, mix the processed sound with the dry sound. Reduce the Resonance to around 5% or less. Turn Mix to 0.0% to hear the unprocessed drums. Bring up the Mix control to add the processed sound. The Mix control’s sweet spot is typically between 20% and 50%, but again, it varies for different drum sounds. Adjust Gain as needed.
Bear in mind that slight changes in the Filter Cutoff and/or Cutoff Env can make a major difference in the sound.
The Extended FX Chain
Fig. 2 shows the Macro Controls panel. This brings out the parameters mentioned above to cover a convenient range of values. In particular, the Envelope range isn’t as critical.
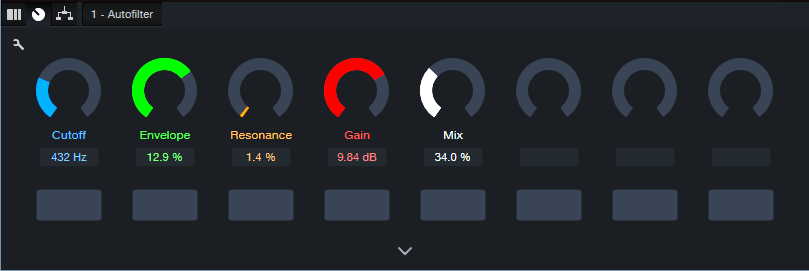
Figure 2: Macro Controls for the Add Snap to Your Snare.multipreset Extended FX Chain.
Pssst…Can You Keep a Secret?
Although this application is disguised as a way to enhance acoustic drums, it can also produce some really wild effects. With lots of processed sound, there’s a compression-like effect, and turning up the Resonance can get downright weird. It also works well on individual drums as well as drum buses and loops. So, don’t be afraid to experiment! You never know when dialing in the “wrong” settings will sound right.