Monthly Archives: September 2023
You Can Do Immersive Audio. Right Now.
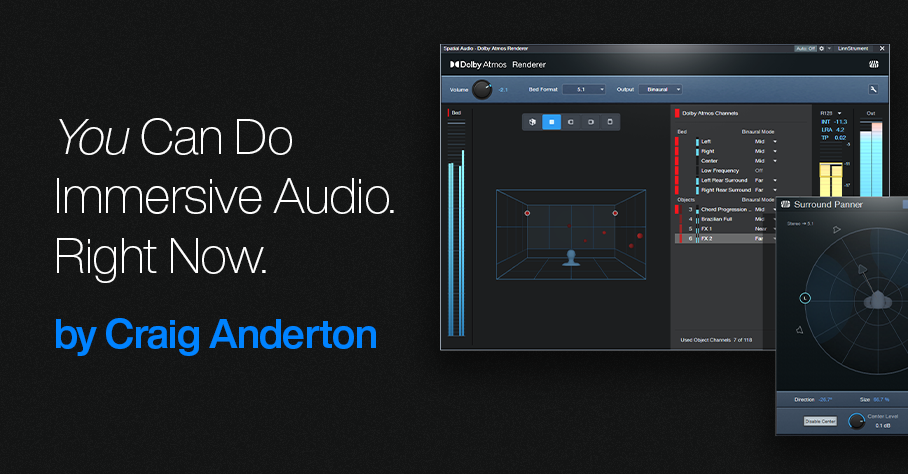
You don’t need a massive surround system with speakers wired all over your studio to create immersive audio. Whether you want surround or Dolby® Atmos mixes, Studio One Professional 6.5 delivers immersive sound over not just speakers, but the headphones you already have. Although it’s counterintuitive that headphones pressed up against your ears can deliver immersive audio, binaural audio makes it possible—here’s why.
Binaural recordings capture audio using a dummy human head with molded, lifelike ear canals. There are two mics, one for each ear. Whether sounds are reaching human ears or microphones in dummy ears, sounds coming from the sides or back have different levels, frequency responses, and delay times compared to those sounds reaching your ears from the front. Incorporating these differences in audio played back through headphones makes it sound like you’re hearing audio from front, sides, above, and behind you. In other words, listening to a binaural recording through headphones sounds like you’re hearing sound in a real-world space. Which brings us to…
Surround
Before headphones can reproduce the effect of hearing immersive audio, we need to create music in the studio that provides a feeling of space. One option is surround sound, which has been applied to movies for almost half a century.
Surround places sound all around you by supplementing stereo’s left and right channels with four more speakers: center channel for dialog, left rear, right rear, and a subwoofer for a movie’s bass requirements—explosions, earthquakes, and so on. When mixing music for surround, the center isn’t as important as it is for movies, because placing the same audio in the left and right channels creates a phantom center. Also, subwoofers are more about effects than reproducing notes. You can’t differentiate note pitches below 20 Hz anyway.
Mixing for surround is kind of like mixing for stereo, except you direct audio files to multiple speakers. So, panpots are now surround panners (fig. 1).
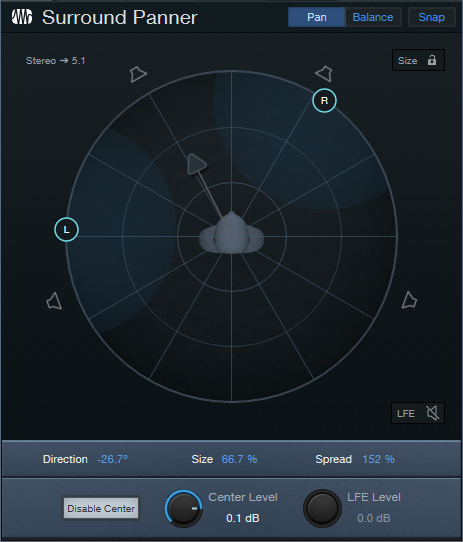
Figure 1: Studio One’s Surround Panner.
Enter Dolby Atmos
Dolby Atmos is a bigger leap from surround than surround was from stereo. First, Atmos adds an element of height. Now you’re not just surrounded by sound, but immersed in a space. Second, Atmos isn’t audio, like a WAV file. Unlike surround, where your choices of where to place sound are limited by the number of speakers, Atmos is about metadata that places mono or stereo sounds in a virtual 3D world.
The optimum way to experience Atmos is with speakers, although that involves some complications and calibrations. For example, to hear sound above you, your “height” speaker (often part of a soundbar) bounces sound off the ceiling. You also need a room that accommodates multiple speakers. However, there’s a brilliant alternative to speakers: binaural sound through headphones. You don’t need a complex multichannel setup, because thanks to binaural audio, you can mix with Atmos and hear the results over headphones. After creating your mix in Atmos’s 3D space, just render that as binaural audio, and voilà—people listening to your rendered mix over headphones will hear what you heard as you mixed it.
Check out Dolby’s short YouTube demo while listening on headphones, and you’ll hear how well an Atmos mix gives a sense of space with headphones.
What Atmos Metadata Defines
Atmos differentiates between a Bed and an Object. A bed is very much like a massive stem based on a conventional, channel-based mix with specific channel restrictions—like 2.0 (stereo), 5.1, or 7.1 surround. (Note that Atmos supports multiple beds.) Conceptually, this is no different than using the console in previous Studio One versions, except that the mix for the bed can include elements that go beyond stereo. These include multi-channel panning for 5.1 or 7.1 surround, and multichannel-friendly effects (fig. 2).
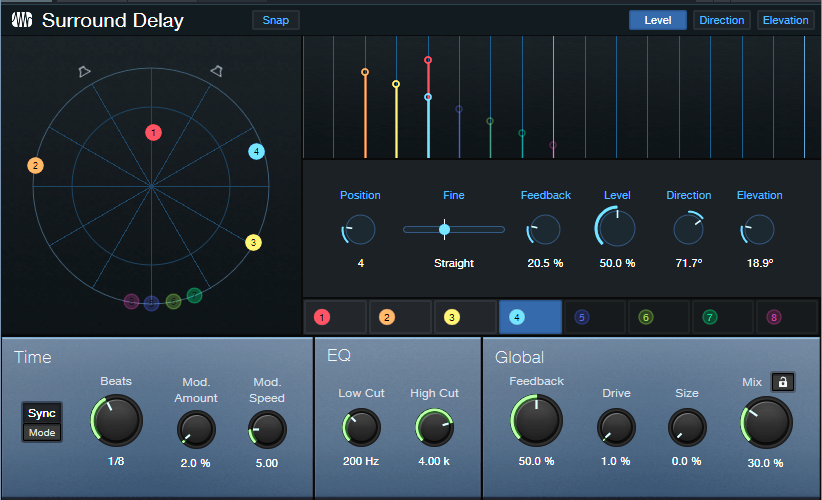
Figure 2: The new Surround Delay is pretty wild—just wait until you try it.
Spatially speaking, the bed has a fixed position in space. For example, consider a movie, where characters are seated in a casino. The bed would consist of the casino sounds in the background, people talking, gamblers, and wait staff moving around based on conventional surround panning.
An Object is discrete mono or stereo audio that can be placed anywhere in the 3D Atmos space. It’s not tied to particular channels, like the bed, but is “floating in space.” For example, in the casino example above, James Bond could be an object. He walks down a staircase in the back of the casino, saunters toward the front, moves to one side of a baccarat table, stands for a while to observe the action, and then walks over to where he can find a seat. Atmos’s dedicated object panning makes it easy to have objects move around in your 3D space (fig. 3).
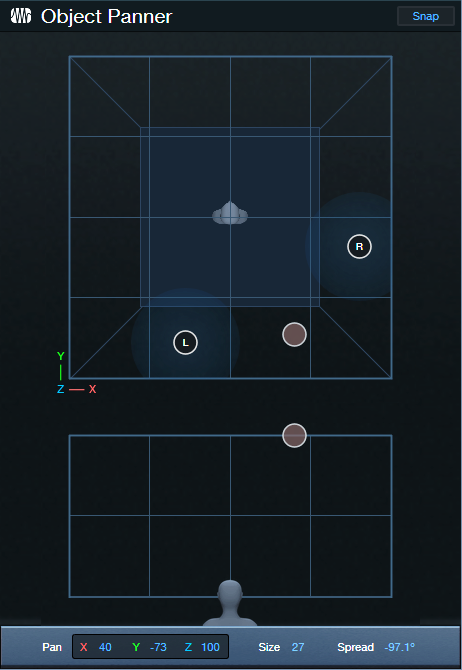
Figure 3: The Object Panner can move objects in a 3D space. You can automate these changes.
Another way to think of beds and objects is a band playing on stage. The drummer, bassist next to the drummer, keyboard player, and background singers remain at their spots on stage. They’re the bed. The lead singer who prances around and the lead guitarist who uses a wireless system to go into the crowd are the objects.
Metadata and Tracks
Atmos defines up to 128 tracks, including objects, to create the spatial field. For movies, this typically involves mixing 10 tracks for a 9.1 surround bed, and up to 118 objects. However, you can distribute the 128 tracks any way you want. This is where the metadata comes into play. It specifies location or panning data, including how fast an object moves, the level of the audio, and the like. Basically, it’s the audio’s traffic director, and routes audio in the 3D soundfield.
Rendering with Atmos
The Dolby Atmos Renderer included in version 6.5 complements and adds functionality to, not replaces, your usual workflow. It can convert your mix into any of several formats, including stereo or surround. For those without multi-channel speaker systems, Binaural Rendering (fig. 4) reproduces the effect of listening over a multi-channel loudspeaker system using headphones.
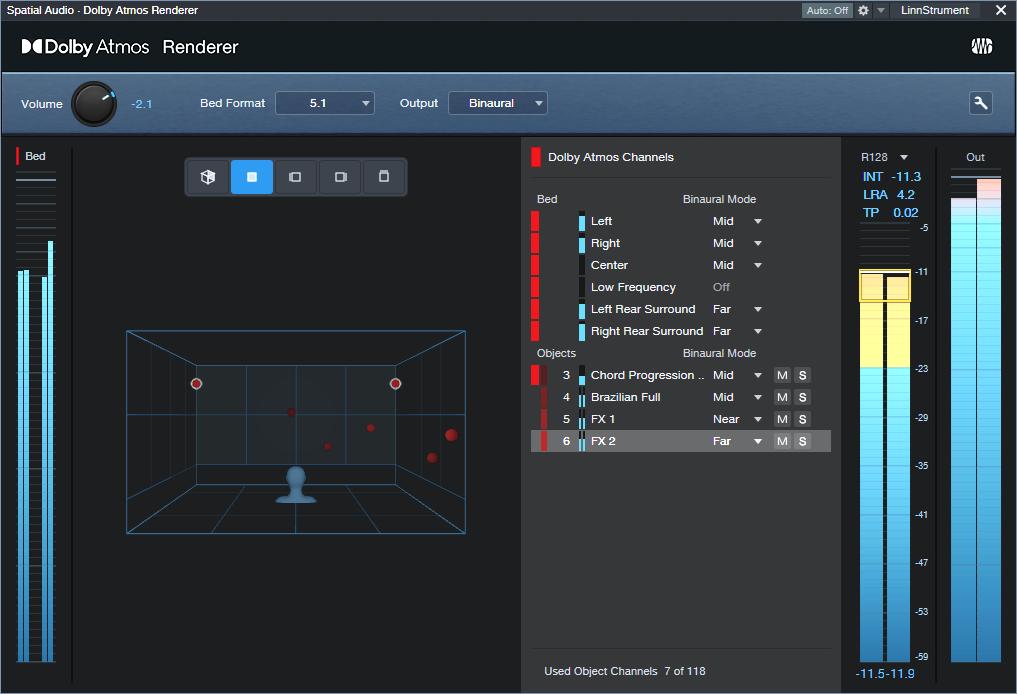
Figure 4: The Dolby Atmos renderer is rendering the mix to binaural.
And we’re back to where we started: just as binaural playback reproduces the spatial sense of a real-world 3D space, it can just as easily reproduce the spatial sense of a 3D space created with Atmos. With Studio One 6.5 and headphones, you can start playing with immersive audio now.
Better Ducking for Voiceovers & Podcasts
By Craig Anderton
Background music or environmental sounds are usually an essential part of commercials, movies, presentations, podcasts, and more. When doing vocal work for these kinds of projects, it’s crucial to attain the correct balance between the voice and the background.
The background level generally needs to duck under the voice when it’s present, and come back up when the voice is absent. With traditional ducking, a compressor processes the background. The voice provides a sidechain signal to the compressor. When the voice is present, it compresses the background. So, its level is lower than the voice.
This tip describes how to use dynamic EQ as an alternate, equally automatic approach that can produce more natural-sounding results. A standard compressor compresses all frequencies. Dynamic EQ can compress only the frequencies that affect vocal intelligibility…which is pretty cool.
First, Analyze Your Voice
Insert the Spectrum Meter in the voice track, after any EQ (if present). Use the settings shown in fig. 1. Play through the narration with the Spectrum Meter’s Hold parameter set to infinity. The resulting curve will show an overall average of the voice’s spectral energy. The cursor can identify where the peak responses occur. Most of my vocal energy falls in the 100 to 600 Hz range, with peaks around 1.3 and 3.5 kHz.
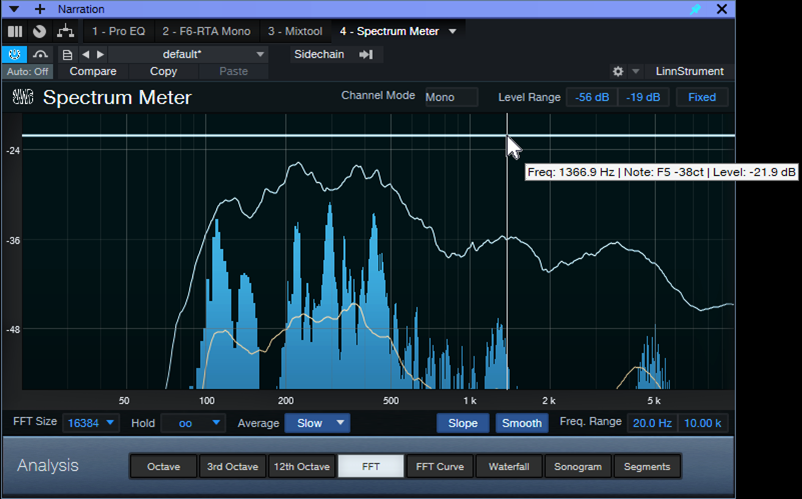
Figure 1: Spectral energy distribution for my voice. Placing the crosshairs over the curve shows the frequencies for various peaks.
Next, insert a Pro EQ3 in the soundtrack’s audio track. Add a pre-fader send to the voice track, and route the send to the Pro EQ3’s sidechain (fig. 2).
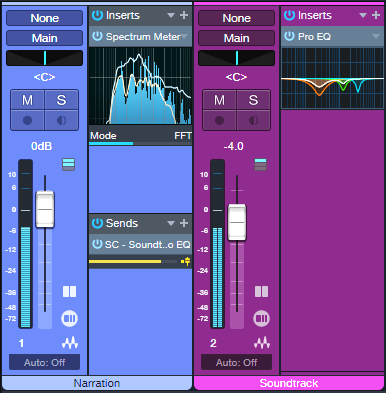
Figure 2: The voice drives the Pro EQ3’s dynamic response via a sidechain.
Finally, create a curve in the Pro EQ3 that’s the inverse of your vocal spectrum. Choose the frequencies you want to reduce, and the appropriate bandwidth for those frequencies. Set negative Range values to determine how much the frequency ranges will be cut. Then, set the Thresholds so that the voice’s peaks trigger the desired amount of gain reduction over that range. Now, the voice’s dynamics will push down the soundtrack’s frequencies that correlate with vocal intelligibility.
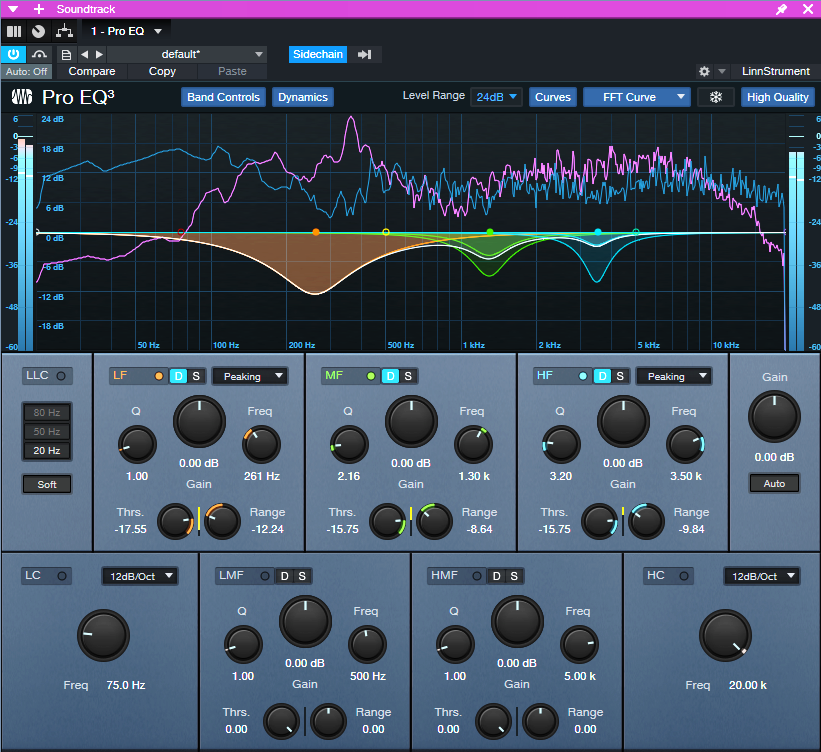
Figure 3: Typical dynamics settings for the Pro EQ3. The dips reduce peaks in the voice’s spectral energy distribution.
To quiet down all soundtrack frequencies when the voice is present, compression is still the best solution. But when you want a scalpel instead of a sledgehammer to produce a more natural ducking effect, try using dynamic EQ.
Now, if only the people mixing movie sound start doing this so we can understand the dialog…!
Steal Your Intro—with Ripple Editing
The post Mixing à la Studio One had a great response, so here’s another tip that relates more to making better music than making better-sounding music. We’ll focus on the all-important intro, because the most crucial part of any pop song is the first 10 seconds. If the intro doesn’t grab the listener’s attention, someone else’s song is only a click or two away.
However, you don’t always have to rack your brain coming up with a great intro—it might be hiding in plain sight. Stealing a bit of the chorus for the intro transfers some of the chorus’s excitement to the beginning. It also foreshadows where the song is heading. My most recent single, I Feel So Alive, used the following technique to replace a “meh” intro with something far more compelling.
Studio One’s Ripple Edit feature is ideal for chorus larceny. Ripple editing is a common video editing technique (see the blog post Basic Video Editing in Studio One). But let’s look at ripple editing with audio. Fig. 1 shows how ripple edits affect cuts.
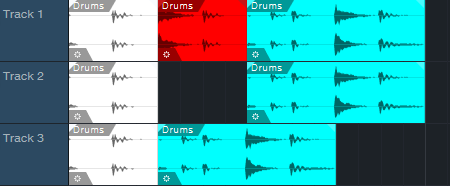
Figure 1: In track 1, the section in red is going to be cut. Track 2 cuts the section without using ripple editing, so the cut section disappears. Track 3 cuts the section but uses ripple editing. The part after the cut moves to the left, to close up the “hole” left by the cut.
Fig. 2 shows how ripple editing affects pastes.
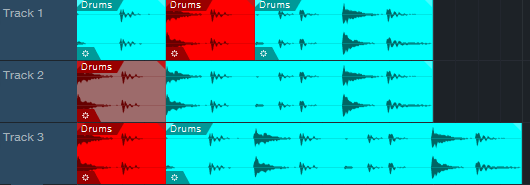
Figure 2: In track 1, the section in red is going to be copied at the beginning of the Event. Track 2 copies the section without ripple editing, so the copied section ends up on top of the original Event. Track 3 copies the section with ripple editing. Copying at the beginning of the Event moves the Event to the right, which opens up space for the copied audio.
Let’s Use Ripple Editing to Steal a Chorus
I often do song intros last. By then the song has solidified, so the intro can provide an appropriate introduction. Fig. 3 shows a song’s original arrangement. It started with two verses (shown as Verse in the Arranger track), followed by a chorus. It needed some kind of intro. At this point, I’d normally choose Edit > Insert Silence at the beginning, add enough measures for an intro, and come up with something suitable.
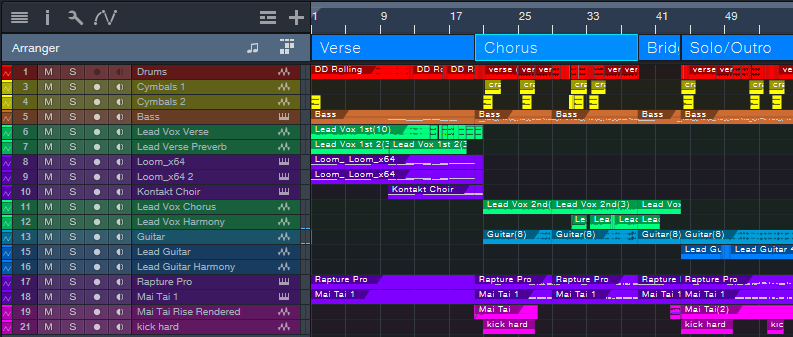
Figure 3: The original song arrangement. It needed a compelling intro before the verse.
This song contrasts soft verses with a hard rock chorus. No matter what I did, creating an intro based on the verse always seemed too chill to qualify as an exciting intro. Then when the verse went into the chorus, there was a sort of “where the heck did that come from?” effect. So, I stole the first part of the chorus by:
1. Using the Arranger track to cut the chorus in half.
2. Enabling Ripple Edit (Ctrl+Alt+R).
3. Alt+dragging the first part of the chorus to copy it at the song’s beginning (fig. 4).
The Ripple Edit function pushed the song to the right to create a space for the “half-chorus.” Now it could provide the intro. (Instead of using Ripple Edit, you could cut the chorus section, copy, select all, move the song to the right, and paste. However, Ripple Edit is faster.)
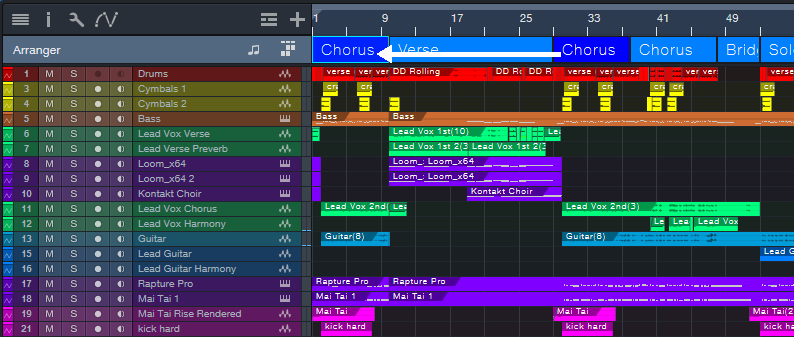
Figure 4: The first half of the chorus is now providing the song’s intro. Ripple editing has pushed the original song start to the right, to make room for the “half chorus.”
After copying and moving the first part of the Chorus, I renamed it to Intro. Additional edits ensured that the music in the new intro would lead smoothly into the verse (fig. 5).
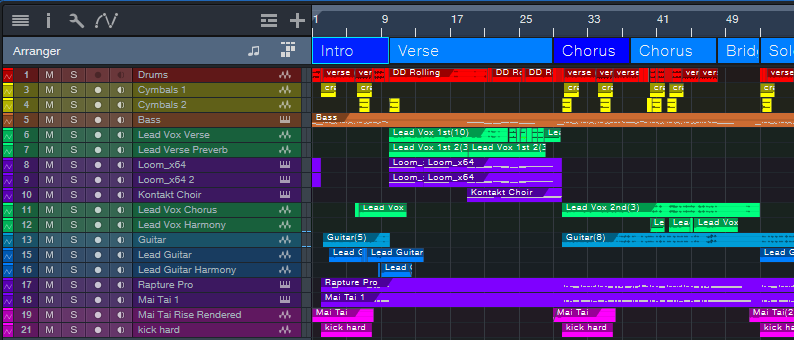
Figure 5: The final arrangement.
The main edit was replacing the leftover lead vocal from the chorus. Fortunately, a vocal phrase from later in the song sang the title. After filtering it heavily and adding some echo, it had an intriguing vibe. It also exposed the listener to the title (repetition can be good!). Adding a short lead guitar part foreshadowed the lead that comes in at the end. Moving some drum beats around, and tweaking the bass line, completed the needed edits to create an intro.
You can hear the results in I Feel So Alive, which is posted on my YouTube channel. The intro plays the “stolen” part of the chorus before going into the verse. If you keep listening past the verse, you’ll hear the chorus come in—as previewed by the intro.
Finally, let’s close with an important tip: Whenever you use Ripple Edit, turn it off as soon as you’ve made your edit! If you forget and leave it on, the next time you cut or paste, you may be dealing with unintended consequences.
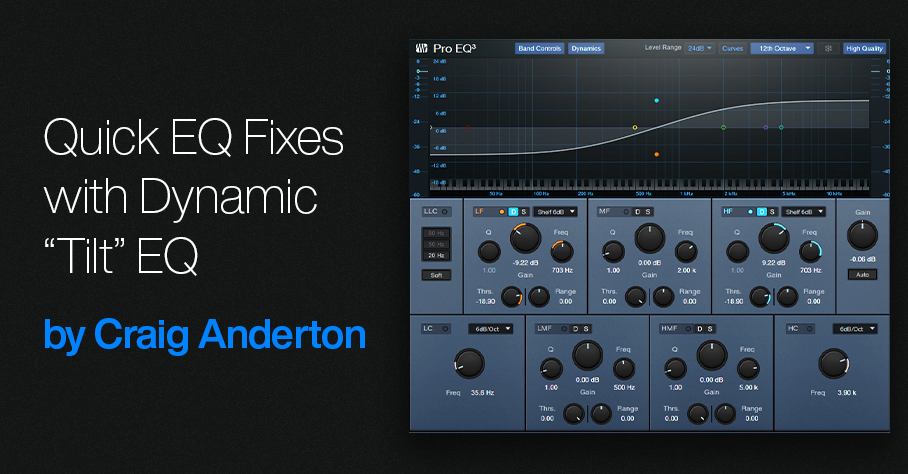
Quick EQ Fixes with Dynamic “Tilt” EQ
This FX Chain’s inspiration is the Tilt filter circuit created by Tonelux® designer Paul Wolff. First used in the Tonelux MP1A mic preamp, the Tilt filter has since been virtualized by Softube and Universal Audio. However, this tip’s FX Chain not only creates the traditional tilt curve, but uses the Pro EQ3’s dynamic response to add more flexibility to the tilt EQ concept.
How It Works
The Pro EQ3’s low- and high-frequency shelf EQ stages have 6 dB slopes. Turning the Tilt macro control clockwise turns up the high-shelf Gain, while simultaneously turning down the low-shelf Gain (fig. 1). Turning Tilt counter-clockwise does the reverse. The original hardware unit tilts around a fixed 700 Hz frequency, but this FX Chain has a variable center frequency.
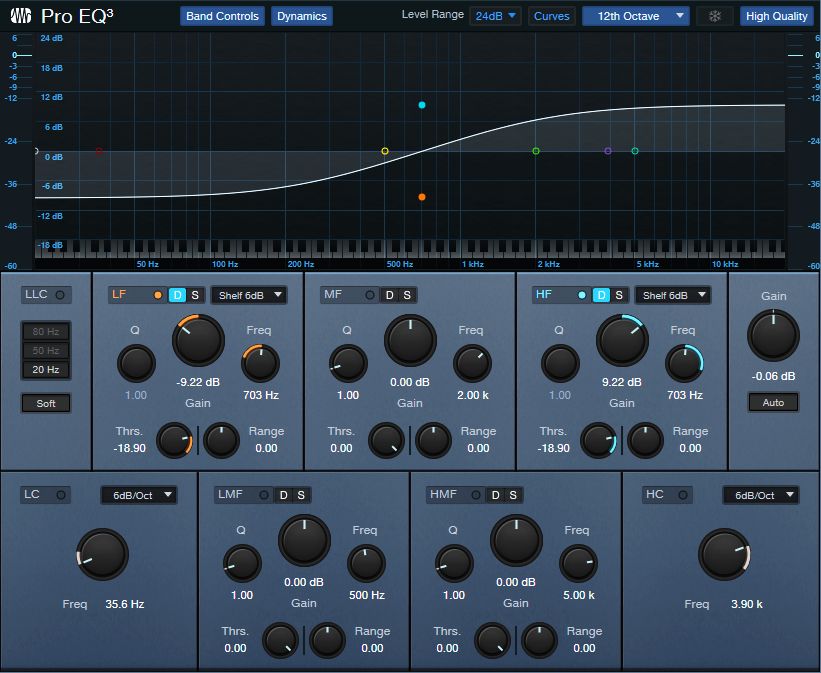
Figure 1: This curve is the result of setting the Tilt control full clockwise, which boosts treble and cuts bass.
With Range at 0.00, tweaking is easy. Center the Tilt macro for a flat response. Rotate the macro clockwise for a brighter sound, or counterclockwise for a warmer sound. This may seem simplistic, but the tilt filter concept is a brilliant design. Even with minimal effort, your tweaks will often end up sounding “just right.”
Having the EQ respond to the input signal’s dynamics makes this FX Chain different from a standard Tilt filter. Threshold sets the level above which the dynamics-based changes kick in. With Range at center, the audio’s dynamics have no effect. Turn Range clockwise for more treble and less bass when the input exceeds the Threshold, or counterclockwise for less treble and more bass. Dynamics control allows using extreme tilt settings for softer signals, but the boosts and cuts needn’t be excessive with louder input signals.
But Wait, There’s More!
The virtualized version of the Tilt EQ hardware incorporates a highpass and lowpass filter, each with a 6 dB/octave slope. It’s easy to emulate these filters with the Pro EQ’s Lo Cut and Hi Cut filters (fig. 2). Each filter has its own macro control for frequency, and an in/out button. Both filters share the Filter Slopes macro control.
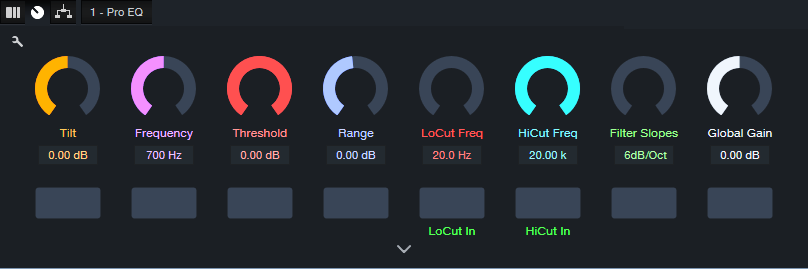
Figure 2: Macro controls for the Dynamic Tilt EQ.
I’m a sucker for simple devices that work well, and the Tilt Filter EQ is no exception. Try it—and see if you don’t agree this ultra-simple FX Chain is an ideal solution for a variety of EQ scenarios.
Create Authentic, Customizable EDM Pumping with X-Trem
But first, some breaking news: Version 1.5 of The Huge Book of Studio One Tips and Tricks is now available from the PreSonus shop. Like previous versions, it’s a free update to those who already own the book. V1.5 includes 743 pages with over 280 innovative tips, 156 free presets, 175 audio examples, and incorporates the latest changes in Studio One 6. Many previous tips have been updated, and the audio examples are better categorized. For new owners, the price is $19.95. Okay…on to the tip!
The EDM “pumping” effect has been popular for over a quarter-century. Traditionally, this effect inserts a compressor in the channel with the audio you want to pump. Then, the kick or another rhythmic element feeds the compressor’s sidechain and triggers compression. The tip Pump Your Pads and Power Chords describes how to create this effect. In this audio example, you can hear the pad in the back pumping behind a Mai Tai solo. A more limited option was presented in a tip that didn’t require a sidechain.
Setting X-Trem to a positive-going sawtooth eliminates the need for the sidechain+compressor combination. However, it doesn’t produce an authentic pumping sound. With traditional pumping, the waveform that does the pumping depends on the compressor’s setting. Typically, an exponential attack settles into a sustained section (fig. 1).
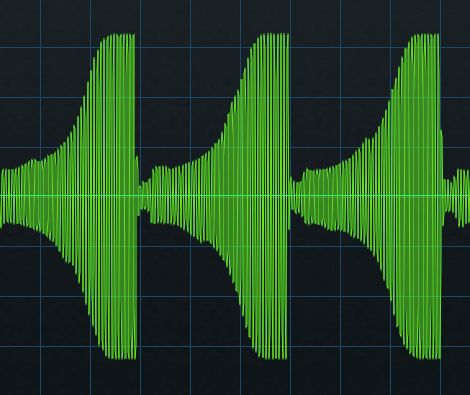
Figure 1: Studio One’s (vastly underrated) Scope plugin shows the amplitude of the pumping curve created by a compressor/sidechain combination.
The X-Trem’s sawtooth has a linear rise time (fig. 2). This doesn’t sound like traditional pumping.
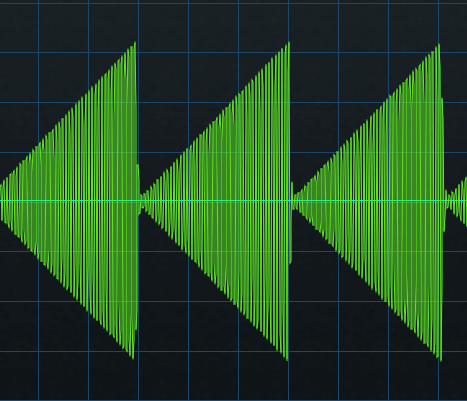
Figure 2: The X-Trem’s Sawtooth waveform.
Although you can use a single X-Trem’s step waveform to create an LFO shape that resembles compressor/sidechain-based pumping, you can hear the transition between the 16 steps. Fortunately, using two X-Trems in series can create an authentic pumping sound. The first X-Trem generates a sawtooth wave, while the second X-Trem shapes the sawtooth into a smoother, more accurate modulation waveform (fig. 3). You can even customize the pumping’s shape, like you would by altering a compressor’s controls.
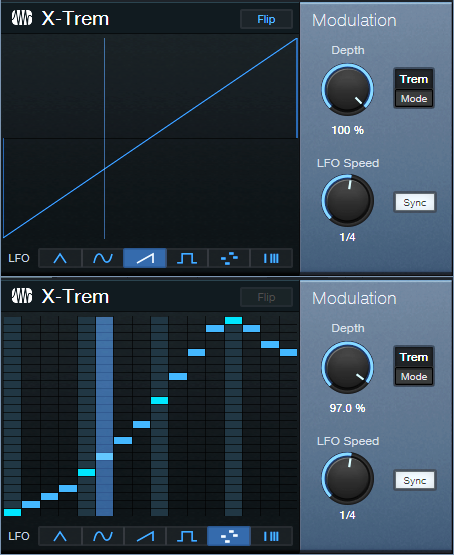
Figure 3: The secret to X-Trem-based pumping is using two in series.
This creates a waveform like fig. 4. The ultimate shape depends on how you set the levels of the 16 steps in the second X-Trem. For example, in my ideal world the pumping would start from a minimum level—so that’s what it does.
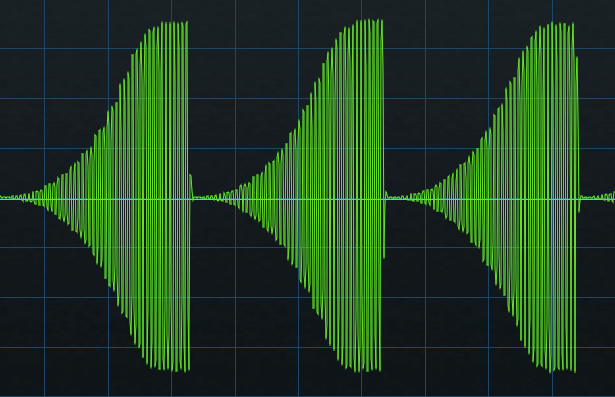
Figure 4: The waveform created by two X-Trems in series emulates the shape of sidechain+compressor-based pumping.
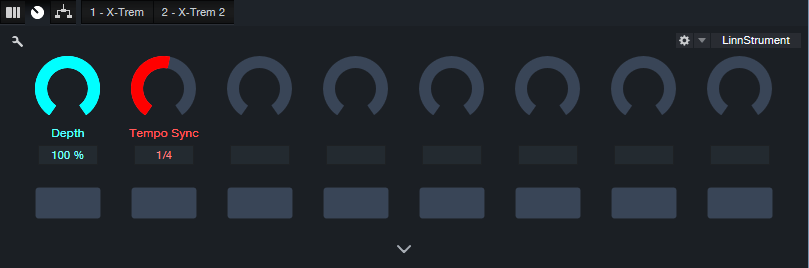
To make using the EDM Pumper even easier for Studio One Professional users, there’s a download link to a Pumper FX Chain. Fig. 5 shows the control panel.
Furthermore, users of Studio One Artist or Professional can download five X-Trem presets. These create pumping curves with five different shapes (Pumper Wave 1.preset is the one I use the most.) So, now it’s easier than ever to pump anything—without needing a complex sidechain+compressor setup.
Download the EDM Pumper.multipreset FX Chain here.
Download the folder with five X-Trem Presets here.