Author Archives: Craig Anderton
Mapping Another Program’s Shortcuts to Studio One
Studio One comes with keyboard shortcut mappings for Cubase, Logic, and Pro Tools, so those switching to Studio One can use the keyboard shortcuts with which they’re familiar—as well as navigate the trial version without having to learn a lot of new shortcuts. To add to that list, I mapped Sonar’s shortcuts to Studio One; these mappings are included as an alternate key scheme in the most recent update. What I learned in the process might be useful if you want to create mappings for a program you were using prior to migrating to Studio One.
Spoiler alert: Ultimately I think it’s best to learn Studio One’s keyboard shortcuts unless you use multiple DAWs and don’t want your brain to explode learning all the variations. Many of Sonar’s shortcuts are based on the traditional Windows approach of using control keys to navigate quickly through menus rather than calling up functions directly. Also, many functions for which Sonar has few or no keyboard shortcuts (e.g., automation) have shortcuts in Studio One, and assigning some shortcuts to Sonar can overwrite useful Studio One shortcuts, so you need to create a new shortcut for any you remove. For example, Studio One’s reverse audio shortcut is Ctrl+R—the same as Sonar’s shortcut to refresh the Media Browser. A Sonar user will more likely want the refresh function, although that means creating a new shortcut for reverse audio.

Another example is for Sonar users who miss its ProChannel. Yet Studio One has a functionally similar Console feature when you open the channel—you see what effects are inserted, and a thumbnail of their settings. So I mapped Studio One’s Open Channel to Ctrl+I (the screenshot shows assigning this in the process of creating the key scheme), Sonar’s shortcut for opening the ProChannel. Although this overwrote Studio One’s shortcut for Invert Selection, I think Sonar users will be willing to sacrifice Invert Selection for having something similar to opening up the ProChannel. The shortcut I is another conflict, which opens Sonar’s Inspector. In Studio One, I enables auto-punch, which you can also enable by clicking on a transport button—but since Sonar users have always enabled auto-punch via a Control Bar button anyway, it made sense to give up I for the Inspector.
Then there are the design differences. For inserting effects in clips (Events), Sonar includes an FX rack that behaves like the one in its Track or Console view. In Studio One, the equivalent appears in the Event’s Inspector. However, having already mapped a Sonar shortcut to open the Inspector, I assigned Studio One’s Insert Event FX to Sonar’s Open Clip FX Rack shortcut. Sonar users can use that to insert an Event FX quickly, and hopefully they’ll realize they can open up the Inspector to see all the options for Event FX.
Nudge is another example of accommodating a common Sonar function. In Studio One, the number keypad is more for navigation and marker recall and with Sonar, nudge operations. So I assigned Sonar’s “greatest hits” nudge functions to the keypad.
Then again, sometimes you get lucky. For example, Studio One’s Audio Bend panel relates to what Sonar’s AudioSnap does, so I just assigned the AudioSnap shortcut to it. And while there’s a shortcut to hide selected tracks in Studio One, I find Studio One’s Track List the most convenient way to manage track hide/show. Sonar’s Track Manager handles show/hide well, so I used its shortcut to open the Track List. Another sneaky trick is that
Studio One doesn’t have a dedicated Navigator pane like Sonar, but if you reduce the track heights to the absolute minimum, the visual representation of a song is very similar.
Studio One doesn’t have screensets per se, but the five Console Scenes for which shortcuts exist are similar, so I assigned number keys 1-5 (which Sonar uses for screensets) to the scenes. Only problem is the tool shortcuts also use number keys, so I changed them to Ctrl+Shift+[function key] because Sonar users are familiar with using function keys to call up tools.
Finally, note that Sonar has many functions that aren’t assigned to default keyboard shortcuts, yet some of these functions do have default keyboard shortcuts in Studio One. So if you’ve created your own custom shortcuts in Sonar or another DAW, if Studio One has a similar function it may already have a default shortcut. If not, you can create similar (if not identical) custom shortcuts in Studio One. Another nice touch: When you open the list of keyboard shortcuts from Help, they reflect whichever mapping you’ve chosen—not just the Studio One defaults. And don’t forget you can create Macros to re-create another DAW’s workflow in Studio One, and then assign the Macro to a shortcut.
Still, after spending way too many hours going over the similarities and differences between Sonar’s and Studio One’s keyboard shortcuts, I have to say that I’ll be learning Studio One’s shortcuts. It’s clear a lot of thought went into choosing and assigning them, so I believe a little effort spent now will save a lot of time overall. My recommendation for learning shortcuts is to print out the list, and learn a new one every few days—you won’t regret it.
Click here for further notes on Sonar’s Shortcut Mappings in Studio One. [PDF]
Friday Tip of the Week: Fun with Tempo Tracks
Fun with the Tempo Track
Creating tempo changes can add a significant amount of emotional impact to a piece of music, and you can create these changes with the Tempo Track. MIDI will follow tempo variations, as will Audio Tracks in Timestretch mode and also, Acidized WAV clips. To open the Tempo Track, click the Clock icon in the Track Column.
It’s important to remember that tempo changes remain in effect until any subsequent tempo changes, and the Transport tempo indicator always reflects the current tempo. Note that unlike other programs where the timeline doesn’t change, a very useful Studio One feature is that the timeline reflects tempo changes. For example if you change two measures to half the original tempo, those two measures will last twice as long graphically as the other measures in the timeline. This also means that if you draw a linear series of tempo changes (see below), they will appear to have a curve but the changes themselves are still linear—it’s just that the timeline display reflects whether the tempo is speeding up or slowing down. That’s pretty cool.
So why would you change the tempo?
I was hoping you’d ask…
I mainly use three types of tempo changes, because each has their use.
Short changes. These happen over a short range, like slowing down the tempo slightly during the measure before going into the big chorus, or speeding up a little during a couple measures before a solo comes to an end.
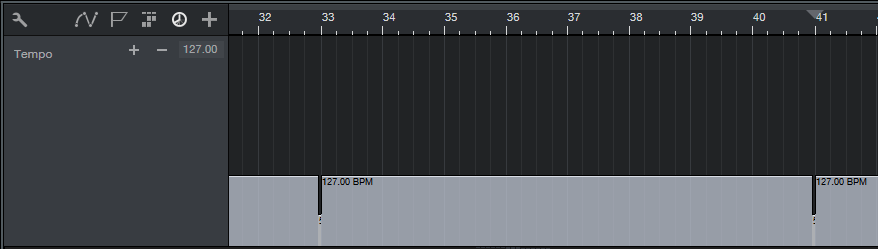
Long-range changes. Here’s a good example of why tempo changes can be really handy. For a particular set, there was a song at 127 bpm followed by one at 133.33 bpm (locked groove tempo). I started a linear tempo change about 2/3 of the way through the first song, slowly increasing the tempo to 133.33. It took long enough that you didn’t really notice the tempo was changing, but it added a feeling of anticipation and segued perfectly into the second song.
It’s easy to create a linear series of tempo changes. Choose the tempo change resolution with the Quantize parameter (it doesn’t matter if Snap to grid is on or off). Hold [Option/Mac] or [Alt/Windows], click, and draw the line. While still holding down the modifier key, you can drag up or down to change the final tempo. Holding the shift key gives 0.1 BPM resolution. For finer resolution, place the cursor in the section containing the tempo change, and enter the number in the Tempo Track field. (Note that the screen shot doesn’t show the fine resolution of the tempo changes, but they’re there.)
“Time Traps.” Suppose you want to add a short, almost subliminal “dramatic pause” at some point, like just before some booming snare drum hit signals the start of the chorus. Although you could shift your tracks over a bit or insert some space, it’s much easier just to do a radical tempo drop (e.g., from 120 to 50 bpm) for a fraction of a beat where you want the dramatic pause. This sloooooows everything down enough to add the pause. (Ideally, you’d want something that sustains over the pause—silence, a pad, held note, etc. but that’s commonly what will be happening anyway.)
Studio One has a neat trick for doing these: you can edit non-consecutive tempo changes simultaneously. This is important because the amount of tempo change is pretty crucial to get the desired effect, so if you want to add more than one time trap in a song, adjusting one can adjust them all. Simply use the Arrow tool to click and drag over the tempo change you want to edit, then hold down Shift and use the Arrow tool to click and drag over any additional tempo changes you want to edit. Editing one edits them all.
Modifying the tempo track can allow a song to “breathe,” like what happens when musicians play together. If you haven’t experimented with subtle (or even dramatic) tempo changes, you’re in for a treat when you do.

Friday Tip of the Week: Upsampling in Studio One, Part 2
In the previous Friday Tip of the Week, we covered how recording soft synths and amp sims at higher sample rates (like 96 kHz) can give higher sound quality in some situations. However, we also discussed some issues involved with recording at higher sample rates that aren’t so wonderful.

So this week, it’s time for a solution. Offline upsampling to higher sample rates can let you retain the CPU efficiencies of running at a lower sample rate, while reaping the sonic benefits of recording at higher sample rates… and you can do this in Studio One by upsampling in a separate project, rendering the file, and then importing the rendered file back into your original project.
But wait—wouldn’t you lose the benefits of upsampling when you later convert the sample rate back down to 44.1 kHz? The answer is no: Rendering at the higher sample rate eliminates any foldover distortion in the audio range, sample-rate converters include an anti-alias filter to avoid this problem, and 44.1 kHz has no problem playing back sounds in the audio range.
However, note that upsampling can’t fix audio that already has aliasing distortion; upsampling audio to 96 kHz that already contains foldover distortion will simply reproduce the existing distortion. This technique applies only to audio created in the computer. Similarly, it’s unlikely that upsampling something recorded via a computer’s audio interface will yield any benefits, because the audio interface itself will have already band-limited the signal’s frequency range so there will be no harmonics that interfere with the clock frequency.
UPSAMPLING IN STUDIO ONE
We’ll assume a 44.1 kHz project sampling rate, and that the virtual instrument’s MIDI track has been finalized but you haven’t transformed it to audio yet. Here’s how to upsample virtual instruments.
- Save the virtual instrument preset so you can call it up in step 5.
- Select the entire MIDI clip driving the instrument, and drag it into the Browser (or right-click on the MIDI clip, and choose Export Selection). In either case, place the MIDI .musicloop so it’s easy to find later.
- Close the existing Song.
- Create a new Song at a higher sample rate, like 88.2 or 96 kHz.
- Insert the virtual instrument you used previously, and then load its preset.
- Drag the MIDI .musicloop clip into the Instrument track.
- Right-click on the track header and choose Transform to Audio Track. You can uncheck everything in the dialog box.
- Drag the audio file into a findable location in the Browser, then close the Song.
- Open the original Song with the 44.1 kHz sample rate.
- Import the upsampled audio; Studio One will convert the sample rate back down to 44.1 kHz automatically. Use this as the transformed instrument audio instead of what you would have obtained in the 44.1 kHz project.
That’s all there is to it. If you want to upsample an amp sim, the process is similar: export the (presumably guitar) track, save the amp sim preset, render at 96 kHz, then import the rendered file into the 44.1 kHz project.
FINAL THOUGHTS
Listen to the audio example “Upsampling with Amp Sim,” which plays the sound of an amp sim at 44.1 kHz and then after upsampling to 96 kHz. The difference isn’t as dramatic as last week’s synth example, but you’ll still hear that the upsampled version is clearer, with more presence.
Do bear in mind you may not want the difference caused by upsampling. When I did an upsampling demo at a seminar with a particular synthesizer, most people preferred the sound with the aliasing because the upsampled sound was brighter than what they expected. However when I did upsampling with an amp sim, and with a different synth, the consensus was that the upsampled version sounded much better. Regardless, the point is now you have a choice—hear the instrument the way it’s supposed to be heard to decide if you like that better, or leave it as is. After all, distortion isn’t necessarily that horrible—think of how many guitar players wouldn’t have a career without it!
Although upsampling isn’t a panacea, don’t dismiss it either. Even with synths that don’t oversample, upsampling may make no audible difference. However, sometimes synths that do oversample still benefit from upsampling; with some sounds, it can take 4x or even 8x oversampling to reproduce the sound accurately. As always, use your ears to decide which sound works best in your music.
Friday Tip of the Week: Upsampling in Studio One, Part 1
The controversy about whether people can tell the difference on playback between audio recorded at 96 kHz that’s played back at 44.1 kHz or a higher sample rate (such as 96 kHz) has never really been resolved. However, under some circumstances, recording at a higher sample rate can give an obvious, audible improvement in sound quality. In this week’s tip we’ll investigate why this happens, and in next week’s tip, tell how to obtain the benefits of recording at a higher sample rate in Studio One with 44.1 and 48 kHz projects.

REALLY? CONVINCE ME!
A Song’s sample rate can make a difference with sounds generated “in the box,” for instance using a virtual instrument plug-in that synthesizes a sound, or distortion created by an amp simulator. Any improvement heard with high sample rates comes from eliminating foldover distortion, also known as aliasing.
Theory time: A digital system can accurately represent audio at frequencies lower than half the sampling rate (e.g., 22.05 kHz in a 44.1 kHz project). If an algorithm within a plug-in generates harmonic content above this Nyquist limit—say, at 40 kHz—then you won’t hear a 40 kHz tone, but you will hear the aliasing created when this tone “folds down” below the Nyquist limit (to 4.1 kHz, in this case). Aliasing thus appears within the audible range, but is harmonically unrelated to the original signal, and generally sounds pretty ugly.
Foldover distortion can happen with synthesized waveforms that are rich in harmonics, like pulse waves with sharp rise and fall times. (Amp sims can also be problematic; although their harmonics may be weak, if you’re applying 60 dB of gain to create overdrive or distortion, the harmonics can be strong enough to cause audible aliasing).
SO IS IT A PROBLEM, OR NOT?
Not all plug-ins will exhibit these problems, for one of four reasons:
- The audio isn’t rich enough in harmonics to cause audible aliasing.
- The plug-in itself can oversample, which means that as far as the plug-in is concerned, the sample rate is higher than that of the Song. So, any foldover distortion occurs outside the audio range.
- The project sample rate is high enough to provide the same kind of environment as oversampling.
- The plug-in designers have built appropriate anti-alias filtering in to the algorithms.
Many modern virtual instruments and amp sims oversample, and DAWs can handle higher sample rates, so you’d think that might be the end of it. Unfortunately, there can be limitations with oversampling and higher project sample rates.
- Recording an entire project at a higher sample rate stresses out your computer more, reduces the number of audio channels you can stream, and won’t allow you to run as many plug-ins.
- Oversampling requires more CPU power, so even if all your instruments are oversampling internally, you may not be able to use as many instances of them.
- Although some instruments may perform 2x oversampling, that still might not be sufficient to eliminate aliasing on harmonically rich sources—so oversampling an oversampled instrument can still make a difference.
Furthermore, with plug-ins that oversample, the sound quality will be influenced by the quality of the sample-rate conversion algorithms. It’s not necessarily easy to perform high-quality sample-rate conversion: check out comparisons for various DAWs at http://src.infinitewave.ca (where, incidentally, Studio One rates as one of the best), and remember that the conversion algorithms for a plug-in might be more “relaxed” than what’s used in a DAW.
So what’s a musician to do? In next week’s Friday Tip of the Week, we’ll cover how to do upsampling in Studio One to reap the benefits of high-sample-rate recording at lower sample rates. Meanwhile, if you still need to be convinced recording at different sample rates makes a difference, check out this audio example of a synthesizer recorded in Studio One first at 44.1 kHz, and then at 96 kHz:
Friday Tip of the Week: A Sweeter, Beefier Ampire
A Sweeter, Beefier Ampire
Let’s transform Ampire’s Crunch American from a motor scooter into a Harley. Here’s our point of departure:
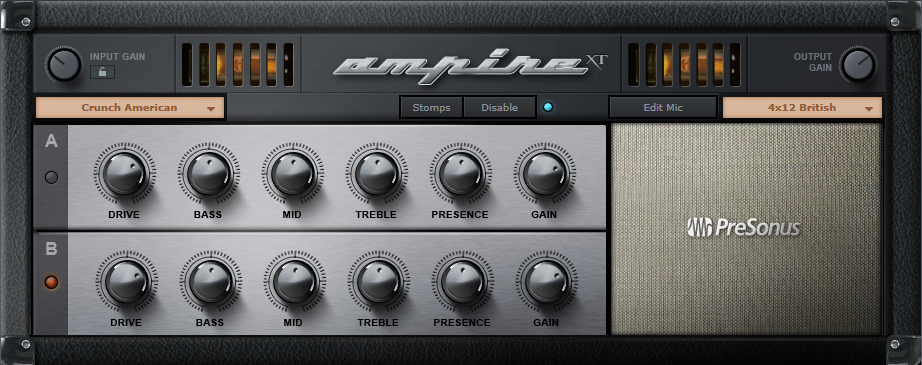
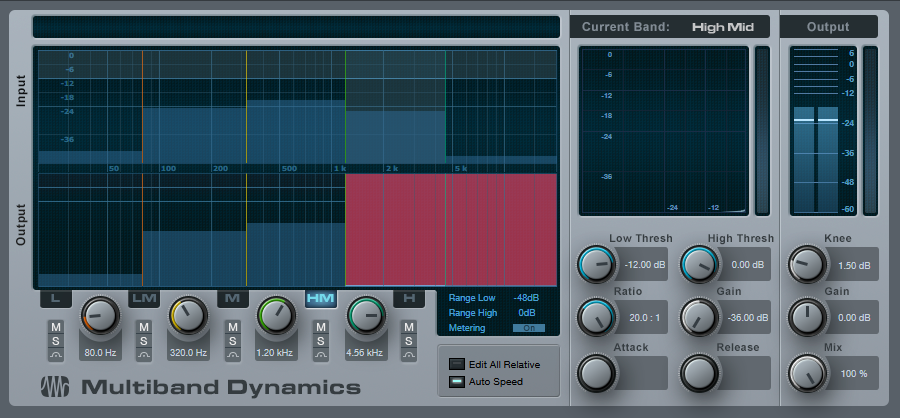
Insert the Multiband Dynamics before Ampire. The default patch is fine, but drag the High Mid and High gain and ratio settings down all the way. The goal here is to add a bit of compression to give more even distortion in the mids and lower mids but also, to get rid of high frequencies that, when distorted, create harsh harmonics.
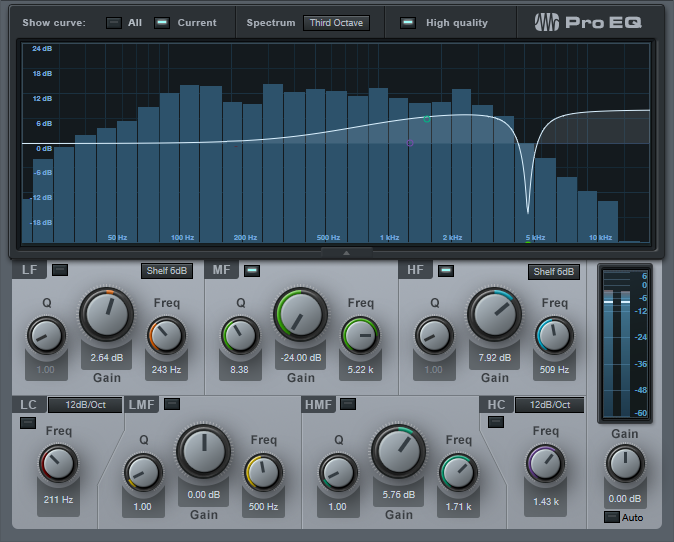
After Ampire, insert the Pro EQ. The steep notch around 8 kHz gets rid of the whistling sound you’ll really notice in the before-and-after audio example, while the high-frequency shelf adds brightness to offset the reduced high frequencies going into Ampire. But this time, we’re increasing the “good,” post-distortion high frequencies instead of the nasty pre-distortion ones.
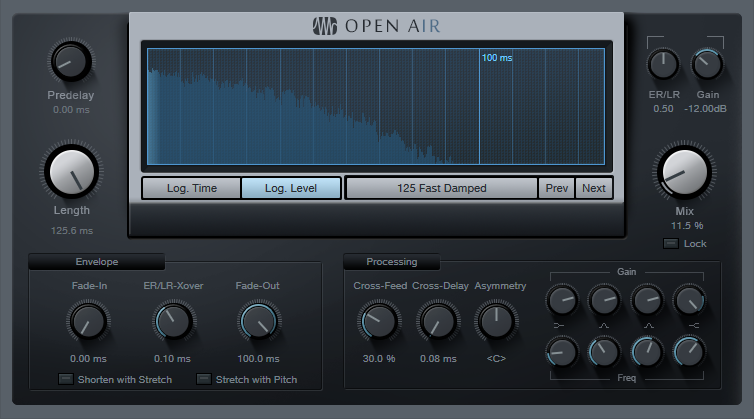
Those two processors alone make a big difference, but let’s face it—people don’t listen to an amp with their ear a couple inches from the speaker, but in a room. So, let’s create a room and give the sound a stereo image with the Open Air convolution reverb. I’ve loaded one of my custom, synthetic IR responses; these are my go-to impulses for pretty much everything I do involving convolution reverb, and may be available in the PreSonus shop someday. Meanwhile, feel free to use your own favorite impulses.
Of course, you can take this concept a lot further with the Channel Editor if you want to tweak specific parameters to optimize the sound for your particular playing style, choice of pickups, pickup type, and the like…hmmm, seems like that might be a good topic for a future tip.
That’s it! Now all that’s left is to compare the before and after example below. Hopefully you’ll agree that the “after” is a lot more like a Harley than a motor scooter.
Friday Tip of the Week: The $10 Presence XT SSD Drive
The $10 Presence XT Solid-State Drive
One of Studio One Pro’s assets is that it comes with a lot of content—well over 20 GB. But of course, you need to figure out where you’re going to put it. If you have a laptop with an SSD boot drive, every gigabyte counts and you might not want it living on your system disk. Also, although the old saying goes “you can never be too rich or too thin,” I’d add “and you can never have too fast a load time for samples.”
Like many people, I use three separate drives on my desktop: system, projects, and samples (including SoundSets and loops). With USB 3.0 flash drives coming down in price, you can put all of Studio One’s SoundSets on a 32 GB flash drive, which at my last price check was $10 (I took it a little further, and spent an extra $20 for a USB 3.0 128 GB flash drive that can spew out data wicked fast).
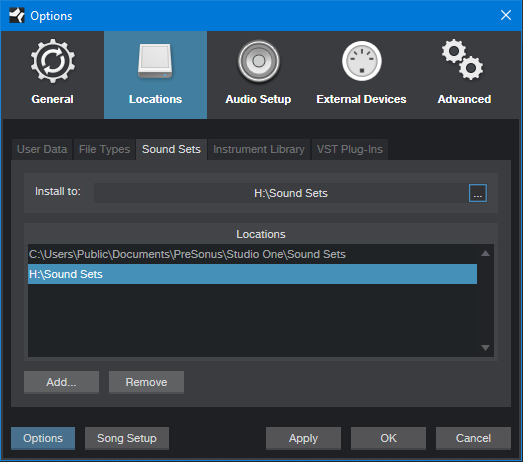
I deleted the default SoundSet folder, copied all my SoundSets over to the flash drive, then added the flash drive location at Studio One > Options > Locations > Soundsets (in this case, it’s H:\Sound Sets). Note that you can’t delete the default location for Sound Sets, so unless you actually delete the Sound Sets in the default location, Studio One will still see them.
USB 3.0 flash drives are super-fast for reading (and still pretty fast for writing). You’ll see the difference when Studio One scans the Sound Sets, and also, when loading instruments that take up a couple hundred megabytes. Furthermore, Sound Sets are compatible with Mac or Windows. So when I want to take my SSD-based MacBook Pro (which never seems to have quite enough space) on the road, I just pop the flash drive out of my Windows desktop, and take the Sound Sets with me. Yes, it’s literally “good to go.”
Friday Tip of the Week: Add Dim Solo to Studio One
The Dim Solo function lets you hear a soloed track at full volume, and the rest of the mix at a considerably lower (dimmed) level. This is very handy when making edits on a track that need to be done in context, but you need to hear the track being edited at a louder volume to make sure you don’t miss any details.
Although Studio One doesn’t have a Dim Solo function per se, it’s easy to set one up!
- Choose Studio One > Options > Song Setup, and choose the Audio I/O Setup tab.
- Click on Add Stereo to create a Sub bus, and assign it to the same outputs as your main bus.

- Assign the track where you want the Dim Solo function to the Sub bus.
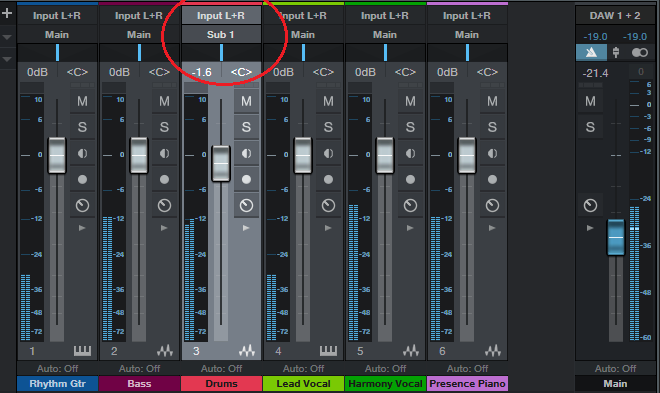
Now you can bring down the Main bus level to choose the amount of “dimming” for all the tracks except for the one assigned to Sub 1, whose track fader controls its level relative to the rest of the mix—make it as loud as you want, and the other tracks as soft as you want.
And how about two bonus Solo tips…
- For an Exclusive Solo function that solos one track while muting all others, click on Solo while holding Alt (Windows)/Option (Mac).
- If you have several tracks soloed, to un-solo them all at once hold Ctrl while clicking on one of the solo buttons. To restore the same state, click on any Solo button while holding Ctrl, and Studio One will revert to the previous solo button state.
Friday Tip of the Week: Create Virtual Room Mics in Studio One
Create Virtual “Room Mics”
Room mics can add ambiance and enhance the stereo image, but with close-miking and direct injection recording, we lose that sense of space. The lack of room mics is particularly noticeable with an instrument recorded direct, when it’s mixed with miked acoustic or electric tracks; the direct track just won’t seem to mesh quite right with the other sounds.
Room mics add short, discrete echos. Splitting the audio into four Analog Delay processors as parallel inserts does a fine job of emulating room ambiance.
First, set up the Splitter for four splits, and choose Channel Split for the Split Mode.
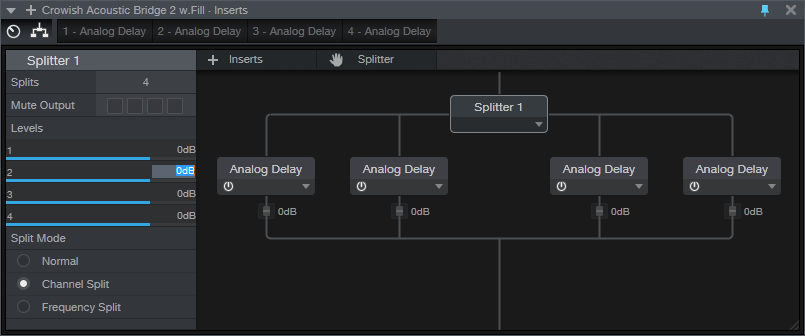
Set the controls on the four delays identically except for the four time parameters; turn off Sync and choose 11, 13, 17, and 23 ms. These are prime numbers so they don’t create resonances with each other.

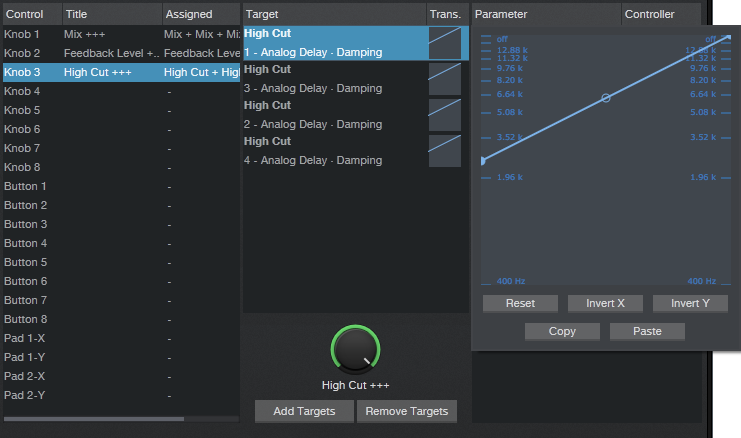
Now use the Channel Editor to create macro knobs for controlling the Mix, Feedback, and High Cut. Assign Knob 1 to the Mix controls on all four delays. Set this to go from minimum to maximum so that if you use this FX Chain as a bus effect, you can set Mix for maximum (no dry signal). Otherwise, when used as an Insert, you’ll likely keep the Mix at 50% or below.

The second knob controls Feedback level. I’ve limited the maximum amount to around 60% for each of the delays. Experiment with this knob depending on the audio source; more feedback gives more diffusion. With percussive instruments like drums, you’ll want more feedback than with sustained instruments.

The third knob controls the amount of High Cut for the delays. Set this so the High Cut doesn’t go much lower than 2.5 kHz.
To hear what this FX Chain can do, load a mono AudioLoop like Guitar > Pop > Dry > 01a Basement Jam E min. Set Mix and Feedback to around 40%, and High Cut to 7 kHz or so. You’ll hear the guitar playing in a room, with a lifelike stereo image.
And don’t forget to save the FX Chain—you’ll likely want to use it again!