Monthly Archives: June 2023
Fix Boring Acoustic Drum Loops
Acoustic drum loops freeze-dry a drummer’s playing—so, what you hear is what you get. What you get. What you get. What you get. What you get. What you get.
Acoustic drums played by humans are inherently expressive:
- Human drummers don’t play the same hits exactly the same way twice.
- Drummers play with subtlety. Not all the time, of course. But ghost notes, dynamic extremes, and slight timing shifts are all in the drummer’s toolkit.
Repetitive loops cue listeners that a drum part has been constructed, not played. So, let’s explore techniques that make acoustic drum loops livelier and more credible. (We’ll cover tips for MIDI drums in a future post.)
Loop Rearrangement
Simply shuffling a few of a loop’s hits within a loop may be all that’s needed to add interest. The following audio examples use a looped verse, and a fill, from Studio One’s Sound Sets > Acoustic Drum Kits and Loops > Fool Rock > Verse 132 BPM.
The first clip plays the Fool Rock Verse 2 loop four times (8 measures), without changes. It quickly wears out its welcome.
We can improve the loop simply by shuffling one snare hit, and adding part of a fill (fig. 1).
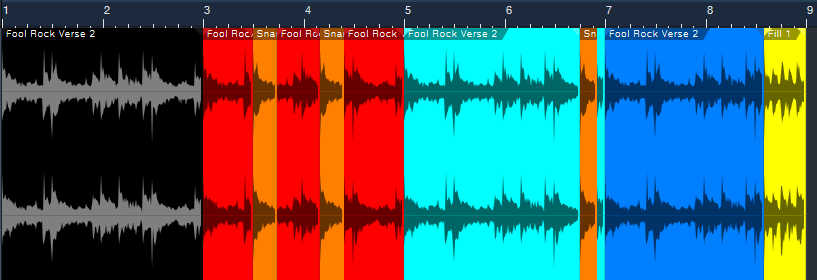
The black loop at the beginning is the original two-measure loop. It repeats three more times, although there are some changes. The red loop is the same, except that a copy of its first snare hit (colored orange) replaces a kick hit later in the loop.
The light blue loop uses the same orange snare hit to provide an accent just before the loop’s end. The copied snare sounds different from the snare that preceded it, which also increases realism.
The dark blue loop is the same as the original, except that it adds the last half of the file Fool Rock Fill 1 at the end.
Listen to how even these minor changes enhance the drum part.
Cymbal Protocol
The Fool Rock folder has two different versions of the Verse 2 loop. One has a crash at the beginning, one doesn’t. I’m not a fan of loops with a cymbal on the first beat. With loops that are only two measures long, repeating the loop with the cymbal results in too many cymbals for my taste. Besides, drummers don’t use cymbals just to mark the downbeat, but to add off-beat hits and accents.
The loops in fig. 1 use the version without a crash. If we replace the first loop with the version that has a crash, the cymbal doesn’t become annoying because it’s followed by three crashless loops. But it’s even better if you overdub cymbals to add accents.
The final audio clip’s first two measures use the Fool Rock loop that includes a crash on the downbeat. However, there are now two cymbal tracks in addition to the loop. A hit from each cymbal creates a transition between the end of the second loop, and the beginning of the third loop.
Loop Ebb and Flow
In this kind of 8-measure figure with 2-measure loops, it’s common for the first and third loops to be similar or even identical. The second loop will add some variations, and the fourth loop will have a major variation at the end to “wrap up” the figure. This natural ebb and flow mimics how many drummers create parts that “breathe.” Keep this in mind as you strive for more vibrant, life-like drum parts.
3 Special FX for Lead Guitar
Melodyne can do much more than vocal pitch correction. Previous tips have covered how to do envelope-controlled flanging and polyphonic guitar-to-MIDI conversion with Melodyne Essential. The following techniques add mind-bending effects to lead guitar, and don’t involve pitch correction per se.
However, all three tips require the Pitch Modulation and Pitch Drift tools. These tools are available only in versions above Essential (Assistant, Editor, and Studio). A Melodyne 5 trial version incorporates these versions. The trial period is 30 days, during which there are no operational limitations.
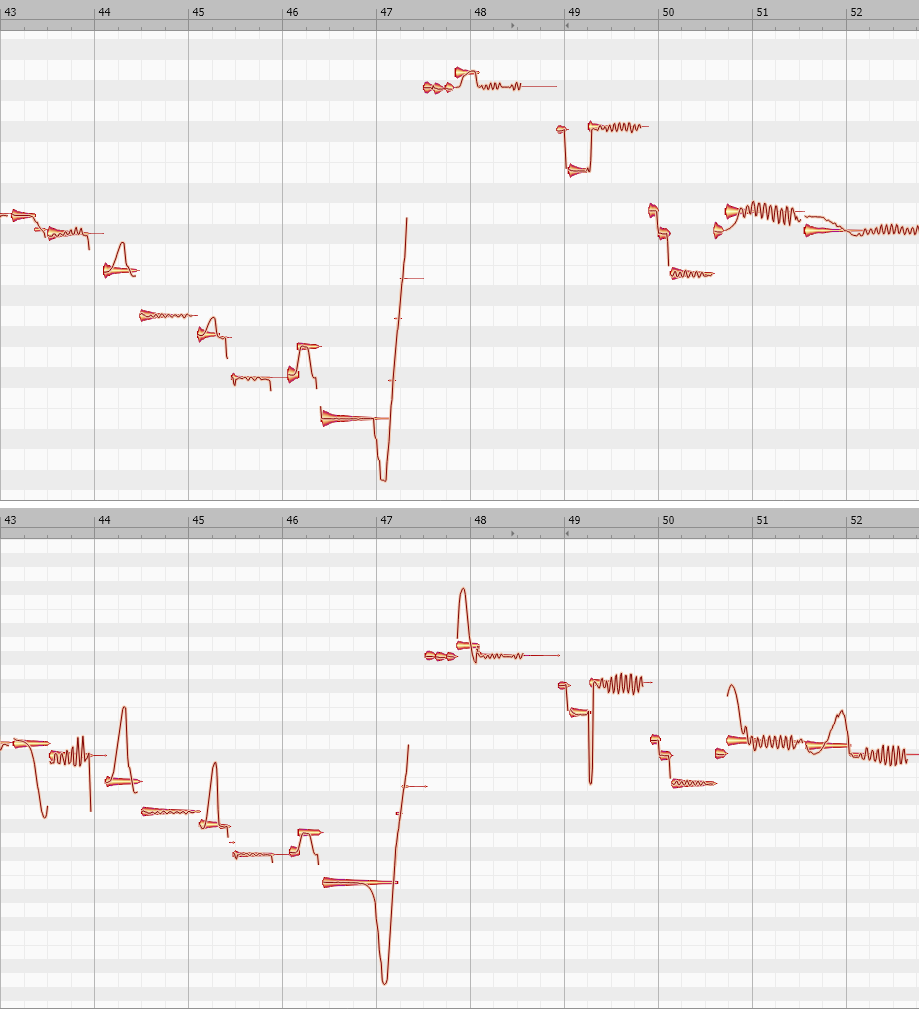
Fig. 1 shows a lead guitar line, before and after processing, that incorporates all three processing techniques. This is the melody line used in the before-and-after audio example.
Vibrato Emphasis/De-Emphasis
To increase or decrease the vibrato amount, use Melodyne’s Pitch Modulation tool. In fig. 1, the increased vibrato effect is most visually obvious at the end of measures 43, 49, and 52. To change the amount of vibrato, click on the blob with the Pitch Modulation tool. While holding the mouse button down, drag up (more vibrato) or down (less vibrato). Extreme vibrato amounts can sound like whammy bar-based vibrato.
Synthesized Slides
Notes with moderate bending can bend pitch up or down over as much as several semitones:
1. Select the Pitch Modulation tool.
2. Click on a blob that incorporates a moderate bend.
3. While holding the mouse button down, drag up to increase the bend up range. With most notes, you can invert the bend by dragging down.
Because a synthesized bend can cover a wider pitch range than physical strings, this effect sounds like you’re using a slide on your finger. In fig. 1, see measures 44 and 45 for examples of upward bends. The end of measure 47 shows an increased downward bend.
For the most predictable results, the note you want to bend should:
- Establish its pitch before you start bending. If you start a note with a bend, Melodyne may think the bent pitch is the correct one. This complicates increasing the amount of bend.
- Have silence (however brief) before the note starts. If there’s no silence, before opening the track in Melodyne, edit the guitar track to create a short silent space before the note.
Slide Up to Pitch, or Slide Down to Pitch
This is an unpredictable technique, but when it works, note transitions acquire a “smooth” character. In fig. 1, note the difference between the modified and unmodified pitch slides in measures 43, 44, 47, 49, 50, and 51.
To add this kind of slide, click on a blob with the Pitch Drift tool, and then drag up or down. The slide’s character depends on what happens during, before, and after the note. Sometimes using Pitch Modulation to initiate a slide, and Pitch Drift to modify the slide further, works best. Sometimes the reverse is true.
This is a trial-and-error process. With experience, you’ll be able to recognize which blobs are good candidates for slides.
The ”Hearing is Believing” Audio Examples
Guitar Solo.mp3 is an isolated guitar solo that uses none of these techniques.
Guitar Solo with Melodyne.mp3 uses all of these techniques on various notes.
To hear these techniques in a musical context that shows how they can add a surprising amount of emotion to a track,this link takes you to a guitar solo in one of my songs on YouTube. The solo uses all three effects.
MIDI-Accelerated Delay Effects
Synchronized echo effects, particularly dotted eighth-note delays (i.e., intervals of three 16th notes), are common in EDM and dance music productions. The following audio example applies this type of Analog Delay effect to Mai Tai.
However, you can also create echoes for virtual instruments by copying, offsetting, and editing an instrument track’s MIDI note data. In the next audio example, the same MIDI track has been copied and delayed by an 8th note (fig. 1).
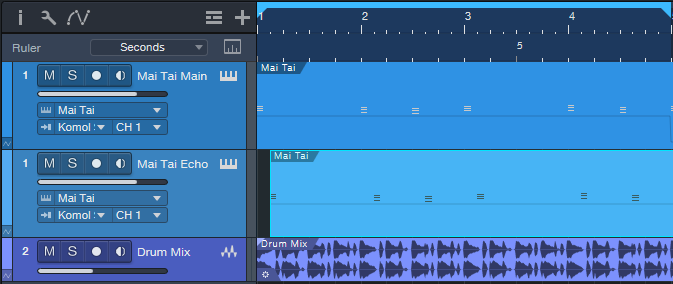
In the original instrument track, the MIDI note data velocities are around 127. These values push the filter cutoff close to maximum. Reducing the copied Echo track’s velocity to about half creates notes that don’t open up the Mai Tai’s filter as much. So, the MIDI-generated delay’s timbre is different.
The next track copies the original track again. But this time, the notes are transposed up an octave, and offset by a dotted eighth-note compared to the original (fig. 2). For this track, the velocities are about halfway from the maximum velocity.
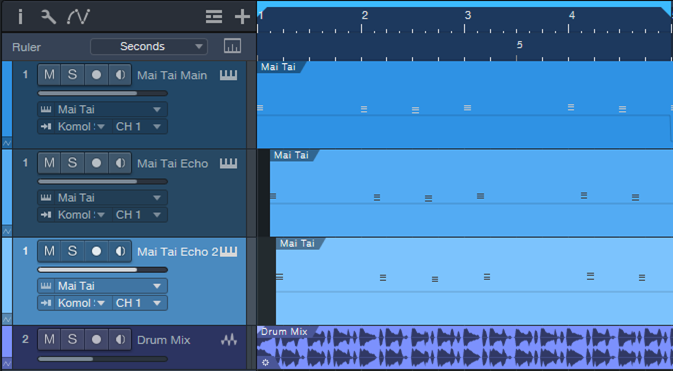
Now we have our “MIDI-accelerated” echo effect for the virtual instrument’s notes, which are still processed by the original Analog Delay effect. The final audio example highlights how the combination of analog delay and MIDI note delay evolves over 8 measures.
These audio examples are only the start of what you can do with MIDI echo by offsetting, transposing, and altering note velocities. You can even feed the different MIDI tracks into different virtual instruments, and create amazing polyrhythms. But why stop there? Hopefully, this blog post will inspire you to come up with your own signature variations on this technique.
Friday Tips in the Real World: the Sequel

This is a follow-up to the Friday Tips in the Real World blog post that appeared in 2020. It was well-received, so I figured it was time for an update.
Although many of the Friday Tips include an audio example of how a tip affects the sound, that’s different from the real-world context of a musical production. So, this blog post highlights how selected tips were used in my recent music/video project, Unconstrained. The project was recorded, mixed, and mastered entirely in Studio One.
As you might expect, the workflow-related tips were used throughout, as were some of the audio tips. For example, all the vocals used the Better Vocals with Phrase-by-Phrase Normalization technique, and all the guitar parts followed the Amp Sims: Garbage In, Garbage Out tip. The Chords Track and Project Page updates were crucial to the entire project as well.
The links take you to specific parts of the songs that showcase the tips, accompanied by links to the relevant Friday Tip blog post. If you’re curious about specific production techniques used in the project, whether they’re included in this post or not, feel free to ask questions in the comments section.
One reader’s comment for the Lead Guitar Editing Hack blog post mentioned how useful this technique is. If you missed it the first time, here’s what it sounds like applied to a solo. Attenuating the attack gives the melody line a synth-like, otherworldly sound. Incidentally, if you back up the video to 6:20, the cello sounds are from Presence. I tried the “industry standard” orchestra programs, but I liked the Presence cellos more. Also, I used the “time trap” technique from the Fun with Tempo Tracks post to slow the cellos slightly before going full tilt into the solo.
The Magic Stereo blog post described a novel way to add motion to rhythm parts, like piano and guitar. This excerpt uses that technique to move the guitar in stereo, but without conventional panning. Later on in the song, the drums use Harmonic Editing to give a sense of pitch. The post Melodify Your Beats describes this technique. But in this song, the white noise wasn’t needed because the drums had enough of a frequency range so that harmonic editing worked well.
I wrote about the EDM-style “pumping” effect in the post “Pump” Your Pads and Power Chords, and it goes most of the way through this song. The reason why I chose this section is because the solo uses Presence, which I think may be underrated by some people.
Another topic that’s dear to my heart is blues harmonica, and it loves distortion—as described in the blog post Blues Harmonic FX Chain. It’s wonderful how amp sims can turn the thin, reedy sound of a harmonica into something with so much power it’s almost like a brass section. However, note that this example uses a revised version of the original FX Chain, based on Ampire. (The revised version is described in The Huge Book of Studio One Tips and Tricks.)
The blog post Studio One’s Session Bass Player generated a lot of comments. But does the technique really work? Well, listen to this example and decide for yourself. I needed a scratch bass part but it ended up being so much like what I wanted that I made only a couple tweaks…done. For a guitar solo in the same song, I tried a bunch of wah pedals but the one that worked best was Ampire’s.
I still think Studio One’s ability to do polyphonic MIDI guitar courtesy of Melodyne (even the Essential version) is underrated. This “keyboard” part uses Mai Tai driven by MIDI guitar. The MIDI part was derived from the guitar track that’s doubling the Mai Tai. For more information, see the blog post Melodyne Essential = Polyphonic MIDI Guitar. Incidentally, except for the sampled bass and choir, all the keyboard sounds were from Mai Tai. If you’ve mostly been using third-party synths, spend some time re-acquainting yourself with Mai Tai and Presence. They can really deliver.
As the post Synthesize OpenAIR Reverb Impulses in Studio One showed, it’s easy to create your own reverb impulses for OpenAIR. In this excerpt, the female background vocals, male harmony, and harmonica solo all used impulses I created using this technique. (The only ambience on the lead vocal was the Analog Delay). Custom impulses are also used throughout Vortex and the subsequent song, What Really Matters (which also uses the Lead Guitar Hack for the solo).
I’m just getting started with my project for 2023, and it’s already generating some new tips that you’ll be seeing in the weeks ahead. I hope you find them helpful! Meanwhile, here’s the link to the complete Unconstrained project.