Author Archives: Craig Anderton
Fun and Games with Alternate Mixes
There are many uses for alternate mixes, and Studio One makes it not only easy to create alternate mixes, but also to store them as part of a song. We’ll cover traditional uses for alternate mixes, and then get into some more unusual applications.
How to Create and Store Alternate Mixes
When sending a file off for mastering, sometimes the engineer will want two additional versions, one with the vocal up 1 dB and another with it down 1 dB. This is because during the course of mastering, the relationship of the vocal to the track might change. A more prosaic example is creating a mix without vocals for karaoke, and of course, remixes are common in EDM. You might also do an “unplugged” version with only the acoustic tracks.
After creating the alternate mix:
- Choose Song > Export Mixdown (Fig. 1).

Figure 1: The Export Mixdown dialog box. Note that Import to track (outlined in white) is checked to bring the exported file into the song.
- Choose a location for the mix, the export range, file resolution, and make sure you check Import to track. (If while exporting a warning says there was clipping, reduce the master fader to compensate—for example if the export was 1 dB over 0, reduce the master fader level by at least 1 dB.)
- The file will now appear as a track within your song. When you save the song, you’ll save the alternate mix.
If your mix changes are relatively extensive, save it as a Version so you can recall it later. Choose File > Save New Version, and name it (Fig. 2). Use a name that corresponds to the name of the alternate mix file, and then you can choose File > Restore Version to recall the version corresponding to that particular mix.

Figure 2: It’s easy to save a version of a song that corresponds to a particular alternate mix.
Processing Song Sections with Alternate Mixes
Suppose you want to add flanging to only a solo section of a song. You can insert a flanger in the main bus, and then adjust automation to enable it and set the parameters as desired. However, another option is to create a mix, and bring it into your song as a track. Then, create an alternate mix you bring into the song. Now you can experiment on the alternate mix with the effect(s) you want to use, and when you have the sound you want, render it. Cut the solo section you want to flange from the main mix, and insert the rendered solo section from the alternate mix.
Better Virtual Instrument and Amp Sim Feel
Last week’s tip covered how to save CPU power with amp sims by bouncing and/or transforming the track with the sim. One user commented “I can see how doing [this] reduces CPU load, but only after I’ve finished choosing and using an amp sim patch. My frustration is the latency or CPU hit when actually playing my guitar through an amp sim, deciding on what I’m going to play, rehearsing it, auditioning amp sim patches and so on.” Alternate mixes to the rescue: make a premix of all tracks except the one with the amp sim, and then disable the tracks themselves. With the tracks now placing no load on the CPU because you’re listening only to the premix, you can throttle the latency way down when playing around with your sim and adding a new part. After recording the part, you can use the tips presented last week to reduce the CPU drawn by the amp sim.
Auditioning Different Mixes for Albums
The renewed interest in vinyl has had a corollary effect: an interest in albums and collections of songs, not just singles. As a result, Studio One’s synergy between the Song and Project page—where you can edit songs after hearing them in context with the master file, and update the master file with that song’s changes—is brilliant. But even if you don’t produce albums, Studio One’s mastering options make it easy to obtain consistency among songs. That way, if someone switches from one song of yours to another on YouTube or Spotify, there won’t be a jarring difference.
But you might do various mixes of songs, so you can choose the best one when assembling an album. If you update the version in the mastering file after changing a mix, to compare it to a previous mix you need to open the file with the other mix (which may take a fair amount of time if you have lots of effects and virtual instruments), update the mastering version, and repeat with any other mixes.
A simpler option is to create alternate mixes in your song as described above (remember to save each alternate mix as a separate version), and mute all tracks in the song except for the track with the mix you want to audition. Update the mastering file with that track. To audition a different mix, mute all tracks except for the different mix, update the mastering file, and hear that mix in context. Once you decide which mix you like best, open the Version containing that mix, and then you can make further tweaks to it.
Using 3rd-Party Cabs with Ampire XT
There’s an old joke about guitarists:
“How many guitars does a guitar player need?”
“Just one more!”
…and sometimes I feel the same way about amp sims, because all of them are different. Ampire XT benefits from PreSonus’s “State Space” technology, and if you have no other amp sims, its collection of amps has pretty much all the essentials.
What’s more, you can load thrid-party cabinet impulse responses (IRs) that re-create the sound of various cabinets, mics, and mic positions. These go into the User Cabinet, whose unique feature compared to typical IR loaders is being able to load individual IRs for the three mics.
But you can take impulses even further by turning off an amp’s cabinet altogether, and following Ampire XT with the Open Air convolution processor. Although most people probably think of Open Air as a way to create a variety of reverb and other space-based effects, it’s also a flexible impulse response loader that plays nice with cabinet impulses.
There are many free cabinet impulses on the web to get you started. Admittedly, the sound quality varies—some are fine, some aren’t, but there’s also a middle ground where tweaking the Open Air controls can give the sound you want. http://cabs.kalthallen.de is a popular source for free impulses (click on the Free tab), but there are many other companies that offer free samples, or sell impulses commercially.
The Setup
Create an FX Chain with Ampire XT followed by Open Air. The Impulse Responses are only for cabinets, so set up Ampire XT’s amp and effects however you want, but turn off the cabinet section (Fig. 1).

Figure 1: Click the cabinet bypass button (middle left, outlined in white) and the cabinet field will show None (upper right, outlined in white).
Follow Ampire XT with the Open Air, and start with its Default preset. Drag an impulse into the Open Air waveform display window (or click on the impulse name field to open the file selector, and then navigate to the impulse you want). Turn Mix to 100% so that you hear only the cabinet output, and none of the pre-cabinet amp sound (Fig. 2).
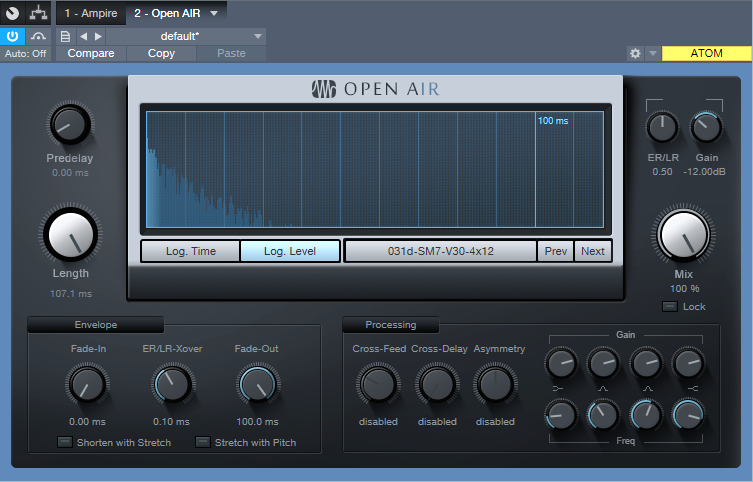
Figure 2: Make sure you set the Open Air Mix control to 100%, so that you don’t hear the pre-cabinet amp sound.
Tweaking the Tone
The Kalthallen impulse shown in the screenshot above didn’t need tweaking to sound good, but you’ll find that with a lot of the free impulse responses, you’ll need to tweak the Gain and Frequency controls. Often the main problem is a “thin” sound and Fig. 3 shows some tweaks that help remedy this issue—pull back on the highs, and boost the low end for a bigger, beefier tone.
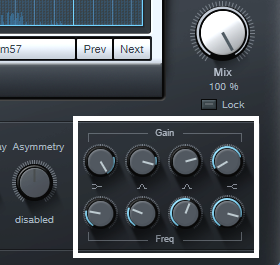
Figure 3: These EQ settings can help tame free impulse responses that sound too thin.
But the most dramatic tweaks come by enabling Shorten with Stretch and Stretch with Pitch, then varying the Length control. This can produce sounds that are similar to different mikings, or even cab sounds you’ve never heard before. The Predelay, ER/LR-Xover, and ER/LR controls can also affect the sound, although the differences aren’t as dramatic as stretching with the Length control.
Finally, although it’s great to have options, you don’t want to suffer from option overload (“maybe trying just one more impulse will give the sound I want…”). If you download a bunch of impulses, create a folder of favorites in a place where it’s easy to open it up, and drag-and-drop impulses into Open Air. If you find one you really like, save it as an Open Air preset for future use.
Open Air: Much More Than Just Reverb
After doing some fairly “normal” tips for the last few Fridays, let’s go a little crazy—and explore some interesting sound design and rhythmic possibilities.
Open Air is a wonderful convolution processor, but it’s helpful to remember it can load any audio file, not just room and reverb impulses. I’ve said many times it’s more fun to ask “what if?” than “how do I?”, because “what if” is all about experimentation. So I asked “What if I’m using a drum loop, and also load that same loop into Open Air as an impulse?” You might not use the resulting sound all the time, but give this technique a try—you’ll hear an entirely new type of percussive effect.
- Make sure the loop itself matches the song’s tempo, and it isn’t just stretched to fit. If it was stretched to fit, select the loop and type Ctrl+B to make the length change permanent.
- Copy the loop (e.g., to an empty track). Open Air doesn’t seem to like high-level drum loop impulses, so drag down the top envelope handle to reduce the level by at least -6 dB. Again, select the loop and type Ctrl+B to make this change permanent.
- Drag the copied loop into the Open Air waveform window, and now you have a cool drum impulse.
- The odds are it will sound pretty dreadful; if needed, start by reducing the Open Air Gain control to prevent distortion.
- The EQ settings are really important (Fig. 1). I’ve had the best results by cutting back on the low frequency shelf, and boosting the high frequency one. To adjust EQ, temporarily set the Mix to 100% so you can hear the results of any changes easily; after the EQ is tweaked, adjust the Mix amount to taste.
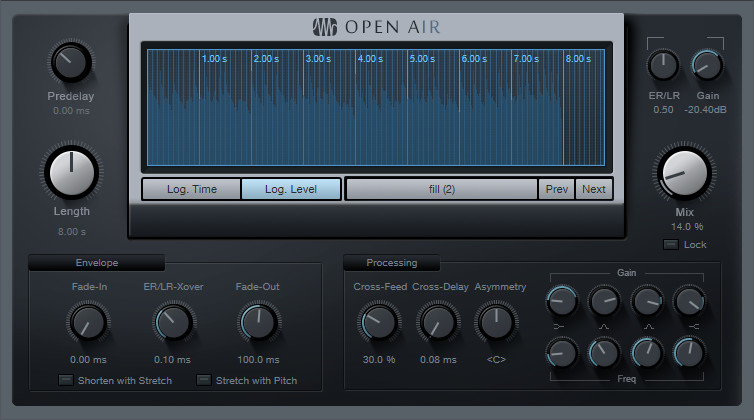
Figure 1: Typical Open Air settings when modulating a drum loop by itself.
Remember that the drum loop is still acting like a reverb, so it will build up a bit over time until the level stabilizes, and the processed sound will have a tail as long as the loop.
Next, there are several ways to add variations. First, you don’t have to convolve a loop with itself—check out the audio example.
The first four measures are a drum loop convolved with itself. The second four measures convolve the original drum loop with a tom loop, while the final four measures convolve the original drum loop with a percussion loop.
Altering the Open Air Length can create interesting effects, especially when using a rhythmically related length—like half or 1/3 the length. With sparse loops, longer lengths can work too, like 1.33, 1.5, or 1.66 the length (get out your calculator, and work with the number that’s shown under the Length control). Additional EQ and processing can add even more interest.
And remember to experiment with other types of impulse as well—pads, voices, guitar chords, whatever! You never know what you’ll discover.
How to Save CPU Power with Amp Sims

You’ll often see this kind of comment in forums: “There must be something wrong with Studio One! I can run only a couple amp sim instances before the program can’t handle any more!” But you’ll also see this comment about other DAWs—because the “problem” isn’t the DAW, it’s the amp sims and current computer technology. Fortunately, Studio One has anticipated these issues, and offers three effective solutions.
Remember, an amp sim is processing a dry guitar track in real time—not playing back processed audio. Amp sim sound quality has improved dramatically over the past few years, but the trade-off is the CPU power needed to do the serious number-crunching required for realistic amp sounds. Studio One’s CPU-saving options are great with virtual instruments, which can sometimes suck even more power than amp sims—but guitar players who are discovering the fun of amp sims need to know about these options, too.
The Old-School Fix
Although some people recommend the general-purpose, old-school fix of increasing latency to reduce stress on your CPU, that makes playing guitar much less fun. Another solution is to buy a much faster computer. Studio One’s solutions work at lower latencies, as well as older, slower computers.
Solution 1: Bounce to New Track
Select one or more Events. Right-click on any of them, and choose Event > Bounce to New Track (Fig. 1). This creates a new audio track that incorporates the sound created by the original track’s processing, but without any inserted plug-ins—the sound is “baked into” the new audio track. Audio tracks require far less CPU power than a track whose effects are being created in real time. Bouncing leaves the original track in place but mutes it, so you can unmute it to return to the original track’s audio and effects if needed.

Figure 1: If you use Bounce to Track (outlined in white) as much as I do, it will show up in the Recent Items section of your right-click context menu.
To conserve the CPU used by the original track’s effect(s), either turn off power to the effect(s), or right-click on the original track in the track column and choose Disable Track. To return the track to its initial status, right-click on the track in the Track column, and choose Enable Track.
Note that when signing off on a project, this is also an excellent way to “future-proof” the project against future operating system (or other) changes that may render a plug-in unusable. If the sound has been preserved as an audio file, you’ll at least be able to open the processed sound.
Solution 2: Transform to Rendered Audio
Right-click on the track in the Track column, or choose Track > Transform, and then choose Transform to Rendered Audio. This renders the effect sound so that it becomes part of the existing audio track. Unlike bouncing, this operation doesn’t create a new track, and it automatically disconnects the effect from the CPU to save power.
When you choose Transform to Rendered Audio, a dialog box appears with two options (Fig. 2).
![]()
Figure 2: The Transform to Rendered Audio dialog box.
You can always undo if you change your mind, but Preserve Realtime State (which I highly recommend checking) preserves the original, real-time state so you can always return to the original track settings and effects. Preserve Realtime State also persists through saves and copies. To return to the original track, right-click on the track in the Track column, or choose Track > Transform, and then choose Transform to Realtime Audio.
The second dialog box option renders any effects tail, such as a long trail of echoes or delay, that extends past the length of the existing Events. You can choose Auto Tail, where Studio One detects how long the tail lasts and renders according, or specify a fixed tail of a particular length. (A fine point: Studio One fades out the Event over the tail’s duration, but it’s an editable envelope.)
Render Event FX
Event FX, as accessed through an Event’s Inspector, are invaluable. With Ampire XT (and many other amp sims), you can’t automate amp or cabinet changes—only parameters within amps and cabinets. So, if the verse’s guitar part is one Event and the chorus’s guitar part is a different Event, each can have its own amp sim sound.
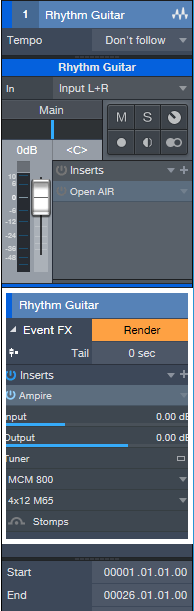
Figure 3: Here, Ampire XT is an Event FX, and can be rendered to save CPU power. Note that you can also choose different amps and cabinets, see a tuner thumbnail, and turn the Stomps section on or off.
The trade-off is that more amp sims draw more CPU power. Fortunately, Event FX have a Render button (Fig. 3). Immediately upon rendering, the sound becomes part of the audio, the effect itself disconnects from the CPU, and the Render button changes to Restore. Similarly to transforming an audio track, you can revert to the original state at any time by clicking Restore.
Multiple Renders in One Operation
Suppose a track has two Events, each with their own Ampire XT inserted via an Event FX, and there’s a CPU-hungry reverb processing the entire track. If you apply Transform to Rendered Audio to the track, it will Render the Event FX and the Track effect automatically. But if you then need to make changes and transform the Track back to realtime audio, the Track and Event FX will be restored to their initial states.
Bounce to New Track with both Events selected will produce the same results in the bounced track, i.e., all the effects will be rendered. If you want to return from where you started, delete the bounced Track, and unmute the two Events in the original Track (which will still have its effects inserted).
Once you bounce or transform tracks and reclaim all that CPU power, you can continue going cRazY with amp sims—without stressing out your computer, or Studio One.
The “Table” Filter Response
There are a lot of filter responses: notch, bandpass, peak, allpass, high pass, lowpass, shelf…now let’s add the “table” response to the collection.
Parametric EQs can add peaks and cuts that are broad, narrow, or anywhere in between, but they all have slopes on either side of the filter frequency. The table response described here can boost or cut over a range of frequencies, with a flat response over that range. This avoids having to dedicate several overlapping parametric stages, which still doesn’t achieve quite the same result. The key to this response is combining shelving EQs.
Table Response Boost
To boost a frequency range, set the low- and high-shelf frequencies to the lowest and highest frequencies in the range (Fig. 1). Use the Shelf setting to determine how quickly the boosted section returns to the flat response. I’ve found the 12 and 24 dB settings works well, because the Q control comes into play. This can provide additional modifications to the response, which we’ll cover later. However, for the gentlest effect, 6 dB is valid in many situations as well.
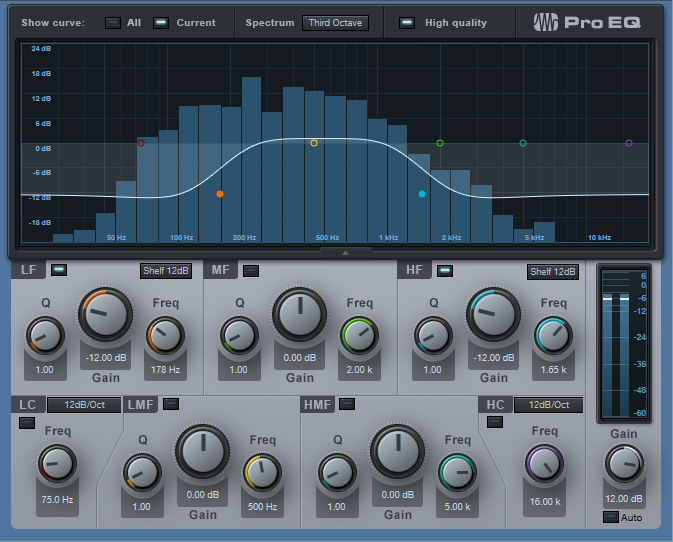
Figure 1: This table response, inserted before a high-distortion amp sim, gives greater sensitivity to midrange notes and also trims the highs and lows for a “tighter” sound.
But we’re not done quite yet. To provide an actual boost, increase the output Gain control for the desired amount of boost. For example, if you want the table response to boost +12 dB, set the high and low shelf Gain settings to -12 dB, and the output Gain control to +12.
Table Response Cut
Similarly to the boost option, set the low- and high-shelf frequencies to the lowest and highest frequencies in the range you want to cut (Fig. 2). Again, use the Shelf setting to determine how quickly the boosted section returns to the flat response; the same general comments about how the shelf slope works with boosting apply here too.
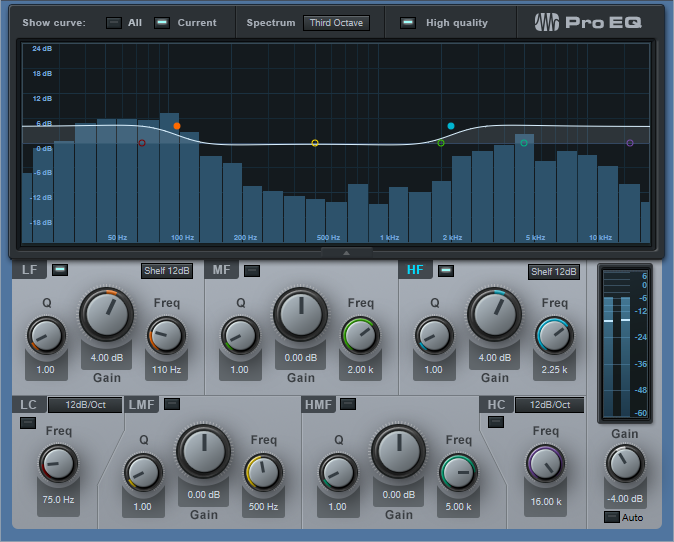
Figure 2: This table response for a drum loop cuts back on the midrange a bit to help emphasize the kick and the snap/sizzle of the share and high-hats; it also reduces any “midrange mud,” and makes space in that frequency range for other instruments.
Cutting requires an equal and opposite approach to what we did for boosting. If you want the table response to cut 4 dB, then boost the shelf controls by +4 dB. Then, set the output gain control to -4 dB. This restores the shelf boosts to flat, and adds the desired amount of cut for the specified frequency range.
Using Q
When cutting with the low shelf or boosting with the high shelf, increasing resonance by turning up the Q control adds a peak just above the shelf’s corner frequency, and a dip below the corner frequency. When boosting with the low shelf or cutting with the high shelf, increasing Q adds a peak just below the shelf’s corner frequency, and a dip above the corner frequency. This emphasizes the extremes of the chosen frequency range, while also increasing the depth of the cuts near the corner frequency. Try adding resonance to the low shelf when using this technique for vocals, particularly narration (Fig. 3).
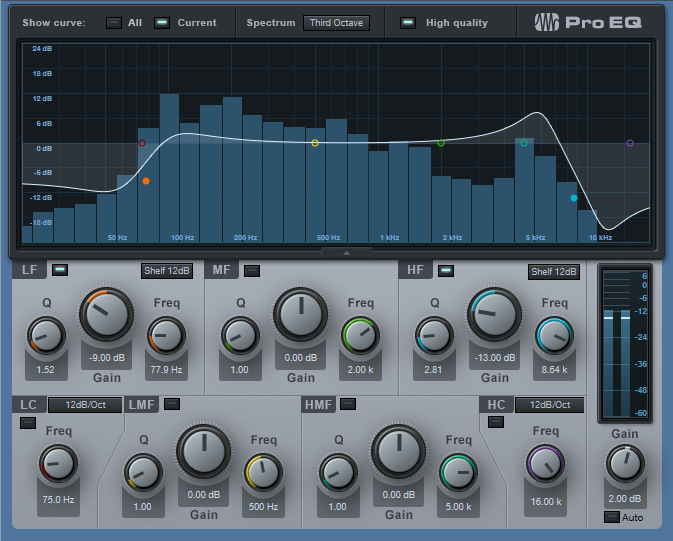
Figure 3: The table response adds a bit of a low-frequency boost (with Q) to give the “late night FM DJ sound,” but also cuts lower frequencies to reduce p-popping. Meanwhile, the high-frequency shelf emphasizes the voice’s articulation, while reducing extraneous highs, hiss, and sibilance.
Of course, the table response doesn’t replace a parametric. But sometimes, it might be just the response you need, and you’ll find it faster to dial in the right frequency range by moving the shelf controls than trying to make multiple stages of peak/boost EQ do what you want.
All About Ampire’s Virtual Miking
A physical guitar amp is more than a box with a speaker—it’s a box with a speaker being picked up by a mic in a room. Both the mic and room contribute to the overall sound. To better emulate the sound of a physical guitar amp, Ampire includes a Mic Edit Controls panel that allows making a variety of virtual mic adjustments.
Ampire doesn’t include room emulation, because you can emulate room sound with several of Studio One’s plug-ins—Room Reverb, Open Air Reverb, Mixverb, and Analog Delay. However, it’s best to avoid adding ambiance until most other tracks have been cut, so that the ambiance achieves the right balance. Too much ambiance can clutter the mix, or hog the stereo field.
The mics you choose, their levels with respect to each other, and whether you add delay can make a major difference in your amp’s sound. So, let’s investigate the Mic Edit Controls panel (Fig. 1).
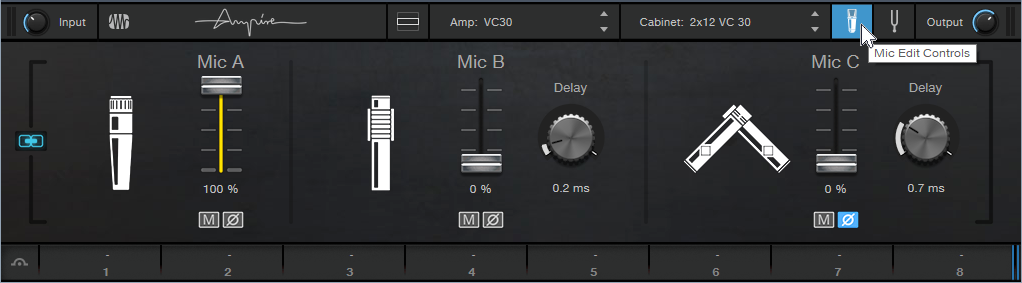
Figure 1: The Mic Edit Controls in Ampire XT.
Choosing the Mic Type
Many guitarists record with their amp cranked to really high levels, to get their “sound.” Dynamic mics are ideal because they can handle high levels, and the inexpensive Shure SM57 is the classic guitar cabinet mic—many engineers choose it even when cost is no object. Although dynamic mics may lack brightness compared to condenser mics (as modeled by Mic C), this doesn’t matter much with amp cabinets, which typically don’t have much energy above 5 kHz or so anyway. Mic A in the Mic Edit Controls panel has the SM57’s sonic character, and will likely be your go-to mic.
Mic B produces the sound associated with ribbon mics, which shows one of Ampire’s benefits: older ribbon mics tended to be fragile—but you can’t blow up a virtual mic. Ribbon mics have an inherently warm midrange. Royer’s R-121 mic is popular for miking cabs, and Mic B models its overall sonic character.
Mic C emulates the PreSonus PM-2 matched pair of condenser microphones. Condenser mics are often too sensitive for close-miking loud amps, but when moved a bit back from the cab, they can give a brighter, more “open” response that handles note attacks well. They’re also commonly used as room mics, which is why these two virtual mics are arranged in an X-Y miking configuration to give a stereo image.
Wait a Minute—Did You Say Stereo?
Guitars are mono signal sources, but taking full advantage of Ampire’s mics, as well as room ambiance plug-ins, requires a stereo signal. To convert the mono guitar into a dual mono signal (i.e., stereo, but with the same audio in the left and right channels), record the guitar with the Channel Mode set to Mono (one circle showing to the right of the Record Input selector). Although this means that any plug-ins will be in mono, that’s acceptable when tracking. After recording the track, change the Channel Mode to stereo (i.e., two circles showing to the right of the Record Input selector), select the event, and bounce it to itself (ctrl+B). Now the mono guitar is dual mono.
Mic Control Applications
Each mic has three controls: level, mute button (which makes it easy to evaluate what a particular mic contributes to the overall sound), and phase switch (the Ø button). Also, Mics B and C have Delay controls.
Often when miking a physical amp with more than one mic, you’ll vary their blend to find the right mix. The Mic Mix Link button toward the extreme left simplifies this process. When enabled, altering one mic’s level adjusts the levels of the other mics oppositely. For example, turning up Mic A turns down Mics B and C, or turning up Mic B turns down Mics A and C.
The Phase buttons and Delay controls can make major differences in the overall sound. There’s no right or wrong phase or delay setting; use whatever sounds best to you. Try the following to hear how these controls affect the sound. (Bear in mind that amp sims do a lot of calculations, so moving the controls will sound “choppy.” This is because Ampire has to recalculate constantly to reflect the changing settings.)
- Turn off Mic Mix Link.
- Mute Mic C.
- Set Mic A’s Level up full, and Mic B’s Level down all the way.
- Enable Mic Mix Link.
- Lower Mic A’s level. Mic B’s level will increase. Note the difference in sound as the levels change.
- Alter Mic B’s Delay time, and again, change Mic A’s level. You’ll hear a sound that’s somewhat like flanging, due to the comb filtering caused by Mic B being out of phase.
- Enable the Phase reverse switch for Mic B, and again, alter Mic A’s level. You’ll hear a wide tonal variation.
Now check out how Mic C creates a stereo spread. With Mic Mix Link off, adjust Mic A and/or Mic B for the desired sound. Bring up Mic C’s Level control slowly, and you’ll hear the stereo image bloom. Again, the Delay control and Phase reverse button make a big difference in the sound.
Clean Sounds, Too
One of my favorite mic applications is with clean guitar sounds (cabinet only, no amp). Mic C is particularly useful, because its brightness gives the cabinet’s tone a useful lift, and creates a stereo image. Finally, note that if you change the Channel Mode from mono to stereo (or the reverse), the sound may mute. Varying one of the Mic level controls restores the sound. Of course, it’s easy enough to call up an Ampire preset, and just start playing… but becoming proficient with the Mic Edit Controls opens up a wealth of possibilities.
Komplete Kontrol Integration, Part 3: Controlling Non-NKS Plug-Ins
Our prep work is in order: in part 1 we integrated the Komplete keyboard as a DAW navigation control surface, and in part 2, explored how to create general-purpose MIDI control surface templates. In the thrilling conclusion of this trilogy (soon to be a major motion picture!), we’ll now find out how to control non-NKS instruments and effects, running within Studio One, from the Komplete keyboard hardware control surface.
BUT FIRST: FOCUS VS. GLOBAL MAPPING
Because we’ll be mapping hardware controls to software parameters, it’s important to understand the difference between Studio One’s Focus and Global control mapping functions. When you program a controller in Global mode, it affects aspects common to all songs, like faders, pan, etc. In Focus mode, you program a controller for a specific instrument or effect. Focus mode has two wonderful attributes: You can program different settings on the same instrument or effect in the same project, and Studio One remembers this assignment for other songs. For example, I made a Komplete keyboard Mojito template so whenever I call up Mojito in any song or any instance in a single song, it has a hardware control surface.
To choose Focus mode (Fig. 1), click the gear button toward an instrument or effect’s upper right. From the drop-down menu to the right of the gear symbol, choose MIDI-OX (the MIDI utility we installed back in Part 1 of the series because it lets the Komplete keyboard talk to non-NKS plug-ins). You’ll also need to choose Focus mode for an instrument or effect when you want to use a previously created template.
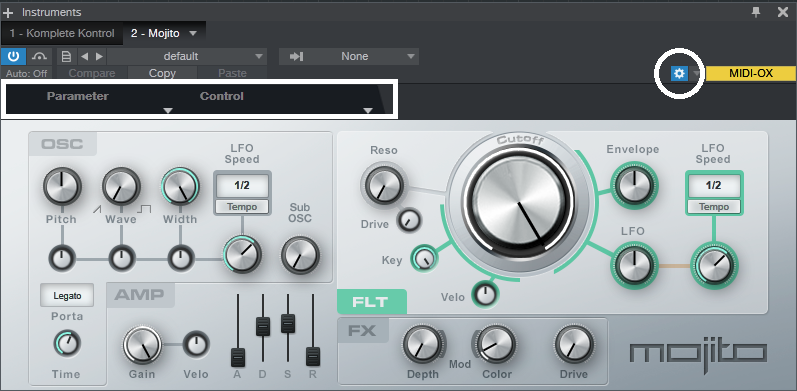
Figure 1: The Gear button (circled in white, upper right) opens the Focus mode Control Link functionality (outlined in white rectangle).
After entering Focus mapping mode, parameter and Control fields appear between the header and plug-in. This is where we do our hardware-control-to-parameter Control Link assignments. To complete a Control Link assignment, click on the arrow that points from a control to a parameter. This causes the arrow to flash yellow in Focus mode, or blue in Global mode.
Okay, let’s return to creating our control surface. To start with a clean slate, close MIDI-OX and Studio One if open, and turn off the Komplete Kontrol keyboard.
- Turn on the Komplete Kontrol keyboard. After it “boots,” open MIDI-OX, and verify that it shows the correct MIDI devices (see Fig. 1 in Part 2). Leave MIDI-OX open, although it can be minimized.
- Open the Komplete Kontrol stand-alone application. Click the application’s MIDI button in the upper-right corner, verify that you’ve chosen the desired template, and then click the MIDI button again to de-select the MIDI mode.
- Open Studio One, and Create a new song. Press the Komplete keyboard’s MIDI button so that it’s lit brightly (if it isn’t already).
- Click on Studio One’s Mix tab, and then on the External button toward the left. A column with External Devices appears.
- Click the MIDI-OX arrow under External Devices. Choose Setup, and verify that it’s sending to and receiving from the correct Komplete Kontrol ports, as described in Part 2 (Receive From = Komplete Kontrol -1, Send To = Komplete Kontrol Ext-1). Click OK.
- Now click on the MIDI-OX arrow again, and choose Edit. Click MIDI Learn, and prepare for an orgy of knob twiddling.
- Turn your attention to the Komplete Kontrol keyboard, whose MIDI button should be brightly lit. Choose the control surface’s Page 1 with the left/right arrow buttons (if it isn’t already selected; check the keyboard’s right display, in the lower right, to confirm that it shows 1/4).
- Turn all 8 keyboard knobs, below the display. Studio One’s External Devices window will sprout 8 controls. Widen the External Devices window so the 8 take up exactly one row, then choose page 2 with the keyboard’s right arrow button. Again, turn all 8 controls.
- Similarly, choose page 3 and turn all 8 controls, then page 4. You’re now populating the External Devices window with all the available controls.
- Similarly, do the same for the four pages of switches.
- Fig. 2 shows our masterpiece of total control. The Komplete keyboard’s controls, switches, and pages are now recognized as a control surface for Studio One.
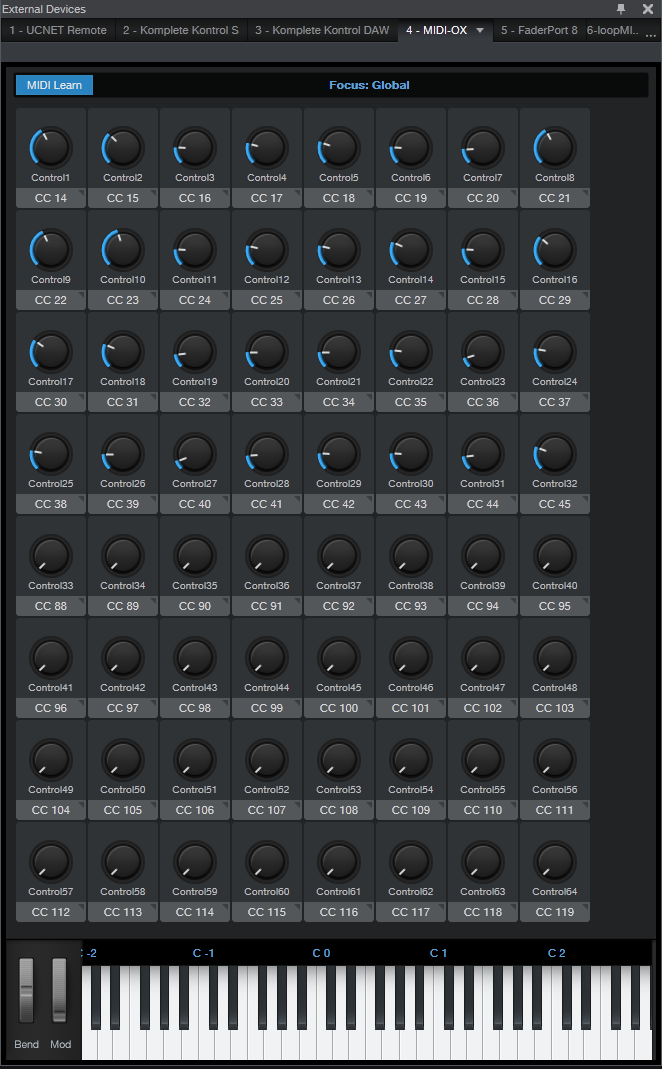
Figure 2: Studio One now recognizes the Komplete keyboard controls and switches as a control surface.
- While in MIDI Learn mode, you can change the control graphic to (for example) a switch instead of a knob. To do so, click on the arrow in the CC label below the knob, and choose the desired graphic.
- After setting up the control surface, turn off MIDI Learn (so you don’t brush up against a control and change something accidentally).
- We’ll use Mojito as an example. Bring Mojito into an Instrument track, and strategize what control layout would be best for each page. Fig. 3 shows what I chose; in the labels, the first number is the page, the second the physical control or switch.
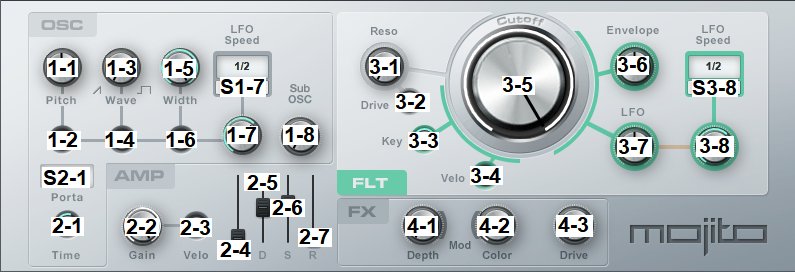
Figure 3. Komplete keyboard hardware assignments for Mojito.
- Next, use Control Link to link the control surface knobs with the Mojito parameters. With Mojito in Focus mode as described above, move Control 1 on the keyboard or the external devices page, click on (or move) the Mojito Pitch control, and then click on the Arrow between them. The arrow turns yellow to confirm the link. Proceed similarly through all the controls and switches until they’re all assigned. (It’s a little complicated with the LFO Speed, because when you switch between the two LFO Sync options, you would actually need two knobs – one to vary frequency, the other to vary beats. I figured I’d use beats 99% of the time, so I used the hardware to control the LFO when in beats mode. For frequency, you can use your mouse to move the knob, or program a couple of the spare knobs that will be available on page 4.)
- After programming your knobs, return to the Komplete Kontrol stand-alone app, click the MIDI button, and label the template’s knobs (Fig. 4). Now, when you choose the template, the knobs on the Komplete keyboard will show the parameters they affect. Done!
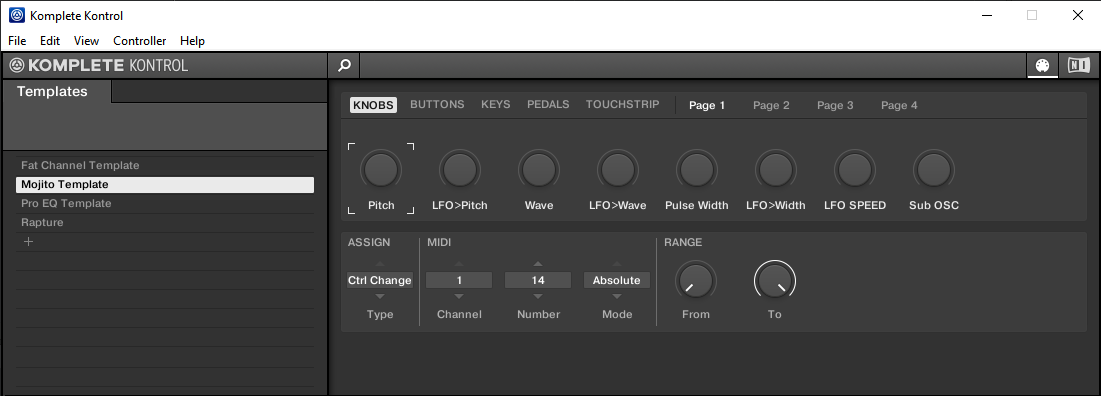
Figure 4: Labeling the template’s controls adds labels to the keyboard’s control surface.
After creating these templates, you won’t want to lose them—which you will if your hard drive crashes. Or maybe you’re going to do a re-install, or want your templates on a different computer. For more information, a helpful document on the NI web site tells where to find the Komplete Kontrol MK2 settings.dat file so you can copy it, or back it up.
NATIVE INSTRUMENTS/STUDIO ONE SYNERGY
If you have multiple templates and want to switch among them to control various instruments and effects while you work in a song, here’s the procedure.
- Make sure the stand-alone Komplete Kontrol application is open (a Komplete Kontrol instrument can be open at the same time in Studio One, there will be no conflicts).
- Enable the stand-alone Komplete Kontrol application’s MIDI button, choose the template, and then disable the MIDI button. (I usually minimize the Komplete Kontrol app after this, but it’s not necessary.)
- Open the instrument or track you want to tweak, and press the keyboard’s MIDI button to enable communication. The keyboard’s MIDI button must be shining brightly to control instruments or effects in Studio One.
You can switch between controlling an instrument loaded in Komplete Kontrol, and a Studio One instrument that uses the currently selected template. This is pretty much automatic; when you select a track with Komplete Kontrol, the PLUG-IN button toward the keyboard’s upper right lights. When you select a non-NKS track, the MIDI button lights. However, you do need to change templates if you switch to an instrument or effect that doesn’t use the currently selected template.
Note that when you want to use the Komplete keyboard as a hardware controller, or to test your programming, the stand-alone app’s MIDI button must be turned off. Then you can press the keyboard’s MIDI button to communicate with the instrument or effect.
GETTING CREATIVE WITH YOUR TEMPLATES
If you’re tweaking one parameter at a time, arguably just grabbing the mouse, clicking on a parameter, and dragging is easier. But where hardware control really comes into its own is being able to adjust multiple parameters at the same time, like varying filter gain and frequency, envelope parameters, or compressor controls that interact, like threshold and ratio.
Also note that knobs can control drop-down menus. For example, in the Pro EQ, you can choose the LC and HC slopes, or the LF and HF filter types, with knobs. Another trick is redundancy. With my Pro EQ template, the filter parameters are spread over different pages. However, the 7 active/bypass switches for the filter stages are available on every page. That way, no matter which filter stage I’m adjusting, it’s possible to bypass or enable any other stage for diagnostic or comparative purposes.
Yes, it takes a bit of effort to program templates for everything you might want to control. While this may seem arduous at first, you need to create a template only once (although of course you can edit it if needed). After a while it becomes second-nature to switch over to the Komplete Kontrol stand-alone application, choose the desired template, minimize Komplete Kontrol, and carry on tweaking parameters. And, a particularly outstanding feature is that you don’t need to switch templates when controlling the same plug-in. A good use case is adjusting EQ during the mixing process. Call up your Pro EQ template, and it can apply to whichever EQ you select.
So now we can use the Komplete keyboard’s control surface not only to tweak NKS-format plug-ins, but virtually any plug-ins from any manufacturer—it even works with prehistoric wrapped DX and DXi plug-ins. Pretty cool!
Komplete Kontrol Integration in Studio One, Part 2/3: General-Purpose MIDI Control
In Part 1 (“A New Hope”) of the NI Kontroller trilogy, we covered how to integrate the DAW functions from Native Instruments’ Komplete Kontrol keyboards with Studio One. Let’s take this another step further.
In theory, Komplete Kontrol’s MIDI control surface application is only for stand-alone use, and requires using both an external power supply and the keyboard’s 5-pin DIN MIDI connectors for I/O. With a live rig, this makes sense; for use with a DAW, you have the NKS spec communicating over USB. But wouldn’t it be great to be able to use the Komplete keyboard’s control surface with non-NKS instruments, and even effects, in Studio One over USB? Well, you can.
GETTING STARTED
For Windows, install MIDI-OX. This utility is key to letting us re-direct the MIDI messages at the Komplete keyboard’s external output to Studio One.
For Macs running Catalina, I currently don’t know of any way to use the MIDI Patchbay utility. This is similar to MIDI-OX, but hasn’t been updated since 2008, and system requirements stop at Mac OS X 10.14. You can try using it with pre-Catalina systems; if Apple’s Gatekeeper blocks the installation, you’ll need to allow it under Security & Privacy. Once you get it installed, it should work similarly to MIDI-OX if you choose Komplete Kontrol S-Series Port 1 for the MIDI input option (and consider that equivalent to Komplete Kontrol -1 in the following description), and choose Komplete Kontrol S-Series Port 2 for the MIDI output option (it should work similarly to Komplete Kontrol EXT-1, below). Mac users, please feel free to comment below about what does and does not work with the Mac.
Back to Windows…
- Turn on the Komplete keyboard.
- After the keyboard boots, open MIDI-OX. Under MIDI-OX’s Options > MIDI Devices, choose Komplete Kontrol – 1 for MIDI Input and Komplete Kontrol EXT-1 for MIDI output (Fig. 1). Click OK to close the MIDI Devices screen.
- Open Studio One, but leave MIDI-OX open while Studio One is open.
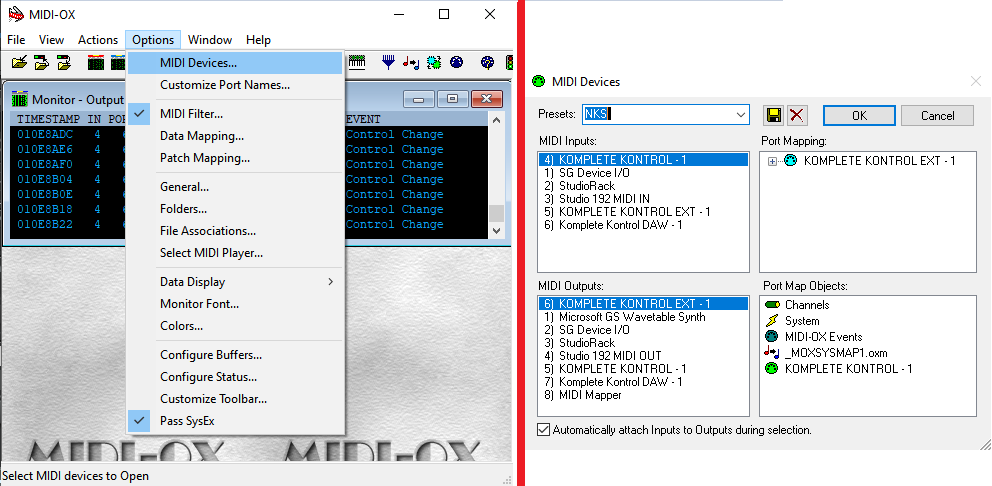
Figure 1: How to set up the MIDI-OX utility so that NI keyboards can control non-NKS instruments over USB.
- Now we need to tell Studio One that MIDI-OX is a new keyboard, even though it isn’t really. Choose Studio One > Options > External Devices, click Add, and choose New Keyboard (Fig. 2).

Figure 2: How to add MIDI-OX as a pseudo-keyboard.
- For Receive From, choose Komplete Kontrol – 1. Studio One will warn you not to do this, but just ignore the warning. For Send To, choose Komplete Kontrol Ext – 1. You’ll have another warning to ignore—but I promise you, no harm will come to Studio One.
- Click OK, then click OK again to get out of the options screen. We’ll cover when/how to use MIDI-OX later.
A WORD OF CAUTION
At the moment, the Komplete Kontrol application’s template management is somewhat primitive. Any changes you make are saved when you close the MIDI controller application; there’s no “Save” or “Save as” command, nor can you manage individual templates—they’re all saved in a single .dat file.
However, if saving-by-closing doesn’t work for you, and you can’t seem to save new templates, there may be an esoteric Windows problem. This is particularly likely for those who upgraded to Windows 10 from an earlier version, because the folder holding the templates may be write-protected due to inheriting permissions. Here’s the fix.
- Open the C: ProgramData folder. (This is a hidden folder, so if you don’t see it, type Windows key+R, and then type Control Panel in the Open box. In the Control Panel, click on Appearance and Personalization, then choose File Explorer Options. Click on View, and then select Show Hidden Files, Folders, and Drives.)
- In ProgramData, locate the Native Instruments folder, and right-click on it.
- Click on the Security tab, then click Edit.
- Choose Users, check all the Allow boxes, and click Apply. Also, do this for any other Group or User names that let you click the Allow boxes (Creator Owner may not…no worries). After applying everything, click OK.
Okay, now that’s out of the way. Hey!! Don’t blame me! It’s a Windows thing.
CREATING A STUDIO ONE-FRIENDLY TEMPLATE
You access the MIDI control surface when you push the Komplete keyboard’s MIDI button, which also defaults to opening if the Komplete keyboard doesn’t see an NKS instrument. The following procedure describes how to create the kind of template we want for Studio One’s plug-ins.
- Open the Komplete Kontrol application (Komplete Kontrol.exe) in stand-alone mode, not as a plug-in. This is the only mode that lets you do MIDI assignments. Then, click on the MIDI 5-pin DIN symbol in the upper right (Fig. 3).
- Create a new template by clicking on the + button under templates. Right-click on it to rename it.
- The template will default to two pages of controls (16 knobs total), but of course, we want more! Click on the + sign to the right of a page, and you can add up to two more pages.

Figure 3: The important items needed to create and customize a template are circled in white. From right to left: MIDI button that opens the MIDI assignment editor, + sign for adding more pages, and + sign for adding more templates (in this case, it’s adding one for the Fat Channel).
- Now comes the tedious part. Each knob and button needs to have a unique MIDI continuous controller (CC) number, so that each one can control a unique parameter. Page 1 defaults to CC14-CC21, and page 2 covers CC22-CC29. However, pages 3 and 4 just duplicate the assignments for page 1, and all the buttons default to CC112-CC119. So it’s time to program some additional controls.
- Click on one of the virtual knobs, and you’ll see its number assignment in the MIDI field toward the lower middle. Change this number to the desired controller number. The label will still reflect the old number, but that’s okay—we’ll be re-naming the labels anyway for specific synth and effects parameters. Here’s how I assigned the controllers.
Knobs
- Page 1: 14-21 (the default)
- Page 2: 22-29 (the default)
- Page 3: 30-37
- Page 4: 38-45
Switches
- Page 1: 88-95
- Page 2: 96-103
- Page 3: 104-111
- Page 4: 112-119 (the default)
Note that you can choose whether the knobs cover an absolute range, as specified by the Range From and To controls, a Relative Range, or a Relative Offset. Since I don’t like my head to explode any more than necessary, I left this option on Absolute to start, knowing that I could change it later. You can also program keyboard parameters, pedals, the touchstrip, and the keyboard key colors—16 color choices in all. So, different templates can color the keys differently for visual confirmation that you’ve chosen the desired template (of course, I chose the color “mint” for the Mojito template).
So to recap, we’ve set up a general-purpose template, with a separate controller for each knob and switch, that we can use to create a custom control surface for non-NKS instruments and effects… as we’ll find out in part 3 of the NKS trilogy, Rise of the Controller.
Komplete Kontrol Integration in Studio One, Part 1/3
Studio One 4.53 introduced integration with Native Instruments’ Komplete series of keyboards, which is a big deal. Although these keyboards are theoretically dedicated to NKS-compatible plug-ins and mixer/transport hands-on control, with Windows systems (Mac fans, there’s more on this later) you can use the keyboard as a general-purpose, hands-on MIDI controller for non-NKS plug-ins, including all bundled PreSonus effects and instruments (as well as plug-ins from other manufacturers). Also, unlike standard NKS, you’ll be able to control effects, regardless of whether or not they’re inserted in an instrument track.
There’s a lot to cover, and since this is more like a tutorial than a tip, it’s split into three parts: DAW control with Studio One, creating custom templates for plug-ins, and how to apply the templates in your workflow.
INTEGRATING THE KEYBOARD
Choose Studio One > Options > External Devices, and click Add. Scroll to the entry for Native Instruments, unfold it, and select either your A/M or S series keyboard for Receive From and Send To. I’m using an S49 (Fig. 1).
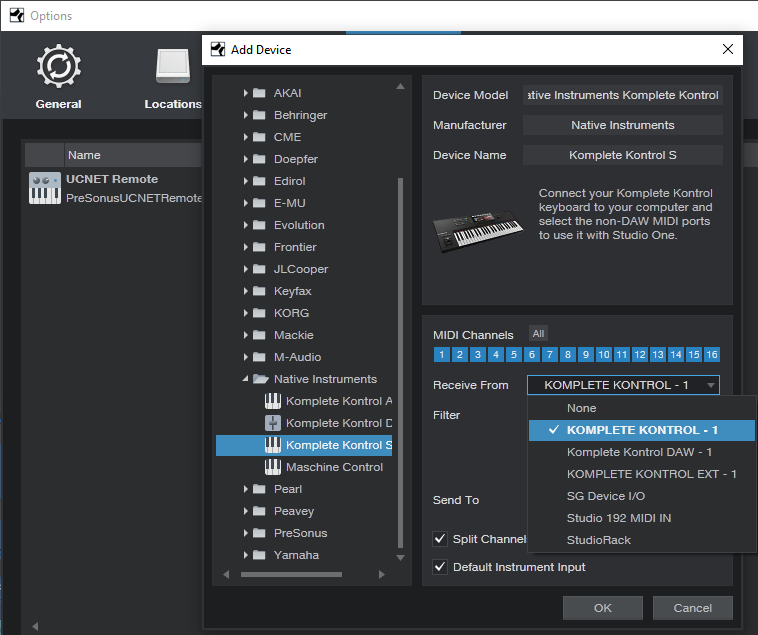
Figure 1: Komplete is selected as the keyboard, with Split Channel selected for more convenient use with multitimbral instruments, like IK Multimedia’s Syntronik.
INTEGRATING THE CONTROL SURFACE
Now let’s set up the Komplete keyboard as a new control surface. Again, choose Studio One > Options > External Devices, click Add, and scroll down to the entry for Native Instruments. Unfold it, and select Komplete Kontrol DAW – 1 for both Receive From and Send To (Fig. 2).
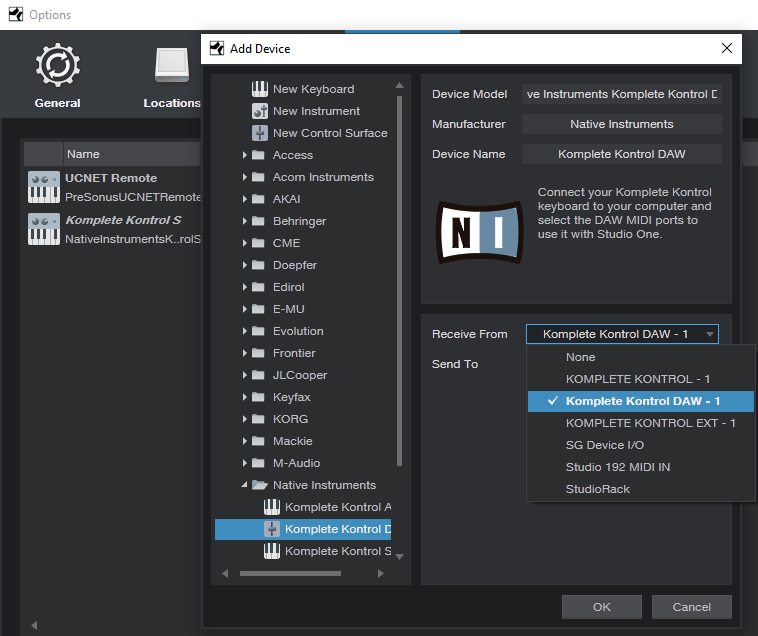
Figure 2: How to add the Komplete keyboard as a control surface for DAW integration.
CHOOSING THE MODE OF OPERATION
To edit NKS plug-ins, press the PLUG-IN mode button in the keyboard’s cluster of six buttons, toward the upper right. Controls that don’t relate to a synth or effect, such as the Transport, Metronome, Tape Tempo, and the like remain active. When it’s time to mix and you want full integration with Studio One’s mixer, press the MIXER button.
The following describes how the control surface for the current S-series Mk2 keyboards integrates currently with Studio One; click here for information from PreSonus on suitability with other NI keyboards, and updates.
Transport. The Play, Rec, and Stop buttons do what you’d expect, but there’s more to the story than that—there are several nuanced options. The following assumes you’re starting from a stopped transport.
- Press Play to begin from the Play Start marker. If there’s no Play Start marker, playback starts from the cursor’s current position. If you stop and re-initiate playback, playback re-starts from the cursor’s original position.
- Return to zero: When the transport is stopped, press Stop again to return to zero.
- Pushing on the big navigation knob toward the right initiates playback from the Play Start marker. (Note that this involves pushing downward into the knob, not left/right or up/down.) If there’s no Play Start marker, playback begins from the Loop Start, whether the loop is active or not.
- Push downward on the navigation knob during playback to jump to the Loop Start, which resumes playback automatically from there.
- Pressing Shift+Play operates the same way as using the navigation knob for playback control.
- With any scenarios involving the Play Start marker, it doesn’t matter if it’s before or after the Loop Start, or within the loop itself.
- Press Rec to initiate or punch-in recording. Press again to end or punch out recording. If you don’t record audio or MIDI while recording is active, there’s no blank event—it’s like nothing ever happened.
- Shift+Rec toggles the count-in between on and off. When you press Shift and count-in is enabled, the Rec button letters light bright red. Otherwise, the rec button letters are dimmed.
- Loop toggles the loop between on and off. To move the loop (whether enabled or not), hold the Loop button down, and rotate the navigation knob. For example, if the loop extends for four measures, moving the knob 1 click clockwise moves the loop forward to the next four measures. Moving the knob 1 click counter-clockwise moves the loop backward to the previous four measures.
- Metronome toggles between on and off.
Mixer
- The display for each visible channel shows the channel’s name, fader level, pan, metering (but not overloads), and status of a channel’s Record, Solo, and Mute buttons.
- Track select buttons. The eight buttons above the display select a track, however, moving the navigation dial left or right moves from one track to the adjacent track (left or right respectively).
- Hold Mute, and then select a channel with its track select button, to mute/unmute. The keyboard’s corresponding select button glows yellow.
- Hold Solo, and then select a channel with its track select button, to solo/unsolo. The keyboard’s corresponding select button glows blue.
- Shift+navigation knob move down (not push inward) selects level for the selected track. This mode remains selected until changed. Both the associated track knob, and the navigation knob, alter the selected track’s level. Holding Shift while moving either knob provides finer resolution. The individual track knobs provide the finest resolution.
- Shift+navigation knob move up (not push inward) selects pan for the selected track. This mode remains selected until changed. Similarly to level selection, both the track knob and navigation knob alter the selected track’s pan, and holding Shift while moving either knob provides finer resolution. The individual track knobs provide the finest resolution. Note: The Pan control for the Main channel is always shown panned full left. You can ignore this, because the Main channel doesn’t have a pan control anyway. The pan is centered properly.
- Auto toggles between Read and Touch (write) automation for the selected track. Be aware that you can’t choose automation off with Auto.
- Left/right arrow buttons select channels in groups of 8. However, if the last bank of eight has fewer than eight channels, the display will fill with the last eight channels. For example, if you expect the last bank to be channels 17-24 but only 22 channels are in use, the keyboard will display channels 15-22. This is by design, because it makes sure there aren’t any blank channels—you can always see eight channels at a time. If you hit the left arrow button, it won’t go back to channel 9, but be offset by the same amount as the previous bank. To “reset” the banks, hit the left arrow button until you’re back at the beginning.
Miscellaneous Functions
- Undo and Redo. For Redo, hold Shift and press Undo.
- Quantize. This quantizes whatever is selected, at the current quantize value.
- Tap this, even if not lit, for tap tempo. I love this feature when starting a song.
This takes care of the mixer and transport functions. Next week, we’ll cover how to create custom MIDI control setups using the Komplete Kontrol application, and that will prepare us for Part 3, which describes how to create “faux NKS” control surface capabilities for PreSonus instruments and effects. Yes, it really is possible…
How to Play Faster—By Playing Slower
In the comments for last week’s tip on varipseed-type formant changes, reader Randy Hayes asked if it was possible to change the tempo similarly so that you could play along with something at a slower tempo, then speed it back up (while still being the correct key). This was a common technique with tape, but because pitch and speed were locked together, there would be formant changes—whether you wanted them or not—when you returned the slowed-down track to pitch.
One of the MIDI’s great features is that you can sloooooooow down the tempo, play along with the slowed-down track, then speed it up to make it seem like you have lightning-fast technique. The good news is that with audio, you can slow down Studio One’s tempo without changing pitch, which sounds great in theory. The bad news is that this isn’t always a painless solution, because Events recorded at a slower tempo will likely need to be time-stretched when you return to the original tempo, and you may also need to call up the Inspector for Events or Tracks to specify how the Events should relate to tempo. Also, if there’s a Tempo Track with tempo changes, then you have to offset all the tempo data, as well as make sure you restore it to the proper tempo when you’re done.
Fortunately, there’s an easy way to record along with a song at a slowed-down tempo, and have the correct timing for the recorded part when you restore the song to its original tempo. This complements last week’s formant-changing trick; the technique starts off similarly but ends up quite differently.
- Create a premix of your existing tracks with the Export Mixdown function. In the dialog box, check Import to Track and Close after Export (Fig. 1; outlined in white).
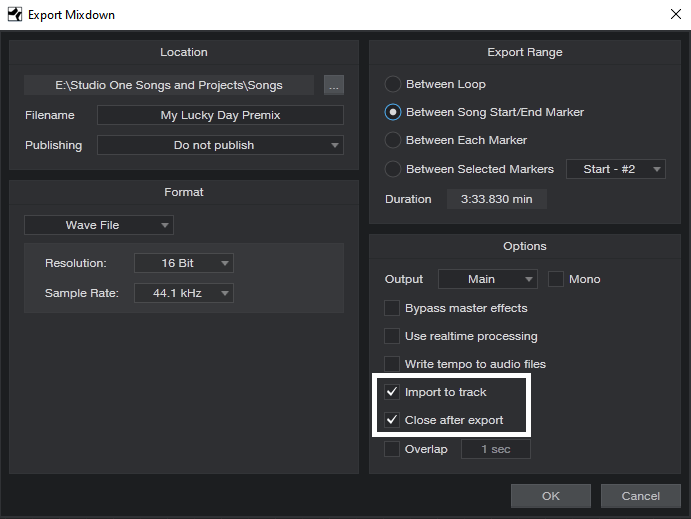
Figure 1: Use the Export Mixdown function to create a premix.
- After the premix is imported, mute all other tracks except for the Imported premix track.
- Select the premixed track, and right-click on it (Fig. 2), or open its Inspector (F4), to access the Speedup parameter. Note that this parameter can also slow down the speed, by entering a value less than 1.00.
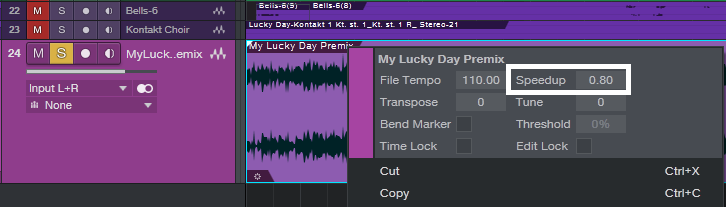
Figure 2: Access the Speedup parameter by right-clicking on the premix.
- Slow down the premix to the desired tempo with the Speedup parameter. For example, a Speedup reading of 0.80 means the song’s tempo is 80% as fast as it had been previously. Bear in mind that you can’t do a ridiculous amount of slowing down without affecting the audio quality of the track you’re recording, but overall, Studio One is quite forgiving.
- Record the new track as you listen to the premix’s slowed-down tempo.
- Before restoring the original tempo, the track you recorded has to start at the song’s beginning. If that’s where you started recording, fine. Otherwise, use the Paint tool to draw an Event between the start of the song and the start of your part, select them both, and type Ctrl+B to merge them together (Fig. 3).
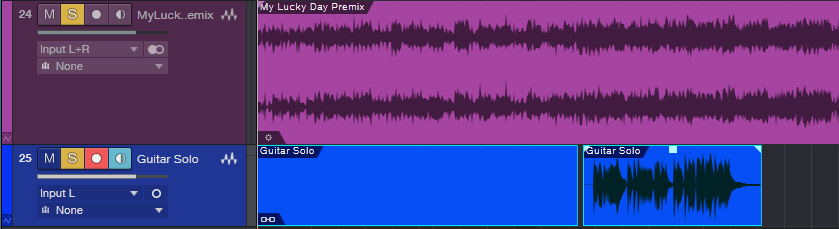
Figure 3: The recorded guitar solo, with an added “dummy” Event that starts at the beginning of the song, prior to merging them together.
- Now, right-click on the overdub you recorded so you can access its Speedup parameter.
- Open up your calculator to determine how much you need to speed up the overdub. Divide 1 by the slowdown amount to obtain the correct Speedup amount. For example, if you slowed down to 0.80, then 1/0.80 = 1.25. So, set the recorded track’s Speedup parameter to 1.25 (Fig. 4).
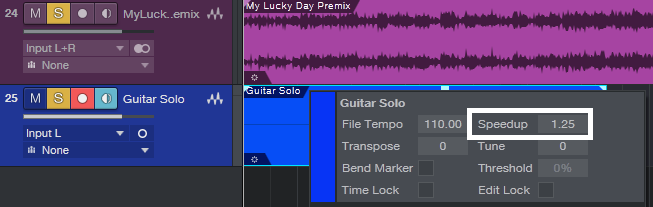
Figure 4: Once the newly recorded track goes to the start of the song, change the Speedup parameter to compensate for the slowdown.
- Delete the premix (or mute it if you plan to do more recording at the slower tempo), and unmute the other tracks. The part you recorded should now match the Song’s overall tempo, even if there are tempo changes.
Note that any vibrato will be sped up when you restore the new part to the original tempo. This may be something you want, but if not, just remember to apply a slower vibrato than usual. Also, the timing will be tighter—a note that’s off the beat by a bit will hit closer to the beat when sped up.
Sure, some people might think this is cheating. But back when recording studios started adding EQ or reverb to vocalists, that was considered cheating too. The technique is the skill with which we use our tools, and having “Studio One technique” can be just as important—and valid—as having technique on your chosen instrument.
Just remember, all that matters about music is the emotional impact on the listener. They don’t care what you did to produce that emotional impact!