Monthly Archives: October 2023
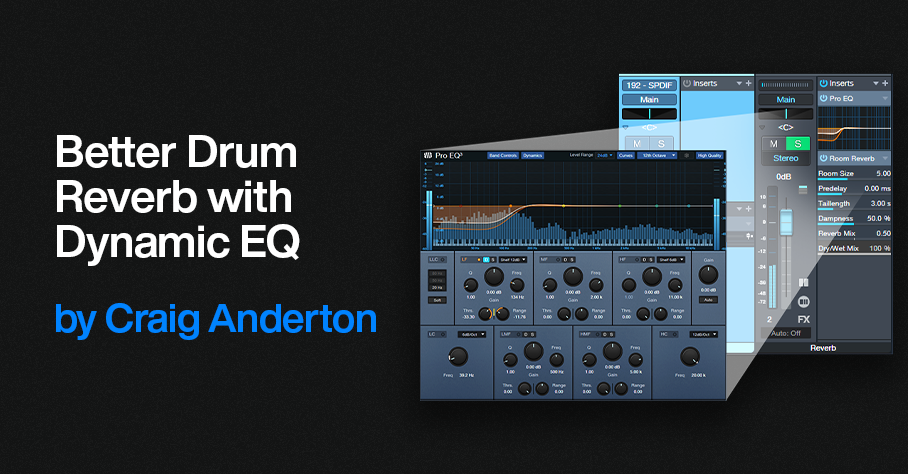
Better Drum Reverb with Dynamic EQ
Sending too many low frequencies through reverb gives a bloated, muddy sound. This is one reason why you’ll rarely see a send from a bass track going into reverb.
Drums are different, because you often want reverb on drums. But you don’t want the kick sending a giant blob of low frequencies through the reverb. You can control this if your drums are on separate tracks or outputs, but drum loops don’t give you that option.
The usual solution is inserting a highpass filter prior to reverb, typically with a 100-300 Hz cutoff. This solves the kick problem, but it also reduces the frequencies that create the “fat” element in snare and toms. You usually want those drums in the reverb, to avoid a thin sound.
The Solution: Dynamic EQ
Using the Pro EQ3’s dynamic processing provides the ideal solution. Fig. 1 shows the track layout. The drums go through a send to an FX Channel, which inserts the Pro EQ3 prior to the Room Reverb (or reverb of your choice).
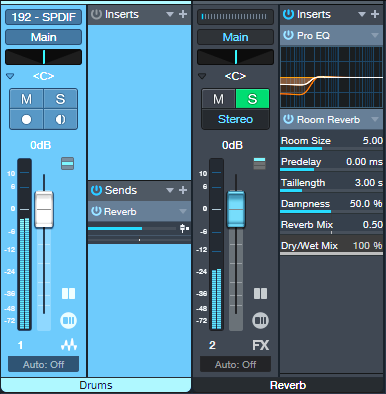
Figure 1: The Pro EQ3 inserts prior to reverb that’s processing the drums.
Fig. 2 shows the dynamic EQ settings. The low-frequency shelf EQ is set for a 12 dB/octave slope, which is steep enough to focus on the kick while leaving higher frequencies intact.
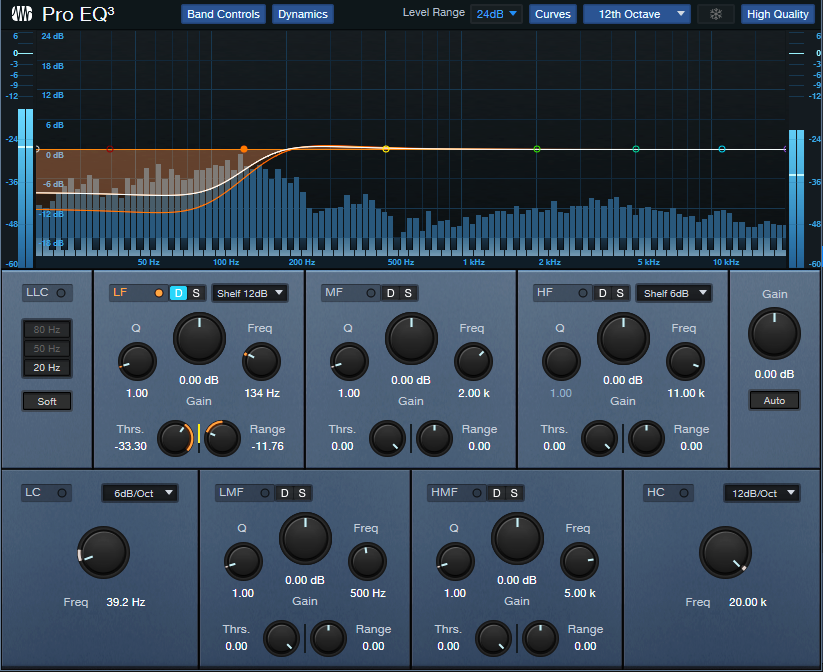
Figure 2: Suggested initial settings for the dynamic EQ parameters. Note that only the LF stage is being used.
The settings in fig. 2 should get you close to the sweet spot between too much bass, and a thin sound from not enough low frequencies. If needed, tweak the Threshold, Frequency, and Range parameters to optimize the sound further.
To hear how this affects the drum reverb, check out the following audio examples. They use a lot of reverb to get the point across. Here’s the drum reverb sound without the Pro EQ3 dynamic EQ.
With dynamic EQ, the sound is tighter and free of mud. Mission accomplished!
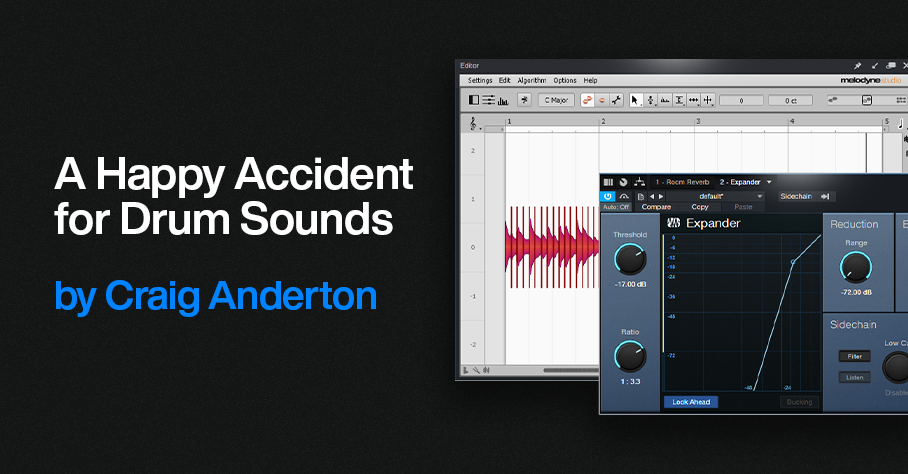
A Happy Accident for Drum Sounds
While trying to do something else with Melodyne, I stumbled on this way to add depth or tightness to drum sounds—quickly and easily. Here’s the sound of an acoustic drum loop.
With this technique, we can create a deeper sound, like this…
Or a tighter sound, like this…
Or a totally crazee sound for all you experimental electronic and sound design fans, like this…
Step-by-Step Instructions
1. Duplicate your drum event. You’ll need to layer a processed drum track with the original drum track.
2. Click on the duplicated drum event. Open it in Melodyne by typing Ctrl/Cmd+M.
3. Then as in fig. 1, choose Algorithm > Universal (Standard). This algorithm is available in all Melodyne versions, including Essential. Then, click on Redetect if needed.
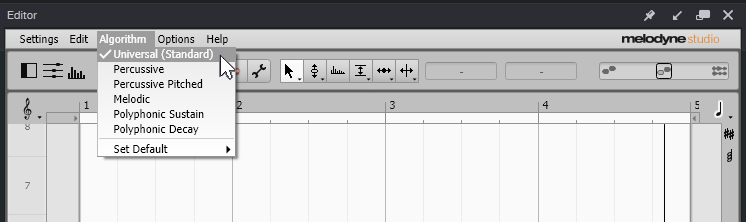
Figure 1: Choose Melodyne’s Universal detection algorithm.
4. Type Ctrl/Cmd+A to Select All the blobs. Melodyne will display your event so it looks like Fig. 2.
Figure 2: The drum blobs are ready to be transposed.
5. Drag the blobs up for a tighter sound, or down for a deeper sound. The DeepDrums audio example transposes all blobs down 5 semitones, while the TightDrums audio example transposes them up 5 semitones. (Sound design and electronic sound fans, feel free to play with extreme transposition amounts.)
6. Although not essential, I recommend inserting an Expander in the duplicated track. This can restrict the dynamics so that you hear transposition applied to only the drum attacks. Fig. 3 shows the Expander settings used in the audio examples. The optimum Threshold setting depends on the drum track’s level.
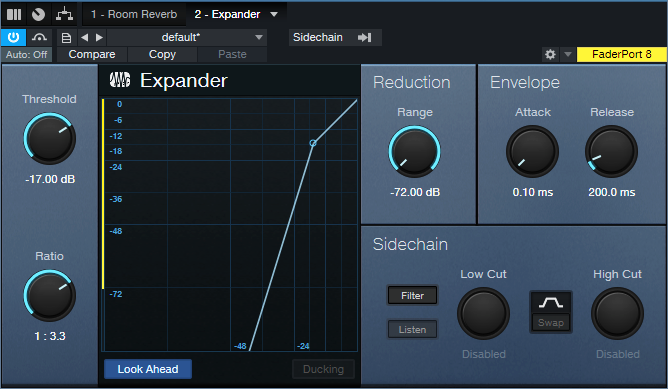
Figure 3: Initial Expander settings to restrict transposition to the drum peaks.
And that’s all you need to do! But if you want to take this further, you can drag individual blobs as desired. For example, you might want to drag a snare hit up by 7 or 8 semitones, or even more. Or, layer two drum parts modified with this technique, and use extreme transpositions…you have a lot of options!
Create Track Presets for Parallel Processing
Parallel processing splits a signal into two or more parallel channels. Bi-amping is a common example of parallel processing:
- One channel processes low frequencies.
- The other channel processes high frequencies.
The two channels then mix together to a common output (e.g., the Main output bus). You generally don’t want the original audio that was split to appear in the mixed output of the two channels.
Parallel processing has many applications, like altering stereo image, emphasizing transients, doing creative compression effects, super-wide reverbs, and more. Studio One Professional has a Splitter module that makes parallel processing easy within an FX Chain. However, this isn’t always a perfect solution, for reasons described later. And Studio One Artist doesn’t have a Splitter—so let’s look at an alternate way to do splits.
Splitting with Buses
The traditional way to create a split for parallel processing uses buses. You insert pre-fader sends in the channel with the track you want to process. These go to two FX or Bus Channels (fig. 1). With pre-fader sends, the original channel’s fader can turn down all the way. This prevents the signal from going to the Main bus, yet audio still proceeds to the parallel paths.
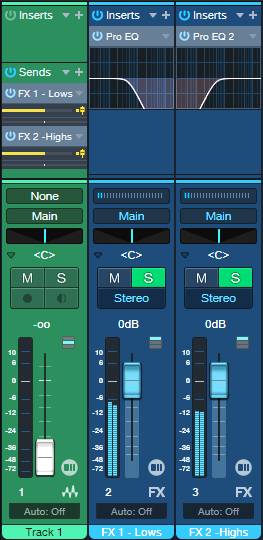
Figure 1: This example of traditional bus-based splitting provides bi-amping.
However, Track Presets can’t save a combination of tracks and buses, only tracks. So, let’s speed up your sessions with a Track Preset-friendly solution.
Splitting with Tracks
This option accomplishes the same goal, but you can save the setup as a Track Preset for instant recall. First, we need to do a little prep work. The parallel channels receive their inputs from Track 1’s output (note that the parallel tracks’ input fields in fig. 3 show “Track 1”). So, we can’t turn the Track 1 fader down to have the equivalent of a bus’s pre-fader send. Although there are some instances where you may want the original sound mixed in with parallel processing, most of the time you want to hear only the outputs from the parallel-processed tracks.
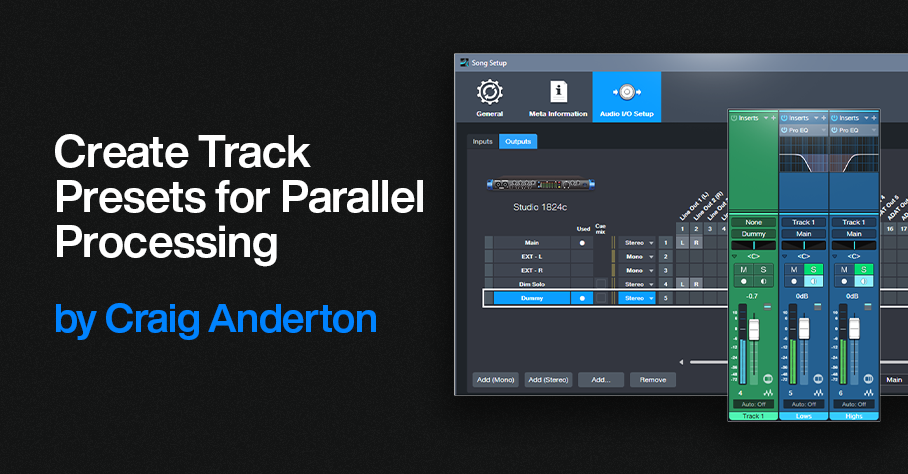
Fortunately, there’s an easy way to do a pseudo pre-fader send. In Song Setup, create a Dummy Output and don’t assign it to anything (fig. 2). We don’t want it to go anywhere. This lets the parallel processed tracks still receive their inputs from Track 1, but Track 1’s output feeds the Dummy bus instead of the Main bus. So, you won’t hear Track 1’s original audio.
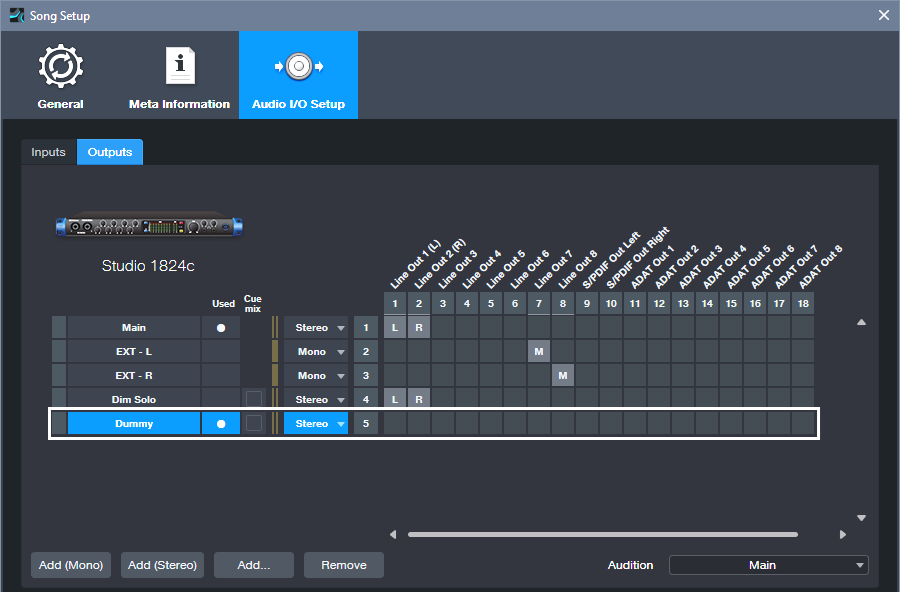
Figure 2: Use Song Setup to create a Dummy bus to nowhere.
Fig. 3 shows the track-based splitting configuration. Aside from assigning the source track to the Dummy bus instead of the Main bus, here are the differences compared to fig. 1:
- The parallel channels need to have their Monitor buttons enabled.
- If you want to blend in the original sound, assign its output to the Main bus instead of the Dummy bus. Because Track 1’s fader serves as a master input level control for the audio feeding the parallel paths, you have the equivalent of a post-fader send if needed.
- Solo Safe isn’t enabled automatically. To enable it, Shift+Click on the Solo buttons in the parallel channels.
- And (drum roll, please!) here’s the big advantage: You can select all three tracks, and save the configuration as a Track Preset. Just remember that any project in which you use this track-based configuration needs to have a Dummy output available in Song Setup.
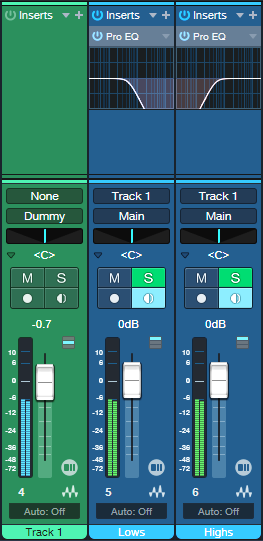
Figure 3: You can save this parallel processing configuration as a Track Preset.
Disadvantages Compared to Studio One Professional’s Splitter Module
- Unlike an FX Chain, this parallel processing method doesn’t insert neatly in a track, and requires an additional channel for each split you want to add. (The FX Chain’s Splitter can have five splits within a single channel and can do frequency-based splits, which is ultra-cool.) A mitigating factor is that once you set the level for the audio track that splits into the parallel tracks, you can hide it.
- Another limitation is there’s no panel for Macro Controls. For complex FX Chains with multiple splits and processors, Macro Controls can save a lot of time when you need to tweak the sound.
Advantages Compared to Studio One Professional’s Splitter Module
- With channel-based parallel processing, the effects providing the processing are exposed. You don’t have to open up the FX Chain to edit, delete, or replace them.
- Because the effects are in channels, you can expand the micro-view. This lets you modify parameters and see characteristics (like EQ curves) at a glance.
- It’s not possible to have inter-effect sends within an FX Chain. With the track-based approach, the splits can have sends that go to effects in other splits. For example, a sound in one split could trigger a dynamic EQ’s sidechain in a different split.
The bottom line is for Studio One Artist, track-based splits are a great way to create parallel effects. And with Studio One Professional, FX Chains provide exceptional functionality—but even so, track-based splits can perform some tricks that FX Chains can’t do.
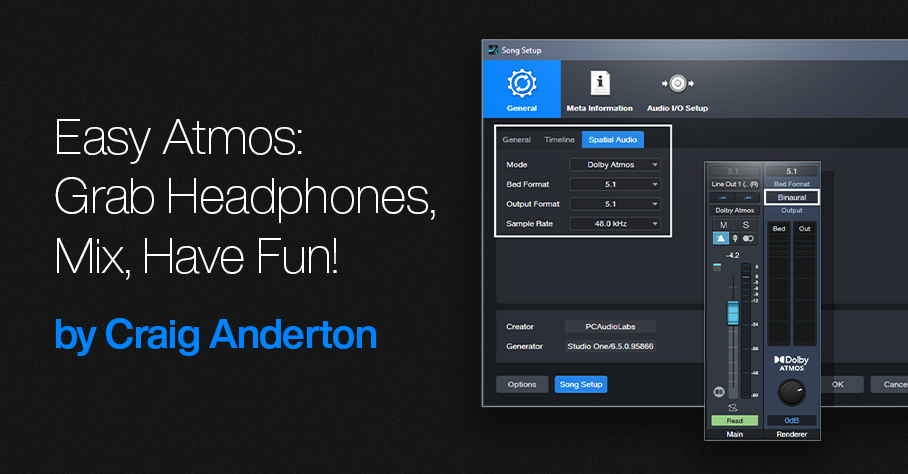
Easy Atmos: Grab Headphones, Mix, Have Fun!
Everyone talks about the importance of Dolby® Atmos for post-production, but the implications go further than that. Atmos really does change how you create and experience music. I’d almost compare it to the switch from mono to stereo.
This blog post is about the simplest, quickest way I’ve found to start exploring the 5.1 format with Atmos: remix one of your pre-Version 6.5 songs for headphones, using Atmos’s immersive panning options and binaural rendering. (Note: Save the song you want to remix to a new folder, and work with the copy. Then if you hit Save accidentally, you won’t overwrite the original song.)
1. Open your pre-6.5 song in Studio One. It will look like it did in previous versions.
2. Choose Song > Spatial Audio. In the Spatial Audio tab under General, for Mode select Dolby Atmos. For Bed Format and Output Format, choose 5.1 (fig. 1). If you’re not familiar with the concept of a Bed, see last week’s blog post. Although you’re locked into choosing 48.0 or 96.0 kHz as the sample rate, Studio One will convert your song automatically if it was done at a different sample rate.
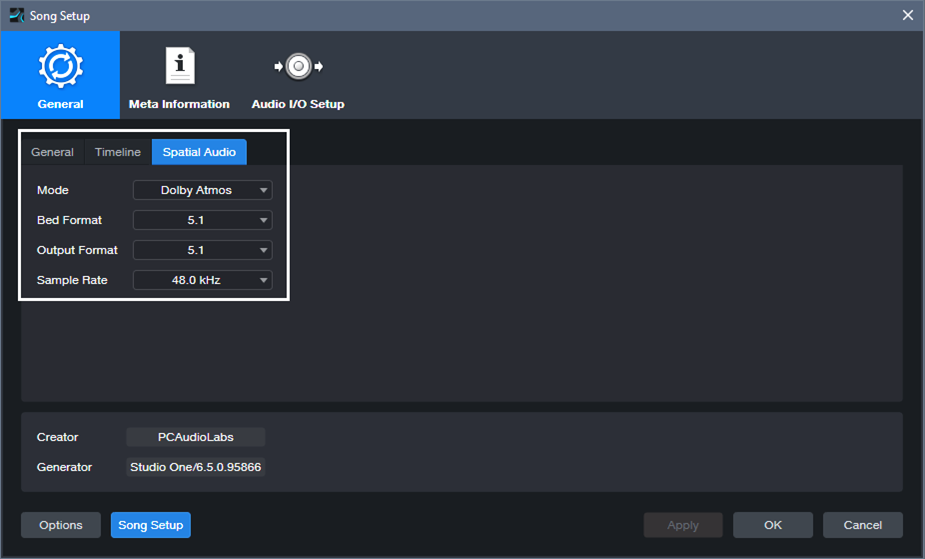
Figure 1: Song Setup for Spatial Audio.
3. Click Apply.
4. Under Audio I/O Setup, Outputs tab, select 5.1 for the Main output (fig. 2).
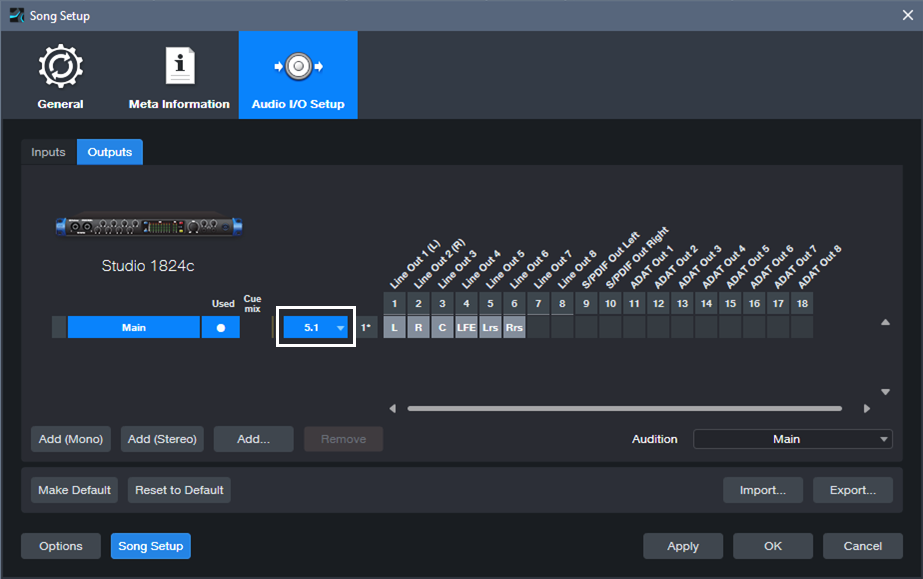
Figure 2: Audio I/O Setup for experimenting with Atmos.
5. Click Apply and OK.
6. Open the Console (F3). Your panpots have now been promoted to Surround Panners. (Regarding Sends and Surround Panning, please see the note at the end.)
7. In the Renderer section at the Console’s right-hand side, choose 5.1 for the Bed Format, and Binaural for the Output. Remember, you’ll need to do all your monitoring on headphones. To avoid blasting your ears, I highly recommend turning down the Renderer’s level, and then bringing it up to a comfortable listening level during playback.
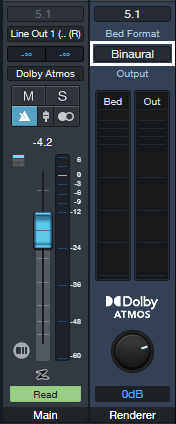
Figure 3: The Renderer section produces the binaural output for monitoring over headphones.
8. Start playback. It won’t sound exactly like the mix did previously, but that’s the point—now you can remix it for Atmos.
Of course, this is just a start. All we’re doing is setting up a sandbox so you can play with this shiny new Atmos toy in Studio One. Start your experiments with panning. Double-click on a Surround Panner to open it. You can change the width of the stereo field, its position, and whether the sound is close to the listener or further away. And yes, it’s all automatable. Choose Disable Center (which is more about dialog placement for movies, so we don’t need it). Also, LFE isn’t all that necessary for most music, unless one of your instruments is an explosion.
Right-click on a panpot, and you can replace the Surround Panner with a Spatial Object Panner, which places the sound anywhere in an immersive space that also emulates height. But we’re getting ahead of ourselves…for now, just have a good time playing around, and we’ll get deeper into how to actually mix with Atmos from an artistic/musical standpoint in later blog posts. Who knows? You might enjoy the process enough to set up a speaker-based surround system, and be seduced by the full impact of Atmos mixing.
About Sends
To have Surround panners for Sends, the Bus they go to needs to be configured for Surround. Do this by selecting 5.1 from the drop-down menu in the field below the Mute and Solo buttons (fig. 4).
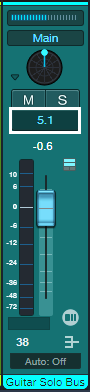
Figure 4: Where to choose the bus Speaker Configuration.
Note that Bus Channels, FX Channels, Aux Channels, and Send panpots can’t be Spatial Object Panners, only Surround Panners.