Category Archives: Friday Tip of the Week
Using a Touchscreen with Studio One
The first touchscreens could detect a single touch, but modern touchscreens can handle up to ten touch points—which makes sense, because we have ten fingers. Studio One supports ten touch points natively on Windows, and thanks to a built-in TUIO extension, on the Mac as well.
DAW control with touch sounds sexy, but using touch on a large monitor is a different experience compared to using touch on a smartphone or tablet. Furthermore, whether a third-party plug-in supports multiple touchpoints is hit-or-miss. Also consider that a good touch monitor costs around $300—that’s quite a bit more than a standard monitor, so you need to decide how valuable touch would be to you.
Practically speaking, you probably don’t need touch, but it does offer two major advantages when working with Studio One. The main plus for me is being able to use a touchscreen control surface and mouse simultaneously—two-handed operation improves the physical workflow. The other advantage is being able to edit multiple parameters simultaneously with effects and virtual instruments (like adjusting filter cutoff while trimming the filter envelope amplitude, or editing EQ frequency and boost/cut8 simultaneously).
The Ergonomics of Using Touch
To use a touchscreen as a control surface, I lay the monitor down almost flat, at about a 20% angle (Fig. 1). It feels very much like working with a conventional hardware mixer. For this application, it’s vital that the monitor have an adjustable A-frame stand, so that you can adjust it to any angle you want.
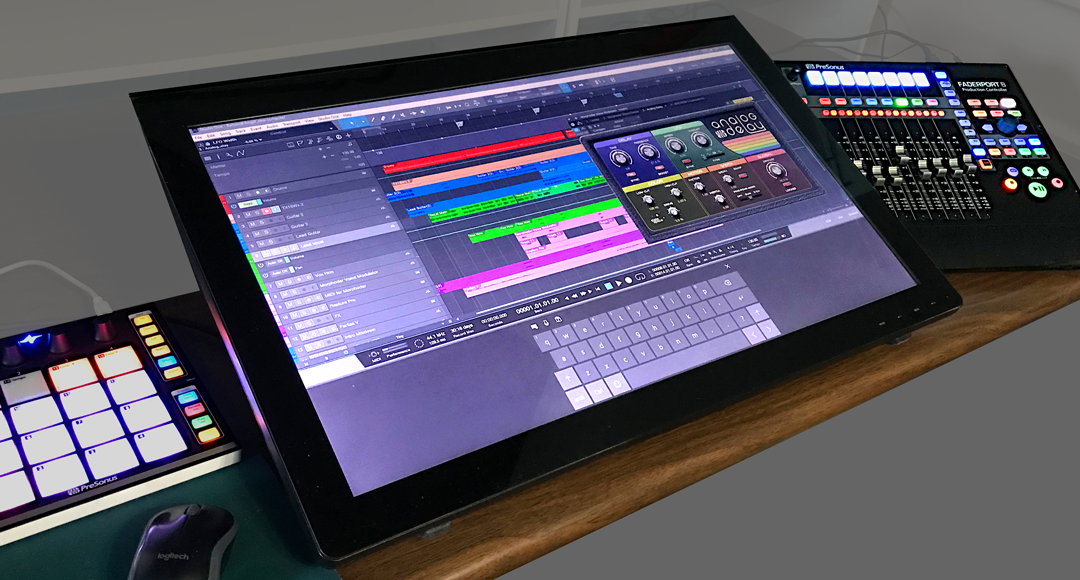
Figure 1: The Planar touchscreen is flanked by PreSonus control surfaces—that’s a lot of hands-on control. It’s at more of an angle than I normally use so that the screen is more visible.
Where touch doesn’t work, at least for me, is trying to use it with a conventional monitor placement (i.e., at a right angle to the desk surface, directly in front of you). Reaching out tires your arms; when I’m using the touch screen as a conventionally placed monitor for a project like writing an article, I rarely use touch. However, it can be helpful to move windows around while the mouse is doing something else, or touching a function after the mouse has made a selection. If you have RSI issues, touch can also provide a break from using a mouse all the time.
Also note that it takes a while to develop “touch technique.” You generally need to use the point of your finger to be sufficiently precise, and with the monitor at a low-lying angle, I usually have to aim a little toward the top of what I’m trying to hit. Also, you need to learn a few new tricks. You “right-click” simply by touching, and then continuing to hold your finger down until the context menu appears. And you can zoom tracks horizontally or vertically with two-finger pinches or stretches, which is pretty cool…as well move a project horizontally along the timeline by just swiping left or right.
Integrating a QWERTY Keyboard
You also need to decide how to integrate a QWERTY keyboard. If it’s in front of the touchscreen, then the touchscreen needs to go further back, which diminishes its ease of use because you have to reach further. One option is placing a keyboard on your lap, or adding an under-table keyboard drawer. Then you can slide the keyboard out when needed, and slide it back in when you want to concentrate on the touchscreen.
Another option is using Windows’ onscreen keyboard. Although primarily intended for tablet mode, right-click on the Taskbar, and choose “Show touch keyboard button.” This button will appear on the taskbar and persist; click on it to show/hide the keyboard. (Also for what it’s worth, you can enable a button for an onscreen touchpad.) Note that you have several keyboard options, from a mini-keyboard to one that includes Alt, Ctrl, Windows, and Function keys (Fig. 2).
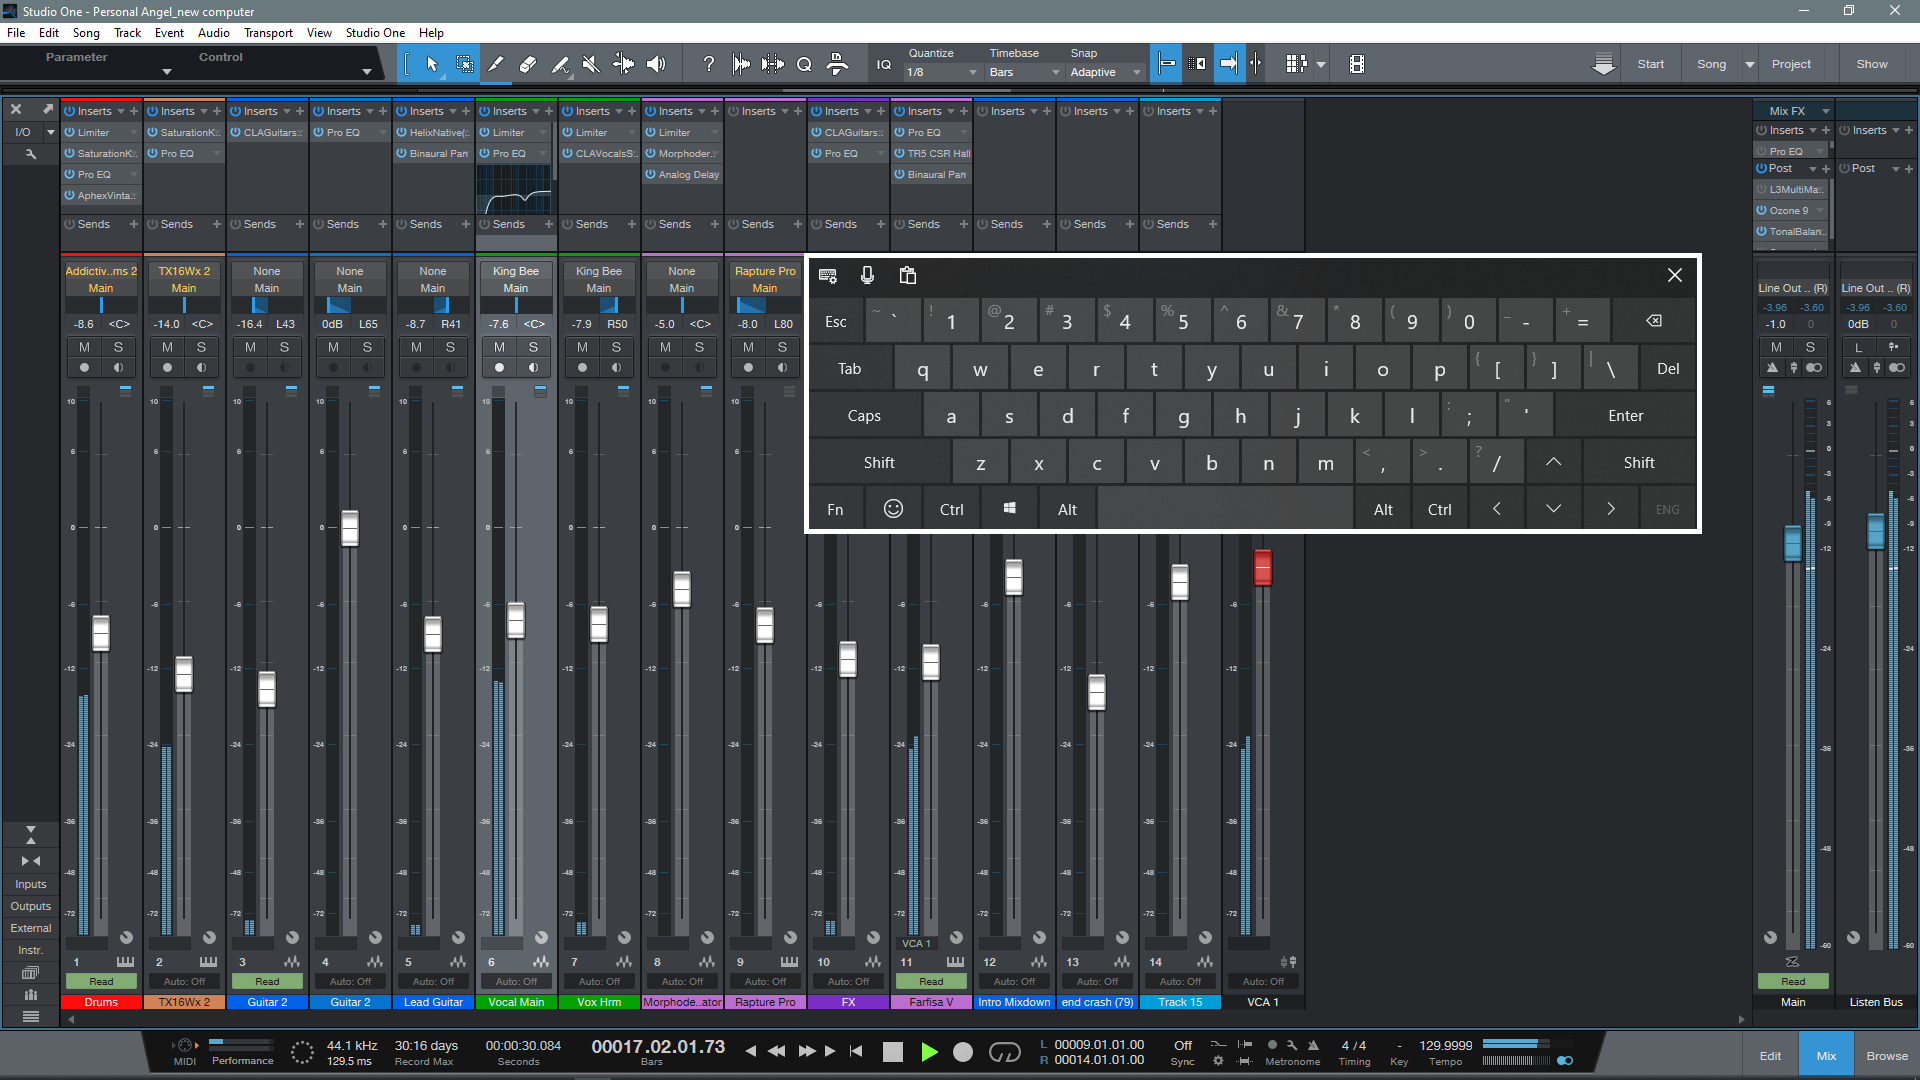
Figure 2: This shows the full keyboard, set for the option to float anywhere over the window. Note how the faders are stretched to give excellent touch resolution.
So Is It Worth It?
If you miss working on a hardware mixer surface, a gently angled, horizontal touch screen is pretty close to that experience. Studio One’s ability to extend the height of faders is also great—when you mostly want to concentrate on fine level adjustments, you can do so with touch. Multitouch on effect and instrument parameter adjustment is also welcome, especially compared to bouncing the mouse back and forth among parameters. Another factor is that unlike an external hardware control surface, you don’t have to “mentally map” the hardware to what you see on the screen—after all, you’re adjusting what’s on the screen.
If you have a choice between spending $300 on upgrading your speakers or buying a reasonably large touchscreen, I’d prioritize upgrading your speakers. But if you’re looking for a new tool that can give you an edge in certain workflows, a touchscreen may be the answer. And even if it isn’t, it can always serve as a conventional monitor, and provide an extra screen. And we can never have enough screens!
Authentic ADT (Automatic Double-Tracking)
Double-tracking is the process of recording the same part a second time, and trying to duplicate the original part as closely as possible. The goal is to make a part sound bigger, more prominent, or (with mono instruments), create a stereo image from the two tracks.
Spoiler alert: humans aren’t perfect. When playing the second part, there will be slight timing, and perhaps pitch, variations. Within reason, these variations are good, because they keep the part from sounding like the original part was just copied to another track. However, sometimes it’s difficult to play a second part that’s tight enough, especially with something like a complex or fast lead guitar part. The usual solution is to do electronic doubling using an effect, like Studio One’s Chorus/Doubler.
However (at least to my ears), electronic doubling has never sounded quite the same as actually double-tracking a part. So here’s a different approach that I find more satisfying, and closer to “the real thing.” It requires copying the original track, processing it as described in this tip to create the doubled sound, then mixing the processed track with the original track. The audio example plays the original track, then the doubled version using this technique.
I wasn’t planning to do an effects chain, because the Analog Delay settings in Fig. 1 are pretty foolproof. In fact, unless you want to explore the options brought out to the control panel, just insert the FX Chain, and carry on with your mixing or recording.
Figure 1: Analog Delay settings for the Authentic ADT effect.

How It Works
To give a more randomized effect, there are two delays (delayed sound only) in series, set for the same initial delay time, but modulated at different LFO rates. So the longest, and shortest, delays happen only when the maximum deviations of the two LFOs coincide. Otherwise, the delay changes constantly, in a somewhat non-periodic way.
But the “secret sauce” is using this on a track dedicated solely to producing the ADT effect. One of the problems with electronic ADT is that the variations can never be ahead of the original, or at the same time—they can only lag. Real double-tracking doesn’t work that way. Sometimes the player will hit a little ahead, sometimes a little behind, and sometimes right on the beat.
To solve this issue, suppose your initial delay setting 20 ms, as in Fig. 1. Because there are two delays in series, this means the total initial delay setting is 40 ms. Move the copied, doubled track 40 ms ahead (earlier) on the timeline. Now the initial delay isn’t delayed compared to the original track, so as the delay time varies, it can lead or lag the original part. (Moving the doubled track ahead by 20 ms acts more like an electronic doubler, where the doubled part always lags, or plays at the same time as, the original.)
Initial delay time settings of 13 to 25 ms work well. For whatever value you choose, move the original track ahead in time, compared to the original track, by twice the amount of the delay time setting.
The Macro Controls Panel
Fig. 2 shows the Macro controls panel. These parameters have been constrained to what I find to be useful settings.
Figure 2: Control panel for the Authentic ADT FX chain.

The maximum delay is 25 ms because remember, there are two delays in series so this can go as high as 50 ms. If this amount of delay happened all the time it would be perceived more like slapback echo, but happening on occasion adds to the realism.
Depth and Rate are to taste. I generally adjust them to give a minimal flanging effect in case the original and doubled tracks end up being summed to mono at some point. However, that’s a worse-case scenario. This technique is designed for a cool stereo effect, with the original and ADT tracks panned oppositely (not necessarily full left and right, just oppositely).
Mod Shape affects only one of the delays, but is interesting. A sawtooth shape, with the other delay being modulated by a sine wave, may give good results if the audio isn’t too continuous. Square can be useful with very low Width settings, but you’ll probably get more use out of sine or triangle wave modulation.
So go ahead—download the FX Chain! I think you’ll agree it gives a more authentic ADT sound.
DOWNLOAD THE AUTHENTIC ADT FX CHAIN
The Filter Shape Shifter

Ah yes…the good old days. When tape cost a week’s salary, you had to clean your recorder’s tape heads and capstan every day, and worst of all, there was no undo. And I had to make fun effects by laboriously breadboarding parts, soldering, and deciding what tradeoffs to make because an effect with 26 controls and 12 switches wasn’t really viable.
But now we have Studio One so we don’t have to mess with tape, and FX Chains, so we can make our own crazeee multieffects without having to solder anything! Which brings us to this week’s tip.
Back in the 70s, sample-and-hold effects from synthesizers were a big deal. This effect synched to tempo, and stepped through a resonant filter. Its cutoff frequency changed on the beat, and held until the next beat, at which point it changed to a different random cutoff frequency. I always liked that effect with guitar, and thought it would make a good Friday Tip, along with a companion, downloadable FX Chain. But I got carried away…check out the audio example, with guitar, bass, and drums.
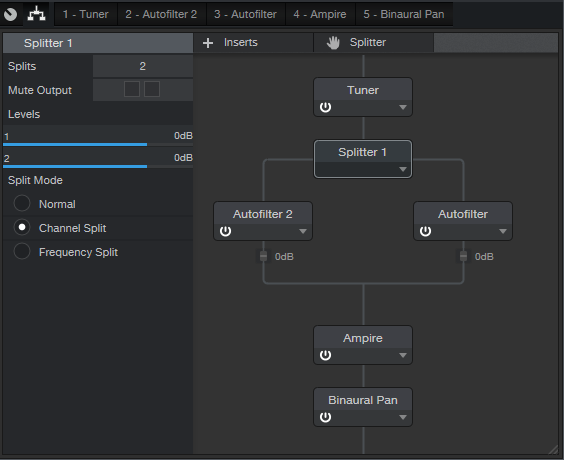
Fig. 1 shows the FX Chain basics. The chain splits the stereo input by channel, into two Autofilters. These are modulated by their LFO step sequencers, which sync to the beat. The filters are before Ampire, so they alter the distortion character in a more subtle way than they would if they followed Ampire.
Figure 1: The Filter Shape Shifter “block diagram.”
Here’s the story on the Macro Controls (Fig. 2).
Figure 2: Macro controls for the Filter Shape Shifter FX Chain.
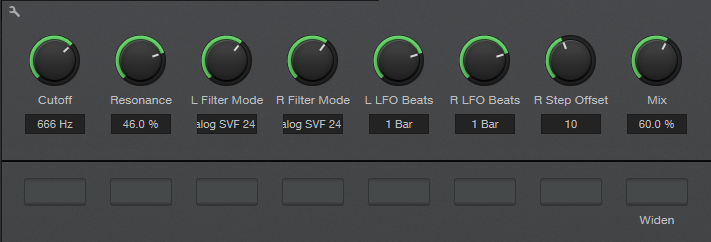
Cutoff and Resonance are “master” controls for both filters. The Filter Modes choose the filter types for the left and right Autofilters, while the two LFO Beats controls choose the rhythmic sync for the left and right LFOs.
R Step Offset is a bit unusual. It changes the values for all of the right LFO’s steps except for 1, 4, 8, and 12. Automating this parameter and varying it can add a considerable amount of variety to the sound, but keeping a constant, relatively high filter frequency on steps 1, 4, 8, and 12 maintains the beat.
Mix changes the wet/dry mix for both filters, and Widen enables a Binaural Pan when you want a wider stereo spread. And you know you want it.
Do check it out, and have fun warping your guitar-meets-Ampire sound!
DOWNLOAD THE FILTER SHAPE SHIFTER FX CHAIN HERE
Pro Tools Multi-Mono Mode with Studio One
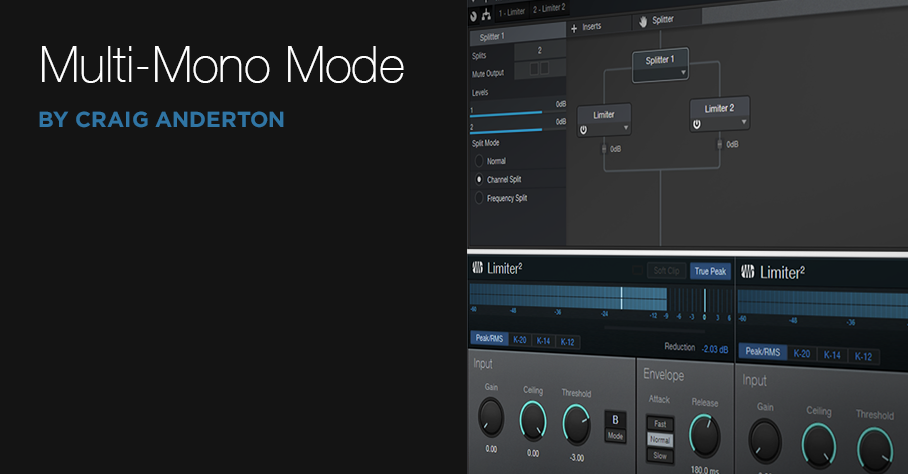
A fundamental difference between Pro Tools and Studio One is effects handling, which can be confusing for Pro Tools users switching to Studio One (and yes, this tip is based on a true story). When you add an effect with Pro Tools’ mixer insert, you’ll see options for Multichannel and Multi-Mono effects—which Studio One doesn’t have.
Or does it? Actually, not only can Studio One emulate the Pro Tools Multi-Mono mode for people who’ve switched, but there are some advantages that are relevant to Studio One users.
In Pro Tools, Multichannel effects are like what we’re used to in Studio One (and other programs), where the effect processes a mono or stereo track. However, Multi-Mono effects insert separate effects for a stereo track’s left and right channels. Normally this is transparent to the user because the effects are linked, and have a single interface, so they seem like a Multichannel effect. However, Multi-Mono’s particular talent is that you can unlink the effects from each other, switch between the two channels in the interface, and process the two channels (or more, for surround) separately.
My Pro Tools friend was disappointed, because he would often use this feature when mastering, restoring tracks, working with two-track audio sources, and the like. For example, when prepping a file for mastering, he sometimes limited one channel to tame peaks, left the other channel with minimal limiting, then added a master limiter at the output to provide overall limiting (this isn’t the same as using a conventional stereo limiter, and unlinking the two channels). On occasion, the different channels needed different EQ as well.
He knew about my Stereo to Virtual Mono blog post, but wanted to have everything in a single track, like Pro Tools. Fortunately, there’s a simple solution (Fig. 1). As an example, let’s use his scenario of wanting different limiters in each channel.
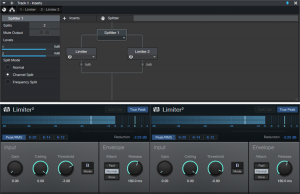
Figure 1: How to implement Pro Tools’ Multi-Mono effects functionality in Studio One.
- Open the Channel Editor, then click on the Routing button.
- Drag a Splitter into the Routing window.
- Set the Split Mode to Channel Split.
- Insert a Limiter2 into each split.
- (Optional) Insert a Limiter2 at the output, to provide the final limiting function.
Done! Now the left and right channels have their own limiters. But the Pro Tools guy also realized there was an advantage to Studio One’s pseudo-Multi-Mono mode: he didn’t have to switch between Limiter interfaces. Instead, he could pin them, and see both at the same time. When I reminded him he could bring out the Gain, Threshold, Ceiling, and Release controls for each Limiter to Macro knobs, save that as an FX chain, and use less screen real estate…let’s just say he was a happy camper.
This isn’t to diss Pro Tools, which (like any DAW) does some things well, and some things not so well. But it does show that when switching from one program to another, concerns you may have about needing to give up a favorite feature could be irrelevant.
Great Bass Sound—In 15 Seconds!
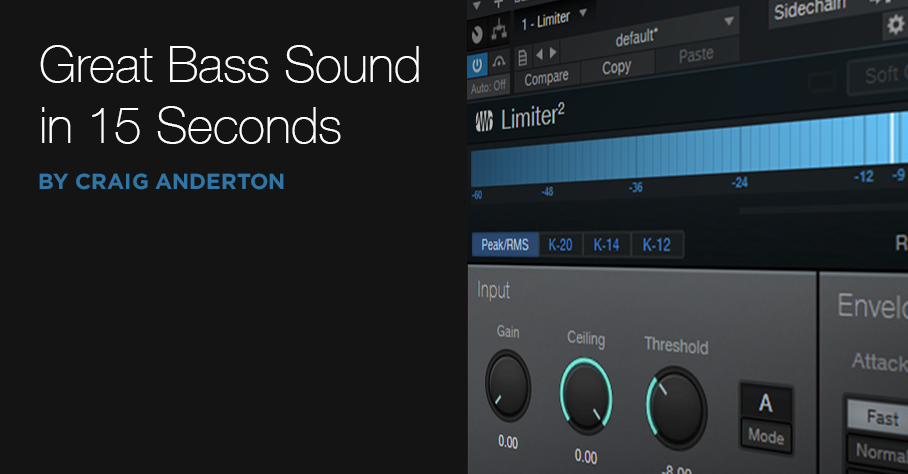
Compression and bass go together like ham and eggs, red beans and rice, or peanut butter and jelly (or gin and tonic, if you prefer something a little stronger). A lot of engineers plug in a compressor within milliseconds of turning up the bass track’s fader. Some “pro tips” on the web even recommend inserting lots of compressors in series. Hey, if one is good, then four must be better—right? Well, I’m not convinced.
Lately with electric bass (synth bass, too) I’ve been tossing compressors aside, and using Limiter2 when I want to get a solid sound down fast. And I mean fast—that 15 seconds is actually a bit misleading. I’ve clocked myself at under 12 seconds from drag-and-drop to pressing play, including editing the Limiter2 settings.
Check out the audio example. The drums are using my Bigness of Huge Drum Sound FX Chain. The first four measures are the bass sound as recorded, using the Limiter2. The next four measures are the same, but with the Limiter2 bypassed. Note that when the limiter is in play, the bass isn’t overwhelmed by the drums.
Fig. 1 shows the Limiter2 settings.
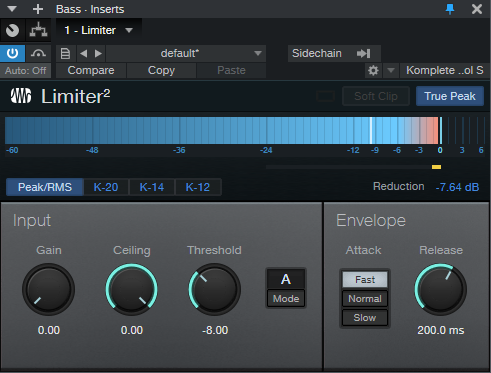
Figure 1: Settings for bass with the Limiter2.
That’s all there is to it. (But if you’re a 5-string bass fan, I do recommend changing the Release time to 300.0 ms.)
Granted, this isn’t necessarily a “one-size-fits-all” tip. You might want to add some EQ, some AutoFilter funk in parallel, or whatever. But this punchy, full sound will hold its own in the rhythm section, and get you through the tracking session. What’s more, if the bass player has a good touch and properly adjusted pickups, it maybe even take you to the final mix.
Create Ampire Cabs with Pro EQ2
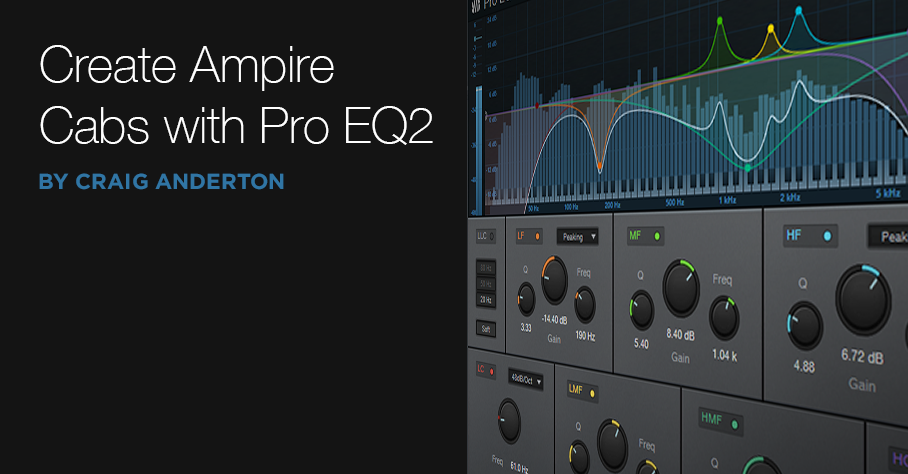
IR-driven cabs are often the weak link with amp sims Fortunately, cab emulations have improved dramatically over the years. Yet like samples, they remain “frozen” to a particular cab—they have their sound, and that’s it.
Although some guitar players think that a cab is a magical device, it’s really just a filter. To be sure, it can be a magical filter…but it’s still a filter. So, we can use filters to create our own cabs. They won’t be able to replicate a specific cabinet down to the smallest detail, but that’s not the point. Using the Pro EQ2 filter to create your own cabinet can give responses that IRs can’t give, with a different sound that can be satisfyingly smooth, and…well, “analog.”
I analyzed the frequency response of several cabs, using the Tone Generator’s pink noise along with the Spectrum Analyzer plug-in, then tried to replicate the response as closely as possible with the Pro EQ2. Although sometimes I was shocked at how close this could come to the cab, more often than not I couldn’t help but make some tweaks—it’s almost like I had taken that cab, brought it into a woodworking shop, and made specific changes for my needs.
If you want to experiment…be my guest! Insert Ampire, choose your amp (I particularly like the following curves with the VC30), select no cab in Ampire (important!), insert the ProEQ2 afterward, and rock out. Here are some ideas to get you started. Note that the white curve is the sum of all the other curves, so that’s the curve you actually hear.
This curve is based on a 1 x12 cabinet that’s designed for leads, but works with rhythm parts as well (Fig. 1).
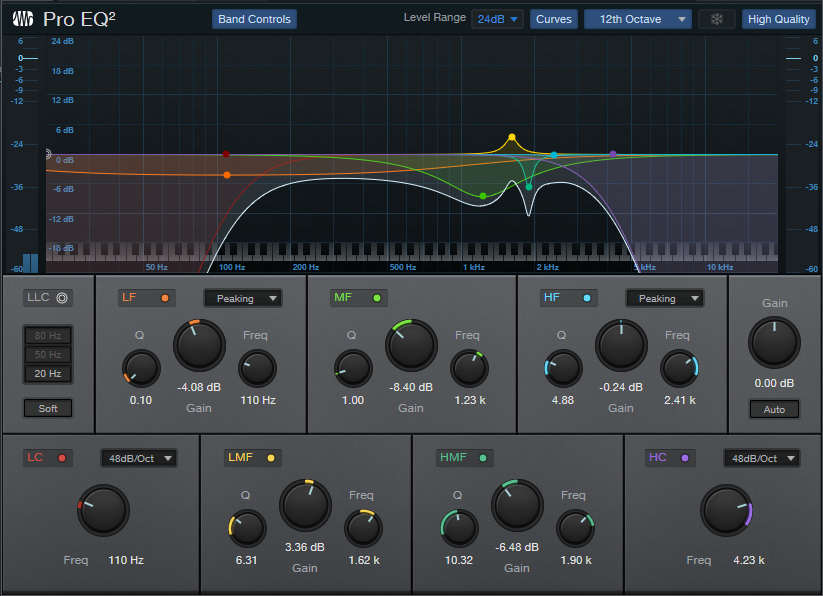
Figure 1
Here’s a curve that’s more “Tweedish” (Fig. 2)
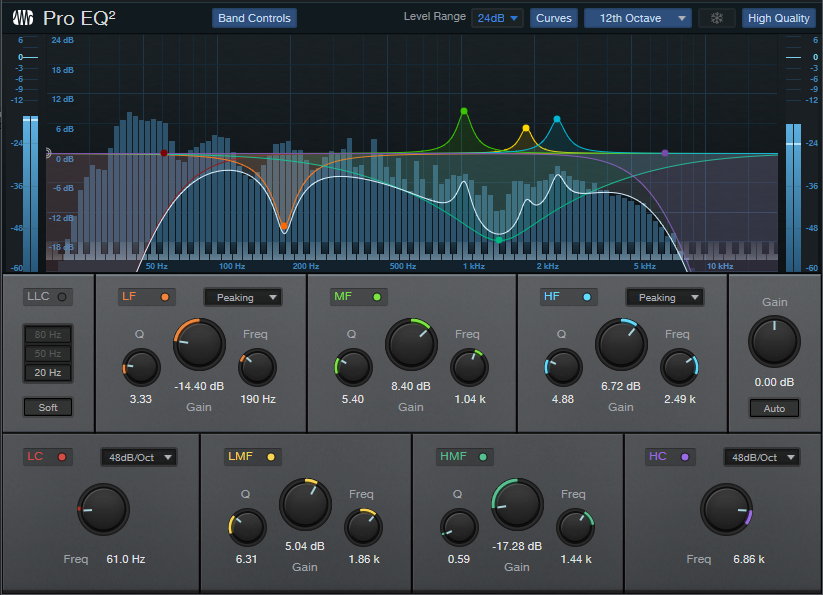
Figure 2
This curve (Fig. 3) is based on an amp by a company that no longer makes amps, but whose name I better not mention so that I don’t have to deal with lawyers. Suffice it to say they’re known mostly for making guitars that are popular with rock guitarists.

Figure 3
And here’s one more…just because we can (Fig. 4)! It’s based on a 2 x 12 cab.
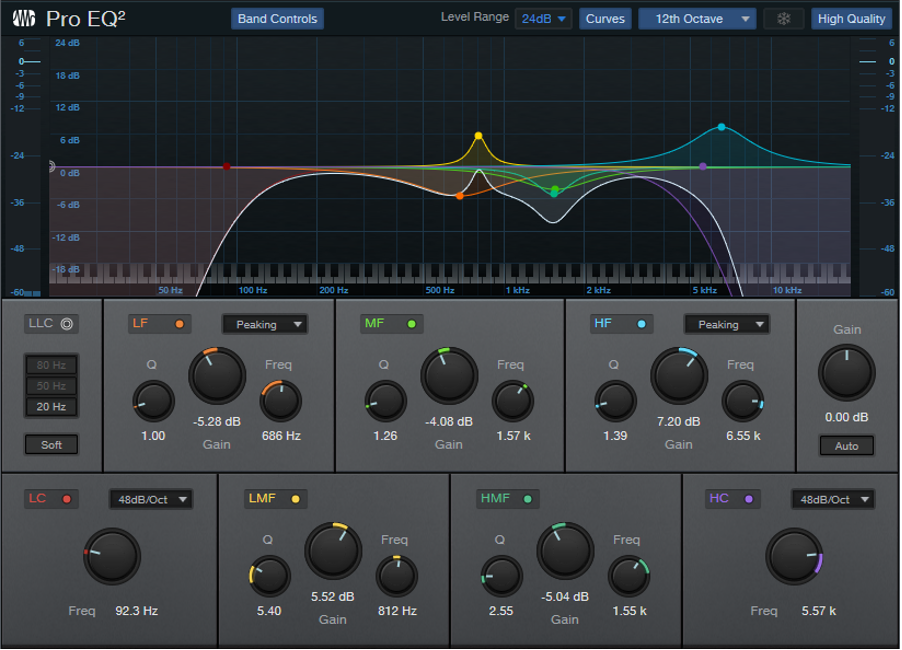
Figure 4
These all have two elements in common: high-frequency rolloffs, and interesting resonances. Although “EQ cabs” may not replace IRs, they’re not supposed to—this is about augmenting your options. Nonetheless, in many of my current productions, I prefer using the Pro EQ2-based cabs because it’s easier to tailor them to fit in with a specific mix.
For this week’s tip, I’m not providing presets because this isn’t about presets—it’s about editing an “analog” cab to give the sounds you need for your productions. So, the “best” curve will depend on what works best with your guitar, playing style, and production goals. In any event, I think you’ll find that constructing your own cabinet can provide a musically useful, and novel, way to expand on what IR-based cabinets can do.
Super-Simple Mono-to-Stereo Conversion

It may be a stereo world, but we still have a lot of mono signal sources. Although some people use delay to convert mono to stereo, this can be fraught if the stereo needs to collapse back to mono eventually. EQ can do an effective, albeit not as dramatic a job, and I wrote a blog post about How to Create Delay-Free Stereo from Mono using two Multiband Dynamics processors. This is a very flexible setup because you can automate the Multiband Dynamics parameters, as well as add in compression selectively if desired.
However, it’s also possible to convert mono into stereo within a single track—no buses needed—with a Splitter and some pan controls. While not as editable as the previous approach, it does the job, is simple to use, requires virtually no CPU power, and the stereo signal collapses back to mono with no problems.
How It Works
The mono-to-stereo conversion process works by splitting the incoming signal into five frequency bands (Fig. 1). A Dual Pan follows each band, with Link enabled and Width set to 0%. So, you can use the Pan controls (which are brought out to the Macro Controls panel) to place each band wherever you want in the stereo field. This is what creates the stereo image.

Figure 1: Block diagram for the Super-Simple Mono-to-Stereo Converter.
The Macros Control Panel
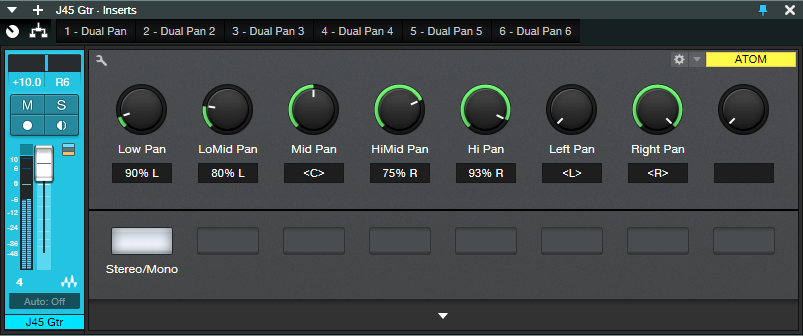
Figure 2: Macro Control knob panel.
There’s a downloadable FX Chain, which takes care of the parameter assignments for the Macro Controls (Fig. 2). However, it would be pretty easy to do it yourself. The five Pan knobs vary the Pan parameters in the five Dual Pans (one for each frequency band). The two right-most controls are tied to a Dual Pan at the output, and serve as “master pan” controls.
How to Use the Super-Simple Mono-to-Stereo Converter
The track being processed has to be in Stereo channel mode. It’s okay if you recorded the track in mono; just make sure Channel Mode is stereo when you play back, or convert the mono to “dual mono” by selecting the Event while the Channel Mode is stereo, and typing Ctrl+B.
The five left-most knobs control panning for the five bands. Pan the frequency bands as desired in the stereo field. Also note the Stereo/Mono switch. When dimmed, it de-activates all the Dual Pans, so it’s easy to compare the synthesized stereo and original mono sounds.
For the full stereo effect, set the Left Pan fully counter-clockwise, and Right Pan fully clockwise. To “tilt” the image more to one side or the other, bring the appropriate Pan control more toward center. For example, if you want to tilt the stereo spread toward the right channel, turn the Left Pan knob more clockwise.
One of my favorite applications is creating a stereo image from an acoustic guitar that was miked with a single mic (to avoid potential phase issues) or taken direct—you can still have a stereo “feel.” It’s also fun to follow Ampire with this FX Chain when you want to splatter a distorted rhythm guitar part across the stereo fiels, or give an old mono synth a stereo facelift.
As I said in the beginning, it’s a stereo world…but now your mono signal sources can be part of it a little more easily.
Friday Tips in the Real World
[Editor’s note, we’re publishing this “Friday Tip” on a Wednesday, since we’re closed for the holidays on Dec. 24 and 25; a Thursday and a Friday.]

The Friday Tip series started three years ago, and it’s been an honor to be part of the family of Studio One enthusiasts. Ultimately, these tips come out of doing projects, and the album I dropped last week was the first one done from start to finish in Studio One. So, I thought you might like to hear what a few of these tips sound like not as isolated SoundCloud examples in a weekly blog, but as integral parts of a musical collection.
The specific examples below include start times, so you don’t have to listen aimlessly—just drag the dot on the embedded video to the indicated place on the timeline. But first, let’s start with the tips that were used on pretty much everything.
This phrase-by-phrase normalization techniques described in How to Gain Better Vocals and Get Better Vocals with Gain Envelopes were used on every vocal—lead and background—in every song. Most vocals added light limiting, and a few added compression, but these tips were the key to consistent vocals. The appearance of Gain Envelopes in V5 became the icing on the cake.
The Streaming: Limiter2 to the Rescue technique was used when assembling songs in the Project page. If it sounds like the songs have the same perceived level throughout the album…that’s why! Anything with a fadeout uses the technique described in How to Obtain The Perfect Fadeout, and Why Overlap Correction Is Totally Cool was used on every bass part (they were all MIDI bass).
Now let’s listen to some specific examples:
Reverb Chord Progressions? Why Not!
The effect is applied here to cymbals and noise, not reverb, but the principle is the same—and the harmonic “tuning” provides what sounds like some strange kind of psychedelic organ behind the guitar at 08:18. This same “organ” effect occurs at 09:06, 09:38, and 10:25 (not to be confused with the obvious Farfisa organ sound). I’ll be exploring this off-the-wall harmonic editing application much more in the future…it’s very cool, and unique to Studio One.
Saturation (using the Softube Saturation Knob) was crucial on several bass and drum parts to help them cut through busy mixes, or to add drama. Saturation is on bass all the way through three songs; the bass comes in at 00:17, 03:02, and 13:59. It’s also on drums all the way through two songs, where the drums enter at 08:25 and 16:58.
The preverb effect provides the ghostly sort of sound that starts at 12:00 behind the lead vocal, as well as several other places throughout the song.
Synthesize Open Air Impulse Responses in Studio One
It’s easy to make your own reverb impulses, and I took advantage of that for lead vocals starting at 03:02, 08:34, 16:09 (the most obvious example), and all vocals (lead/background) starting at 18:50. Custom impulses are also on drums at 16:58, and the Mai Tai organ starting at 19:14.
Create the “Barberpole” Audio Illusion
I love the way the “barberpole” effect starting at 12:25 accompanies the moon in the video getting bigger and bigger. The barberpole also uses a custom Open Air impulse with a long reverb time, which enhances the illusion of a tone that never stops rising.
This is applied to the entire stereo mix at 12:49 (go big or go home, right?), but it’s also applied more subtly to the flanged guitar parts in the same song. And I didn’t write a tip about it, but you gotta love that factory preset Mai Tai bell sound…
Yes, even something done in the middle of a pandemic when you just want to de-stress can come in handy. This provides a transition between songs; the first one is at 10:45, and the second at 13:38.
Polyphonic Glide with Any Synth
The “steel guitar” sound that starts at 21.22 and goes through to the end is actually a synthesizer that uses this technique.
This doesn’t dial up the gritty blues sound as much as on my 2017 album Simplicity, but it does make the harmonica at 03:52 and 0 4:52 sound a little less wholesome. This is a good thing.
Although I converted a guitar to Nashville tuning to replace the “faux” part, it didn’t sound quite right…so I mixed some of the virtual Nashville tuning part back in at 17:02 and 17:55. It’s the kind of effect you don’t notice until you take it out.
Varispeed-Type Formant Changes
This was used most prominently at 07:20, on the background vocals by the Nashville QTs. The goal was to create a sound like there were more people singing, but without using time-based effects.
Three hand percussion parts, processed as described in the tip, kick in at 06:04, and again at 06:40, after a brief drum solo. The odd thing about this technique is the percussion sounds like what percussion should sound like…but if you take out the tremolos and have the parts going all the time, they sound repetitive. (Oh, and I think you’ll recognize what’s providing much of the video background…)
Tempo Changes for Already Mixed Songs—Reloaded
When doing a mostly continuous mix, you’re bound to have beats that don’t quite match up. This technique was used in the two segues that start at 02:29 (the guitar carries the transition and speeds up) and 05:02 (the keyboard carries the transition, and slows down).
Of course there were plenty of other workflow and FX Chain-based tips used throughout, but I think these are arguably the most interesting ones. I’m looking forward to seeing what PreSonus comes up with in 2021 as we work our way through a new year. Stay healthy, stay optimistic—and keep making music! As Quincy Jones says, it’s food for the soul.
Vintage EQ FX Chain
While modern EQ can emulate pretty much any curve that a “vintage EQ” could produce, there’s more to EQ than the curve itself.
Vintage EQ, due analog technology’s constraints, wasn’t as flexible as today’s EQs. Therefore, the various parameters were limited to specific choices—and these choices were made for musical reasons. When people talk about dialing in a great vocal or drum sound within seconds using vintage EQ, I suspect it’s because those vintage EQs were engineered for fast, efficient changes that made musical sense.
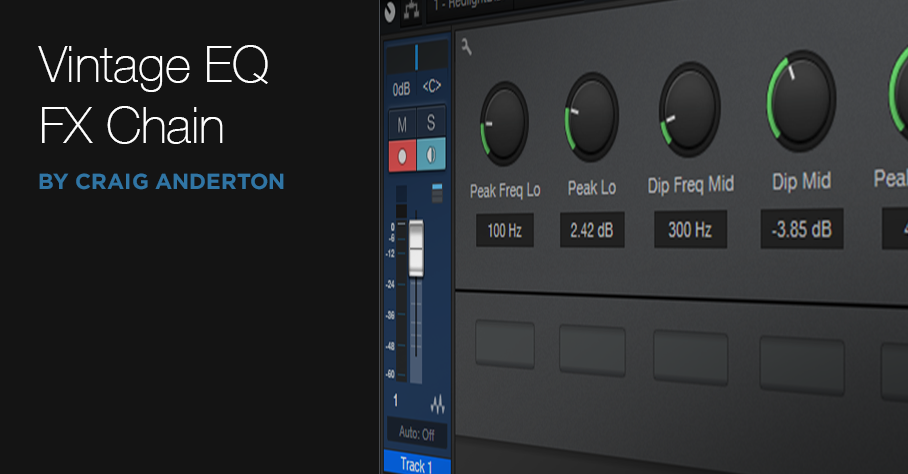
So as an experiment, I created a Pro EQ2 FX chain that emulated (quite accurately, if I do say so myself!) not just the curves, but the controls of a Pultec MEQ-5 midrange equalizer (Fig. 1).
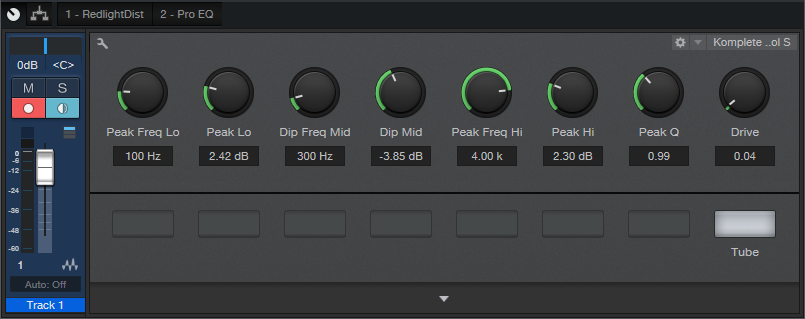
Figure 1: Control panel for Pro EQ2 Vintage Equalizer.
The Lo and Hi stages have a Frequency control and Boost (no cut) control. Originally, the low band had stepped frequencies of 200, 300, 500, 700, and 1 kHz, while the high band had 1.5, 2, 3, 4, and 5 kHz. The Freq controls cover mostly the same range, although in recognition of bass’s importance in today’s music, the low band goes down to 60 Hz. Another tweak is that the high band had a fixed EQ, which I always felt was a bit too narrow anyway—so I added a Q control.
The midrange section cuts (no boost) from 200 Hz to 7 kHz. However, the MEQ-5 had a subtle EQ shift that depended on the amount of cut, which is emulated here. I also added a RedLightDist to give subtle saturation effects.
So next time you need EQ, download and try out this FX Chain. It won’t sound different than what you can achieve with a Pro EQ2—but you may very well get where you want to go faster. Maybe even much faster.
Download the Pro EQ2 Vintage EQ here!
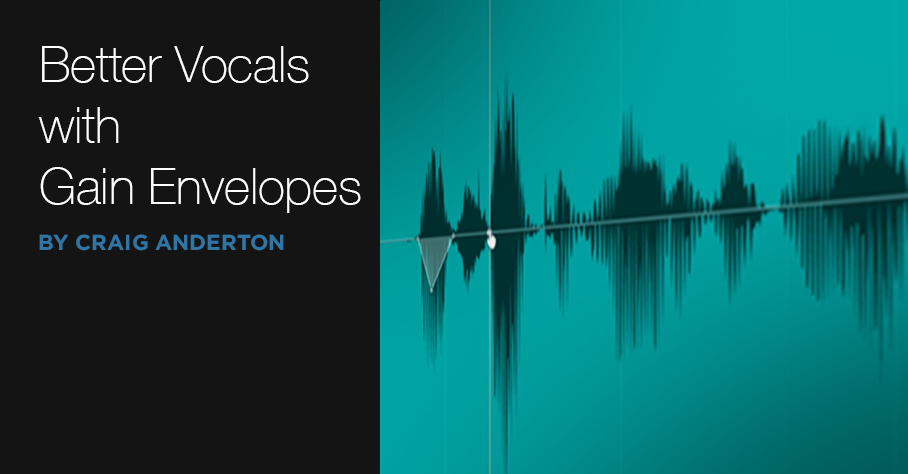
Get Better Vocals with Gain Envelopes
Several of the comments have mentioned wanting me to do some video tips, and this week’s tip is well-suited to a video treatment—so here you go.
Gain envelopes have many uses, but one of my favorites is using them to bring down peaks with vocal and narration to allow boosting the overall level. This is a further refinement of the phrase-by-phrase normalization technique I’ve mentioned in the past, which is basically like compressing without a compressor. As a result there are none of the artifacts associated with compression or limiting, so the resulting sound is totally natural.
Showing this with a video makes it easy to see how placing nodes strategically simplifies taming peaks, and how clicking and dragging on a single node can control your dynamics, quickly and efficiently.
View this post on Instagram
If you like the video, let me know in the comments section, and I’ll do more videos in the future if I think they can convey a concept better or more efficiently than text.
And while we’re on the subject of videos…if you’re not aware of Gregor Beyerle’s playlist of Studio One video tips, they’re well worth watching. Unlike so many YouTube “tips” videos, after watching his videos you’ll feel you learned useful techniques that will help you use Studio One more efficiently—not wasted several minutes of your life you’ll never get back ?. Even when I’ve known much of what he covers, there are always some little gems I hadn’t discovered before.