Category Archives: Friday Tip of the Week
Friday Tip: The Project Page Meets Bluetooth
The Project Page Meets Bluetooth
After mastering a project, I like to check out its suitability in a variety of contexts by listening to it over and over again—in the foreground, in the background while people are talking, while the dishwasher runs, whatever. This can be very instructive when trying for masters that are transportable not just for different playback systems, but for different listening conditions.
And that’s when it hit me: Bluetooth! I have IK Multimedia’s iLoud portable Bluetooth speaker, and carry it around the house to listen to music that’s streaming from a mobile device. Why not carry it around while listening to a mastered Project? Or even loop a Song, so I can get lyric ideas while the instrument tracks play in the background? Or listen over other Bluetooth devices, to get an idea of the type of sonic violence the music will have to endure at the hand of consumers?
Okay, so I was a little slow to tumble to this…but reality checks can indeed be useful, and I hope you find this tip useful as well. We’ll do the Mac first, and then Windows.
Mac
1. Choose Apple menu > System Preferences > Bluetooth.
2. Turn on Bluetooth at the Mac if it isn’t already.
3. Turn on your Bluetooth playback device, and enable pairing for it (usually by pressing a pairing button on the device).
4. When the Connection Request appears, click Connect.
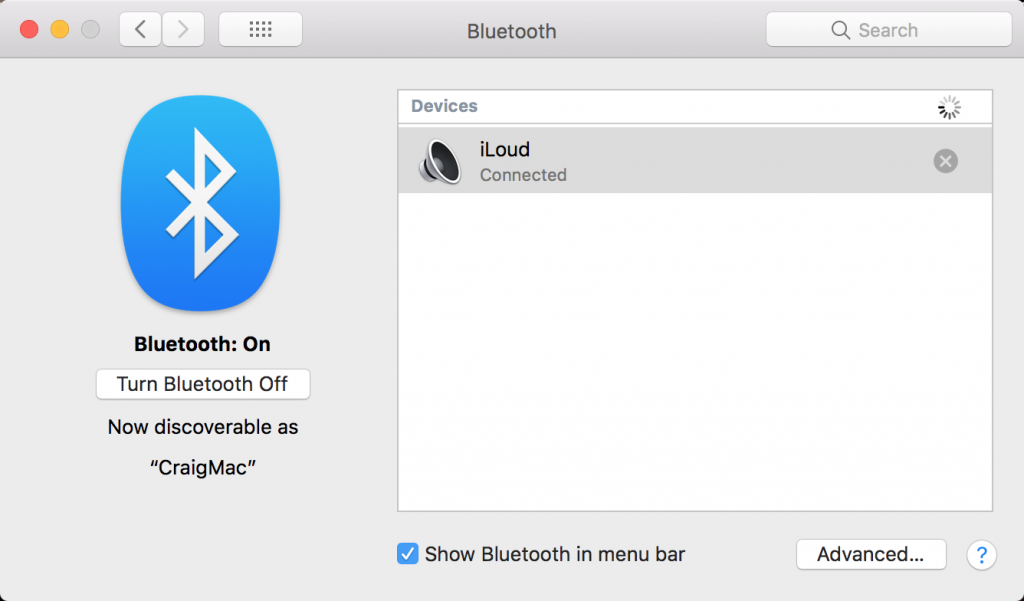
5. The Bluetooth window will show the device as connected.
6. In Studio One, choose Preferences.
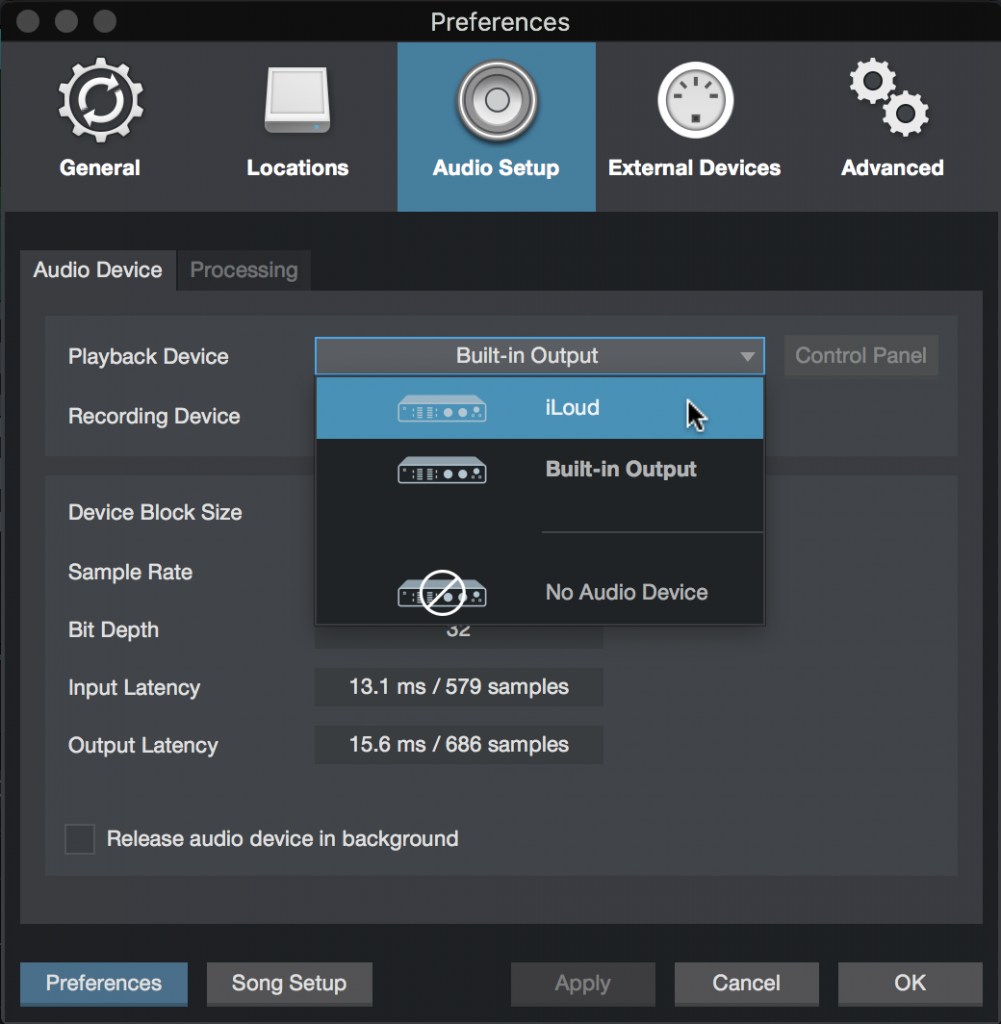
7. For Playback Device, choose your Bluetooth playback device.
Windows
1. Choose Settings > Devices > Bluetooth & other devices.
2. Turn on Bluetooth in Windows if it isn’t already.
3. Click on Add Bluetooth or other device, then choose Bluetooth when Add a Device appears.
4. Turn on your Bluetooth playback device, and enable pairing for it (usually by pressing a pairing button on the device).
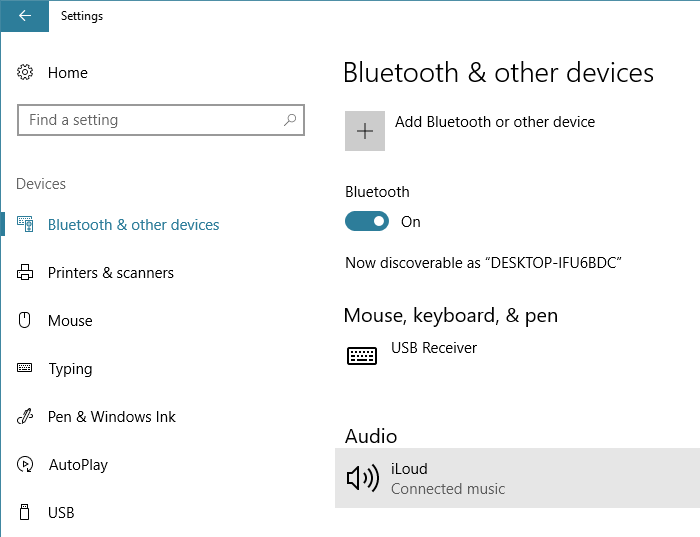
5. Click on the device name to connect it. Once it’s connected, click on Done.
6. In the Windows search box, type Sound and then select Sound Control Panel.
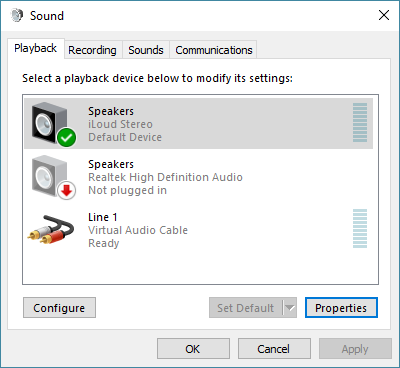
7. Your Bluetooth device should appear in the list of potential playback devices. Click on it, and then click Set Default to make the Bluetooth device your default playback device.
8. Now that Windows is set up, open Studio One, and choose Options. Select Windows Audio for your Audio Device, and you’re good to go.
Friday Tip: Pedal Power
Here’s a follow-up to last Friday’s tip on creating an authentic sounding wah with the Pro EQ. That’s fine, but what if you want to control it with a footpedal instead of a mouse? Keep reading.
First, you need a pedal that generates MIDI data. There are several options. Most keyboard controllers have an expression pedal input. Plug an expression pedal into this, and the controller will likely output controller 11 over MIDI. You may be able to assign this to a different controller number (see your hardware’s documentation); however, this probably won’t be necessary.
If you don’t have a keyboard (or floor multi-effects with a pedal that produces MIDI out), then check out the Pedal Controller, a small box from MIDI Solutions. This accepts an expression pedal input and outputs your choice of MIDI controllers. (For do-it-yourselfers, the circuit board is small enough you can probably mount it in a pedal if you want a stand-alone MIDI pedal.)
Assuming you’re using a keyboard with an expression pedal input, you now need to add the control surface to Studio One if you haven’t already. Call up the Options menu, and add the keyboard. Here, I’ve added The Laboratory controller from Arturia.
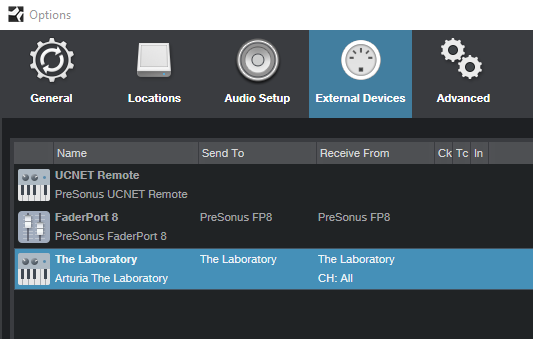
Next, you need to map the pedal. Go to the right-hand side of the Control Link menu and select the device to open the Device Control map. Note that The Laboratory is selected as the device.

If you can’t see the right section of the Control Link menu, then your monitor resolution is probably 1600 pixels wide or less. Another way to open the Device Control map is to open the Mix view [F3], and then click on External in the Console navigation column (to the far left of the Console). This opens the External panel; double-click on the desired device in the External panel.
Now click on the Device Control’s MIDI Learn button, and then move the footpedal. As if by magic, Control 1 appears, with its controller number assignment.
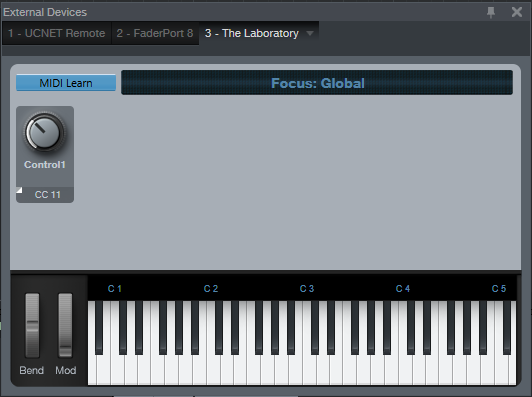
Now whenever you want something in Studio One to react to the footpedal, you just select Control 1. You can also rename this—perhaps not surprisingly, I changed Control 1 to Footpedal.
Now let’s suppose you want to control the Pro EQ Mid Frequency (Freq) control, which we used last week to vary the wah frequency. It’s simple:
- Vary the Freq control.
- Move the pedal.
- Right-click on the Freq knob.
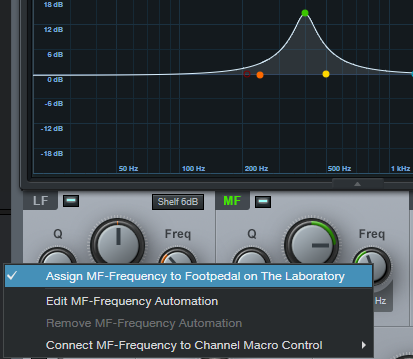
Now choose the desired assignment—in my case, “Assign MF-Frequency to Footpedal on the Laboratory.” Move the pedal, and it will change the frequency.
However, you probably don’t want the pedal to cover the full frequency range, but just a typical wah’s range so you have more precise control. We have a solution for that, too. Instead of right-clicking on the knob and assigning it to the footpedal, assign it to a Channel Macro Control, like Knob 1. Open up the Channel Editor, right-click on Knob 1, move the knob, next move the pedal, and then choose “Assign MF-Frequency to Footpedal on the Laboratory.” (By the way, you can assign pretty much everything in Studio One to a controller using the right-click + move controller + choose assignment protocol.)
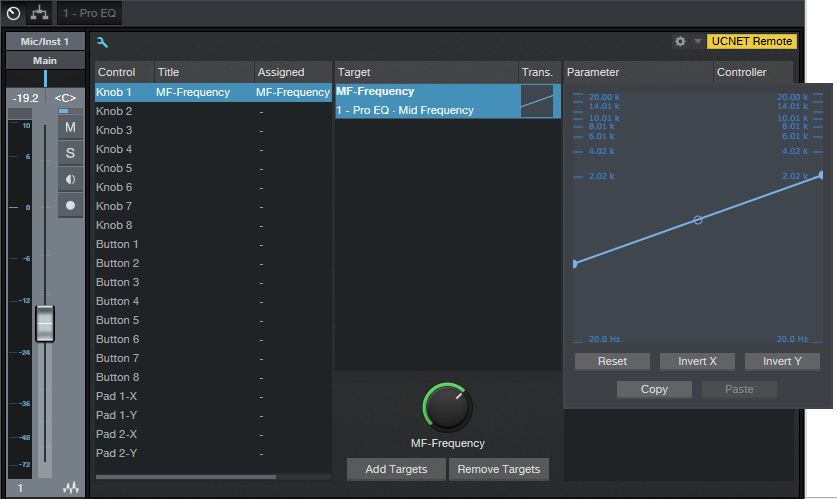
Now you can use the Transition settings graph to limit the pedal’s range. Alter the curve shape to a response you like—it doesn’t have to be linear—or even change the “sense” of the pedal travel so that pulling back on the pedal raises the wah frequency.
Once you’ve done this kind of assignment a few times, it will become second nature and you’ll be able to take advantage of pedal power for increased expressiveness. So put your foot down, get on the good foot, or put your best foot forward—the choice of clichés is yours!
Friday Tip: The Studio One Wah Pedal
You never know where the next gig is coming from—maybe it’s joining a disco revival tribute band, being asked to play guitar on a remake of Shaft, or getting a quick $200 from a YouTube producer to come up with a background theme for their “Remembering the ’70s” docu-series. What do all of these have in common? Yes! The magic of the wah pedal.
A mint condition Vox Crybaby pedal can sell for up to a grand, but no worries—this Friday’s tip reveals the “secret sauce” for getting a can’t-tell-the-difference-from-the-real-thing wah pedal sound.
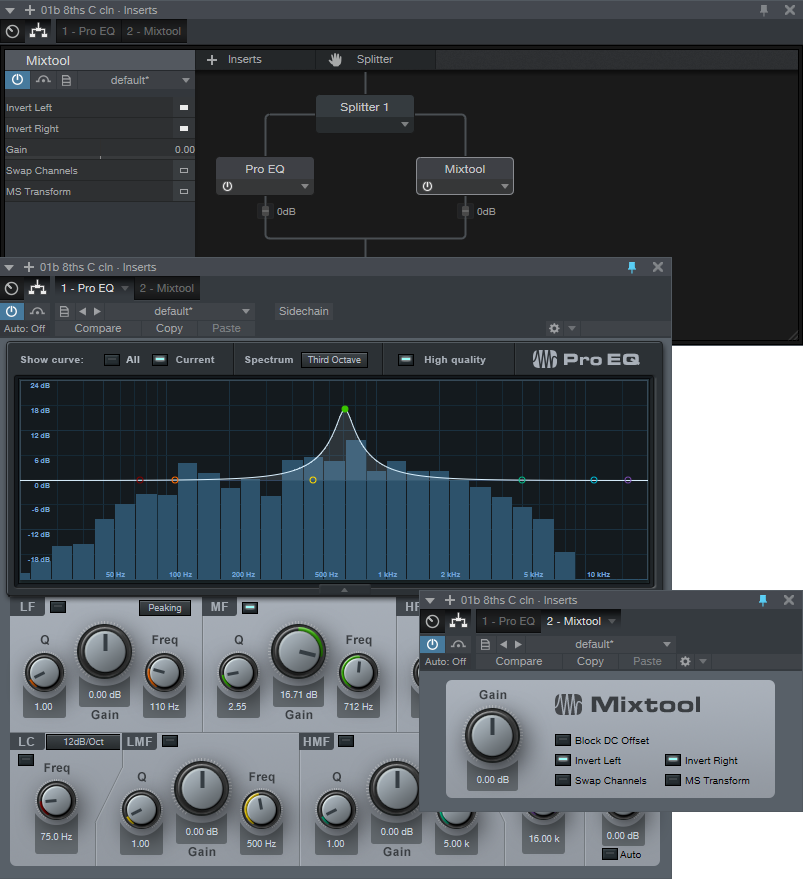
Now you might say “C’mon Craig, try to come up with something better next week, okay? It’s no big deal. You just put a ProEQ parametric stage in your guitar track, set it to a relatively high Q, and vary the frequency.” But actually, it’s not that easy. A real wah doesn’t just have a peak that pokes its head up in the middle of the frequency spectrum, but has steep high and low frequency rolloffs on either side of the peak—and we can do that with parallel processing.
- Set up a Splitter in Normal split mode.
- Insert the ProEQ in one split, and the Mixtool in the other split.
- Invert both the Left and Right channels in the Mixtool. If you play guitar through this, you should hear nothing because the out-of-phase MixTool is canceling out the audio.
- Create a parametric peak. You’ll want a fairly high Q and gain, depending on which wah you’re modeling.
Now sweep the frequency back and forth, and you’ll swear you’ve been transported back in time to when wah pedals ruled the earth. This is due to the cancellation on either side of the peak from the Mixtool being out of phase.
And by the way… wahs can also sound great in parallel with bass, and in parallel with drums when you want to add a dose of funk. So don’t spend a grand on a vintage wah—just make your own with Studio One.
Friday Tip: Using DX and DXi Plug-Ins with Studio One
Using DX and DXi Plug-Ins with Studio One

The DX and DXi (instrument) plug-in formats for Windows were developed in the late 18th century, shortly after the invention of the steam-powered computer. Okay, okay…they’re not really that old, but development of new DX plug-ins ceased years ago when VST became the dominant plug-in lifeform for Windows. Regardless, you may still have some DX plug-ins installed on your computer from other programs, and want to use them.
Like many other programs, in theory Studio One doesn’t support DX/DXi plug-ins. However, it does support shell plug-ins (e.g., like Waves uses). This means you can use a wrapper that makes DX plug-ins look like they’re VST types. With this workaround, Studio One can “see” and load DX and DXi plug-ins because it thinks they’re VSTs.
I’ve tested the following with many DX and DXi plug-ins, from several manufacturers, in 64-bit Studio One. They can’t do sidechaining, and 32-bit plug-ins that were never updated to 64 bits aren’t compatible with 64-bit Windows, but otherwise they work as expected. Here’s how to make your DX and DXi plug-ins productive members of Studio One society.
- Go to https://www.xlutop.com/buzz/zip/
- Download the zip file dxshell_v1.0.4b.zip
- Extract it.
- Copy the files dxshell.x64.dll and dxishell.64x.dll to the folder where Studio One looks for VST plug-ins.
That’s pretty much all there is to it. Open Studio One, and you’ll see all the DX and DXi plug-ins—the screenshot shows plug-ins from Cakewalk, rgc:audio, and Sony. The Instruments tabs will show any available DXi plug-ins.
I don’t have a 32-bit system so I didn’t test this with 32-bit DX shells. But if it works like the 64-bit one, you should be covered there as well.
Granted, this is a bit of a hollow victory because if a DX plug-in’s functionality is available with Studio One’s VST plug-ins, you’re better off using the VST versions. But there are still some DX effects that have no real equivalents in the modern world—and now you can use them.
Friday Tip of the Week: The Sparkler!
Sometimes it seems that certain recorded sounds, like acoustic guitar attacks and percussion, just don’t have the “sparkle” you hear when they’re playing live. The Sparkler is a sophisticated brightening FX Chain that adds definition—without treble equalization.
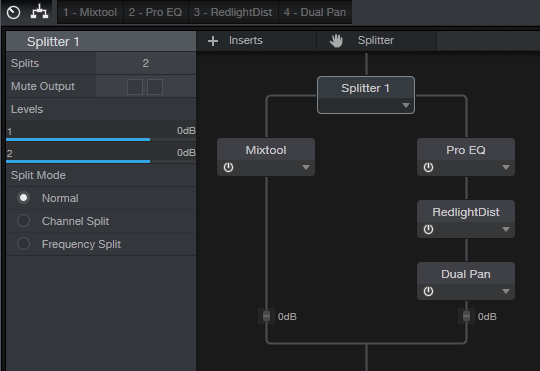
The Sparkler is a parallel effect. Referring to the FX Chain structure, a Splitter in normal mode creates a dry path through the Mixtool. This increases the level by 6 dB to compensate for the volume drop that occurs when bypassing an FX Chain where one of the splits contributes no significant level. The other split goes to the Sparkler effect, which consists of the Pro EQ, Redlight Dist, and Dual Pan.

How it works. First, the signal goes through the Pro EQ, set for a steep (48 dB/octave) high-pass filter that leaves only the very highest frequencies intact. The Low Cutoff control varies the cutoff from 7.6 kHz to 12.5 kHz. The Redlight Dist synthesizes harmonics from those high frequencies. (Even though it has a High Freq control, that’s not drastic enough a cutoff—hence the Pro EQ.) The Soft/Hard control chooses between 1 or 2 distortion stages; stage 1 is my preference because it sounds more natural, but people with anger management issues might prefer 2 stages, which gives a nastier, more aggressive sound.
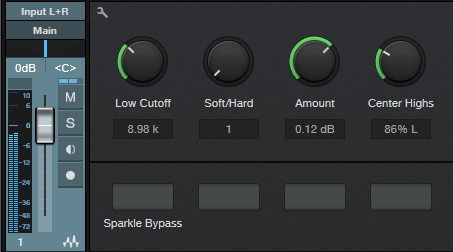
The Amount control sets the Redlight Dist output, which determines how much Sparkle gets added in parallel with the main signal. Use the Sparkle Bypass button to compare the sound with and without the Sparkle effect.
The reason for the Dual Pan module requires some explanation. The Sparkle FX Chain is intended for individual tracks, buses, and even master mixes when used subtly. Highs are very directional, so if with a bus or master there’s a trebly instrument mixed off to one side, like tambourine, the Sparkle effect can “tilt” the image toward the channel with more highs. The Center Highs control, when turned clockwise, brings the Left and Right “sparkle” channels more to center until when fully clockwise, the highs for both channels are centered.
Applying the Sparkle. To learn that the Sparkle effect does, it’s best to listen to the effect by itself and manipulate the controls to hear the results. Unfortunately you can’t assign FX Chain controls to Splitter parameters, so if you want to hear the Sparkle sound in isolation, go into the FX Chain and bring down the post-Mixtool level control all the way. As you tweak the Sparkle sound in isolation, grab only the highest audible frequencies, and avoid harsh distortion—you want just a hint of breakup, and only at the highest frequencies.
When using the Sparkle effect in context with a track of bus, start with the Amount control at minimum, and bring it up slowly. Use the Bypass button for a reality check—you want just a subtle brightening, not highs that hit you over the head and make dogs run away in panic. It takes a little effort to master what this effect can do, and it’s not something you want to use all the time. But when used properly, it can really add—well, sparkle—to tracks that need it.
Friday Tip of the Week: The “Harmonic Tremolo” FX Chain
I did a Harmonic Tremolo as a Sonar FX Chain tip, and it was very popular—so here’s a Studio One-specific version. For those not familiar with the term, some of the older, Fender “brown” amps used a variation on the standard, amplitude-oriented tremolo which the company called “harmonic tremolo.” It splits the signal into high and low bands, and then an LFO amplitude-modulates them out of phase so that the while the highs get louder, the lows get softer and vice-versa. The sound is quite different from a standard tremolo, and many players feel the sound is “sweeter.” But unlike a guitar amp, you can sync this tremolo to the rhythm—and that makes it a useful addition to groove-oriented music as well.
Here’s the FX Chain “schematic.”
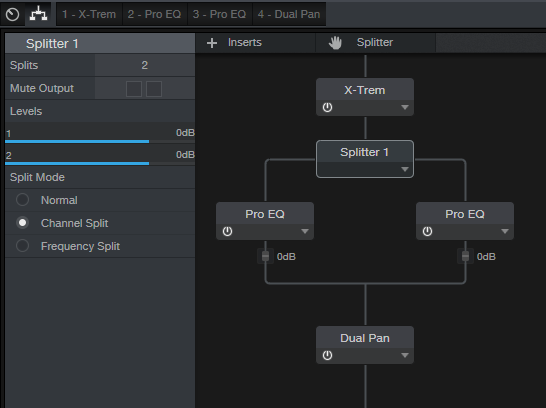
X-Trem needs to be in Pan Mode or this won’t work. As a result, this FX Chain must be inserted in a stereo track—a mono track switches X-Trem to Tremolo Mode (although a mono file inserted in a track set to stereo will work). If you switch a stereo track to mono accidentally and then switch it back to stereo, you’ll need to click on the Reset button in the FX Chain to return X-Trem to Pan Mode.

In Pan mode, while the left X-Trem channel gets louder, the other becomes softer and vice-versa. The Splitter (in Channel Split mode) sends the left split to a Pro EQ set to High Cut, while the right split goes to a Pro EQ set to Low Cut; their frequencies track to set the split point between the high and low bands.
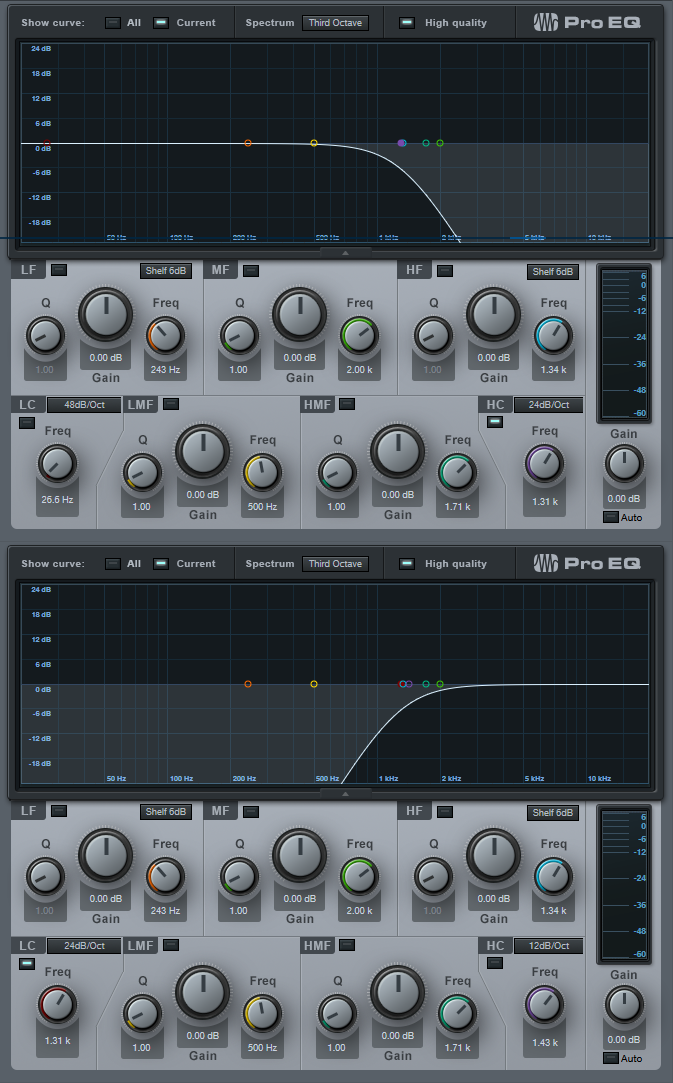
Finally the two outputs go to a Dual Pan, which provides several functions.

Creating the FX Chain:

Crossover links the Pro EQ HC and LC Freq controls so you can adjust the split frequency between the high and low bands. At either the full clockwise or counter-clockwise position, the Harmonic Tremolo acts like a conventional tremolo.
Reset connects to the X-Trem Mode so you can reset it to Pan if needed.
LFO Speed controls the X-Trem speed from minimum to about 15 Hz. This control is inactive if the LFO Sync switch is on.
LFO Beats chooses the X-Trem sync rhythm and requires that the LFO Sync switch be on.
LFO Depth controls the X-Trem depth.
LFO Type chooses among the four standard waveforms (triangle, sine, sawtooth, square).
Lo/Hi Balance ties to the Dual Pan’s Input Bal knob. Fully counter-clockwise gives only the low band, clockwise gives only the high band, and the settings in between set the balance between the two bands.
Width controls the Dual Pan’s Width control. For the most authentic sound, leave this centered for mono operation (the Dual Pan should have Link enabled, and Pan set to <C>.
After assigning the controls, congratulations! You have your own Harmonic Tremolo… no soldering or guitar amps required!
Click here to download the effects chain described above. Just drag and drop it directly into a channel in Studio One!
Friday Tip of the Week: Through-Zero Flanging
Flanging that Actually Sounds Like Vintage Tape Flanging
Personal bias alert: I like digital flangers, but most can’t do what true, analog-based, tape flanging could do. Back in the day, the sessions for my band’s second album were booked following Jimi Hendrix’s sessions for Electric Ladyland. His flanging setup remained after the session, so we took advantage of it and used it on our album… and the sound of true, tape-based flanging was burned into my brain. This tip is about obtaining that elusive sound.
The tape flanging process used two tape recorders, one with a fixed delay and one with variable speed. As you sped up and slowed down one recorder, it could lag or lead the other recorder, and the time difference produced the flanging effect. If the audio path for one of them was out of phase, as one tape recorder pulled ahead of the other one (or fell behind after pulling ahead), the audio passed through the “through-zero” point where the audio canceled. This left a brief moment of silence when the flange hit its peak.
To nail “that sound,” first you need two delays. One has to be able to go forward in time, but since that’s not possible without violating the laws of physics (which can lead to a hefty fine and up to five years in jail), a second delay provides a fixed delay so the other can get ahead of it. Second, don’t use LFO control—if you don’t control the flanging effect manually, it sounds bogus.

In this implementation, a Splitter in normal mode feeds two Analog Delays. One of them goes through the Mixtool to flip the phase for the through-zero effect. Start with the Analog Delay settings shown in the screen shot; they’re identical for both delays, except for the Factor control on the delay that feeds the Mixtool.
To hear the tape flanging effect, move the Factor control from full counter-clockwise to clockwise. At the center point, you’ll hear the through-zero effect as the signals cancel. (Actually you can move either Factor control as long as the other one is pointing straight up.)
Variations on a Theme
It’s also fun to make an FX chain to allow for more variations. The left-most knob controls the Factor knob, whose parameter is called Delay Speed. Delay Time chooses how low the flanger goes. It’s scaled to a range from 1 ms to 13 ms; I find 4 – 9 ms about right (copy this curve for the second Analog Delay, because you want their times to track). Delay Inertia uses the control on the same Analog Delay as the Factor knob being controlled. This adds a bit of “tape transport inertia vibe” when you move the Factor knob.
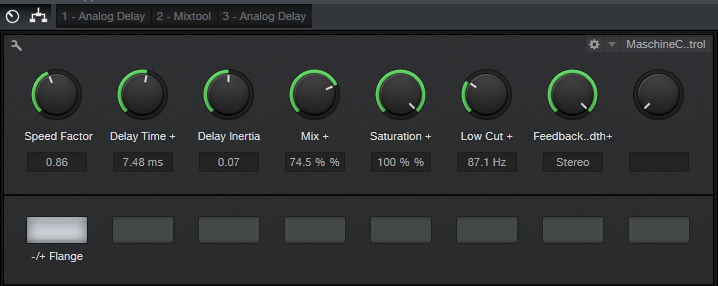
The Mix knob controls the mix on one of the delays from 0% to 100%. (Note that if the Mix controls on both delays are at 0%, the audio should cancel; if it doesn’t, adjust the Mixtool Gain knob until it does.) 100% gives the most dramatic flanging effect, but back in the day, cancellations weren’t “digitally perfect” so setting Mix for one delay to 60-75% gives a smoother through-zero sound. Saturation controls the Saturation parameter on both delays when you want a little more grit, and a Low Cut control for both Analog Delays reduces some of the muddiness that can occur with long Delay Time settings. The Feedback control also ties to both Analog Delays. You’ll usually want to leave this in the stereo position (full clockwise). Finally, -/+ Flange controls the Invert Left and Invert Right buttons on the Mixtool module. Enable them for through-zero (“negative”) flanging, disable for positive flanging.
So does it really sound like tape flanging? Listen for yourself. I took an excerpt from a song on my YouTube channel, applied flanging to it, and posted it as an audio example on craiganderton.com (click on the Demos tab).
Bonus fun: Stick Binaural Pan after the two splits mix back together, and set Width to 200%. If Feedback is set to stereo, this produces a variation on the flanging effect.
Click here to download the preset described in this post! (Updated 4-10-18 with multipreset link)
Friday Tip of the Week—How to Gain Better Vocals
Vocals are the most direct form of communication with your audience—so of course, you want your vocal to be a kind of tractor beam that draws people in. Many engineers give a more intimate feel to vocals by using dynamics control, like limiting or compression. While that has its uses, the downside is often tell-tale artifacts that sound unnatural.
The following technique of phrase-by-phrase gain edits can provide much of the intimacy and presence associated with compression—but with a natural, artifact-free sound. Furthermore, if you do want to compress the vocal further, you won’t need to use very much dynamics control because the phrase-by-phrase gain edits will have done the majority of the work the compressor would have needed to do.
The top track shows the original vocal. In the second track, I used the split tool to isolate sections of the vocal with varying levels (snap to grid needs to be off for this). The next step was clicking on the volume box in the center of the envelope, and dragging up to increase the level on the sections with lower levels. Although you can make a rough adjustment visually, it’s crucial to listen to the edited event in context with what comes before and after to make sure there aren’t any continuity issues—sometimes soft parts are supposed to be soft.
The third track shows the finished vocal after bouncing all the bits back together. Compared to the top track, it’s clear that the vocal levels are much more consistent.
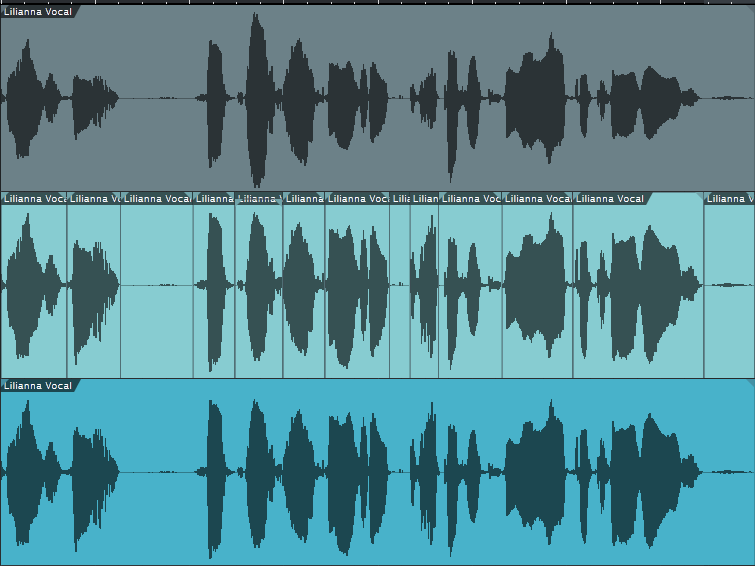
There are a few more tricks involved in using this technique. For example, suppose there’s a fairly loud inhale before a word. A compressor would bring up the inhale, but by splitting and changing gain, you can split just after the inhale and bring up the word or phrase without bringing up the inhale. Also, I found that it was often possible to raise the level on one side of a split but not on the other, and not hear a click from the level change. Whether this was because of being careful to split on zero crossings, dumb luck, or Studio One having some special automatic crossfading mojo, I don’t know…but it just works and if it doesn’t, you can always add crossfades.
That’s all there is to it. If you want to hear this technique in action, here’s a link to a song on my YouTube channel that uses this vocal normalization technique.
Friday Tip of the Week: Strums Made Easy with Step Recording
One of the main differences between guitar and keyboard is chord voicing. Guitar chords typically have six widely separated notes, whereas keyboard notes tend cluster around two areas accessible by each hand. For example, check out the notes that make up an E major chord on guitar.

If you’re a keyboard player using chords to define a chord progression, it’s easy enough to have chords hit on, for example, the beginning of a measure. But “strumming” the chord can add interest and a more guitar-like quality. Although you can edit the notes in a chord so that successively higher notes of the chord have increasing delay compared to the start of the measure, that’s pretty time-consuming. Fortunately, there’s an easy way to do guitar voicings—and strum them.
Stepping Out. The core of this technique is step recording, which is easy to do in Studio One once you’ve inserted a virtual instrument. Steps are keyed to numbers on the screen shot. This assumes the strummed chord will start on the beat.
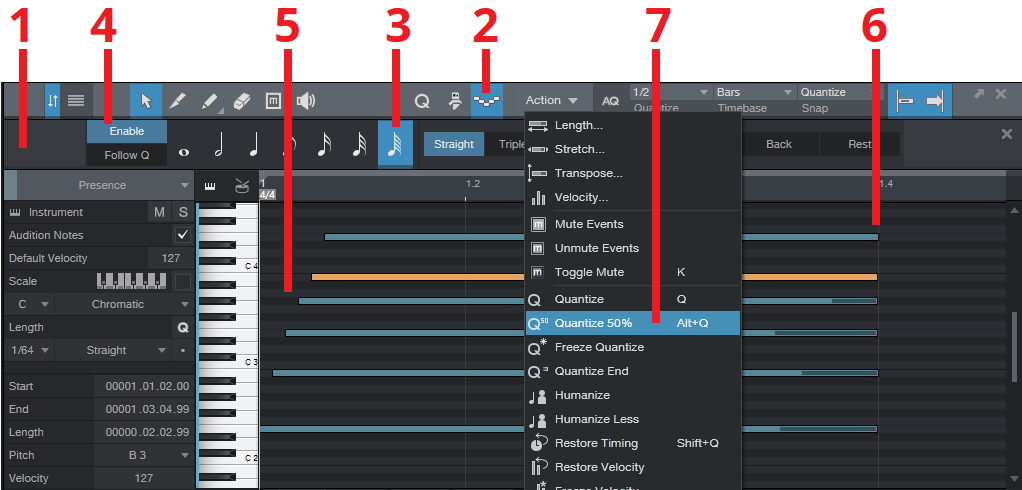
- Define your MIDI region, then open it in the Editor (F2).
- Click on the Editor’s Step Recording button—the one that looks like stairs going down and up.
- Choose a note length value of 64th notes.
- Click Enable.
- Play the notes of the chord, from low to high (or strum down from high to low), starting from the beginning of a measure.
- You’ll probably want to extend the note lengths.
- This will be a fairly slow strum, and there may be too much time between notes. No problem: select the notes, set quantization as appropriate to move the strummed notes closer to the first note (e.g., a half-note in the example above), and then choose Action > Quantize to 50%. Moving the notes closer to the first note speeds up the strum.
The moral of the story is that chord notes don’t always need to hit right on the beat—try some strumming, and add variety to your music.
Friday Tip of the Week: Studio One’s Other Equalizer
The Pro EQ isn’t the only equalizer in Studio One: there’s also a very flexible graphic equalizer, but it’s traveling incognito. Although the Pro EQ can create typical graphic equalizer responses, there are still situations where a good graphic equalizer can be the quickest and easiest way to dial in the sound you want—and the one in Studio One has some attributes you won’t find in standard graphic EQs. Once you start realizing the benefits of this technique, you just may wish you had discovered it sooner.
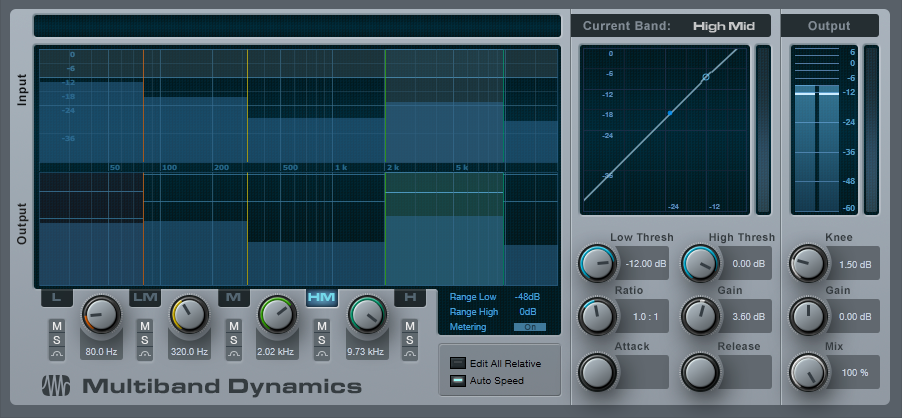
The secret is the Multiband Dynamics processor. A multiband dynamics processor is basically a graphic EQ with individual dynamics control for each band, but we can ignore the dynamics control aspect and use just the equalization.
The reason why setting up this EQ can be so fast is because of being able to solo and mute individual bands, and move the band’s upper and lower limits around freely to focus precisely on the part of the spectrum you want to affect. Of course you can enable/disable individual bands in the Pro EQ, but you’ll still hear the unprocessed sound at all times. With the Multiband Dynamics serving as a graphic EQ, the ability to focus on a specific band of frequencies is something that’s not possible with standard parametric-based EQs.
The first step is to defeat the compression, so set the Ratio for all bands to 1.0. Attack, Release, Knee, and Thresholds don’t matter because there’s no compression.
Now you can adjust the frequency ranges and level for individual bands, and this is where being able to mute and solo bands is incredibly helpful. For example, suppose you want to zero in on the part of a vocal that adds intelligibility. With a parametric EQ you would need to go back and forth between the frequency, bandwidth, and gain to find the “sweet spot.” With the Multiband Dynamics processor, just solo the HM band and move the range dividers until you focus on the vocal frequencies with the most articulation, then boost that band’s gain. Simple.
Even better, the Multiband Dynamics processor has a Mix control so you can blend the processed and unprocessed sound to make the overall effect of the EQ more or less drastic. And speaking of drastic, the Gain control does ±36 dB so you have more control over level than most parametric EQs.
Being able to define individual bands, solo them, and adjust their gain and frequency ranges precisely can be a very useful technique that supplements what you can do with the Pro EQ. For general tone-shaping, try the Multiband Dynamics processor—you might be surprised at how fast you can dial in just the right sound.
