Category Archives: Friday Tip of the Week
Spruce Up Your Mono Guitar’s Image
Almost all guitars, and many vintage keyboards, have mono outputs—but when it comes to recording and mixing, it’s a stereo world. Ooops. Although you can always follow guitar with a stereo effect (like reverb or chorusing) to create a stereo image, the guitar itself is still mono. You can also do tricks with time delays or phase changes, but these usually produce comb filtering, and don’t collapse well to mono.
So, here’s a solution for giving your guitar a stereo spread that collapses back into mono without any problems. As a bonus, once you’ve converted the guitar to stereo, you’ll also get the most out of any stereo effects that follow it.
The Secret Sauce
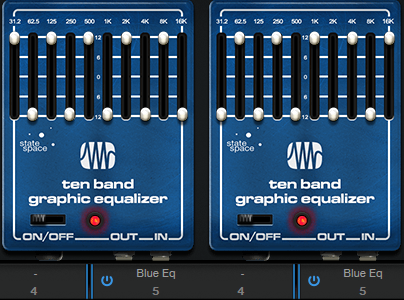
This technique works in Studio One Artist, but at the end, we’ll also cover a tidier alternative for Studio One Professional. The stereo image comes from splitting the guitar into two parallel Ampire Blue EQs. The EQ sliders are set to equal and opposite positions so that when one EQ’s band is boosting, the same band on the other EQ is cutting, and vice-versa (fig. 1). Panning one Graphic EQ to the left and the other to the right splits the frequencies into different channels, which creates the stereo image.
If all you want is the stereo image, bypass the Ampire amps and cabinets. But wait—there’s more! If you set up different amps and cabs in the two channels, you’ll have a gorgeous stereo “stacked’ amp setup. Note that the graphic EQs will affect the amp’s tone; you’ll have a different sound depending on whether the EQs precede or follow the amp+cab. See which option you like best.
Routing and Setup
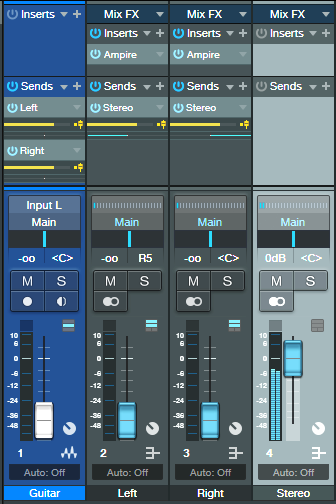
Referring to fig. 2, the guitar track has two pre-fader sends, which send the guitar’s audio to two buses (these buses become the left and right channels). Each bus has an Ampire inserted, with the graphic EQ settings shown in fig. 1.
The two buses go through their own pre-fader sends, with one send panned left and the other panned right. The sends end up at the last bus in the setup, which provides the final stereo guitar signal.
Note that with this setup, you can also “weight” the stereo image more to one side. For example, pan the left channel’s send left, but the right channel’s send to center. Now the guitar will sound like it’s coming more from the left channel. Because the panning isn’t acting like a typical stereo pan control (which is really a balance control), both channels are equally prominent—they’re just mixed together.
Studio One Professional Version
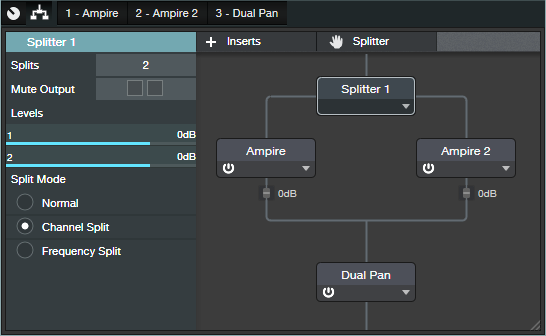
With Professional, you can build all of this into an FX Chain (fig. 3) that inserts in your guitar’s track.
The Splitter, in Channel Split mode, splits the guitar into left and right channels. Each has the same Ampire setup described earlier (only graphic EQs, or graphic EQs with amps and cabs). The Dual Pan is optional. Because we’re not using pannable sends, the Dual Pan allows the kind of weighting described previously, where you can tilt the image more to the left or right side.
And now, guitar players of the world—go forth and stereo!
Mixmaster Magic FX Chain
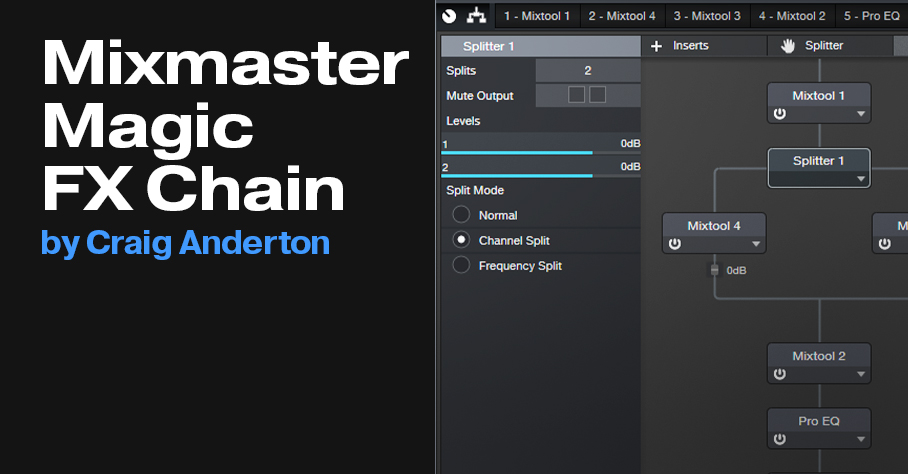
This Main bus FX chain is all about an easy-to-adjust, useful set of controls for processing a stereo mix (or other buses, like background vocals or drums). Want more kick? More voice? Add some “fairy dust”? Widen the mix? Make it louder? No problem.
This doesn’t substitute for a final, deeply-thought-out mastering chain…or maybe it does, depending on what your mix needs. In any event, insert this chain in your Main bus, and I think you’ll like how it can spice up a mix. (Note: although designed for Studio One Professional, you can apply the same concept in Studio One Artist by using buses to “deconstruct” the chain.)
Default Settings
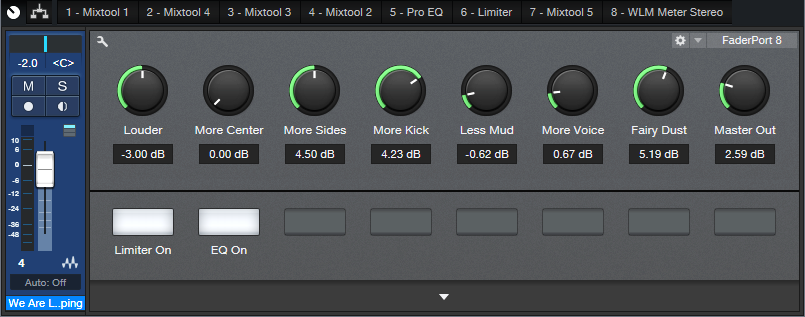
Fig. 1 shows the settings used in the audio example. However, the default initial setting for all controls is fully counter-clockwise, except for the Master Out. When it’s centered, and the controls are at their defaults, you’ll hear the same level whether you enable or bypass the FX Chain. Here’s what the controls do:
- Louder: Lowers the Limiter Threshold from 0 to -6 dB. You won’t win the loudness wars, but this gives a tasty boost to the average level.
- More Center: The FX Chain uses mid-side processing. The More Center control boosts the mid component by 0 to 3.5 dB, so turning it up will typically give you more voice, bass, kick, snare, and anything else that’s panned to center.
- More Sides: Boosts the sides by 0 to 9 dB. Turning this up widens the stereo image.
- More Kick: Bass boost at 65 Hz, 0 to +6 dB. Turn up for more low-end punch.
- Less Mud: Cuts at 300 Hz, from 0 to -5 dB. If your mix sounds muddy, turn this up to reduce mud.
- More Voice: Boosts at 3.2 kHz, from 0 to 4.8 dB. Turn up for more intelligible vocals, and to add some zing to midrange instruments (like acoustic guitar).
- Fairy Dust: Boosts at 9 kHz, from 0 to 9 dB (with a fairly narrow Q). Be sparing—use this power only for good.
FX Chain Block Diagram
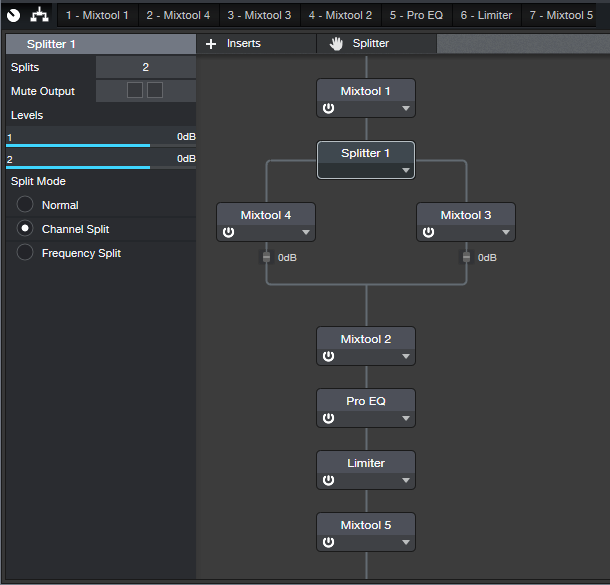
Here’s what the various processors do:
- Mixtool 1: Transforms the input into mid/side audio.
- Splitter: Sends the Mid audio to Mixtool 4, and the Sides audio to Mixtool 3. Altering their gains alters the mid and sides level, respectively.
- Mixtool 2: Transforms the mid/side audio back to stereo.
- Pro EQ: Uses four stages to control the kick, mud, vocal, and “fairy dust” frequencies.
- Limiter: Increases the average level.
- Mixtool 5: Compensates for the lower level going through the FX chain by adding a 6 dB boost.
To hear what kind of difference this chain can make, here’s a short before-and-after excerpt from We Are Looping. The first half bypasses the FX Chain, while the second half uses the control settings in fig. 1. Both sections are normalized to the same peak level.
And of course, you’ll want to download the FX Chain—so go grab it!
Download the Mixmaster Magic FX Chain here
Studio One’s FM Synthesizer
On the surface, Mai Tai is an easy-to-program, fine-sounding virtual analog subtractive synthesizer. But let’s dig deeper—and unlock its unique FM synthesis talents (fig. 1).
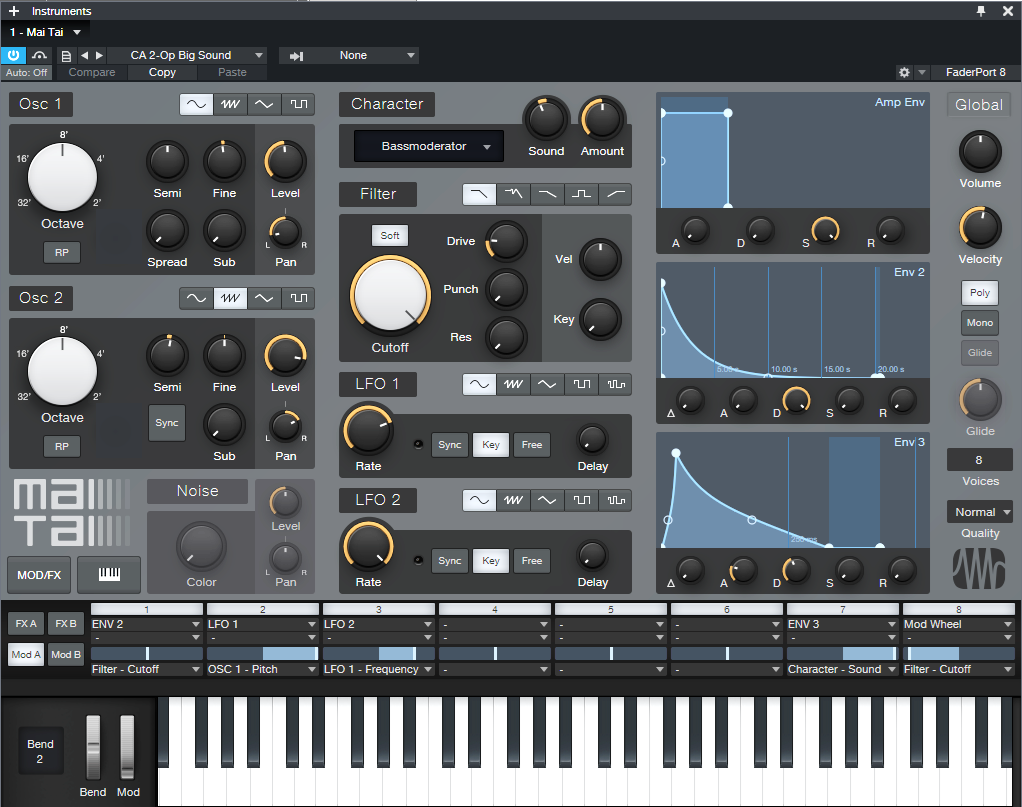
Mai Tai FM synthesis is possible because the LFOs go up to 8 kHz, and can also track the keyboard. So, using an LFO in the audible range to modulate oscillator pitch provides the basics of FM synthesis. What’s more, LFO 2 can modulate LFO 1’s frequency, which allows for 2-operator FM synthesis. However, note that you’ll probably want to use either the 80s or Normal quality setting. Oversampling with the High or Supreme settings can add more unpredictability because of the higher bandwidth…but then again, it can also add interesting variables.
For basic FM synthesis , try this: set Osc 1 to a sine wave. Set LFO 1’s waveform to sine, and enable its Key button. Assign LFO 1 to modulate Osc 1, and turn up modulation all the way. Vary the LFO frequency control in the audio range, and you’ll be greeted with a huge variety of bell and chime-like effects. Then, throw some delay and reverb on it—instant ambient sounds.
You can also try other LFO waveforms, but let’s take this further. Turn up Osc 1’s Spread control past 80%, and you start to enter a world of tremolo and psycho-acoustic panning. Note that the following audio example uses no effects—just a long release time on the amplitude envelope. Changing the modulation depth gives wildly different sounds; for the next audio example it’s up about halfway.
Let’s do one more “nice” sound before we get nasty. This uses the LFO to modulate Osc 1’s Pan instead of pitch, which creates a stereo image from Osc 1’s output.
Okay, it’s time for some sci-fi sound design. Here’s what happens when you modulate both Osc 1 Pitch and Pan, choose Sawtooth for Osc 1 and LFO, turn up Spread, and bend pitch up. Again, there are no effects.
How about a nasty bass? The previous presets are all simple, but this one brings in another oscillator, adds envelopes for both the filter and VCA, and overlays a hint of distortion. Rather than take up the space to describe the parameters, you can just download the CA Nasty Bass.preset.
Note that for “pitched” sounds, the LFO setting is quite critical. Sometimes, offsetting the pitch for the Osc the LFO is driving can fine-tune the preset.
Finally, here’s a 2-Operator FM preset, where LFO 1 is modulating Osc 1, and LFO 2 is modulating LFO 1. Feel free to download the preset, I think it’s a pretty cool sound.
However, tuning is extremely tricky when one LFO is modulating another. This preset plays back 1 semitone sharp compared to concert pitch—sorry. Of course, there are plenty of ways to transpose it, either by shifting your controller down a semitone, or transposing the rendered audio. Like most FM synth presets, when you find something you like, save it! You may never find it again, and changing just one parameter might bring the whole house of cards falling down.
Now go have fun with your shiny new FM synth…that’s been around since Studio One 3 😊
Download the CA Nasty Bass preset here!
Download the CA 2-Op Big Sound here!
Become a Grouping Groupie
Recently, I did some mix consulting on a 60-track project centered around Ukrainian relief—and as someone who usually works with far fewer tracks, it reminded me just how valuable grouping can be. Although Studio One’s grouping in early days was basic, over the years it has grown up, gone to graduate school, and gotten a high-paying job. In the process, I’ve become a groupie for grouping.
Creating Groups
This process hasn’t changed—control+click on the channels you want to group, or shift+click for contiguous channels. This applies to both the Mix and Arrangement views. Then, right-click and choose Group Selected Tracks.
Working with Groups
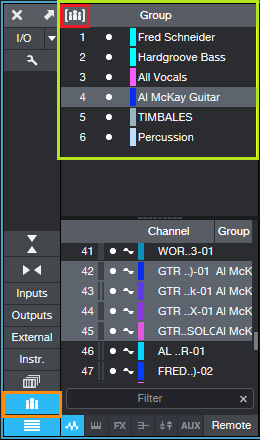
Click on the Group icon (the three little people, outlined in orange in fig. 1), and the Groups appear (lime-green outline) at the top of the Channels List. Clicking on a Group highlights the grouped tracks in the Channel List, and shows the Group’s name to the right of the Channel. (Note that in wide console view, a Group icon appears above the faders of grouped tracks.)
The group button in brackets (red outline) toward the upper left of the Group box turns grouping on and off. For example, if you want to make some quick edits to a couple of channels without affecting other channels in any group, turn off grouping, make your edits, and turn grouping back on again. Another way to suspend grouping is to hold Alt (Windows) or Option (Mac) while you change a parameter in a Group.
In the Channel List, clicking the white dot next to a Group suspends only that Group. However, if the Group is nested within another “master” group, then the rules change. In the example above, the Timbales are a Group, and Percussion—which includes the Timbales—is another Group. With Timbales turned off, any changes made to channels in the Percussion Group will still affect the Timbales, because Timbales are part of the Percussion Group. However, turning off grouping for the Percussion Group allows editing the Timbales independently.
Choosing Group Attributes
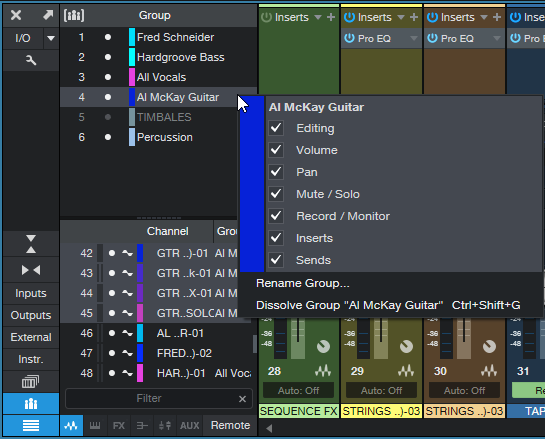
Right-click on a Group to choose the Group’s attributes. These include color, Rename Group, Dissolve Group, and 6 different parameters—Volume, Pan, Mute/Solo, Record/Monitor, Inserts, and Sends (fig. 2).
The Editing attribute isn’t a “parameter” per se, but covers editing operations. This is powerful, because edit operations affect all members of the Group—split an event in one grouped track, and it splits events at the same place in all grouped tracks. The same is true for move, quantize, normalize, transpose, tune, etc. However, for instruments with individual outputs, note that edit operations apply only to audio when you group their Console channels. To have edits operations apply to the instrument tracks for individual outs, you need to group the instrument tracks separately, in the Arrange view.
Being able to choose attributes selectively is great. For example, I often Group Solo/Mute and Editing, and leave the other parameters alone while I’m setting up the mix. Then, I’ll add in Volume. (Note that if you use Insert to add an effect to all Grouped tracks, the effect parameters aren’t grouped, but you can Expand, Bypass, Remove, and Disable all grouped effects in the Console view.)
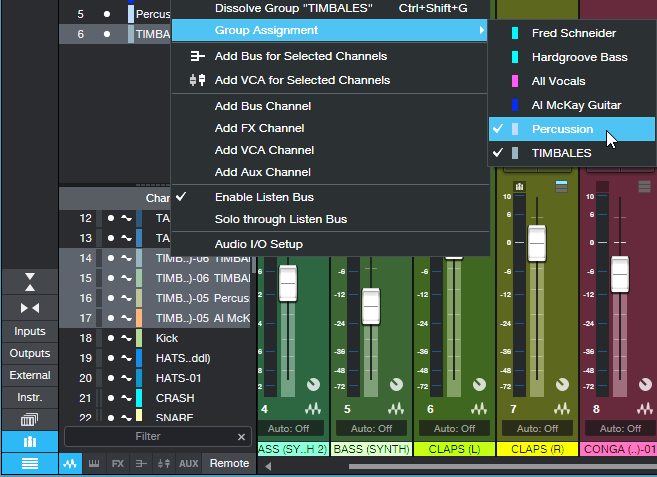
You can also edit the Group to which a channel belongs. In the Channel List, right-click on one of the grouped tracks, select Group Assignment, then check or uncheck a Group, as appropriate (fig. 3).
So, there you have it: everything you need to become a groupie. Grouping is a great feature, so be sure to take advantage of it.
Unlock the Power of Impact XT’s Multiple Outs
We all know Impact XT is cool—but it’s at its coolest when you use the individual audio outputs, because then you can add exquisite effects to individual drums.
How Multiple Outputs Work, Part 1: Impact Setup
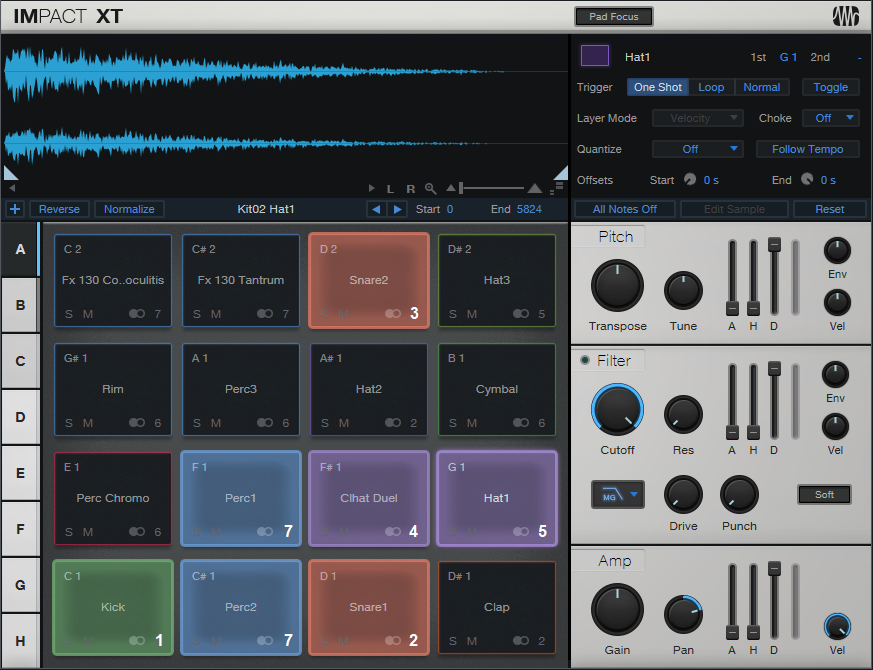
Let’s zoom out. Impact has 16 potential outputs, which can be mono or stereo. The reason for saying “potential” is that you can use as many as you want, in whatever configuration you want—all stereo, all mono, or a mix of mono and stereo outputs.
You assign a drum to one of the 16 outputs by clicking on the little number in a pad’s lower right, and choosing from one of the 16 outputs, either stereo or mono. More than one drum can feed a single output. For example, fig. 1 shows an Impact layout for a recent song. All the drums go to their own outputs, except that Perc1 and Perc2 feed the same output because they’re going to be processed, and have their levels adjusted, simultaneously.
Part 2: Console Setup
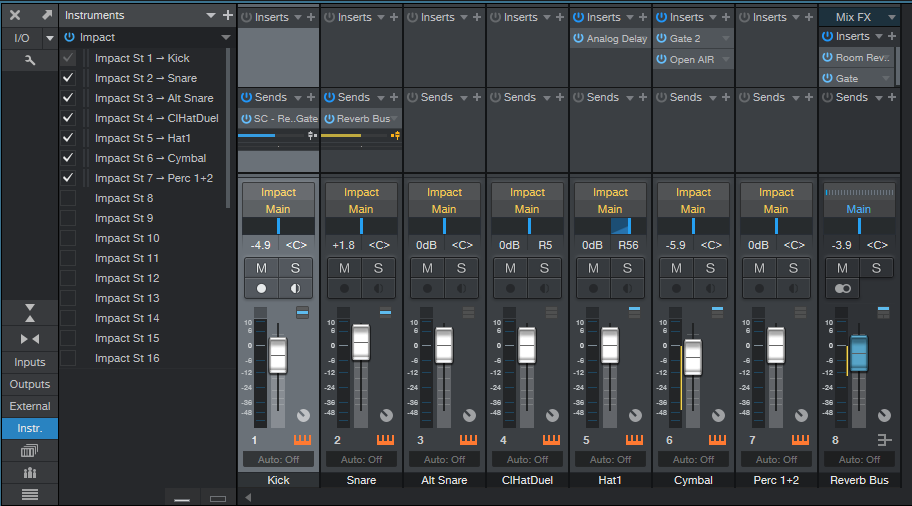
Now we’ll have the drums show up in the console. Open the Instruments panel, click on the downward arrow, and choose Expand to see Impact XT’s outputs. You’ll see all the Impact outputs (you may have to scroll to see more than the 16 stereo outputs). They’ll have an St (stereo) or M (mono) prefix, followed by the output number. Check the box that corresponds to each output that you’re using. It doesn’t hurt to check outputs you’re not using, but they’ll take up space in the console, and serve no purpose.
Next, simplify your life by renaming the console channels to reflect the drum names (fig. 2). The names will then show up in the Instruments panel. This lets you think of the console channels as sounds instead of just outputs.
Part 3: The Payoff
So why bother doing all this instead of just using a stereo output? Because we can do all kinds of fun processing. In this example:
- The Snare channel is going to a bus with Room Reverb, set for a loooong decay. It’s followed by a Gate.
- The Kick channel has a send that feeds the Gate’s sidechain, so when the kick hits, it lets through the snare’s reverb.
- The Hat1 sound’s Analog Delay adds some motion.
- The Cymbal goes through another Gate, set for a long attack time to give an attack delay effect. This is followed by the Open Air convolution reverb, which uses the “8.00s Thin” idealized reverb impulse from my Surreal Reverb Impulse Responses pack.
This processing transforms a dancehall-type beat into something more chill. The audio example’s first half plays what the loop would be like without processing, while the second half includes the processing—and that’s just the tip of the iceberg of what multiple outputs can do.
Frequency Splitting in Artist
The Splitter is one of Studio One Professional’s coolest features, because it can split by frequency and do multiband processing. I’m a huge fan of the focused, smooth distortion sound you get by splitting guitars into low, mid, and high-frequency bands, and then distorting each one with its own amp sim. But multiband processing is also cool with delay, chorusing, reverb…you name it.
That’s the good news. The bad news: the Artist version doesn’t include the Splitter. However, there is a way to split your audio into three frequency bands. Let’s listen to the sound of single-band distortion, which uses the Ampire default setting (MCM 800).
Compare this to the multiband setting. The amp sounds are also the Ampire default, with a few minor tone knob edits.
If you like the second sound better, keep reading.
Console Setup
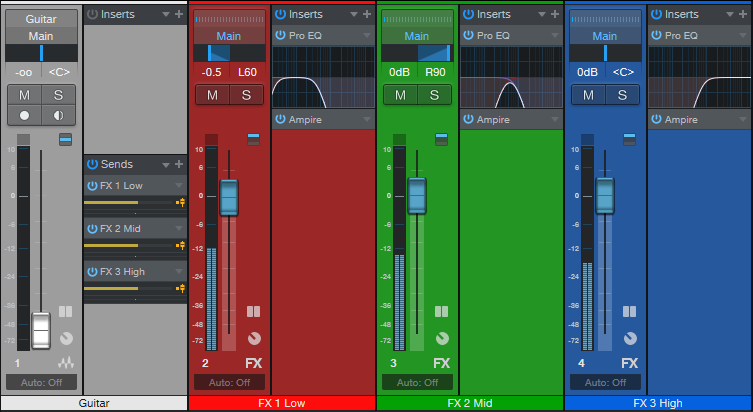
Create three pre-fader sends for the track you want to process, and assign them to three FX Channels or Buses (fig. 1). With pre-fader sends, you can turn down the main channel’s fader to hear only the processed sound, or turn it up to mix in dry sound for additional parallel processing. Fig. 1 shows the setup used for the 3-band audio example. At the end of this post, there’s a download link for a song file that contains this setup.
Pro EQ2 Settings
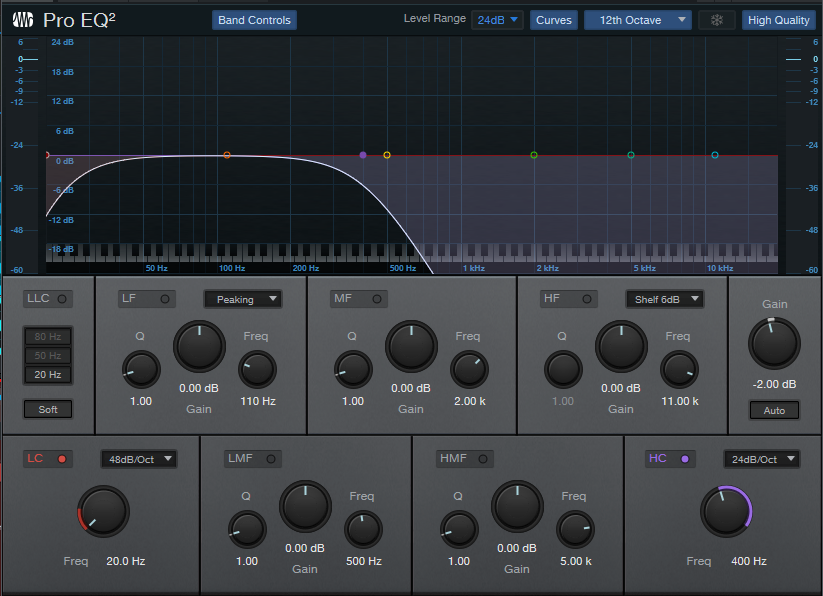
The Pro EQ2 settings start with the default. Only the LC, HC, and Gain parameters need changing. The table shows suggested frequency bands for guitar, but feel free to alter them. The main consideration is that the Low band’s HC frequency should equal the Mid band’s LC frequency, and the Mid band’s HC frequency should equal the High band’s LC frequency. All the slopes are 24 dB/octave.

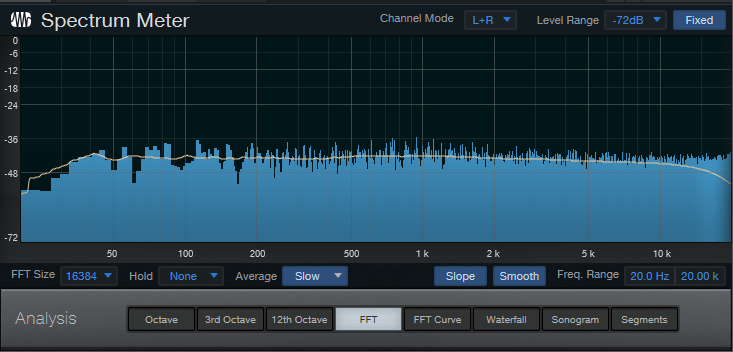
The slight gain control differences compensate for the phase issues inherent in splitting with non-linear-phase filters. Fig. 3 shows white noise going through the splits, and summed at the output—the frequency response is almost perfectly flat. The slight bass rolloff is due to my preference mentioned above for rolling off the Low Band’s LC filter (20 Hz, with a 48 dB/octave slope). Similarly, the High band’s HC filter rolls off at 20 kHz, with a 48 dB/octave slope. Amp sims don’t need those high frequencies anyway.
Time for Tweakage!
Multiband setups are highly customizable. Pan the bands differently to create a stereo image, alter the band levels, tweak the amp settings to optimize them for a specific band, and so on. The only caution is that because of the heavy filtering, there’s less audio going to the amp inputs. So, you may need to turn up the amp gain (or Pro EQ2 gain for one or more bands) to get the sound you want. And of course, this isn’t just about amp sims, because multiband chorusing, delay, reverb, and effects combinations are also very cool.
Download the .song file, and you’ll have all the EQs and splitting set up…so plug in an instrument or load a track, and start playing around.
Download the multiband template in Fig. 1 here.
The Guitarist’s Hum Buster
Hum is like an unwanted house guest—when it shows up, all you really want to do is get rid of it. Unfortunately, I can’t help you with unwanted house guests…but we do have an answer on how to deal with hum.
If you play guitar, you know how much of a problem hum can be. However, it’s not good enough to get rid of only the hum’s 50 or 60 Hz sine wave, because there will often be harmonics of the hum—we need to remove those as well.
Before going any further, let’s listen to an audio example, so you have the incentive keep reading. The first half has some nasty hum, while the second half has obviously read this week’s tip.
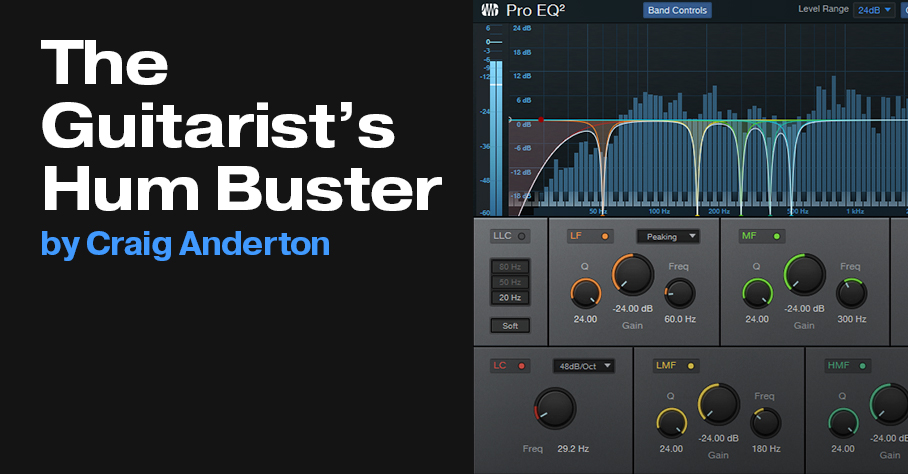
Fig. 1 shows the Pro EQ2 settings, but you don’t need to copy them—just download the 50 and 60 Hz presets from the links at the end of the tip. You’d insert this at the beginning of a chain of effects.
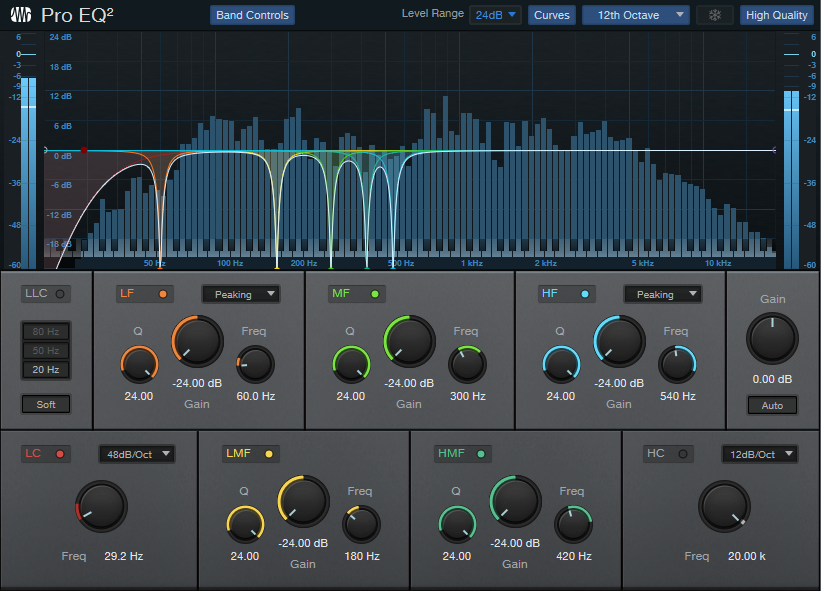
For 60 Hz, in addition to notching out 60 Hz, you want deep notches at 60 Hz’s odd harmonics: 180, 300, 420, and 540 Hz. For 50 Hz, the magic frequencies are 50, 150, 250, 350, and 450 Hz. Note that these notches are narrow enough so that they don’t interfere much with the original guitar sound. For less severe hum, you can try turning off some of the filter stages, because they may not be needed.
That’s all there is to it…so go ahead, download the preset that’s appropriate for your part of the world, and make the hum go away.
Download the 60 Hz Hum Remover.preset and 50 Hz Hum Remover.preset below
Your Virtual Listening Room
Listening to speakers is a different experience than listening to headphones. Instead of your head being one point of an equilateral triangle with speakers, headphones are more like having speakers at your left and right sides, an inch away from your ears, and pointing directly into them—while bunching up the center inside your head.
Several commercial plug-ins are designed to make headphones sound more like listening to speakers in a room. This tip’s implementation isn’t quite as sophisticated, but you’ll find that it makes listening over headphones more fun, less fatiguing, and gives your mix more depth. It takes full advantage of Studio One Pro’s Listen bus.
How It Works
When listening over speakers, left channel audio hits your right ear a couple milliseconds later than your left ear, at a reduced level, and with some high-frequency loss because your head acts as a high-cut filter in the audio’s path. A similar issue happens with right channel audio and your left ear. The Virtual Listening Room effects chain reproduces the crosstalk, delay, and high-frequency cuts in the Listen Bus, which you layer with the Main bus.
Although Studio One has several delay-based effects, they’re effects—we need a basic, boring, “all-it-does-is-stereo-delay” processor. Fortunately, the free Voxengo Sound Delay plug-in (VST2, VST3, and AU) does the job. Similar basic delays, like Eventide’s Precision Delay, also work.
The Effects Chain
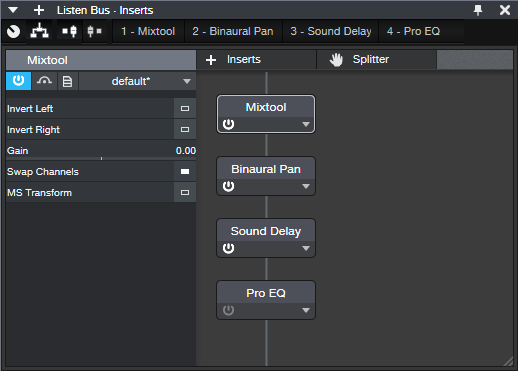
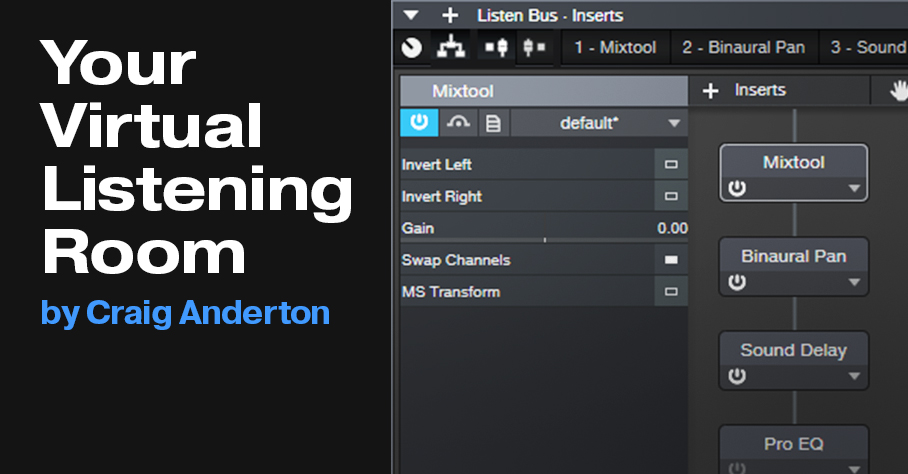
Fig. 1 shows the effects chain. For the Mixtool, simply drag it in, and click on the Swap Channels button. The Binaural Pan processor adds a little extra depth. Drag it in, and set the Width to 150. You may want to increase or decrease this later, but it’s a good starting point.
Set the stereo delay between 1 to 3 milliseconds. I usually choose 2 ms. Note that the Voxengo Sound Delay has an option to choose Stereo Swap for Routing instead of Stereo. If you choose Stereo Swap, then you don’t need the Mixtool to swap the channels.
Finally, the Pro EQ2 provides a simple, high-frequency rolloff. Enable the HC filter, choose 24 dB/octave slope, and a frequency of 6 to 7 kHz. Although this produces a more realistic effect, remember that we’re listening in a virtual listening room. I leave the filter bypassed because my virtual head is sonically transparent and passes high frequencies, so that makes the filter irrelevant.
The Listen Bus
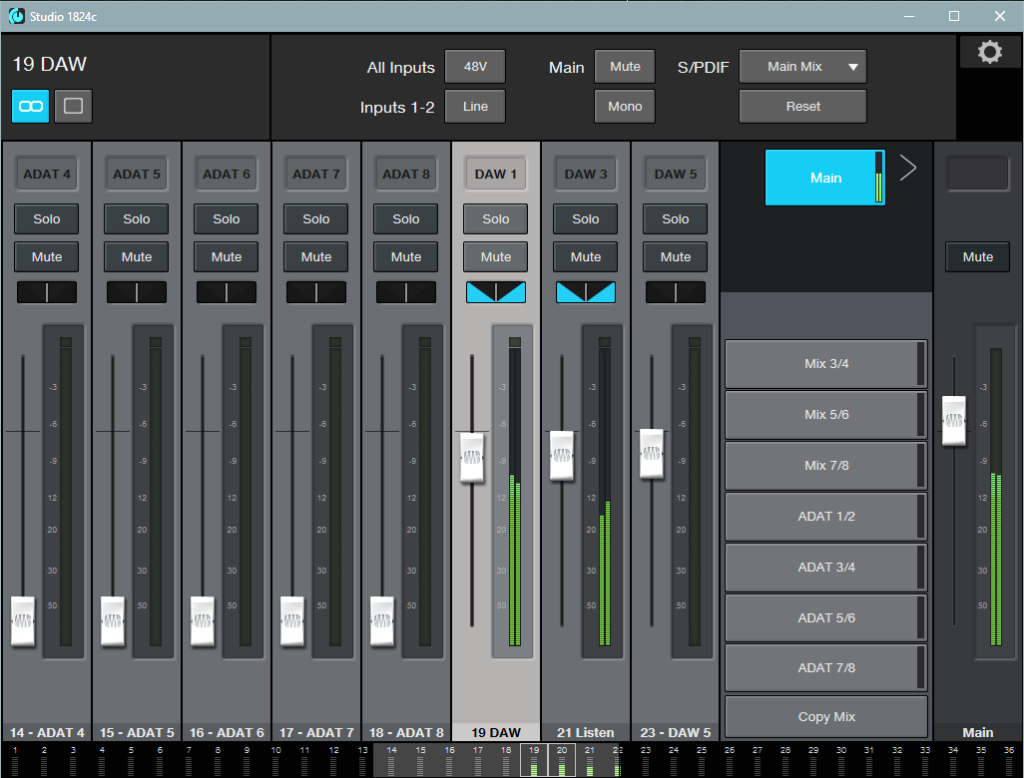
I use the PreSonus 1824c interface and Universal Control, and Studio One’s Listen Bus makes it easy to create the Virtual Listening Room. The Listen Bus goes to outputs 3+4, so the 1824c’s mixer faders for channels 3+4 are turned up (along with the Main Bus, which is channels 1+2; see fig. 2). Altering the Listen Bus fader changes the extent of the virtual room effect—between -3 and -9 dB at Studio One’s mixer seems about right. Of course, this technique isn’t limited to using a PreSonus interface. Any other way you can layer the Main Bus output and Listen Bus output works.
Because this involves the Main Bus, Listen Bus, and using headphones, I can’t really give an audio example. But if I could, and you could hear what this effect does, I’m pretty sure you would try it out. So—try it out!
Fix Mixes with Multiband Dynamics

Multiband compressors can seem daunting. However, they’re just several compressors stuffed into one plug-in (or in the case of Studio One, dynamics processors that can do more than just compression). If you know how compressors work, you’re halfway to understanding multiband compression. The other half is EQ, because each compressor processes a single frequency band. In fact, if you set the ratio controls for all to 1:1 so that there’s no compression, then the Multiband Dynamics processor turns into a “focusing” graphic EQ.
This week’s tip has two downloadable files:
- Original File.wav is included so you can experiment with the techniques in this tip. It’s part of a mixed but unmastered song (the finished version is here) that we’ll process with the Multiband Dynamics plug-in. It’s the same file used for the first audio example.
- Multiband Mix Fix.preset is the Multiband Dynamics preset we’re using. You can “reverse engineer” the settings, and experiment with making your own edits to hear how they affect the original file.
Multiband Compression and Mastering
Mastering engineers often receive mixed stereo files, so it’s not possible to change the mix. However, multiband compression can almost “get inside” the mix to change it. We’ll cover a practical example of how to use multiband compression with a mixed file.
The first step in mastering is to listen to a file several times, so that you can identify problems that need to be fixed. Here’s the file we’ll be processing.
There are three main issues:
1. The high end lacks the high-frequency “fairy dust” that’s often added to masters. Think of it like adding a pinch of salt to food.
2. The low end is weak. You can hear the bass and kick, but they don’t have enough power. This issue is especially noticeable with the bass slides between 12-16 seconds into the file, and in the downward slide at the end.
3. The upper midrange needs to be “crisper” when vocals are present, because the overall sound is a little boxy. This also affects the acoustic guitar, especially between 20-25 seconds. Finally, in the instrumental section that starts at 25 seconds, the drum attacks are too prominent. They need to be tamed so that the guitar and bass come more to the forefront.
Let’s Fix the Mix
Please note I’ve altered the Multiband Dynamics user interface artwork to include only the elements relevant to fixing the three problems above. No worries—this isn’t from some weird beta version of Studio One.
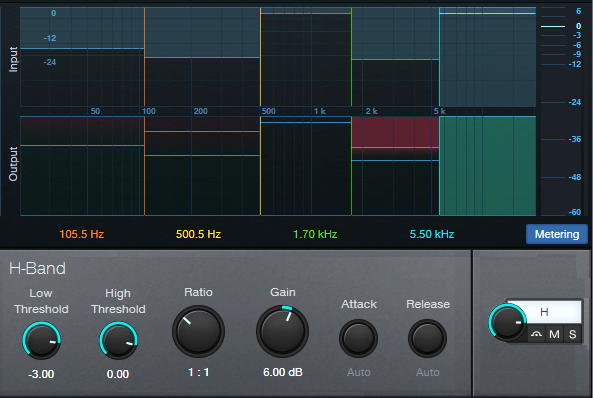
Fixing (1) is easy. The high band extends from 5.50 kHz on up (fig. 1). Although there’s no compression, the Gain control boosts the high frequencies. You could apply the same effect with EQ, but it’s more convenient with the Multiband Dynamics, because sometimes you want to make tweaks that relate to the other bands.
Fixing (2) takes a little more effort, and involves the Low and Low Mid bands (fig. 2).
The Low Band compresses frequencies below 105.5 Hz, and adds 6 dB of gain. The Low Mid band compresses frequencies between 105.5 and 500.5 Hz, and adds 5 dB of gain. This Low Mid range is where engineers often scoop the response slightly, to avoid a “muddy” sound. But this case is the exception that proves the rule, because we need more level in this range, not less.
The Mid Band applies no processing, which brings us to (3). This is the most difficult to adjust; overdo the High Mid range, and the sound becomes harsh. But without enough high mids, the sound lacks clarity.
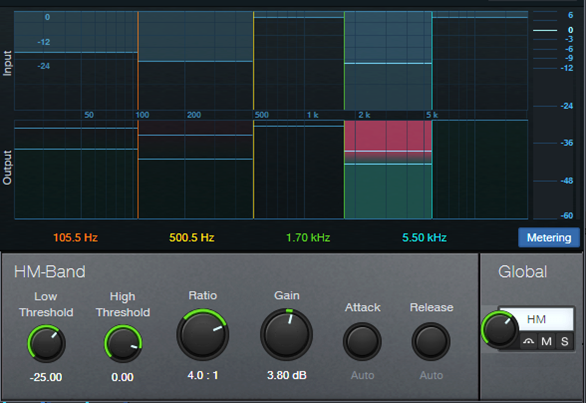
This band covers 1.70 kHz to 5.50 kHz (fig. 3). The compression ratio is higher than the other bands, to tame the percussive drum peaks. Also, the threshold is low, and there’s almost 4 dB of gain. This gives a lift to the upper mids, and tames the drum peaks in the instrumental section.
Final Comments
The second audio example includes all the above changes. It has the same LUFS value as the first audio example, so a level difference doesn’t influence the comparison.
Note that the threshold on all the compressor’s bands is quite low. This is because the original file is around -16 LUFS. If it was higher, the thresholds wouldn’t need to be so low. The Multiband Dynamics brings the output up to around -14 LUFS. If you wanted a hotter sound, you could limit this further. But in any event, at least to my ears, the processed version sounds better than the original.
Downloads!
Download the original audio file below so you can follow along with this tip.
Download the final Multiband Mix Fix preset below. Try bypassing, soloing, and muting bands to hear what they contribute to the overall processing.
EZ 80s Gated Mixverb Drums
The gated reverb effect on drums was one of the signature sounds of the 80s, with probably the most famous example being Phil Collins’ “In the Air Tonight.” The dramatic moment when the drums came crashing in was all about gated reverb.
It may seem like this is an easy effect to create, but it’s not as easy as it might seem. Not just any reverb sound will do, and the gate parameters are critical.
Fortunately, the Mixverb is reasonably good at doing gated drum sounds, especially with drums like toms that have a decent amount of sustain or ring.
The downside is that the Mixverb’s gate section doesn’t have a sidechain, which is needed for the most flexible and authentic gated reverb effects. Because the gate is after the reverb, its gating action tracks the reverb’s decay, not the drum’s decay. Also, if a couple hits happen in quick succession, they’ll keep the reverb going. This keeps the gate opens, and forfeits the gated effect.
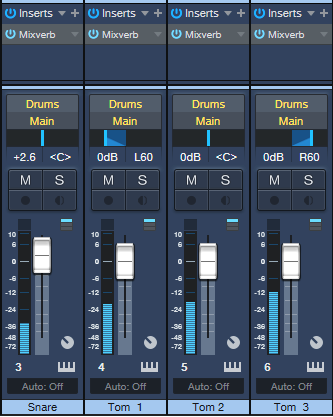
For best results, each drum whose reverb you want to gate will need a separate output, processed by its own Mixverb. Fortunately, it doesn’t draw much CPU, so your computer won’t complain. For next week’s tip, we’ll cover a more traditional (albeit more complex) solution for gated drum effects. Meanwhile, let’s hear what the Mixverb can do.
The first half is unprocessed drums, the second half has gated Mixverb on the toms and snare.
The mixer setup (fig. 1) is straightforward.
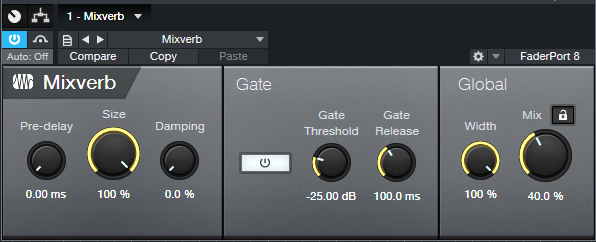
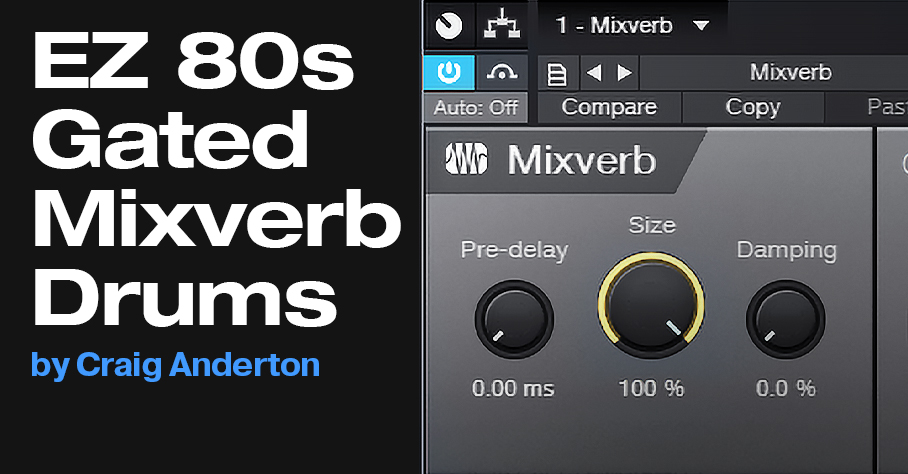
Start with the initial settings shown in fig. 2, which are fairly crucial. Because the Gate is post-reverb, the Size, Gate Threshold, and Gate Release interact.
Next, vary the Gate Threshold to alter how long the gated reverb effect lasts. The optimum settings will depend on the drum sound itself, and the incoming level to the Mixverb. Even a 1 or 2 dB change in the threshold can have a major influence. Then, vary the Mix control to obtain the desired blend of dry and gated reverb sound.
Finally, play around with the Size and Gate Release controls to see if you can optimize the sound any further. Note that the snare in the audio example had the same settings, except the Gate Threshold was at the lowest possible level, and the Gate Release was 50 ms.
After trying this, you might think “Nice try, Craig…it sounds okay in the audio example, but my drums don’t sound like that.” Well, remember that we just got lucky with the Mixverb, and it’s not equally accommodating to all drums. So tune in next week, when we’ll show a more universal way to do gated reverb drums—which can also be very cool with gated delay.
