Category Archives: Friday Tip of the Week
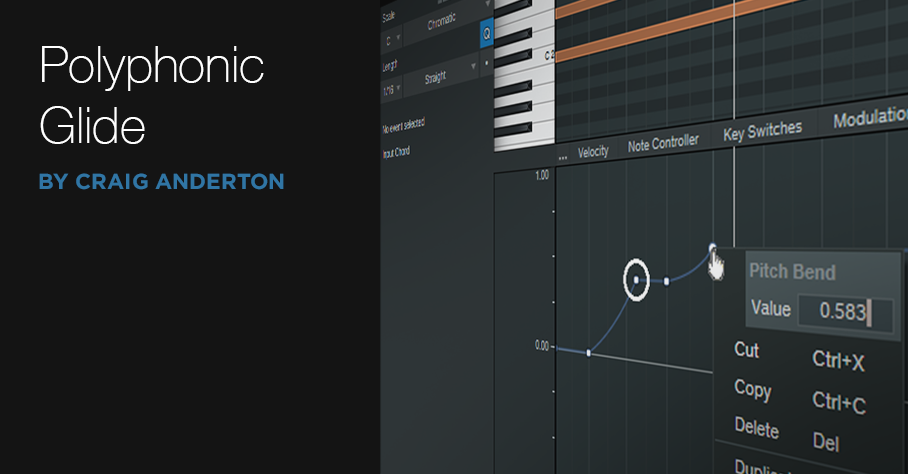
Polyphonic Glide with Any Synth
 Before getting into this week’s tip, here’s some news.
First, thank you for your continued support of the Studio One eBooks. The goal was to make sure that the books remain current—so there are revisions, as well as new editions.
Revisions are like software “point” updates. They’re free to registered users of the original book, and also make sure new buyers get the latest information. A revision for “How to Make Compelling Mixes with Studio One” will be available next week. New editions expand substantially on the original (like how software advances from one version to the next). The latest is More than Compressors: The Complete Guide to Dynamics in Studio One – 2nd Edition, available now in the PreSonus shop (available to owners of the first edition for half-price).
Second, remember that if you have any questions, comments, corrections, or additional ideas about the books, there’s a support thread where you can ask questions and I’ll answer them. The thread also announces when revisions and new editions are available.
And now…on to the tip!
Why Polyphonic Glide is Cool
Creating steel or slide guitar sounds with keyboards is difficult, because few soft synths have polyphonic glide. If they do, sometimes the results are unpredictable.
For my first, admittedly pathetic attempt at “steel synth,” I tried setting the synth bend range to 12 semitones and using the pitch bend wheel to slide entire chords up or down in pitch. However, hitting an exact pitch with the wheel is really difficult. I tried editing the parts to have correct tuning…but that took forever.
Fortunately, there’s a simple answer. It’s not a real-time solution (you’ll need to use the note data edit view), but it works really well—check out the audio example.
A Studio One Pitch Bend “Secret”
The basic idea for slide emulations is you sustain a note, and then use pitch bend to slide the sustained note(s) up (or down). In Fig. 1, a C major chord is gliding up to F and then G, to create the ever-popular I-IV-V progression.
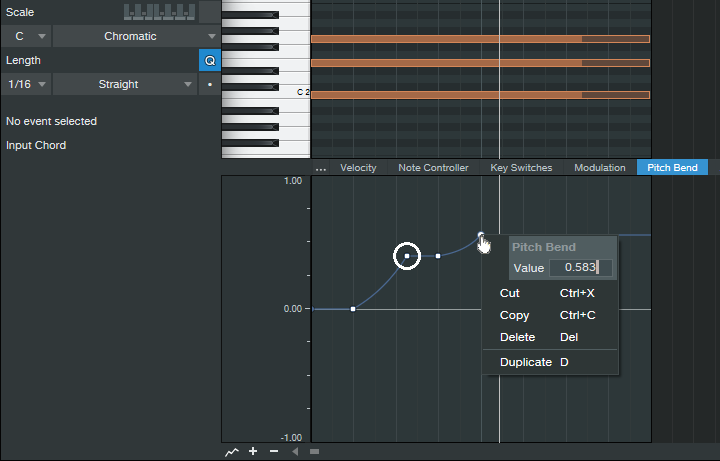
Figure 1: A C major chord is sliding up to an F major, and then a G major.
To ensure correct tuning, create a pitch bend node where you want the new pitch to begin. Right-click on it, and then enter a number that corresponds to the number of semitones you want to “glide” (see the table below). This assumes the synth’s pitch bend range is set to 12 semitones. If you want to bend down by a certain number of semitones, use the same pitch bend amount—just make it negative.

Remember that pitch bend is based on a percentage scale, so in Fig. 1, the first pitch bend node (circled in white to make it more obvious) is set to 0.417 (5 semitones). The second node for the fifth is 0.583 semitones. Lines from one node to the next create the actual glide.
When you right-click on a node to enter a number, the resolution appears to be only two digits to the right of the decimal point, which isn’t good enough for accurate tuning. However, you can enter a three-digit number, as shown above. Even though it won’t be displayed, if you enter that third digit, the dialog box accepts it and Studio One will remember it—so now, you can glide to the exact right pitch.
The Ultimate TremPan
I never lost faith in the potential of tremolo, even after those opto-based amplitude processors in guitar amps had become quaint. X-Trem rewarded my faith—and it’s about time tremolo joined the 21st century, given that we’re a fifth of the way through it already.
This FX Chain does dual-band standard tremolo, harmonic tremolo, and panning—and because it’s dual-band, the high and low frequencies are processed independently. You can download the Ultimate TremPan FX Chain if you can’t wait, but because of the flexibility, let’s go through the control panel before covering how it works.
Download the Ultimate TremPan FX Chain!
The control panel (Fig. 1) gives multiple ways to configure the effect. The low- and high-frequency bands have identical switches.
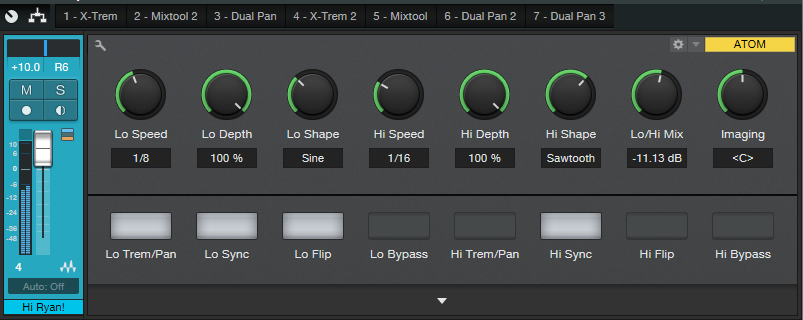
Figure 1: The TremPan control panel.
- Trem/Pan – chooses tremolo or panning mode
- Sync – Syncs to tempo
- Flip – Reverses the LFO phase, e.g., from positive-going to negative-going sawtooth
- Bypass – Bypasses a band, so you hear the effect on only the non-bypassed band
Let’s look at the controls. The low- and high-frequency bands have three controls in common.
- Speed – The sync switch determines whether the LFO speed syncs to tempo or runs free. When running free, the Speed control calibration still shows rhythmic values, but it’s actually continuously variable.
- Depth – Controls how much the tremolo or panning affects the signal.
- Shape – Available LFO waveforms are Triangle, Sine, Sawtooth, or Square.
The Hi/Lo Mix control determines the balance of the low- and high-frequency bands. Imaging spreads the low and high bands; when centered, the low and high bands are centered too, and if a band is in panning mode, it pans the full stereo field. Turning this control counter-clockwise moves the low band toward the left and the high band toward the right, while de-emphasizing panning so that when fully counter-clockwise, both bands are acting as tremolos in their respective channels. Turning this control clockwise reverse the action, i.e., when fully clockwise, the high band sounds like a tremolo in the left channel, while the low band sounds like a tremolo in the right channel.
How It Works
Figure 2 shows the block diagram.
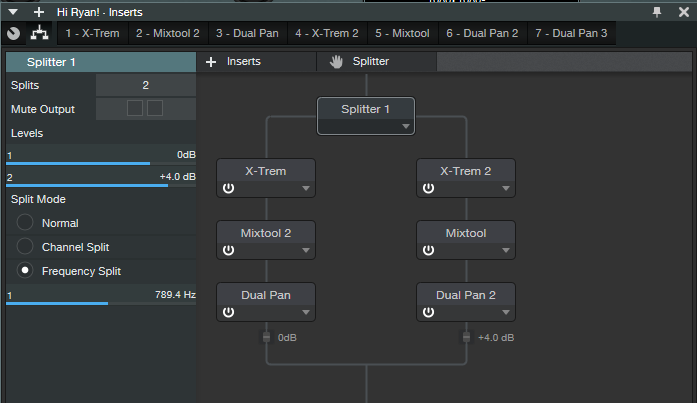
Figure 2: The processors inside the Ultimate TremPan FX Chain.
The Splitter does two splits based on frequency, with a split around 800 Hz. This seems to work well for guitar, but feel free to play around with it (I hope that in some future update, Splitter parameters will be assignable to control panel Macro knobs).
The Mixtools have their gains varied oppositely by the Lo/Hi Mix control to set the proportions of the high and low bands. The Dual pans in the Splits have their Input Balance controlled oppositely by the Imaging knob.
Applications
You have a lot of options, but here are some of my favorites.
- Different tremolo speeds and waveforms avoid the stereotyped tremolo sound.
- For EDM tremolo, try two negative-going sawtooths (i.e., don’t enable Flip) with the low band set to 1/8th notes and the high band set to 16th This gives a cool percussive effect.
- You can do the “harmonic tremolo” effect, as found in some old Fender amps, by setting both modes to tremolo and the same speed, but choosing Flip for one of the bands.
- Panning the low band back and forth slowly while setting a fairly fast tremolo for the high band gives a wide, interesting imaging effect.
The rhythmically synched effects can make one instrument almost sound like two instruments, working together as a team. This FX Chain can also animate hand percussion tracks by varying where the percussion happens in the stereo field. Have fun with this sucker—it’s time to re-discover amplitude modulation.
Poly Aftertouch: Ready for Prime Time
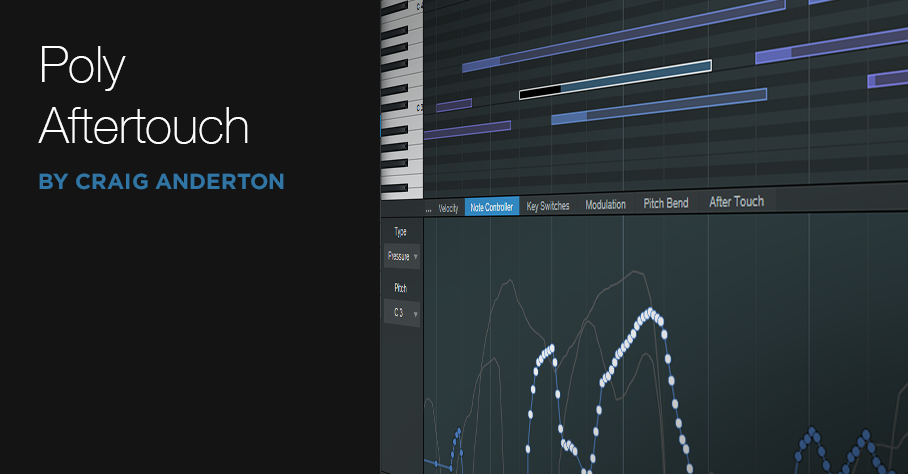
One of the complaints about electronic music instruments and controllers is that they lack the expressiveness of acoustic instruments. Although future instruments will take advantage of MIDI 2.0’s enhanced expressiveness, two options are available right now: polyphonic pressure, and MPE (MIDI Polyphonic Expression). Studio One 5 can record/edit both, and ATOM SQ generates polyphonic pressure…so let’s dig deeper.
Language Lesson
First, there’s some confusion because people call the same function by different names. Channel Aftertouch = Channel Pressure = Mono Aftertouch = Mono Pressure. Polyphonic Aftertouch = Polyphonic Pressure = Poly AT = Poly Aftertouch = Poly Pressure. Okay! Now we’ve cleared that up.
Aftertouch: Two Flavors
Aftertouch generates a control signal when you press down on a keyboard key after it’s down, or continue pressing on a percussion pad after striking it. Aftertouch is a variable message, like a mod wheel or footpedal—not a switch. A typical application would be changing filter cutoff, adding modulation, or doing guitar-like pitch bends by pressing on a key.
There are two aftertouch flavors. Mono pressure has been around since the days of the Yamaha DX7, and sends the highest controller value of all keys that are currently being pressed. Polyphonic pressure sends individual pressure messages for each key. For example, when holding down a chord for a brass section, by assigning poly pressure to filter cutoff, you can make just one note brighter by pressing down on its associated key. The other chord notes remain unaffected unless they’re also pressed.
Controllers with polyphonic aftertouch used to be fairly expensive and rare, but that’s changing—as evidenced by ATOM SQ.
Synth Requirements
As expected, you need a synth that responds to poly pressure. Many hardware synths respond to it, even if they don’t generate it. As to soft synths, although I haven’t tested all of the following, they reportedly support poly pressure: several Korg Collection synths, Kontakt, Reaktor, all Arturia instruments, all U-He instruments, XILS-Lab synths, TAL-Sampler, AAS synths, Albino 3, impOSCar2, Mach5, and Omnisphere. If you know of others, feel free to mention them in the comments section below. (Currently, Studio One’s bundled instruments don’t respond to polyphonic aftertouch.)
The Controller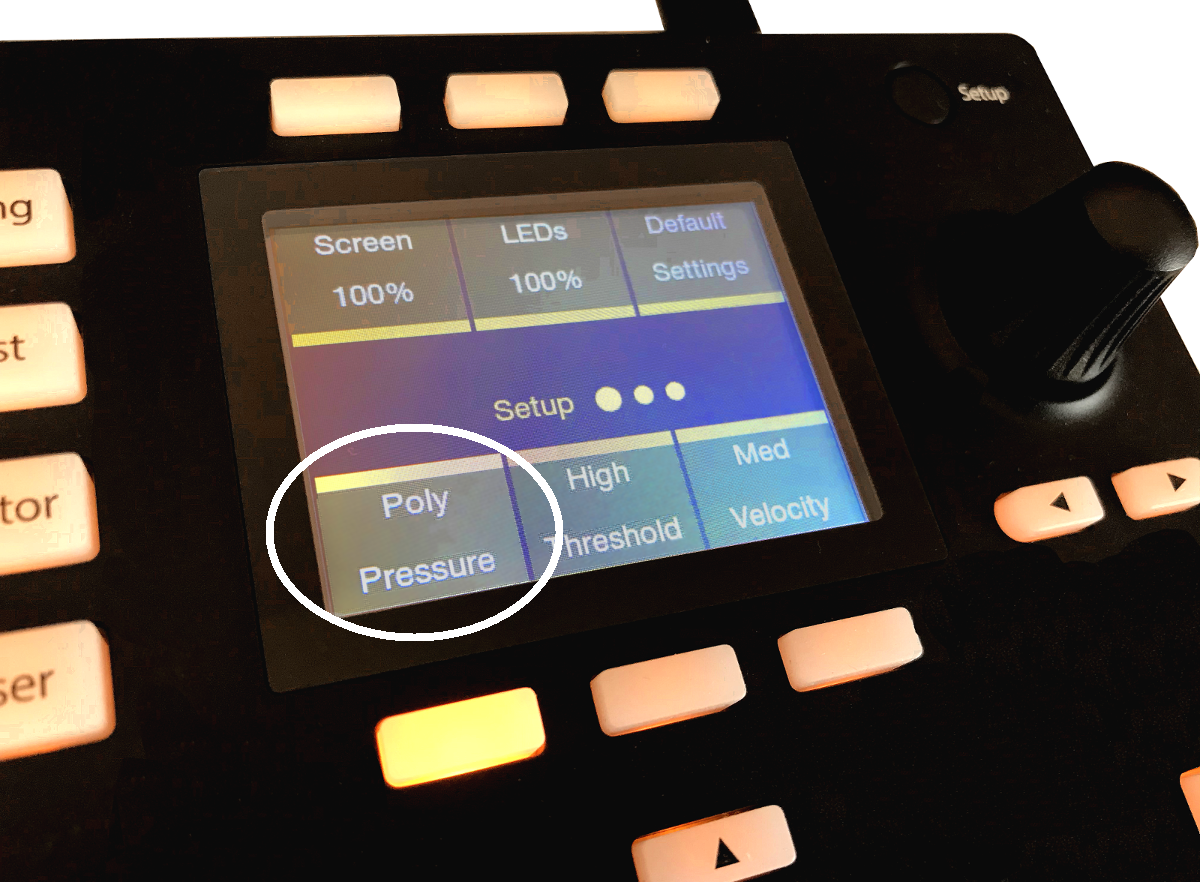
Figure 1: ATOM SQ being set up to generate Poly Pressure messages.
With ATOM SQ, press the Setup button. Hit the lower-left “pressure” button below the display, then spin the dial to choose Poly (Fig. 1). Note that if ATOM SQ outputs poly pressure, most instruments that respond only to channel (mono) aftertouch will ignore these messages.
Recording and Editing
Record poly pressure in Studio One 5 as you would any MIDI controller. To edit pressure messages, use the Edit window’s Note Controller tab. Select Pressure for the Type, and then the Pitch of the note you want to edit. Or, click on a note to select its corresponding note Pitch automatically. You can then edit that note’s poly pressure controller as you would any other controller (Fig. 2).
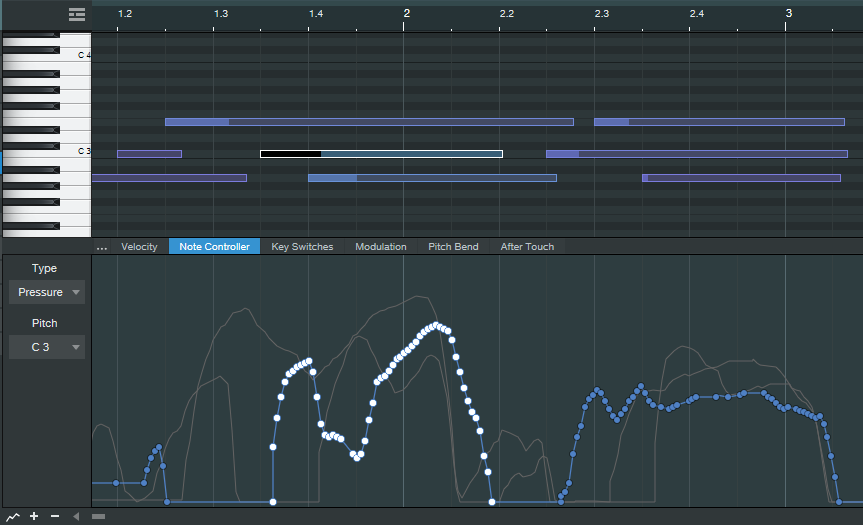
Figure 2: The selected Note’s data is white; unselected notes of the same pitch are blue. The gray lines in the background show the poly pressure controller messages for notes with other pitches.
It may seem that editing data for individual notes would be tedious, and it can be. However, because poly pressure allows for more expressive real-time playing, you might not feel the need to do as much editing anyway—you won’t need to use editing to add expressiveness that you couldn’t add while playing.
A fine point is that it’s currently not possible to copy Note Controller data from one note, then paste it to a note of a different pitch (probably because the whole point of poly AT is for different notes to have different controller data). However, if you copy the note itself to a different pitch, the Note Controller data will go along with it.
Although ATOM SQ can adopt a layout that resembles a keyboard, it would be a mistake to see it as a stripped-down version of a standard keyboard. Controllers with polyphonic pressure tend to think outside the usual keyboard box, by incorporating pads or other transducers that are designed for predictable pressure sensitivity. Poly pressure has been around for a while, but a new generation of MIDI controllers (like ATOM SQ) are making the technology—and the resulting expressiveness—far more accessible for those who want to wring more soul out of their synths.
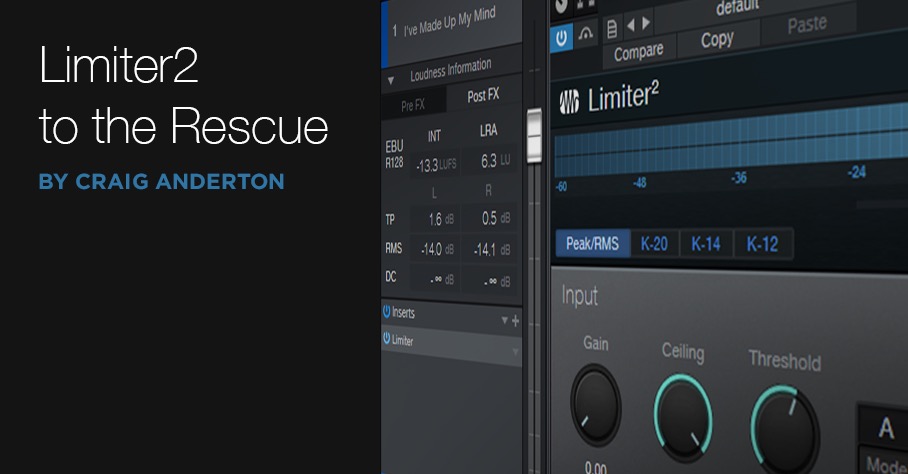
Streaming: Limiter2 to the Rescue
The How to Make Spotify Happy blog post picked up a lot of interest, so let’s take the concept a bit further. Even if you’re not dealing with a streaming service, having consistent listening levels in your music makes sense—especially with a collection of songs. But what happens if a song is compressed for artistic reasons, yet you still want to aim for a standard listening level (streaming or otherwise)?
The beauty of the LUFS specification is that it avoids penalizing those who want to take advantage of dynamic range in their music (jazz, classical, etc.). But not everyone creates music that requires maximum dynamic range. I add about 4 to 6 dB of gain reduction when mastering my music, and aim for -13.0 LUFS, because I like what a little compression does to glue the tracks together. However, I do want the music to be streaming-friendly—and the whole point of this post is that Limiter2 makes it easy to hit both LUFS and True Peak settings recommended by various streaming services.
Fig. 1 shows the screen shot for an exported, pre-mastered song. It has a -18.0 LUFS reading. My goal is -13.0 LUFS, with a true peak value below 0.0.

Figure 1: The initial raw export.
To get closer to -13.0 LUFS, let’s start with a Limiter2 Threshold of -5.00, because applying -5.00 dB of gain reduction to -18.00 LUFS should put us somewhere around -13 dB LUFS. To control True Peak, we’ll use Mode A, Fast Attack (Fig. 2).

Figure 2: Preliminary Limiter2 settings to reach -13.0 dB LUFS.
We’ve come close to -13.0, but the true peak is well above 0.0. Bringing down the Ceiling by -2 dB puts that 1.6 dB True Peak reading under 0.0 (Fig. 3).
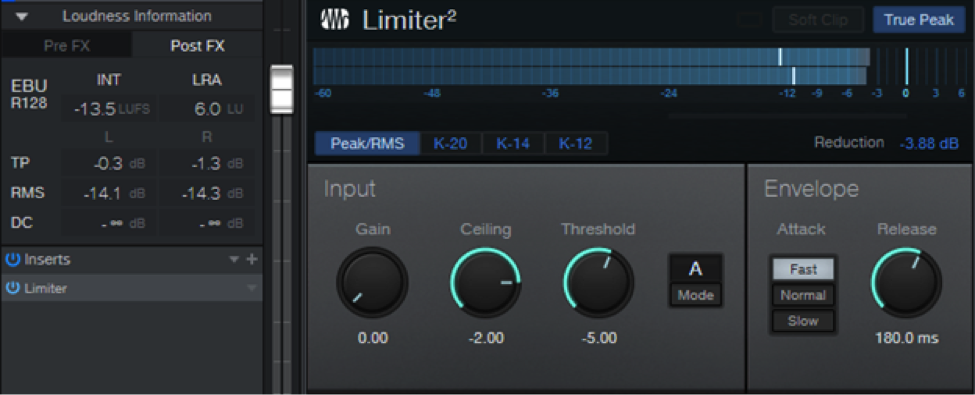
Figure 3: The True Peak is now under 0.0, but the LUFS is a bit lower than desired.
We’ve brought down the peaks, but because the output is lower, the perceived level is lower too (-13.5 LUFS). Dropping the threshold by ‑0.7 dB brought the LUFS to -13.0, while maintaining a TP value under 0.0 (Fig. 4).

Figure 4: Bringing the Threshold down to -5.70 gave -13.0 LUFS, and true peak under 0.
We can also make streaming services (like Spotify) happy, with -14.0 LUFS and -1.0 TP values (Fig. 5).
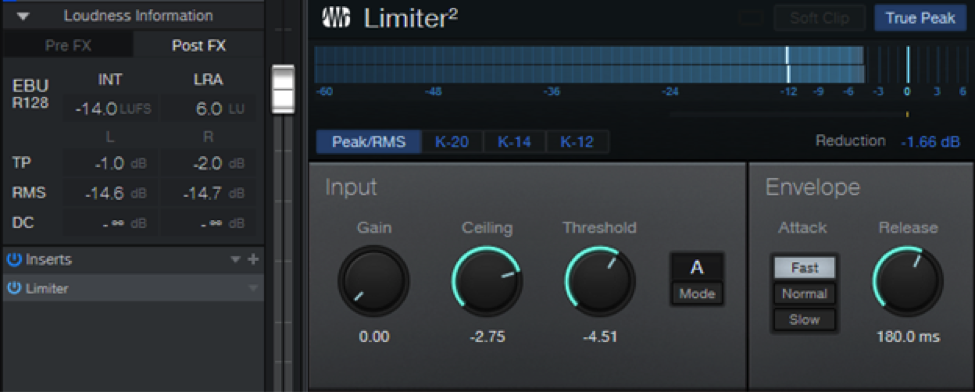
Figure 5: Now we’ve met Spotify’s recommended spec, simply by re-adjusting the Threshold and Ceiling.
But suppose you really like to compress stuff, not because you want to win the loudness wars per se, but just because you like that sound. Fair enough—let’s give listeners music with -9.0 LUFS, and not worry about True Peak (Fig. 6).
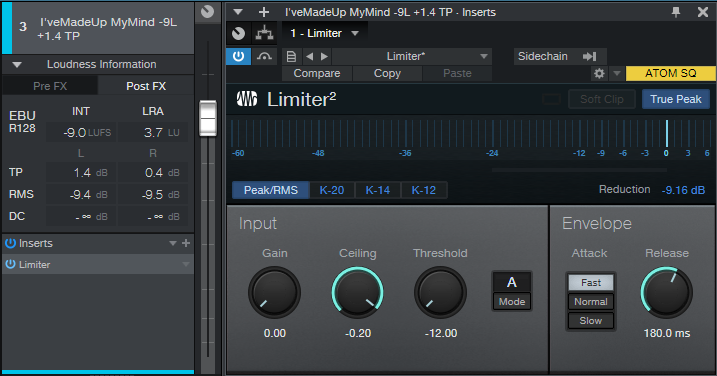
Figure 6: If you like the sound of compression… go for it!
But What About the Loudness Wars?
I’m glad you asked. If your music doesn’t meet a streaming service’s specs, they’ll turn it down to an equal perceived level. But what does that sound like?
In the audio example, the first part is of an unmastered song at -9.0 LUFS. It’s fairly loud, and could win at least a skirmish in the loudness wars. The second part is the same unmastered song at -14.0 LUFS, which sounds much quieter.
The third part turns down the -9.0 LUFS section to -14.0 LUFS. Although it has the same overall perceived level as the second part, it sounds compressed, so it has a different character. Bottom line: If you like the sound of compression, a streaming service will not change that sound; it will simply turn down the volume to match material that’s not as compressed. So feel free to use a rational amount of compression—the sound you want will still be there, just at a lower level.
And if you want a higher level…well, that’s why the volume control was invented… right?
Control Ableton as a ReWire Client with ATOM SQ

It’s not surprising a lot of Studio One users also have Ableton Live, because they’re quite different. I’ve always felt Studio One is a pro recording studio (with a helluva backline) disguised as software, while Ableton is a live performance instrument disguised as software.
Fortunately, if you like working simultaneously with Live’s loops and scenes and Studio One’s rich feature set, Studio One can host Live as a ReWire client. Even better, ATOM SQ can provide full native integration with Ableton Live when it’s ReWired as a client—once you know how to set up the MIDI ins and outs for both programs.
Studio One Setup
- Under Options > Advanced > Services, make sure ReWire Support is enabled.
- Insert Ableton Live (from Instruments > ReWire). Click “Open Application” in the dialog box, but if Live won’t open (it doesn’t for me), open Live manually. Note that Live must be version 10.1.15 or higher.
- In Studio One, go Options > External Devices. Click on ATOM SQ, and then click on Edit.
- Select None for both Receive From and Send To. Click OK, then click OK again to leave the Options menu.
- In the ReWire track, set the MIDI input to ATOM SQ so that ATOM SQ’s knobs can control Ableton Live.

Ableton Live Setup
- Choose Options > Preferences > Link MIDI tab.
- Set the MIDI and Ports connections as shown.
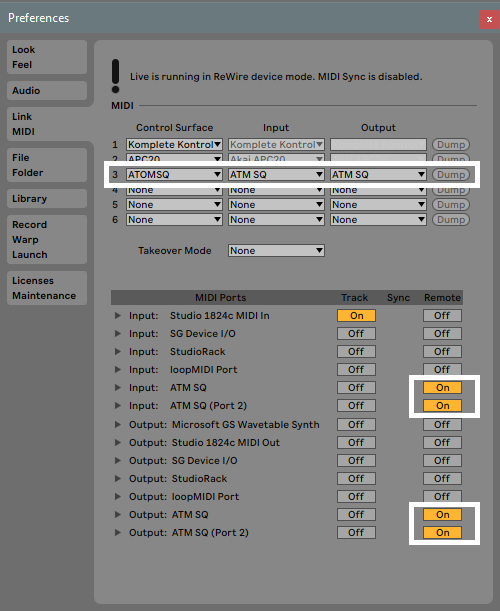
Now ATOM SQ will act as an integrated controller with Ableton Live while it’s ReWired into Studio One. Cool, eh?
Returning to Studio One
To return control to Studio One, reverse the process—in Live, set Control Surface to None, and toggle the MIDI Ports that relate to ATOM SQ from On to Off. In Studio One’s Options > External Devices, For ATOM SQ, reconnect ATOM SQ to Receive From and Send To.
Note that with ATOM SQ controlling Studio One, the Transport function still controls both Live and Studio One. Also, if Live has the focus, any QWERTY keyboard assignments for triggering Clips and Scenes remain valid. So even while using ATOM SQ in the native mode for Studio One, you can still trigger different Clip and Scenes in Live. If you switch the focus back to Studio One, then any QWERTY keyboard shortcuts will trigger their assigned Studio One shortcuts.
Note: When switching back and forth between Live and Studio One, and enabling/disabling Studio One and Ableton Live modes for ATOM SQ, to return to Live you may need to “refresh” Live’s Preferences settings. Choose None for the Control Surface and then re-select ATOM SQ. Next, turn the various MIDI Port options off and on again.

Learn more about the ATOM SQ here!
The Studio One “Drumcoder”
Vocoders are processors that use the audio from vocals (called the modulation source, or modulator) to modulate another sound, like a synthesizer pad (called the carrier). However, no law says you have to use vocals as a modulator, and I often use drums to modulate pads, power chords, and more. While Studio One’s toolset doesn’t have enough resolution for super-intelligible vocoding with voice, it’s perfect for drumcoding, which actually benefits from the lower resolution.
This tip is for advanced users and requires a fairly complex setup. Rather than go into too much detail about how it works, simply download the Drumcoder.song file, linked below, which has a complete drumcoding setup. Load Drumcoder.song into Studio One 5, press play, and you’ll hear what drumcoding is all about. (Note that the file format isn’t compatible with previous Studio One versions. However, based on the description in this tip, you should be able to “roll your own” drumcoding setup in previous Studio One versions.)
Click here to get drumcoder.song
Let’s check out an audio demo. The first half has the drumcoded sound only, while the second half mixes in the drum (modulator) sound.
But wait—there’s more! Although the drumcoder isn’t designed to be the greatest vocoder in the world (and it isn’t), you can still get some decent results. Here, the voice is saying “Even do some kinds of vocal effects with the PreSonus drumcoder—have fun!’
Next, we’ll explore how it works…or if you’re impatient, just reverse-engineer the song.
Drumcoding Explained
Vocoding splits the modulator (like voice or drums) into multiple frequency bands. In a traditional vocoder, each band produces a control voltage that corresponds to the audio’s level in each band. Similarly, the carrier splits into the same frequency bands. A VCA follows each carrier band, and the VCAs are fed by the modulator’s control voltages. So, if there’s midrange energy in the modulator, it opens the VCA for the carrier’s midrange audio. If there’s bass energy in the modulator, it opens the VCA for the carrier’s bass audio. With a vocoder, as different energy occurs in different bands that cover a vocal’s frequency range, the carrier mimics that same distribution of energy in its own bands. This is what generates talking instrument effects.
Studio One’s Implementation
Vocoders typically need at least eight frequency bands to make voices sound intelligible. Studio One’s Splitter can divide incoming audio into five bands, which is enough resolution for drumcoding. Fig. 1 (which takes some graphic liberties with Studio One’s UI), shows the signal flow.
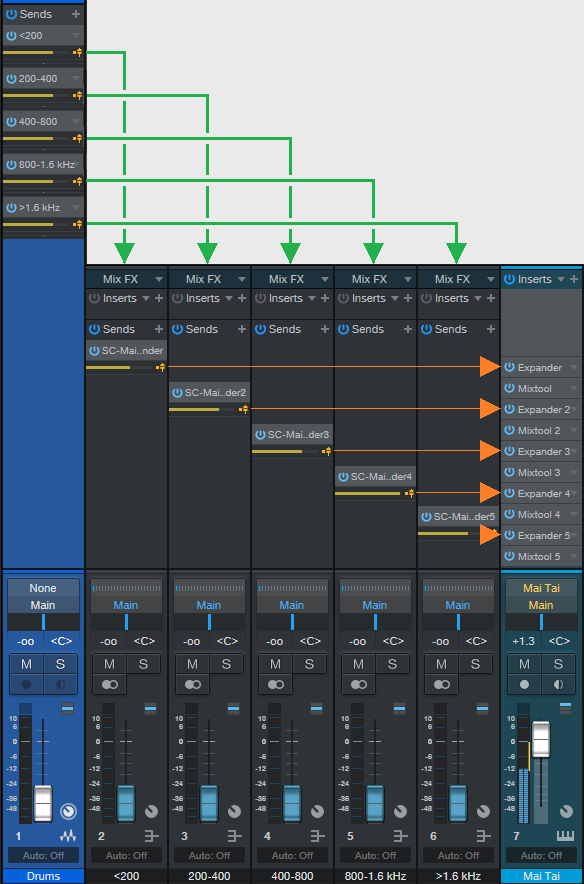
Figure 1: Drumcoder signal flow.
The Drums track provides the modulator signal, and the Mai Tai synthesizer provides the carrier. The Drums track has five pre-fader sends to distribute the drum sound to five buses. As shown in Fig. 2, each of the five buses has a Splitter (but no other effects) set to Frequency Split mode, with splits at 200, 400, 800, and 1600 Hz. The < 200 Hz bus mutes all Splits except for 1, the 200-400 bus mutes all Splits except for 2, the 400-800 bus mutes all splits except for 3, the 800 – 1.6 kHz mutes all splits except for 4, and the > 1.6 kHz bus mutes all splits except for 5. Now each bus output covers one of the five bands.
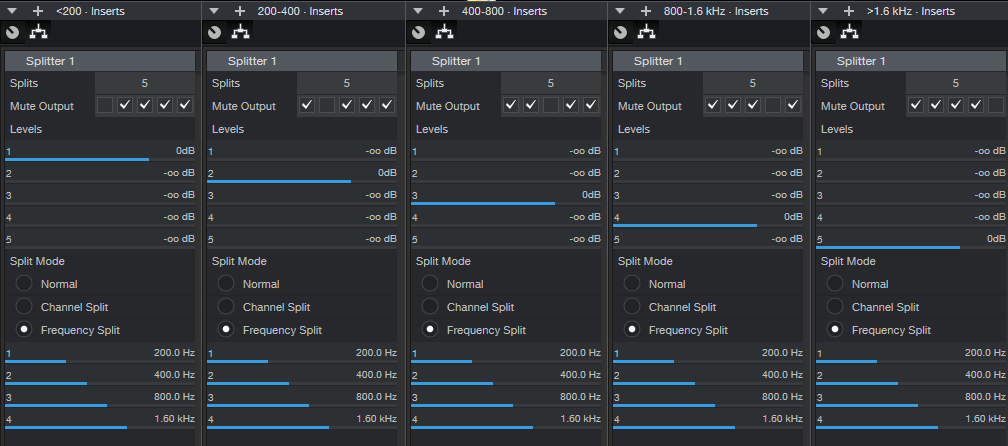
Figure 2: Splitter settings for the five buses.
The Mai Tai carrier has a splitter set to the same frequencies. Each split goes to an Expander, which basically acts like a VCA; see Fig. 3. We don’t need to break out the Splitter outputs, because you can access the sidechain for the Expanders located within the Splitter. (A Mixtool follows each Expander, but it’s there solely to provide a volume control for each of the carrier’s bands in the control panel.)

Figure 3: Effects used for the Mai Tai synthesizer carrier track.
As to the bus outputs, the < 200 Hz bus has a send that goes to the sidechain of the Expander in the carrier’s < 200 Hz split. The 200-400 Hz bus has a send to the sidechain of the Expander in the carrier’s 200-400 Hz split. The 400-800 Hz bus has a send to the sidechain of the Expander in the carrier’s 400-800 Hz split…you get the idea. Basically, each bus provides a “control voltage” for the corresponding “VCA” (Expander) that controls the level of the carrier’s five bands.
Fig. 4 shows the Control panel.

Figure 4: Drumcoder macro controls.
Threshold, Ratio, and Range cover the full range of Expander controls. They affect how tightly the Expander follows the modulator, which controls the effect’s percussive nature. Just play around with them until you get the sound you want. The Expander Envelope settings aren’t particularly crucial, but I find 0.10 ms Attack and 128.0 ms Release work well. Of course, you also need to enable the sidechain for each Expander, and make sure it’s listening to the bus that corresponds to the correct band.
The five knobs toward the right control the level of the individual bands by altering the Gain of the Mixtool that follows each band’s Expander. The five associated buttons enable or bypass the Expander for a particular band, which can give some really cool effects. For example, turn off the Expander on the Mid band, and with the Song’s Mai Tai preset, it almost sounds like a choir is singing along with the drumcoded drums.
Vocal Effects
Although the Drumcoder isn’t really designed for vocal effects, it still can be fun. The key is to bring up the > 1.6 kHz Bus slider, as this mixes in some of the voice’s “s” sounds, which give intelligibility. Experiment with the Expander controls to find what works well. If you really want to dig into vocal applications, edit the Splitter frequencies to optimize them for the vocal range instead of drums…or leave a comment asking me to pursue this further.
Due to the complexity, if I think I’m going to use the Drumcoder, I’ll just treat this song like a template and build the rest of the song from there. But once you understand the principle of operation, you can always add the effect in to an existing song as needed. I have to say this is one of my favorite Friday tips ever… I hope you enjoy playing with the Drumcoder!
Studio One 5’s Tape Emulator
Although Studio One 5 doesn’t have a tape emulator plug-in per se, it can emulate some of the most important characteristics that people associate with “the tape sound.” Truly emulating tape can go down a serious rabbit hole because tape is a complicated signal processor; no two vintage tape recorders sounded the same because they required alignment (influenced by the engineer’s preferences), used different tape formulations, and were in various states of maintenance. However, emulating three important characteristics provides what most people want from tape emulation.
- Tape saturates, which rounds off waveform peaks and affects dynamic range. This gives a higher average level, which is part of why tape sounds “punchy.”
- Head “bump.” The frequency of a bass range peak (around 2 dB) depends on the tape speed and the tape machine. At 15 IPS, a typical peak is in the 40-70 Hz range, and at 30 IPS, in the 70-150 Hz range. However, at 30 IPS, the bass response drops off below the bump—sometimes drastically, sometimes gently. Even though in theory 30 IPS offered better fidelity, many engineers preferred to work at 15 IPS due to the bass response characteristics (and they saved money by using half as much tape for the same recording time).
- Tape is a flawed recording medium that trades off noise, high-frequency response, and distortion. For example, some engineers aligned their machines to underbias the tape, which increased distortion but gave more highs; other engineers did the reverse and made up for the lack of highs with subsequent equalization.
Check out the audio example to hear what this FX Chain can do. The first part is unprocessed, while the second part uses the default FX Chain control settings with a little underbiasing and head bump. The difference is subtle, but it adds that extra “something.”
The Tape Emulator FX Chain
This FX Chain starts with a Splitter, which creates three signal paths: one for saturation, one for hiss, and one for hum (Fig. 1).
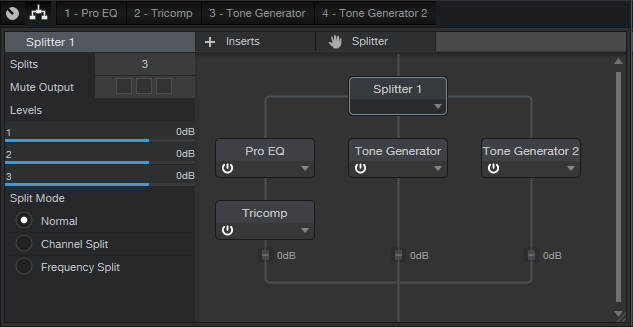
Figure 1: FX Chain block diagram.
After auditioning all available Studio One 5 saturation options, I liked the TriComp best for this application. The Pro EQ stage preceding the TriComp provides the head bump EQ and has a control to emulate the effect of underbiasing tape (more highs, which pushes more high-frequency level into the TriComp and therefore increases distortion in that range) or overbiasing (less highs, less distortion).
At first, I wasn’t going to include tape hiss and hum, but if someone needs to use this FX Chain for sound design (i.e., an actor starts a tape in a theatrical production), then including hiss and hum sounds more authentic. An additional knob chooses 50 or 60 Hz hum, which represents the power standards in different countries. (Note that the closest you can get to these frequencies is 50.4 and 59.1 Hz, but that’s good enough). However, I draw the line at including wow and flutter! Good riddance to both of them.
Because creating three splits reduces each split’s level, the TriComp Gain control provides makeup gain.
Turning Bump on adds a boost at the specified frequency, but also adds a 48 dB low-cut filter around 23 Hz to emulate the loss of very low frequencies due to the head bump. As a result, depending on the program material, adding the bump may increase or decrease the total apparent bass response. For additional flexibility, if you turn Bump Amount down all the way, the Bump On/Off switch enables or disables only the 48 dB/octave low-cut filter.
Fig. 2 shows some typical spectra from using the FX Chain.
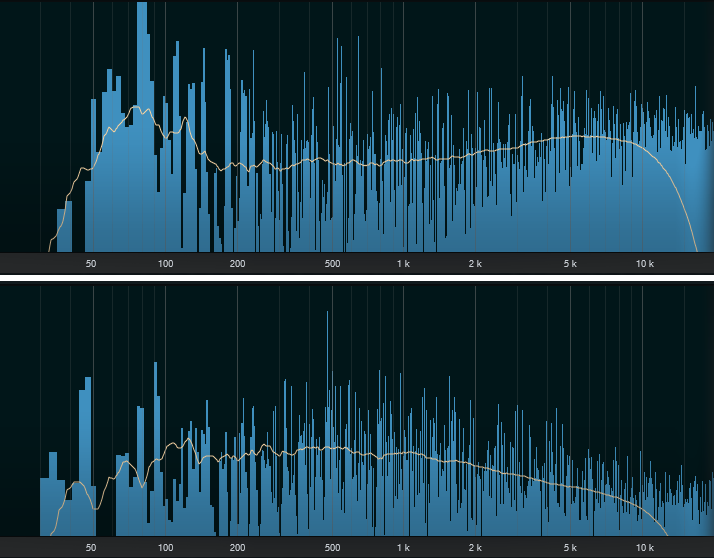
Figure 2: The top curve shows the head bump enabled, with underbiasing. The lower curve shows minimal added bump, but with the ultra-low cut filter enabled, and overbiasing.
Roll Tape!
The controls default to rational settings (Fig. 3), which are used in the audio example. But as usual with my FX chains, the settings can go beyond the realm of good taste if needed.
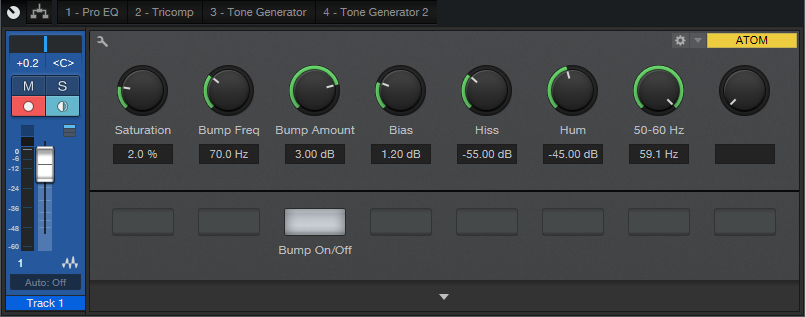
Figure 3: Control panel for the Tape Emulator.
For example, I rarely go over 2-3% saturation, but I know some of you are itching to kick it up to 10%. Ditto tape hiss, in case you want to emulate recording on an ancient Radio Shack cassette recorder—with Radio Shack tape. Just remember that the Bias control is clockwise to overbias (less highs), and counter-clockwise to underbias (more highs).
There’s a lot of mythology around tape emulations, and you can find some very good plug-ins that nail the sound of tape. But try this FX Chain—it may give you exactly what you want. Best of all, I promise you’ll never have to clean or demagnetize its tape heads.
Download the Tape Emulator.multipreset here!
How to Make Spotify Happy

With physical audio media in its twilight, streaming has become the primary way to distribute music. A wonderful side effect has been the end of the loudness wars, because streaming services like Spotify turn levels up or down as needed to attain a specific, consistent perceived level—squashing a master won’t make it sound any louder.
However, the “garbage in, garbage out” law remains in effect, so you need to submit music that meets a streaming service’s specs. For example, Spotify prefers files with an LUFS of -14.0 (according to the EBU R128 standard), and a True Peak reading of -1.0 or lower. This avoids adding distortion when transcoding to lossy formats. If the LUFS reading is above -14.0, then Spotify wants a True Peak value under -2.0.
Fortunately, when you Detect Loudness for a track on the mastering page, you’ll see a readout of the LUFS and LRA (a measure of overall dynamic range), as well as the True Peak, RMS (average signal level), and DC offset for the left and right channels. Fig. 1 shows an example of the specs generated by detecting loudness.
Figure 1: Although the LUFS reading meets Spotify’s specs, True Peak doesn’t, and the RMS value of the left and right channels isn’t balanced.
Note that this hits Spotify’s desired LUFS, but the left channel’s True Peak value is higher than what’s ideal. This readout also shows that the average RMS levels for each channel are somewhat different—the left channel is 1.2 dB louder than the right one, which also accounts for the higher True Peak value. This may be the way the artist wants the mix to sound, but it could also indicate a potential problem with the mix, where the overall sound isn’t properly centered.
A simple fix is to insert a Dual Pan into the Inserts section. Use the Input Balance control to “weight” the stereo image more to one side for a better balance. After doing so and readjusting the LUFS, we can now give Spotify exactly what it wants (Fig. 2). Also note that the left and right channels are perfectly balanced.
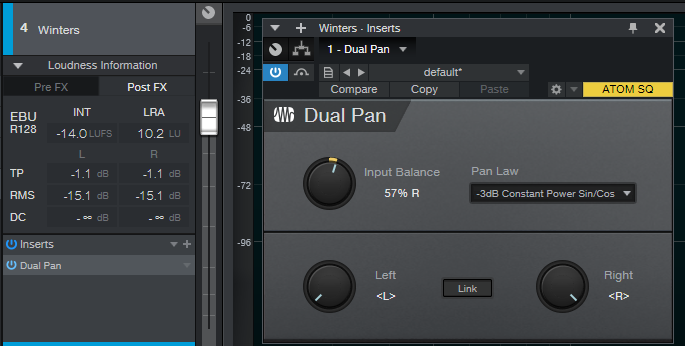
Figure 2: The True Peak and RMS values are now identical, so the two channels are more balanced than they were without the Dual Pan.
A Crucial Consideration!
You don’t want to mix or master based on numbers, but on what you hear. If you set up Dual Pan to balance the channels, make sure that you enable/bypass the plug-in and compare the two options. You might find that balancing the left and right channels not only accommodates Spotify’s requirements, but improves the mix’s overall balance. If it doesn’t, then leave the balance alone, and lower the track’s overall output level so that True Peak is under -1.0 for both channels (or under -2.0 for LUFS values above ‑14.0). This will likely lower the LUFS reading, but don’t worry about it: Spotify will turn up the track anyway to reach -14.0 LUFS.
Coda: I always thought that squashing dynamic range to try and win the loudness wars made listening to music a less pleasant experience, and that’s one of the reasons CD sales kept declining. Does the end of the loudness wars correspond to the current music industry rebound from streaming? I don’t know… but it wouldn’t surprise me.
My Craziest Mastering Salvage Job (So Far)

My mastering specialty is salvage jobs, which has become easier to do with Studio One. But this gig was something else.
Martha Davis’s last solo album (I Have My Standards, whose mastering challenges were covered in this blog post) has done really well. Since the pandemic has sidelined her from touring as Martha Davis and the Motels or going into the studio, she’s releasing a new song every month online. These involve excellent, but unreleased, material.
That’s THE good news. The bad news is that her latest song choice, “In the Meantime,” had the drum machine kick mixed so loud the song should have been credited as “Solo Kick Drum with Vocal Accompaniment.” With a vocalist like Martha (listen to any of her many hits from the 80s), that’s a crime. She was hoping I could fix it.
Don’t tune out, EDM/hip-hop fans. What about those TR-808 “toms” that are always mixed way too high? When I was given a Boy George song to remix, those toms were like sonic kryptonite before I figured out how to deal with them. And let’s not get into those clichéd 808 claps, okay? But we have a solution.
What Didn’t Work
I tried everything to deal with the kick, including EQ, iZotope RX7 spectral reduction, mid-side processing using the Mixtool, and more. The mix was mostly mono, and the kick was full-frequency—from low-frequency boom to a nasty click that was louder than the lead vocal. Multiband dynamics didn’t work because the kick covered too wide a frequency range.
What Did Work
In desperation, I thought maybe I could find an isolated kick sound, throw it out of phase, and cancel the kick wherever it appeared in the song. Very fortunately, the song intro had a kick sound that could be isolated as an individual sample. So instead of going directly to Studio One’s mastering page, I went into the Song page, imported the stereo mix into one track, created a second track for only the kick, and dragged the copied kick to match up with every kick instance in the song (yes, this did take some time…). It wasn’t difficult to line up the copied kicks with sample- (or at least near-sample) accuracy (Fig. 1).
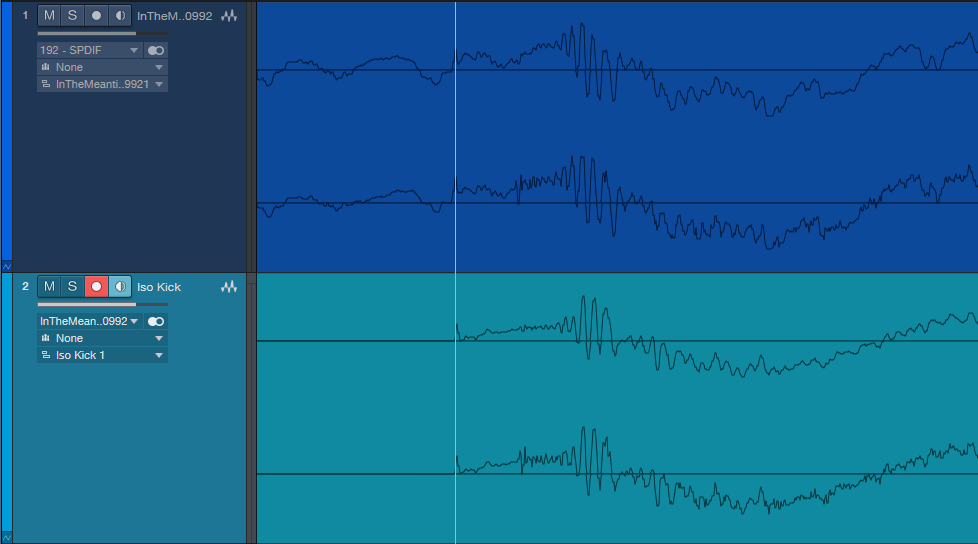
Figure 1: The top track is from the original song, while the lower track is an isolated kick. After lining the sounds up with respect to timing, flipping the kick track phase removed the kick sound from the mixed tracks.
The payoff was inserting Mixtool in the kicks-only track and flipping its phase 180 degrees. It canceled the kick! Wow—this physics stuff actually works.
But now there was no kick. So, I added the Waves LinEQ Broadband linear-phase equalizer (a non-linear-phase EQ can’t work in this context) in the kick drum track. This filtered out some of the kick drum’s lower frequencies so there was less cancellation while leaving the highs intact so they would still cancel as much as possible. Adjusting the shelving frequency and attenuation let in just enough of the original kick, without overwhelming the track. Even better, because the kick level was lower, I could bring up the low end to resurrect the bass part that had been overshadowed by the kick.
The Rest of the Story
The mix traveled to the mastering page for a little more processing (Studio One’s Pro EQ and Binaural Pan, IK Multimedia’s Stealth maximizer, and Studio One’s metering). After hitting the desired readings of -13.0 LUFS with -0.2 True Peak readings, the mastering was done. Sure, I would much rather have had the individual tracks to do a remix, but it was what it was—a 28-year-old two-track mix.
To hear how this ended up, the audio example first plays an excerpt from the mastered version. Then there’s a brief pause, followed by the same section with the original file. I’m sure you’ll hear the difference in the kick drum.
Listen to an audio example from In the Meantime here:
The Vocal Repair Kit
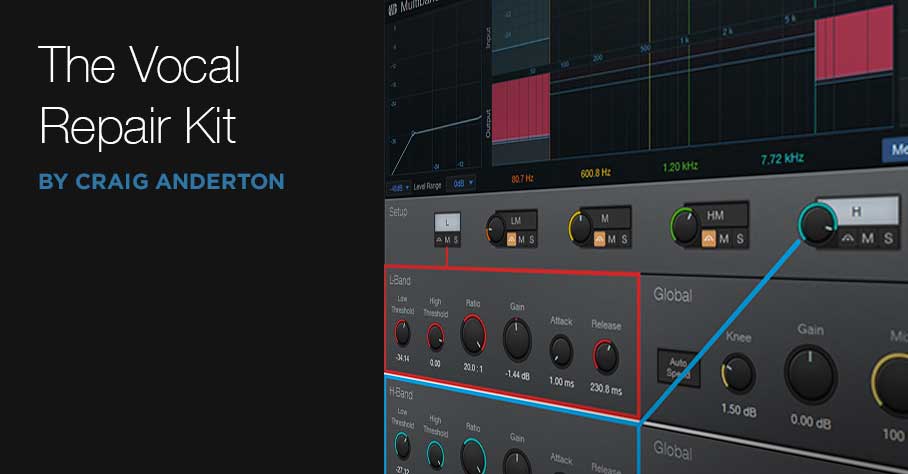
Although it’s always better to fix issues at the source, here’s a tip to help repair recorded vocals during the mixing phase. The technique (which is featured in the new book How to Record and Mix Great Vocals in Studio One – 2nd Edition) combines multiband dynamics processing with equalization to both de-ess and reduce plosives. Although the screen shot shows the Multiband Dynamics processor in Studio One 5, this technique will work with previous Studio One versions if you duplicate the settings.

In the screen shot, the Multiband Dynamics’ Low band settings are outlined in red, and the High band settings are outlined in blue. (Note this is not the actual interface; the high band panel is pasted into the image from a different screen shot so you can see both the Low and High band settings simultaneously.)
The High band acts as a de-esser, because it applies compression to only the high frequencies. This helps tame sibilance. The Low band compresses only the low frequencies, which reduces pops. However, this preset also takes advantage of the way Multiband Dynamics combines equalization with dynamics control. Turning down the Low stage Gain all the way further reduces the low frequencies, where pops like to hang out and cause trouble.
For the High band, vary compression to taste. The compression settings are less critical for the Low band if you turn the Gain down all the way, but in either case, you’ll need to tweak the settings for your particular vocal track.
And that’s all there is to it. When a loud pop or sibilant sound hits the Multiband Dynamics, it’s compressed to be less annoying, while leaving the rest of the vocal intact. Vocal repaired!