Category Archives: Friday Tip of the Week
Friday Tip of the Week: Synthesize OpenAIR Reverb Impulses in Studio One
Convolving white noise with audio produces reverb but frankly, the results aren’t all that inspiring compared to the impulses obtained from “sampling” real rooms. However, there are ways to make white noise impulses that provide a unique, “idealized” sound compared to standard impulses.

- You need a noise source, so insert Mai Tai and create a noise-only preset.
- Sculpt the noise to emulate a “room.” Suppose you want a 2.0 second reverb from a highly damped room. Use the amplitude envelope to provide a 2 second fadeout, and the filter envelope to damp the sound. I also add a little delay to make the noise a wider image.
- Transform the instrument sound to an audio track.
- Normalize the audio, then bring the peak level down by about 7 or 8 dB. Open Air seems happiest with impulses that don’t use up all the available headroom.
- Export the WAV file.
Now bring the WAV file you just saved into Open Air, and check out the clarity and smoothness of the sustain—it has an “idealized” quality, sort of like how CGI is an idealized version of an image. Listen to the audio example processing some percussive sounds from Impulse, and you’ll hear what I mean.
Here are a few other hints:
- When you shorten the reverb in Open Air, it sounds more gated. Once you find an impulse you like, generate versions at different lengths, and then you can choose the length that’s appropriate for the music.
- Create short reverb impulses and reverse them—you’ll hear the best reverse reverb sounds ever.
- Make a bright, sparkly vocal reverb by filtering out the lows, or to create the Taiko Drum of Doom, create a long impulse but filter out all the highs.
- Try different effects, like “chopping” the noise for rhythmic effects.
The bottom line is this is an incredibly flexible way to come up with reverb sounds…and you can end up with different reverb sounds than any other reverb processor on your hard drive. Have fun!
Friday Tip of the Week: The Ultra-Tight Rhythm Section
Last week, we used the Gate for drum replacement. This week, let’s use it to tighten up an electric bass part—and end up with a rhythm section that’s tighter than a comic book superhero’s costume.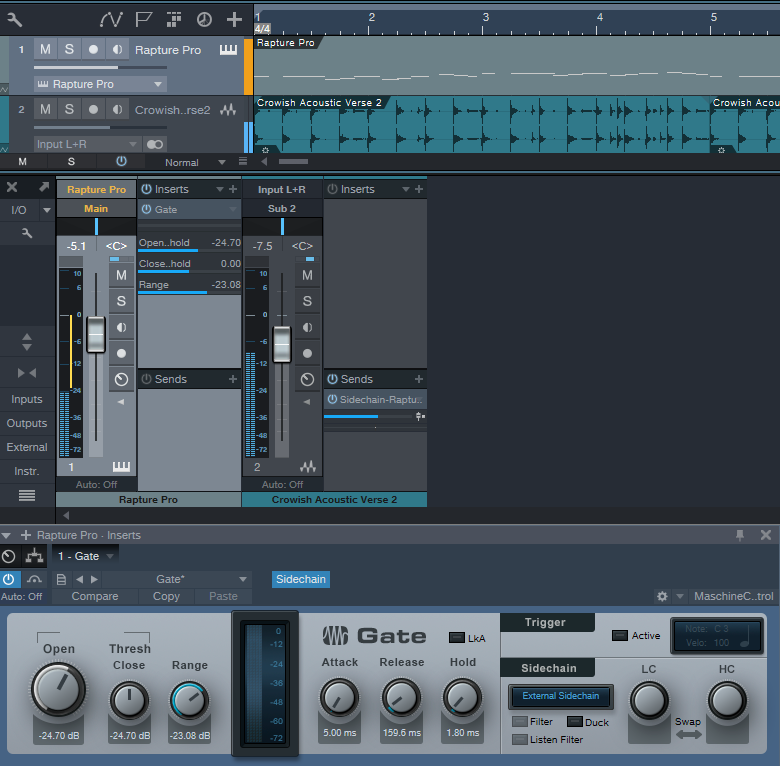
We’ll use a fairly basic example of sidechaining to create this tightness. While most people understand the principles behind sidechaining, I haven’t heard very many people actually use this particular application. But with electric bass, using a drum sidechain signal to gate the bass adds a percussive overlay to the bass’s melodic character that fits perfectly with drums.
For the bass sound, in this example I’m using my bass expansion pack for Cakewalk’s Rapture Pro (I’ll be porting the samples over to Presence XT soon). The drum loop track has a send that drives a Gate inserted in the bass track, with the Gate’s sidechain set to External so it’s triggered by the drum’s audio.
Although different situations call for different Gate settings, I find the key to getting good results with electric bass is the Gate’s Release control. Because bass has a natural decay, a little release time prevents the bass from sounding too percussive—the attacks are all properly in place, but the bass note trails off gracefully, even though the drum transient may be long gone.
However with more electro-oriented material, using a sharp decay with an electric bass provides an unusual type of effect—you have the organic, natural sound of the electric bass modulated by the clipped, percussive decays caused by gating with the drums. As always, experimentation can yield interesting—and sometimes delightfully unexpected—results. Try it!
Friday Tip of the Week: Get Your Kicks with Kick Drum Replacement
I admit it…I’m very picky about kick drums. But I also like using drum loops, so I often want to replace the kick. Fortunately, it’s not hard to do with Studio One, and you don’t need a dedicated drum replacement application to do it.
In this example, the audio track with the drum loop (Acoustic Verse 2 in the screen shot, toward the left) has two pre-fader sends. One goes to the Main Drums bus, which carries the drum loop audio. The reason for having a separate bus with the drum audio (and for turning down the original drum audio track) is because we want to reduce the level of the loop’s kick as much as possible. So the loop’s audio has two Pro EQs in series—both set to 48 dB Low Cut at around 100 Hz—to create a super-steep slope and get rid of most of the kick.
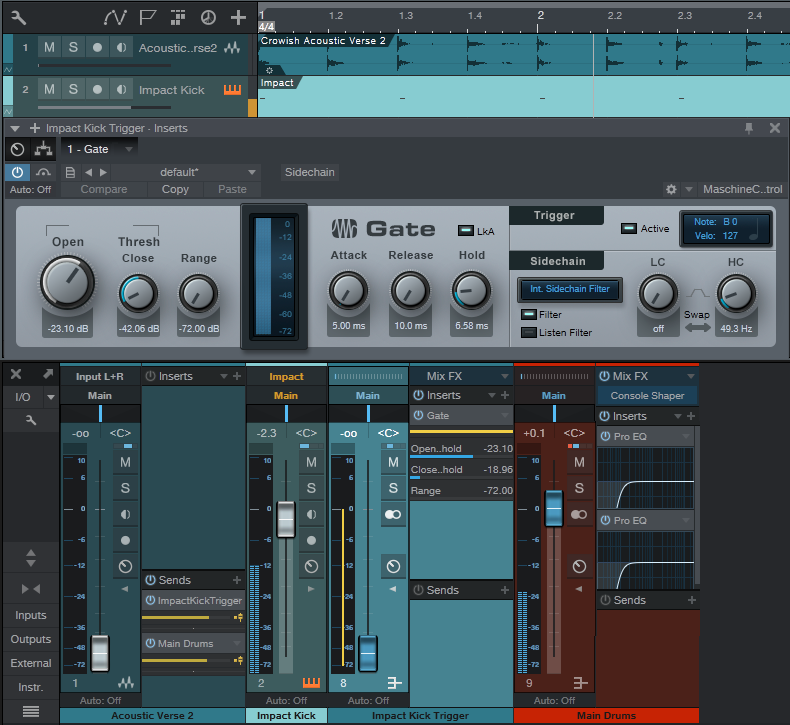
The other send goes to the Impact Kick Trigger bus, which exists only to hold a Gate (that’s why the bus fader is all the way down—we don’t want to hear the audio). To isolate the kick for triggering, turn down the Gate’s HC control so that the Gate responds only the lowest frequencies where the kick drum lives. Whenever the Gate opens, it can send out a MIDI note with your choice of note and a fixed velocity (you’ll have to add any dynamics yourself), and an instrument track can respond to that note. I set up an instance of Impact with a suitable kick drum, and assigned the Gate trigger to it. So, Impact provides the replacement kick drum sound and the Main Drums bus has the original drum loop without the kick. You can listen to the kick in real time as you trigger it, but you can also record the MIDI trigger in the instrument track.
The only caution is that the Gate parameter settings for Threshold and Attack/Release/Hold are critical for reliable triggering. For example if there are 16th-note kicks, you have to make sure that hold is short enough to allow retriggering; and you want Threshold high enough to it’s triggered only by the kick.
There are many variations on this theme…you may want to double an existing kick with the kick replacement, rather than reduce the original kick’s level as much as possible, or use the Pro EQ Low Cut filters to take out only the very lowest frequencies, so the original kick provides the higher-frequency beater sounds…whatever sounds best.
Of course if the drums are on individual tracks, then it’s easy to replace the drum sounds. But even with a mixed drum loop, it’s often possible to isolate at least the kick and snare to give drum loops a whole new character.
Friday Tip of the Week: Upsampling in Studio One, Part 2
In the previous Friday Tip of the Week, we covered how recording soft synths and amp sims at higher sample rates (like 96 kHz) can give higher sound quality in some situations. However, we also discussed some issues involved with recording at higher sample rates that aren’t so wonderful.

So this week, it’s time for a solution. Offline upsampling to higher sample rates can let you retain the CPU efficiencies of running at a lower sample rate, while reaping the sonic benefits of recording at higher sample rates… and you can do this in Studio One by upsampling in a separate project, rendering the file, and then importing the rendered file back into your original project.
But wait—wouldn’t you lose the benefits of upsampling when you later convert the sample rate back down to 44.1 kHz? The answer is no: Rendering at the higher sample rate eliminates any foldover distortion in the audio range, sample-rate converters include an anti-alias filter to avoid this problem, and 44.1 kHz has no problem playing back sounds in the audio range.
However, note that upsampling can’t fix audio that already has aliasing distortion; upsampling audio to 96 kHz that already contains foldover distortion will simply reproduce the existing distortion. This technique applies only to audio created in the computer. Similarly, it’s unlikely that upsampling something recorded via a computer’s audio interface will yield any benefits, because the audio interface itself will have already band-limited the signal’s frequency range so there will be no harmonics that interfere with the clock frequency.
UPSAMPLING IN STUDIO ONE
We’ll assume a 44.1 kHz project sampling rate, and that the virtual instrument’s MIDI track has been finalized but you haven’t transformed it to audio yet. Here’s how to upsample virtual instruments.
- Save the virtual instrument preset so you can call it up in step 5.
- Select the entire MIDI clip driving the instrument, and drag it into the Browser (or right-click on the MIDI clip, and choose Export Selection). In either case, place the MIDI .musicloop so it’s easy to find later.
- Close the existing Song.
- Create a new Song at a higher sample rate, like 88.2 or 96 kHz.
- Insert the virtual instrument you used previously, and then load its preset.
- Drag the MIDI .musicloop clip into the Instrument track.
- Right-click on the track header and choose Transform to Audio Track. You can uncheck everything in the dialog box.
- Drag the audio file into a findable location in the Browser, then close the Song.
- Open the original Song with the 44.1 kHz sample rate.
- Import the upsampled audio; Studio One will convert the sample rate back down to 44.1 kHz automatically. Use this as the transformed instrument audio instead of what you would have obtained in the 44.1 kHz project.
That’s all there is to it. If you want to upsample an amp sim, the process is similar: export the (presumably guitar) track, save the amp sim preset, render at 96 kHz, then import the rendered file into the 44.1 kHz project.
FINAL THOUGHTS
Listen to the audio example “Upsampling with Amp Sim,” which plays the sound of an amp sim at 44.1 kHz and then after upsampling to 96 kHz. The difference isn’t as dramatic as last week’s synth example, but you’ll still hear that the upsampled version is clearer, with more presence.
Do bear in mind you may not want the difference caused by upsampling. When I did an upsampling demo at a seminar with a particular synthesizer, most people preferred the sound with the aliasing because the upsampled sound was brighter than what they expected. However when I did upsampling with an amp sim, and with a different synth, the consensus was that the upsampled version sounded much better. Regardless, the point is now you have a choice—hear the instrument the way it’s supposed to be heard to decide if you like that better, or leave it as is. After all, distortion isn’t necessarily that horrible—think of how many guitar players wouldn’t have a career without it!
Although upsampling isn’t a panacea, don’t dismiss it either. Even with synths that don’t oversample, upsampling may make no audible difference. However, sometimes synths that do oversample still benefit from upsampling; with some sounds, it can take 4x or even 8x oversampling to reproduce the sound accurately. As always, use your ears to decide which sound works best in your music.
Friday Tip of the Week: Upsampling in Studio One, Part 1
The controversy about whether people can tell the difference on playback between audio recorded at 96 kHz that’s played back at 44.1 kHz or a higher sample rate (such as 96 kHz) has never really been resolved. However, under some circumstances, recording at a higher sample rate can give an obvious, audible improvement in sound quality. In this week’s tip we’ll investigate why this happens, and in next week’s tip, tell how to obtain the benefits of recording at a higher sample rate in Studio One with 44.1 and 48 kHz projects.

REALLY? CONVINCE ME!
A Song’s sample rate can make a difference with sounds generated “in the box,” for instance using a virtual instrument plug-in that synthesizes a sound, or distortion created by an amp simulator. Any improvement heard with high sample rates comes from eliminating foldover distortion, also known as aliasing.
Theory time: A digital system can accurately represent audio at frequencies lower than half the sampling rate (e.g., 22.05 kHz in a 44.1 kHz project). If an algorithm within a plug-in generates harmonic content above this Nyquist limit—say, at 40 kHz—then you won’t hear a 40 kHz tone, but you will hear the aliasing created when this tone “folds down” below the Nyquist limit (to 4.1 kHz, in this case). Aliasing thus appears within the audible range, but is harmonically unrelated to the original signal, and generally sounds pretty ugly.
Foldover distortion can happen with synthesized waveforms that are rich in harmonics, like pulse waves with sharp rise and fall times. (Amp sims can also be problematic; although their harmonics may be weak, if you’re applying 60 dB of gain to create overdrive or distortion, the harmonics can be strong enough to cause audible aliasing).
SO IS IT A PROBLEM, OR NOT?
Not all plug-ins will exhibit these problems, for one of four reasons:
- The audio isn’t rich enough in harmonics to cause audible aliasing.
- The plug-in itself can oversample, which means that as far as the plug-in is concerned, the sample rate is higher than that of the Song. So, any foldover distortion occurs outside the audio range.
- The project sample rate is high enough to provide the same kind of environment as oversampling.
- The plug-in designers have built appropriate anti-alias filtering in to the algorithms.
Many modern virtual instruments and amp sims oversample, and DAWs can handle higher sample rates, so you’d think that might be the end of it. Unfortunately, there can be limitations with oversampling and higher project sample rates.
- Recording an entire project at a higher sample rate stresses out your computer more, reduces the number of audio channels you can stream, and won’t allow you to run as many plug-ins.
- Oversampling requires more CPU power, so even if all your instruments are oversampling internally, you may not be able to use as many instances of them.
- Although some instruments may perform 2x oversampling, that still might not be sufficient to eliminate aliasing on harmonically rich sources—so oversampling an oversampled instrument can still make a difference.
Furthermore, with plug-ins that oversample, the sound quality will be influenced by the quality of the sample-rate conversion algorithms. It’s not necessarily easy to perform high-quality sample-rate conversion: check out comparisons for various DAWs at http://src.infinitewave.ca (where, incidentally, Studio One rates as one of the best), and remember that the conversion algorithms for a plug-in might be more “relaxed” than what’s used in a DAW.
So what’s a musician to do? In next week’s Friday Tip of the Week, we’ll cover how to do upsampling in Studio One to reap the benefits of high-sample-rate recording at lower sample rates. Meanwhile, if you still need to be convinced recording at different sample rates makes a difference, check out this audio example of a synthesizer recorded in Studio One first at 44.1 kHz, and then at 96 kHz:
Friday Tip of the Week: A Sweeter, Beefier Ampire
A Sweeter, Beefier Ampire
Let’s transform Ampire’s Crunch American from a motor scooter into a Harley. Here’s our point of departure:
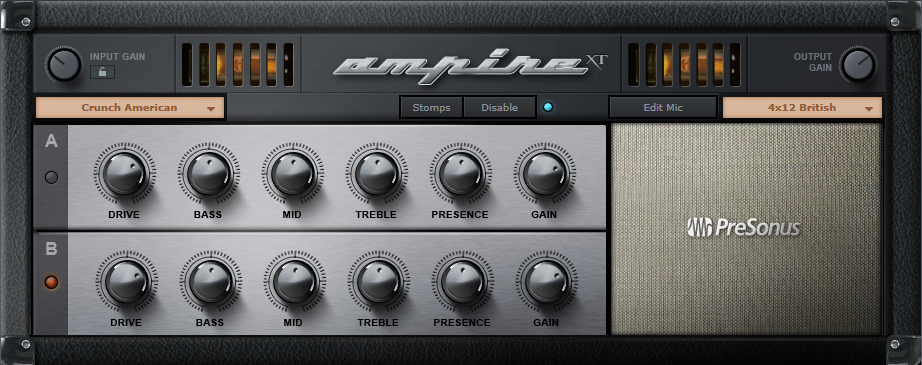
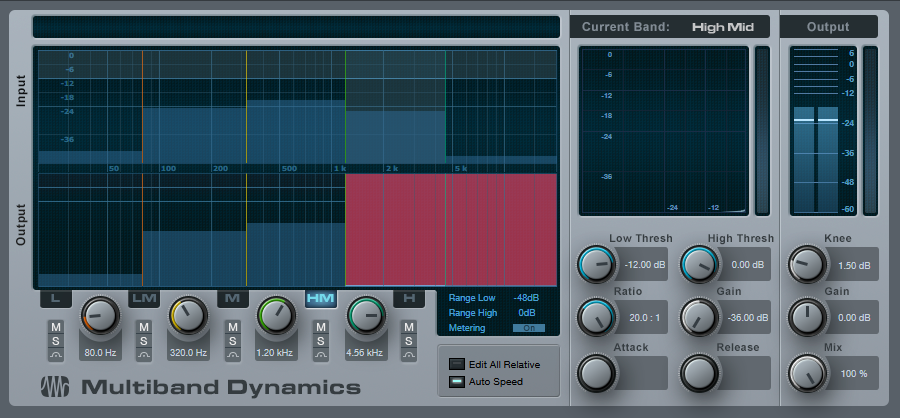
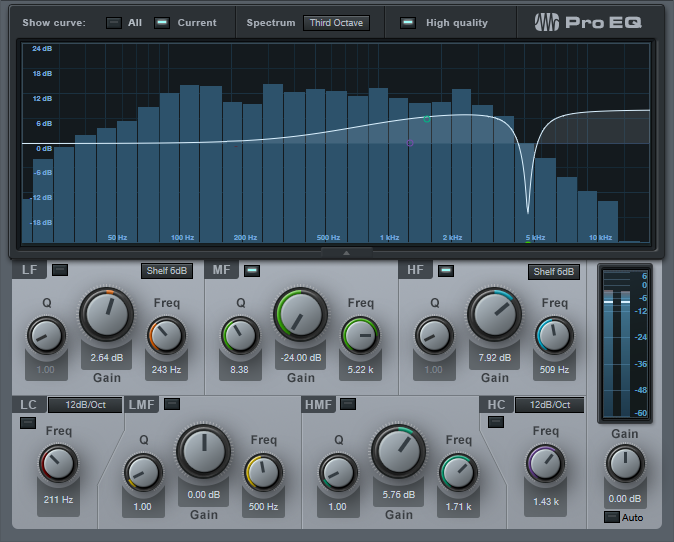
Insert the Multiband Dynamics before Ampire. The default patch is fine, but drag the High Mid and High gain and ratio settings down all the way. The goal here is to add a bit of compression to give more even distortion in the mids and lower mids but also, to get rid of high frequencies that, when distorted, create harsh harmonics.
After Ampire, insert the Pro EQ. The steep notch around 8 kHz gets rid of the whistling sound you’ll really notice in the before-and-after audio example, while the high-frequency shelf adds brightness to offset the reduced high frequencies going into Ampire. But this time, we’re increasing the “good,” post-distortion high frequencies instead of the nasty pre-distortion ones.
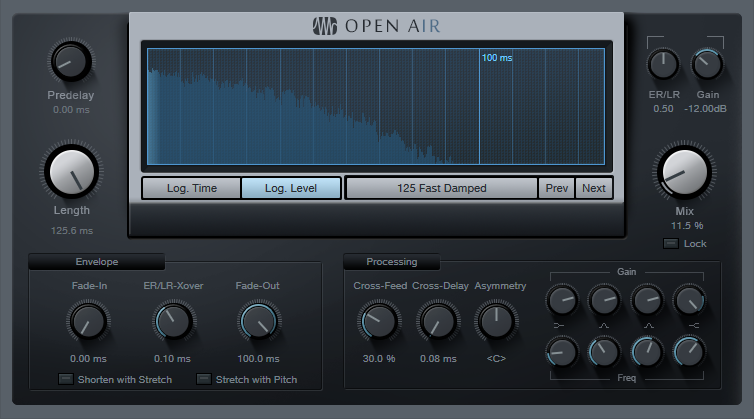
Those two processors alone make a big difference, but let’s face it—people don’t listen to an amp with their ear a couple inches from the speaker, but in a room. So, let’s create a room and give the sound a stereo image with the Open Air convolution reverb. I’ve loaded one of my custom, synthetic IR responses; these are my go-to impulses for pretty much everything I do involving convolution reverb, and may be available in the PreSonus shop someday. Meanwhile, feel free to use your own favorite impulses.
Of course, you can take this concept a lot further with the Channel Editor if you want to tweak specific parameters to optimize the sound for your particular playing style, choice of pickups, pickup type, and the like…hmmm, seems like that might be a good topic for a future tip.
That’s it! Now all that’s left is to compare the before and after example below. Hopefully you’ll agree that the “after” is a lot more like a Harley than a motor scooter.
Friday Tip of the Week: Create Virtual Room Mics in Studio One
Create Virtual “Room Mics”
Room mics can add ambiance and enhance the stereo image, but with close-miking and direct injection recording, we lose that sense of space. The lack of room mics is particularly noticeable with an instrument recorded direct, when it’s mixed with miked acoustic or electric tracks; the direct track just won’t seem to mesh quite right with the other sounds.
Room mics add short, discrete echos. Splitting the audio into four Analog Delay processors as parallel inserts does a fine job of emulating room ambiance.
First, set up the Splitter for four splits, and choose Channel Split for the Split Mode.
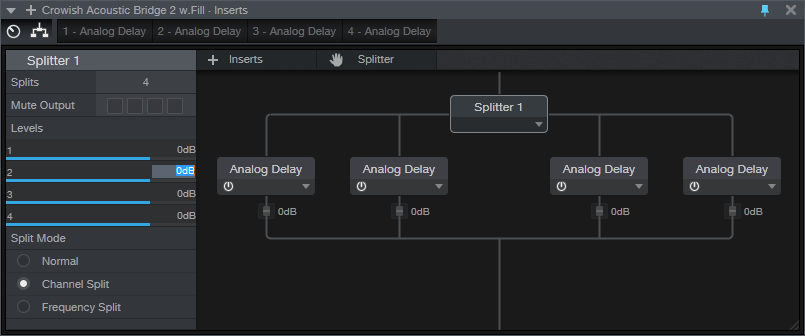
Set the controls on the four delays identically except for the four time parameters; turn off Sync and choose 11, 13, 17, and 23 ms. These are prime numbers so they don’t create resonances with each other.

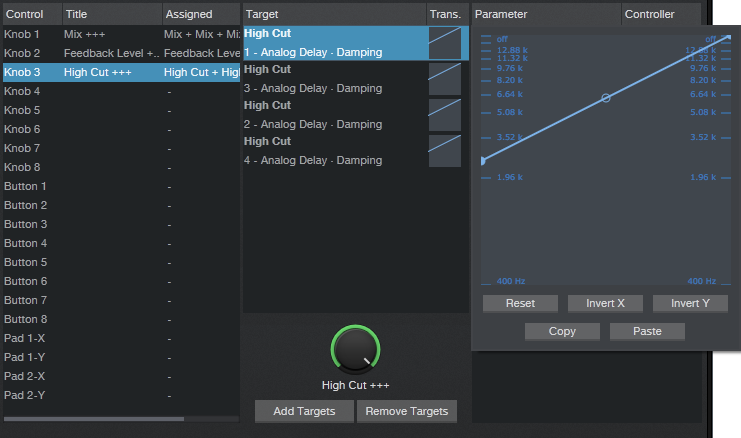
Now use the Channel Editor to create macro knobs for controlling the Mix, Feedback, and High Cut. Assign Knob 1 to the Mix controls on all four delays. Set this to go from minimum to maximum so that if you use this FX Chain as a bus effect, you can set Mix for maximum (no dry signal). Otherwise, when used as an Insert, you’ll likely keep the Mix at 50% or below.

The second knob controls Feedback level. I’ve limited the maximum amount to around 60% for each of the delays. Experiment with this knob depending on the audio source; more feedback gives more diffusion. With percussive instruments like drums, you’ll want more feedback than with sustained instruments.

The third knob controls the amount of High Cut for the delays. Set this so the High Cut doesn’t go much lower than 2.5 kHz.
To hear what this FX Chain can do, load a mono AudioLoop like Guitar > Pop > Dry > 01a Basement Jam E min. Set Mix and Feedback to around 40%, and High Cut to 7 kHz or so. You’ll hear the guitar playing in a room, with a lifelike stereo image.
And don’t forget to save the FX Chain—you’ll likely want to use it again!