Magic Stereo

For me, the gold standard for sound isn’t what comes out a studio, but live music. One of the reasons is that mono sound does not exist in an acoustic environment—it’s always interacting with the acoustic environment.
Sure, we can add reverb to give a mono instrument like electric guitar a static position in a stereo field. However, that will always require some kind of time-based manipulation. For a recent song project, I wanted a background guitar part to have motion within a stereo field—but without using any kind of delay, reverb, panning, or EQ. In other words: dry, electric, mono-output guitar with a stereo image. Impossible? Let’s find out.
The Track Setup
The way this works is so simple I’m surprised I never figured it out before. Fig. 1 shows the track layout. The guitar (with added chorus, as required by the song) pans full left, and has two sends. One send provides the guitar’s audio to a bus. The other send controls the sidechain of a Compressor inserted in the bus. The bus is panned full right.
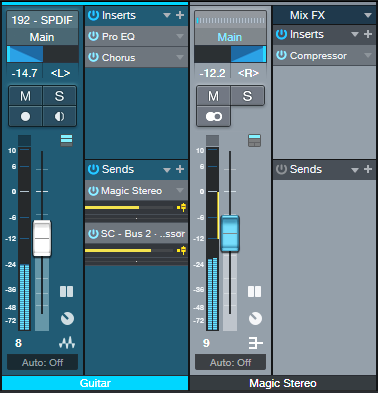
As the Compressor’s level changes, there’s a sense of motion as the dynamics and levels in the left and right channels change. Even better, these changes are tied to the instrument’s dynamics. This makes for a more natural effect.
This audio example plays the guitar by itself, panned to center, and going through the PreSonus chorus.
Now let’s hear the magic stereo effect. Although it’s most obvious on headphones, you’ll hear the effect on speakers as well.
The final audio example plays it in context with the mix. It adds a sense of animation to the guitar you can’t get in any other way. I also included this example because the drums are following the chord track. It has nothing to do with this tip, but I love the cool melodic quality it adds.
Compressor Settings
The Compressor settings are crucial. The ones shown in fig. 2 are a good place to start.
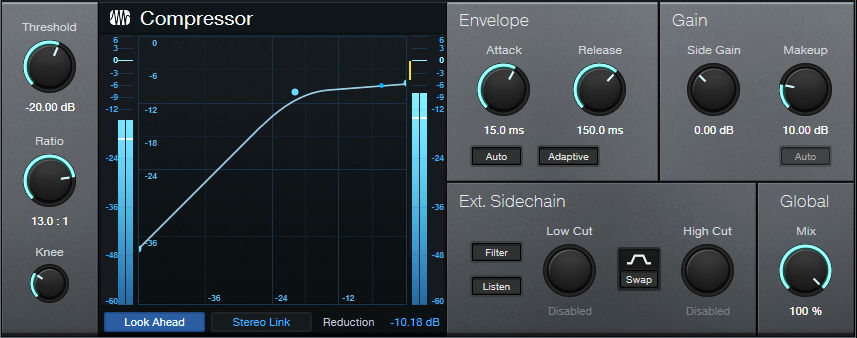
Adjust the settings by panning the source track full left. Increase the processed track’s level until both channels are at about the same level. Experiment with the Compressor’s Threshold to find the sweet spot between the compressor having no effect, or having too much of an effect. The Release can also affect this—too short or too long a release neuters the effect. You’ll likely have to readjust the processed channel’s level quite a bit as you zero in on the ideal settings.
With 15 ms Attack, both channels have their attacks hit at the same time and with the same intensity. So, the attack sound appears in the center, has the advantage of center-channel buildup, and helps anchor the part. As the audio decays and the channels are more dissimilar, the audio “wanders” more in the stereo field.
This technique is also great with background vocals. I didn’t use it in this song because there was so much motion going on overall I wanted the background vocals to be a constant. However I’ve used this technique with other songs, and it’s very effective—especially if you have multiple tracks of background vocals, and you apply individual magic stereo processing to each one.
Instant Inspiration!
The MIDI-oriented Songwriter’s Assistant tip makes it easy to play around with chord progressions. This new tip is about experimenting with, and recording, audio chord progressions in real time—keep the sections you like, discard the rest, and build your song from there. It’s a simple, eight-step process.
1. Start with an empty Song. Enable the Chord Track, then use the Paint tool to create a Chord Track that runs the length of how long you expect to be trying out different chord progressions. The chord itself doesn’t matter.
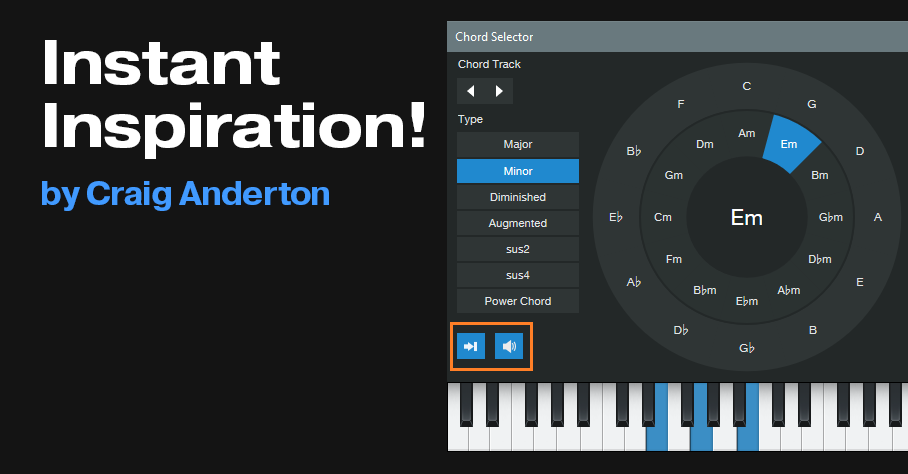
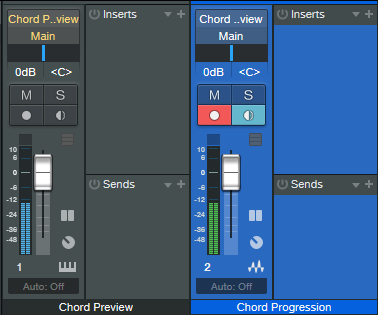
2. Double-click on the Chord Track, then enable the Chord Selector’s Instrument Input and Speaker buttons (fig. 1).
3. Create a stereo audio track. Assign its input to Instruments > Chord Preview, and record-enable it. We’ll call the track Chord Progression (fig. 2).
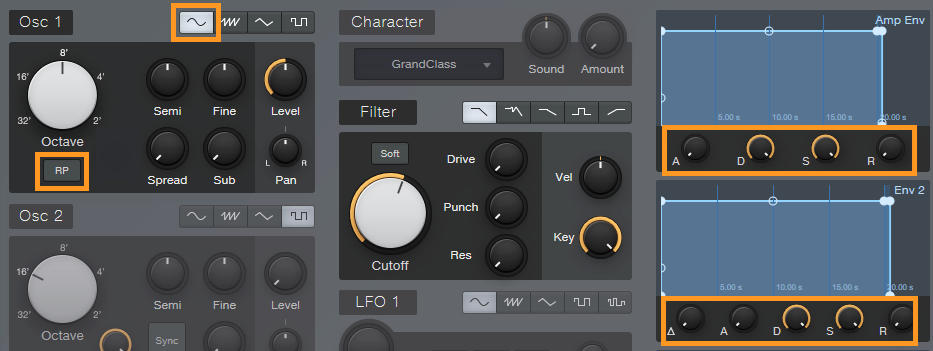
4. Click on the Instrument Editor button in the Chord Preview mixer channel to open Mai Tai. This is the sound used for the Chord Track preview. For this tip to work correctly, it’s crucial to make the edits in fig. 3 to the Chord Preview preset. (After making the edits, I overwrote the original preset.)
5. At this point, you’ll usually enter a rough tempo (you can always tweak the tempo later), enable the metronome, and select a 1-bar precount.
6. With the Chord Selector visible, start recording in the Chord Progression track. Click on a chord in the Chord Selector (however, the first chord must be different than the one that’s currently selected) to record its sound into the Chord Progression track. Continue selecting chords to create various chord progressions. Note: the chord will play for only a finite amount of time after you click on it, and it won’t play if you click on it again. To extend a chord’s playback, my workaround is to alternate clicking between the original chord and Power Chord (under Type).
7. Some of the progressions you try might be useful, some might not be—no problem. Keep the chord progressions that work, delete the rest, move them around on the timeline…whatever.
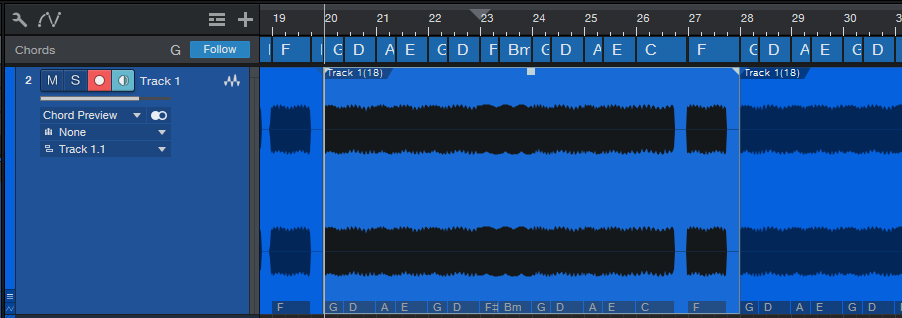
10 . At this point, you’ve probably forgotten which chords you played and when. Right-click on the recorded Event, and choose Audio > Extract to Chord Track. This automagically shows your chord progression (fig. 4). You may need to do a little cleanup, like extending a chord over where there’s silence—but your song is on its way.
If you extended a chord’s length by using the workaround described in step 6, when you extract to the Chord Track, the chord extends for the time you clicked between the chord and Power Chord. Furthermore, it retains the chord type. For example, if you click on Dm, Power Chord, Dm, Power Chord, Dm, all of those will be represented as a single Dm chord “bar” in the Chord Track when extracted. Nice.
Now you can record other parts on other tracks, and have them follow the Chord Track. And here’s an extra tip: Read over the Chord Track documentation when you get a chance, and re-visit my previous Chord Track tips—the Chord Track is an incredibly powerful feature.
Heads-up: Version 1.3 of The Huge Book of Studio One Tips and Tricks is now available! This 637-page book with 230 innovative tips is a free update to owners of previous versions ($19.95 to new buyers). Download the update from your PreSonus or Sweetwater account the same way you downloaded your previous version. For more information, check out the series of Studio One eBooks. Also, there’s a dedicated support forum if you have questions about the tips, or suggestions for future revisions.
Instant Soundtrack!

Who reading this wouldn’t want to make a little more money from their music? Okay, dumb question.
When people think “soundtrack,” images of Hollywood scoring stages come to mind. But soundtracks are a much broader topic now. YouTube videos, podcasters, corporate presenters, educational videos, and local businesses doing radio or TV ads all need soundtracks.
In 1992, I wrote an article called “Subtractive Sequencing” for Keyboard magazine that described filling a piece of music with loops, and then cutting out sections to make an arrangement. It didn’t get much attention. But over 20 years later (!), a blog post called “Subtractive Arranging—Novel Production Method from Danny J Lewis” presented the same technique. This time, it did get attention, to the point where the inevitable “Why I Don’t Use Subtractive Arranging” appeared in someone else’s blog.
Why? He didn’t like how this technique created static arrangements. But those “static arrangements” are actually ideal for… wait for it… soundtracks.
A good soundtrack fills space behind visuals or narration, but always plays a supporting role. So, I use subtractive arrangements to create soundtracks. I just take a song, and remove anything with a human voice, lead lines, some of the layers in layered parts, and most ear candy unless it complements the visuals (fig. 1). Then I render the mix, and compress the heck out of it—not to win the loudness wars, but to maintain a constant level that can happily sit -12 to -15 dB or so below the narration or dialogue.

In fig. 1, subtracted events are filled in with white for clarity. The tracks Lead Vocal and Smile (some ear candy) were muted. So was a layered, Nashville tuned guitar track, because the high frequencies stood out too much. The layered Standard tuning part was left in, but extra tempo-synched echo for both were cut. Similarly, there were two tracks of “Beat Filters,” loops from my AdrenaLinn Guitars loop library. They were panned to center and side for a cool stereo effect—that no one would care about. So, I muted one of them. Sections of a house bass loop were also removed.
The final, mixed soundtrack is exactly 1.5 minutes, and consists of drums, rhythm guitar triggered by a drum sidechain signal, bass in some parts, a beat filter loop in some parts, and a little acoustic guitar. That’s all that was needed. One last tip: You can mix bass up pretty high, because it helps drive a song and is out of the speech range.
Every now and then, I go through some of my older projects, strip out anything distracting, create a soundtrack, and save it into my “Soundtracks” folder. Whenever I need a soundtrack, there’s always something suitable in there. And even better, if you get into creating soundtracks, you might find some interesting opportunities to make money from them.
Here’s the finished soundtrack:
For more tips on how to get the most out of Studio One, check out the series of Studio One eBooks that cover tips & tricks, creative mixing, recording/mixing vocals, dynamics processors, and recording/mixing guitar. Remember, just like software, eBook owners can download the latest “point” updates for free from their PreSonus account (or Sweetwater account, if purchased from there). Owners are also eligible for new editions at a reduced price.
Compress Only the Bass’s Midrange
A bass’s low strings typically produce more energy than the higher strings. So, the low frequencies will push a compressor into compression before the higher strings produce enough level to be compressed. This can overcompress the lower strings, which doesn’t let them ring out and sound full.
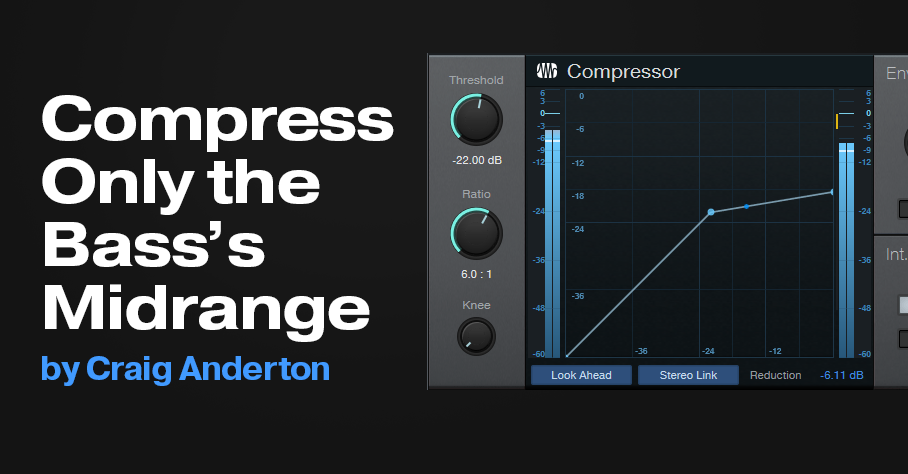
Fortunately, there’s an easy solution—thanks to the Compressor’s internal sidechain filters. Enabling the Low Cut filter, and rolling off low frequencies (fig. 1), reduces how much the low frequencies are compressed. (This tip complements the tip on Frequency-Selective Guitar Compression, but doesn’t necessarily need its optional sidechain-based version.)
Tip: Cutting the internal sidechain’s low frequencies can also be useful with drum tracks. This prevents the kick drum from triggering heavy compression that dominates the rest of the drums.
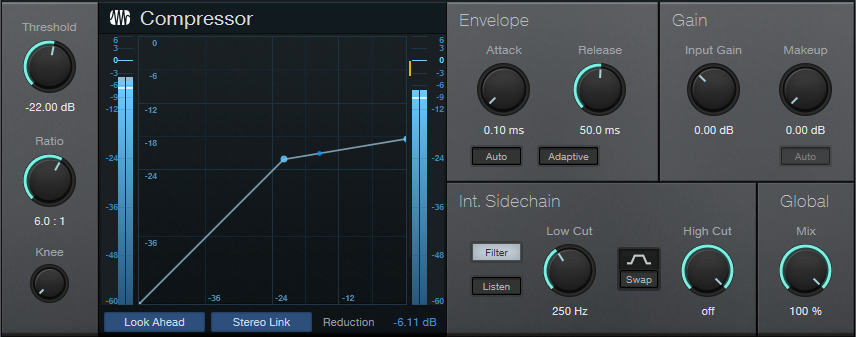
Fig. 2 shows the effect of the above settings. The left image’s response is with the Low Cut filter bypassed. The compression is more uniform over the entire frequency range. The right image’s response has theLow Cut filter enabled, which tilts the response toward the bass. Although the levels are about the same above 200 Hz, the low-frequency lift below around 100 Hz is due to the less-compressed, lower frequencies.
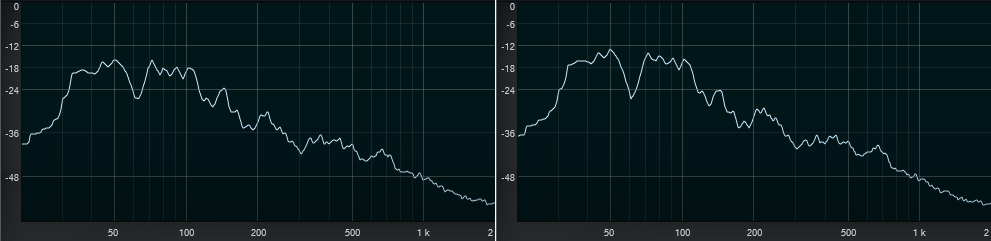
Note that the spectrum analyzer’s vertical scale covers a wide range, so the boost is around 3 dB—enough to make a significant difference. So, next time you want to compress your bass, but not lose the power of the low strings in the process, let this technique give you the best of both worlds.
For more tips on how to get the most out of Studio One, check out the series of Studio One eBooks that cover tips & tricks, creative mixing, recording/mixing vocals, dynamics processors, and recording/mixing guitar. Remember, just like software, eBook owners can download the latest “point” updates for free from their PreSonus account (or Sweetwater account, if purchased from there). Owners are also eligible for new editions at a reduced price.
The Artist Version Remix: Super Stereo/Mondo Mono
After the July 27 post on the Super Stereo and Mondo Mono FX Chain for Studio One Professional, there was interest in a version for Artist. I’ve always said I take requests, so here it is! The main difference is that this version requires three buses instead of fitting in a single track’s FX Chain. However, the results are the same. Although intended for use with stereo master mixes to make them “pop,” the same technique works with any stereo track. For example, the super stereo process can bring out the best in drum buses that incorporate overheads or room sounds. Furthermore, Mondo Mono can translate stereo files into better mono backing tracks for live performance.
How It Works
This technique is based on mid-side processing, so before proceeding, here’s a refresher course
Mid-side (M-S) processing encodes a standard stereo track into a different type of stereo track with two separate components. The left channel contains the center of the stereo spread, or mid component. This is the same as the mono audio produced by panning the left and right panpots to center. The right channel is mono audio that contains the sides of the stereo spread—the difference between the original stereo file’s right and left channels (i.e., what the two channels don’t have in common). You can then process these components separately, and after processing, decode the separated components back into conventional stereo.
With that out of the way, let’s unpack fig. 1. Note that I’ve erased parts of the UI that don’t pertain to what we’re doing. Also, all plug-ins except the Analog Delay show their parameter settings in the expanded views.

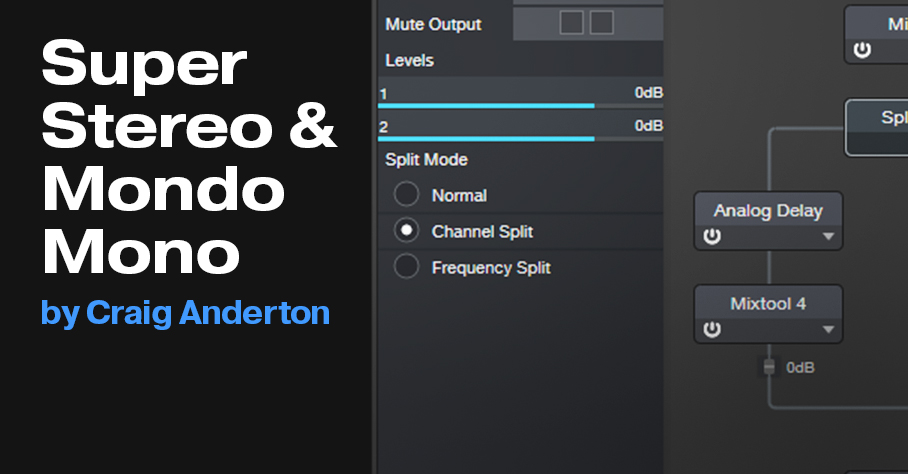
The Stereo Mix track has the master audio to be processed. Its Mixtool uses the default preset, except for enabling MS Transform. The encodes the mid signal into what’s normally the left channel, and the sides into what’s normally the right channel.
There are two pre-fader sends. Studio One track and buses are inherently stereo, but we need to treat the Mid and Side audio as mono signals. So, the Mid send pans all the way to the left. Only the left (mid) audio goes to the Mid bus. Similarly, the Side send pans all the way to the right. Only the right (side) audio goes to the Side bus.
This provides independent control over the Mid and Side audio—we can vary their levels with their channel faders, and insert processors. Each channel has an Analog Delay inserted, which we’ll get to shortly. But first, let’s explain how to convert our mono mid and side channels back into stereo.
The mid and side bus outputs go to the Decoded track. This has a Mixtool inserted, with MS Transform enabled. The Mixtool converts the mid signal from the left channel, and the side signal from the right channel, back to conventional stereo.
However, the Side and Mid channels need an extra plug-in. The Analog Delay effect is inherently stereo, but no audio should be in the Side bus’s left channel or the Mid bus’s right channel. So, the Side bus Dual Panpot plug-in pans the left and right channels full right, and the Mid bus Dual Panpot plug-in pans the left and right channels full left. Now the decoder receives the side audio in only its right channel, and the mid audio only in its left channel. This allows conversion back to stereo. Note that if you add any processing to these buses, it needs to be before the Dual Pan.

The Analog Delay offsets the time between the side and mid by 2.0 ms. Enabling the delay in the Side bus extends the stereo image outward, while enabling the delay in the Mid bus pushes the left and right sides closer into the center. This is especially useful for those who use backing tracks for live performance. Mono ensures that everyone in the audience hears the same sound—there aren’t any stereo “sweet spots.” With Mondo Mono, bring up the side faders, and you’ll push what’s in the sides more to the center. The Analog Delay’s modulation is a kind of “secret weapon” for stereo—it adds an extremely subtle 3D quality on headphones.
Finally, even without the delay, changing the balance of the mid and sides with the channel faders can alter the mix. Bringing up the sides makes the stereo seem wider, because the extreme right and left parts of the stereo field are louder. You can also process the mid and sides differently. For example, adding reverb to only the sides keeps audio mixed to center, like kick and bass, out of the reverb. Then you can add a separate reverb for the vocals, which will likely be mixed to center.
Whether you choose Super Stereo, Mondo Mono, or just want to widen your stereo image a bit, now it’s easy to do in Artist as well as Studio One Professional. For an audio example, and phase meter readings that show how Super Stereo and Mondo Mono affect the imaging, please look at the blog post referenced in the first sentence.
For more tips on how to get the most out of Studio One, check out the series of Studio One eBooks that cover tips & tricks, creative mixing, recording/mixing vocals, dynamics processors, and recording/mixing guitar. Remember, just like software, eBook owners can download the latest “point” updates for free from their PreSonus account (or Sweetwater account, if purchased from there). Owners are also eligible for new editions at a reduced price.
Beyond “New York”-Style Compression

Go to the web, and you’ll see a zillion YouTube videos and web posts that all say the same thing: a technique called parallel compression (also called New York compression) uses two parallel tracks to blend compressed and dry audio. The goal is to retain a compressed sound, while using the dry signal to mix some dynamics back in.
Realistically, though, this is kind of old news. Modern compressors (like Studio One’s) often add a dry/wet mix control, which means you no longer need to set up a separate dry path. So, let’s bid a fond farewell to New York compression—and take it to the next level.
Who Says the Dry Track Has to Be “Dry”?
It doesn’t, which is helpful because there’s a problem with mixing in a dry track. Although the goal is to preserve some dynamics, much of the dry signal overlaps with the compressed audio. So while you’re mixing the peaks back in, you’re also masking the compressed signal with the dry sound. This takes away from the theoretical purpose of New York-style compression.
Of course, that’s not “wrong”—it might be the sound you want. But it’s not the sound I want, because I want to isolate the peaks more before mixing them in with the compressed sound. And I want to do it in a way that sounds more natural than a transient shaper, and doesn’t obscure the benefits of the compressed audio.
Fig. 1 shows a potential answer: Use a parallel track for compression, but instead of a parallel dry track, use a parallel track with an expander.

The audio above the Expander’s threshold is dry, while the audio below the threshold that’s expanded downward gets out of the way of the compressed track. This lets you dial in exactly how you want to handle dynamic peaks, and the amount of unprocessed drum overlap with the compressed drums. Because the dry drum channel’s pre-fader sends to the Compressor and Expander, you can still bring in some dry drum sound if you want…but after using the Expander instead, you may prefer to leave the dry drums out entirely.
Since a waveform is worth 1,000 words, here are some audio examples.
This is the original dry drum loop. Note the gorgeous attack on the snare—we don’t want to lose this.
Applying compression with the settings in fig. 2 gives this sound. The heavy squashing is typical of New York compression, because mixing in dry drums offsets the compression effect somewhat.
Mixing in dry signal gives the traditional New York compression sound. The peaks are back, compared to the compressed signal.
This version uses the Beyond NYC technique. The sound is tighter, the snare is punchier, the kick and peaks hit harder, and there’s a cleaner sound because there’s no heavy overlap of dry and compressed sound at levels below the Expander’s threshold. What’s more, with traditional NYC compression normalized to the same peak value, the Beyond NYC version is about 0.6 LUFS louder—despite having a greater sense of dynamics.
How to Adjust It
1. Set up the Compressor for the sound you like. Fig. 2 shows typical compression settings to squash your drums. These are the settings used in all the audio examples (except for the dry drums).
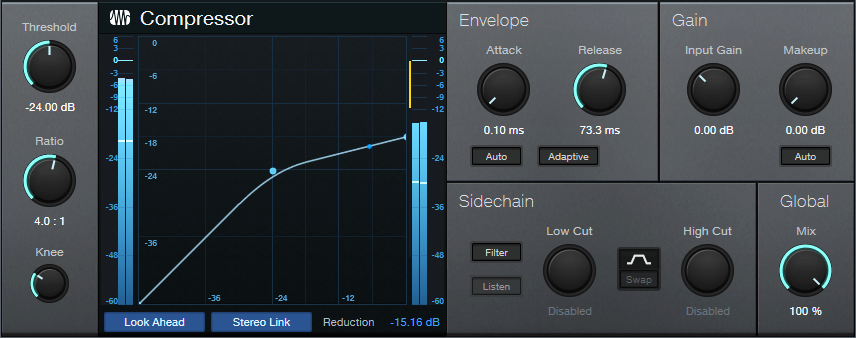
2. Set the Expander Threshold somewhat higher than the Compressor’s Threshold. This is a starting point, because you’ll likely want to vary the Expander’s Threshold as you dial in an appropriate setting. Start with an Expansion ratio of 1:1.
3. With the ratio at 1:1, the effect is the same as traditional New York compression. Bring up the Expander channel’s level so that the peaks start complementing the compressed track.
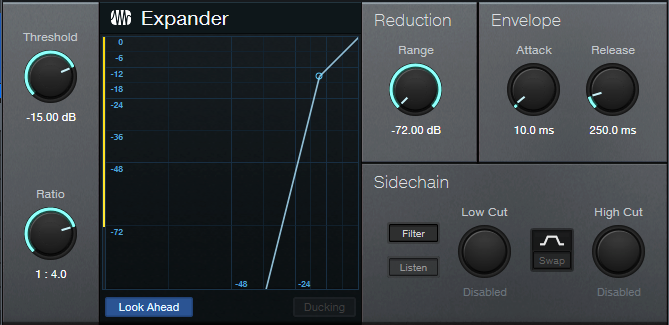
4. Now comes the fun part. Increase the Expander Ratio. Around 1:2, the dry sound masks the compressed sound less. Meanwhile, the Expander is preserving the peaks that fall above the Threshold.
5. Adjust the Expander Threshold to choose the best balance (and separation) of the dry peaks with the downward expanded audio. Fig. 3 shows the Expander settings used for the audio example.
6. Choose your ideal balance of the Compressed and Expanded tracks.
Further Customizing
Return the Expander’s Ratio control to 1:1. The sound will seem looser, and less defined. That may be a sound you like, but increase the ratio to 1:4.0. Now you can bring up more of the compressed sound, yet still have a punchier, more percussive vibe from the expanded channel.
Readjust the mix of compressed and expanded channels until you find the right balance. Higher expansion ratios not only tighten the drums, but leave more space in the arrangement. Just remember that any time you change the Expander’s ratio, you’ll probably have to tweak the balance of the compressed and expanded channels.
Sometimes, it’s worth questioning how we’ve always done something. Replacing a dry path with an Expander resulted from simply asking “what if…”. Who knows how many other techniques are waiting for us to find them?
For more tips on how to get the most out of Studio One, check out the series of Studio One eBooks that cover tips & tricks, creative mixing, recording/mixing vocals, dynamics processors, and recording/mixing guitar. Remember, just like software, eBook owners can download the latest “point” updates for free from their PreSonus account (or Sweetwater account, if purchased from there). Owners are also eligible for new editions at a reduced price.
Super Stereo and Mondo Mono
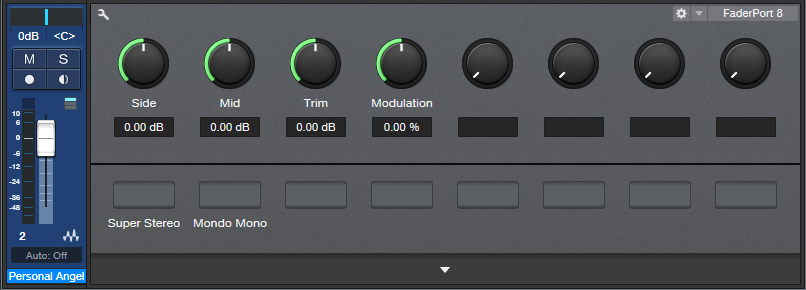
This is my first FX Chain designed for Project page songs, although it also works for tracks and buses in the Song page. It’s based on mid-side processing. Fig. 1 shows the control panel, with switch-selectable Super Stereo (side emphasis) and Mondo Mono (center/mid emphasis). Complementary gain controls for the Mid and Side fine-tune the levels. Trim compensates for level changes caused by adjusting the other controls.
How It Works
Actually, you don’t need to know how it works—just download the FX Chain for Studio One Professional. (If you want to see an Artist version, let me know in the Comments.) For the curious, fig. 2 shows the “block diagram.”
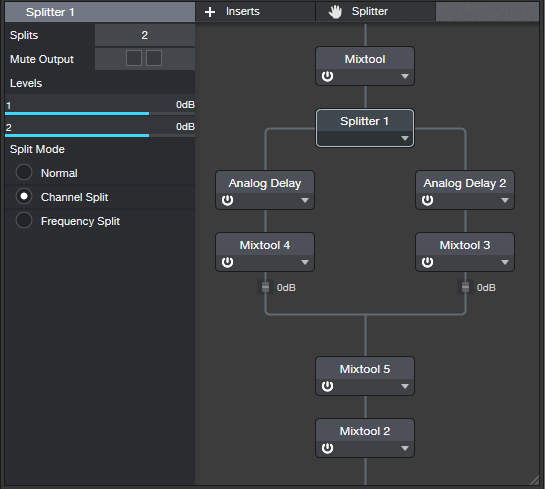
The Mixtool encodes the stereo signal into mid and side channels, and the Splitter splits them into two parallel paths. Each path has a 2.0 ms Analog delay, with Modulation used as a “secret weapon”—it adds an extremely subtle 3D quality on headphones. Enabling the delay in the side path extends the stereo image outward, while enabling the delay in the mid path squeezes the image more to mono.
Each path has a Gain control for adjusting the mid and side levels. Use these to fine-tune the switched settings.
The second-to-last Mixtool adds a fixed 6 dB of gain to compensate for the encoding/decoding process. The final Mixtool provides the Trim control’s ±6 dB of cut/gain. Fig. 3 shows the results of using this effect.
How to Use It
This is not one of those effects that sounds best if you turn everything up full. The default has all controls flat. Start by enabling Super Stereo. Turn that off. Enable Mondo Mono. You’ll hear an obvious difference. Then turn both off, and play with the Gain controls for the Mid and Side. As to modulation, sometimes you can hear the effect, sometimes not.
Use Mondo Mono to tweak something that you know is going to play back over a mono, or close-to-mono, sound system. Turn the Side gain up all the way, then enable Mondo Mono. This mixes the sides more into mono, so they translate well in a mono mix.
In the audio example, the first half is without processing. Then the same phrase repeats in Super Stereo, with modulation up full. Both have been edited to the same LUFS value. I think you’ll hear the difference, especially if you go back to the first half after listening to the second half—which definitely “pops” more.
[insert audio example, Super Stereo.mp3]
Download the Super Stereo Mondo Mono.multipreset here
For more tips on how to get the most out of Studio One, check out the series of Studio One eBooks that cover tips & tricks, creative mixing, recording/mixing vocals, dynamics processors, and recording/mixing guitar. Remember, just like software, eBook owners can download the latest “point” updates for free from their PreSonus account (or Sweetwater account, if purchased from there). Owners are also eligible for new editions at a reduced price.
Purify Your Reverb

With algorithmic reverbs (like the Room Reverb), you might be surprised at how much dry sound makes its way to the output, even with the dry/wet control set to all wet. Normally we don’t think about this—the reverb’s in a bus, it’s 100% wet, end of story. But this causes a certain lack of clarity, because the dry sound we want to hear by itself has to compete with a reverberated version of itself. Removing the last vestiges of dry sound from a reverb bus by adding a second, out-of-phase reverb in a parallel bus increases clarity, and spreads the reverb more.
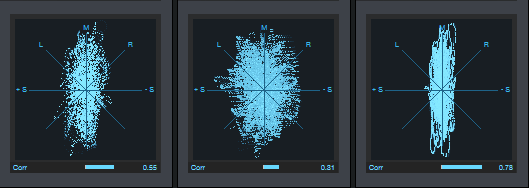
Here’s the sound of conventional reverb. Even though there’s no dry sound mixed in, you can still hear plenty of piano.
Next, the sound of pure reverb. There’s less piano, and the reverb stretches out to the sides. This leaves more space in the middle for mixing in the dry piano we do want to hear.
Of course, if your productions are loaded with tracks, these subtle differences may not matter. But if you do productions with solo instruments, prioritize vocals, or prefer minimal track counts in your own work, the purer reverb sound can improve the final mix’s clarity and space.
How It Works
We’re stealing a page from mid-side processing, without actually doing it. Instead of the usual, single reverb bus, this technique uses two reverb buses in parallel. The same algorithmic reverb, with the same settings, is in both buses (fig. 1).
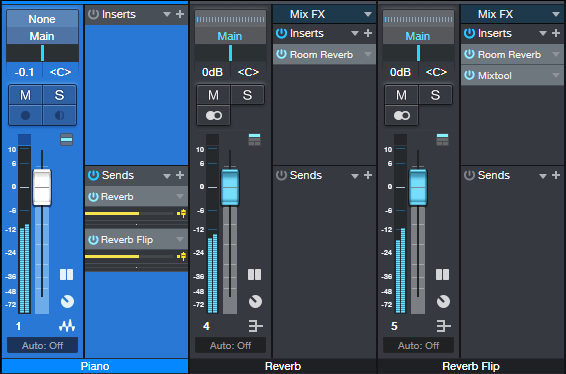
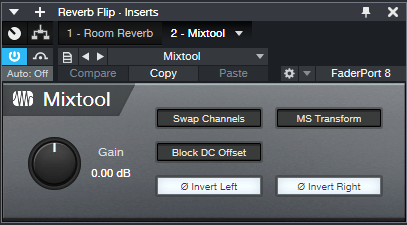
The second bus has a Mixtool inserted. Its sole purpose is to flip the reverb’s phase (fig. 2).
That’s all there is to it. There are only a few tips:
- Make sure the send going to each reverb is at the same level.
- You can change the characteristics for one reverb (e.g., Length) and the common audio will still cancel, as long as the two reverbs are at the same level.
- For this technique to work with convolution reverb, you also need to enable Swap Channels in the Mixtool. This is because convolution reverb doesn’t have the same variations as algorithmic reverb, with which this technique works best.
- Advanced tip: If you follow one of the reverbs with a Pro EQ, boosting within a frequency range will reduce cancellation in that range, so the dry sound will creep back in. For example, boost the highs, and the common sound’s higher frequencies will be reverberated.
Finally, let’s hear the sound in context. The main track is a dry piano part. In the first and third parts, the piano feeds a standard reverb bus, set to wet sound only. In the second and fourth parts, the piano feeds the purified reverb bus. You’ll hear that in these parts, the reverb “floats” out more to the sides, is more prominent even though it’s not louder, and the dry piano sound mixed with the reverb is more defined. For the most objective comparison, the piano is not mixed higher in the 2nd and 4th parts, so it does sound a little softer than in the 1st and 3rd parts, where the piano’s sound is inherently mixed in with the reverb.
For more tips on how to get the most out of Studio One, check out the series of Studio One eBooks that cover tips & tricks, creative mixing, recording/mixing vocals, dynamics processors, and recording/mixing guitar. Remember, eBook owners can download the latest “point” updates for free from their PreSonus account (or Sweetwater account, if purchased from there), just like software. Owners are also eligible for new editions at a reduced price.
“Pump” Your Pads and Power Chords
I’ve written about how to get that cool “pumped” drum sound using the Compressor’s internal sidechain—but I’ve never written about how to obtain the traditional, sidechain-based pumping sound that works with any sustained audio. Apologies! Let’s remedy that oversight.
If you’re not familiar with this effect, a waveform is worth a thousand words. Here, the drum track’s kick is pumping the Mai Tai synth part, which would otherwise be sustaining (like it does at the end).
The Routing
Fig. 1 shows the routing. The Drum Mix track’s signal goes through a pre-fader send to a Bus. To isolate the kick sound going through the Bus, the Pro EQ cuts off the highs, and boosts the bass. The kick signal from the Bus goes through a pre-fader send to the sidechain of a Compressor in the synth track. The Compressor does the pumping.
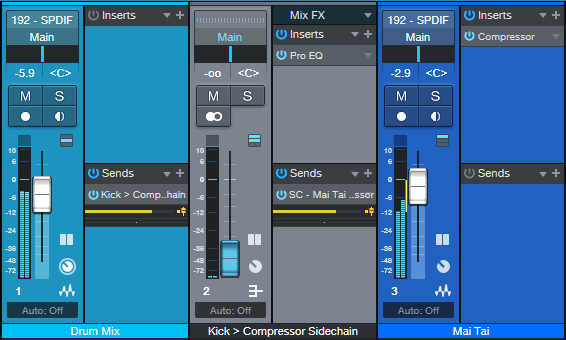
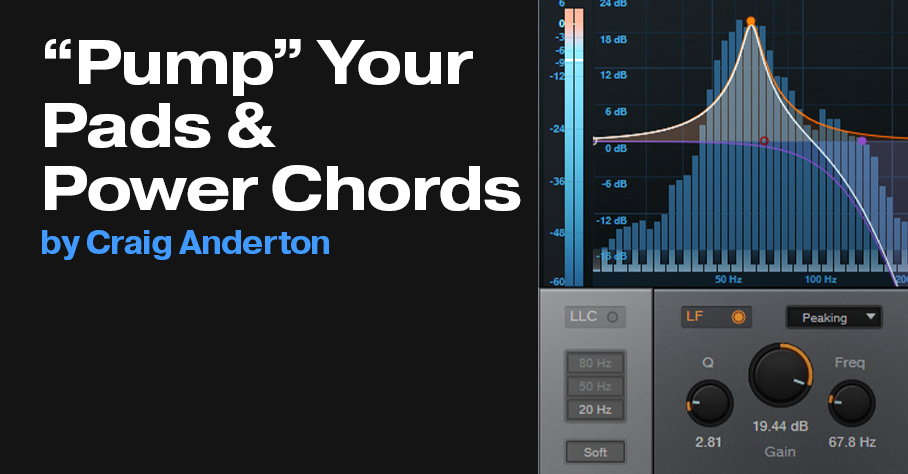
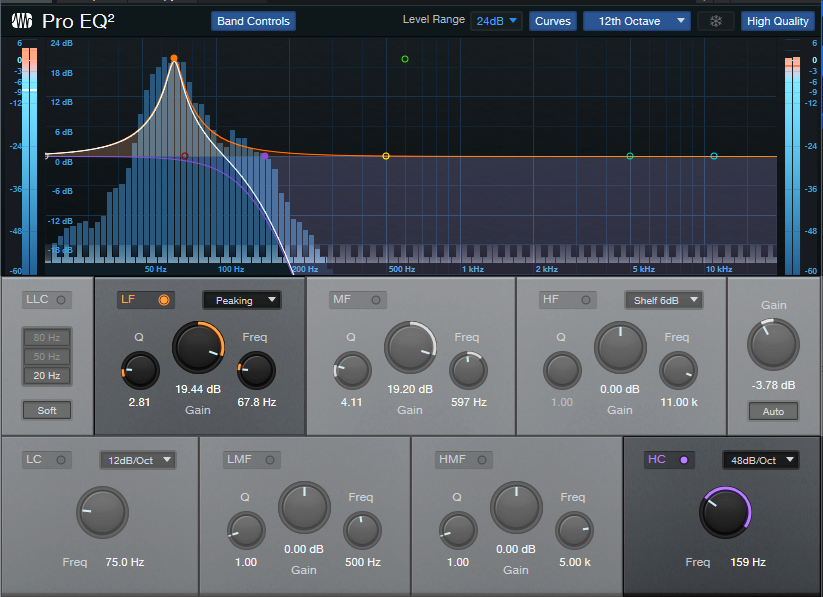
The Bus EQ
Fig. 2 shows the EQ settings. Yes, I know it’s horribly distorted. But it doesn’t matter, because we don’t hear it. We just want a big honkin’ blob of kick energy to bombard the compressor’s sidechain…which this does.
The Compressor
Fig. 3 shows the settings used in the audio example, but these are quite critical. You’ll likely need to tweak them for your specific musical scenario.
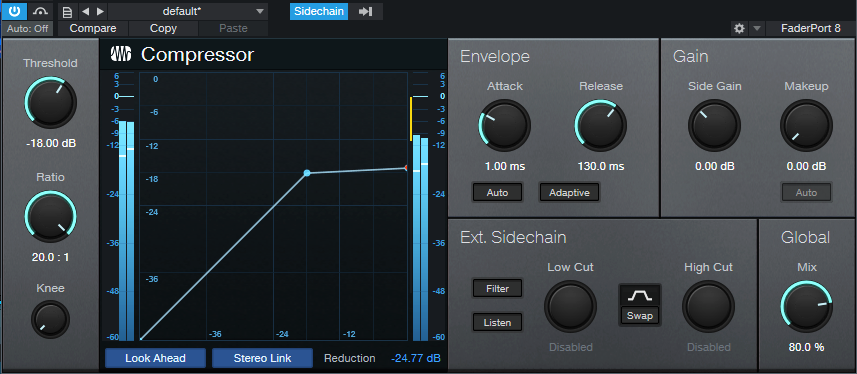
- Lower Threshold = deeper pumping
- Higher Ratio = more aggressive pumping
- Higher Release = longer recovery from the pump
- Higher Knee value = slightly less abrupt pumping
- Auto and Adaptive = leave them off—we don’t want a natural compression sound
- Mix = the secret weapon! Go from a hint of pumping at low percentages, to extreme pumpological action at 100%. And remember: this parameter is automatable. Just sayin.’
- Pre-fader send to the Compressor’s Sidechain = tweak this for the most consistent results.
Frankly, I never get tired of this effect. I hope you enjoy it!
For more tips on how to get the most out of Studio One, check out the series of Studio One eBooks that cover tips & tricks, creative mixing, recording/mixing vocals, dynamics processors, and recording/mixing guitar. Remember, eBook owners can download the latest “point” updates for free from their PreSonus account (or Sweetwater account, if purchased from there), just like software. Owners are also eligible for new editions at a reduced price.
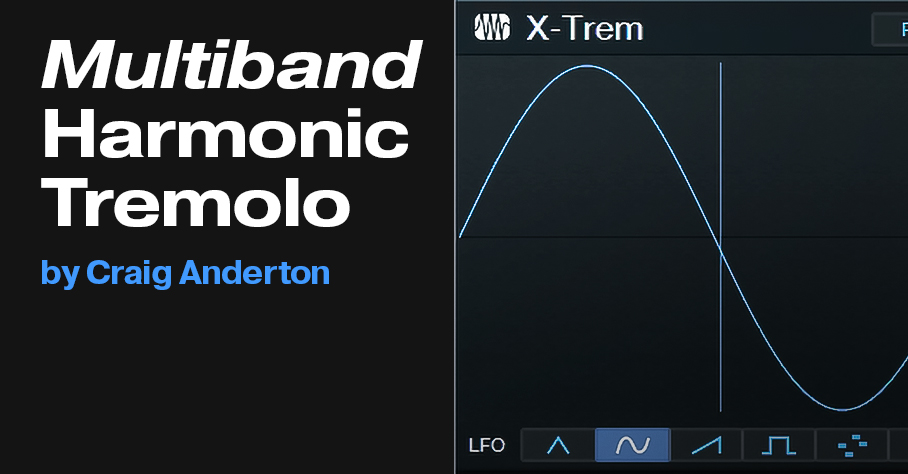
Multiband Harmonic Tremolo
If you’ve been following the Friday Tip blog posts, then you know two things: I actually use the stuff I write about, and ask “What if?” a lot. Those attributes come together into this post, which is more like a mod of two previous posts.
The March 26, 2018 post was The “Harmonic Tremolo” FX Chain. Unlike a standard tremolo, which does periodic modulation between high and low volume levels, a harmonic tremolo does periodic modulation between high and low frequency bands. In other words, the modulation is frequency-based instead of amplitude-based.
Then on June 3 of this year, the post was Spruce Up Your Mono Guitar’s Image. This split the signal to two Ampire graphic EQs only (no amp and no cab), with their sliders set oppositely—if one band’s slider was up on one graphic EQ, the same band’s slider was down on the other EQ. The result is a stereo image from a mono instrument like guitar or vintage synths. However, this particular effect can also impart some very interesting sounds to pads when you slow the X-Trem speed way down.
The “Aha!” Moment
When using both tips in one project, I wondered what would happen if I inserted the X-Trem from “The Harmonic Tremolo FX Chain” before the Splitter in “Spruce Up Your Mono Guitar’s Image.” Bingo! This creates a multiband harmonic tremolo that sounds pretty darn cool. Simply make the following mods in the June 3 post.
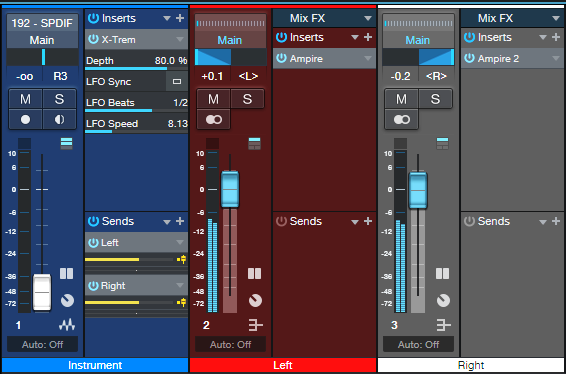
For the Studio One Artist version, which uses pre-fader Sends and Buses, insert the X-Trem into the Instrument track. Choose Pan mode (fig. 1).

The two pre-fader sends from the Instrument track go to two buses hosting their own Ampires, each with the graphic EQ settings shown in the June 3 post. These then feed into the Main Bus (fig. 2). However, note that we can simplify this particular implementation, because we’ll usually want to vary the levels and panning of the Left and Right buses. For example, panning Right to center and Left to hard left spreads the sound from center to left.
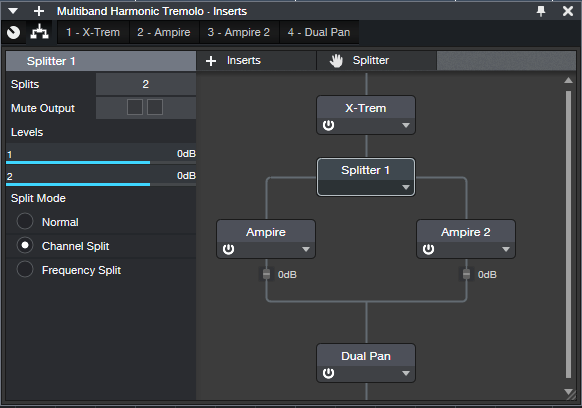
The downloadable Multiband Harmonic Tremolo FX Chain for Studio One Professional doesn’t need a control panel, because it can expose the crucial parameters (X-Trem Depth and Speed, Dual Pan Left and Right controls) when you expand the related plug-ins (fig. 3).

The routing (fig. 4) is the same as for the Harmonic Tremolo in the 2018 post, except that the Ampire graphic EQs replace the two Pro EQs.
That’s all there is to it. If you thought tremolo effects didn’t have any more life to them—this sucker just might change your mind! And I’ve learned that just because there’s a standard definition of what a harmonic tremolo does, that doesn’t mean we can’t invent new approaches.
Download the appropriate FX Chain for your version of Ampire:
Multiband Harmonic Tremolo.multipreset for standard Ampire
Multiband Harmonic Tremolo HD.multipreset for Ampire with the High-Density pack