EZ Voiceovers with the Lyrics Track
I narrate an average of a video a week, so I’m always looking for better workflow options—and version 6 came through with the Lyrics Track. This tip is about one workflow, but the concept is flexible enough that you may find something that works better for you.
The Recording Process
Recording narration is different from laying down a guitar part. First, I record a reference narration track that breaks the narration down into smaller pieces. Typically, they’re around 20 seconds. Then, the narration for each section becomes a separate phrase in the Lyric Track.
Because I never get narration right the first time (hey, at least I admit it!), I loop-record the narration five or six times. This is where the Lyrics Display is invaluable. Normally, Studio One is on the main monitor, and the second, smaller monitor is dedicated to working with plug-ins and such. But for narration, the Lyrics Display goes on the main monitor. I’m only recording, not editing or arranging, so placing Studio One on the smaller monitor isn’t an issue (figs. 1 and 2). The Lyrics Display’s maximum font size (60.00) allows seeing the text while being at least a couple meters away from the computer. By using a ribbon mic and pointing the mic’s null response at the computer, there’s virtually zero background noise.
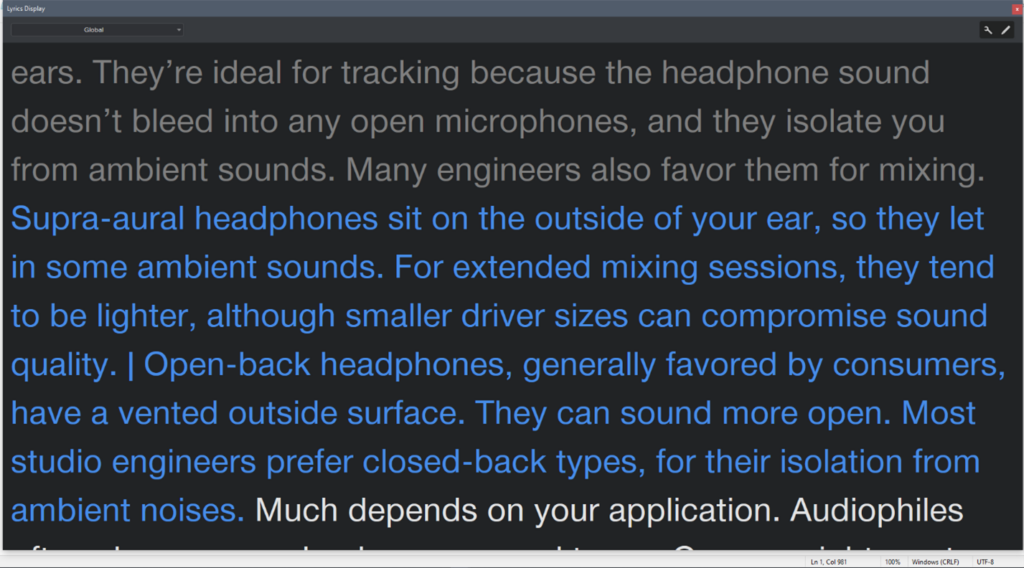
Before V6, I opened a text file with narration in the main monitor. However, this required scrolling for longer narrations. Paging up and down with a wireless keyboard worked, but was distracting (and I had to edit out the noise it made). With V6, while recording, the Lyrics Display jumps automatically to the next section of text, and highlights it in blue. This is way more convenient.
Editing
The standard comping tools are less useful because narration isn’t cut to a beat. Due to the slight variations, I unpack the layers to Tracks, and use the Listen Tool to decide which version has the best narration for any given section. The preferred sections are cut, and moved to a composite track. Keyboard shortcuts are essential here to choose among select, cut, and listen.
Some Events may have issues where the narration is good, but there’s a potential deal-breaker problem (e.g., a prominent mouth click). The Inspector comes into play here. V6’s Customize option pares the interface down to what’s needed needed to work with narration. Sometimes an Event processing plug-in will solve the problem, but if not, I add a marker to indicate where more editing is needed. That may mean substituting a section from a different take, or coming back to it later and recording replacement narration.
After selecting individual Events and bouncing them to single file, next is overall processing. The Pro EQ’s linear-phase low-cut filter reduces some of the ribbon mic’s boomy qualities, and a bit of high-end boost adds intelligibility. iZotope RX takes care of mouth de-clicking. Then, the Limiter and Gain Envelope even out any unwanted level variations, while V6’s new De-Esser reduces any overbearing sibilance. This group of processors cleans up the narration well.
Once the narration is exactly as desired, then it’s time to render, lay it on the timeline with the visuals…and send the invoice 😊
Mega-Modulate the Vocoder
I use vocoders all the time, but rarely for voice. One of my favorite techniques is using drums to “drumcode” synth pads or guitar power chords, and give instruments a drum part’s percussive qualities. This tip takes that concept to the next level.
For conventional applications, Version 6’s Vocoder inserts in the track that provides the vocoder’s modulation source (e.g., voice). Then, the audio you want to vocode comes into the Vocoder’s sidechain from a different track.
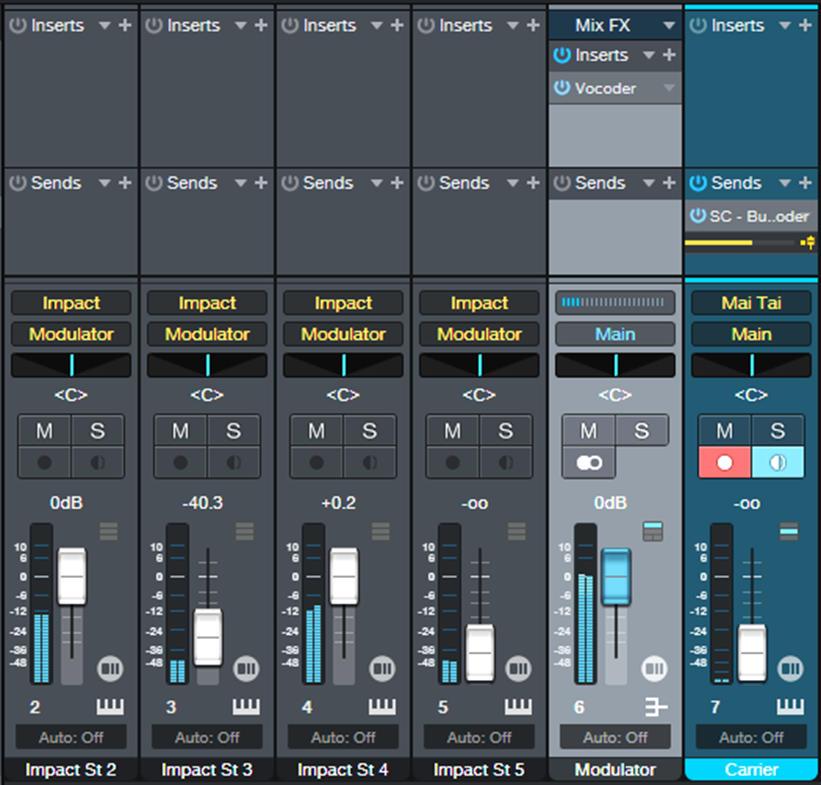
This tip’s goal is to use Impact XT’s individual drum outputs as separate modulation sources. For example, you could modulate the Vocoder with just the kick, or just the snare…or the snare and hi-hat…or all three, and vary the amounts in real time. The first audio example has only the “drumcoded” carrier, while the second audio example mixes in some of the original carrier sound. Both options are useful. (The carrier is Mai Tai, with the free CA Hard Sync.preset download from the 5 Mai Tai Tips & Tricks blog post.)
Mega-modulated drumcoded carrier.
Mega-modulated drumcoded carrier, with original carrier sound mixed in.
How It Works
Referring to fig. 1, the key to this technique is inserting the Vocoder in a Modulator Bus, not a Track. Then, send Impact’s individual outputs to the Modulator Bus. Because each output has its own fader, you can “mix” how much modulation you want each drum to contribute to the Vocoder.
Regarding the Carrier, to hear only the drumcoded sound, use a pre-fader send and turn down the carrier’s channel fader. Or, use a post-fader send, and mix in the desired amount of the original carrier with the channel fader.
Finally, for big-time, fader slammin’ fun, hook up a Faderport to control the Impact XT outputs. Now you can “play” the drumcoding in real time, and add some DJ-type thinking for a cool, live-performance vibe.
Version 1.3 of The Huge Book of Studio One Tips and Tricks is now available as a free update to owners of previous versions ($19.95 to new buyers). Download this 637-page book with 230 innovative tips from your PreSonus or Sweetwater account, the same way you downloaded your previous version. For more information, check out the series of Studio One eBooks. Please note: version 1.3 does not cover the new features in version 6, although there will be a free update in the future. If you have questions about the tips, suggestions for future updates, or want news about the next version, please visit the dedicated support forum.
Ultra-Easy Mid-Side Processing with Artist
A previous Friday tip, Mid-Side Processing with Artist, was published in June 2021. Since then, I’ve found a less obvious, but simpler away to accomplish virtually identical results.
To simplify, mid audio is what’s centered in a stereo track. Sides audio is what’s panned off to the sides. This tip extracts a stereo audio track’s mid audio to one console channel, and the sides audio to a second console channel.
Once extracted, you can process each element separately. This can be as simple as changing the balance between the mid and sides, or as complex as adding signal processors (like reverb to the sides, and equalization or delay to the mid). A common technique is increasing the sides level to widen the stereo image.
Obtaining the Mid and Sides
The mid is simply both channels of a stereo track panned to center. So, the mid also includes what’s in the right and left sides, but the sides are at a lower level. This is because anything the left and right channels have in common will be a few dB louder when panned to center.
The sides first reverses one of the stereo channels before mixing them into dual mono. So, whatever the two channels have in common—namely, the mid audio—cancels out. Following the dual mono signal with a second phase reversal restores the signal to stereo, and corrects for the original phase change.
Fig. 1 shows the setup for how to extract the mid and sides audio from a stereo console channel.

How to Extract the Mid Audio
The Mid pre-fader send from the Stereo Audio track feeds the Mid console channel. Set the send level to 0.0. The Mid console channel includes a Dual Pan. Select the Dual Pan’s Mono preset. This is all that’s needed to extract the Mid audio in the Mid console channel.
How to Extract the Sides Audio
This extraction process is a little more complex. The Sides pre-fader send from the Stereo Audio track (also set to 0.0) feeds the Sides console channel. The first Mixtool inverts the right channel. For the Dual Pan plug-in that follows the Mixtool, again choose the Mono preset. (You want both Dual Pans to use the same pan law.) Because the right channel is out of phase, the Dual Pan’s mono output cancels any audio the left and right channels have in common. This produces the sides audio.
To convert the sides audio back to conventional stereo, the second Mixtool inverts the right channel’s phase. Now, the sides are extracted, in stereo, and in phase with each other.
Mixing with Mid and Sides
With this method, you’ll need to mix the mid and sides level individually:
- Set the Stereo Audio track to minimum. The sends are pre-fader, so this won’t affect the send levels.
- Edit the mid audio level with the Mid channel’s level.
- Edit the sides audio level with the Sides channel’s level.
- To process the Mid or Sides, insert plug-ins after the existing console channel plug-ins.
When the Mid and Sides balance is correct, group the two console channels. To do this, select the two tracks and type Ctrl+G. This also gives you the option to name them. Now you can set both levels by moving either fader.
Notion Mobile is here!
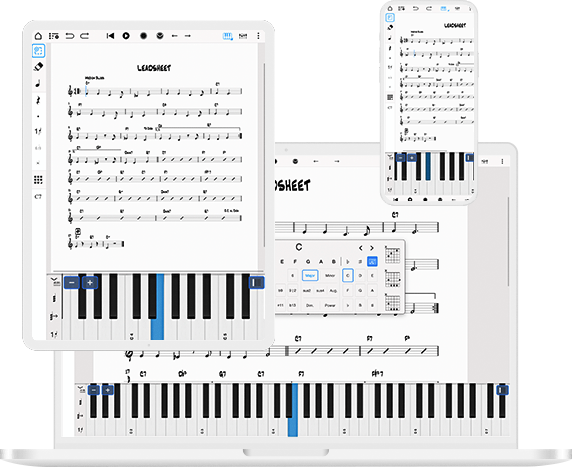
Notion Mobile is a free, industry-leading music composition tool for iOS, iPadOS®, MacOS, Android™, Windows®, Chrome OS™, and Fire OS mobile devices. You’ll effortlessly create dynamic compositions in traditional musical notation or guitar tablature with its intuitive touch-based interface and incredibly broad editing capabilities. With cross-platform compatibility, you can begin your composition on one device and finish on another!
With a user-friendly interface and simple interactive piano keyboard, fretboard, drum pad, and even optional Handwriting Recognition, Notion Mobile makes it easy to get started composing your music. You can also hear your music performed with the most realistic playback possible, using real audio samples recorded by the London Symphony Orchestra at Abbey Road Studios.
Notion Mobile is a natively cross-platform app, meaning you can write anywhere on any device without requiring a constant Internet connection. And when you’re back online, you’ll be able to sync your work across multiple devices — either through your preferred cloud provider, or through the optional wireless transfer between PreSonus applications on any device. Start your work on one device and finish it on another. Once you are happy with your creation you can share the Notion file, or export as MIDI, MusicXML, PDF or as an audio file.
Notion Mobile is free, and all add-ons are included in a PreSonus Sphere membership or available through the Feature Bundle in-app purchase.
Learn more about Notion Mobile here.
Find it on the platform of your choice below:


MIDI Guitar: the V6 Remix

The May 2021 Friday Tip described how to use Jam Origin’s MIDI Guitar 2 software with Studio One 5 running on Windows. Unlike the Mac, Windows doesn’t support virtual MIDI ports natively. So, the tip described a workaround of running Jam Origin in standalone mode, and using Tobias Erichsen’s loopMIDI virtual MIDI cable to connect it with Studio One.
Although Melodyne Essential can also translate guitar audio to polyphonic MIDI data, it doesn’t work in real time, track pitch bend, or have features like legato response. However, V6’s instrument track enhancements eliminate having to do any kind of workaround with MIDI Guitar 2, and improves the overall performance.
How to Do It
1. Add a mono audio track for your guitar, and assign its input to your guitar’s audio interface input. Set the track’s input Monitor to on.
2. Insert the Jam Origin MIDI Guitar 2 plug-in into the guitar track.
3. Create an instrument track with your instrument of choice. Mai Tai is my go-to for MIDI guitar, but any VST3 or VST2 instrument I’ve used so far works.
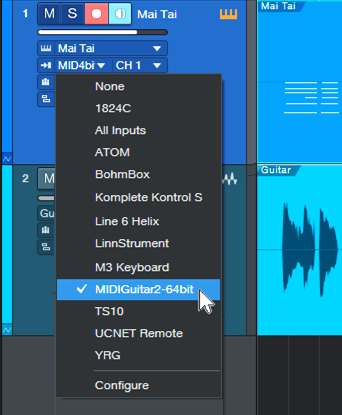
4. Assign the instrument track input to MIDIGuitar2-64bit (fig. 1).
5. Start recording. I recommend recording the guitar track and the Instrument track. Processing the recorded guitar track, like using a gate or expander, can create some interesting results when driving the instrument. Also, sometimes lowering the clip level improves the conversion to note data.
6. When it’s time to edit the Instrument track’s note data, make sure to set the Instrument’s MIDI input to None (or, delete the guitar track). Otherwise, the instrument will be triggered from both the note data and the original audio data.
And Speaking of Editing…
You always need to clean up MIDI guitar parts to some extent, but some mass operations can save time. Select all the part’s notes, then remove notes with ultra-low velocities and ultra-short note lengths (fig. 2). Note that you need to do this as two separate passes, otherwise you’ll delete only notes that have both low velocities and short lengths.
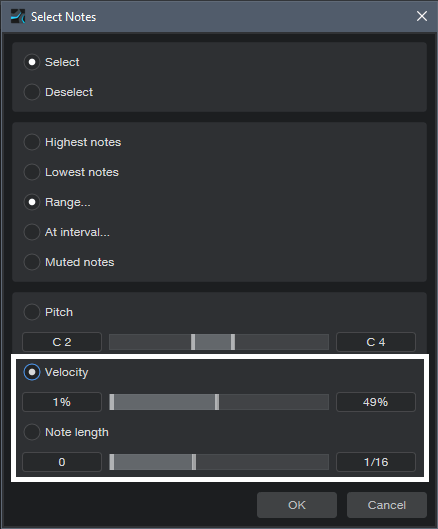
Even better, a Macro that deletes ultra-low velocity notes can save a lot of otherwise detailed editing. To create a new Macro that does this:
1. After creating the new Macro, add Musical Functions | Select Notes
2. Double-click on the command, and choose Select and Range. Then, specify Velocity from 1% to 50% (or whatever velocity works best for your playing style and guitar level).
3. Add Musical Functions | Delete Notes
Using a Macro to clean up ultra-short, unintended notes is more fraught, because MIDI Guitar 2 will pick up the transitional notes that happen when you slide from one chord to another. These can be quite short, and I usually want to keep them. So, I select all notes, choose Delete Notes, and start with very short values (like 0.00.10). That deletes some undesired notes. I’ll then repeat with a longer value, like 0.00.20. There’s usually a value that gets rid of notes you don’t want, but keeps the transitional ones.
Of course, you can be less concerned about deleting longer note lengths if you’ll end up quantizing the notes anyway, and just want to delete any notes that are shorter than desired.
Further Optimization
MIDI guitar is never perfect, but given that Jam Origin works polyphonically with guitar audio and requires no special hardware, it’s pretty amazing. MIDI guitar opens up other advantages, like using Note FX, and altering the Chord Track to create more adventurous chord progressions. For further advice about optimization, see the original tip referenced at the beginning, and also check out the documentation on the Jam Origin website.
Faster, Simpler Plug-In Parameter Control
You’re probably familiar with Studio One’s Micro Edit view, where you can expand/collapse an effect in the Insert Device Rack. However, Studio One 6 extends this ability to third-party plug-ins. You can treat the Insert Device Rack as your plug-in GUI, and tweak or write automation for parameters without having to open a plug-in’s interface. The Micro Edit view is ideal for quick tweaks, but also, for effects that interact with each other, like EQ and compression. Instead of having to bounce back and forth between two different plug-in UIs, all the necessary parameters are laid out in front of you.
Fig. 1 shows an example of using a Micro Edit view in the master bus. The processors are Waves’ UM226 stereo-to-5.1 surround upmix plug-in, followed the IK Multimedia’s Stealth Limiter as a post-master fader effect. Although the UM226 is designed to synthesize surround, I also use it as a “secret weapon” to give more of an immersive feel, and sense of space, to stereo mixes. Its UI is relatively large, so this lets me tweak it while doing a mix with other plug-ins open. Micro Edit view lets you choose the parameters you want to include from third-party plug-ins. The ones shown are the ones I edit most often.
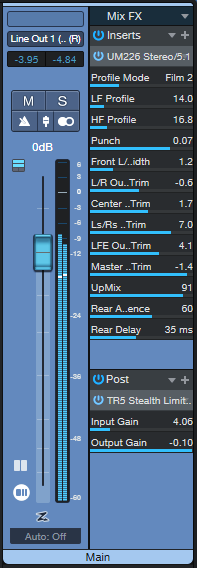
You can choose as many or as few parameters as you want, and all of them are automatable. However, also note that the standard automation options don’t have to overlap with these parameters. For example, I use standard automation for switched functions that might only be needed to change once or twice during a song. There’s no need to have them take up space in the Micro Edit view.
Serious Micro Edit Automation
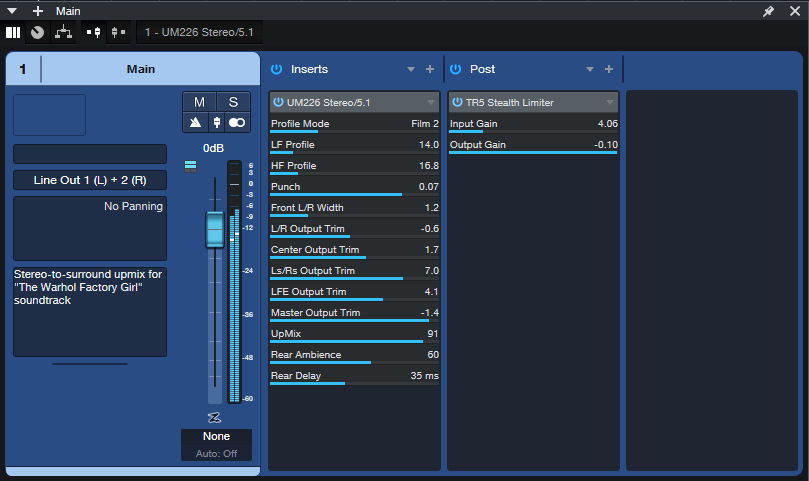
Opening the view in the Insert Device Rack limits the fader length. That’s okay for tweaking parameters, but for automation, it’s better to have a longer fader. Version 6’s Channel Overview takes care of that (fig. 2).
Assigning Parameters
With PreSonus plug-ins, Micro Edit View parameters are pre-assigned to the most-used functions. With third-party effects, you select the Micro Edit view parameters, similarly to how you choose automation parameters.
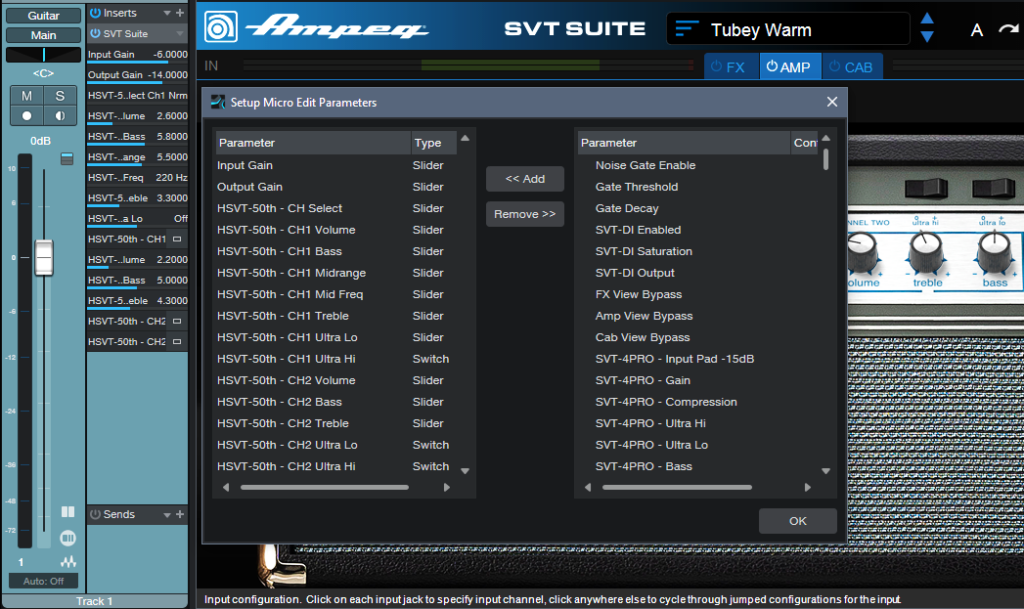
Right-click on the effect name in the Insert Device rack, and choose Setup Micro Edit Parameters. Click on the parameters you want to add in the right pane, and choose Add. Now the parameters will be in the left pane, and visible as Micro Edit view parameters.
Fig. 3 shows how this can save a huge amount of screen real estate when mixing. The Ampeg SVT suite bass plug-in’s UI takes up a lot of space. So, I assigned all the parameters for the amp being used to Micro View parameters. Now tweaking the parameters simply requires expanding the Micro Edit view, and collapsing it again when done (expanding and collapsing are both one-click operations).
This is the kind of feature that may not seem like much of a big deal—until you start using it. Micro Edit view makes for a less cluttered, more compact, and visually streamlined mixing experience.
Heads-up: Version 1.3 of The Huge Book of Studio One Tips and Tricks is now available! This 637-page book with 230 innovative tips is a free update to owners of previous versions ($19.95 to new buyers). Download the update from your PreSonus or Sweetwater account the same way you downloaded your previous version. For more information, check out the series of Studio One eBooks. Please note: version 1.3 does not cover the new features in version 6, although there will be a free update in the future. If you have questions about the tips, suggestions for future updates, or want news about the next version, please visit the dedicated support forum.
Plug-In Matrimony: Pro EQ3 Weds Dynamics
Studio One’s Pro EQ3 represents a major evolution to the Pro EQ. It now incorporates dynamic EQ, effectively but unobtrusively—if you want, you can treat EQ3 just like you did EQ2. Another addition is solo buttons for individual bands. This is useful with standard EQ, but is particularly useful with dynamic EQ.
Dynamic EQ Basics
Dynamic EQ boosts or cuts over a specific frequency range, like standard EQ. However, the boosting or cutting doesn’t occur until the audio in that frequency range crosses over a threshold. The higher the audio level is compared to the threshold, the greater the amount of boost or cut.
De-essing is a basic example of dynamic EQ. High-frequency “ess” sounds aren’t processed unless they exceed a threshold. When they do, the dynamic EQ cuts the response in that range. The stronger the ess sound, the greater the attenuation. Another example is attenuating excessively loud cymbals if they exceed a threshold.
Superficially, dynamic EQ may seem like multiband dynamics. Both combine dynamics processing and equalization. However, multiband dynamics processors use crossover filters to split the incoming audio into multiple, fairly broad bands. The EQ3 processes frequencies with the precision of its usual peaking and shelf EQ stages, using as many or as few stages as needed.
A more technical difference is that crossover filtering is fairly drastic. This introduces phase shifts, unless a multiband dynamics processor uses linear-phase filters. Dynamic EQ is less likely to require super-drastic settings, which minimizes potential phase shifts.
Let’s Get Dynamic!
To use Studio One’s Pro EQ3 for dynamic EQ processing:
- Click the Dynamics button toward the EQ3’s top. This reveals Threshold and Range controls for the parametric/shelving stages.
- Check that the Curves button is enabled, so you can see the curves that the dynamic EQ stages generate.
- Click a stage’s D button to enable its dynamic equalization response.
The display unambiguously shows how dynamic EQ processes the sound. The white curve is the usual curve that shows a stage’s amount of boost or cut. Varying the Range parameter adds a second curve. It uses the same color as its associated EQ stage. This curve represents the maximum amount of gain change that can occur once a signal exceeds the threshold.
Let’s look at a practical example. A 500 Hz sine wave from the Tone Generator feeds the Pro EQ3 MF peaking stage, which is set to 500 Hz.
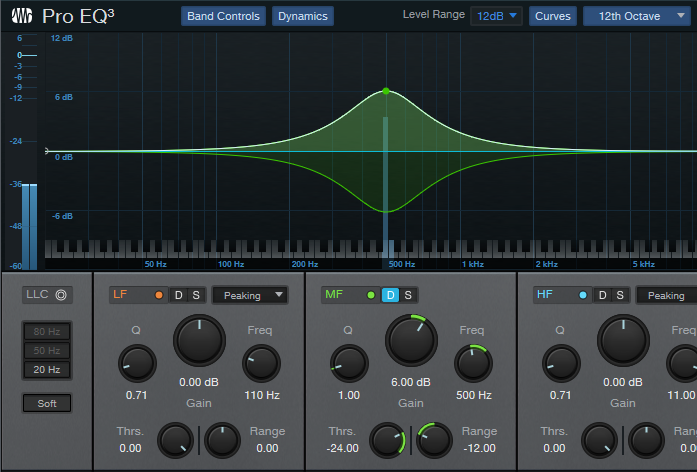
In fig. 1, according to the meter on the right, the input signal is at -36 dB. This is below the dynamic EQ stage’s threshold (which is -24 dB), so the EQ is not affected. The white curve shows that the EQ is applying 6 dB of gain at 500 Hz, just like a standard EQ stage.
The green curve graphically shows the available range of dynamic processing, as specified by the Range control. Range is set to -12 dB, and the curves confirm this—the range from the current +6 dB of gain to the maximum ‑6 dB cut is -12 dB.
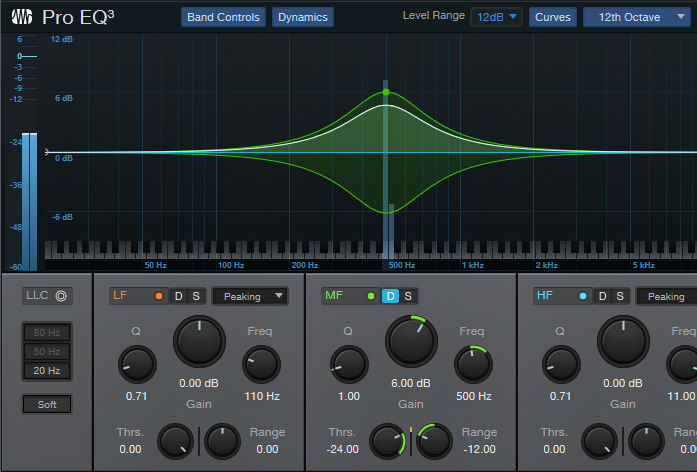
In fig. 2, the input signal is now above the -24 dB Threshold. Because the Range value is negative, audio above the threshold reduces the EQ’s gain. The white line has now moved downward to show that the EQ’s gain is no longer 6 dB, but has been pushed down because the input signal is above the threshold.
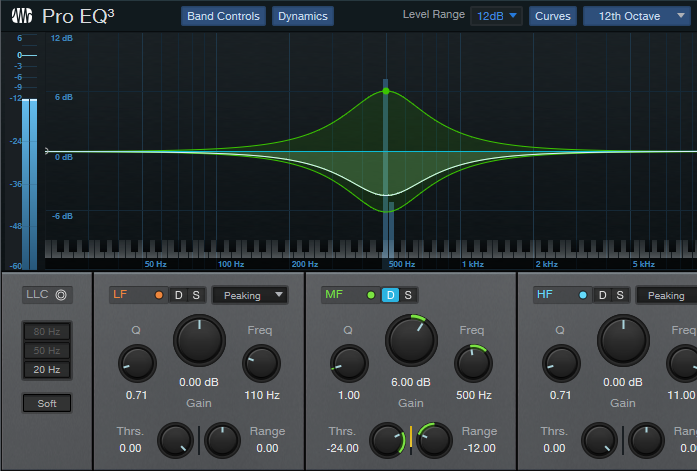
In fig. 3, the input is just under -12 dB. This is almost at the maximum available negative range. The white curve shows that the EQ stage has gone from a boost to a substantial cut. Also, note the yellow bar meter to the left of the Range knob. This displays the reduction amount.
That’s really all there is to understanding dynamic EQ—in future tips, we’ll get into practical applications.
Heads-up: Version 1.3 of The Huge Book of Studio One Tips and Tricks is now available! This 637-page book with 230 innovative tips is a free update to owners of previous versions ($19.95 to new buyers). Download the update from your PreSonus or Sweetwater account the same way you downloaded your previous version. For more information, check out the series of Studio One eBooks. Please note: version 1.3 does not cover the new features in version 6, although there will be a free update in the future. If you have questions about the tips, suggestions for future updates, or want news about the next version, please visit the dedicated support forum.
Related: Here’s Gregor taking a closer look at ProEQ3 in action, as well as the other new plug-ins in Studio One 6!
Studio One 6 has Arrived!
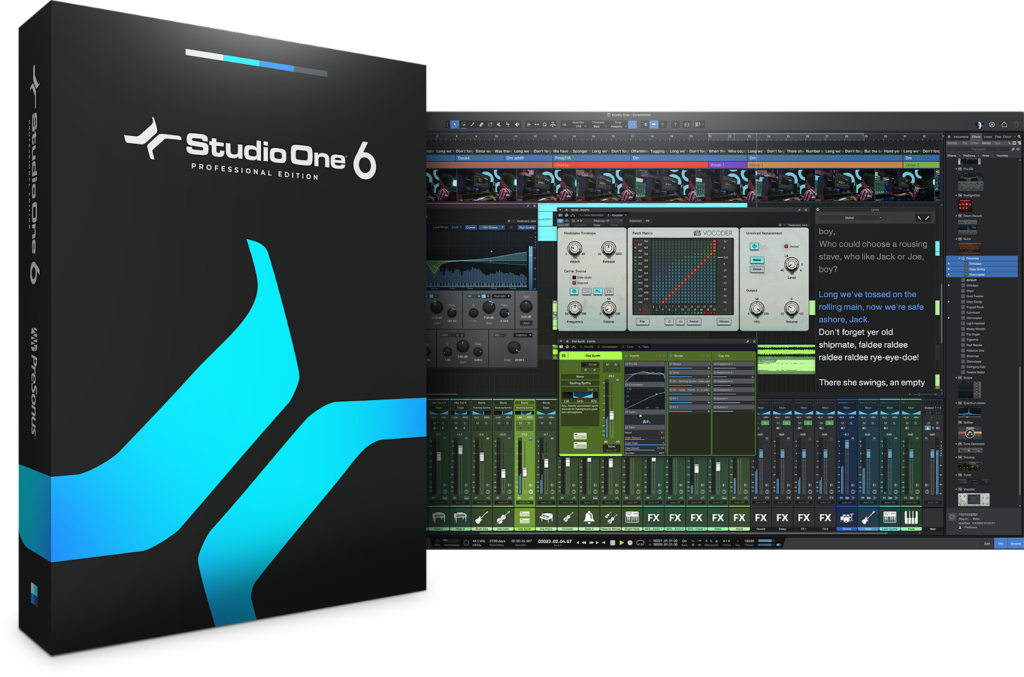
Here’s a quick FAQ of all you need to know about Studio One 6:
What’s new in Studio One 6?
A lot. Studio One 6 is our most personal update ever, fulfilling seven of the top eight feature requests over at Answers.PreSonus.com.
Click here to view the What’s New in Studio One 6 page for all the details. [LINK TO WHAT’s NEW PAGE]
If you don’t want to read that whole page now, here’s a short list of what’s new:
Smart Templates; a customizable UI; a Lyric Track and Lyrics Lanes; A Global Video Track with basic video editing; Track Presets; Online Collaboration tools; Vocoder; De-Esser; a dynamic function for ProEQ3; MPE support for Mai Tai, Sample One XT, and Presence XT; sidechaining in virtual instruments; control Sends from faders (Fader Flip); new stereo panning modes; Channel overview… and more.
Click here to see the full changelog. (Forum link)
[WHAT’s NEW VIDEO EMBED]
If I am a PreSonus Sphere member, do I have to pay extra for Studio One 6?
No, you already paid for it. If you’re a PreSonus Sphere member it’s already in your account. Click here to go get Studio One 6.
Do I have to start using Studio One 6 right away if I’m in the middle of a project?
No! You also still have access to Studio One 5, so if you’re in the middle of a high-priority project, you’re welcome to upgrade whenever it’s most convenient.
But I just bought Studio One 5!
That’s OK. If you bought Studio One 5 on or after Aug. 1, 2022, just log into your MyPreSonus account to redeem your complimentary upgrade. Important: You must redeem this offer before January 1, 2023.
Where do I get it and how much does it cost?
Studio One 6 Professional is available as part of a PreSonus Sphere Membership along with just about every piece of software PreSonus makes and tons of exclusive content and features.
Both Studio One 6 Professional and Artist editions are also available as standalone purchases, or as an upgrade from a previous version.
Studio One 6 Artist is also available for free with select PreSonus hardware.
Prices vary slightly by region, but you can check out our shop to see the pricing in your area:
- A monthly PreSonus Sphere membership
- An annual PreSonus Sphere membership
- Studio One 6 Professional
- Studio One 6 Artist
- Upgrade from Studio One x.x Artist to Studio One 6 Professional
- Upgrade from Studio One x.x Producer/Professional to Studio One 6 Professional
- Upgrade from Studio One x.x Artist to Studio One 6 Artist
I want to try before I buy.
That’s not a question, but we understand. The 30-day demo of Studio One 6 will be available soon! In the meantime, we invite you to try a month of PreSonus Sphere for $14.95 and test drive the ultimate platform for music creation and just about every piece of software we make. There’s no commitment, cancel anytime.
Five One-Stage EQ Fixes
These simple EQ settings can fix a variety of issues. Just remember that often, a little goes a long way. When boosting or cutting with EQ, try the “rule of half”—boost or cut by what you think is the correct amount, then cut it in half and live with the sound for a while before deciding you need more.
1. Magic Fairy Dust
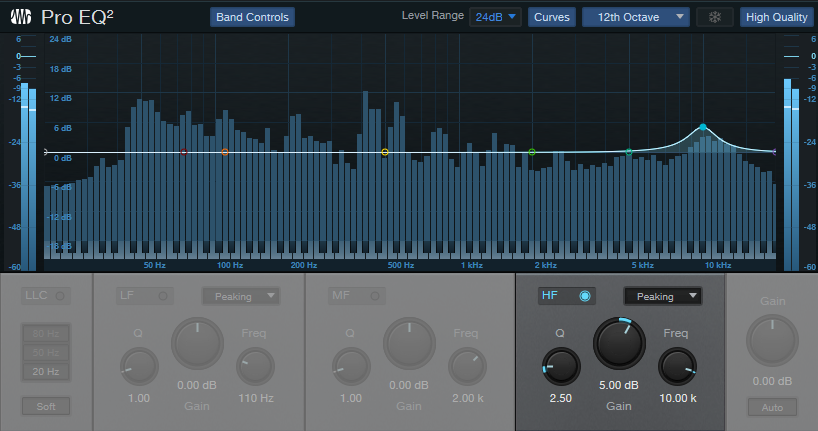
This trick dates back to the days of tape, when multitrack projects would start to lose high frequencies due to constant playback and self-erasure. Adding some high-frequency spice on the stereo mixes or masters helped compensate for any dullness. Although we don’t need to add as much compensation with DAWs, a somewhat narrow, moderate boost at 10 kHz (fig. 1) adds sparkle and brightness that gives a sheen to cymbals, percussion, and even vocals.
2. Clean Out Mud from Your Reverb
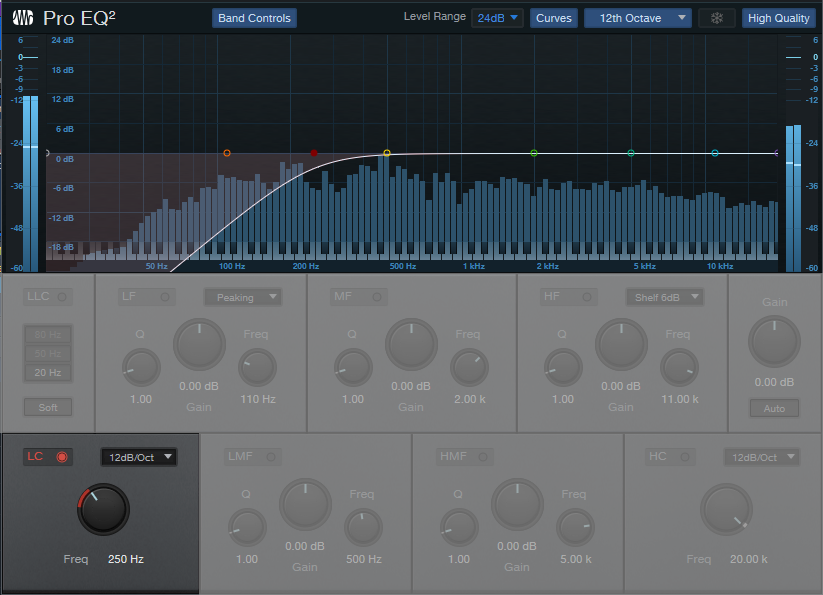
This is especially useful for drum reverb. Reverberated kick can produce a muddy, indistinct sound that interferes with clarity in the bass range. Rolling off some low frequencies (fig. 2) prior to going into reverb eliminates the mud, and tightens the reverb. Note that you don’t need to use the linear-phase EQ for this application, because it doesn’t matter if there are some phase shifts about the cutoff frequency—it’s just going through reverb anyway. Also, if your CPU is straining, you don’t need to use the Pro EQ2’s High Quality mode.
3. Make Vocals More Intelligible
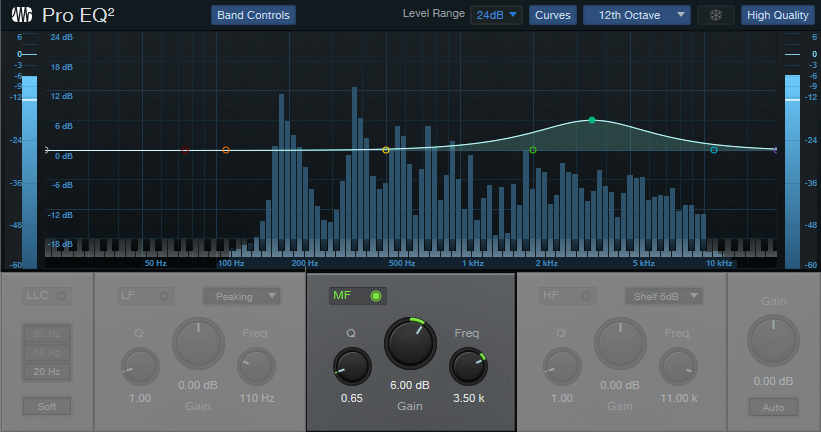
This tip applies not just to singing, but to narration, voiceovers, and podcasts. A fairly broad boost in the 3 to 5 kHz range (fig. 3) increases intelligibility and adds brightness that helps lift a vocal in the mix. The optimum frequency depends on the voice and mic, but don’t overdo the boost. The human ear is most sensitive in this region, so too much boosting leads to listener fatigue—and you don’t want listeners to get tired of your vocals.
4. Tighten Your Master

For a brighter, tighter pop sound when mastering, a slight dip in the 250-300 Hz region (fig. 4) reduces any potential muddiness. This can occur because many instruments have energy in this region, which unbalances the sound. Again, though, you be sparing. This region also contributes “warmth” to the sound, and you don’t want to reduce that too much.
5. Selectively Push Frequencies into Processing
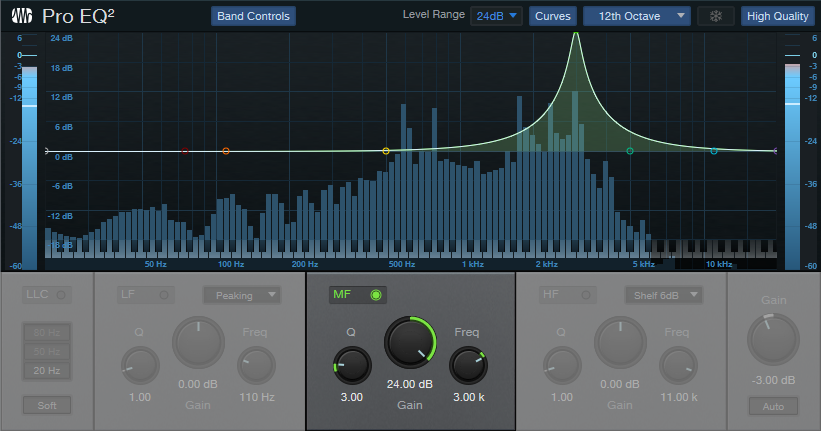
This tip is most relevant with dynamics processing and amp sims. The sound of dynamics processors depends on whether audio goes above a threshold or not, while amp sims depend on a signal level being high enough to go into distortion.
Fig. 5 shows settings that precede an amp sim set for lead sounds. With these settings, the guitar’s high notes go into distortion more readily than low notes. The lead notes sustain longer, and you don’t have to hit the strings as hard to get the same amount of level as the lower strings. Although this goes against the conventional wisdom of placing EQ after compression, we’re using the EQ to modify the subsequent effect, not specifically to change the tone. Besides, conventional wisdom is overrated 😊
Heads-up: Version 1.3 of The Huge Book of Studio One Tips and Tricks is now available! This 637-page book with 230 innovative tips is a free update to owners of previous versions ($19.95 to new buyers). Download the update from your PreSonus or Sweetwater account the same way you downloaded your previous version. For more information, check out the series of Studio One eBooks. Also, there’s a dedicated support forum if you have questions about the tips, or suggestions for future revisions.
Two Crucial Tips for Quantizing Rhythm Guitar
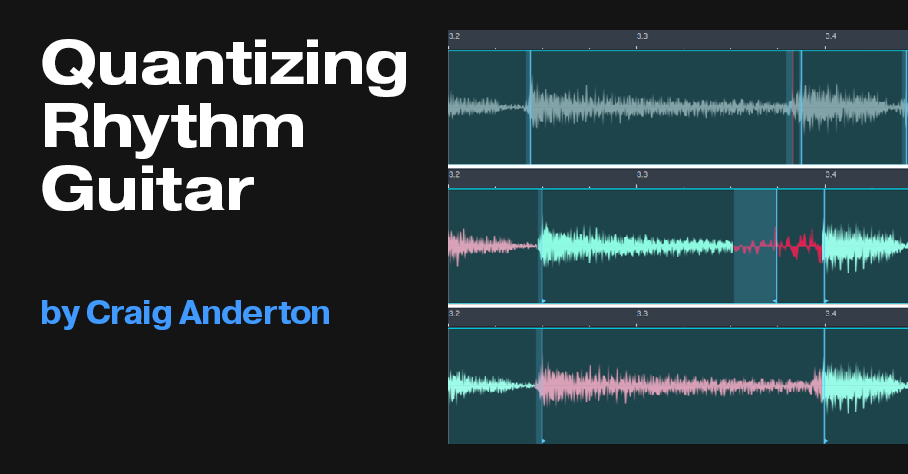
Quantizing audio works best with short, percussive sounds—like drums. Rhythm guitar is more of a challenge, because the attacks aren’t always defined well, and volume fluctuations can add spurious transients as a chord decays. I know quite a few guitarists who set up their quantize parameters, hit “Apply,” and then wonder why the guitar part sounds worse, not better. So, they hit “Undo” and assume quantizing doesn’t work well for guitar. But it can, if you know the two tips in this week’s blog post.
To start the quantization process, select the event, open it in the Edit view, right-click on it, and choose Detect Transients. Do not choose Quantize, because we’ll need to edit some of the transient markers prior to quantizing. Then open the Audio Bend panel. The default transient detection is Standard analysis, with a Threshold of 80% (fig. 1). These are good initial settings for guitar.

Tip #1: First, Do No Harm
With complex chords and lots of strings vibrating, Studio One may dutifully identify each attack with a transient marker. However, when listening, you might not hear any attacks in those places. Applying quantization to places that don’t need to be quantized can degrade the sound.
In fig. 2, after playing back the part, it didn’t seem the markers colored red (top view) needed to be there—only the marker between the two chord attacks correlated to an audible transient.
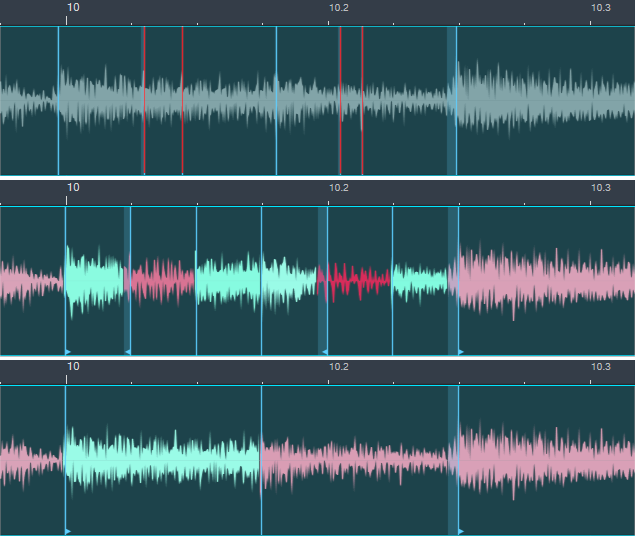
Quantizing with all the markers in place created awkwardly stretched audio (middle view). After removing the markers in red and quantizing (bottom view), the quantization occurred exactly as desired.
Bottom line: If a transient marker doesn’t correlate to a transient you can hear, you’re probably better off deleting it. Sometimes, lowering the Threshold percentage in the Audio Bend panel takes care of removing unneeded markers for the entire Event.
Tip #2: Simplify Double Attacks
This is a big problem with rhythm guitar, because it’s physically impossible to hit all 6 strings at the same time. In fig. 3’s top view, note the doubled attack just before 3.4 (one of the attacks is colored red for clarity).
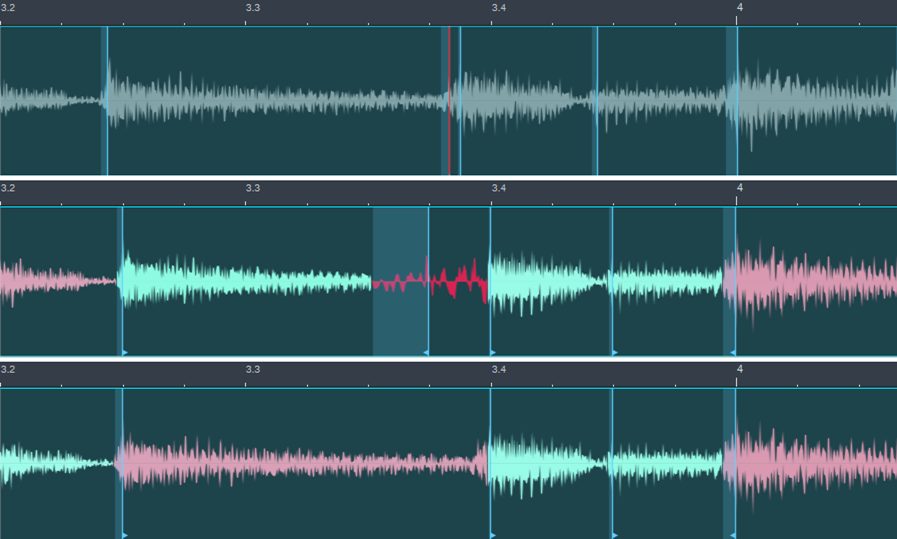
The middle view applies quantization. Studio One has dutifully shifted the two transients to 16th notes, as instructed by the quantization parameters. But this overstretches the audio between the two transients, and doesn’t sound good.
The bottom view shows the audio after removing the transient shown in red in the top view, and then applying quantization. Studio One has shifted the remaining attack transient to the nearest 16th note, which is what we want.
Here’s another tip that relates to fig. 3. Note how the quantized transients at 3.4 and 4 seem a little late, like they missed the first part of the attack. However, I’ve found that if Studio One doesn’t have to deal with double attacks, it makes good judgment calls about where to define the chord’s attack. I’ve tried placing the transient closer to where the attack starts and quantizing, but most of the time, the chord then sounds a little late. Trust the force.
In any case, a little manual tweaking prior to quantization can make the difference between a natural-sounding part that doesn’t seem quantized, and quantized audio with unwanted glitches. I never quantize a rhythm guitar part without looking over the transients first, and making sure they don’t exhibit any of the issues described here.

