Instant Inspiration!
The MIDI-oriented Songwriter’s Assistant tip makes it easy to play around with chord progressions. This new tip is about experimenting with, and recording, audio chord progressions in real time—keep the sections you like, discard the rest, and build your song from there. It’s a simple, eight-step process.
1. Start with an empty Song. Enable the Chord Track, then use the Paint tool to create a Chord Track that runs the length of how long you expect to be trying out different chord progressions. The chord itself doesn’t matter.
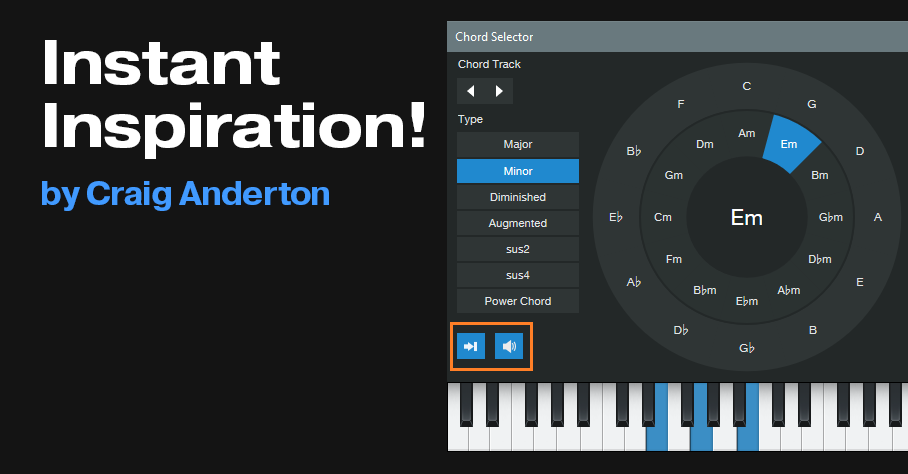
2. Double-click on the Chord Track, then enable the Chord Selector’s Instrument Input and Speaker buttons (fig. 1).
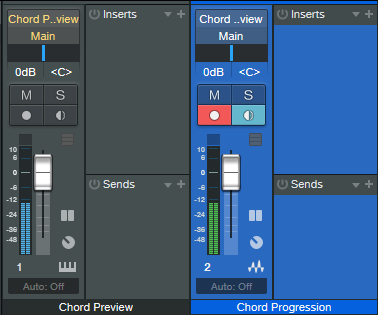
3. Create a stereo audio track. Assign its input to Instruments > Chord Preview, and record-enable it. We’ll call the track Chord Progression (fig. 2).
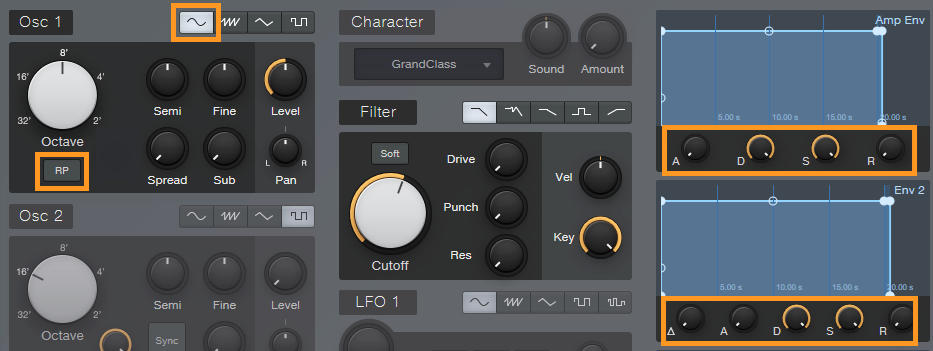
4. Click on the Instrument Editor button in the Chord Preview mixer channel to open Mai Tai. This is the sound used for the Chord Track preview. For this tip to work correctly, it’s crucial to make the edits in fig. 3 to the Chord Preview preset. (After making the edits, I overwrote the original preset.)
5. At this point, you’ll usually enter a rough tempo (you can always tweak the tempo later), enable the metronome, and select a 1-bar precount.
6. With the Chord Selector visible, start recording in the Chord Progression track. Click on a chord in the Chord Selector (however, the first chord must be different than the one that’s currently selected) to record its sound into the Chord Progression track. Continue selecting chords to create various chord progressions. Note: the chord will play for only a finite amount of time after you click on it, and it won’t play if you click on it again. To extend a chord’s playback, my workaround is to alternate clicking between the original chord and Power Chord (under Type).
7. Some of the progressions you try might be useful, some might not be—no problem. Keep the chord progressions that work, delete the rest, move them around on the timeline…whatever.
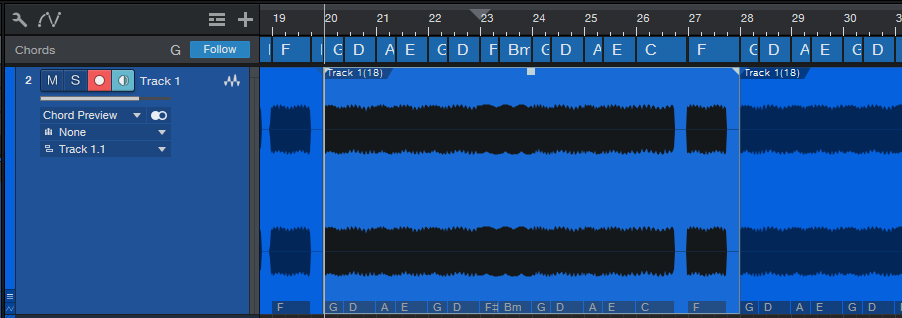
10 . At this point, you’ve probably forgotten which chords you played and when. Right-click on the recorded Event, and choose Audio > Extract to Chord Track. This automagically shows your chord progression (fig. 4). You may need to do a little cleanup, like extending a chord over where there’s silence—but your song is on its way.
If you extended a chord’s length by using the workaround described in step 6, when you extract to the Chord Track, the chord extends for the time you clicked between the chord and Power Chord. Furthermore, it retains the chord type. For example, if you click on Dm, Power Chord, Dm, Power Chord, Dm, all of those will be represented as a single Dm chord “bar” in the Chord Track when extracted. Nice.
Now you can record other parts on other tracks, and have them follow the Chord Track. And here’s an extra tip: Read over the Chord Track documentation when you get a chance, and re-visit my previous Chord Track tips—the Chord Track is an incredibly powerful feature.
Heads-up: Version 1.3 of The Huge Book of Studio One Tips and Tricks is now available! This 637-page book with 230 innovative tips is a free update to owners of previous versions ($19.95 to new buyers). Download the update from your PreSonus or Sweetwater account the same way you downloaded your previous version. For more information, check out the series of Studio One eBooks. Also, there’s a dedicated support forum if you have questions about the tips, or suggestions for future revisions.