Beyond “New York”-Style Compression

Go to the web, and you’ll see a zillion YouTube videos and web posts that all say the same thing: a technique called parallel compression (also called New York compression) uses two parallel tracks to blend compressed and dry audio. The goal is to retain a compressed sound, while using the dry signal to mix some dynamics back in.
Realistically, though, this is kind of old news. Modern compressors (like Studio One’s) often add a dry/wet mix control, which means you no longer need to set up a separate dry path. So, let’s bid a fond farewell to New York compression—and take it to the next level.
Who Says the Dry Track Has to Be “Dry”?
It doesn’t, which is helpful because there’s a problem with mixing in a dry track. Although the goal is to preserve some dynamics, much of the dry signal overlaps with the compressed audio. So while you’re mixing the peaks back in, you’re also masking the compressed signal with the dry sound. This takes away from the theoretical purpose of New York-style compression.
Of course, that’s not “wrong”—it might be the sound you want. But it’s not the sound I want, because I want to isolate the peaks more before mixing them in with the compressed sound. And I want to do it in a way that sounds more natural than a transient shaper, and doesn’t obscure the benefits of the compressed audio.
Fig. 1 shows a potential answer: Use a parallel track for compression, but instead of a parallel dry track, use a parallel track with an expander.

The audio above the Expander’s threshold is dry, while the audio below the threshold that’s expanded downward gets out of the way of the compressed track. This lets you dial in exactly how you want to handle dynamic peaks, and the amount of unprocessed drum overlap with the compressed drums. Because the dry drum channel’s pre-fader sends to the Compressor and Expander, you can still bring in some dry drum sound if you want…but after using the Expander instead, you may prefer to leave the dry drums out entirely.
Since a waveform is worth 1,000 words, here are some audio examples.
This is the original dry drum loop. Note the gorgeous attack on the snare—we don’t want to lose this.
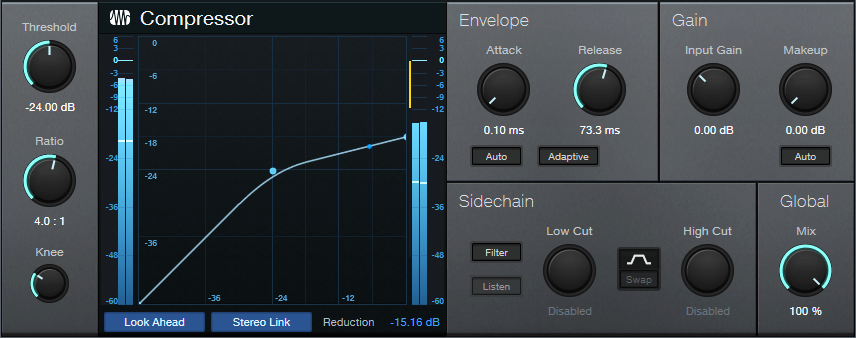
Applying compression with the settings in fig. 2 gives this sound. The heavy squashing is typical of New York compression, because mixing in dry drums offsets the compression effect somewhat.
Mixing in dry signal gives the traditional New York compression sound. The peaks are back, compared to the compressed signal.
This version uses the Beyond NYC technique. The sound is tighter, the snare is punchier, the kick and peaks hit harder, and there’s a cleaner sound because there’s no heavy overlap of dry and compressed sound at levels below the Expander’s threshold. What’s more, with traditional NYC compression normalized to the same peak value, the Beyond NYC version is about 0.6 LUFS louder—despite having a greater sense of dynamics.
How to Adjust It
1. Set up the Compressor for the sound you like. Fig. 2 shows typical compression settings to squash your drums. These are the settings used in all the audio examples (except for the dry drums).
2. Set the Expander Threshold somewhat higher than the Compressor’s Threshold. This is a starting point, because you’ll likely want to vary the Expander’s Threshold as you dial in an appropriate setting. Start with an Expansion ratio of 1:1.
3. With the ratio at 1:1, the effect is the same as traditional New York compression. Bring up the Expander channel’s level so that the peaks start complementing the compressed track.
4. Now comes the fun part. Increase the Expander Ratio. Around 1:2, the dry sound masks the compressed sound less. Meanwhile, the Expander is preserving the peaks that fall above the Threshold.
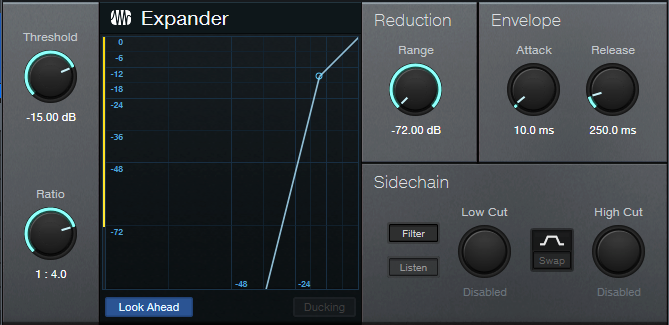
5. Adjust the Expander Threshold to choose the best balance (and separation) of the dry peaks with the downward expanded audio. Fig. 3 shows the Expander settings used for the audio example.
6. Choose your ideal balance of the Compressed and Expanded tracks.
Further Customizing
Return the Expander’s Ratio control to 1:1. The sound will seem looser, and less defined. That may be a sound you like, but increase the ratio to 1:4.0. Now you can bring up more of the compressed sound, yet still have a punchier, more percussive vibe from the expanded channel.
Readjust the mix of compressed and expanded channels until you find the right balance. Higher expansion ratios not only tighten the drums, but leave more space in the arrangement. Just remember that any time you change the Expander’s ratio, you’ll probably have to tweak the balance of the compressed and expanded channels.
Sometimes, it’s worth questioning how we’ve always done something. Replacing a dry path with an Expander resulted from simply asking “what if…”. Who knows how many other techniques are waiting for us to find them?
For more tips on how to get the most out of Studio One, check out the series of Studio One eBooks that cover tips & tricks, creative mixing, recording/mixing vocals, dynamics processors, and recording/mixing guitar. Remember, just like software, eBook owners can download the latest “point” updates for free from their PreSonus account (or Sweetwater account, if purchased from there). Owners are also eligible for new editions at a reduced price.