Magic Stereo

For me, the gold standard for sound isn’t what comes out a studio, but live music. One of the reasons is that mono sound does not exist in an acoustic environment—it’s always interacting with the acoustic environment.
Sure, we can add reverb to give a mono instrument like electric guitar a static position in a stereo field. However, that will always require some kind of time-based manipulation. For a recent song project, I wanted a background guitar part to have motion within a stereo field—but without using any kind of delay, reverb, panning, or EQ. In other words: dry, electric, mono-output guitar with a stereo image. Impossible? Let’s find out.
The Track Setup
The way this works is so simple I’m surprised I never figured it out before. Fig. 1 shows the track layout. The guitar (with added chorus, as required by the song) pans full left, and has two sends. One send provides the guitar’s audio to a bus. The other send controls the sidechain of a Compressor inserted in the bus. The bus is panned full right.
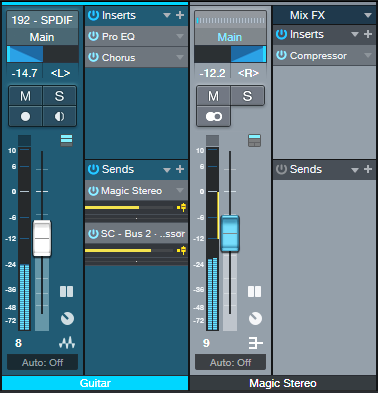
As the Compressor’s level changes, there’s a sense of motion as the dynamics and levels in the left and right channels change. Even better, these changes are tied to the instrument’s dynamics. This makes for a more natural effect.
This audio example plays the guitar by itself, panned to center, and going through the PreSonus chorus.
Now let’s hear the magic stereo effect. Although it’s most obvious on headphones, you’ll hear the effect on speakers as well.
The final audio example plays it in context with the mix. It adds a sense of animation to the guitar you can’t get in any other way. I also included this example because the drums are following the chord track. It has nothing to do with this tip, but I love the cool melodic quality it adds.
Compressor Settings
The Compressor settings are crucial. The ones shown in fig. 2 are a good place to start.
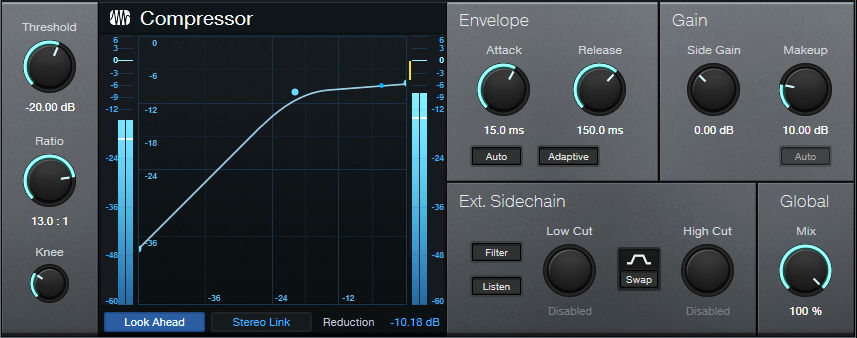
Adjust the settings by panning the source track full left. Increase the processed track’s level until both channels are at about the same level. Experiment with the Compressor’s Threshold to find the sweet spot between the compressor having no effect, or having too much of an effect. The Release can also affect this—too short or too long a release neuters the effect. You’ll likely have to readjust the processed channel’s level quite a bit as you zero in on the ideal settings.
With 15 ms Attack, both channels have their attacks hit at the same time and with the same intensity. So, the attack sound appears in the center, has the advantage of center-channel buildup, and helps anchor the part. As the audio decays and the channels are more dissimilar, the audio “wanders” more in the stereo field.
This technique is also great with background vocals. I didn’t use it in this song because there was so much motion going on overall I wanted the background vocals to be a constant. However I’ve used this technique with other songs, and it’s very effective—especially if you have multiple tracks of background vocals, and you apply individual magic stereo processing to each one.