Create Rhythmic Alchemy with the BeatCoder
By Craig Anderton
Over three years ago, I wrote a blog post on how to make a “drumcoder.” Its design was somewhat like a vocoder—drum audio served as a modulator for a carrier (e.g., a synth pad or guitar power chord). However, because the goal was not to process voice, the sound was warmer and more organic than traditional vocoding.
Unfortunately, the effect was super-complex to put together, and was practical only if you had Studio One Professional. But, no more: Dynamic EQ can take the concept to the next level. The BeatCoder is a much improved—and far simpler—version of the Drumcoder. Even better, it works with Studio One Artist and Professional. Let’s take a listen…
Fig. 1 shows one way to do BeatCoding.
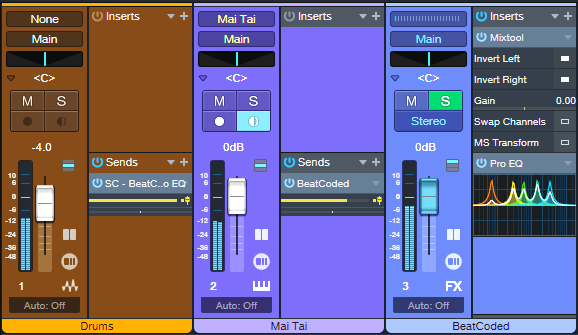
Figure 1: BeatCoder channel layout.
Let’s look at the Mai Tai “carrier” first. The Mai Tai track (or other sound of your choice) typically provides a sustained pad or similar sound. A Send goes to the BeatCoded FX Channel, which is in parallel with the Mai Tai and includes a Mixtool. The Mixtool inverts the left and right channels, so the BeatCoded track is out of phase with the Mai Tai. This causes the carrier sound to cancel.
The magic happens because of the Pro EQ3 in the BeatCoded track. The Drums track has a pre-fader send that feeds the Pro EQ3’s sidechain. By using the Pro EQ3’s Dynamic mode (fig. 2), the drum dynamics boost particular frequencies in the BeatCoded track in time with the beat. In the audio example, you’ll hear a drum loop driving the dynamic EQ as it processes a Mai Tai pad.
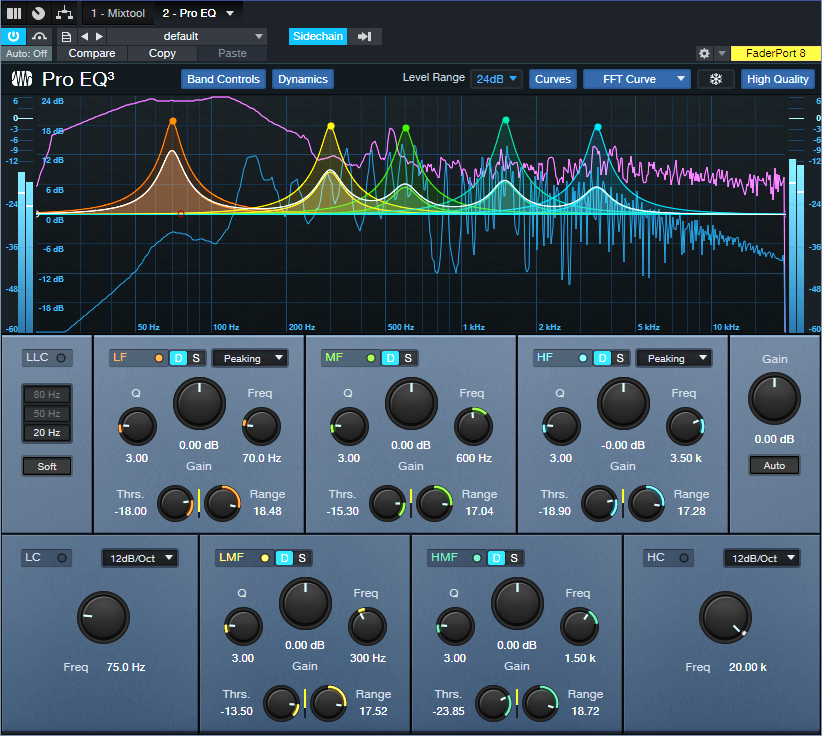
Figure 2: EQ settings used in the audio example.
Editing the Parameters
The editing possibilities are enormous:
- The EQ frequencies can cover various ranges. The Low and High Shelf EQs are in play as well as the Peaking filter type. You can even tune the EQ stages to different drums to have the synth sound respond super-tightly to the drum sounds.
- Higher Q settings are more dramatic, but can lead to overloads. Trim the synth/pad/power chord’s level if needed. You may also need to trim the Pro EQ3’s output level if the peaks distort.
- Each stage’s Range sets how much boost the EQs will receive from drum frequencies in the stage’s range. Threshold sets the level above which the drums affect the EQ.
- The Solo buttons for the various EQ stages help when getting to know this effect. They make it easy to set the Threshold and Range for a balanced response to dynamics (assuming that’s what you want).
- The pre-fader Send from the Drums track adjusts the amount of cancellation. Moving it off center lets through more of the synth sound. This is a very sensitive control, so it’s easy to miss where there’s maximum cancellation.
- Note that it’s not possible to have total cancellation, so that you hear only the effect of the EQ. EQs based on analog modeling have unavoidable phase shifts, which causes some leakage between the bands.
Other Implementations
The implementation shown above is simple and flexible, but it’s not the only one.
- You could create an FX Chain with the plugins from the BeatCoder track in fig. 1, insert the FX Chain in an Instrument track, and save the combination as an Instrument + FX preset. The Pro EQ3’s sidechain would still be accessible to an audio track with drums or a different audio source.
- The Pro EQ3 sidechain acts like a bus, because it can receive multiple inputs. So, if a drum module had individual outputs, particular drums could feed the sidechain selectively.
- The Range can also go negative, where the drums cut the response instead of boost it. This creates a more subtle effect, but can be useful in ambient and other forms of chill music.
Take the time to set this up, and play with it for a while. Warning: The results can be habit-forming.