Tag Archives: Studio One
Studio One 5’s Dynamic EQ Meets EDM
I’ve always loved having one track impart its characteristics to a different track (“cross-modulation”), particularly for EDM. A good example is using a vocoder for “drumcoding,” where drums—not a microphone—provide the vocoder’s modulation source. Previous Friday Tips along these lines include The Ultra-Tight Rhythm Section, Smoother/Gentler Sidechain Gating, Pumping Drums – With No Sidechain, and most recently, Rockin’ Rhythms with Multiband Gating.
Sending audio from one track over a sidechain to control dynamic EQ in another track is great for cross-modulation effects—and now this is easy to do in Studio One 5 because sidechaining has been added to the Multiband Dynamics processor. One of my favorite effects is using the kick drum to boost the upper midrange on a rhythm guitar part or keyboard pad so that the guitar or pad emphasizes the rhythm…and that’s just one possibility.
This isn’t about “textbook” dynamic EQ in the sense of being able to use any type of filter (e.g., highly resonant bandpass) as the EQ, but as pointed out in the Friday Tip Studio One’s Secret Equalizer, the Multiband Dynamics combines both EQ and dynamics. We’ll use that to our advantage—and in a way, a relatively broad filter response is better for this kind of application. (The typical dynamic EQ application involves fixing a problem, and for that, you often need precise filtering.)
The Setup
Insert the Multiband Dynamics in the Target track, like guitar, pad, organ, etc. Then, insert a Send (pre-fader is probably best) in the Source track (e.g., kick or snare drum). Assign the Send to the Multiband Dynamics sidechain (Fig. 1).
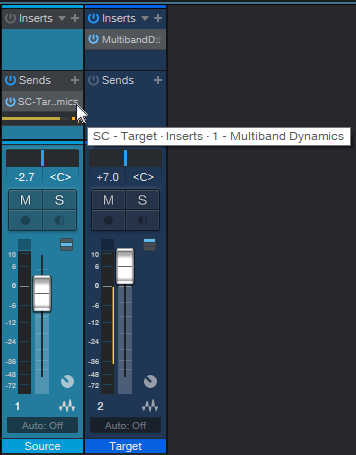
Figure 1: This technique requires a source track to trigger the Multiband Dynamics’ sidechain and a target track that’s processed by the Multiband Dynamics.
Multiband Dynamics Settings
This is where the fun begins. The sidechain feeds all Multiband Dynamics bands simultaneously, so the most basic implementation would be bypassing all the bands except for one, which you then set to either cut or boost a particular frequency range. The amount of boost or cut depends on the level that the source track sends to the sidechain.
For example, with compression, you can create pumping effects (Fig. 2).
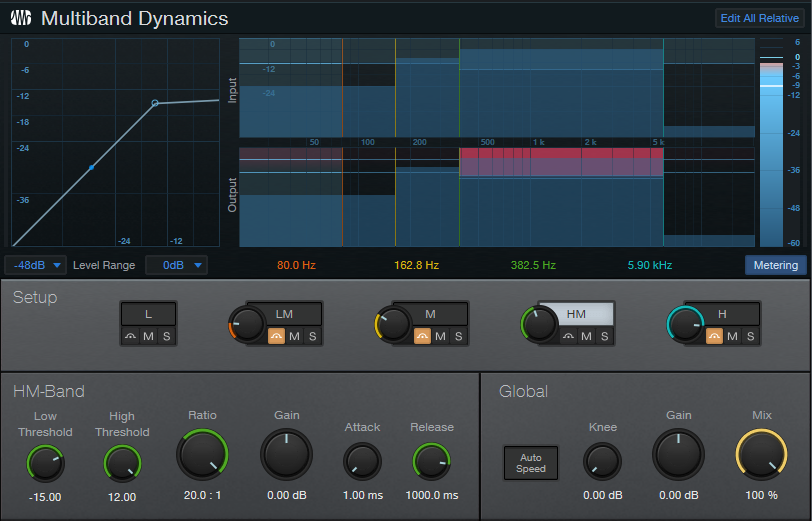
Figure 2: The Multiband Dynamics attenuates the selected frequency range whenever it receives a signal from the source track.
In this example, a kick drum is modulating a pad. Every kick drum hit attenuates the HM (High-Mid) range; the amount of attenuation fades over the 1000 ms Release time. A shorter Release parameter creates a more percussive effect. Choose the frequency range you want to modulate by adjusting the crossover frequencies. Even better, note that you can automate the Multiband Dynamics’ crossover frequencies, so the frequency range can sweep over time—this is a novel effect that adds considerable animation.
Another option is to raise the target band’s Gain so that any modulation lowers the band’s level. In other words, the default state for that band is boosted, and modulation reduces the boost.
You can also boost a band’s level in response to dynamics, by setting the Multiband Dynamics parameters for upward expansion (Fig. 3). Note how the graphic in the upper left shows an expansion curve instead of one for compression.

Figure 3: Upward expansion boosts the target audio in the selected frequency range.
The control settings here are fairly crucial. Ratio must be set for upward expansion, so the second number in the ratio control needs to be greater than one—the bigger the number, the steeper the expansion. For the maximum expansion effect, set High Threshold to 12.00. The Low Threshold parameter determines where expansion begins, and Gain increases the overall level to compensate for the lower level below the point where expansion kicks in. Adjust Attack and Release to shape the boost’s dynamics. Because upward expansion boosts the output signal level, you may need to reduce the Global gain somewhat.
But Wait—There’s More!
The best way to understand all the possibilities is to create a basic setup like the one in Fig. 1 with a kick drum as the source and a very simple, sustained pad (e.g., a chord with sawtooth waves) as the target. This will make it easy to hear the results of playing around with the Multiband Dynamics’ controls. And of course, it is a multiband processor, and the sidechain feeds all the bands, so you could have one band attenuating while another is boosting. If you get into automating parameters, the sky’s the limit.
Dynamic EQ can also be useful to process signal processing. For example, suppose there’s a main reverb inserted in a bus, to which you send drums, guitar, voice, etc. To avoid muddiness, insert a Multiband Dynamics after the reverb, use kick as the sidechain source, and attenuate the low frequencies whenever the kick hits.
Cross-modulation with dynamic EQ can be serious fun…give it a try.
The Envelope, Please
Studio One V5 adds Event Gain Envelopes for audio, which joins Event Level Envelopes and Track Automation Envelopes. So, how do you choose the right tool for the right job? Let’s use a paint brush analogy: Event Level Envelopes (ELE) are like broad brushes, Track Automation Envelopes (TAE) are medium brushes, and Event Gain Envelopes (EGE) are the fine-pointed brushes you use for detail work.
EVENT GAIN ENVELOPE BASICS
- To work with EGEs, right-click on an audio Event (EGEs don’t work with Instrument Tracks unless transformed to audio) and check the Gain Envelope box. Unchecking this show/hide function does not remove edits, it just hides the EGE.
- The envelope will be visible on that Event and any copies of the Event.
- Editing an Event’s EGE makes the same edits in any copies.
- If you don’t want a copy to be affected, bounce it to itself before adding an envelope.
- Editing an EGE is like editing a TAE: add nodes, bend curves, type in values, hover over the Event’s upper quarter and drag up or down to alter the envelope gain over a selected range, etc.
- Like TAE, if you move the Event, the EGE moves with it.
Next, let’s turn our attention to which envelope type is best suited to particular use cases.
EVENT LEVEL ENVELOPE
Some people think the EGE replaces the ELE, but I think the ELE remains the fastest way to trim an Event’s level—click and drag. This is particularly useful to change the response of subsequent level-sensitive processors, like compressors, amp sims, limiters, envelope followers, and so on. For details on this technique, check out the Friday Tip Yet Another Use for Event Envelopes. ELEs are also the quickest way to add a fade in or fade out to a group of multiple Events. For example, if you’ve split a series of vocal Events just before an inhale, it’s easy to reduce the inhale on all Events simultaneously.
EVENT GAIN ENVELOPE
I’ve often mentioned that rather than use heavy compression on vocals, I instead adjust levels manually to even out variations, before applying a light amount of compression. This is covered in the Friday tip Better Vocals with Phrase-by-Phrase Normalization. While this technique is still fast and effective with ELEs, EGEs allow for much more detailed editing.
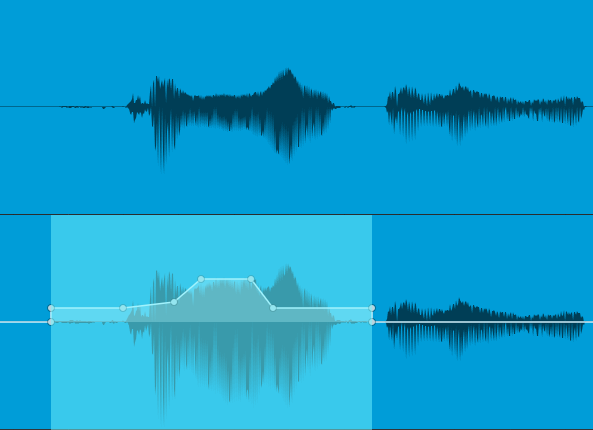
Figure 1: The EGE in the lower view has smoothed out level changes in the upper waveform.
In Fig. 1, the first waveform in the upper image would be difficult to level with an ELE. Splitting would likely cause some discontinuities, resulting in potential pops. Fixing this would then require crossfading across the split.
The EGE makes levelling much easier. Furthermore, selecting the Region containing the envelope allows using the Trim function to bring up the audio’s overall level. (And before proceeding, it’s time for a moment of levity: Microsoft Word automatically writes Alt Text to caption images based on pattern recognition. It determined that Fig. 1 was “a picture containing water, outdoor, dog, lake.”)
The EGE is also great for reducing levels of p-pops, manually editing “ess” sounds, reducing pick noise at the beginning of a guitar attack, minimizing the severity of inhales, and more. It can bring up the decay of a guitar note to provide a more consistent signal to a compression, create extremely precise fadeouts, and more. The bottom line is when you need detailed level control, EGE is the droid you’re looking for.
TRACK AUTOMATION ENVELOPE
Prior to the addition of EGE, this was the preferred way to do what the EGE can do. However, there are three main drawbacks compared to the EGE.
- The waveform graphic doesn’t change to reflect level changes, whereas with the EGE, you can see how level change affect the waveform level.
- Changes made to one Event aren’t duplicated in other Events.
- You’ve now dedicated the TAE to a specific function, so using it for traditional level automation can be more of a problem.
The latter showcases a major advantage of having multiple envelopes: the EGE and ELE can do detailed changes on specific Events, while the TAE does overall level changes for the track. For example, imagine if you had to use the EGE in Fig. 1 to create an overall level fade. It’s doable, but would take a lot more work than just using a TAE to fade out over the duration of the clip.
FINAL COMMENTS
All these envelopes can exist concurrently. However, you may need to change the editing environment. For example, suppose you’ve added an EGE to an Event, and now you want to add an ELE. You can’t do that while the Envelope Gain is showing, because Studio One assumes that any editing you want to do is to the Envelope Gain. So, uncheck the Envelope Gain box, and now you can use the ELE to change the level or fade. The waveform will reflect these changes, as well as any you added with the EGE.
Sometimes it’s a toss-up as to which approach is best. To even out level variations in vocals, if it’s mostly a question of changing the level of phrases, it’s often easiest to split at the beginning and end of the phrase and alter the level with the ELE. But if you need to go granular with changing overbearing consonants, breath noises, mouth clicks, and the like, then the EGE is the way to go.
An interview with UJAM’s Jannik Hainke and Christoph Lange

[UJAM is a prolific developer of virtual instruments located in Bremen, Germany. Jannik Hainke and Christoph Lange were kind enough to talk to us a little bit about life behind the scenes at UJAM, and what it is about Studio One that makes it such an excellent host DAW for their world-class instruments.]
PreSonus: Introduce yourselves! Who are you and where is your team located? How long has UJAM been around?
J&C: Hi there! We’re a music software company based in the beautiful city of Bremen in the north of Germany! Our company was founded in 2010 by musicians and technology nerds, and we’re proud to say that two of our co-founders include Pharrell Williams and Hans Zimmer. For many years we were a consulting company developing cool technologies for ourselves and others, but in 2016, we decided to branch out and start making our own virtual instruments and plug-ins. It’s been great—we’ve discovered that we love making instruments and plug-ins for musicians.
P: What makes UJAM products different from the WIDE array of virtual instruments available from other developers? What sets UJAM apart?
J&C: Our products sound amazing, and we pride ourselves on our quality German engineering 🙂 but I think what really sets us apart is our fanatical obsession with ease-of-use. I think from day one, our goal has always been to build instruments that are simple enough for total beginners in a bedroom studio but great-sounding enough that serious professionals will use them on their big-budget productions.
We don’t want our products to feel super tech-y or require years of production experience to use properly. That’s why we design the interfaces for maximum clarity and set up our “frustration-free” controls so you always get musically interesting results no matter how you set the knobs and other controls. Basically, you can be up and running in a few seconds with very little knowledge but there is enough depth there that you can keep using our instruments years later when you’ve become a professional! That’s what we strive for, anyway.
P: How do you choose what niche to fill in a product family? For example, Virtual Bassist or Virtual Guitarist each have up to five stylistic varieties. How do you choose what styles to pursue and develop an instrument for?
J&C: There’s no simple answer for this one. In general, we look at what our customers are saying, what is happening in the marketplace, and what kind of genres we are excited to cover ourselves. I can say that we definitely avoid chasing trends since trends come and go quickly and end up sounding dated. Instead, we do our best to find styles and genres that musicians will continue to find useful and interesting for many years.
Once we decide on a certain genre or style, we hire session musicians to record the sounds and patterns we need for a virtual instrument. If we’re developing a plug-in effect, we research and create the effects and effect chains in-house. Thanks to our glorious Gorilla Engine software development kit, we’re able to create products very quickly!
P: The new Finisher series seems to be a different and exciting direction for UJAM. What (or who) inspired it?
J&C: Finisher is actually a spin-off feature from our highly successful Virtual Guitarist CARBON. For CARBON, we realized we needed something special to get those beautifully distorted sounds happening quickly so we invented Finisher. As soon as CARBON was released, customers started asking us to give them just the Finisher part as its own separate plug-in! We released Finisher MICRO as a small, free product in December 2019 and it was a huge success, so we followed in 2020 with Finisher NEO (an expanded version of MICRO) and VOODOO.
For those that aren’t familiar, our Finisher products are really cool—this plug-in is like having the mother of all pedalboards to process your sounds. Each Finisher product (currently Micro, NEO and VOODOO) has its own sonic signature and has up to 50 separate effects inside itself. Those effects are connected and routed to each other in dozens of different ways that you can load instantly. The cool thing is that our sound design team puts in countless hours to find those cool combinations, and countless more hours to figure out how to control all the available parameters with a super-simple interface. This lets you get totally awesome effects on your guitars, synths, drums and other sounds without spending an eternity setting up and dialing in 50 separate effects one by one. We do this crazy, difficult stuff so musicians can have fun. As someone here once said “It’s supposed to feel like flow, not work!”
P: Is there anything in particular about Studio One that you feel makes it a strong host for UJAM instruments?
J&C: Well let me start by saying that we have quite a few fans of Studio One here, so that certainly doesn’t hurt!
The recent addition of Chord Track and Key Switch Editing in Studio One 5 has made it a fantastic choice for our Virtual Bassist plug-ins! We’re delighted to be the first company to support these features right from the start. With the Key Switch integration, our Virtual Bassists (ROYAL 2, ROWDY 2, MELLOW 2 and the new DANDY) report their key switches display articulations with their names automatically. Chord Track detects and displays the chords that have been played, so newly recorded passages will follow the established chord progression. Our bassists automatically change the MIDI notes for you when Chord Track enabled, so things stay not only in time but also in tune. It’s really nicely integrated!
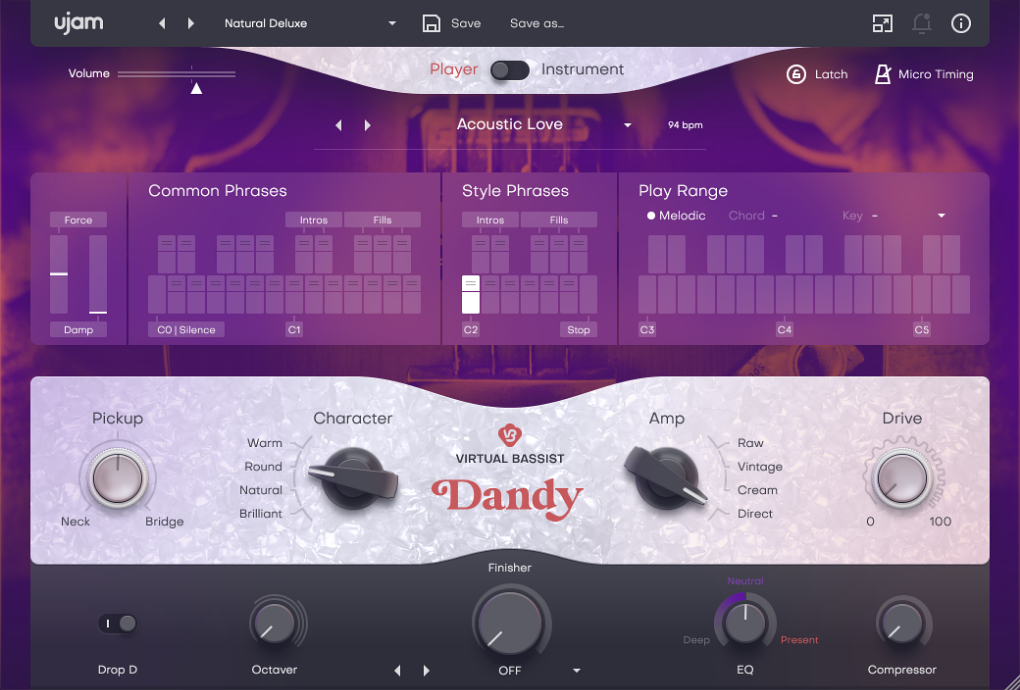
DANDY is UJAM’s latest product, and available at a discounted intro price of $89 USD!
P: In software development, it’s common to see customers using products in fascinating ways that were not intended during development. What are some of the uses you’ve seen of UJAM products that have surprised you?
J&C: You’re right—sometimes we’re surprised and delighted when we see our products being used in new or unexpected ways. Getting this feedback is incredibly valuable for us. It helps us learn what works well for customers and what doesn’t, and helps us figure out what to do with our product updates.
Once in a while we get feedback that really gets us right in the heart. Here’s a message from a customer in New Zealand. The whole ujam team loved this so much, we put it on our office wall:
“I’m a lifelong guitar player until the last few years as rheumatism has worked its devilish ways into my hands. My productivity with recording the songs I write fell off the proverbial cliff. Then, along comes Virtual Guitarist, I can “play” in ways I never could have in my best years as a player. Styles & genre’s I’d never attempted. Needless to say because of your products – I have all three: IRON, AMBER, and SPARKLE—my creativity scaled that cliff & put up a guardrail around the edge. Thank YOU for doing these VI’s. Please, keep them coming!”
- Find out more about UJAM at www.ujam.com
- Shop UJAM at shop.presonus.com
90 Day Grace Period Information
The response to Studio One 5 and the launch of PreSonus Sphere has been OVERWHELMING, to say the very least… We are blown away and extremely grateful for our customers’ enthusiasm! We are working non-stop to respond to specific issues any customers may run into. We wanted to take a minute and answer a few questions about the grace period we’re offering to our customers.

Join PreSonus Sphere here.
PreSonus is providing a super-sized 90 day grace period for Studio One version 5. This means if you registered a copy of Studio One 4 on or after April 1, 2020, you are within the grace period. Here are all the specifics:
- If you registered Studio One 4 Professional within the grace period, you will receive either Studio One 5 Professional or enjoy a full year as a member of PreSonus Sphere. Just choose which option you prefer in your MyPreSonus account.
- If you registered Studio One 4 Artist within the grace period, you will have a choice between a complimentary upgrade to Studio One 5 Artist or a 4-month membership in PreSonus Sphere. Just choose which option works best for you.
- If you registered a piece of PreSonus hardware that came with Studio One 4 Artist included within the grace period, you will receive 4 months membership in PreSonus Sphere for free. Studio One 5 Artist is not an option in this scenario, however, your Studio One 4 license is still yours and you can purchase an upgrade if you prefer. Please note: you must be the original owner of the registered PreSonus hardware to qualify.
Note: If you registered a copy of Studio One 4 Artist that was bundled with a third-party product during the grace period, we are sorry but you are not eligible for an upgrade.
During this grace period, if you have multiple copies of Studio One Professional or Studio One Artist in your account, all copies are stamped as upgraded automatically. However, only you only get one copy of Studio One 5 or PreSonus Sphere per account, not per product. This is only a rule for those registrations that occurred during the grace period.
Instructions to Redeem:
- Log in to your MyPreSonus account
- Go to “Products.” This will take you to the Products page.
- Select the qualifying software that you would like to upgrade.
- You should see a green “Redeem” button. Click it to begin the process. If you don’t see the Redeem button, it may be necessary to log out of your my.presonus.com account and log back in to refresh the page.

After clicking the Redeem button above you will see a screen similar to the one pictured below. Depending on how you acquired your product or your product type you may not have both buttons:

Mastering Martha Davis—for Vinyl!
Martha Davis is best known for her string of hit singles in the 80s with the Motels.
Songs like “Suddenly Last Summer” and “Only the Lonely” were Top 10 hits that remain on playlists to this day, but her varied (and ongoing) career includes solo albums, an acting stint in “Bill & Ted’s Excellent Adventure,” creating music for several films (including “Moscow on the Hudson,” “Teachers,” “The Golden Child, and her “Soul Man” duet with Sly Stone), and working in theater. She still tours—at least when there’s not a pandemic—and amazingly, her voice is better than it was in the 80s. But, it took Studio One’ Project Page to bring a solo album back to life that had been all but written off ten years ago.
The collection of songs on “I Have My Standards” (Fig. 1) was meant to be an album of jazz standards, with orchestration—but the twist was that Martha had written the “standards.” She cut a demo album with longtime musical collaborator Marty Jourard (piano, tenor sax), Allen Hunter (bass), Paul Pulvirente (drums), and Felix Mercer (clarinet). However, the budget to do the orchestration never materialized, and the record was never finished.

Figure 1: The cover of “I Have My Standards.”
When Martha found out I did mastering, she mentioned “the album that never was” and being curious, I asked to listen to it. I was floored. The songs were deep, the vocals flawless, and the instrumentation excellent. I heard the lack of orchestration as an advantage because the sparse, emotional treatments were compelling in themselves.
Except…being a demo, there were technical problems. Among other issues, the acoustic bass overpowered the song on some of the demos, the mic had a boxy quality that was no friend to Martha’s voice, and there were mix and level issues that resulted in a lack of clarity. I asked if she could locate the multitracks so I could remix before mastering, yet no one had any idea where they were. Oh, and the project had to be mastered for vinyl—she wanted to put it out on 180-gram vinyl for her nascent record label, Remarkable Records.
ENTER STUDIO ONE
Fortunately, the songs were recorded with the same basic setup. Although I’m usually not a fan of “one size fits all” mastering chains, in this case, there weren’t too many variations among the songs (Fig. 2).
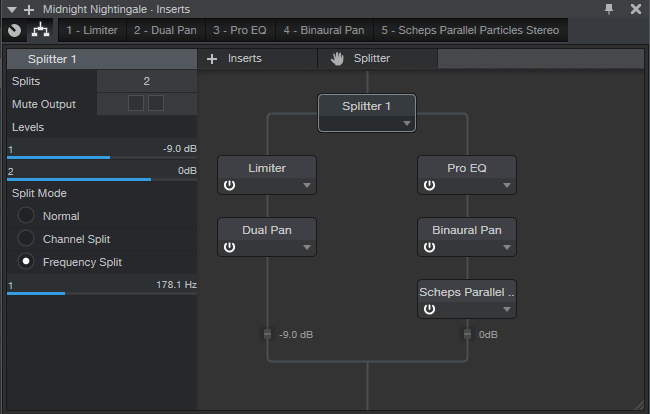
Figure 2: The Project Page mastering chain.
The Splitter separated the frequencies below 178 Hz from the rest of the audio. With vinyl, bass needs to be centered, and the dynamics need to be controlled—hence the Limiter, and the Dual Pan. with both left and right channels set to center.
Another reason for the Splitter was that in some songs, the acoustic bass overpowered the mix. Note the fader at the end of the Dual Pan, set to -9.0 dB to help keep the bass under control. This setting worked for most of the songs but for one of them, I had to pull the level down by -13.8 dB to get the right balance. The frequency splitting was crucial.
For the rest of the audio, EQ was by far the most important process. Fig. 3 shows the setting that was used on most of the songs. Remember that the RIAA curve for vinyl (which boosts treble massively on the vinyl, then cuts it on playback) isn’t a fan of high frequencies, so the highs were often cut on vinyl masters. Although the steep high-cut filter wasn’t needed on all the songs, when necessary this gave a sound that was more consistent with vinyl records.
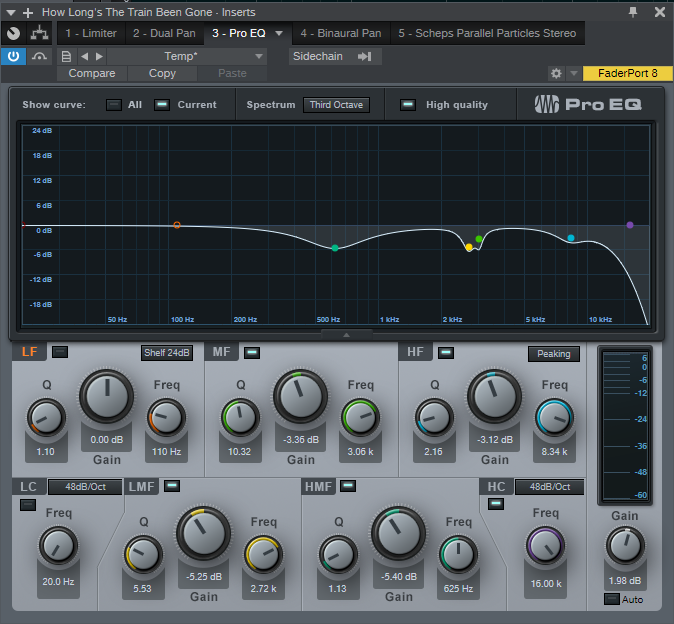
Figure 3: Initial EQ settings for the songs.
The substantial dip at 625 removed the muffled quality by making the highs more prominent. The dips at 2.72 and 3.06 kHz were tricky—they were essential in removing a resonance on Martha’s voice that took away from of the openness and intimacy. Almost all the songs needed the dip at 8 kHz, where treble energy from recording the individual tracks “bunched up.” Bass wasn’t an issue, because the split took care of that.
The Binaural pan was set between 124% and 137%, depending on the song. This mainly had the effect of spreading out the reverb more than the instruments, which enveloped the sound in an ambiance it didn’t have otherwise. This also moved the reverb a bit out of the center, so there could be more focus on the voice.
Finally, I’m not much of a believer in “special sauce” processors, but the Scheps Parallel Particles from Waves was ideal (Fig. 4).

Figure 4: The Scheps Parallel Particles plug-in added just the right amount of “air.”
After taming the highs to accommodate vinyl mastering, I wanted to restore a perception of high frequencies. Adding a significant amount of the Air parameter, with just a touch of Thick and Bite for a little more midrange presence, did exactly what was needed.
FINAL TOUCHES
I was aiming for a LUFS of -12. This was a bit of a compromise between vinyl and streaming. A little compression would make it easier for the vinyl cutter to optimize the levels for vinyl, and besides, being a little “hotter” than the typical streaming target of -14 LUFS was fine. For the last stage of dynamics control, I used IK Multimedia’s Stealth Limiter (which is designed for mastering), in the Project Page’s Post slot. It’s a transparent but CPU-intensive plug-in, hence using only one instance as the final limiter. The songs were the levels I wanted, so they needed only very slight tweaks to hit the Stealth Limiter a little harder or softer to reach the -12 LUFS goal.
It was easy to generate timings from the Project Page, so that those cutting the vinyl would know where to put the bands between cuts…and we were on our way. The vinyl hits the world in August (available from themotels.com and specialty record stores). The digital release is available now on iTunes, Apple Music, Spotify, Amazon Music, Amazon Disk on Demand, and you can hear it on Pandora, Shazam, iHeart Radio, and YouTube Music. Most of these have ways to preview the songs, and I think it’s well worth following some of the links to check out music that sounds like it’s frozen in time, yet curiously modern.
I checked out some of the customer reviews on Amazon. While they’re all over-the-top about Martha’s voice and songs, as you might expect my favorite is the one that said “The album is mastered in such a way that you would think that Martha Davis is actually in the same room with you.” Mission accomplished (Fig. 5)!

Figure 5: Martha with the author.
Rockin’ Rhythms with Multiband Gating
We’ve covered multiband processing before, but now it’s time for something different: multiband gating.
You send a drum or percussion track to three buses, each with an EQ covering a different frequency range—e.g., kick, snare, and cymbals. These provide three control signals…and here’s what we do with them.
A guitar track feeds an FX Chain with Ampire, which goes into a Splitter that splits by frequency. There’s a gate in each split, and they’re driven by the control signals. So when the kick hits, the guitar’s low frequencies come through. When snare and upper toms hit, the mids come through and when there are high-frequency sounds like percussion, they trigger the highs. You can think of the effect as similar to a mini-vocoder.
The audio example has some Brazilian rhythms triggering the gates, and you can hear the kind of animation this technique adds to the guitar part. The first four measures have the drums mixed with the processed guitar, while the second four measures are processed guitar only.
SETTING IT UP
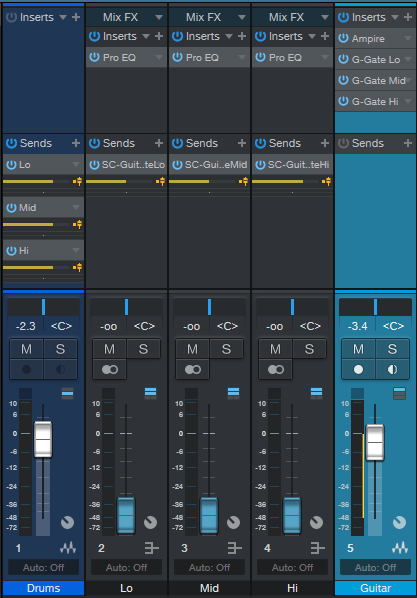
Fig. 1: The track layout for multiband gating.
The Drums track has three pre-fader sends, which go to the Lo, Mid, and Hi frequency buses. Each bus has a Pro EQ to emphasize the desired low, mid, and high frequencies. Then, each bus has a send that goes to its associated Gate sidechain in the Guitar track (Fig. 2).
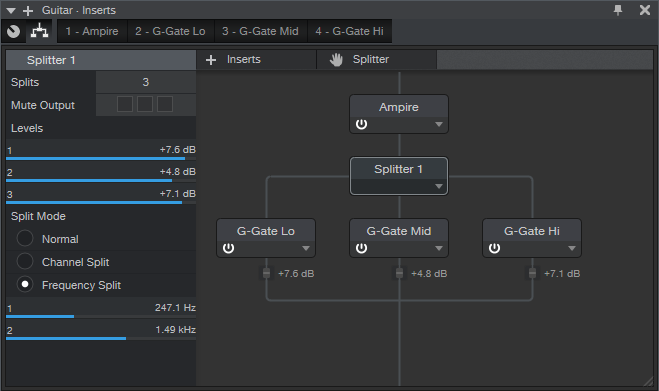
Fig. 2: Splitter and Gate setup for multiband gating.
The guitar goes to Ampire, which splits into three frequencies bands thanks ot the Splitter’s Frequency Split magical powers. Each split goes to a Gate, and the sends from the Lo, Mid, and Hi buses feed their respective gate sidechains.
Inserting a Dual Pan after the Mid and Hi gates can enhance the sound further, by spreading these frequencies a bit to the left or right to give more of a stereo spread. You’ll probably want to keep the low frequencies centered.
You don’t have to get too precise about tuning the EQs in the buses, or setting the Splitter frequencies. I set up the Splitter frequencies by playing guitar through the Splitter, and adjusting the bands so that the guitar’s various frequency ranges seemed balanced. As for the Pro EQs in the buses, I just tuned those to the drum sounds until the guitar rhythm was rockin’ along.
This takes a little effort to set up, but multiband gating can add a unique rhythmic kick to your music. Interestingly, you may also find that you don’t need as much instrumentation when one of them is blurring the line between melody and rhythm.
Add Studio One to your workflow today for 30% off!
Craig Anderton’s Big Book Round-Up
If you’ve spent a couple of spare evenings at home poking around the web for tips on music and audio production, it’s really very likely that you’ve run into some posts, articles, or comments from Craig Anderton. In fact, you may have had to update your search criteria to sort by “most recent,” because it’s fairly common for Google to show you some Craig Anderton posts from the dawn of the internet age, which—while cool—may not be particularly full of insight on Studio One version 4.
Fact is Craig is our industry’s most acclaimed writers, and he’s spoken about Studio One in-person at more events than I can count, and is of course responsible for the Friday Tips section of this very blog. In short, Craig’s contributions to the success and proliferation of Studio One can’t really be counted.
But his Studio One books? Those can be counted. There are five.
We wanted to take a minute to thank Craig for all of his hard work, broadly-reaching creative output, and continued support of PreSonus and Studio One. Let’s take a closer look at what he’s got over at shop.presonus.com. Chances are one or more of these will prove valuable to you and your process. Note that these are eBooks, not hardcover books, and will be downloaded as PDFs.
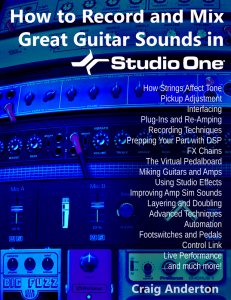
How to Record and Mix Great Guitar Sounds in Studio One
Essential reading for anyone who records guitars in Studio One, this definitive book covers invaluable production and engineering techniques.
- 274-page, beautifully-illustrated eBook is the fifth book in this acclaimed series of how to get the absolute most out of Studio One
- Covers all aspects of recording and mixing guitar, from how to choose the right strings for a particular tone, to advanced techniques that bring out the best in amp modeling plug-ins
- Applicable to all genres, from acoustic folk to heavy metal
- Links from contents page to topics—find specific subjects quickly
- Find out how to use DSP, effects, real-time control, and much more
 The Big Book of Studio One Tips and Tricks
Consolidates, updates, expands on, and categorizes 130 tips from Craig’s popular “Friday Tip of the Week” blog posts that you probably have been checking out right here. Essential reading. This massive book includes tips on how solve problems, enhance sound quality, improve workflow, achieve greater expressiveness, create signature sounds, and much more.
- 289 pages with 278 four-color illustrations to help streamline the learning process
- Includes 39 free presets (28 Multipresets, 10 Mai Tai presets, 1 Presence XT preset) that support the tips
 How to Create Compelling Mixes in Studio One
A comprehensive, practical, and above all inspiring guide on how to use Studio One’s sophisticated toolset to craft the perfect mix.
- 258-page eBook with over 180 four-color illustrations
- Downloadable PDF format, with links from the contents to book topics
- “Key Takeaways” section for each chapter summarizes chapter highlights
- “Tech Talk” sidebars do deep dives into selected topics
- Covers all aspects of mixing with Studio One
 More than Compressors: The Complete Guide to Dynamics in Studio One
The ultimate guide to becoming an expert on Studio One’s dynamics processors and dynamics-oriented features.
- 258-page eBook with over 180 four-color illustrations
- Downloadable PDF format, with links from the contents to book topics
- “Key Takeaways” section for each chapter summarizes chapter highlights
- “Tech Talk” sidebars do deep dives into selected topics
- Covers all aspects of mixing with Studio One
 How to Record and Mix Great Vocals in Studio One
The ultimate guide to capturing, producing, and mixing superb vocal performances in Studio One.
- Profusely illustrated, 121-page eBook
- Covers everything from microphones to the final mix
- Tips on creating compelling vocal performances
- Links from contents page to topics
- Filled with practical, real-world examples
SuperKick—Tune and Enhance Your Kick Drum
If you do hip-hop or EDM, you’re in the right place.
This tip turns wimpy kicks into superkicks, using a different technique compared to drum replacement (see the Friday Tip for February 9, 2018). Listen to the audio example, and you’ll hear why this is cool.
Audio Example: The second four measures add the SuperKick effect to the loop in the first four measures. The added kick is 40 Hz…so don’t expect to hear anything on laptop speakers!
The basic concept is to add another track with a low-frequency sine wave, tuned to your pitch of choice. This can be a WAV file, but this example uses the highly-underrated, and extremely useful, Tone Generator plug-in set to a floor-shaking 40 Hz sine wave. A Bus “listens” to the loop, and uses EQ to filter out everything except the kick; you don’t hear this audio, but it gates the Tone Generator’s sine wave so that it tracks the kick. Fig. 1 shows the setup.

Figure 1: Setup to tune and enhance the kick in an existing loop.
- Track 1 is your drum loop; the audio example uses the Warehouse Tech Musicloop included in Studio One. Insert a pre-fader Send that goes to a Bus (named “EQ Bus” in this example). The reason for a pre-fader send is you’ll want to turn the Track fader down when tweaking the EQ and Gate responses covered later.
- Insert the Pro EQ into the EQ Bus. Tweak the response to filter out everything but the kick. The High Cut’s 48 dB/octave slope will probably do the job, although if there’s a lot of other bass action (like floor toms or bass) you may need to add an additional Peaking stage. Zero in on the kick’s lowest audible frequency, and apply a narrow boost.
- Add a Track, and insert the Tone Generator. Turn it on, then set it to produce a constant, low-frequency sine wave. Follow the tone Generator with a Gate.
- Add a pre-fader send from the EQ Bus to the Gate’s sidechain.
- To produce the most reliable triggering, the Gate settings and the Send level going to the Gate’s sidechain are crucial. Set the Threshold Close just slightly lower than the Open setting. Release determines how long the kick will last; 5 to 10 ms of hold minimizes “chattering.” Start by setting the Open and Threshold controls as shown, and adjust the Send to the sidechain for the most reliable triggering. If the kick tone doesn’t trigger, even with the Send to the sidechain turned up, lower the Open and Threshold close controls. If the kick tone stays on all the time, lower the Send level.
With the loop fader down so you’re not distracted, play with the Tone Generator frequency, EQ frequency to isolate the kick sound, and Gate settings until there’s reliable kick triggering. How you set the gate provides various options: extend the Release for a “hum drum” effect, or for more expressiveness, automate the release time. Increasing the Hold time alters the character as well.=
And after everything is set up…stand back while the floors shake!

Buy Studio One for LESS now!
The De-Stresser FX Chain
Feeling a little bit stressed?
I’m not surprised. Or do you ever have one of those days? Of course you do! Wouldn’t it be great to go down to the beach, listen to the waves for a while, and chill to those soothing sounds? The only problem for me is that going to the beach would involve a 7-hour drive.
Hence the De-Stresser FX Chain, which doesn’t sound exactly like the ocean—but emulates its desirable sonic effects. If you’re already stressed out, then you probably don’t want to take the time to assemble this chain, so feel free to go to the download link. Load the FX Chain into a channel, but note that you must enable input monitoring, because the sound source is the plug-in Tone Generator’s white noise option.
About the FX Chain

Figure 1: Effects used to create the De-Stresser’s virtual ocean.
Fig. 1 shows the FX Chain’s “block diagram.” The Splitter adds variety to the overall sound by feeding dual asynchronous “waves,” as generated by the X-Trems (set for tremolo mode). The X-Trem LFO’s lowest rate is 0.10 Hz; this should be slow enough, but for even slower waves, you can sync to tempo with a long note value, and set a really slow tempo.
Waves also have a little filtering as they break on the beach, which the Autofilters provide. The Pro EQs tailor the low- and high-frequency content to alter the waves’ apparent size and distance.
And of course, there’s the ever-popular Binaural Pan at the end. This helps create a more realistic stereo image when listening on headphones.
Macro Controls
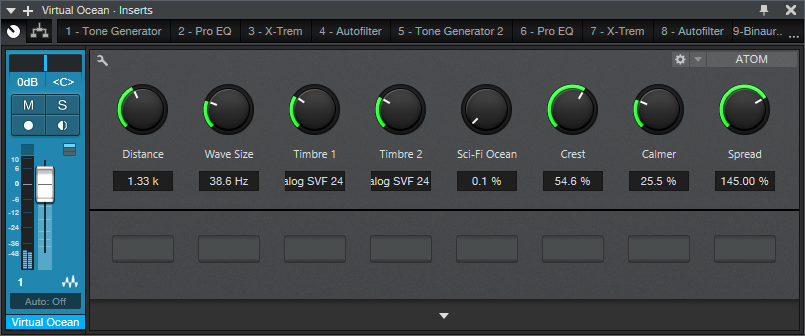
Figure 2: The Macro Controls panel.
Regarding the Macro Controls panel (Fig. 2), the two Timbre controls alter the filter type for the two Autofilters. This provides additional variety, so choose whichever filter type combination you prefer. Crest alters the X-Trem depth, so higher values increase the difference between the waves’ peaks and troughs.
The Sci-Fi Ocean control adds resonance to the filtering. This isn’t designed to enhance the realism, but it’s kinda fun. Another subtle sci-fi sound involves setting the two Timbre controls to the Comb response.
As you move further away from real waves, the sound has fewer high frequencies. So, Distance controls the Pro EQ HC (High Cut) filters. Similarly, Wave Size controls the LC filter, because bigger waves have more of a low-frequency component. The Calmer control varies the Autofilter mix; turning it up gives smaller, shallower waves.
When you want to relax, this makes a soothing background. Put on good headphones, and you can lose yourself in the sound. It also makes a relaxing environmental sound when played over speakers at a low level. If your computer has Bluetooth, and you have Bluetooth speakers, try playing this in the background at the end of a long day.
Son of the Beach
This is just one example of the kind of environmental sounds and effects you can make with Studio One, so let me know if this type of tip interests you. I’ve also done rain, rocket engines, howling gales, the engine room of an interstellar cargo ship, cosmic thuds, various soundscapes, and even backgrounds designed to encourage theta and delta brain waves. I made the last one originally for a friend of mine whose children had a hard time going to sleep, and burned it to CD. When I asked what he thought, he said “no one has ever heard how it ends.” So I guess it worked! Chalk up another unusual Studio One application.
Download the De-Stresser FX Chain here!

Shop Studio One NOW!
Into the Archives, Part 2
After last week’s thrilling cliff-hanger about how to preserve your WAV files for future generations, let’s look at how to export all your stereo audio tracks and have them incorporate effects processing, automation, level, and panning. There are several ways to do this; although you can drag files into a Browser folder, and choose Wave File with rendered Insert FX, Studio One’s feature to save stems is much easier and also includes any effects added by effects in Bus and FX Channels. (We’ll also look at how to archive Instrument tracks.)
Saving as stems, where you choose individual Tracks or Channels, makes archiving processed files a breeze. For archiving, I choose Tracks because they’re what I’ll want to bring in for a remix. For example, if you’re using an instrument where multiple outputs feed into a stereo mix, Channels will save the mix, but Tracks will render the individual Instrument sounds into their own tracks.
When you export everything as stems, and bring them back into an empty Song, playback will sound exactly like the Song whose stems you exported. However, note that saving as stems does not necessarily preserve the Song’s organization; for example, tracks inside a folder track are rendered as individual tracks, not as part of a folder. I find this preferable anyway. Also, if you just drag the tracks back into an empty song, they’ll be alphabetized by track name. If this is an issue, number each track in the desired order before exporting.
SAVING STEMS
Select Song > Export Stems. Choose whether you want to export what’s represented by Tracks in the Arrange view, or by Channels in the Console. Again, for archiving, I recommend Tracks (Fig. 1).

Figure 1: The Song > Export Stems option is your friend.
If there’s anything you don’t want to save, uncheck the box next to the track name. Muted tracks are unchecked by default, but if you check them, the tracks are exported properly, and open unmuted.
Note that if an audio track is being sent to effects in a Bus or FX Channel, the exported track will include any added effects. Basically, you’ll save whatever you would hear with Solo enabled. In the Arrange view, each track is soloed as it’s rendered, so you can monitor the archiving progress as it occurs.
In Part 1 on saving raw WAV files, we noted that different approaches required different amounts of storage space. Saving stems requires the most amount of storage space because it saves all tracks from start to end (or whatever area in the timeline you select), even if a track-only has a few seconds of audio in it. However, this also means that the tracks are suitable for importing into programs that don’t recognize Broadcast WAV Files. Start all tracks from the beginning of a song, or at least from the same start point, and they’ll all sync up properly.
WHAT ABOUT THE MAIN FADER SETTINGS?
Note that the tracks will be affected by your Main fader inserts and processing, including any volume automation that creates a fadeout. I don’t use processors in the Main channel inserts, because I reserve any stereo 2-track processing for the Project page (hey, it’s Studio One—we have the technology!). I’d recommend bypassing any Main channel effects, because if you’re going to use archived files for a remix, you probably don’t want to be locked in to any processing applied to the stereo mix. I also prefer to disable automation Read for volume levels, because the fade may need to last longer with a remix. Keep your options open.
However, the Main fader is useful if you try to save the stems and get an indication that clipping has occurred. Reduce the Main fader by slightly more than the amount of clipping (e.g., if the warning says a file was 1 dB over, lower the Main channel fader by -1.1 dB). Another option would be to isolate the track(s) causing the clipping and reduce their levels; but reducing the Main channel fader maintains the proportional level of the mixed tracks.
SAVING INSTRUMENT AUDIO
Saving an Instrument track as a stem automatically renders it into audio. While that’s very convenient, you have other options.
When you drag an Instrument track’s Event to the Browser, you can save it as a Standard MIDI File (.mid) or as a Musicloop feature (press Shift to select between the two). Think of a Musicloop, a unique Studio One feature, as an Instrument track “channel strip”—when you bring it back into a project, it creates a Channel in the mixer, includes any Insert effects, zeroes the Channel fader, and incorporates the soft synth so you can edit it. Of course, if you’re collaborating with someone who doesn’t have the same soft synth or insert effects, they won’t be available (that’s another reason to stay in the Studio One ecosystem when collaborating if at all possible). But, you’ll still have the note events in a track.
There are three cautions when exporting Instrument track Parts as Musicloops or MIDI files.
- The Instrument track Parts are exported as MIDI files, which aren’t (yet) time-stamped similarly to Broadcast WAV Files. Therefore, the first event starts at the song’s beginning, regardless of where it occurs in the Song.
- Mutes aren’t recognized, so the file you bring back will include any muted notes.
- If there are multiple Instrument Parts in a track, you can drag them into the Browser and save them as a Musicloop. However, this will save a Musicloop for each Part. You can bring them all into the same track, one a time, but then you have to place them properly. If you bring them all in at once, they’ll create as many Channels/Tracks as there are Instrument Parts, and all Parts will start at the Song’s beginning…not very friendly.
The bottom line: Before exporting an Instrument track as a Musicloop or MIDI file, I recommend deleting any muted Parts, selecting all Instrument Parts by typing G to create a single Part, then extending the Part’s start to the Song’s beginning (Fig. 2).

Figure 2: The bottom track has prepped the top track to make it stem-export-friendly.
You can make sure that Instrument tracks import into the Song in the desired placement, by using Transform to Audio Track. As mentioned above, it’s best to delete unmuted sections, and type G to make multiple Parts into a single Part. However, you don’t need to extend the track’s beginning.
- Right-click in the track’s header, and select Transform to Audio Track.
- Drag the resulting audio file into the Browser. Now, the file is a standard Broadcast WAV Format file.
- When you drag the file into a Song, select it and choose Edit > Move to Origin to place it properly on the timeline.
However, unlike a Musicloop, this is only an audio file. When you bring it into a song, the resulting Channel does not include the soft synth, insert effects, etc.
Finally…it’s a good idea to save any presets used in your various virtual instruments into the same folder as your archived tracks. You never know…right?
And now you know how to archive your Songs. Next week, we’ll get back to Fun Stuff.
Add Studio One to your workflow NOW for 30% off!