Friday Tips: Studio One’s Secret Equalizer
[Announcement: the follow-up book to “How to Record and Mix Great Vocals in Studio One” is now available—hop on over to the PreSonus Shop to check out “More than Compressors: The Complete Guide to Dynamics in Studio One.” Thank you! We now return to our regularly scheduled programming.]
Pop quiz: How many EQ plug-ins ship with Studio One Pro?
If you answered seven, congratulations! Then you know about the Pro EQ, the three different Fat Channel EQs, Ampire’s Graphic Equalizer, the Channel Strip, and using the Multiband Dynamics as a really hip graphic EQ. But actually, the correct answer is eight.
If you turn off the “auto” aspects of the Autofilter, you can take advantage of two filters, each with multiple filter topologies: three “rhymes-with-vogue”-style lowpass Ladder filters (sorry, if I mention the actual synthesizer name, I get hassled), two analog state-variable filters (yes, the same topology as the infamous Project #17, the “Super Tone Control,” in my book Electronic Projects for Musicians), one digital state-variable filter, a comb filter, and a zero-delay, 24/dB octave low-pass filter. Furthermore, you can route the two filters in series, or in parallel, as well as offset their cutoff frequencies from each other by up to 2 octaves.
The state-variable filters are particularly interesting because you can alter the response continuously from lowpass, to bandpass, to highpass, all with variable cutoff and resonance. This gives responses that are difficult, if not impossible, to obtain any other way.
So who cares about different filter types, anyway—other than guitar players who want to get totally rad wah effects? Well, these are invaluable for sound design, FX and breaks for DJs, synthesizer sweeps, and to add spice to tracks that sound just too darn normal. Don’t think of these filters necessarily as standard EQ, but more like EQ-based special effects. These parameters are automatable too, which opens up even more possibilities.
Using the testing procedure described in the Testing, Testing tip from May 16, let’s look at some of the spectral responses this exceptionally versatile pair of filters can produce.
But First, Turn Off Everything that Says Auto
To use the Autofilter as a filter, we need to turn off the automated aspects. Ctrl+click on both pairs of Env and LFO sliders to zero them out. Now we’re left with only the filters, not the modulators trying to control them. Also turn off the gain’s Auto function, because in some of the unusual ways we’ll be using the filter, overloading and nasty distortion can result from Auto gain.
Filtering Time
Fig. 1 shows the response for the 24 dB/octave ladder filter, with resonance turned up. Note that the Pro EQ high cut (lowpass) and low cut (highpass) filters can’t create this kind of curve, because they don’t have resonance controls. This is very much like the response of the classic rhymes-with-“vogue” filter, and you can automate the filter cutoff for grandiose filter sweeps.
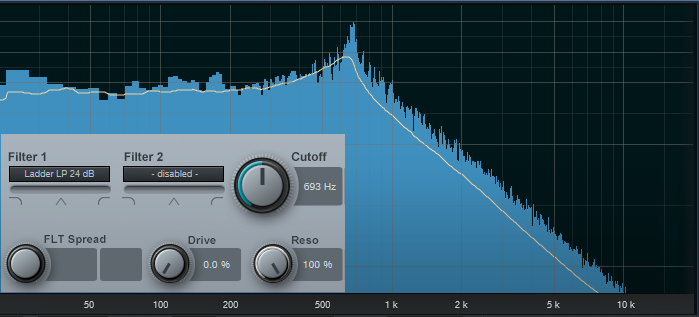
Figure 1: 24/dB ladder response, with resonance.
But wait! There’s more—because there are two different filter sections, you can offset the resonant frequencies to create double peaks. In Fig. 2, the frequencies are offset by two octaves, and the filters are in parallel (see the section outlined in orange). So now we have a double-peak ladder filter…cool.
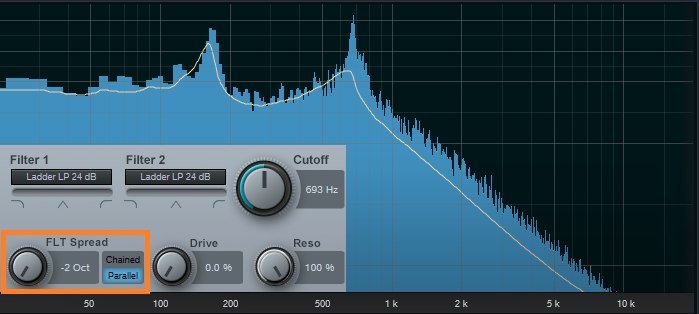
Figure 2: Double-peak ladder filter.
We can also do the “twin peaks” type of filter effect with the state-variable filters set to bandpass mode (Fig. 3). Here the filters are in parallel, and as with the above curve, they’re offset two octaves apart.
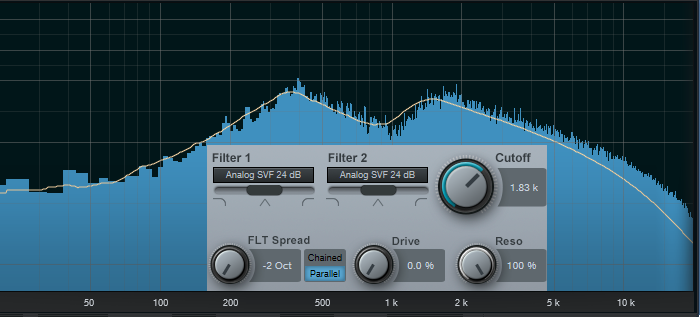
Figure 3: Dual bandpass filters in parallel can create twin peak filter responses, with fairly steep “skirts” on both sides of the peaks.
If you chain the two state-variable filters in series, set them to bandpass mode, don’t offset them, and boost the resonance, the filter curve makes a wonderful wah pedal (Fig. 4). The peak is sharp, with a steep rolloff on either side.
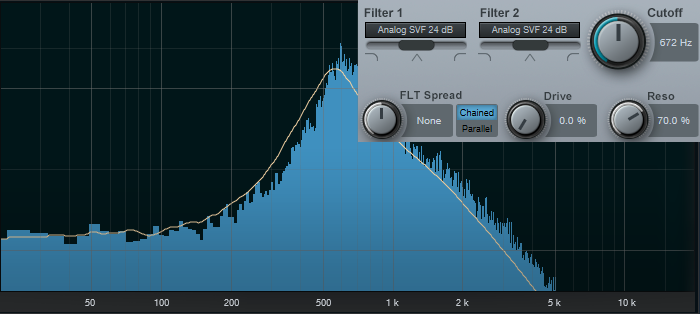
Figure 4: If you’re looking for a wah pedal sound…start here.
This also produces a strong sense of pitch with white or pink noise. One cool trick is using this setting to add a “tuned” aspect to snare drums, and other percussion instruments. Edit Studio One’s Tone Generator plug-in to generate pink noise, feed that into the above filter configuration, turn up the resonance, tune the cutoff to the desired pitch, then gate the noise with a snare hit. Mix in the desired amount of noise to give the drum a sense of pitch.
The highpass setting is useful as well, because you can obtain what’s popularly called the “voice of the Gods” effect for announcing and narration. Using a highpass filter gets rid of the super-low-frequency p-pops, but the resonance adds a boost in the bass range above the nasty stuff, so the voice still sounds full and big (Fig. 5).
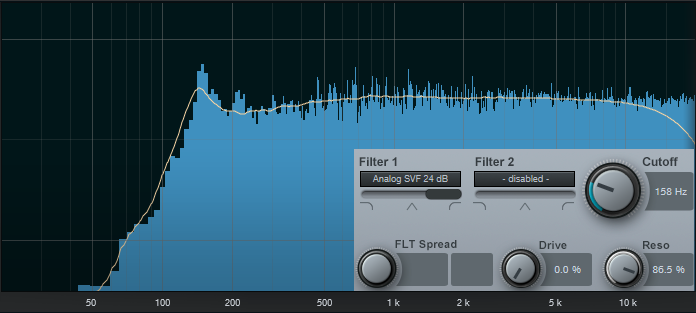
Figure 5: A high-pass filter with resonance can do wonders for narration.
It’s also possible to create responses that are just plain unusual, like this notch + double peak outside of the notch (Fig. 6). For some sound-design type wind sounds, drop the resonance to around 30%, and sweep the cutoff between 2 kHz and 6 kHz. Modulating randomly around a relatively low cutoff frequency can also give good rain and downpour sounds. Besides, who doesn’t like a curve that looks like Batman.
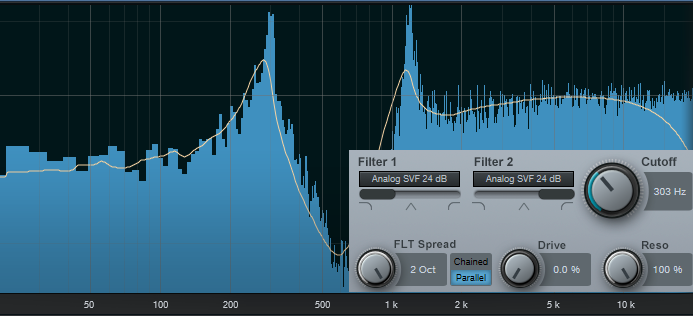
Figure 6: This unusual filter response has various uses for sound design.
Combining two different filter topologies can also give interesting results. Fig. 7 shows a ladder filter in parallel with a state variable filter, along with considerable amounts of resonance. If you really want to scope out this configuration’s flexibility, vary the Filter 2 slider to alter the topology, and/or vary the Filter Spread to change the offset between the two filter types. Of course, changing resonance alters the sound even further.
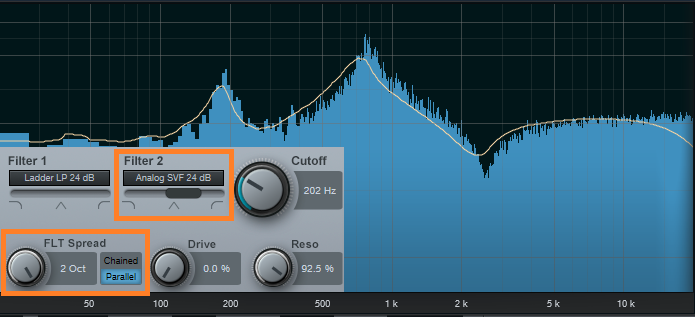
Figure 7: This filter configuration is in love with sound design and automation.
And finally…this is going to sound ridiculous, but bear with me. I often augment sampled female choir presets; octave lower sine waves mixed in subtly can give the illusion of a male choir combined with a female choir. But that’s not all—noise can be a powerful enhancer for choirs, and it’s possible to set the Autofilter to impart vocal-like qualities to pink noise.
For this application, the Zero Delay LP 24 dB is the filter of choice to insert after the Tone Generator’s pink noise output, because the filtering has a smooth kind of quality, even with high resonance. To concentrate the spectrum on voice, a Pro EQ follows the Autofilter to take off the highs and lows outside of the vocal range (Fig. 8).
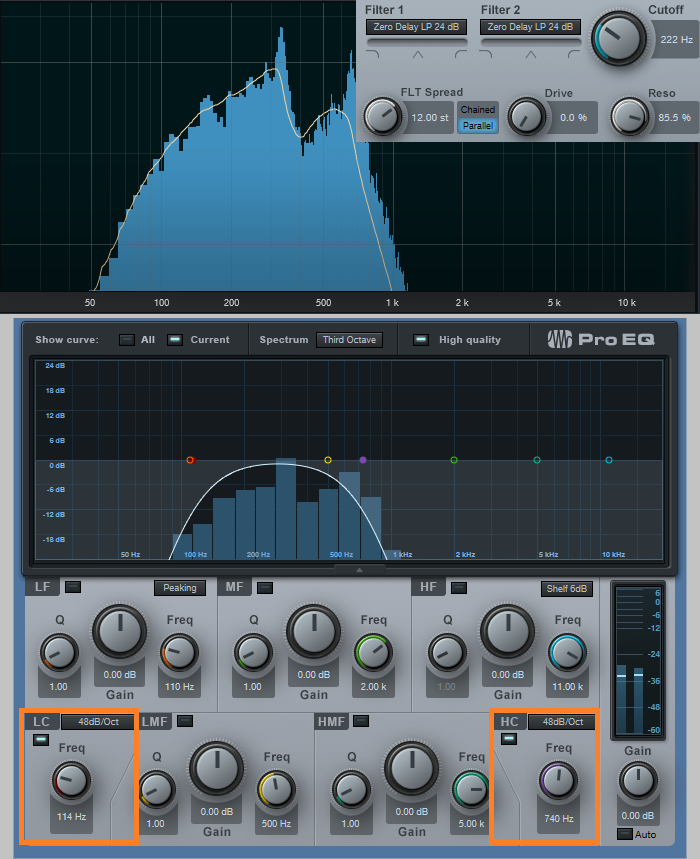
Figure 8: The Pro EQ shapes the pink noise into more of the vocal range.
Okay, now for the bummer: You can’t control the Autofilter cutoff, and therefore the pitch, with notes—only controllers. That’s not a problem if you just need a kind of pedal point choir addition; tune the cutoff to the desired pitch, and use volume automation to bring it in and out.
One workaround is to sample the resulting choir-like noise at different pitches, and load them into Sample One XT (or Impact XT) so you can create envelopes that match the envelope of whatever choir sound you’re using, and play the notes from a keyboard. The result is uncanny—in some ways, it makes a sampled choir sound more like a real choir than if it consisted only of samples. And finally, for sound design, don’t forget that filtered white noise can also augment crowd sounds.
Autofilter? Okay, yeah, well…I guess. But there’s a lot more to the story than just wah pedals and funk bass.
Grab a copy of Craig’s latest eBook here!