Tag Archives: Studio One
Safety First: Into the Archives, Part 1
I admit it. This is a truly boring topic.
You’re forgiven if you scoot down to something more interesting in this blog, but here’s the deal. I always archive finished projects, because remixing older projects can sometimes give them a second life—for example, I’ve stripped vocals from some songs, and remixed the instrument tracks for video backgrounds. Some have been remixed for other purposes. Some really ancient songs have been remixed because I know more than I did when I mixed them originally.
You can archive to hard drives, SSDs, the cloud…your choice. I prefer Blu-Ray optical media, because it’s more robust than conventional DVDs, has a rated minimum shelf life that will outlive me (at which point my kid can use the discs as coasters), and can be stored in a bank’s safe deposit box.
Superficially, archiving may seem to be the same process as collaboration, because you’re exporting tracks. However, collaboration often occurs during the recording process, and may involve exporting stems—a single track that contains a submix of drums, background vocals, or whatever. Archiving occurs after a song is complete, finished, and mixed. This matters for dealing with details like Event FX and instruments with multiple outputs. By the time I’m doing a final mix, Event FX (and Melodyne pitch correction, which is treated like an Event FX) have been rendered into a file, because I want those edits to be permanent. When collaborating, you might want to not render these edits, in case your collaborator has different ideas of how a track should sound.
With multiple-output instruments, while recording I’m fine with having all the outputs appear over a single channel—but for the final mix, I want each output to be on its own channel for individual processing. Similarly, I want tracks in a Folder track to be exposed and archived individually, not submixed.
So, it’s important to consider why you want to archive, and what you will need in the future. My biggest problem when trying to open really old songs is that some plug-ins may no longer be functional, due to OS incompatibilities, not being installed, being replaced with an update that doesn’t load automatically in place of an older version, different preset formats, etc. Another problem may be some glitch or issue in the audio itself, at which point I need a raw, unprocessed file for fixing the issue before re-applying the processing.
Because I can’t predict exactly what I’ll need years into the future, I have three different archives.
- Save the Studio One Song using Save To a New Folder. This saves only what’s actually used in the Song, not the extraneous files accumulated during the recording process, which will likely trim quite a bit of storage space compared to the original recording. This will be all that many people need, and hopefully, when you open the Song in the future everything will load and sound exactly as it did when it was finished. That means you won’t need to delve into the next two archive options.
- Save each track as a rendered audio WAV file with all the processing added by Studio One (effects, levels, and automation). I put these into a folder called Processed Tracks. Bringing them back into a Song sounds just like the original. They’re useful if in the future, the Song used third-party plug-ins that are no longer compatible or installed—you’ll still have the original track’s sound available.
- Save each track as a raw WAV file. These go into a folder named Raw Tracks. When remixing, you need raw tracks if different processing, fixes, or automation is required. You can also mix and match these with the rendered files—for example, maybe all the rendered virtual instruments are great, but you want different vocal processing.
Exporting Raw Wave Files
In this week’s tip, we’ll look at exporting raw WAV files. We’ll cover exporting files with processing (effects and automation), and exporting virtual instruments as audio, in next week’s tip.
Studio One’s audio files use the Broadcast Wave Format. This format time-stamps a file with its location on the timeline. When using any of the options we’ll describe, raw (unprocessed) audio files are saved with the following characteristics:
- No fader position or panning (files are pre-fader)
- No processing or automation
- Raw files incorporate Event envelopes (i.e., Event gain and fades) as well as any unrendered Event FX, including Melodyne
- Muted Events are saved as silence
Important: When you drag Broadcast WAV Files back into an empty Song, they won’t be aligned to their time stamp. You need to select them all, and choose Edit > Move to Origin.
The easiest way to save files is by dragging them into a Browser folder. When the files hover over the Browser folder (Fig. 1), select one of three options—Wave File, Wave File with rendered Insert FX, or Audioloop—by cycling through the three options with the QWERTY keyboard’s Shift key. We’ll be archiving raw WAV files, so choose Wave File for the options we’re covering.
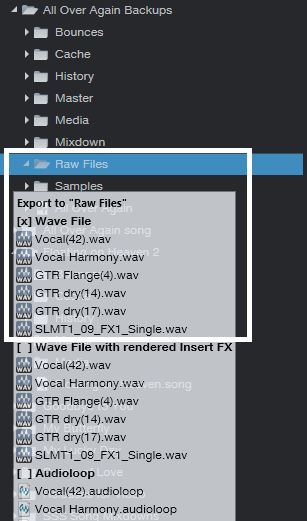
Figure 1: The three file options available when dragging to a folder in the Browser are Wave File, Wave File with rendered Insert FX, or Audioloop.
As an example, Fig. 2 shows the basic Song we’ll be archiving. Note that there are multiple Events, and they’re non-contiguous—they’ve been split, muted, etc.
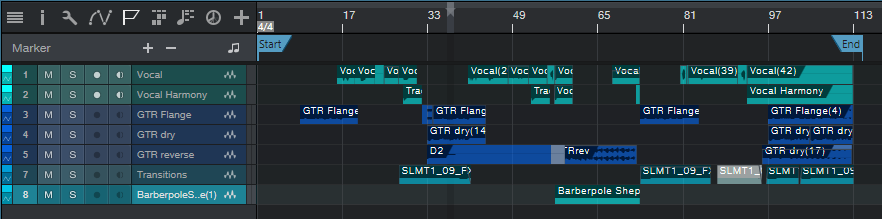
Figure 2: This shows the Events in the Song being archived, for comparison with how they look when saving, or reloading into an empty Song.
Option 1: Fast to prepare, takes up the least storage space, but is a hassle to re-load into an empty Song.
Select all the audio Events in your Song, and then drag them into the Browser’s Raw Tracks folder you created (or whatever you named it). The files take up minimal storage space, because nothing is saved that isn’t data in a Song. However, I don’t recommend this option, because when you drag the stored Events back into a Song, each Event ends up on its own track (Fig. 3). So if a Song has 60 different Events, you’ll have 60 tracks. It takes time to consolidate all the original track Events into their original tracks, and then delete the empty tracks that result from moving so many Events into individual tracks.
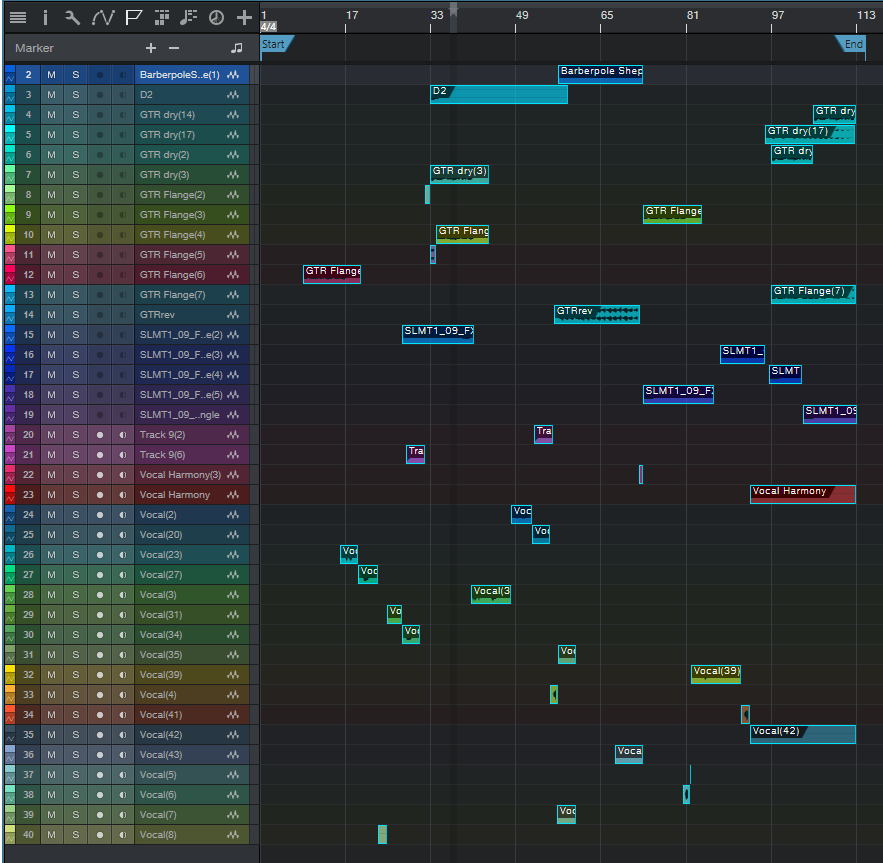
Figure 3: These files have all been moved to their origin, so they line up properly on the timeline. However, exporting all audio Events as WAV files makes it time-consuming to reconstruct a Song, especially if the tracks were named ambiguously.
Option 2: Takes more time to prepare, takes up more storage space, but is much easier to load into an empty Song.
- Select the Events in one audio track, and type Ctrl+B to join them together into a single Event in the track. If this causes clipping, you’ll need to reduce the Event gain by the amount that the level is over 0. Repeat this for the other audio tracks.
- Joining each track creates Events that start at the first Event’s start, and end at the last Event’s end. This uses more memory than Option 1 because if two Events are separated by an empty space of several measures, converting them into a single Event now includes the formerly empty space as track data (Fig. 4).
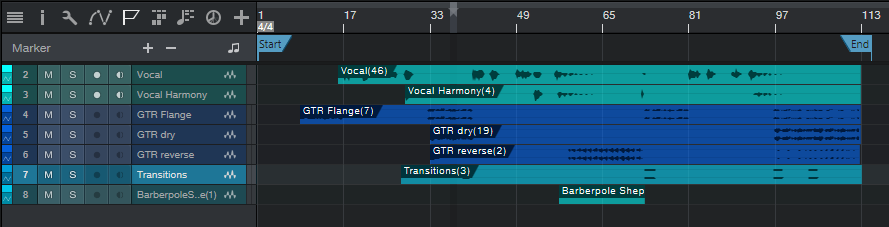
Figure 4: Before archiving, the Events in individual tracks have now been joined into a single track Event by selecting the track’s Events, and typing Ctrl+B.
- Select all the files, and drag them to your “Raw Tracks” folder with the Wave File option selected.
After dragging the files back into an empty Song, select all the files, and then after choosing Edit > Move to Origin, all the files will line up according to their time stamps, and look like they did in Fig. 4. Compare this to Fig. 3, where the individual, non-bounced Events were exported.
Option 3: Universal, fast to prepare, but takes up the most storage space.
When collaborating with someone whose program can’t read Broadcast WAV Files, all imported audio files need to start at the beginning of the Song so that after importing, they’re synched on the timeline. For collaborations it’s more likely you’ll export Stems, as we’ll cover in Part 2, but sometimes the following file type is handy to have around.
- Make sure that at least one audio Event starts at the beginning of the song. If there isn’t one, use the Pencil tool to draw in a blank Event (of any length) that starts at the beginning of any track.
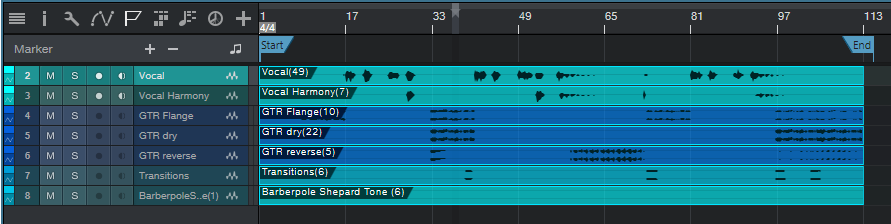
Figure 5: All tracks now consist of a single Event, which starts at the Song’s beginning.
- Select all the Events in all audio tracks, and type Ctrl+B. This bounces all the Events within a track into a single track, extends each track’s beginning to the beginning of the first audio Event, and extends each track’s end to the end of the longest track (Fig. 5). Because the first Event is at the Song’s beginning, all tracks start at the Song’s beginning.
- Select all the Events, and drag them into the Browser’s Raw Tracks folder (again, using the Wave File option).
When you bring them back into an empty Song, they look like Fig. 5. Extending all audio tracks to the beginning and end is why they take up more memory than the previous options. Note that you will probably need to include the tempo when exchanging files with someone using a different program.
To give a rough idea of the memory differences among the three options, here are the results based on a typical song.
Option 1: 302 MB
Option 2: 407 MB
Option 3: 656 MB
You’re not asleep yet? Cool!! In Part 2, we’ll take this further, and conclude the archiving process.
Add Studio One to your workflow today and save 30%!

Four VCA Channel Applications
A VCA Channel has a fader, but it doesn’t pass audio. Instead, the fader acts like a gain control for other channels, or groups of channels. In some ways, you can think of a VCA Channel as “remote control” for other channels. If you assign a VCA to control a channel, you can adjust the channel gain, without having to move the associated channel’s fader. The VCA Channel fader does it for you.
Inserting a VCA channel works the same way as inserting any other kind of channel or bus. (However, there’s a convenient shortcut for grouping, as described later.) To place a channel’s gain under VCA control, choose the VCA Channel from the drop-down menu just below a channel’s fader…and let’s get started with the applications.
APPLICATION #1: EASY AUTOMATION TRIM
Sometimes when mixing, you’ll create detailed level automation where all the moves and changes are perfect. But as the mix develops, you may find you want to increase or decrease the overall level. There are several ways to do this, like inserting a Mixtool and adjusting the level independently of the automation, or using the automation’s Trim control. However, a VCA control is sometimes easier, and besides, it can control several channels at once if desired, without having to feed them to a bus. The VCA fader can even offset automation for multiple tracks that are located within a Folder Track (Fig. 1)
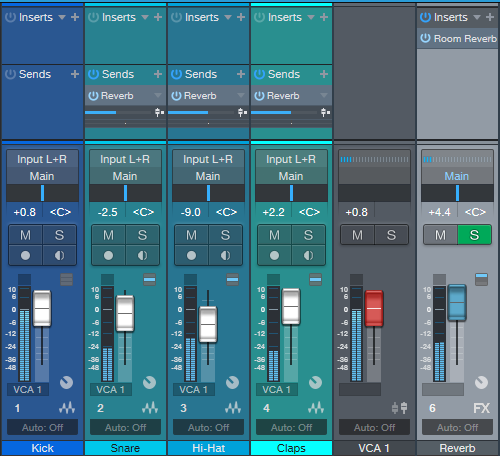
- Figure 1: Note how the label below each fader says VCA 1. This means each channel’s gain is being controlled by the VCA 1 fader on the right. If all these tracks have their own automation, VCA 1 can bring the overall level up or down, without altering the automation shape, and without needing to send all their outputs to the same bus.
If the automation changes are exactly as desired, but the overall level needs to increase or decrease, offset the gain by adjusting the VCA Channel’s fader. This can be simpler and faster than trying to raise or lower an entire automation curve using the automation Trim control. Furthermore, after making the appropriate adjustments, you can hide the VCA Channel to reduce mixer clutter, and show it only if future adjustments are necessary.
APPLICATION #2: NESTED GROUPING
One of the most common grouping applications involves drums—when you group a drum kit’s individual drums, once you get the right balance, you can bring their collective levels up or down without upsetting the balance. Studio One offers multiple ways to group channels. The traditional option is to feed all the outputs you want to group to a bus, and vary the level with the bus fader. For quick changes, a more modern option is to select the channels you want to group, so that moving one fader moves all the faders.
But VCAs take this further, because VCA groups can be nested. This means groups can be subsets of other groups.
A classic example of why this is useful involves orchestral scoring. The first violins could be assigned to VCA group 1st Violins, the second violins to VCA group 2nd Violins, violas to VCA group Violas, and cellos and double basses to VCA group Cellos+Basses.
You could assign the 1st Violins and 2nd Violins VCA groups to a Violins Group, and then assign the Violins group, Violas group, and Cellos+Basses group to a Strings group. Now you can vary the level of the first violins, the second violins, both violin sections (with the Violins Group), the violas, the cellos and double basses, and/or the entire string section (Fig. 2). This kind of nested grouping is also useful with choirs, percussion ensembles, drum machines with multiple outputs, background singers, multitracked drum libraries, and more.
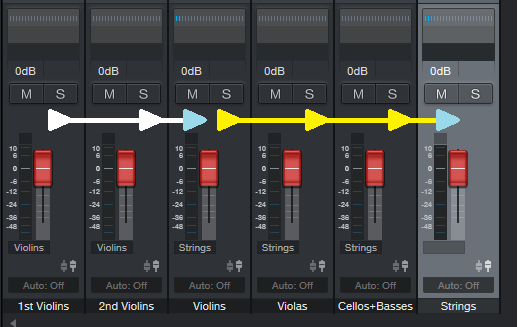
Figure 2: The 1st Violins and 2nd Violins have their own group, which are in turn controlled by the Violins group. Furthermore, the Violins, Violas, and Cellos+Basses groups are all controlled by the Strings group.
Although it may seem traditional grouping with buses would offer the same functionality, note that all the channel outputs would need to go through the same audio bus. Because VCA faders don’t pass audio, any audio output assignments for the channels controlled by the VCA remain independent. You’re “busing” gain, not audio outputs—that’s significant.
If you create a group, then all the faders within that group remain independent. Although with Studio One you can temporarily exclude a fader from a group to adjust it, that’s not necessary with VCA grouping—you can move a fader independently that’s controlled by a VCA, and it will still be linked to the other members of a VCA group when you move the VCA fader.
Bottom line: The easiest way to work with large numbers of groups is with VCA faders.
APPLICATION #3: GROUPS AND SEND EFFECTS
A classic reason for using a VCA fader involves send effects. Suppose several channels (e.g., individual drums) go to a submix bus fader, and the channels also have post-fader Send controls going to an effect, such as reverb. With a conventional submix bus, as you pull down the bus fader, the faders for the individual tracks haven’t changed—so the post-fader send from those tracks is still sending a signal to the reverb bus. Even with the bus fader down all the way, you’ll still hear the reverb.
A VCA Channel solves this because it controls the gain of the individual channels. Less gain means less signal going into the channel’s Send control, regardless of the channel fader’s position. So with the VCA fader all the way down, there’s no signal going to the reverb (Fig. 3)
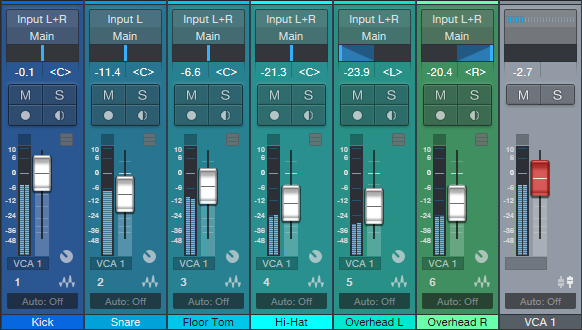
- Figure 3: The VCA Channel controls the amount of post-fader Send going to a reverb, because the VCA fader affects the gain regardless of fader position. If the drum channels went to a conventional bus, reducing the bus volume would have no effect on the post-fader Sends.
APPLICATION #4: BUS VS. VCA
There’s a fine point of using VCAs to control channel faders. Suppose individual drums feed a bus with a compressor or saturation effect. As you change the channel gain, the input to the compression or saturation changes, which alters the effect. If this is a problem, then you’re better off sending the channels to a standard bus. But this can also be an advantage, because pushing the levels could create a more intense sound by increasing the amount of compression or saturation. The VCA fader would determine the group’s “character,” while the bus control acts like a master volume control for the overall group level.
And because a VCA fader can control bus levels, some drums could go to an audio bus with a compressor, and some drums to a bus without compression. Then you could use the VCA fader to control the levels of both buses. This allows for tricks like raising the level of the drums and compressing the high-hats, cymbals, and toms more, while leaving the kick and snare uncompressed…or increasing saturation on the kick and snare, while leaving other drum sounds untouched.
Granted, VCA Channels may not be essential to all workflows. But if you know what they can do, a VCA Channel may be able to solve a problem that would otherwise require a complex workaround with any other option.
How to Use a Game Controller as a MIDI Device In Studio One!
Most of us who work here at PreSonus are musicians ???????or audio engineers ?.
And some of us are also gamers ?in addition to that.
For those of you who can relate, check out this interesting and fun video that PreSonus Artist/Endorser Nik Jeremić just created and shared with us recently. He’s using an Xbox One game controller to trigger samples in Studio One:
[Nik’s Official Website]
The “Double-Decker” Pre-Main Bus
This Friday tip has multiple applications—consider the following scenarios.
You like to mix with mastering processors in the Main bus to approximate the eventual mastered sound, but ultimately, you want to add (or update) an unprocessed file for serious mastering in the Project page. However, reality checks are tough. When you disable the master bus processors so you can hear the unprocessed sound you’ll be exporting, the level will usually change. So then you have to re-balance the levels, but you might not get them quite to where they were. And unfortunately, one of the biggest enemies of consistent mixing and mastering is varying monitoring levels. (Shameless plug alert: my book How to Create Compelling Mixes in Studio One, which is also available in Spanish, tells how to obtain consistent levels when mixing.)
Or, suppose you want to use the Tricomp or a similar “maximizing” program in the master bus. Although these can make a mix “pop,” there may be an unfair advantage if they make the music louder—after all, our brains tend to think that “louder is better.” The only way to get a realistic idea of how much difference the processor really makes is if you balance the processed and unprocessed levels so they’re the same.
Or, maybe you use the cool Sonarworks program to flatten your headphone or speaker’s response, so you can do more translatable mixes. But Sonarworks should be enabled only when monitoring; you don’t want to export a file with a correction curve applied. Bypassing the Sonarworks plug-in when updating the Project page, or exporting a master file, is essential. But in the heat of the creative moment, you might forget to do that, and then need to re-export.
THE “DOUBLE-DECKER,” PRE-MAIN BUS SOLUTION
The Pre-Main bus essentially doubles up the Main bus, to create an alternate destination for all your channels. The Pre-Main bus, whose output feeds the Main bus, serves as a “sandbox” for the Main bus. You can insert whatever processors you want into the Pre-Main bus for monitoring, without affecting what’s ultimately exported from the Main bus.
Here’s how it works.
- Create a bus, and call it the Pre-Main bus.
- In the Pre-Main bus’s output field just above the pan slider, assign the bus output to the Main bus. If you don’t see the output field, raise the channel’s height until the output field appears.
- Insert the Level Meter plug-in in the Main bus. We’ll use this for LUFS level comparisons (check out the blog post Easy Level Matching, or the section on LUFS in my mixing book, as to why this matters).

Figure 1: The Pre-Main bus, outlined in white, has the Tricomp and Sonarworks plug-ins inserted. Note that all the channels have their outputs assigned to the Pre-Main bus.
- Insert the mastering processors in the Pre-Main bus that you want to use while monitoring. Fig. 1 shows the Pre-Main bus with the Tricomp and Sonarworks plug-ins inserted.
- Select all your channels. An easy way to do this is to click on the first channel in the Channel List, then shift+click on the last channel in the list. Or, click on the channel to the immediate left of the Main channel, and then shift+click on the first mixer channel.
With all channels selected, changing the output field for one channel changes the output field for all channels. Assign the outputs to the Main bus, play some music, and look at the Level Meter to check the LUFS reading.
Now assign the channel outputs to the Pre-Main bus. Again, observe the Level Meter in the Master bus. Adjust the Pre-Main bus’s level for the best level match when switching the output fields between the Main and Pre-Main bus. By matching the levels, you can be sure you’re listening to a fair comparison of the processed audio (the Pre-Main bus) and the unprocessed audio that will be exported from the Main bus.
The only caution is that when all your channels are selected, if you change a channel’s fader, the faders for all the channels will change. Sometimes, this is a good thing—if you experience “fader level creep” while mixing, instead of lowering the master fader, you can lower the channel levels. But you also need to be careful not to reflexively adjust a channel’s level, and end up adjusting all of them by mistake. Remember to click on the channel whose fader you want to adjust, before doing any editing.
Doubling up the Main bus can be really convenient when mixing—check it out when you want to audition processors in the master bus, but also, be able to do a quick reality check with the unprocessed sound to find out the difference any processors really make to the overall output.
Acknowledgement: Thanks to Steve Cook, who devised a similar technique to accommodate using Sonarworks in Cakewalk, for providing the inspiration for this post.
Starpoint Gemini 3 With Nikola Jeremić
For those of you who are not familiar with Nikola (Nik) Jeremić’s work on the previous iteration of the Starpoint Gemini videogame soundtrack, you can find out about that here.
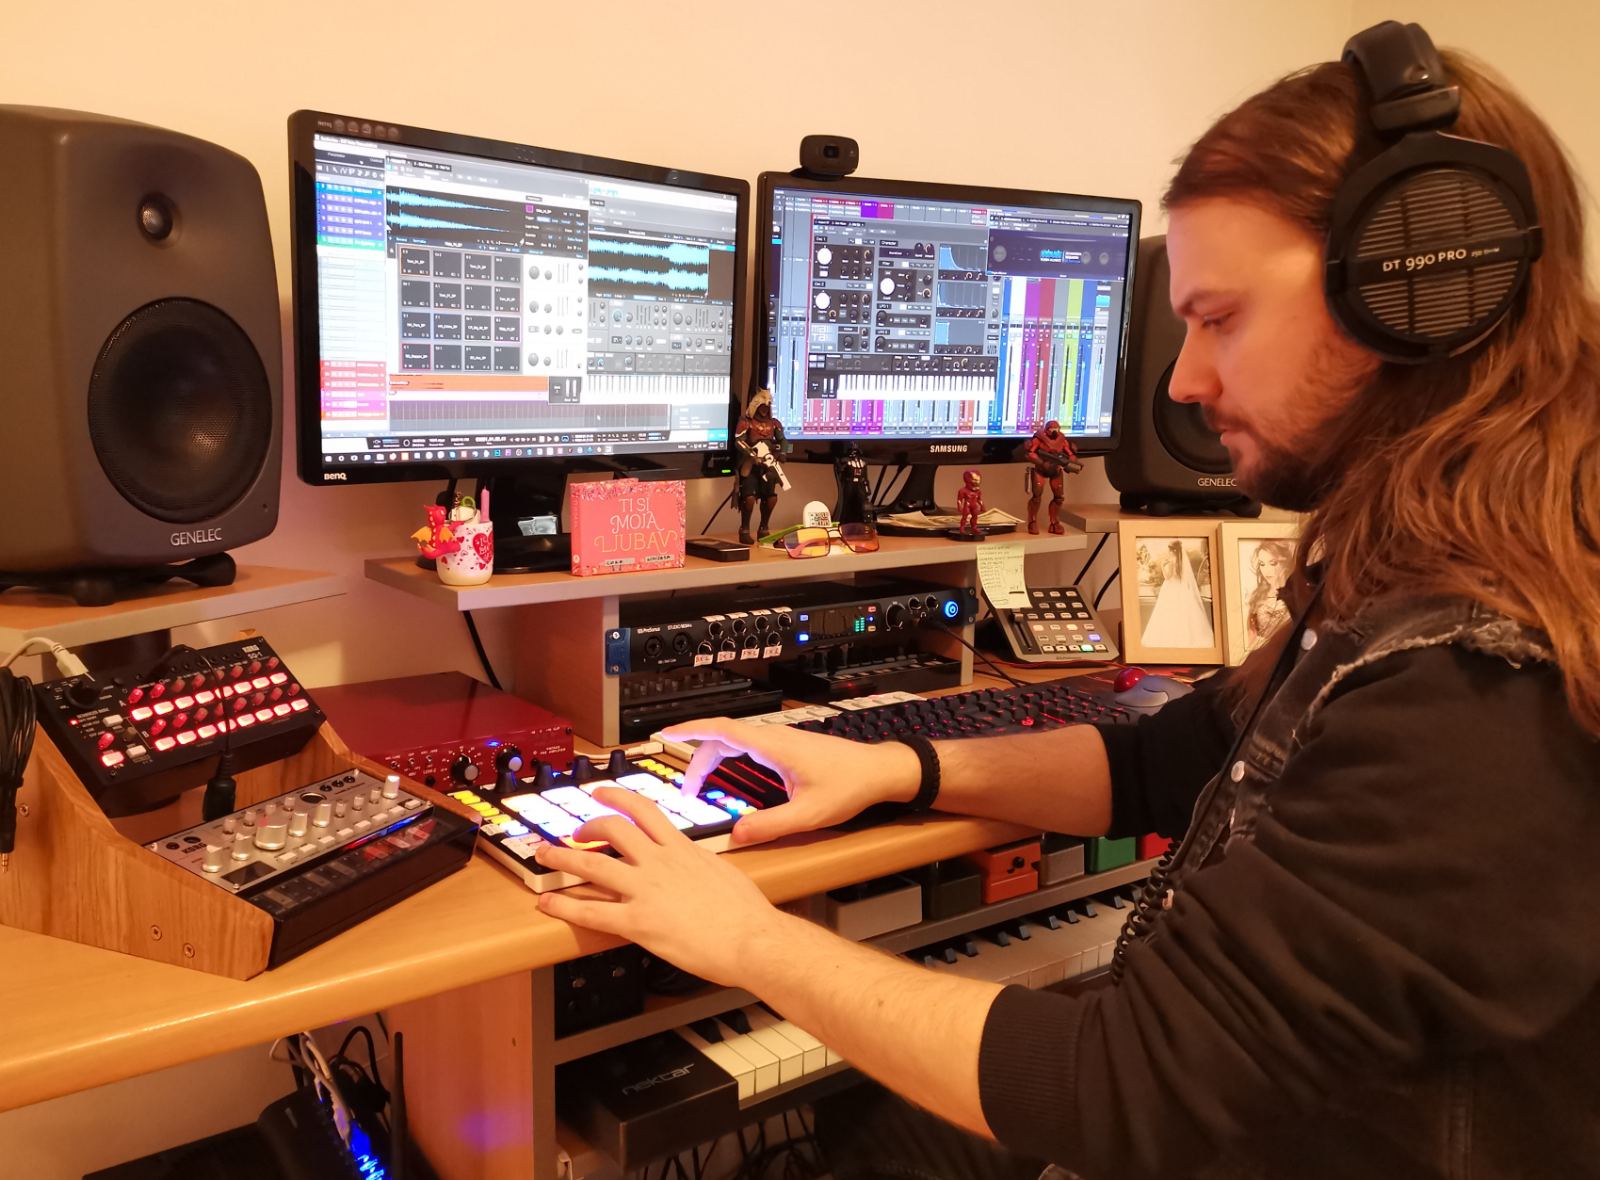
This will be a “deep dive” into how Nik used Studio One Professional along with the ATOM and our Studio 1824c interface to route audio and MIDI data to and from external hardware synths… his own words!
ATOM Controller
The most important thing about ATOM in this production is that it is used both as a playable instrument, as well as editing and mixing controller.
The layout was very simple in terms that it already integrates itself perfectly with Studio One, and I didn’t have to do much with tweaking it.
So far it completely replaced my old Classic FaderPort (which I still own and use it from time to time) in regards to transport commands, writing automation for track levels, panning, and the amount of signal being sent to FX tracks. I will surely upgrade myself with the current FaderPort pretty soon because I have worn out the buttons on the old one from years of usage.
I used small sticky tags in order to label the four knobs, so I always know which knob controls which parameter.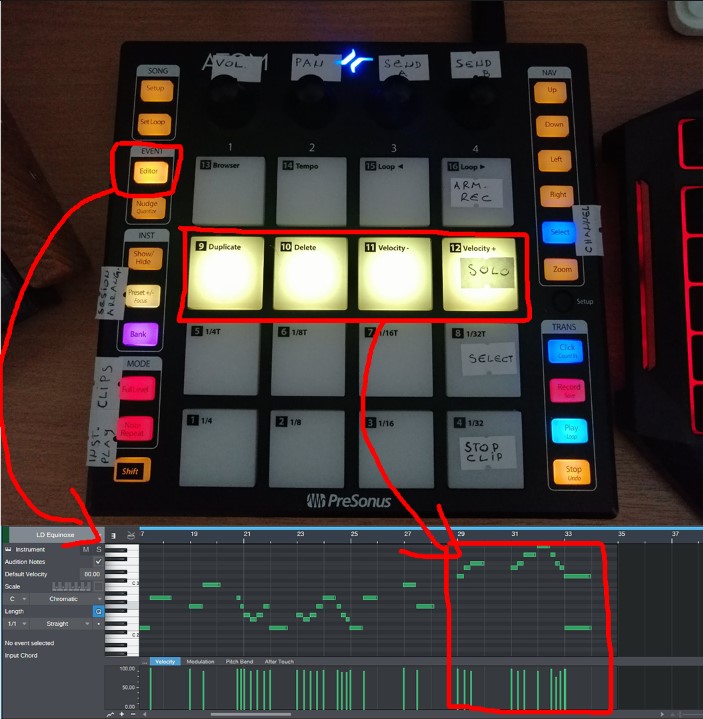
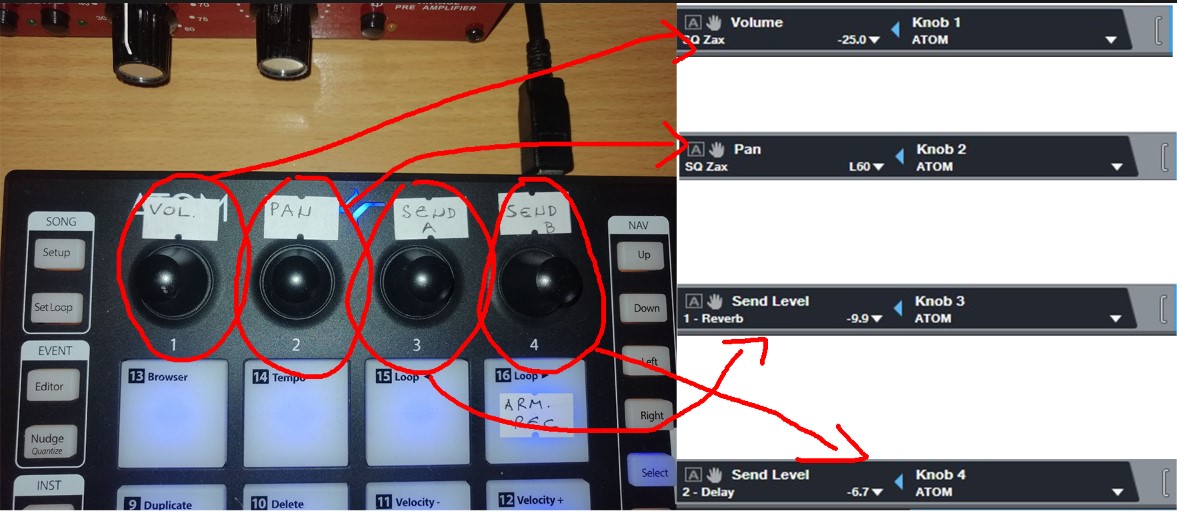
After the transport tab buttons, the ones I used the most are Song Setup, Editor and instrument Show/Hide. It really speeds up my workflow, and it was especially helpful on this game. Since 80% of the game’s soundtrack was done in the box, browsing through instruments and editing their MIDI data was really easy and fast.
One of the things that really amazed me regarding ATOM was the fact that every pad is labeled with the corresponding default control in Studio One Editor. I rarely touched my computer keyboard for editing.
Whenever I wanted to make a quick edit of my parameters in Impact, or any other instrument that matter, I just hit that Show/Hide instrument button, and… voila! Everything is right there at my fingertips! I will talk more about ATOM and Impact XT later.
Studio 1824c Interface
I used FireStudio Project for over eight years, and it has been a solid workhorse of an interface for me throughout my career. It worked flawlessly until I had a power surge at my home, which fried some of my gear, including the interface, so THAT was the only reason I had to replace it.
It actually happened in the middle of my work on Starpoint Gemini 3, so I researched a little and decided to go with Studio 1824c as an upgrade. To be honest, it’s as if I never replaced my old interface, because PreSonus hardware is really great when it comes to communication with Studio One, so the only thing I had to do was to plug it in my PC and install the latest drivers, and that was it. My production of this soundtrack hasn’t stopped at all, because everything was so compatible, so I just had to re-connect a few audio cables. It took me only minutes and I was back on track.
Since 20% of the soundtrack to Starpoint Gemini 3 is done on hardware synths and instruments, Studio 1824C is a Godsend for connecting all four of my hardware synths:
My Yamaha DX7 was connected via splitter cable as a stereo unit to my inputs 5 and 6.
I also used my three analogue KORG synths: (Volca Bass, Volca Keys, Volca Kick) in stereo via another splitter cable which was connected to inputs 1 and 2, because these Volcas were used the most for this soundtrack.
All of the synths received their MIDI data via MIDI In/Out from Studio 1824c, and I am really happy I didn’t have to buy an external MIDI interface for this. The only thing I had to do was to plug and unplug the midi cables from one synth to another, depending which one I was using at that time, but it’s not a mood killer.
My inputs 3 and 4 were set up as mono. Input 3 has an external 1073 clone mic preamp attached to it, and Input 4 has an external DI for recording and re-amping guitars and bass.
Inputs 7&8 together with Outputs 7&8 were used as stereo FX loop send/return for my FX pedal chain with Pipeline Stereo plugin:
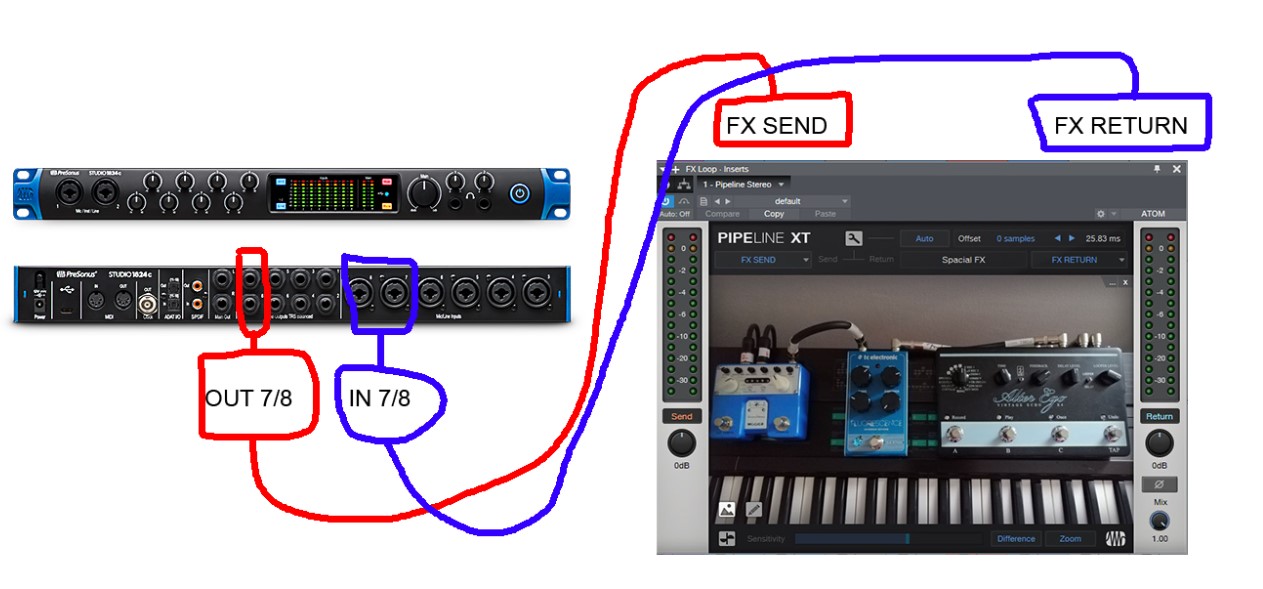
I also used sticky tags to label my front panel of Studio 1824C, and I mapped out my ins and outs inside song setup window, so I could save it as a default setting for all of my tracks for this game.
Regarding my FX chain loop, I used delay, chorus and shimmer reverb pedals in series, and I set them up to be used with Pipeline XT stereo plugin (which comes bundled with Studio One Pro) on an FX track. The reason I opted for this approach instead of connecting my synth output directly to pedals, is because I wanted to have an overall control of the amount of synth signal I am sending to any FX chain. Sometimes I wanted to automate the amount of signal being sent, and that is where those mapped knobs from ATOM came in handy.
I am pretty amazed by the build quality of Studio 1824c, having in mind the price of the unit. I absolutely love the front panel metering and big level knob for main out. Having two headphone outputs is really handy when I invite a session musician to record, because I don’t have a booth, then we both use headphones in the same room. Studio 1824c is a workhorse of an interface and it has improved my workflow ten times better than before.
I amhave yet to build my own Eurorack modular synth, so I can send CV signals via Studio 1824c outs to my synth. That is an AMAZING feature, and I am really looking forward to using it in the future.
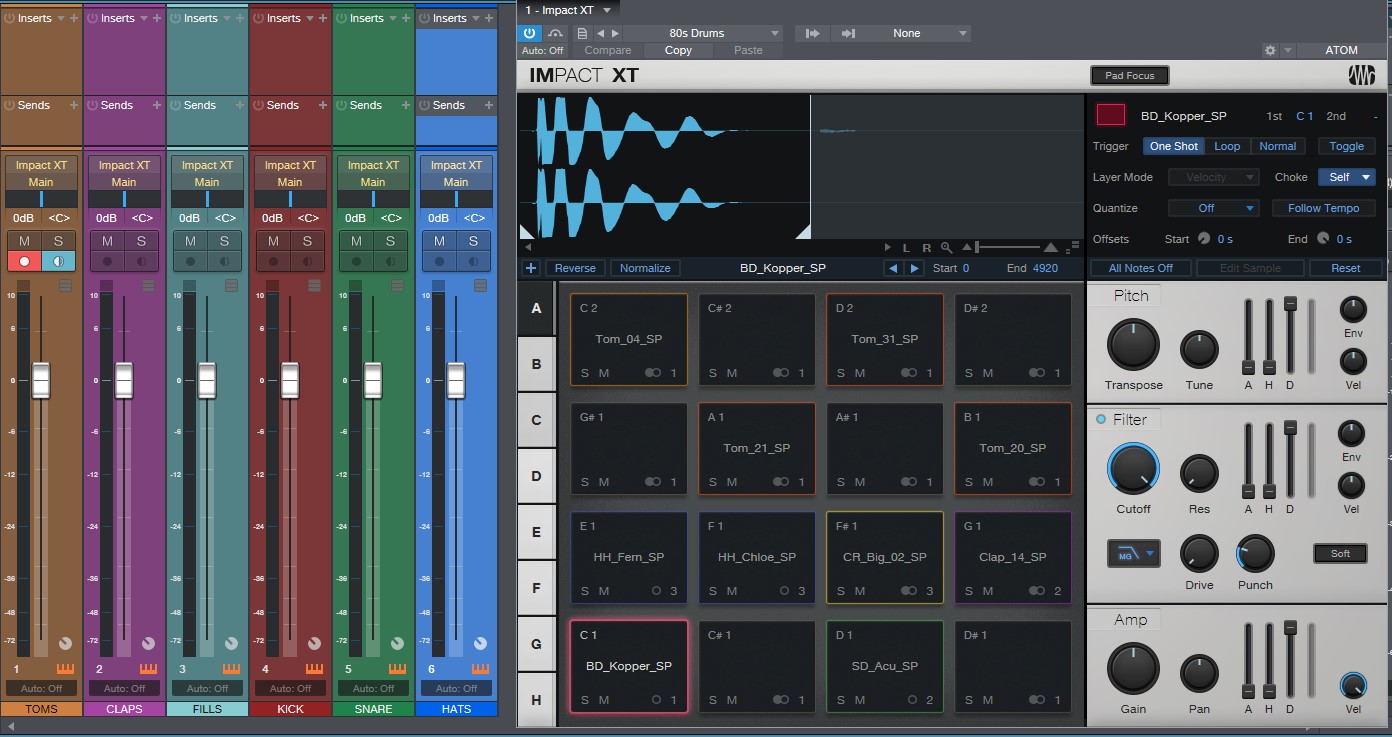
Impact XT
Impact XT was an essential part of my beats and percussive materials for both action and exploration tracks, and the way ATOM integrates with Impact XT has been really helpful to my workflow throughout the course of this entire soundtrack.
I used two instances of Impact XT: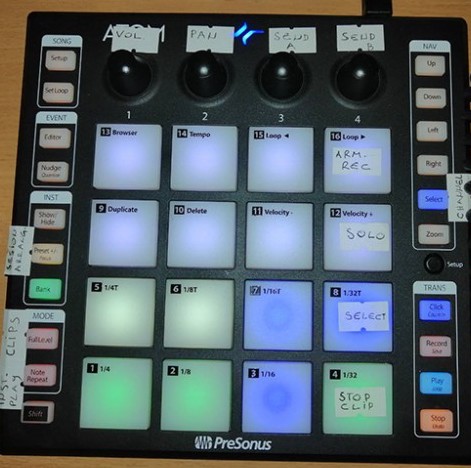
One was for triggering 80s synth drums and transition fills that you can hear in synthwave all the time. The first bank (BLUE) was for elements of the drum kit, and the second bank (GREEN) was for triggering drum fills for transitions between parts.
I love the fact I can trigger loops and audio clips inside Impact XT and sync them to the BPM of my track. All you have to do is to quantize each trigger pad to Follow Tempo and Beats, and no matter what tempo you’re in, it will work flawlessly.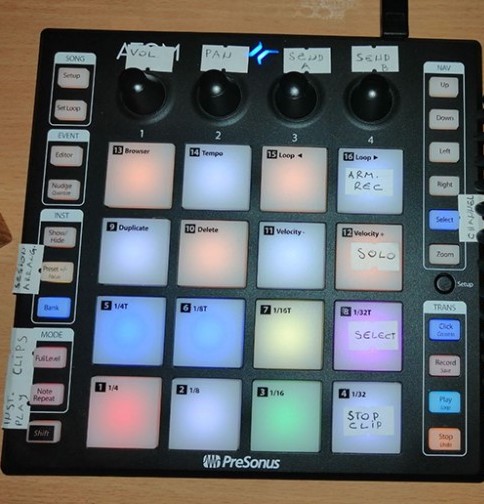
One more thing I like about Impact XT and ATOM is that all the pads can be color-coded the way you like for each bank, because it really helps during the performance to know which pad corresponds to which sound or loop. The bank button on the ATOM itself responds to the bank color of Impact XT, which is really cool.
My second instance of Impact XT was for deep ambient hits and various atonal noises and synth FX for background. I mean, you can’t have a space exploration soundtrack without some weird alien sounds in the background, right??
I love the option of multiple stereo and mono outputs in Impact, so that was really helpful for me to have different FX chains for various drum sounds.
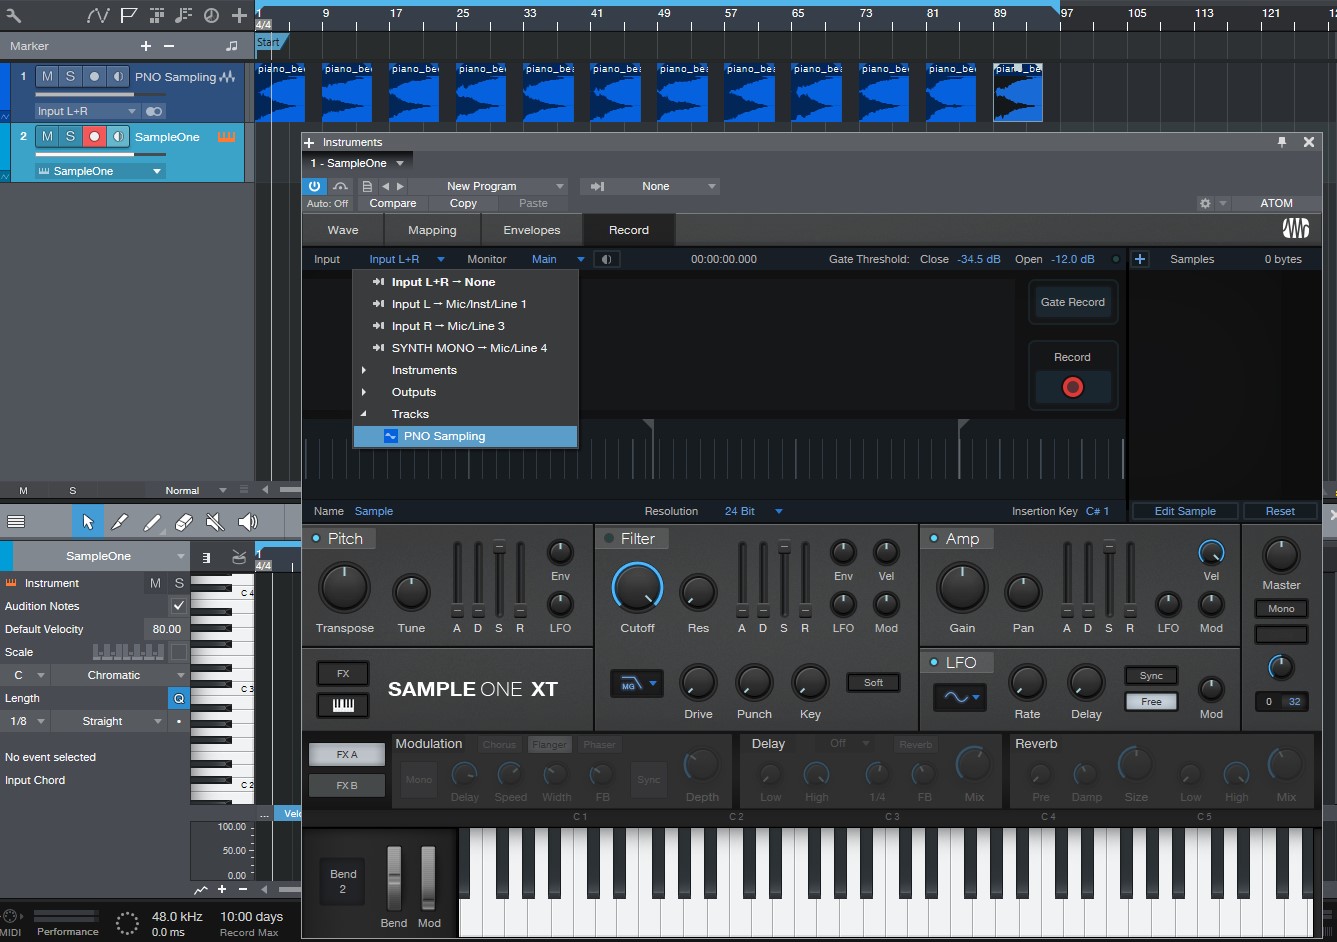
SampleOne XT
SampleOne XT is featuring my main piano sounds for the entire Starpoint Gemini 3 soundtrack. I haven’t recorded actual piano samples, instead I re-sampled a piano VST I am using most of the time for my work. The thing is that this sampled piano uses up a lot of RAM and CPU, so I couldn’t use it in real-time with my other instruments inside my template, because the piano was processed with a lot of plugins, and then it was introducing latency after I had to increase the buffer size.
 In order to use the sounds that I wanted, I re-sampled this piano in two octaves note by note with the processing included. It was more convenient for me, and it saved me a lot of loading time of the template itself.
SampleOne XT proved to be a great choice because it’s really user-friendly and convenient.
First, I had to edit and cut all of the individual notes and label them. That is the only tedious work I had to do here.
After that, all I had to do was to drag the sampled notes to their corresponding key inside Sample One XT. But… I opted for the faster and better solution of sample recording inside SampleOne XT.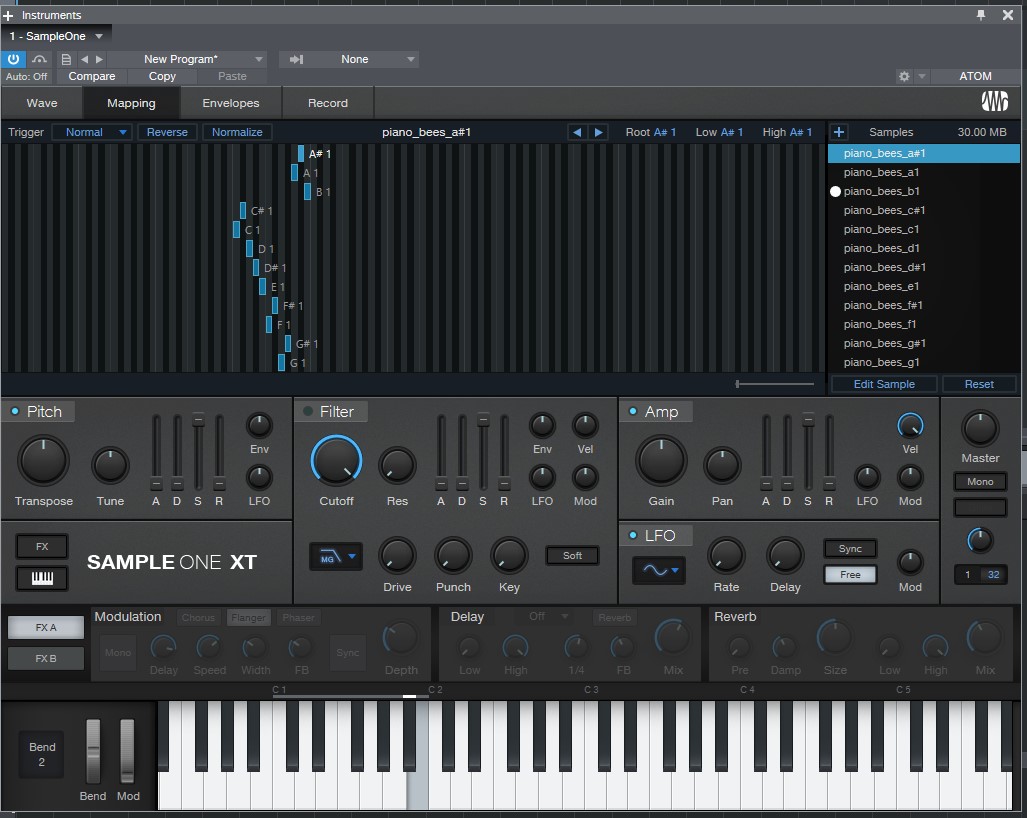
Basically what I did was to place all of the samples on the grid, select the audio input inside Sample One XT, choose the starting note and Play, Stop, and Record buttons in order to tell the engine to separate notes. After that, I only renamed the files, and that was it.
After that was done, I was able to play my piano instantly. I saved the patch as a preset, so I could recall it any time.
It doesn’t get any simpler than that, and this is the reason I love Studio One.
Pattern Editor
As I said, ATOM and Impact XT are all over my percussive tracks and beats on this soundtrack, but I also used another drum VST plug-in here in order to make things sound a little bit organic, and I used my 80s synth drum kit as a layer on top of those organic drum parts. Call it some sort of a kick and snare drum sample trigger like you have in metal production.
The option that really inspired me and got my creative juices flowing is the pattern editor in Studio One 4.6.
The way I sequenced my drums and percussion was to play them in at first, and get the most humanization out of them based on velocity, sample offset etc… But then I took those performances and improved them inside Pattern Editor, changed a hit here and there, modify the rhythm, etc… 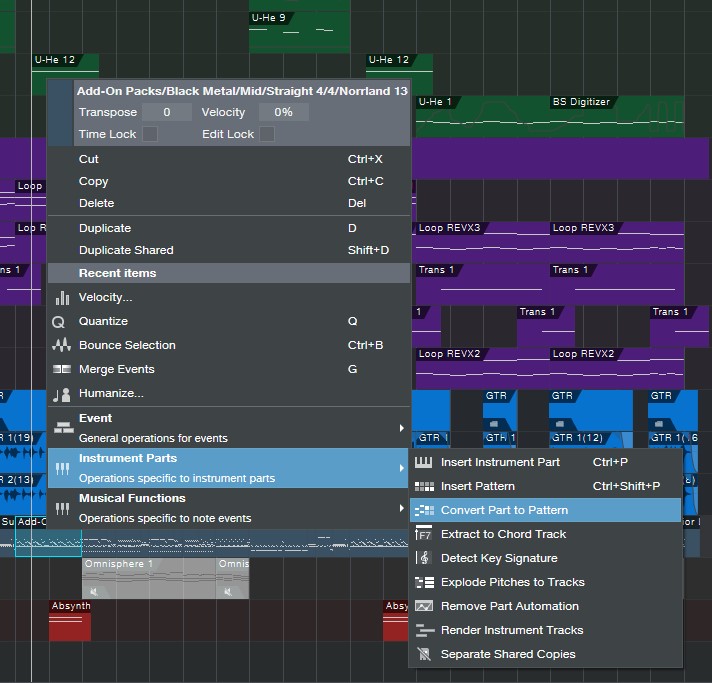
Basically, I had a drum performance on a midi piano roll with all the notes labeled properly, and then I right-clicked on the midi clip to select the option to convert it to drum pattern for editing.
Editing note data inside Pattern Editor is a breeze.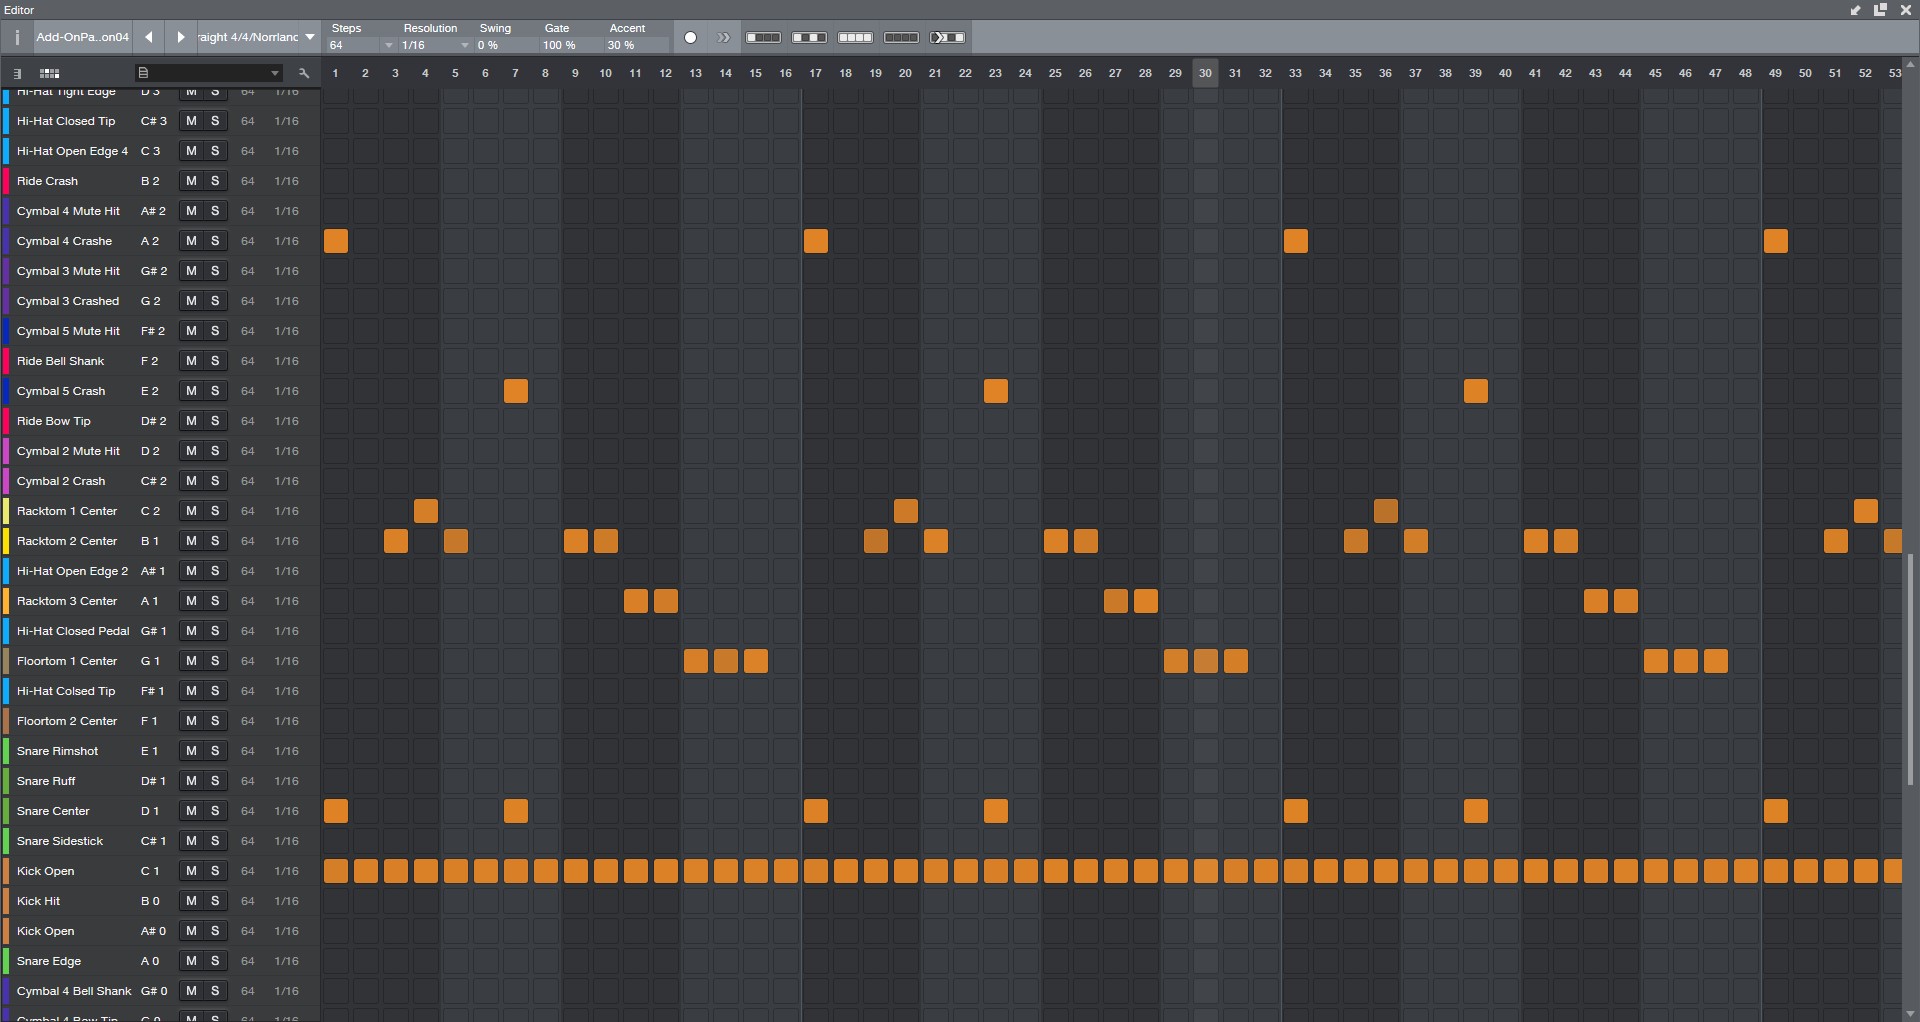
I could easily replace notes, create new performances, shift the beats and add some swing to them in order to make them sound more natural. The option for half-lane resolution is a really cool feature to add triplets and some odd hits, but it allows me to follow the pattern with precision. This is just one example of a pre-chorus pattern inside the action track, and you can clearly see the name of all the notes properly, and I love the way it integrates properly with third party drum VSTs.
It really is a beatmaking workhorse for electronic music. I have yet to test in on cinematic percussion with big drums and more elements.
MIDI FX
MIDI FX in Studio One (the arpeggiator especially) can come in handy if you don’t like the fuss of setting up some complex sequences.
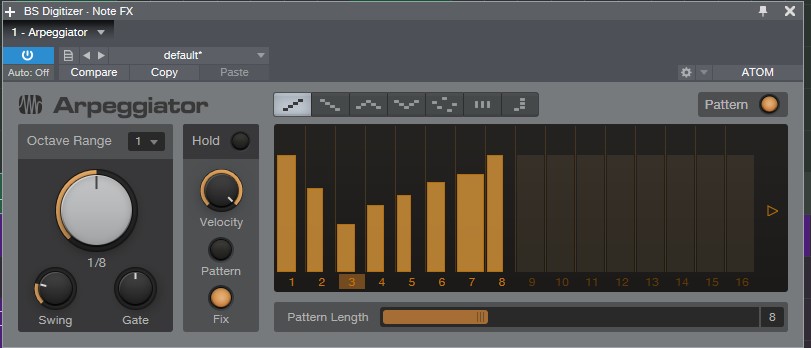 I used arpeggiator mostly on action cues where I wanted to create running sequences in order to have that sense of tension going on during combat. It was mostly set up in 8th or 16th notes, and then I played wide chords on percussive synths in order to get them running and the results were stunning! The arpeggiator is really easy to use, and it was my go-to MIDI effect on this soundtrack.
Repeater is a whole different beast, and this one is for people who 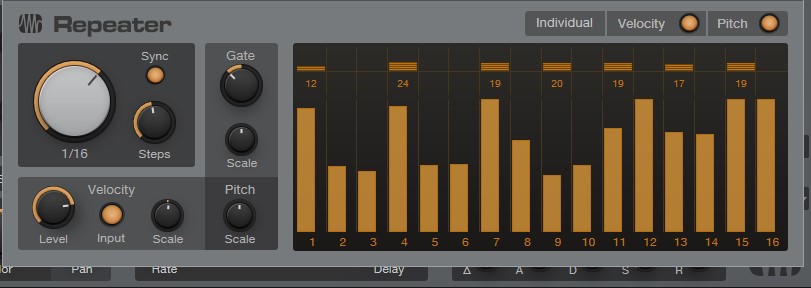 actually like working with complex sequences of scales and melodies. I used Repeater also mostly on action cues for the same reason as the Arpeggiator, but I programmed it to play some aggressive melodies that would counter the chords of the Arpeggiator. I actually have a hardware analogue sequencer, but this was easier and faster to use.
The real fun starts when you place a Chorder in front of Repeater!
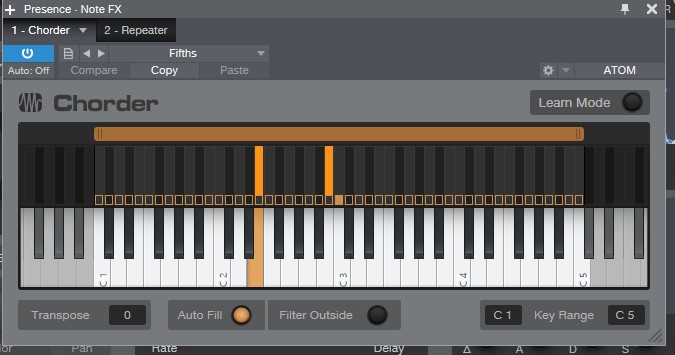
What I did with Chorder was to make it play intervals like fifths or octaves, and then sequence those with either Repeater or Arpeggiator.
The results I got were some really complex action sequences which made the game developers smile from ear to ear! I highly recommend trying this approach.
Play Starpoint Gemini 3 here on Steam!
[ Nik’s Official Website | Starpoint Gemini 3 Soundtrack (Bandcamp) ]
Melodic Percussion
This week’s tip shows how to augment percussion parts by making them melodic—courtesy of Harmonic Editing.
The basic idea is that setting a white or pink noise track to follow the chord track gives the noise a sense of pitch. Although having a long track of noise isn’t very interesting, if we gate it with a percussion part, then now we’ve layered the percussion part’s rhythm with the tonality of the noise. Add a little dotted 8th note echo, and it can sound pretty cool.
Step 1: Bring on the Noise
Noise needs to be recorded in a track to be affected by harmonic editing, so open up the mixer’s Input section, and insert a Tone Generator effect in tracks 1 and 2. Set the Tone Generator to Pink Noise, and trim the level so it’s not slamming up against 0 (Fig. 1).
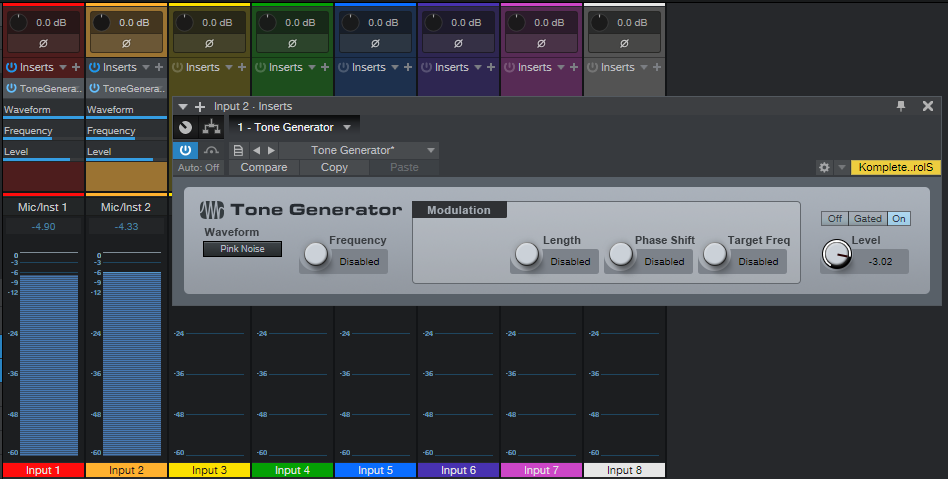
Figure 1: We need noise in each channel to implement this technique.
Record-enable both tracks (set them to Mono channel mode), enable Input Monitor, and start recording noise into the tracks. The reason for recording into two tracks is we want to end up with stereo noise, so the tracks can’t be identical.
Step 2: Make the Noise Stereo
Now that the noise is recorded, you can remove the Tone Generator effects from the track inputs. At the mixer, pan one channel of noise left, and one right. In each track’s Inspector, choose Universal Mode for Follow Chords, and Strings for Tune mode (Fig. 2).
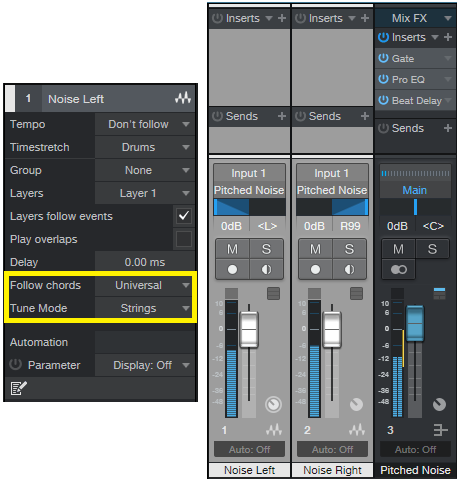
Figure 2: How to set up the tracks for stereo noise. The crucial Inspector settings are outlined in yellow.
Set each track’s output to a Bus, and now we have stereo noise at the Bus output. Insert a Gate in the Bus, and any other effects you want to use (I insert a Pro EQ to trim the highs and lows somewhat, and a Beat Delay for a more EDM-like vibe—but use your imagination).
Step 3: Control the Gate’s Sidechain
Choose the percussion sound with which you want to control the Gate sidechain, insert a pre-fader send in the percussion track, assign the send to the Gate, and then adjust the Gate parameters so that the percussion track modulates the noise percussively. Fig. 3 shows the track setup.
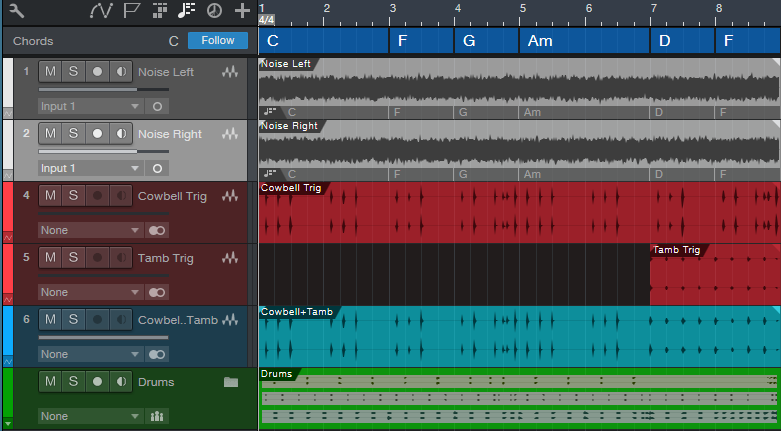
Figure 3: Track layout used in the audio example.
Tracks 1 and 2 are the mono noise tracks that follow the Chord Track, and feed the Bus. Tracks 4 and 5 both have pre-fader sends to control the Gate, so that for the first 7 measures only the cowbell controls the gate, but at measure 8, a tambourine part also modulates the Gate.
Track 6 has the cowbell and tambourine audio, which is mixed in with the pitched noise, while the folder track has the kick, snare, and hi-hat loops. (The reason for not using post-fader sends on the percussion tracks is so that the tracks controlling the Gate are independent of the audio, which you might want to process differently.)
But Wait…There’s More!
With a longer gate, the sound is almost like the rave organ sound that was so big at the turn of the century. And there are options other than gating, like using X-Trem…or following the Gate with X-Trem. Or draw a periodic automation level waveform for the bus, and use the Transform function to make everything even weirder. In any case, now you have a new, and unusual tool, for percussive accents.
Keyboard Meets Power Chords
Hey keyboard players!
Do you feel kind of left out because of the cool guitar amps that Studio One added in version 4.6? Well, this week’s tip is all about having fun, and bringing power chord mentality to keyboard, courtesy of those State Space amps. Listen to the audio example, and you’ll hear what I’m talking about.
And so you can get started having fun, you don’t even have to learn what’s going on to get that sound you just heard. Download Power Chordz.instrument, drag it into the track column, feed it from your favorite MIDI keyboard, and start playing.
Now, I know some of you prefer just to download a preset and get on with your life, and that’s fine—but for those who want some reverse engineering, here’s what’s under the hood.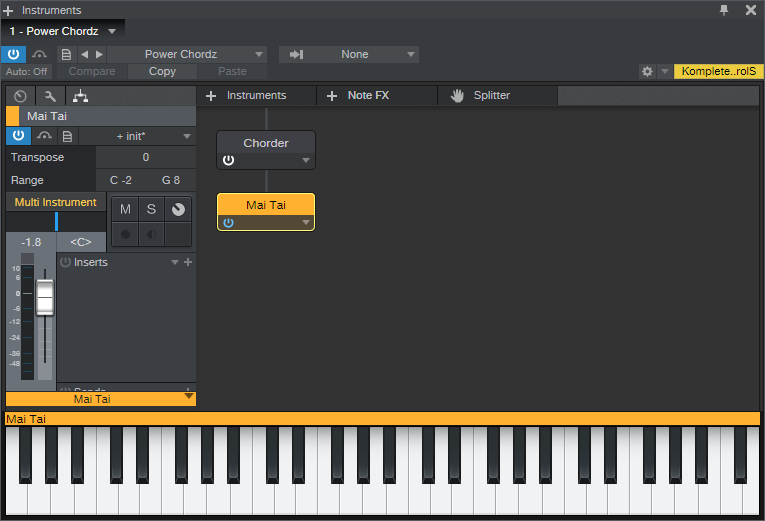
Figure 1: The Multi-Instrument is pretty basic—it just bundles a Chorder Note FX and Mai Tai together.
The preset starts with a Multi-Instrument (Fig. 1) that consists of the Chorder Note FX, and Mai Tai synthesizer. The Chorder plays tonic, fifth above, an octave above, octave+fifth above, and two octaves above when you hit a keyboard key—your basic “it’s not major, and it’s not minor” type of power chord.
The Mai Tai uses a super-simple variation on the Init preset. In Fig. 2, anything that’s not relevant is grayed out. Turn off Osc 2, Noise, LFO 1, and LFO 2. There’s no modulation other than pitch bend, and no FX. Envelope 2 and Envelope 3 aren’t used. I set Pitch Bend to 7 semitones to do whammy bar effects, but adjust to taste. Also, you might want to play around with the Quality parameter. I’m allergic to anything called “normal,” so if you are as well, try the 80s, High, and Supreme settings to see if you like one of those better.
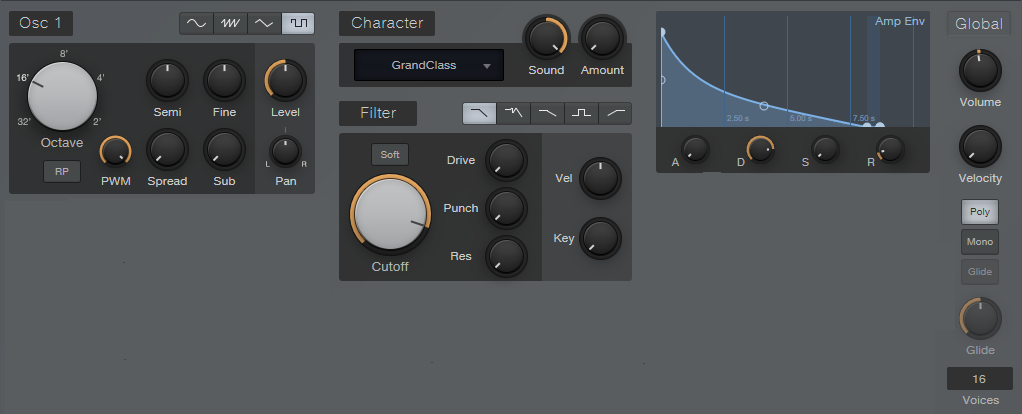
Figure 2: The Mai Tai preset uses simple waveforms, which is what you want when feeding amp sims and other distortion-oriented plug-ins.
Look in the instrument’s mixer channel, and you’ll see four Insert effects: Pro EQ, Ampire, Open Air, and Binaural Pan. You can check out their settings by opening them up, but the Ampire settings (Fig. 3) deserve a bit of explanation.
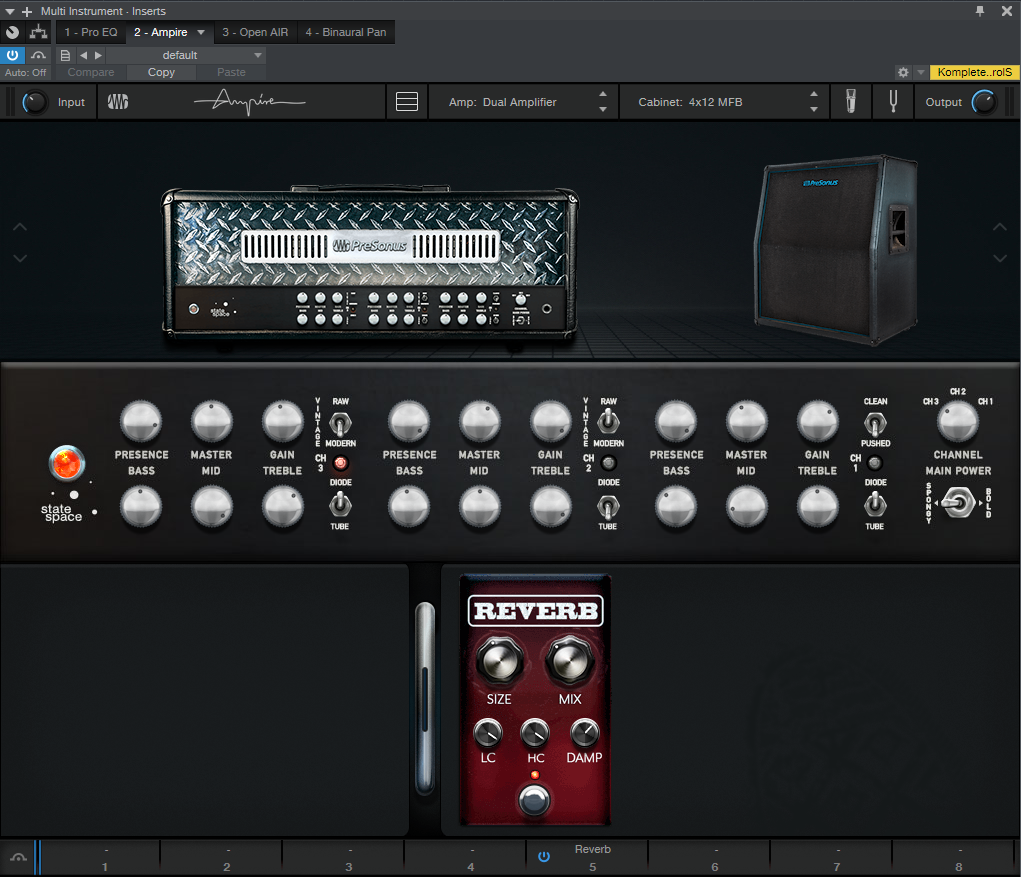
Figure 3: Ampire is using the Dual Amplifier and 4×12 MFB speaker cabinet, but just about any amp and cab has their merits.
The reason for choosing the Dual Amplifier is because it’s really three amps in one, as selected by the Channel knob on the right—I figured you’d appreciate having three separate sounds without having to do anything other than adjust one knob. Try different cabs and amps, but be forewarned—you can really go down an Endless Rabbit Hole of Tone, because there are a lot of great amp and cab sounds in there. I’ll admit that I ended up playing with various permutations and combinations of amps, effects, and cabs for hours.
You can also get creative with the Mai Tai, specifically, the Character controls. I didn’t assign any controls to a Control Panel, or set up modulation because having a pseudo-”whammy” bar pitch wheel was enough to keep me occupied. But, please feel free to come up with your own variations. And of course…post your best stuff on the PreSonus Exchange!
Sascha Konietzko (KMFDM) Talks Studio One

Hello… this is Sascha Konietzko a.k.a Käpt’n K, a native of Germany, founder of KMFDM in 1984 (when I was living in Paris, France), a producer and remixer for the past 35+ years.
Besides KMFDM, I’ve done work to more or lesser degrees of involvement with a number of projects on the side: MDFMK, EXCESSIVE FORCE, KGC, SCHWEIN, PIG, and SKOLD, to name a few. As a remixer, I was fortunate enough to contribute to bands such as Metallica, Rob Zombie, Megadeth, The Young Gods, Front 242, Die Krupps and many more.
Under the moniker KMFDM, I have released 21 studio albums, as well as dozens of singles, EPs and live albums.
I’ve been using the PreSonus StudioLive 24.4.2 digital console mixer for live shows (monitor setup) for a number of years now, as well as Studio One Professional and the trusty ol’ Studio Channel. Studio One Professional has been used in my personal studio, mainly to record vocals.
So here’s the story: I’ve been using Pro Tools since 1991; previously I’ve worked with the earlier version of it, which was Sound Designer II. Over the years Pro Tools evolved into a platform with many great features, but also many (not to be underestimated) negative aspects—such as severe latency, under some circumstances.
When I discovered Studio One, which was actually highly recommended to me by KMFDM’s drummer Andy Selway, I found out that I could easily use the workflow I’ve come to develop over the years with the click of a button, PLUS… and this is the absolutely greatest feature of Studio One Professional in my mind: without any latency AT ALL. It allows me to interchange seamlessly between my recording and my mixing environments!
Seriously, it’s been a lifesaver after so many situations where a recording session just went downhill really quick due to latency issues in Pro Tools, with frustrated performers and a super-frustrated Yours Truly!
Website | Spotify | YouTube | Instagram | Facebook | Twitter
The Various Sound-Worlds Of Anna Clark
 Nineteen year-old Anna Clark works as a Grammy-nominated vinyl mastering engineer at Welcome to 1979 Industries. Nine years ago, she founded 501(c)(3) organization Guitars 4 Gifts, which has given over 1,000 youths access to their first musical instrument.
As a lifelong singer/songwriter/musician, Anna has performed live on Lightning 100 (Nashville’s premier independent radio station), she holds a Certificate in Music Business from the Berklee College of Music and is currently on track to graduate from Belmont University in 2022.
When not working on one of her passion projects, Anna loves to spend time with her dogs or attend concerts with her friends and family.
Let’s find out more about how she’s been navigating through and actualizing all of these different creative sonic environments!
What hardware and software tools help you with your audio work at home these days?
I currently use a StudioLive 16 mixer, a Central Station Plus, HP4 headphone amp, a pair of Sceptre S6 monitors, and Studio One DAW software.
Originally, a friend introduced me to your monitors and I basically fell in love with using them. Because I work in many different areas of audio engineering, I needed products that I could use for any area that I was working in, so that I wouldn’t have to have different setups.
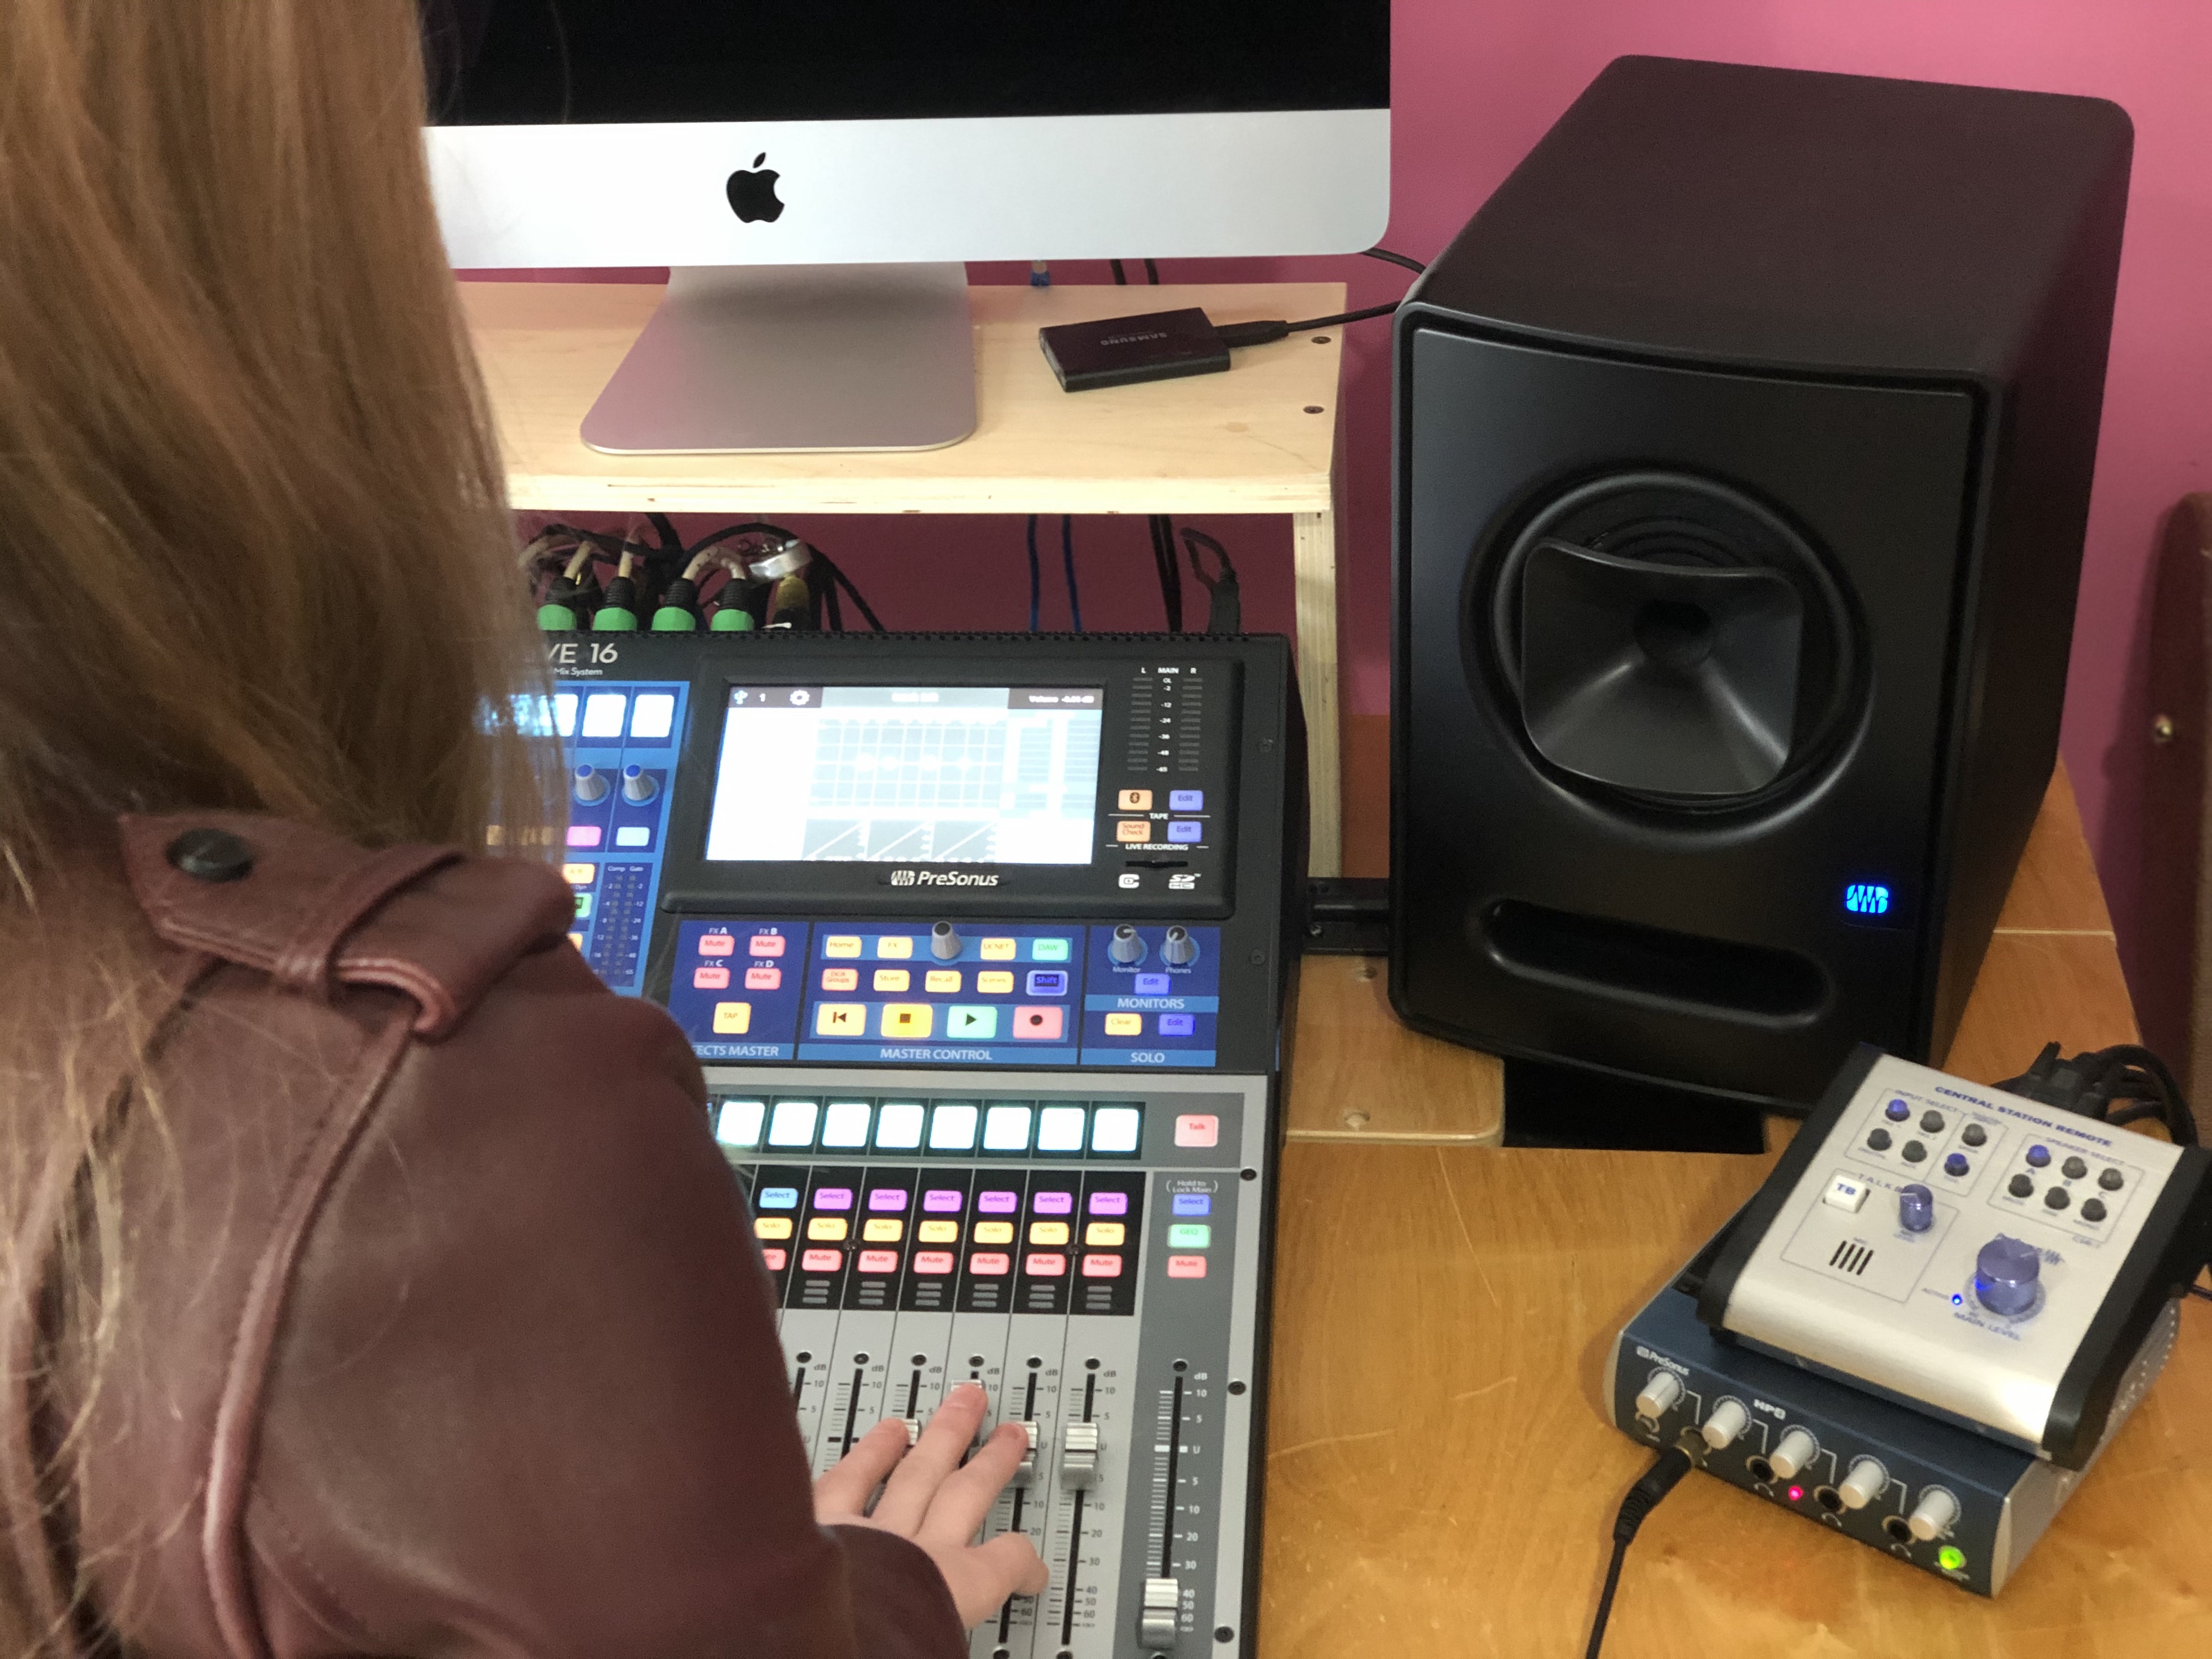 I use my StudioLive mixer pretty much every day. It is great because I save different scenes so that if I am recording a guitar/vocal demo, I have some EQ and compression settings saved, and I can bring them up super easily. I love that I can A/B EQ settings using the A/B button, and I also love the vintage EQ and tube compressor. I also have scenes saved for full band sessions, piano/vocal sessions, and more. The StudioLive mixer makes it super convenient for me to walk up and start working. I will also say that I carry it with me everywhere to run sound for live shows and recordings, and have even used it for a live broadcast of a show. It has never let me down and has always been very easy to set up! Because I am able to save settings from my recording sessions, it makes it even easier to set up for a live show.
Basically, I have various synths, mics, instruments, etc. that I leave set up so that I can record an idea at any time and they go directly into the mixer. From there, I use the Central Station which outputs to my Sceptre monitors along with other monitors and a PreSonus HP4.
We’re curious about your work as a vinyl mastering engineer… can you tell us about that sound-world?
The first thing I do when I’m mastering a project for vinyl is look at all of the files and create a session for them.  I then check the length of both of the sides. For each speed and size of disk, there are certain limits for how long the side can be. Next, I typically adjust the overall level of the project. Usually, the project is too loud, even if it hasn’t been mastered before. The louder the project is, the wider the grooves are. If the grooves are too wide and take up too much space, the project won’t be able to fit on the lacquer (the type of disk I cut on to make a vinyl master). I then mono the low end and use an EQ to filter out any frequencies that may give me problems. Sometimes if the vocal has too much sibilance it can cause issues, especially if there are also a lot of hi-hats/cymbals. I then run the project down to make sure it will fit and also to make sure there won’t be any trouble areas. If everything looks good, I’ll cut the project after that! Before I cut a lacquer, though, I have to use a microscope to look at a couple test cuts and make sure the stylus is working properly and that there is enough space in between the grooves.
Moving back to your home studio working environment; tell us more about how you’ve been using Studio One and what led you to our DAW?
For producing, tracking, mixing, and mastering. I will also occasionally use it for live recordings with my StudioLive 16 mixer. It has been a very helpful tool!
One of the main factors that lead me to it was when I was producing, being able to bounce between ideas easily and combine ideas from different files. I tend to either work with an “engineer” mindset or a “creative” mindset. Because of how easy Studio One is to use, I am able to start tracking a song while I am writing it, and I am able to keep my “creative” mindset. It helped me when I would be writing and producing at the same time, because it allowed me to be able to keep my creative hat on while still being able to engineer a track.
What Studio One features have proven particularly useful and why?
It is very quick and easy to use, which is helpful when recording live shows. It makes the show go a lot smoother when you’re not having to worry about having to spend a lot of time setting up a session, etc. I also love how well all of the PreSonus gear works together; it is extremely nice to have products that all communicate together so that I’m not wasting time trying to fix something. If I have an idea, I can walk right into my studio and know that I’ll be able to get everything down fast.
This was especially helpful when I was just getting started as an engineer, because everything was very straightforward when I was setting it up.
All of the PreSonus products work in many different settings. For example, I originally purchased my StudioLive board for live events, but I use it in a studio setting as well and love it there, too!
Finally, let’s talk about you as a creative musical artist!
My main influences for my own music are artists like Maggie Rogers, Florence and the Machine, and St. Vincent. I have a love for analog synths and was lucky enough to get my hands on a couple for this project. I used a Roland Juno 6 and a MOOG Sub Phatty for most of the songs, and then had a drummer/guitarist/bassist add parts to each of the songs as well. I love using basic tools like EQ and reverb to make new sounds that I haven’t heard before. Typically, I will use the Pro EQ plugin that comes with Studio One to take out certain frequencies. The majority of EQ’ing I do is subtractive, because I like to make sure that every instrument has its own space in my songs. A lot of my time is spent experimenting with lots of different effects to try to get the sounds that I can hear in my head. I love the depth that an analog synth and live instruments can bring to a session, but I also love being able to edit a project easily. Even though I’ll record a lot of different instruments, I like to be able to edit each of the parts so that you can feel the song “build up” from each of the verses to the chorus. Studio One makes it really easy for me to audition different parts and figure out what I like. I am also known for creating a bunch of different versions of the same song, and Studio One is able to make my workflow seamlessly. I use the Scratchpad function because I typically write a song while I am also recording it, so I am able to try out different ideas without having to commit. That is one of the things that Studio One does best, is it works for Engineers, but also Songwriters, Artists and Producers of creative content these days online.
I feel very lucky that I found your products because it has really helped me grow my studio and career. Thank you, PreSonus!
Website | Instagram | Facebook
SANGUINE: Cold Blood(ed) With Studio One
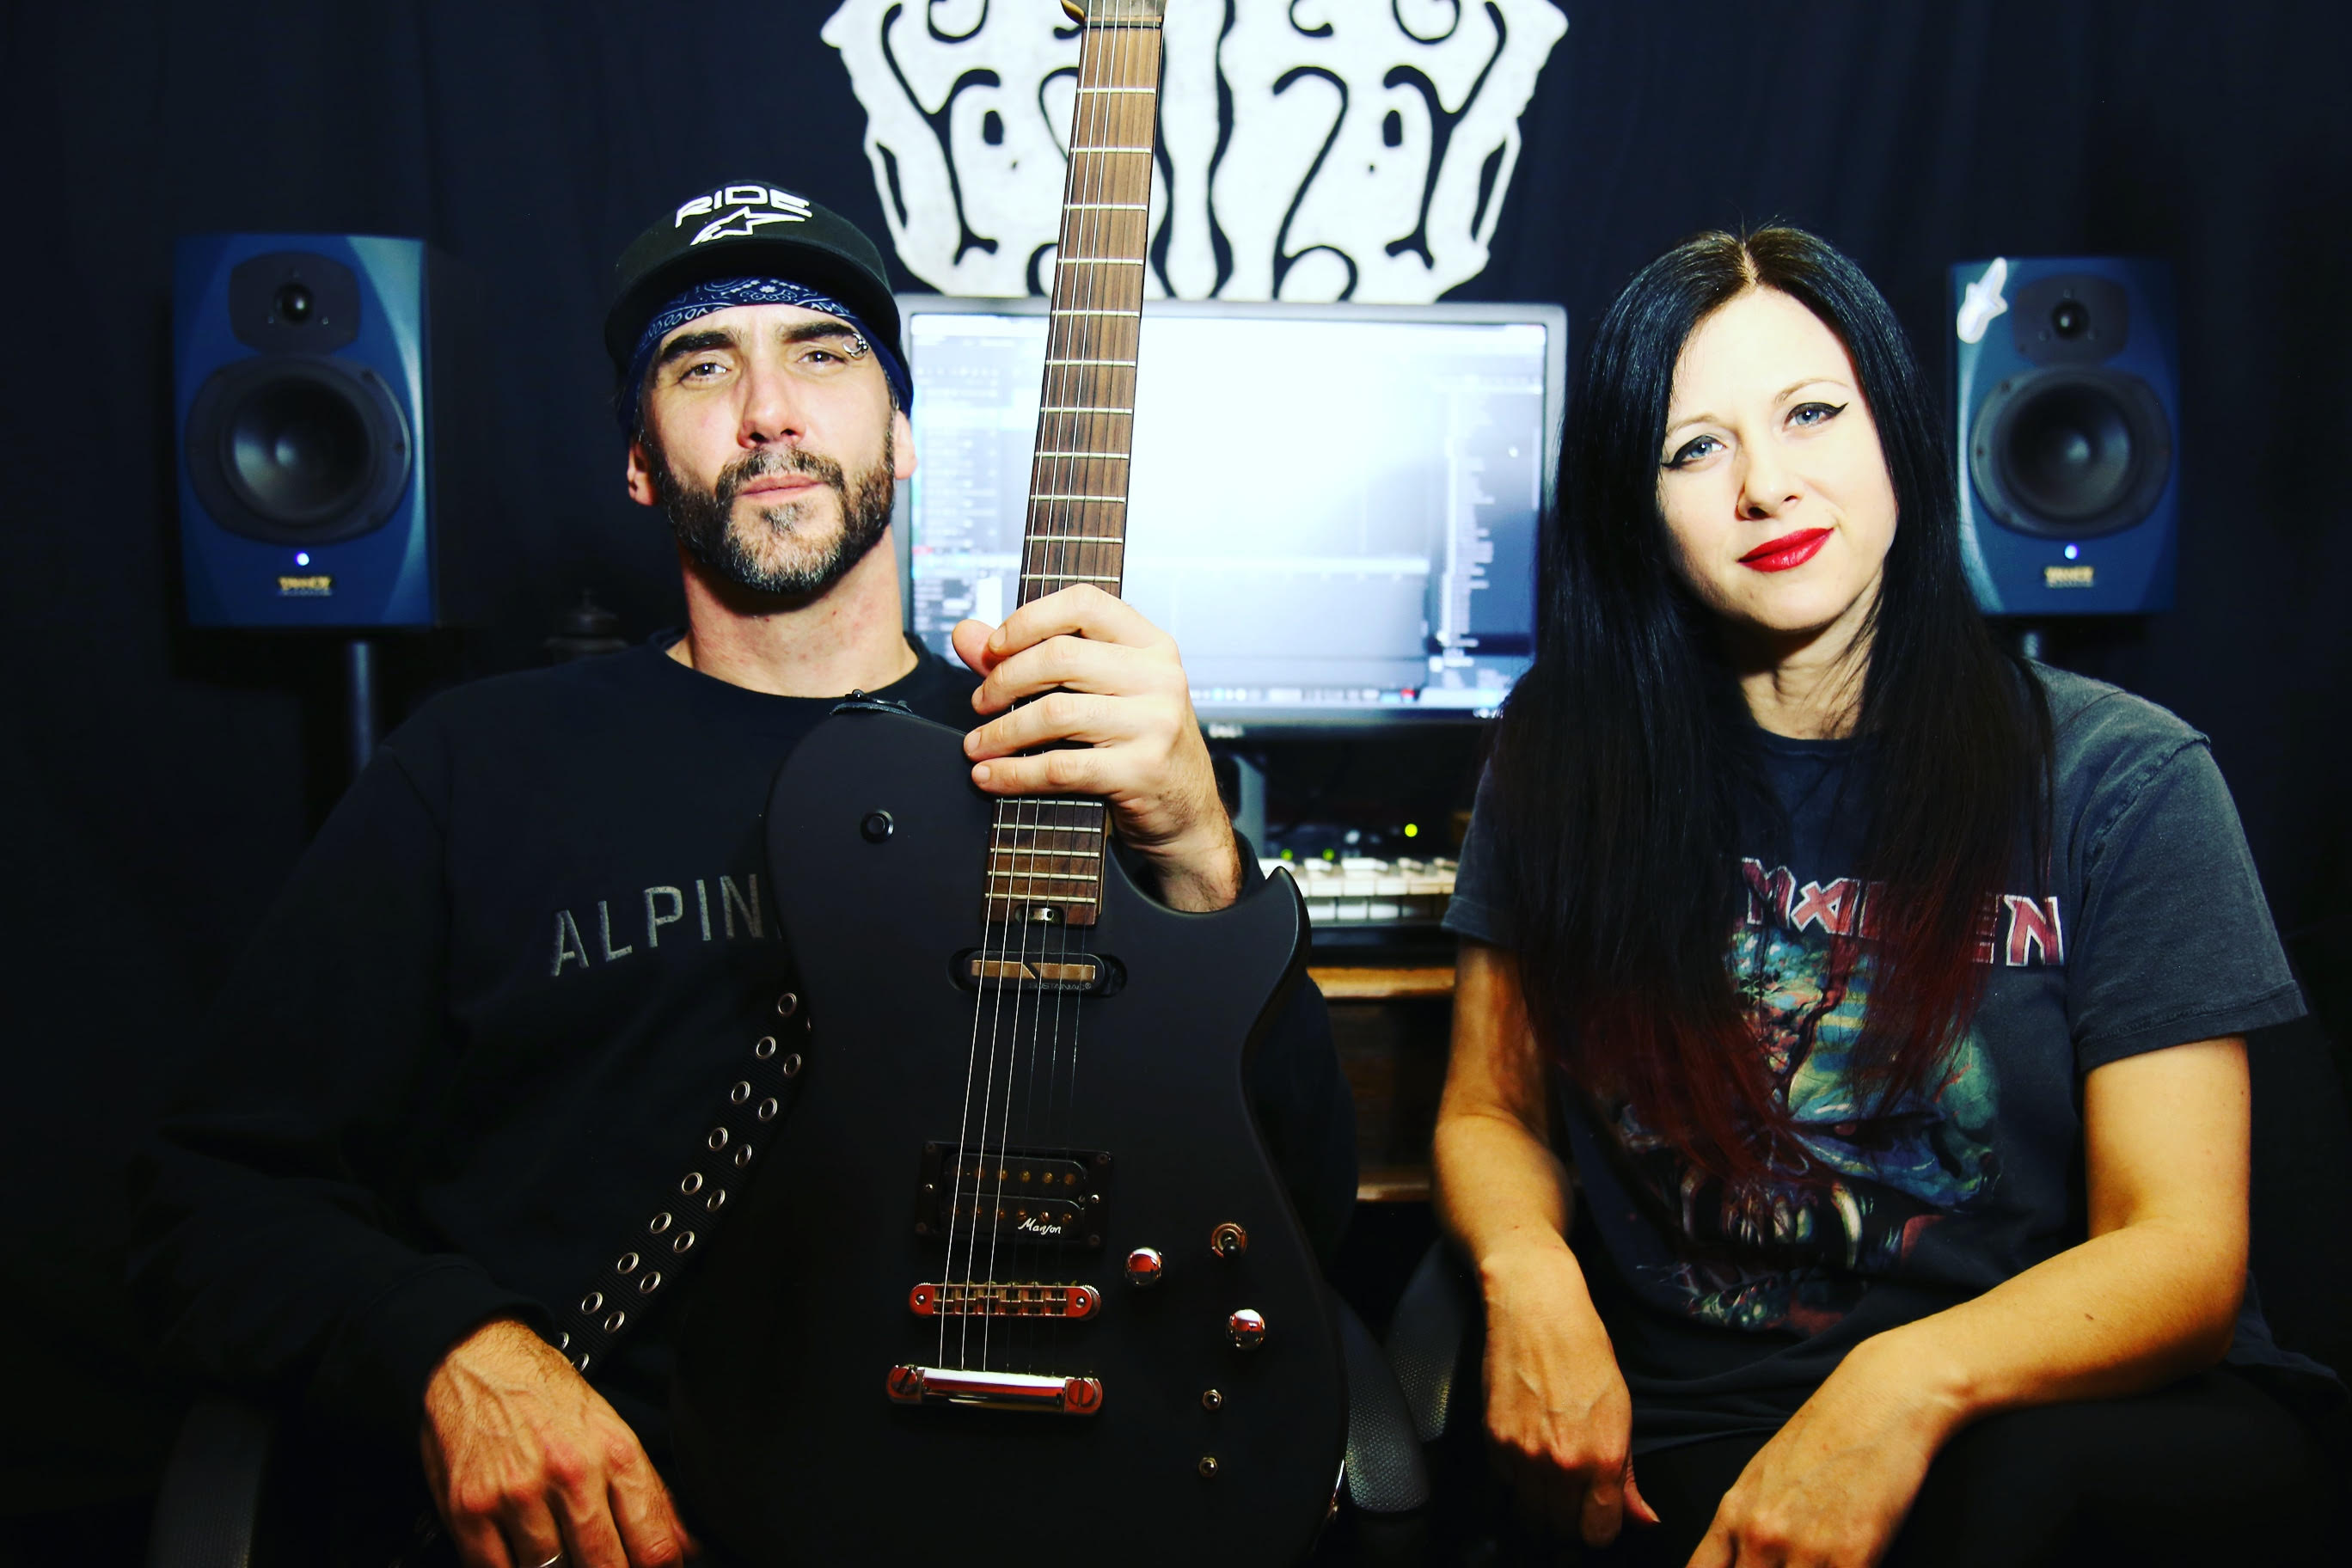
SANGUINE are an Alternative Rock Metal band from Exeter in the UK, led by singer Tarin Kerrey and guitarist Nick Magee.
The band released their first Album, Black Sheep, in 2016, co-written by Jesper Stromblad from Grammy Award-winning band In Flames. It gained incredible reviews, and Sanguine went on to tour the UK and Europe with many notable acts including Fear Factory, Megadeth, Skindred, MushroomHead, Hellyeah, Cancer Bats, OPM, Zebrahead, and many more.
“Save Me” single from Black Sheep
Following the tour cycle, SANGUINE returned to the UK to record the follow-up album. They tried various producers, but found the energy wasn’t really connecting and wanted it to feel right. At the same time, they had been playing around with the free version of PreSonus Studio One—Studio One Prime. They found it incredibly intuitive, and as their skills improved they began making higher and higher quality demos. They started showing the recordings to the labels, sponsors, and their inner circle… and the feedback was extremely positive.
When it came to the final decision of who to record with, SANGUINE mixed up the recordings with versions of the same songs from professional producers done in other studios, and asked people to choose their favorite based just on sound. The majority of them picked the band’s version recorded in Studio One.
This inspired the band to fully embrace the program and learn as much as they could in a very short time.
The result is Cold Blood, which like its predecessor has received stunning reviews from both mainstream and underground press/blogs/fanzines.
“Ignite,” single from Cold Blood
In a modern climate where music makes very little revenue compared to the cost of making it, getting the cost of an album down is crucial. The average cost of a rock album is about £10-£20K. Cold Blood cost under £500 to make in total because of Studio One. SANGUINE only used the plug-ins that came with Studio One—as there was plenty to work with!
Perhaps one of the most impressive things about Studio One is its user-friendly interface. Nobody in the band was particularly computer-minded. None of us had any previous experience engineering at all. That alone is a testament to how logical the layout is. The only regret SANGUINE have is not going down this path earlier, because the benefits have been so instant and rewarding.
PreSonus: What PreSonus products have you used and which do you currently use?
SANGUINE: We actually have a really simple and achievable setup. We use Studio One Professional, Tannoy monitors, and a range of mics. We have brought additional plug-ins like Izotope and VSTs, but to be honest 90% of what we ended up using for the album came free with the software. It’s a seriously comprehensive range of sounds to get started with. You could spend weeks alone exploring just them!
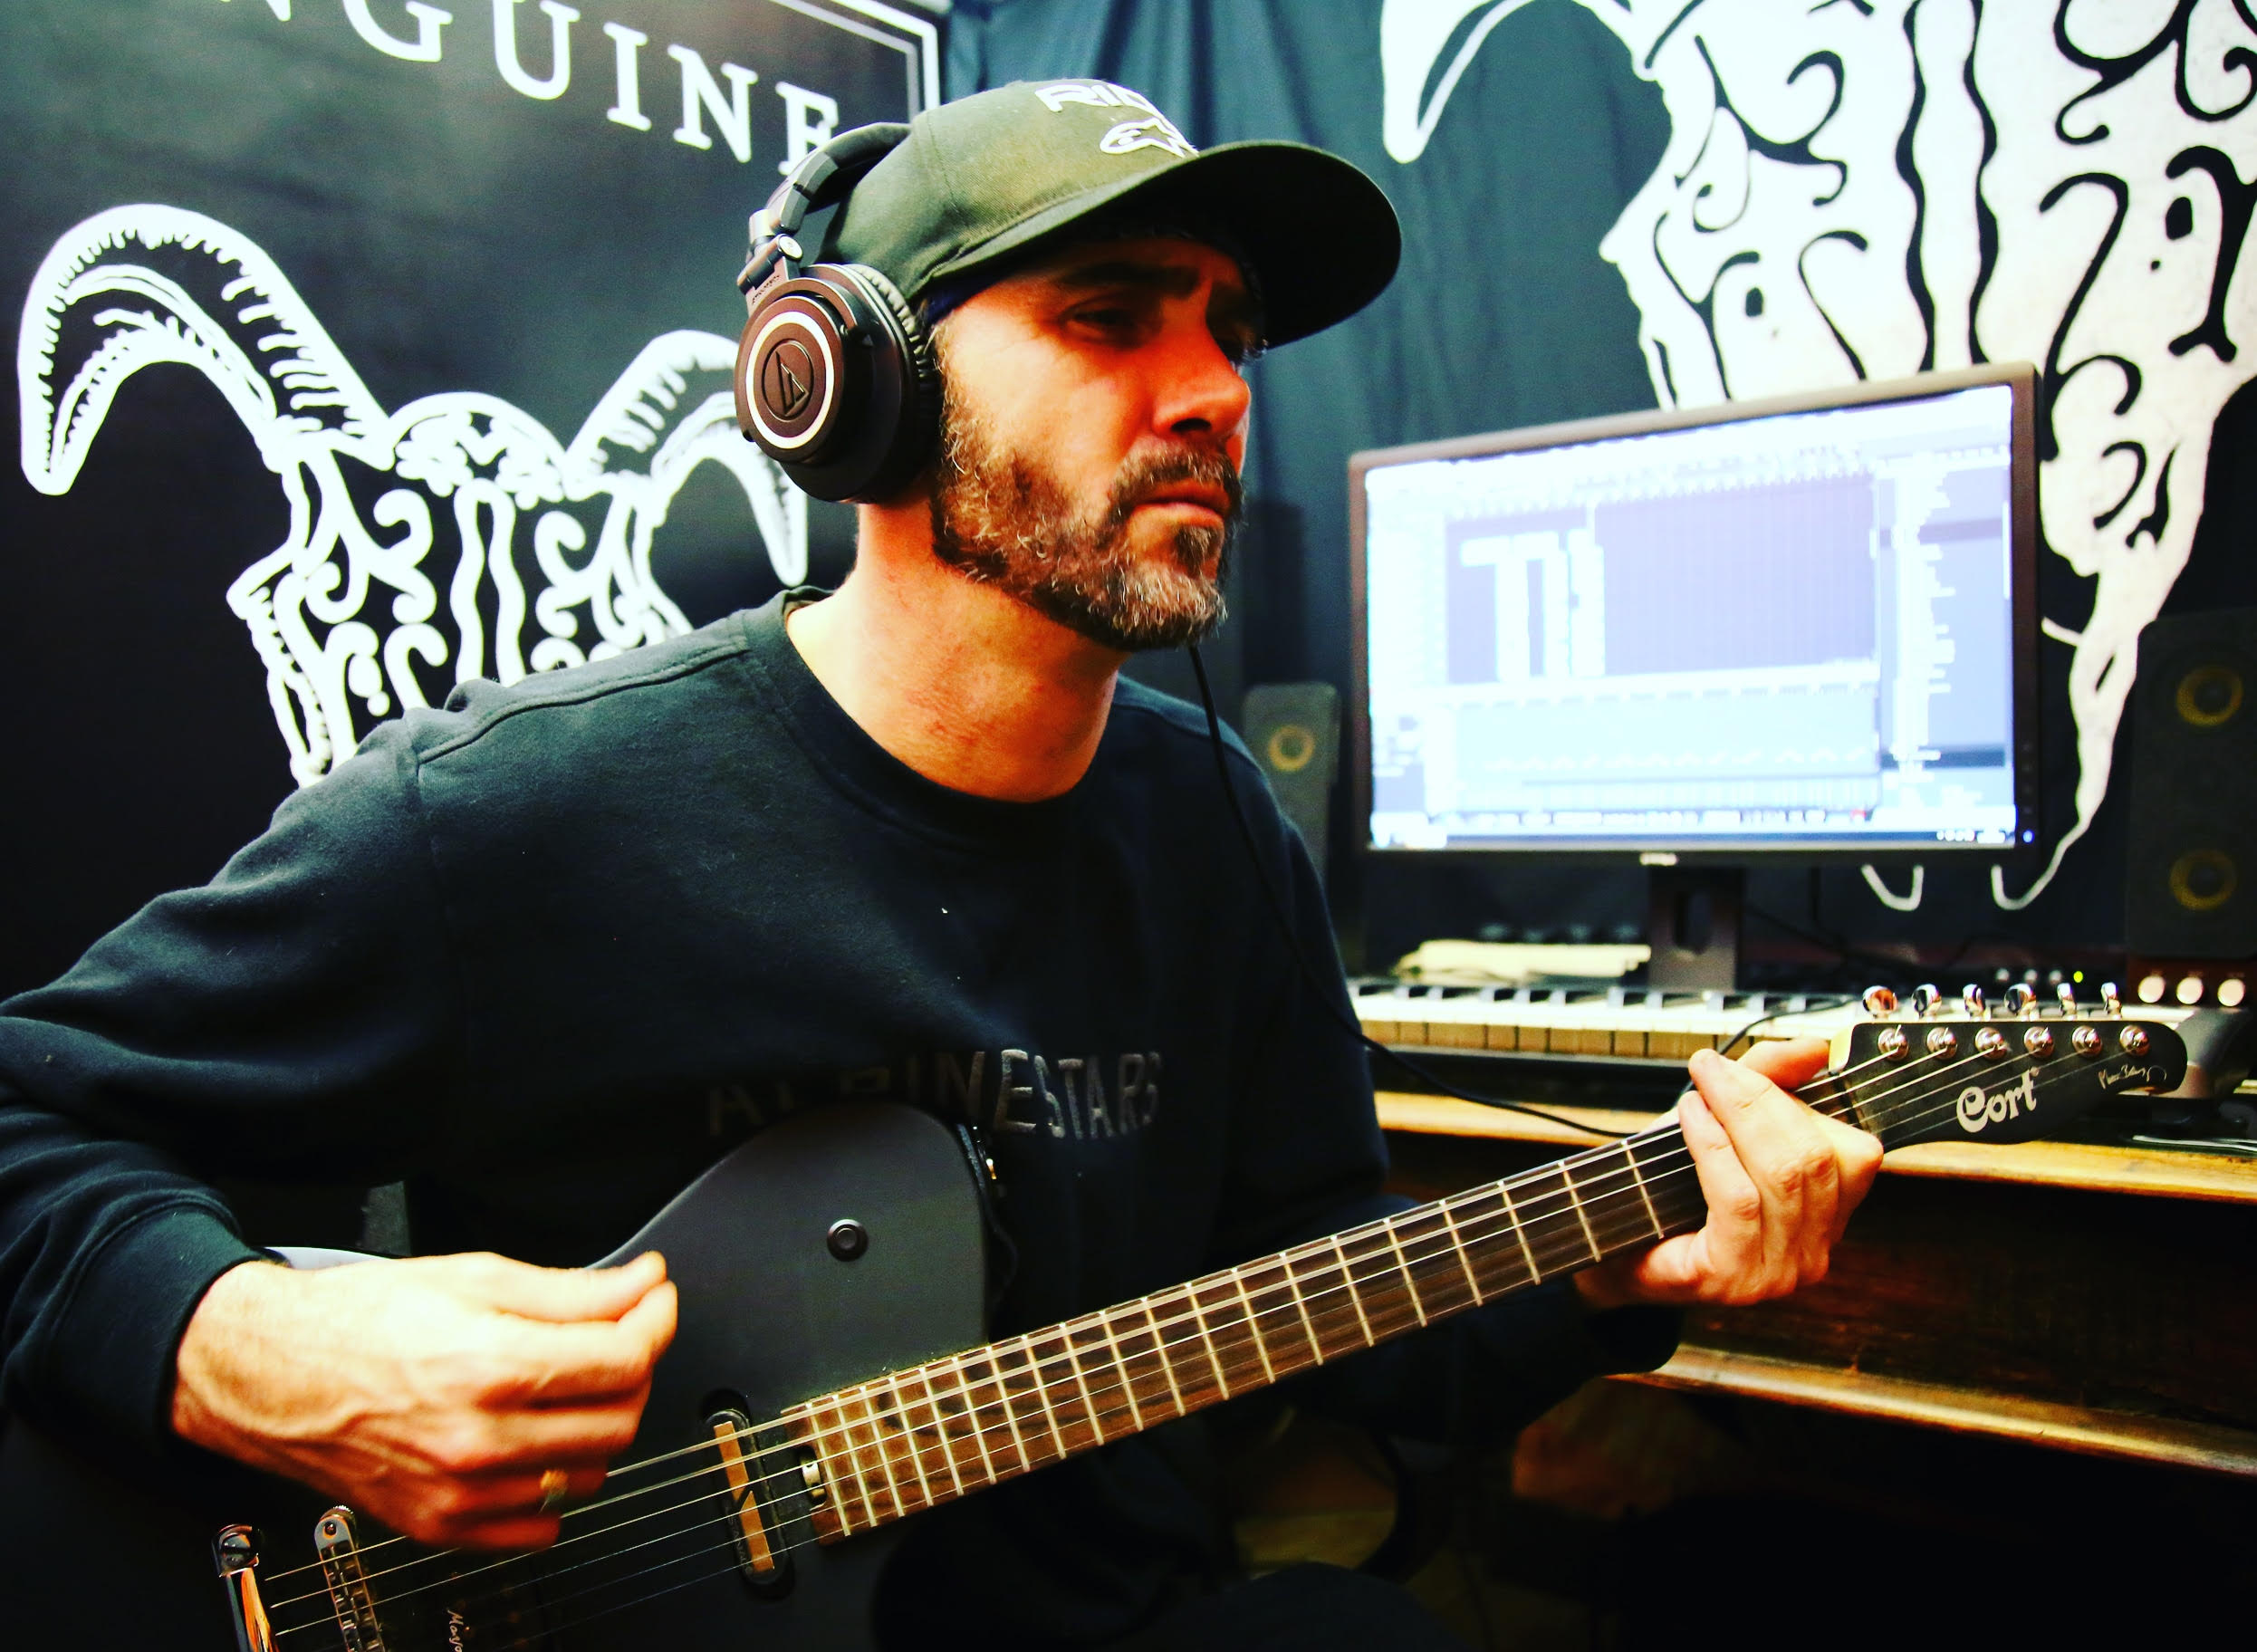
We are looking at buying more expansion packs for the next round of recordings. We compensate for our lack of outboard studio gear by using VST plug-ins and extremely high-quality instruments and mics. Nick uses a Manson MBC-1 with Pro Sustainiac Sustainer and Ross uses a Fender Precision bass with Nordstrand Audio custom pickups. Changing to Mansons and Nordstrand gear changed our game quite a bit both live and for the studio. We have learned that having high-quality source sounds, good quality microphones/pre-amps, and a decent soundcard is absolutely key to the end product sounding good.
PreSonus: What led you to Studio One? Was it the company’s reputation, audio quality, ease of use, specific features, price, other factors?
SANGUINE: To be honest it kind of found us! Producer Daniel Flores introduced us to the program during the recording of the Black Sheep album. We had never heard of this DAW before, but Daniel is a true pro, so the fact that he was using it alone was a big validation. You could tell he was excited by the functionality of the program and throughout the recording, he would often show us some of the cool things you could do with it. This sparked our interest.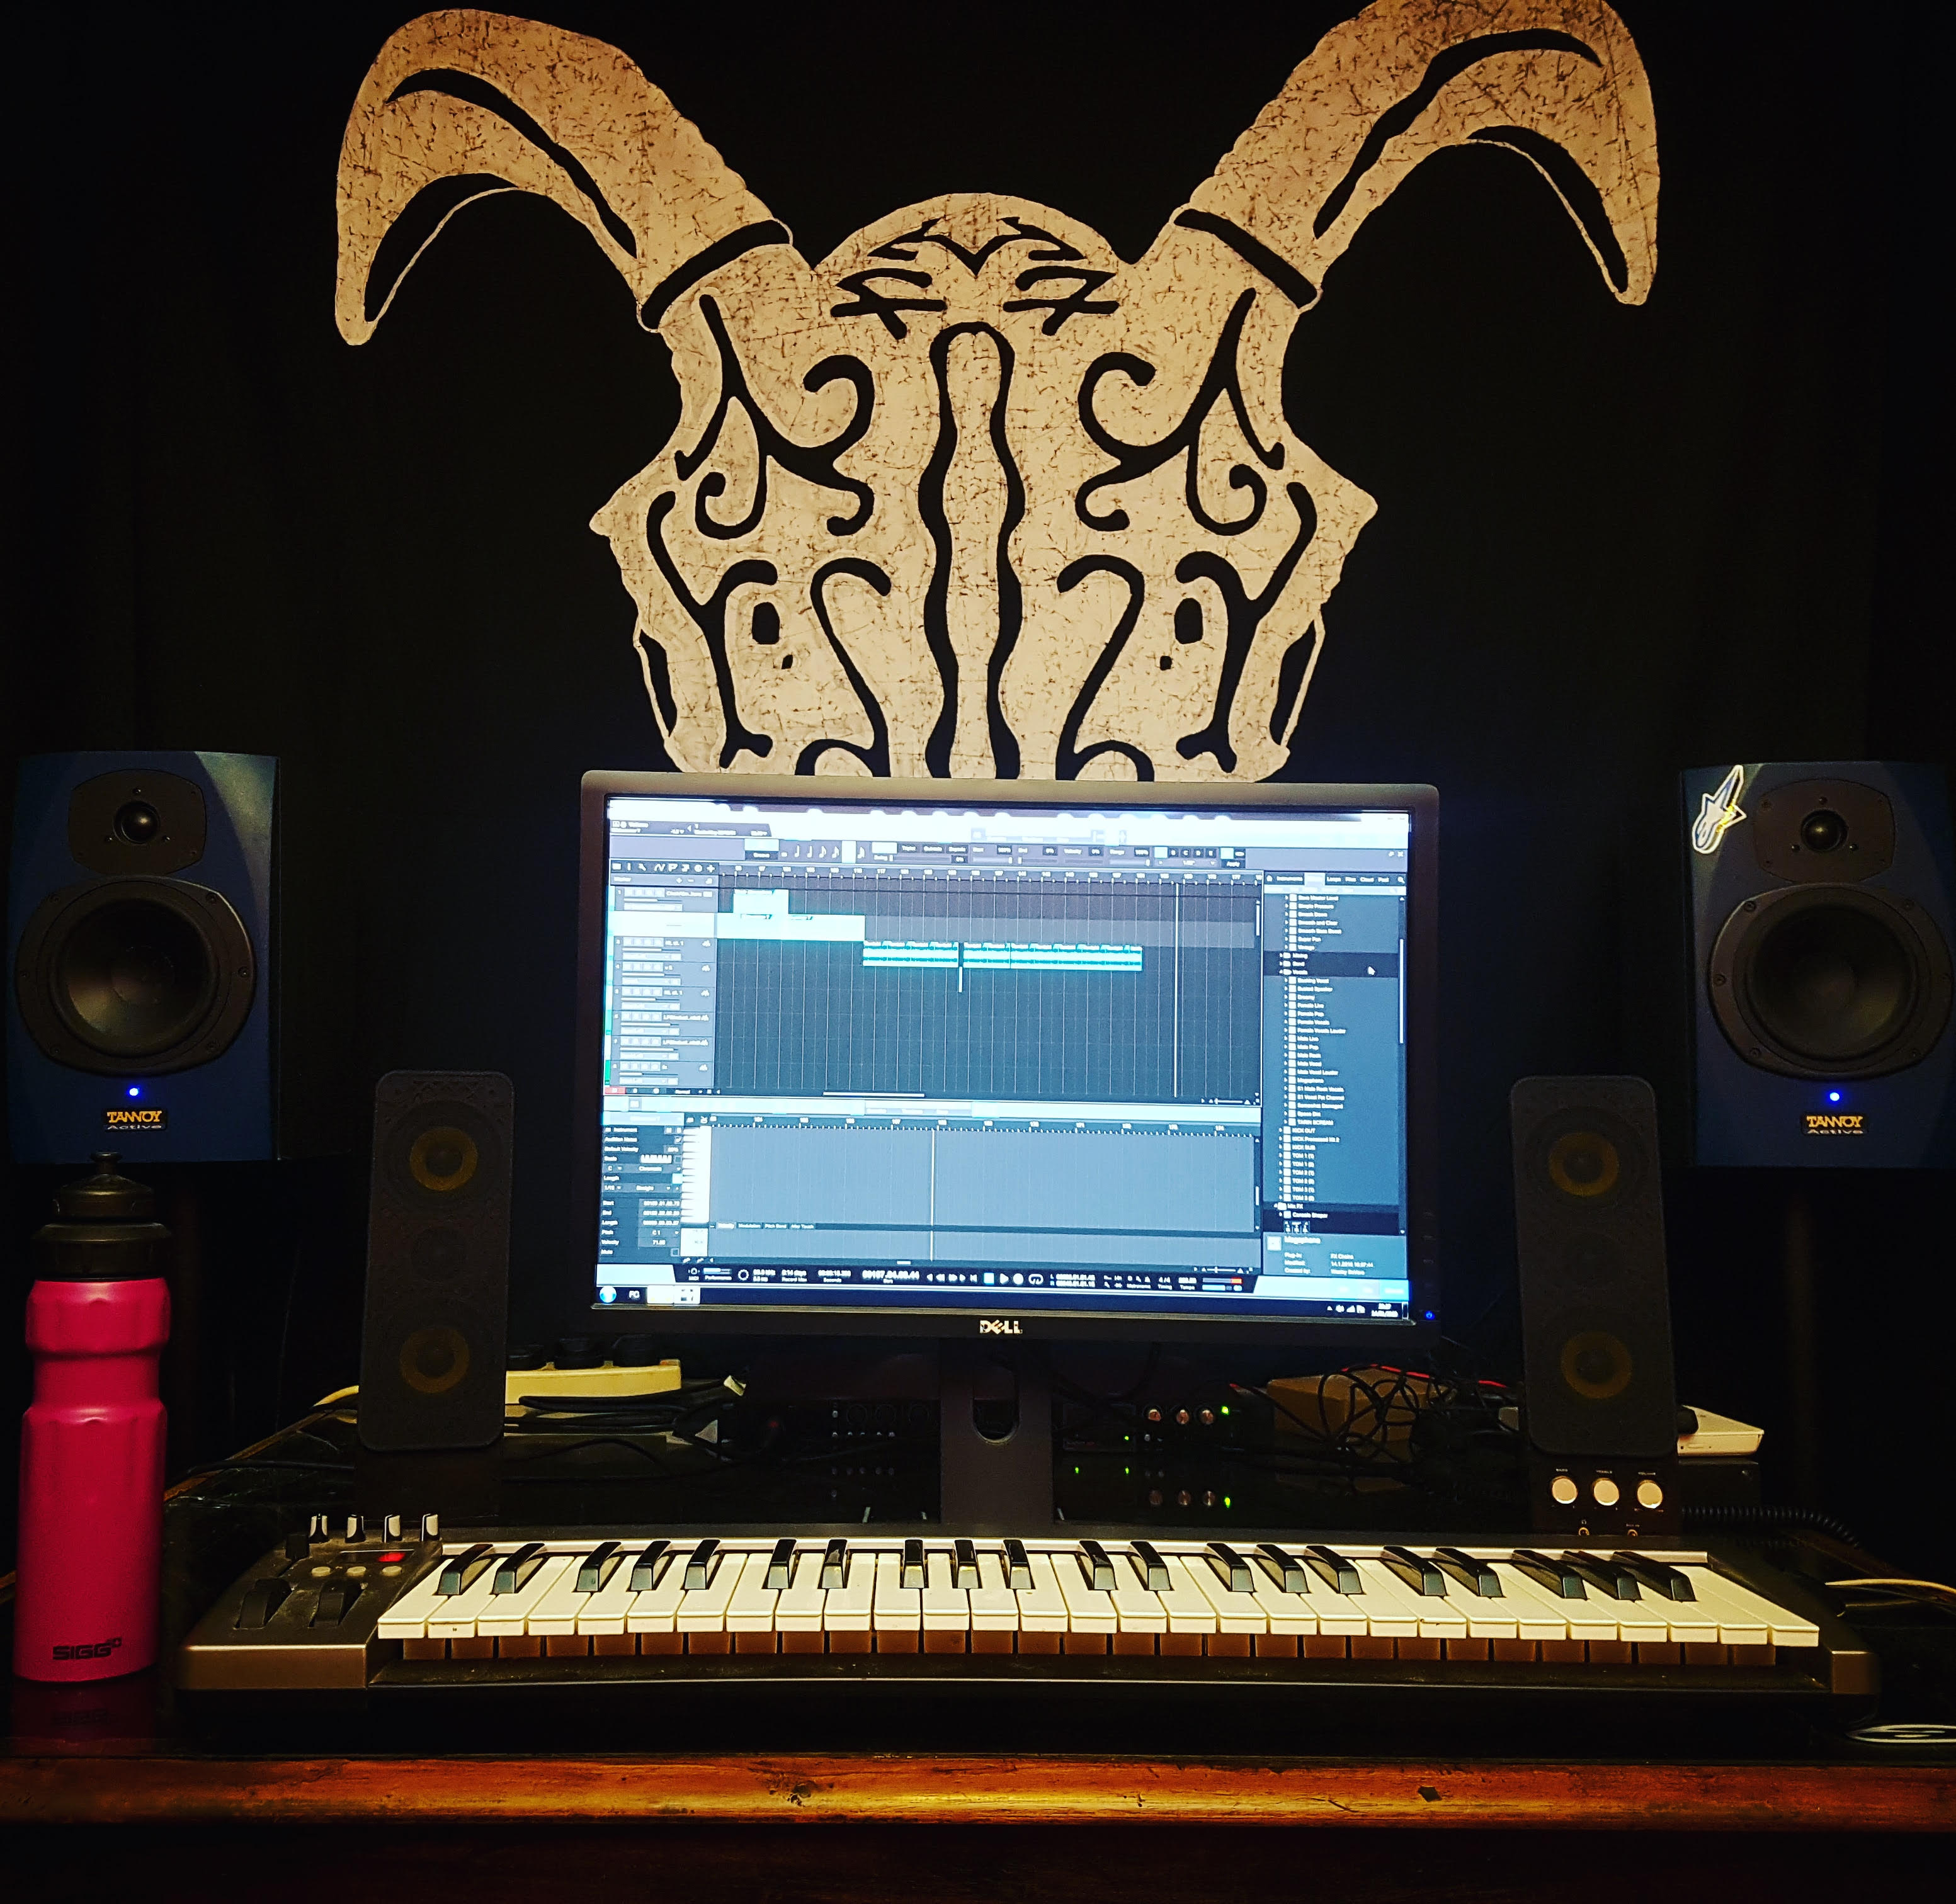
Studio One has a really intuitive layout unlike other DAWs, things are where you would want or expect them to be rather than hidden away in obscure menus. Studio One is easy to use; we rarely have to look up where to find functions and that is a big advantage to the writing process.
We knew that Studio One was being widely used by studio producers but we were uncertain about its capacity to record a live band… we were wrong, it’s just as good as Pro Tools and we would now recommend it as the only option for musicians.
PreSonus: What Studio One features have proven particularly useful and why?
SANGUINE: There is so much included with Studio One, features include everything that their competitors are offering and MORE!
We started the Cold Blood album recording process by recording a live demo of the songs in our band room. We then used Studio One to help us make a decision on which ones to record for the album.
We set up our album project at 96kzHz and recorded the drum stems in a professional studio with an acoustically treated room, and brought the tracks back to our studio to edit, quantize and process. This was nerve-racking for us, as we had never quantized drums before, but again PreSonus delivered by making the drum quantizing and triggering process a breeze. We then laid all the other instruments in our studio using Studio One; it was easy to try something and undo it if it didn’t sound right. We used a mixture of real sounds and plugins to achieve the final result.
For SANGUINE we have found the VSTs, sound packs, synths, and loops included with Studio One Professional inspired us to create and record our new sound. We downloaded a few plug-ins and VSTs but mostly used the free Add-Ons provided by Studio One. SANGUINE always felt like it needed an extra sound in some songs, not enough to warrant a full-time extra member—more just the odd effect, ping, or some other sound to pick up the ear and keep it interesting. Lots of bands do this in our genre like Linkin Park, Slipknot, Skindred, Bring Me The Horizon, etc. The Studio One sounds were exactly what we were looking for, there is a huge range of sounds, but also the ability to forge, combine and bend the audio to pretty much anything you can think up. We now run our extra production sounds live.
PreSonus: How does Studio One compare to other DAWs you have used?
SANGUINE: We played around with Cubase in the early days but it just felt like climbing a mountain. It’s not very motivating as an artist if you can’t get into a good writing flow. We personally didn’t find it intuitive at all. We tried Logic but didn’t find it very logical! After seeing colleagues spend thousands on Pro Tools, we saw a cycle of money going out but never coming back in! In an industry where it is hard to make money, it seemed to us that Pro Tools was only for people with more money than sense!
 For an untrained eye, most DAWs look complex and difficult to use. None of the band are qualified sound engineers, so usability was the first priority. Studio One offered an interface that was easy to use and a high-quality sound.
Originally we just intended to record demo’s on Studio One – but after a while, we started to prefer our versions of the songs to the other Producers we were using. We found that you could use Studio One to experiment quickly with new ideas. It’s changed how we write – writing used to take place in the room but now we often have Studio One running so we can try different beats quickly or see how a section sounds if you add strings. Everything has improved as a result.
In simple terms, Studio One has made it easy for an everyday person with no previous engineering experience or ability, to create professional studio quality recordings without having to spend thousands hiring a traditional studio. That alone blows our minds. We used to spend around £1000 per song. So an album could chalk up £10K pretty easily. The modern music industry just doesn’t provide the economy of scale to make sense of those numbers. Hundreds of thousands of Spotify plays will earn you about £50 for example – so you would have to have millions of streams to earn that back.
By learning Studio One we have essentially eliminated that cost and empowered ourselves to have the freedom to write and release anything we want, whenever we want. As artists, we can’t think of what could be better than having 100% autonomy over our output. Most artists play for the love of music, but due to the towering expense involved with being in a touring band, at some point they have to turn it into a business to continue doing what they love. We have seen so many amazing bands who have exhausted themselves and essentially burnt out trying to make sense of the money side of the business. The bottom line is that eliminating cost makes it easier to return a profit and survive.
PreSonus: Which Studio One feature or concept isn’t talked about enough in your opinion?
SANGUINE: A BIG feature for us was the ease of adding ISRC codes. We had friends who were releasing records at the same time as us who were struggling to get theirs embedded for a sensible price—can’t say that we didn’t feel a bit smug knowing we could do ours within the session—it took us about an hour to sort out. Again, we learned and executed a new task in an hour using only free internet tutorials. That is one of the many examples of how Studio One makes our life easier and cheaper. It’s another process that we previously would have paid someone to do.

Also, I think the depth you can go inside a sound is slightly overlooked—when you start really playing with the parameters of an effect, layering them up/combining you can approximate virtually any sound within reason. Initially, we assumed that we would need to keep topping up the extension packs more frequently – however the deeper we explored the program the more we found. I would advise anyone using this program to spend at least two weeks just exploring the sounds and how you can manipulate them. At first, we grouped sounds that we liked and made notes of their location— after a while though we started using sounds that we never thought we would ever need—for example, sounds that sound irrelevant on their own but amazing within the context of a mix.
We heard that Studio One is very popular with EDM Producers—it’s easy to see why because of the quality of recording produced, sound packs and ease of use. However, we are a rock band, so 90% of the sound we record is played on drum/bass/guitar/vocals. We think if more rock/metal bands knew how radically Studio One could impact their output, many more would jump on board. Our advice would be don’t wait to be told, spend time on it, try it for yourself… and most importantly trust your ears!
PreSonus: Any useful tips/tricks or interesting stories based on your experience with Studio One that would be of interest to our user base?
SANGUINE: This is probably the most relevant question to us out of all of them. Historically every time we tried to record ourselves the programs just seemed too complicated. We would spend hours on a recording in Cubase and obtain a very average result. We put this down to none of us being a qualified sound engineer, but when we moved over to PreSonus suddenly our recording quality went up! We realized it wasn’t our talent it was the usability of the program that was holding us back.
After you master a DAW system you realize that 50% of the songwriting is achieved via the recording and production process. You may have noticed over the last few years that producers are often credited before artists on songs. It’s like the guys that used to be kept in the backroom are now thinking ‘Hang on a minute—who’s the talent here?!’ Mark Ronson is a good example. We don’t blame them—after all the song is only 50% of the process—the production and recording are what makes it viable.
We see a future where the only artists who can survive are the ones who create and record their own music from scratch. SANGUINE have taken this DIY ethic to the extremes and for our latest album, Cold Blood, we literally created every visual and sound ourselves. It meant many nights of reading, trial and error, and a few headaches… but we are now in a position where we can create everything for almost zero cost. The bottom line for any recording is spending hours grooming through the takes until you have the right sound and delivery. When you are being charged in a studio you are “on the clock” and you don’t always achieve the best take or treatment of sound. By taking control of our own recording environment we can spend hours recording and playing around with the music until we have the exact sound we are looking for… I don’t think we could have afforded to pay an engineer or producer for that!
People can overlook how psychological the recording process is – we realised how much our insecurity over our ability to pull this off was impacting us as artists/writers. We had to really learn to trust our ears and what WE thought sounded good.
We blind tested this by recording the same song three ways:
- record with a named producer from scratch
- sending our own recordings to producers and asking them to do a mix
- recording and mixing the song ourselves.
After a blind test listen of these three options we asked our fans and managers to chose which they preferred, surprisingly option 3 was the winner, so we decided to record the album ourselves with no help! Not because the other producers were bad at what they did, more that they simply couldn’t compete with the AMOUNT OF TIME we had to spend on it. Time is free after all, so it is one of an artist’s biggest assets. This confirmed our self-belief that we could do it and we found that energy very motivating—the more positive feedback we got, the more hours we put into it and the better the result. One of the frustrating things is that as you get better you find yourself looking back at songs and pulling them apart/finding fault. Having a studio at your fingertips means you can re-visit those issues and iron them out.
I haven’t met an artist yet who has left a studio being 100% blown away and happy with what they have created with another producer. In fact, it’s more often the opposite. Sure you can go back to a studio and make corrections but it isn’t very practical or spontaneous and you will always be working to someone else’s timetable. Why pay thousands for something you don’t even like that much? Studio One puts our entire catalog at our fingertips. It also means if we need to make alterations like removing vocals for a soundtrack, we can just fire up the computer and do it ourselves. Even a simple task like that would set you back £200 if you were to get a studio to do it for you.
We were joking recently that Studio One is our fifth band member—we feel so in tune with the system it almost feels sentient at times! We might start offering it coffee when we pull a late one…
Finally—something which we didn’t expect was that other bands started asking us to record them and mix their music after hearing ours. This provides an additional revenue stream that we didn’t account for. More money is never a bad thing and it’s a huge compliment to us that after two years we are being asked to do these things. If you had told us this five years ago we definitely would have laughed at you.
PreSonus: Any final comments about PreSonus and Studio One?
 SANGUINE: Even if you have never been good with computers or tried a DAW system before we would urge you to at least play around with the Demo (full-featured Professional version, 30-day license). The gear we listed above is all we used for our record and the entire set up can be brought for a few thousand pounds. This relatively small investment for infinite recordings seems like a no brainer to us. We managed to learn how to record/mix/master and release a record in 2 years from scratch. If Studio One wasn’t as easy to navigate then how would that be possible? The proof is in the pudding.
It’s pretty rare for us to get this excited about a DAW but it has fundamentally changed everything from our recording all the way down to how we write and the business models that we use. We now have 1/10th of the previous outgoings and this has allowed us to scale the band much faster than previously. What was once by far the biggest expense a band has now reduced to practically zero. The more we use it the more we will improve which is also exciting.
Finally… artists need to understand that the music industry has fundamentally changed forever. The days of making millions from music are long gone and eventually, only those who can sustain will be able to survive. We predict a future where only producer/writer/performers will realistically be able to survive. It’s no longer enough to just be a musician. Recording is the bread and butter of any band so if you do one thing this year: try Studio One.
For us, it changed everything!
Website | Instagram | Twitter | Facebook