Create Authentic, Customizable EDM Pumping with X-Trem
But first, some breaking news: Version 1.5 of The Huge Book of Studio One Tips and Tricks is now available from the PreSonus shop. Like previous versions, it’s a free update to those who already own the book. V1.5 includes 743 pages with over 280 innovative tips, 156 free presets, 175 audio examples, and incorporates the latest changes in Studio One 6. Many previous tips have been updated, and the audio examples are better categorized. For new owners, the price is $19.95. Okay…on to the tip!
The EDM “pumping” effect has been popular for over a quarter-century. Traditionally, this effect inserts a compressor in the channel with the audio you want to pump. Then, the kick or another rhythmic element feeds the compressor’s sidechain and triggers compression. The tip Pump Your Pads and Power Chords describes how to create this effect. In this audio example, you can hear the pad in the back pumping behind a Mai Tai solo. A more limited option was presented in a tip that didn’t require a sidechain.
Setting X-Trem to a positive-going sawtooth eliminates the need for the sidechain+compressor combination. However, it doesn’t produce an authentic pumping sound. With traditional pumping, the waveform that does the pumping depends on the compressor’s setting. Typically, an exponential attack settles into a sustained section (fig. 1).
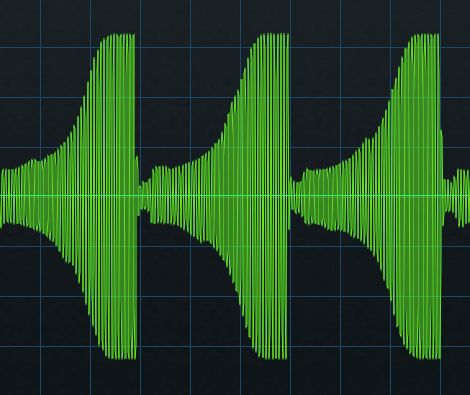
Figure 1: Studio One’s (vastly underrated) Scope plugin shows the amplitude of the pumping curve created by a compressor/sidechain combination.
The X-Trem’s sawtooth has a linear rise time (fig. 2). This doesn’t sound like traditional pumping.
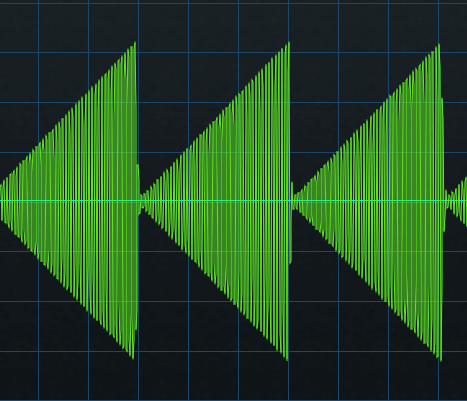
Figure 2: The X-Trem’s Sawtooth waveform.
Although you can use a single X-Trem’s step waveform to create an LFO shape that resembles compressor/sidechain-based pumping, you can hear the transition between the 16 steps. Fortunately, using two X-Trems in series can create an authentic pumping sound. The first X-Trem generates a sawtooth wave, while the second X-Trem shapes the sawtooth into a smoother, more accurate modulation waveform (fig. 3). You can even customize the pumping’s shape, like you would by altering a compressor’s controls.
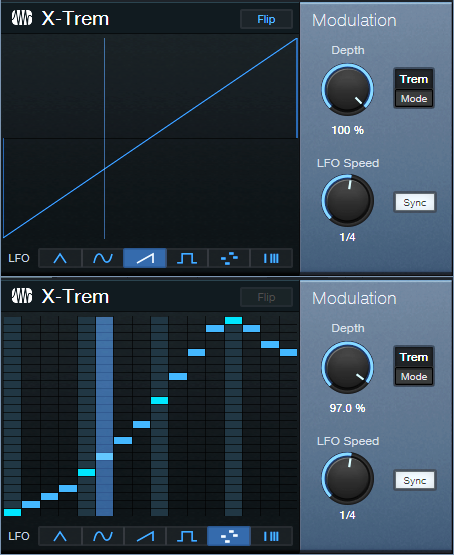
Figure 3: The secret to X-Trem-based pumping is using two in series.
This creates a waveform like fig. 4. The ultimate shape depends on how you set the levels of the 16 steps in the second X-Trem. For example, in my ideal world the pumping would start from a minimum level—so that’s what it does.
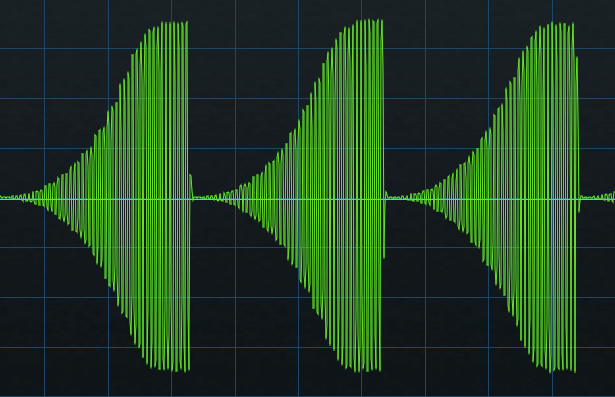
Figure 4: The waveform created by two X-Trems in series emulates the shape of sidechain+compressor-based pumping.
To make using the EDM Pumper even easier for Studio One Professional users, there’s a download link to a Pumper FX Chain. Fig. 5 shows the control panel.
Furthermore, users of Studio One Artist or Professional can download five X-Trem presets. These create pumping curves with five different shapes (Pumper Wave 1.preset is the one I use the most.) So, now it’s easier than ever to pump anything—without needing a complex sidechain+compressor setup.
Download the EDM Pumper.multipreset FX Chain here.
Download the folder with five X-Trem Presets here.
Superspeed Comping with Studio One 6.2
Studio One 6.2 reworked Layer and Take handling, and some of the new functionality is exceptionally useful. For example, suppose you want to record comp vocals for two choruses, and a harmony part for the second chorus. Previously, you had two options: set a comping range that covered both choruses, and then do a separate set of comped Takes for the harmony. Or, comp one verse, then stop. Set up to comp the next verse. After completing that, set up to comp the harmony.
With version 6.2, you can do all your Takes, for both choruses and the harmony, in a single comping operation. The same technique works for any parts in a song that occur more than once, like verses. The only constraint is that the sections need to have equal lengths. Here’s how the process works.
Fig. 1 shows the first chorus set up for comping. Below it are 12 Takes: 4 for the first chorus, 4 intended for the second chorus, and 4 intended for the second chorus harmony. (Personal bias alert: I try to avoid doing more than 4 comps for any given part. If I can’t nail a take in four tries, it’s probably time to move on and try again some other time.)
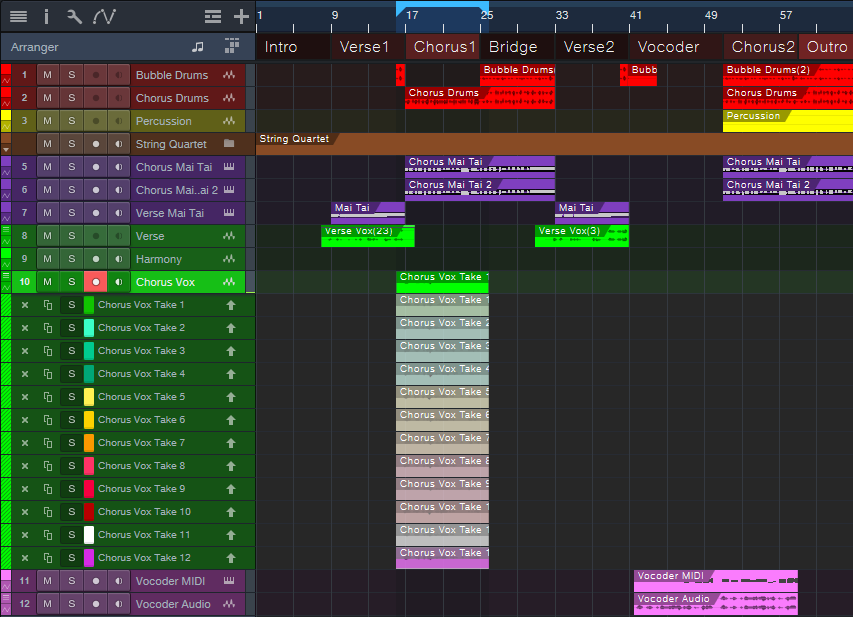
Figure 1: All the needed Takes have been recorded for both choruses and the harmony.
With v6.2, you can move layers around as easily as any other Event. Click on a layer while holding Ctrl/Cmd, and drag. Fig. 2 shows the second group of Takes moved to the second chorus.
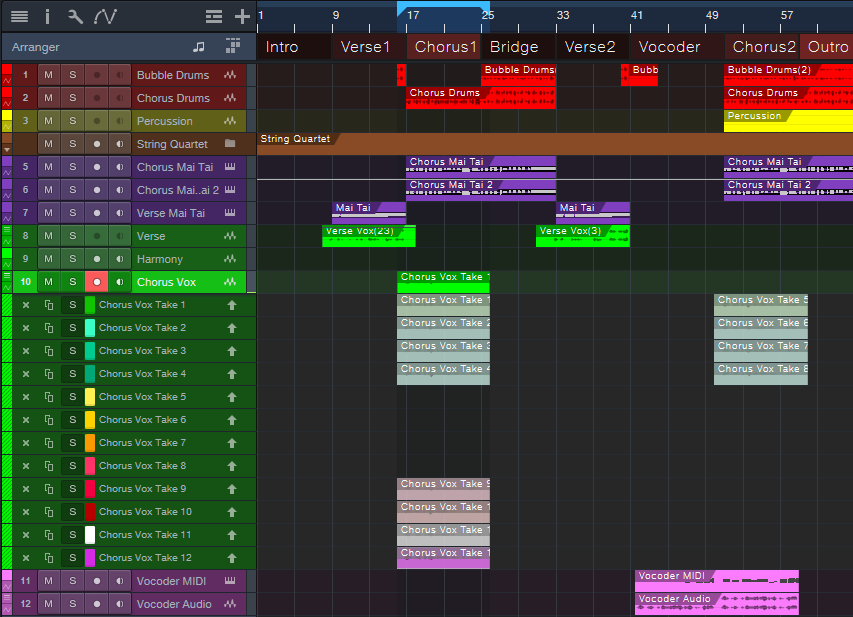
Figure 2: The next group of Takes has been moved to the second Chorus.
The four Harmony Takes need to go in the Harmony track instead of the original parent track. Creating four layers for the Harmony track provides a place to move the Harmony Takes (fig. 3). Now all the comps are in place, and ready for editing.
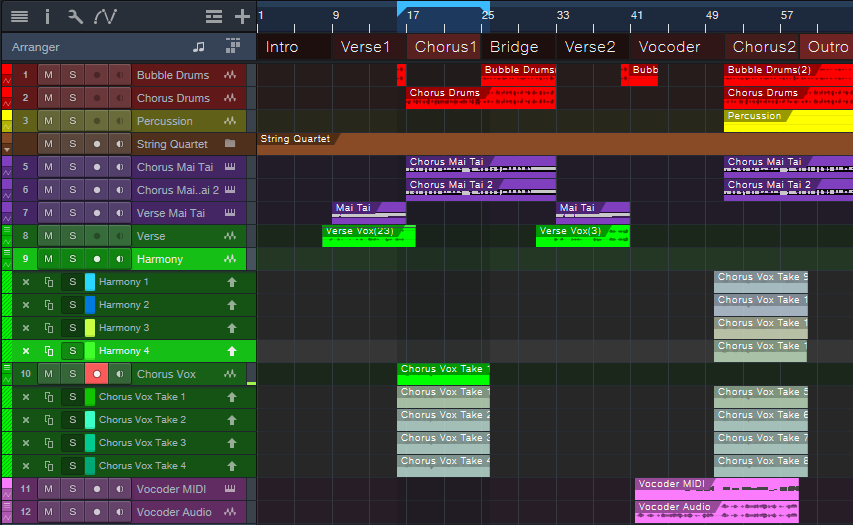
Figure 3: Adding four layers to the Harmony track provides a home for the harmony Takes.
Fig. 4 shows the final result: the edits are done for the two verses and the harmony. Complete the process by deleting the unneeded layers.
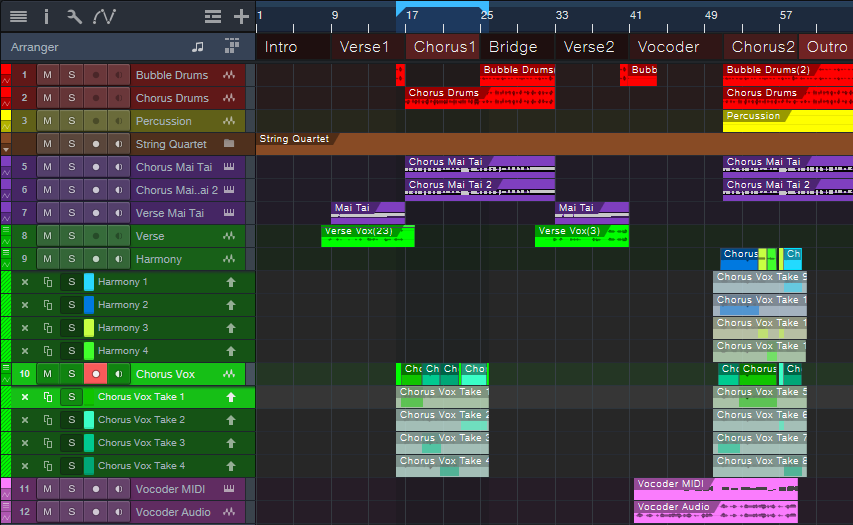
Figure 4: All the Takes have been edited to create the final composite vocals.
But Wait…There’s More!
This is only one application of Studio One 6.2’s enhanced layering. In the example above, suppose I messed up a word in the second chorus, but the first chorus had two Takes with a good version of the word. Previously, you needed to promote the alternate word to the parent track, move it, and then promote the original word. It’s now possible to select part of any layer with the Range tool, and unlike the Arrow tool, this avoids promoting the selection to the parent track. Click on the selected part while holding Ctrl/Cmd, and drag it out of its layer to use it elsewhere.
It’s great that comping and layers continue to improve, but don’t overlook the existing shortcuts and advanced techniques. If you haven’t checked out the Help section on comping and layers in a while, it’s worth re-visiting.
The PhaseTone Warper

We haven’t done a “boutique digital effect” for Studio One Professional in a while, so let’s use a plugin in a totally wrong way—yet end up with something cool. This unconventional tone control is based on phase interactions in different frequency bands. You’ll find a download link for the PhaseTone Warper FX Chain at the end of this post.
It’s a Feature…Not a Bug!
Like traditional analog filters, the Splitter’s frequency-splitting crossover produces varying amounts of phase shift at different frequencies. Normally, these phase shifts are not significant. However, mixing a dry signal in parallel with the Splitter, and changing the frequencies of the Splitter’s Frequency splits, creates phase additions and cancellations at various frequencies. The result is a novel tone shaper. I’ve used the PhaseTone Warper with synths, guitars, cymbals, amp sims, and more…it’s fun, and different. One application is creating subtle (or not-so-subtle!) timbral differences in the same instrument for different verses or choruses.
How It Works
The FX Chain starts with a Splitter in normal mode. It splits the incoming audio into a dry channel that incorporates a Mixtool, and a second Splitter in Frequency Split mode (fig. 1).
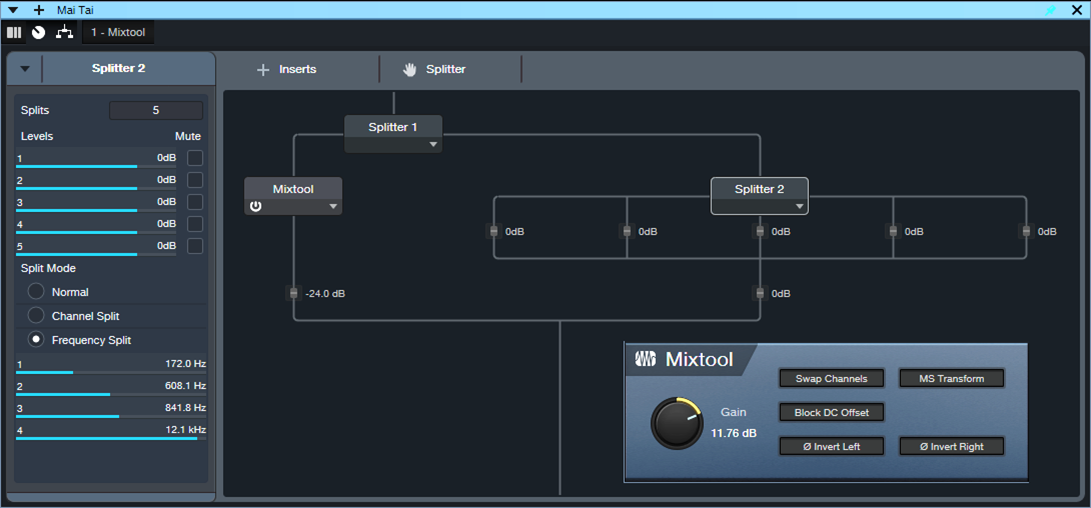
Figure 1: The FX Chain block diagram.
Varying Splitter 2’s frequencies produces a variety of unusual, phase-based equalization changes. They’re difficult to describe, and sound somewhat like a voicing control. The audio example gives some representative sounds, as applied to distorted guitar. The first phrase has no processing. Subsequent repetitions use various PhaseTone Warper settings.
Fig. 2 shows the control panel. The effect is most pronounced with Intensity turned up all the way. Turning it down gives more subtle effects. The buttons alter the stereo image in unpredictable ways.
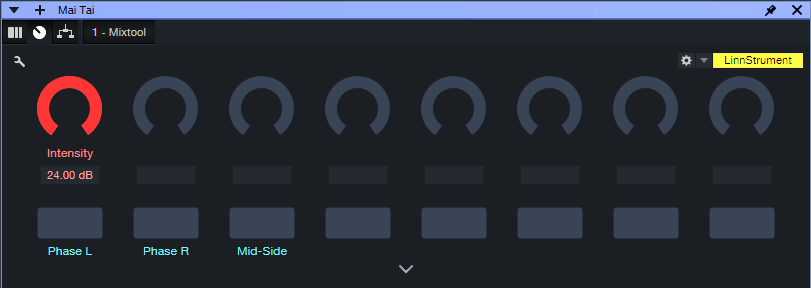
Figure 2: Channel Editor macro controls.
Unfortunately, Splitter 2’s frequency settings are not automatable and can’t be assigned to control panel parameters. So, you have two ways to access the Splitter’s four frequency parameters:
- Open up the Splitter 2 module in the FX Chain
- Expand Splitter 2 in a Mixer channel (fig. 3). This makes adjusting the parameters easy.
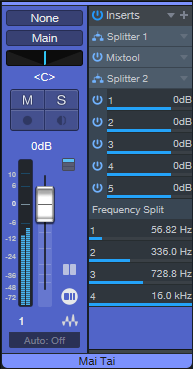
Figure 3: Expanding Splitter 2 makes the Frequency Split controls available for easy editing.
So…when you’re looking for that “sound-I-haven’t-gotten-before,” give the PhaseTone Warper a try. Although the demo shows it with a distorted guitar, also try synthesizer sounds with lots of harmonics, cymbals, noise, orchestral sounds, and more. (And don’t overlook dry guitar—you’ll hear an almost varitone-like effect.)
Download the PhaseTone Warper FX Chain
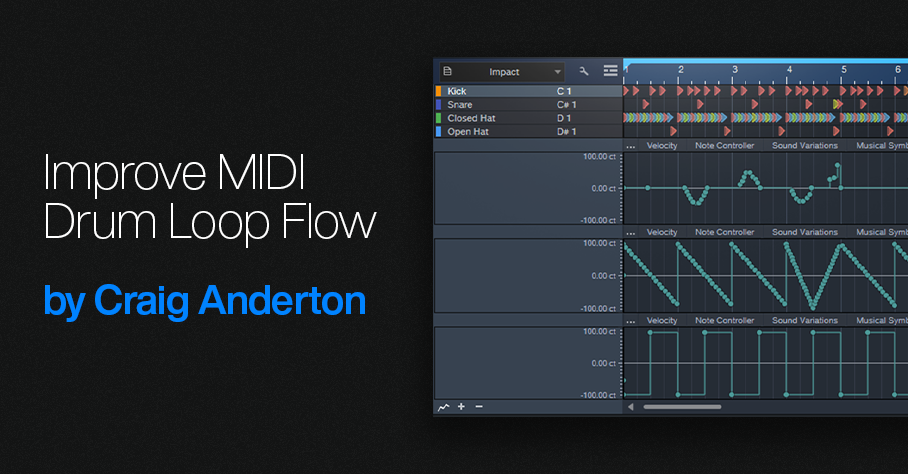
Improve MIDI Drum Loop Flow
MIDI drum loops have a bad rap, because some musicians consider them metronomic and boring. But they don’t have to be. Subtly leading or lagging the beat at strategic moments, like physical drummers do, can give a better “feel.” You can also introduce slight, random variations with Studio One’s humanize function.
This tip covers yet another option: pitch changes. Harder hits raise the pitch of acoustic drums. Sometimes, electronic drums are programmed to emulate this effect. Furthermore, pitch changes can go beyond subtlety to create special effects.
Impact XT responds to pitch bend, but bending affects all drums that trigger at the same time. This technique is more selective. It uses automation to vary the Tune parameter for Impact XT’s individual pads.
The following drum loop is for reference, prior to any automated pitch changes.
Creating Automation Data
You can automate individual pads in the Arrange View or Edit View. I prefer creating automation in the Edit View. This makes it easy to see the correlation between a pad’s notes and the associated automation data. Here’s how to add automation in the Edit View:
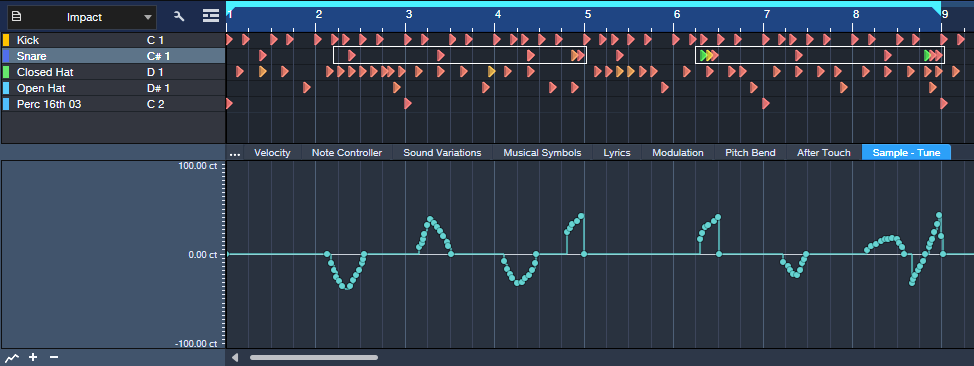
1. Click on the three dots … at the left of the controller labels in the Edit View’s Automation Lane. This brings up the Add/Remove automation dialog (fig. 1).
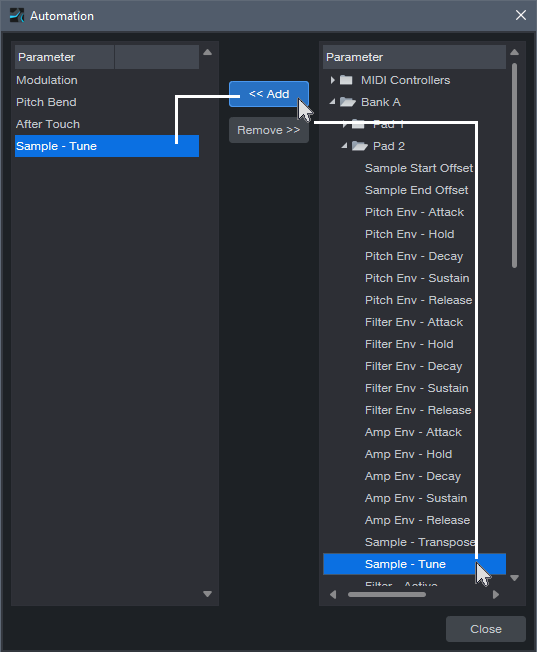
2. In the Parameter column on the right, locate the pad you want to automate. For example, in fig. 1 the snare is on Pad 2 in Bank A.
3. Click on the Sample – Tune parameter to select it.
4. Click on <<Add. The target parameter will appear in the left Parameter (automation type) column.
5. This adds a Sample – Tune tab to the Edit View’s existing controller lane options. Now you can click on this tab when you want to draw automation that changes the drum’s pitch (fig. 2).
Viewing Automation
As you add automation for more pads, you can view the automation in two ways:
- See the automation data for one pad at a time in the Edit View’s Automation Lane. As you add automation for the same parameter (e.g., Sample – Tune) in different pads, each new automation envelope adds its own tab for that controller. To switch among the different pads’ automation data, click on their associated tabs. However, this can be confusing because different pads that use the same type of controller have the same controller name for their tabs. You won’t know which pad a particular tab controls, unless you remember that tabs are added from left to right as you assign more automation.
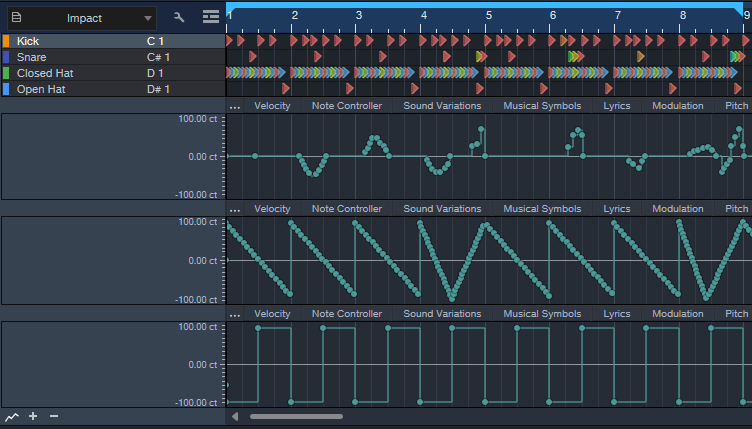
- Add multiple Automation Lanes so you can see the automation data for several pads at once (fig. 3). Again, you can’t see the target pad’s name in the Automation Lane, but you can see them all at the same time.
With the second option, the Edit view can become cluttered. So, after creating automation in the Edit view, I often use a third option:
1. Create an automation track in the Arrange View that’s the same as an Automation Lane in the Edit View.
2. Copy the automation in the Edit view.
3. Paste it into the Arrange view’s automation track. Note: Studio One recognizes a MIDI track’s start as its first piece of data. To paste automation data at the beginning of an Arrange View’s automation track, prior to copying the data, add a node at the beginning of the Edit View’s Automation Lane.
4. Delete the automation in the Edit View. Now the Edit View’s Automation Lane is available for displaying new automation data.
Transferring automation data in this way provides two main benefits:
- In the Arrange view, you can set Auto: Off to turn off existing automation data while you add new automation data in the Edit View.
- To show the full name of the target parameter being automated, right-click on the parameter name in the Automation Track.
Additional Creative Options
To change drum pitches in novel ways, try drawing automation waveforms (fig. 3) and sometimes, using the Transform tool. For example, draw a downward sawtooth for hi-hat automation, using 1-measure quantization. Now, the pitch descends over the course of a measure. With kick, use square wave automation to create a lower pitch for a measure’s first half, and a higher pitch for the second half. This gives a less static feel.
The following example includes the automation edits shown in fig. 3. This isn’t intended to showcase an ideal application, but demonstrates how subtle and selective changes can alter the loop’s sound. When mixed with other tracks, you “feel” the difference more than hear it as an obvious effect.
But of course, you don’t have to be subtle—automate Transposition instead of Tune, and you’ll have semitone changes. That can work well with hand percussion parts where the hits have short decays. In any case, automating pitch can add a new flavor to MIDI drum loops.
Mixing à la Studio One
Ask 100 recording engineers about their approach to mixing, and you’ll hear 100 different answers. Here’s mine, and how this approach relates to Studio One.
The Mix Is Not a Recording’s Most Important Aspect
If it was, recordings from the past with a primitive, unpolished sound wouldn’t have endured to this day. The most important aspect is tracking—the mix provides a home for the tracks. If you capture stellar instrument and vocal sounds, the mix will almost take care of itself. Granted, you can fix sounds in the mix. But because each track interacts with the other tracks to create the mix, changing any track changes its interactions with all the other tracks. If multiple tracks require major fixes, the mix may start to fall apart as different fixes conflict with each other.
So, a great mix starts with inspired tracks. When tracking and working with MIDI, enable Retrospective Recording (Preferences or Options, then Advanced/MIDI/Enable retrospective recording). If you play some dazzling MIDI part but hadn’t pressed record, no worries—Studio One will have stored what you played. For audio, create a template that lets you track audio quickly, before inspiration dissipates. It’s helpful if your audio interface has enough inputs so that you can leave your main instruments and mics always patched in. Then, simply record-enable a track, and you’re ready to record.
Start Mixing Without Plugins—But Do Any Needed DSP Fixes
Here’s one reason why you don’t want to start by adding plugins. Sound on Sound did a series called Mix Rescue where the editors would go to a home studio and give tips on how the person working there could obtain a better mix. One time the owner offered the editors some tea, and went into the kitchen to make it. Meanwhile, the SOS folks wanted to hear what the raw tracks sounded like, so they bypassed all the plugins. When the owner came back, his first question was “what did you do to make it sound so much better?” I assume the problem was that the person doing the mix started adding plugins to enhance individual tracks, without remembering the importance of all the tracks working together.
Using DSP to alter levels can optimize tracks, without altering their character the way most plugins do. For more consistent levels, particularly with vocals, use Gain Envelopes and/or selective normalizing. (Note that you can normalize Events in the Inspector.) Also, cut spaces between phrases to delete any residual noise. Edit tracks to remove sections that you may like, but don’t advance the song’s storyline. Then, the remaining parts will have more prominence.
My one exception to “no plugins at first” is if the plugins are essential to the final sound. For example, a guitar part may require an amp sim. Or, a synth arpeggio may require a dotted eighth-note delay when it’s part of the song’s rhythm section.
Obtain the Best Possible Balance of Your Tracks
While you work on the mix without plugins, get to know the song’s feel and the global context for the tracks. As you mix, you may hear sounds you want to fix. Avoid that temptation for now—keep trying to achieve the best possible balance until you can’t improve the balance any further. Personal bias alert: The more plugins you add to a track, the more they obscure the underlying sound. Sometimes this is good, sometimes it isn’t. But when mixing with a minimalist approach, you can always make additions later. If you make additions early on, they may not make sense in the context of changes that occur as you build toward the final mix.
Here’s another personal bias alert: Avoid using any master bus plugins until you’re ready to master your mix. Although master bus plugins can put a band-aid on problems while you mix, those underlying problems remain. I believe that if you aim for the best possible mix without any master bus plugins, then when you do add master bus plugins in the Project page to enhance the sound, they’ll make a great mix outstanding.
This way of working is unlike the “top-down” mixing technique that advocates mixing with master bus processors from the start. Proponents say that this not only encourages listening to the mix as a finished product, but since you’ll add master bus processors eventually, you might as well mix with them already in place. However, most top-down mixes still undergo mastering, so bus processors then become part of mixing and mastering. If that approach works for you, great! But my best mixes have separated mixing and mastering into two distinct processes. Mixing is about creating a balance among tracks. Mastering is about enhancing that balance into a refined, cohesive whole.
EQ Tracks Strategically
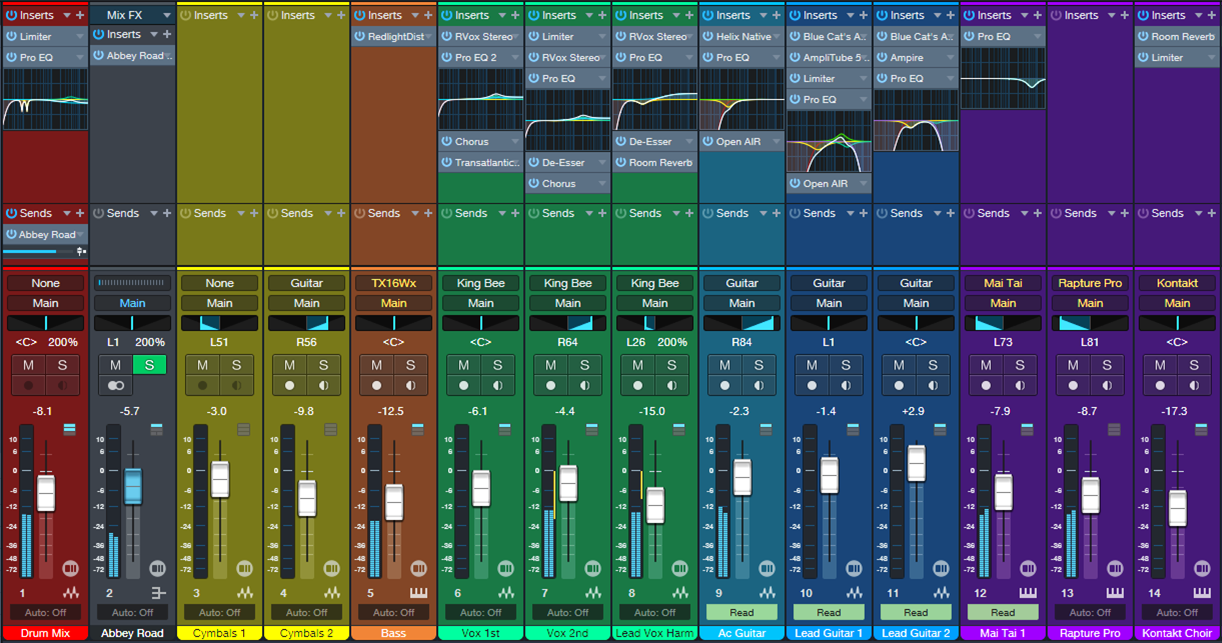
By now, mixing without plugins has established the song’s character. Next, it’s time to shift your focus from the forest to the trees. Identify problem areas where the tracks don’t quite gel. Use the Pro EQ to carve out sonic spaces for the tracks (fig. 1), so they don’t conflict with each other. For example, suppose the lower mids sound muddy, even though the balance sounds correct. Solo individual tracks until you identify the one that’s contributing the most “mud.” Then, use EQ to reduce its lower midrange a bit. Or, a vocal might have to be overly loud to be intelligible. In this case, a slight upper midrange boost can increase intelligibility without needing to raise the track’s overall level.
If a static boost or cut seems heavy-handed, the Pro EQ3’s dynamic equalization function introduces EQ only when needed, based on the audio’s dynamics. For more info, see the blog post Plug-In Matrimony: Pro EQ3 Weds Dynamics.
Some engineers like using a highpass filter on tracks that don’t have low-frequency energy anyway. Use the Pro EQ’s linear-phase stage, and then before adding any other effects to the track, render it to save CPU power. Traditional minimal-phase EQ can introduce phase shifts above the cutoff frequency.
Implement Needed Dynamics Control
Using EQ to help differentiate instruments means you may not need much dynamics processing. For example, after using EQ to make the vocals more intelligible, they might benefit more from light limiting than heavy compression. A little saturation on bass will give a higher average level, reduce peaks, and add harmonics. These enhancements allow the bass to stand out more without using conventional dynamics processors, or having to increase its level to where it conflicts with other instruments.
Be sparing with dynamics processing, at least initially. Mastering most pop/EDM/rock/country music involves using compression or limiting. This keeps the level in the same range as other songs that use master bus processing, and helps “glue” the tracks together. But remember, master bus processors—whether compression, EQ, maximization, or whatever—apply that processing to every track. If you’ve already done a lot of dynamics processing to individual tracks, adding more processing with mastering plugins could end up being excessive. (To be fair, this is a valid argument for top-down mixing. It’s not my preference, but it’s a technique that could work well for you.)
Studio One has the unique ability to jump between the mastering page and its associated multitrack projects. (I’m astonished that no other DAW has stolen—I mean, been inspired by—this architecture.) If after adding processors in the mastering page you decide individual tracks need changes to their amounts of dynamics processing, that’s easy to do.
Ear Candy: The Final Frontier
Now you have a clean,integratedmix that does justice to the vision you had when tracking the music. Keep an open mind about whether any little production touches could make it even better—an echo that spills over, an abrupt mute, a slight tempo change to help the song breathe (although it’s often best to apply this to the rendered stereo mix, prior to mastering), a tweak of a track’s stereo image—these can add those extra “somethings” that make a mix even more compelling.
Mastering
Mastering deserves its own blog post, because it involves a lot more than just slamming a maximizer on the output bus. If this post gets a good response, I’ll do a follow up on mastering.
FL Studio Meets Studio One
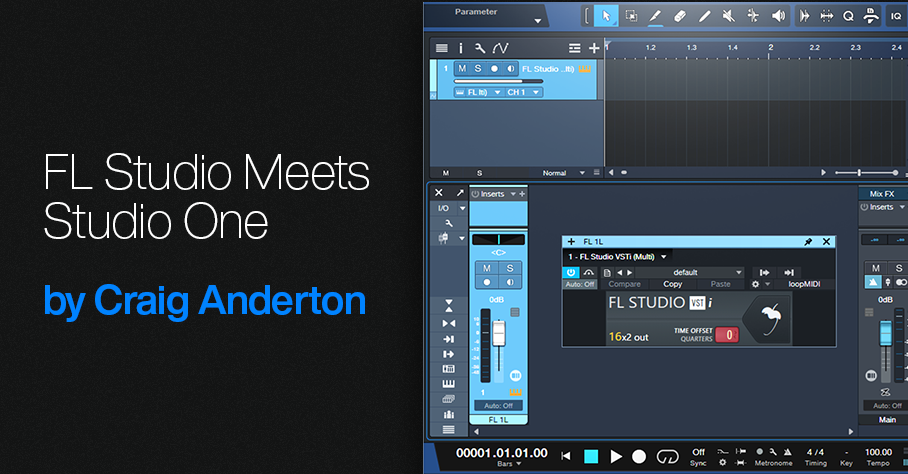
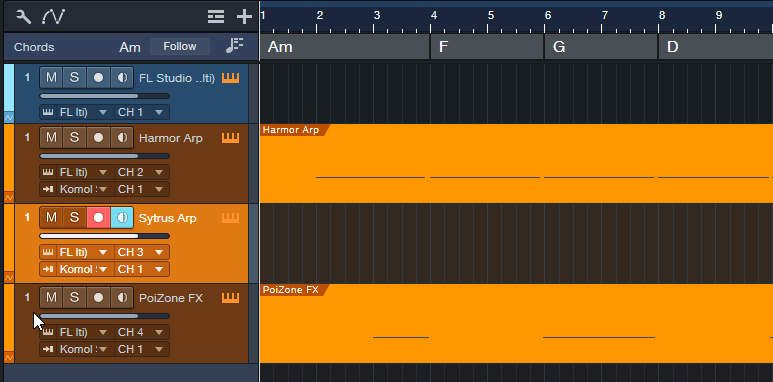
FL Studio is a cool program. Yet when some users see me working with Studio One’s features like comping tools, harmonic editing, the lyrics track, Mix FX, MPE support, and the like, I’ll often hear “wow, I wish FL Studio could do that.” Well, it can…because you can open FL Studio as a multi-output VSTi plug-in within Studio One. Even with the Artist version, you can stream up to 16 individual audio outputs from FL Studio into Studio One’s mixer, and use Studio One’s instrument tracks to control FL Studio’s instruments.
For example, to use Studio One’s comping tools, record into Studio One instead of FL Studio, do your comping, and then mix the audio along with audio from FL Studio’s tracks. With harmonic editing, record the MIDI in Studio One and create a Chord track. Then, use the harmonically edited MIDI data to drive instruments in FL Studio. And there’s something in it for Studio One users, too—this same technique allows using FL Studio like an additional rack of virtual instruments.
The following may seem complicated. But after doing it a few times, the procedure becomes second nature. If you have any questions about this technique, please ask them in the Comments section below.
How to Set Up Studio One for FL Studio Audio Streams
1. Go to Studio One’s Browser, and choose the Instruments tab.
2. Open the Image-Line folder. Drag FL Studio VSTi (Multi) into the Arrange view, like any other virtual instrument. This creates an Instrument track in Studio One, and opens the FL Studio widget (fig. 1).
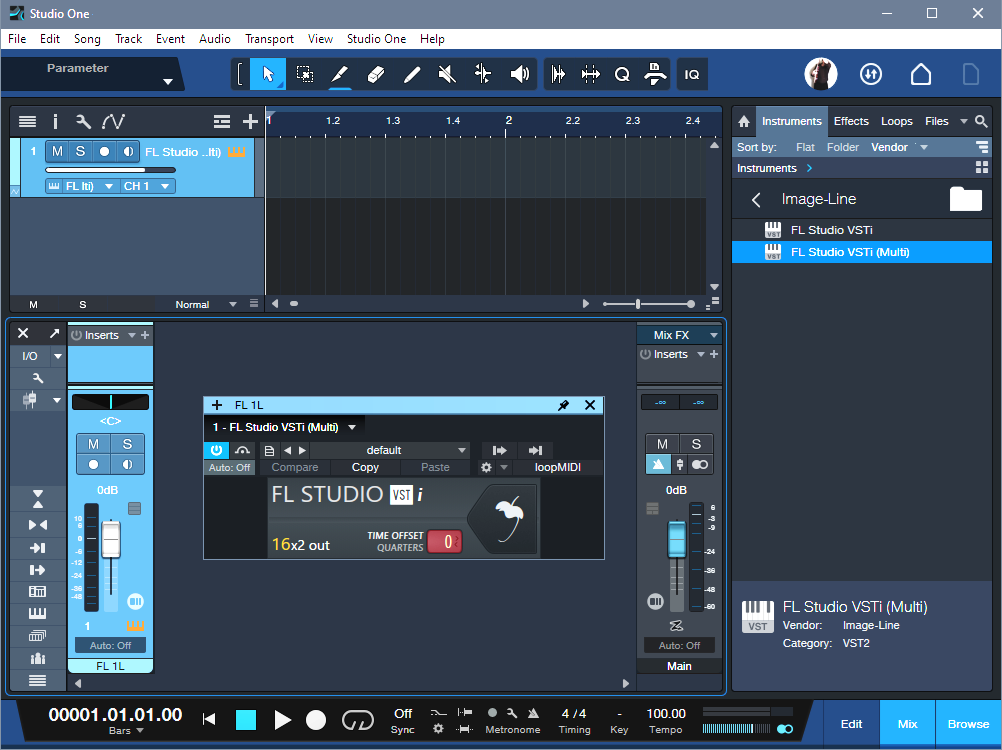
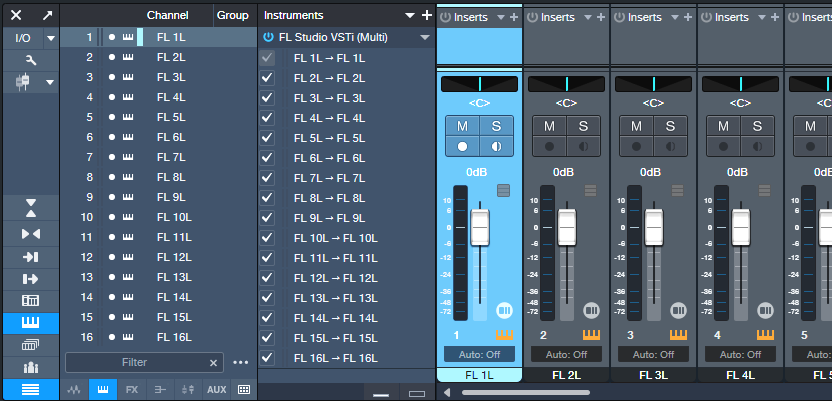
3. Refer to fig. 2 for the following steps. Click on Studio One’s Keyboard icon toward the left of the Mixer view to open the Instrument rack. You’ll see FL Studio VSTi (Multi).
4. Click the downward arrow to the right of the FL Studio VSTi (Multi) label, and choose Expand. This exposes the 16 FL Studio outputs.
5. Check the box to the left of the inputs you want to use. Checking a box opens a new mixer channel in Studio One.
6. To show/hide mixer channels, click the Channel List icon (four horizontal bars, at the bottom of the column with the Keyboard icon). This opens a list of mixer channels. The dots toggle whether a channel is visible (white dot) or hidden (gray dot).
Assign FL Studio Audio Streams to Studio One
To open the FL Studio interface, click on the Widget’s fruit symbol. Then (fig. 3):
1. In the Mixer, click on the channel with audio you want to stream into Studio One.
2. Click on the Audio Output Target selector in the Mixer’s lower right.
3. From the pop-up menu, select the Studio One mixer channel that will stream the audio.
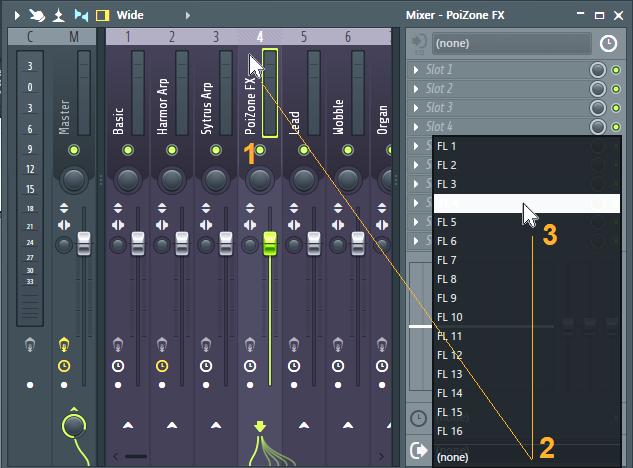
Note: FL 1 carries a two-channel mixdown of all FL Studio tracks. This is necessary for DAWs that don’t support multi-output VST instruments. To play back tracks only through their individual Studio One channels, turn down Studio One’s FL 1L fader. For similar reasons, if you later want to record individual instrument audio outputs into Studio One, the process is simpler if you avoid using channel FL1 for streaming audio.
Drive FL Studio Instruments from Studio One MIDI Tracks
This feature is particularly powerful because of Studio One’s harmonic editing. Record your MIDI tracks in Studio One, and use the harmonically edited data to drive FL Studio’s instruments. Then, you can assign the instruments to stream their audio outputs into Studio One for further mixing.
FL Studio defaults to assigning the first 16 Channel Rack positions to the first 16 MIDI channels. These positions aren’t necessarily numbered 1-16, because the Channel Rack positions can “connect” to mixer channels with different numbers. So, insert the instruments you want to use with Studio One in the first 16 Rack Channel positions. Referring to fig. 4:
1. After the FL Studio VSTi has been inserted in Studio One, insert an additional Studio One Instrument track for each FL Studio instrument you want to drive.
2. Set Studio One’s Instrument track output channel to match the desired FL Instrument in the Channel Rack.
3. Any enabled Input Monitor in Studio One will feed MIDI data to its corresponding Rack Channel in FL Studio. To send data to only one Rack Channel, select it in FL Studio. In Studio One, enable the Input Monitor for only the corresponding Rack Channel.
4. Record-enable the Studio One track into which you want to record.
Now you can record MIDI tracks in Studio One, use Harmonic Editing to experiment with different chord progressions, and hear the FL Studio instruments play back through Studio One’s mixer.
Recording the FL Instruments as Audio Tracks in Studio One
Studio One’s Instrument channels aren’t designed for recording. Nor can you render an FL Studio-driven Instrument track to audio, because the instrument isn’t in the same program as the track. So, to record an FL Studio instrument:
1. Add an Audio track in Studio One.
2. Click the Audio track’s Input field. This is the second field above the channel’s pan slider.
3. A pop-up menu shows the available inputs. Unfold Instruments, and choose the instrument you want to record. (Naming Studio One’s Instrument tracks makes choosing the right instrument easier, because you don’t need to remember which instrument is, for example, “FL 5L.”)
4. Record-enable the Audio track, and start recording the track in real time.
About Transport Sync
FL Studio mirrors whatever you do with Studio One’s transport, and follows Studio One’s tempo. This includes Tempo Track changes. You can jump around to different parts of a song, and FL Studio will follow.
Unlike ReWire, though, the reverse is not true. FL Studio’s transport operates independently of Studio One. If you click FL Studio’s Play button, only FL Studio will start playing. This can be an advantage if you want to edit FL Studio without hearing what’s happening in Studio One.
I must admit, ReWire being deprecated was disappointing. I liked being able to use two different programs simultaneously to take advantage of what each one did best. Well, ReWire may be gone—but FL Studio and Studio One get along just fine.
Make Bass “Pop” in Your Mix
Bass has a tough gig. Speakers have a hard time reproducing such low frequencies. Also, the ear is less sensitive to low (and high) frequencies compared to midrange frequencies. Making bass “pop” in a mix, especially at low playback levels, isn’t easy.
Fortunately, saturating the bass can provide a solution. This type of distortion has two beneficial effects:
- Adds high-frequency harmonics. A bass note with harmonics is easier to hear, even in systems with a compromised bass response and at lower playback levels.
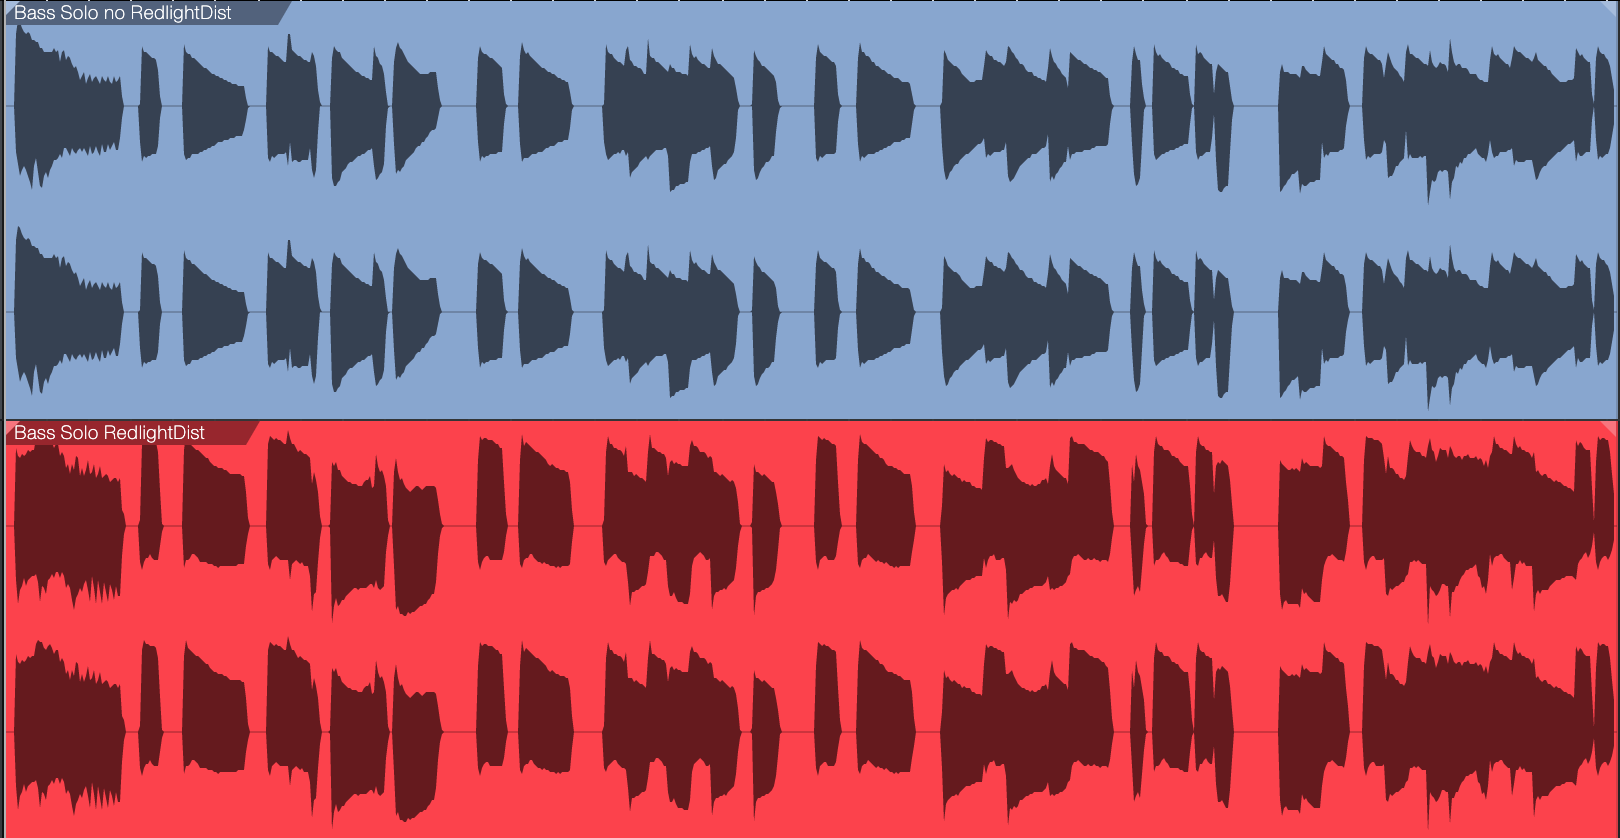
- Raises the bass’s average level. With light saturation, the bass has a higher average level. But this doesn’t have to increase the peak level (fig. 1).
Most bass lines use single notes. So, unlike guitar, saturation doesn’t create nasty intermodulation distortion due to notes interacting with each other. Even with saturation, the bass sounds “clean” in the context of a mix.
The Star of the Show: RedlightDist
Although tape emulation effects are popular for saturating bass, RedlightDist (fig. 2) is all you need. Setting Type to Hard Tube and using a single Stage produces an effect with bass that’s almost indistinguishable from tape emulation plugins. (The Bass QuickStrip tip also includes the RedlightDist, but the preset uses the Splitter. This simpler tip works with Studio One Artist or Professional.)

How to Optimize the Input Level
The saturation amount depends on the input level, not just the settings of the In, Distortion, and Drive controls. The Distortion and Drive settings in fig. 2 work well. At least initially, use the In control to adjust the amount of saturation. If the highest setting doesn’t produce enough saturation, increase the level going into the RedlightDist. If you still want more saturation, increase Drive.
Hearing is Believing!
Make sure you check out these audio examples, because the way RedlightDist affects the overall mix is dramatic. First, listen to the unprocessed bass sound as a reference. All the examples are normalized to ‑6 dB peak levels.
The next example is the saturated sound. But the real payoff is in the final two examples.
The following example plays an excerpt from a song. The bass is not saturated. Listen to it in context with the mix.
The final example uses saturated bass in the song excerpt. Listen to how the bass stands out in the mix, even though its peak level is the same as the previous example.
By using saturation, you can mix the bass lower than you could without saturation, yet the bass sounds equally prominent. This offers two main benefits:
- There’s more low-frequency space for the kick and other instruments.
- Having less low-bass energy frees up more headroom. So, the entire mix can have a higher level, without needing to add compression or limiting.
RedlightDist is a versatile effect. Also try this technique with kick—as well as analog, beatbox-style drum sounds—when you need more punch and pop.
Notion Mobile 3.2 Now Available
Notion Mobile v3 took mobile music creation to the next level with support for iOS, Android, Windows and macOS. Now v3.2 adds many enhancements and fixes, as well as being available in a brand new app store, the Samsung Galaxy Store, for the very first time.
Notion Mobile is free, and all add-ons are included in a Studio One+ membership or available through the Feature Bundle in-app purchase. Download from your preferred App Store now
Top 5 New Features
1. Studio One+
Notion Mobile is now part of Studio One+, the new name for PreSonus Sphere. Unlock Notion Mobile across all platforms with one easy sign-in, plus get Notion 6 Desktop, Studio One 6 Professional, All add-ons and expansion sounds, exclusive training materials and online collaboration. Find out more here

2. Samsung Galaxy Store
Notion Mobile’s Android version can now be found in the Samsung Galaxy App Store. This makes Notion available for free in 6 App Stores and in 9 languages!

3. Chord, tablature and lead sheet improvements
It is now even easier to create leadsheets and tab with improvements in 3.2
| Add slides and gliss lines to grace notes | The most frequently added feature for writing for guitar – you can now add slides both between and to/from grace notes |
| More types of harmonics | Additional common harmonic types (pinch, tap and harp) are now available to enter into the score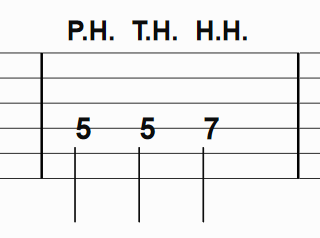 |
Fill with rhythm slash | You can now make a selection and automatically fill with rhythm slashes. You can still convert existing individual notes into rhythmic slashes as before, but with this new tool a whole range of empty measures can be filled with rhythmic slashes with one tap – by default the slash takes the common denominator of the time signature for its duration. |
| Paste lyrics from external source | You can now paste lyrics text that has been copied from another application (i.e. from the system clipboard). Use the lyrics tool to select the first note, then just paste! If there are hyphens or underscores then Notion will treat these for syllables and melisma respectively. Select text in another application and copy. Go back to Notion and use the Lyrics tool to click under the note you want to paste from. Then long press (or right click) and select ‘Paste’, or use the shortcut Ctrl+V (or Cmd+V) |
4. Notation improvements
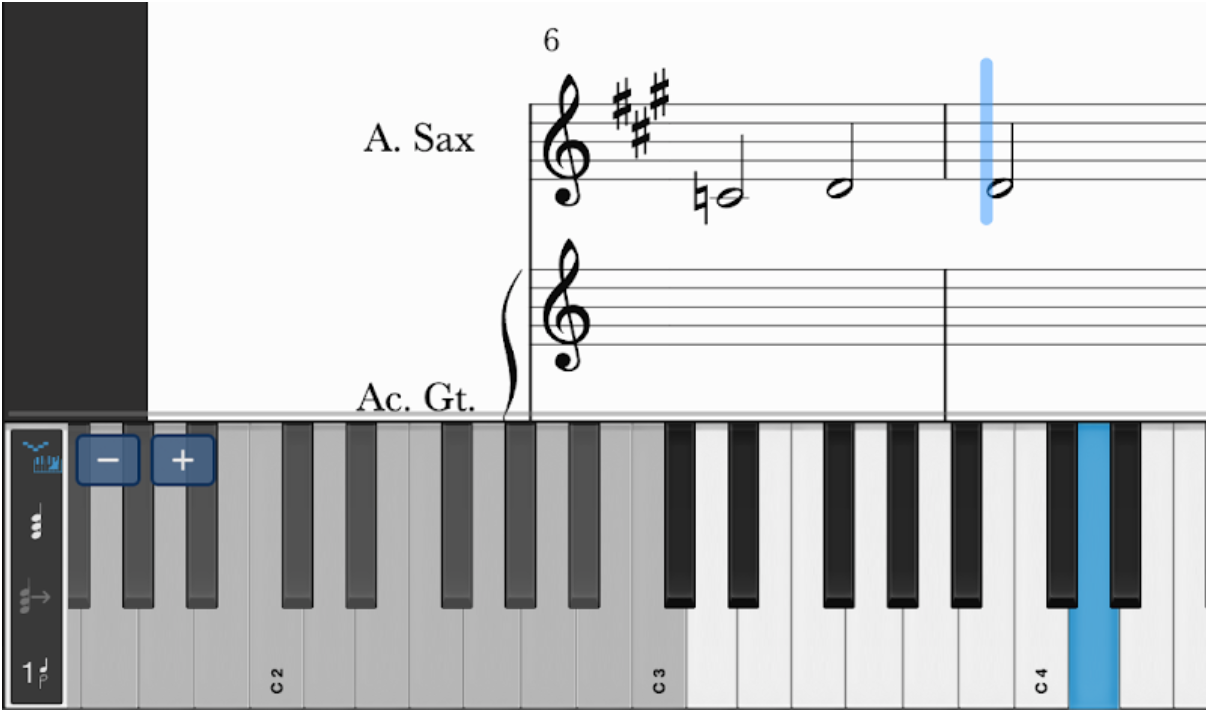
| Mid-staff Instrument Change | You can now change instrument mid-staff with Notion Mobile and even have different instrument sounds in each voice. Though this has long been possible with Notion 6 desktop, this is the first time this feature has been available for Notion Mobile. This is for situations where a single player needs to swap instruments within the same piece of music, for example: a flautist changing to piccolo; a clarinettist switching between ‘A’ and ‘Bb’ instruments; a pianist changing to celesta. In musical theatre, woodwind players can swap between many instruments in a single song – from saxophone to flute to clarinet and back again! If the change involves a transposing instrument (such as cor anglais) then a change of key signature is automatically added:  In the Tools Grid select the new Instrument Change icon, or use the shortcut Shift+I:  Then tap wherever in the score you wish to change the instrument.  Select the instrument, and optionally, which voice you want to change |
Add multiple fingering numbers to chords | You can now stack multiple fingerings vertically for chords, as well as the ability to add finger substitutions (to change finger during a note) Select the finger number you want from the Fingering palette in the Tools Grid:  Then tap it onto the note you wish to apply to it. To enter a finger substitution, hold ‘Shift’ as you enter the number. If you’ve dragged any fingerings out of line, you can straighten them up by selecting a passage, then go to the context menu>Tools>Align Fingerings |
| Entering tuplets with different durations | It’s now much easier to create tuplets that contain different durations, both in touch, and in step time entry. Instead of having to create the base tuplet first (and then change the existing durations), you can now add the durations as they come. In this example, you select and enter the first triplet quarter note, then simply select and enter the triplet eighth notes. Notion will calculate and position them together. |
5. Transpose Input
It is now possible to elect whether your attached MIDI, Bluetooth MIDI, or onscreen instrument, transposes automatically on input. While this feature has long been possible in Notion 6 desktop, this is brand new to Notion Mobile, and allows a user to easily input already transposed music into Notion (“as is”). In the Application Menu, go to Record Options then ‘Transpose Input’
All Changes in Notion Mobile 3.2
| Group | Features / Fixes |
|---|---|
| Notation | Mid-staff Instrument change now possible (Shift+I) Slides and glissandi can now be added to grace notes Pedal up/down tool now available to Vibraphone Different harmonic type text now available for score entry: Harp Harmonic (HH), Tap Harmonic (TH), Pinch Harmonic(PH) Increased spacing between a time signature change and any following accidentals Cross-staff tuplet number no longer shows between staves Stems on cross-staff notes now show correctly when beam is dragged Beam is now shown on correct side if all notes in a group are cross-staff Fingering numbers can now be stacked vertically for chords Finger substitution dashes and numbers now can be added (hold shift while adding the finger number) Notes do not now overlap when they have different durations and in different voices Issue fixed where on some occasions a gliss could not be added to the 3rd beat |
| Editing | New ‘Fill with Rhythm Slashes’ tool (Context menu>Tools) Can now paste lyrics text from an external source (e.g. system clipboard) Can now advance lyrics on iOS with tab key (as well as space) Entering lyrics after a melisma now does not skip the next note Adjusting lyrics text size no longer changes the font on Android Can now flip a tie below/above notes (Context menu>Attachments>Show Above/Below, or Ctrl+Shift+F) Can now hide the tuplet number (Context menu>Make Custom Tuplet>Hide Number) Fingerings can be realigned (Make a selection>Context menu>Tools) Tempo markings can now be shortened, hidden, and deleted (Make a selection>Context Menu>Attachments) Measure tools in the Context Menu now affect the measure in which the menu was opened (rather than where the caret is located) |
| Note Entry | New ‘Transpose Entry’ option in Options>Record Setup. This will transpose notes entered with both a MIDI instrument, and with the onscreen instruments. Entering tuplets with different durations improved |
| Chords | Maj9 chords now play back as expected (i.e. not as dom9) Better handling of chord alterations (e.g. C13b9) |
| Parts | Titles on following pages can now be set at different sizes to page 1 as expected |
| UI | Palette spacing improvements Tooltips added for the Tools Grid [Android] Text now shows as expected when renaming scores Drumpad octave up/down buttons now represented with arrows |
| General | [iOS] Soundsets now retained when device is low on storage Rests are now not added to measures that have a one-measure repeat sign on MusicXML export [Android] Sound Installation buttons now responsive after removing sounds [Amazon] Pending Purchases now supported (i.e. when a purchase is made by a Kids Profile and requires Adult account approval) Documentation updated |
Enhance Your Reverb’s Image
First, an announcement: If you own the eBook “How to Record and Mix Great Vocals in Studio One,” you can download the 2.1 update for free from your PreSonus account. This new version, with 10 chapters and over 200 pages, includes the latest features in Studio One 6. New customers can purchase the eBook from the PreSonus Shop. And now, this week’s tip…
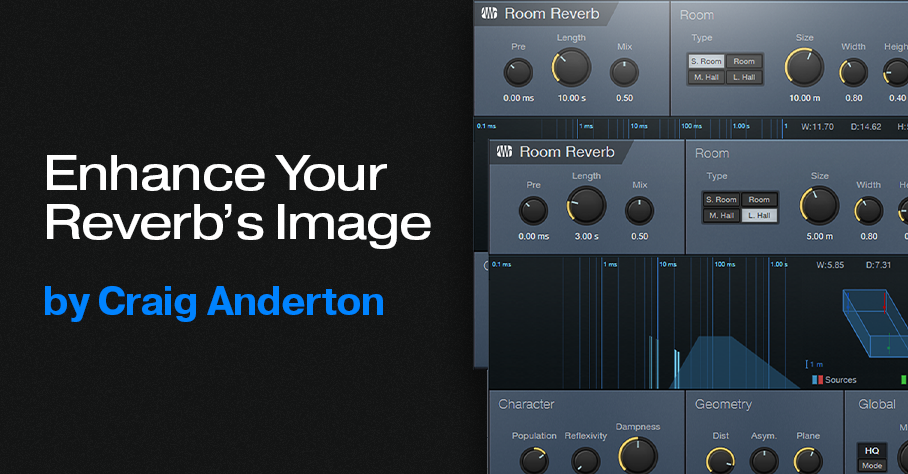
Studio One’s Room Reverb creates realistic ambiance, but sometimes “realistic” isn’t the goal. Widening the reverb’s stereo image outward can give more clarity to sounds panned to center, such as kick, snare, and vocals. Expanding the image also gives a greater sense of width.
This tip covers four ways to widen the reverb’s image. All these techniques insert reverb in an FX Channel. The channels you want to process with reverb feed the FX Channel via Send controls.
#1 Easiest Option: Binaural Pan
Version 6 upgraded the mixer’s panpot to do dual panning or binaural panning, in addition to the traditional balance control function. Click on the panpot, select Binaural from the drop-down menu, and turn up the Width control to widen the stereo image (fig. 1).
If you haven’t upgraded to version 6 yet, then insert the Binaural Pan plug-in after the reverb. Turn up the Binaural Pan’s Width parameter for the same widening effect.
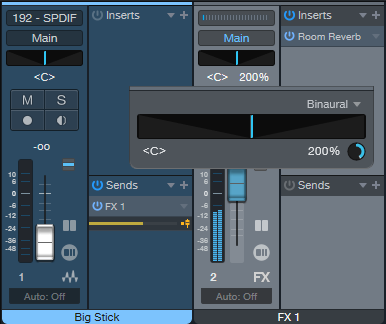
#2 Most Flexible: Mid-Side Processing
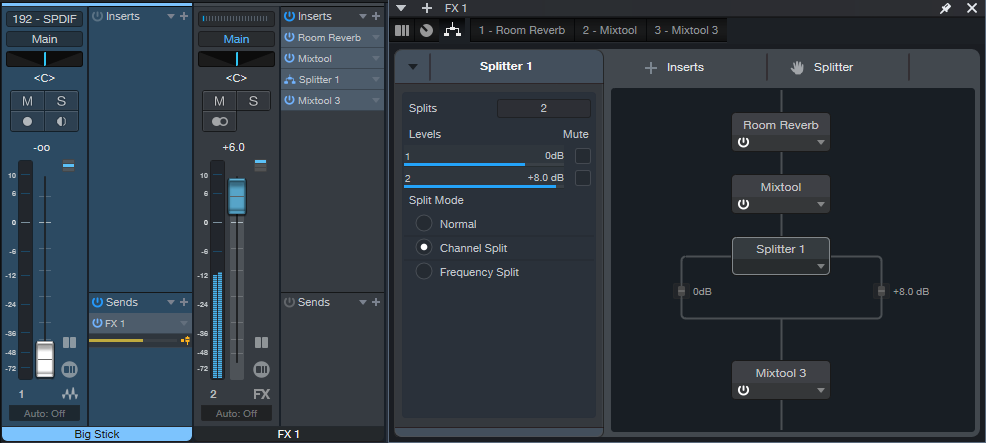
Mid-side processing separates the mid (center) and side (left and right) audio. (For more about mid-side processing, see Mid-Side Processing Made Easy and Ultra-Easy Mid-Side Processing with Artist.) The advantage compared to the Binaural Pan is that you can process the sides or center audio, as well as adjust their levels. This tip uses the Splitter module in Studio One Professional.
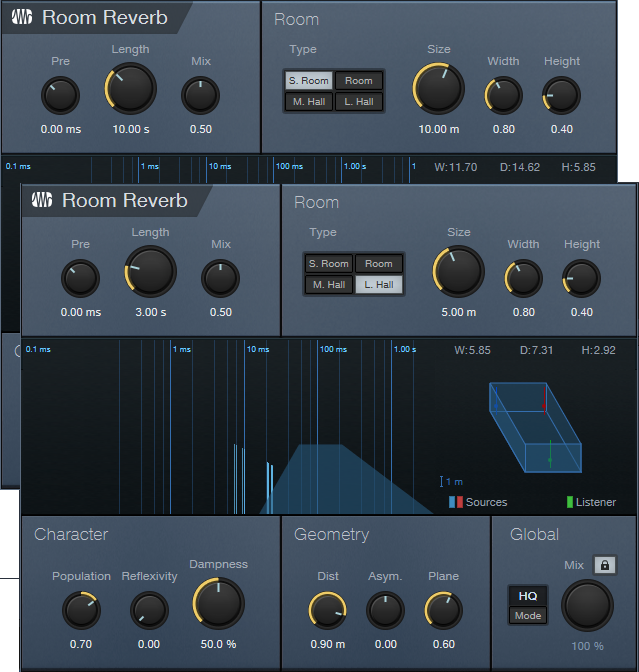
In fig. 2, the Room Reverb feeds a Mixtool. Enabling the Mixtool’s MS Transform function encodes stereo audio so that the mid audio appears on the left channel, and the sides audio on the right. The Splitter is in Channel Split mode, so its Level parameters set the levels for the mid audio (Level 1) and sides audio (Level 2). To widen the stereo effect, set Level 2 higher than Level 1. The final Mixtool, also with MS Transform enabled, decodes the signal back into conventional stereo.
#3 Most Natural-Sounding: Dual Reverbs and Pre-Delay
This setup requires two FX Channels, each with a reverb inserted (fig. 3).
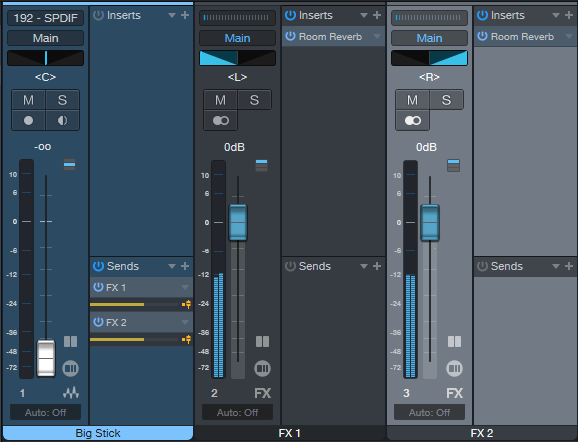
To create the widening effect:
1. Edit one reverb for the sound you want.
2. Pan its associated FX Channel full left.
3. Copy the reverb into the other channel, and pan its associated FX Channel full right.
4. To widen the stereo image, increase or decrease the pre-delay for one of the reverbs. The sound will be similar to the conventional reverb sound, but with a somewhat wider, yet natural-sounding, stereo image.
Generally, copying audio to two channels and delaying one of them to create a pseudo-doubling effect can be problematic. This is because collapsing a mix to mono thins the sound due to phase cancellation issues. However, the audio generated by reverb is diffuse enough that collapsing to mono doesn’t affect the sound quality much (if at all).
#4 Most Dramatic: Dual Reverbs with Different Algorithms
This provides a different and dramatic sense of width. Use the same setup as the previous tip, but don’t increase the pre-delay on one of the reverbs. Instead, change the Type algorithm (fig. 4).
If you change one of the reverbs to a smaller room size, you’ll probably need to increase the Size and Length to provide a balance with the reverb that has a bigger room size. Conversely, if you change the algorithm to a larger room, decrease Size and Length. You may also need to vary the FX Channel levels if the stereo image tilts to one side.
Free! Three Primo Piano Presets
Let’s transform your acoustic piano instrument sounds—with effects that showcase the power of Multiband Dynamics. Choose from two download links at the end of this post:
- FX Chains. These include the FX part of the Instrument+FX Presets (see next), so you can use them with any acoustic piano virtual instrument. You may want to bypass any effects added to the instrument (if present) so that the FX Chains have their full intended effect. Then, you can try adding the effects back in to see if they improve the sound further.
- Instrument+FX Presets. These are based on the PreSonus Studio Grand piano SoundSet. This SoundSet comes with a Sphere membership, or is optional-at-extra-cost for Studio One Artist or Professional.
Remember, presets that incorporate dynamics will sound as intended only with suitable input levels. These presets are designed for relatively high input levels, short of distortion. If the presets don’t seem to have any effect, increase the piano’s output level. Or, add a Mixtool between the channel input and first effect to increase the level feeding the chain.
CA Studio Grand Beautiful Concert
Before going into too different a direction, let’s create a gorgeous solo piano sound. In this preset, the Multiband Dynamics has two functions. The Low band compresses frequencies below 100 Hz (fig. 1), to increase the low end’s power.
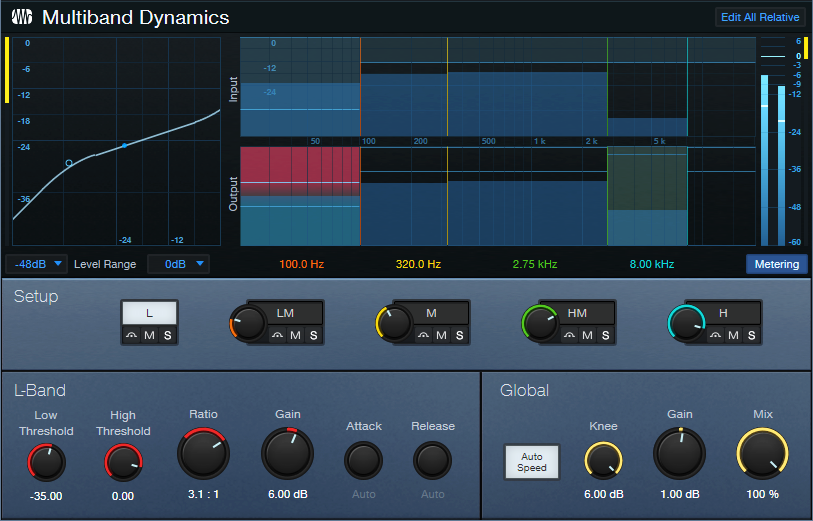
The HM stage is active, but doesn’t compress. It acts solely as EQ. By providing an 8 dB boost from 2.75 kHz to 8 kHz, this stage adds definition and “air.” The remaining effects include Room Reverb for ambiance and Binaural Pan to widen the instrument’s stereo image. Let’s listen to some Debussy.
CA Studio Grand Funky
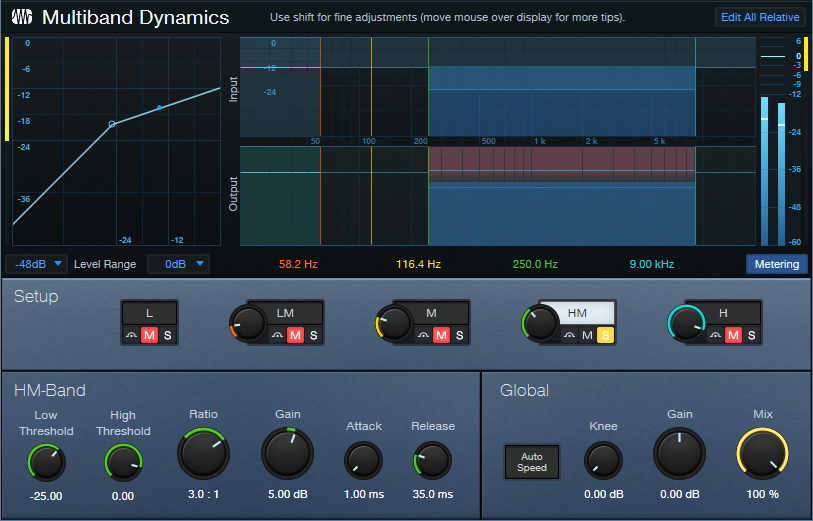
Although not intended as an emulation, this preset is inspired by the punchy, funky tone of the Wurlitzer electric pianos produced from the 50s to the 80s. The Multiband Dynamics processor solos, and then compresses, the frequency range from 250 Hz to 9 kHz (fig. 2).
The post-instrument effects include a Pro EQ3 to impart some “honk” around 1.6 kHz, and the RedlightDist for mild saturation. X-Trem is optional for adding vintage tremolo FX (the audio example includes X-Trem).
CA Studio Grand Smooth
This smooth, thick piano sound is ideal when you want the piano to be present, but not overbearing. The Multiband Dynamics has only one function: provide fluid compression from 320 Hz to 3.50 kHz (fig. 3). This covers the piano’s “meat,” while leaving the high and low frequencies alone.
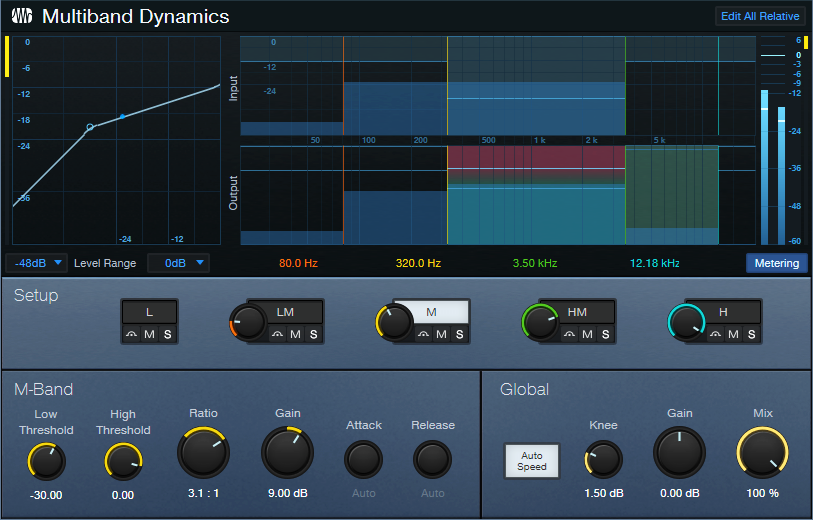
The audio example highlights how the compression increases sustain on held notes.
Hey—Up for More?
These presets just scratch the surface of how multiband dynamics and other processors can transform instrument sounds. Would you like more free instrument presets in the future? Let me know in the comments section below.
Download the Instrument+FX Presets here:
Download the FX Chains here: