FL Studio Meets Studio One
FL Studio is a cool program. Yet when some users see me working with Studio One’s features like comping tools, harmonic editing, the lyrics track, Mix FX, MPE support, and the like, I’ll often hear “wow, I wish FL Studio could do that.” Well, it can…because you can open FL Studio as a multi-output VSTi plug-in within Studio One. Even with the Artist version, you can stream up to 16 individual audio outputs from FL Studio into Studio One’s mixer, and use Studio One’s instrument tracks to control FL Studio’s instruments.
For example, to use Studio One’s comping tools, record into Studio One instead of FL Studio, do your comping, and then mix the audio along with audio from FL Studio’s tracks. With harmonic editing, record the MIDI in Studio One and create a Chord track. Then, use the harmonically edited MIDI data to drive instruments in FL Studio. And there’s something in it for Studio One users, too—this same technique allows using FL Studio like an additional rack of virtual instruments.
The following may seem complicated. But after doing it a few times, the procedure becomes second nature. If you have any questions about this technique, please ask them in the Comments section below.
How to Set Up Studio One for FL Studio Audio Streams
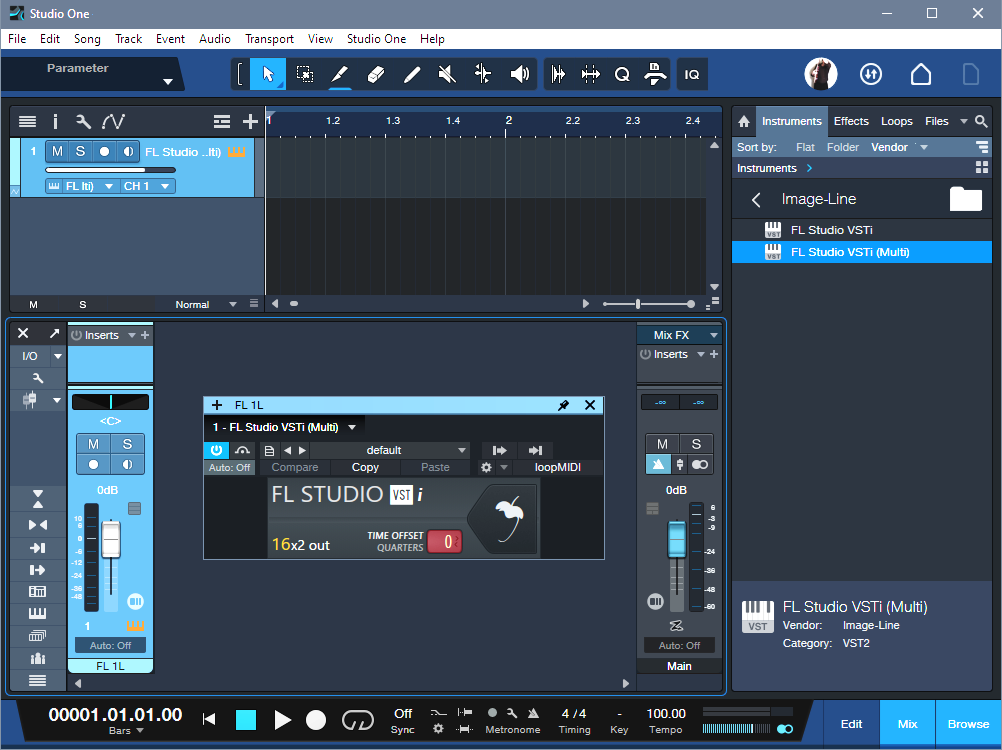
1. Go to Studio One’s Browser, and choose the Instruments tab.
2. Open the Image-Line folder. Drag FL Studio VSTi (Multi) into the Arrange view, like any other virtual instrument. This creates an Instrument track in Studio One, and opens the FL Studio widget (fig. 1).
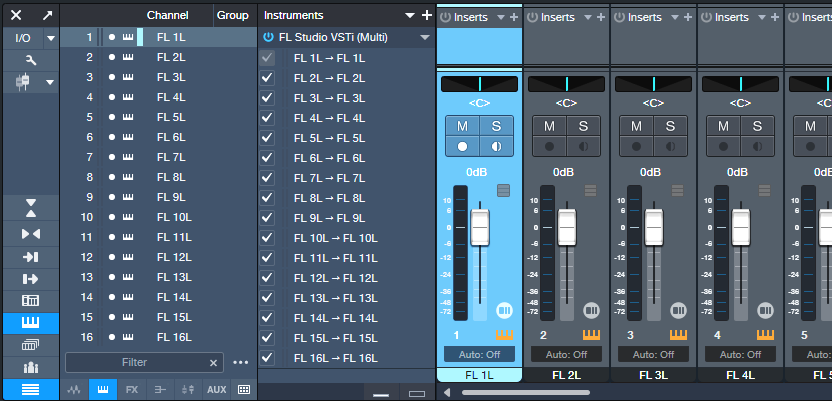
3. Refer to fig. 2 for the following steps. Click on Studio One’s Keyboard icon toward the left of the Mixer view to open the Instrument rack. You’ll see FL Studio VSTi (Multi).
4. Click the downward arrow to the right of the FL Studio VSTi (Multi) label, and choose Expand. This exposes the 16 FL Studio outputs.
5. Check the box to the left of the inputs you want to use. Checking a box opens a new mixer channel in Studio One.
6. To show/hide mixer channels, click the Channel List icon (four horizontal bars, at the bottom of the column with the Keyboard icon). This opens a list of mixer channels. The dots toggle whether a channel is visible (white dot) or hidden (gray dot).
Assign FL Studio Audio Streams to Studio One
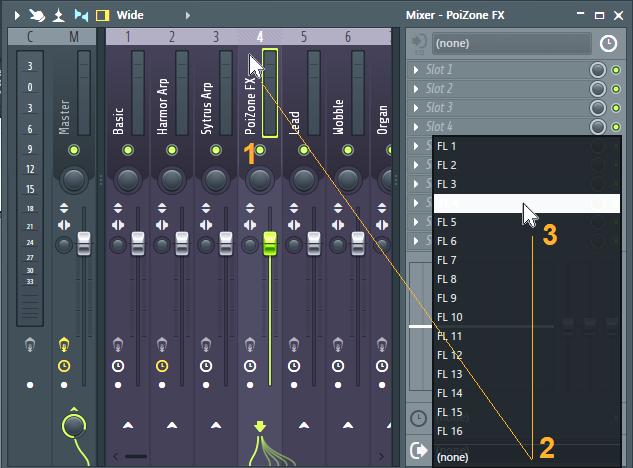
To open the FL Studio interface, click on the Widget’s fruit symbol. Then (fig. 3):
1. In the Mixer, click on the channel with audio you want to stream into Studio One.
2. Click on the Audio Output Target selector in the Mixer’s lower right.
3. From the pop-up menu, select the Studio One mixer channel that will stream the audio.
Note: FL 1 carries a two-channel mixdown of all FL Studio tracks. This is necessary for DAWs that don’t support multi-output VST instruments. To play back tracks only through their individual Studio One channels, turn down Studio One’s FL 1L fader. For similar reasons, if you later want to record individual instrument audio outputs into Studio One, the process is simpler if you avoid using channel FL1 for streaming audio.
Drive FL Studio Instruments from Studio One MIDI Tracks
This feature is particularly powerful because of Studio One’s harmonic editing. Record your MIDI tracks in Studio One, and use the harmonically edited data to drive FL Studio’s instruments. Then, you can assign the instruments to stream their audio outputs into Studio One for further mixing.
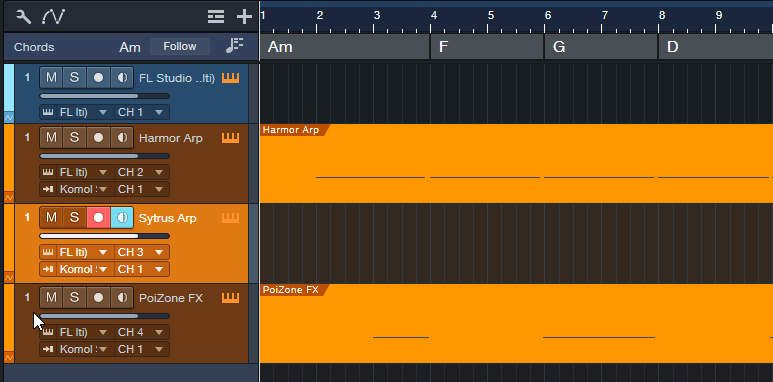
FL Studio defaults to assigning the first 16 Channel Rack positions to the first 16 MIDI channels. These positions aren’t necessarily numbered 1-16, because the Channel Rack positions can “connect” to mixer channels with different numbers. So, insert the instruments you want to use with Studio One in the first 16 Rack Channel positions. Referring to fig. 4:
1. After the FL Studio VSTi has been inserted in Studio One, insert an additional Studio One Instrument track for each FL Studio instrument you want to drive.
2. Set Studio One’s Instrument track output channel to match the desired FL Instrument in the Channel Rack.
3. Any enabled Input Monitor in Studio One will feed MIDI data to its corresponding Rack Channel in FL Studio. To send data to only one Rack Channel, select it in FL Studio. In Studio One, enable the Input Monitor for only the corresponding Rack Channel.
4. Record-enable the Studio One track into which you want to record.
Now you can record MIDI tracks in Studio One, use Harmonic Editing to experiment with different chord progressions, and hear the FL Studio instruments play back through Studio One’s mixer.
Recording the FL Instruments as Audio Tracks in Studio One
Studio One’s Instrument channels aren’t designed for recording. Nor can you render an FL Studio-driven Instrument track to audio, because the instrument isn’t in the same program as the track. So, to record an FL Studio instrument:
1. Add an Audio track in Studio One.
2. Click the Audio track’s Input field. This is the second field above the channel’s pan slider.
3. A pop-up menu shows the available inputs. Unfold Instruments, and choose the instrument you want to record. (Naming Studio One’s Instrument tracks makes choosing the right instrument easier, because you don’t need to remember which instrument is, for example, “FL 5L.”)
4. Record-enable the Audio track, and start recording the track in real time.
About Transport Sync
FL Studio mirrors whatever you do with Studio One’s transport, and follows Studio One’s tempo. This includes Tempo Track changes. You can jump around to different parts of a song, and FL Studio will follow.
Unlike ReWire, though, the reverse is not true. FL Studio’s transport operates independently of Studio One. If you click FL Studio’s Play button, only FL Studio will start playing. This can be an advantage if you want to edit FL Studio without hearing what’s happening in Studio One.
I must admit, ReWire being deprecated was disappointing. I liked being able to use two different programs simultaneously to take advantage of what each one did best. Well, ReWire may be gone—but FL Studio and Studio One get along just fine.