How to Use Virtual Synths as Signal Processors
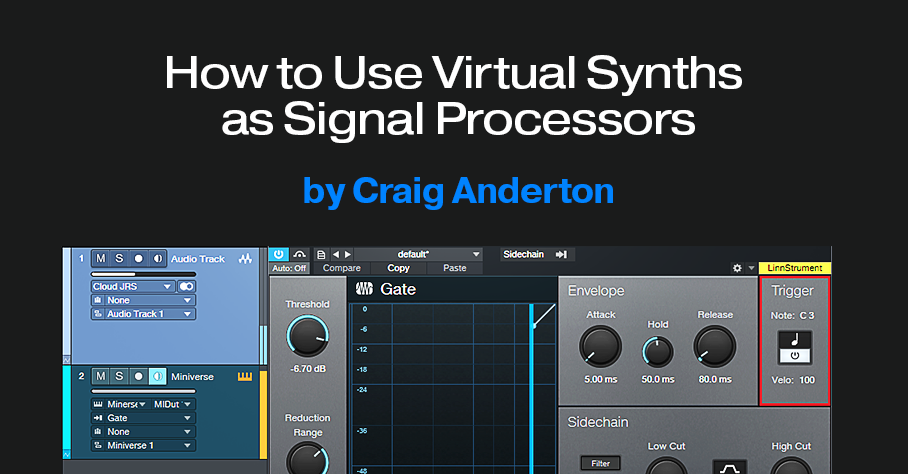
Some virtual instruments can accept external audio inputs. This lets you process audio through the synthesizer’s various modules like filters, VCAs, effects, and so on. Essentially, the synthesizer becomes an effects processor. To accommodate this, Version 6 introduced a sidechain audio input for virtual instruments.
Not all instruments have this capability. I’ve tested the audio sidechain input successfully with Cherry Audio’s CA2600, Miniverse, PS-30, Rackmode Vocoder, and Voltage Modular. Arturia’s Vocoder V also works. I’d really appreciate any notes in the Comments section about other instruments that work with this feature.
Is My Virtual Instrument Compatible?
Insert the synth, and click on the sidechain symbol in its header. If you see a box with Send and Output options (fig. 1), you can feed audio into the synthesizer. Check the box for either a Send from a track (pre- or post-fader), or the track output.

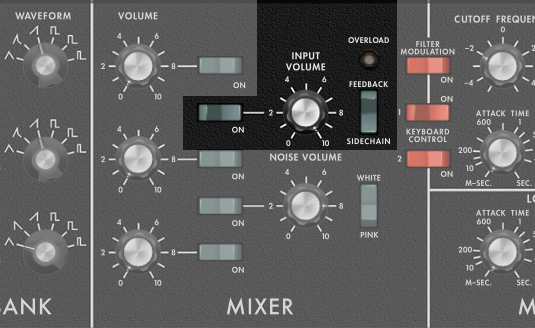
You’ll probably need to enable the virtual instrument’s external audio input. Fig. 2 shows how to do this with Cherry Audio’s Miniverse, which emulates how the Minimoog accepted external inputs:
- Set the Input’s Mixer switch to on.
- Turn up the Input volume.
- The Miniverse can feed the external input from its own output to obtain feedback, or from the Sidechain. For this application, choose Sidechain.
Studio One Setup
Fig. 3 shows the track layout for Studio One. Ignore the Gate for now, we’ll cover that shortly.
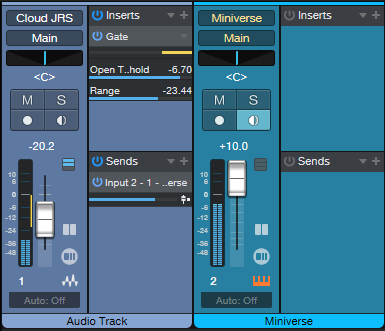
I chose a post-fader Send from the audio track, not the track output, to drive the synth. This is because I wanted to be able to mix parallel tracks—the audio providing the input, and the audio processed by the synthesizer.
Using the Gate
You won’t hear anything from the synth unless you trigger the VCA to let the external audio signal through. You can play a keyboard to trigger the synth for specific sections of the audio track, but the Gate can provide automatic triggering (fig. 4).
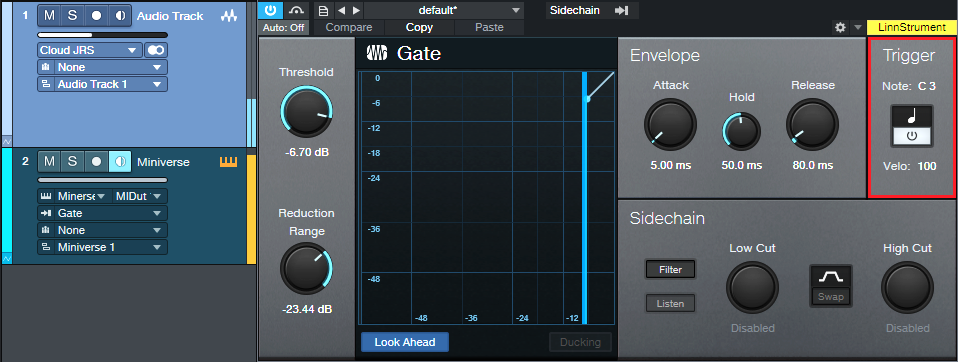
With Triggering enabled, the Gate produces a MIDI note trigger every time it opens. So, Insert the Gate in the audio track, and set the Instrument track’s MIDI input to Gate. Now, the audio will trigger the synth. Adjust the Gate Threshold for the most reliable triggering. This is particularly useful with instruments that have attacks, like drums, guitar, piano, etc.
Import JPG/PNG Files into the Video Track
This builds on last week’s tip about splitting and navigating within the Video Track, because one of the main reasons for creating splits is to import additional material. Although the Video Track can accept common video file formats, sometimes you’ll need to import static JPG or PNG images. These could be a band logo, screen shots for a tutorial video, a slide with your web site and contact information, photos from a smartphone, public domain images, etc. To bring them into the video track, you need to convert them into a compatible format, like MP4.
Many online sites offer to “convert JPEG to MP4 for free!” However, I’m skeptical of those kinds of sites. Fortunately, modern Mac and Windows operating systems include tools that can do any needed conversion.
Converting with the Mac
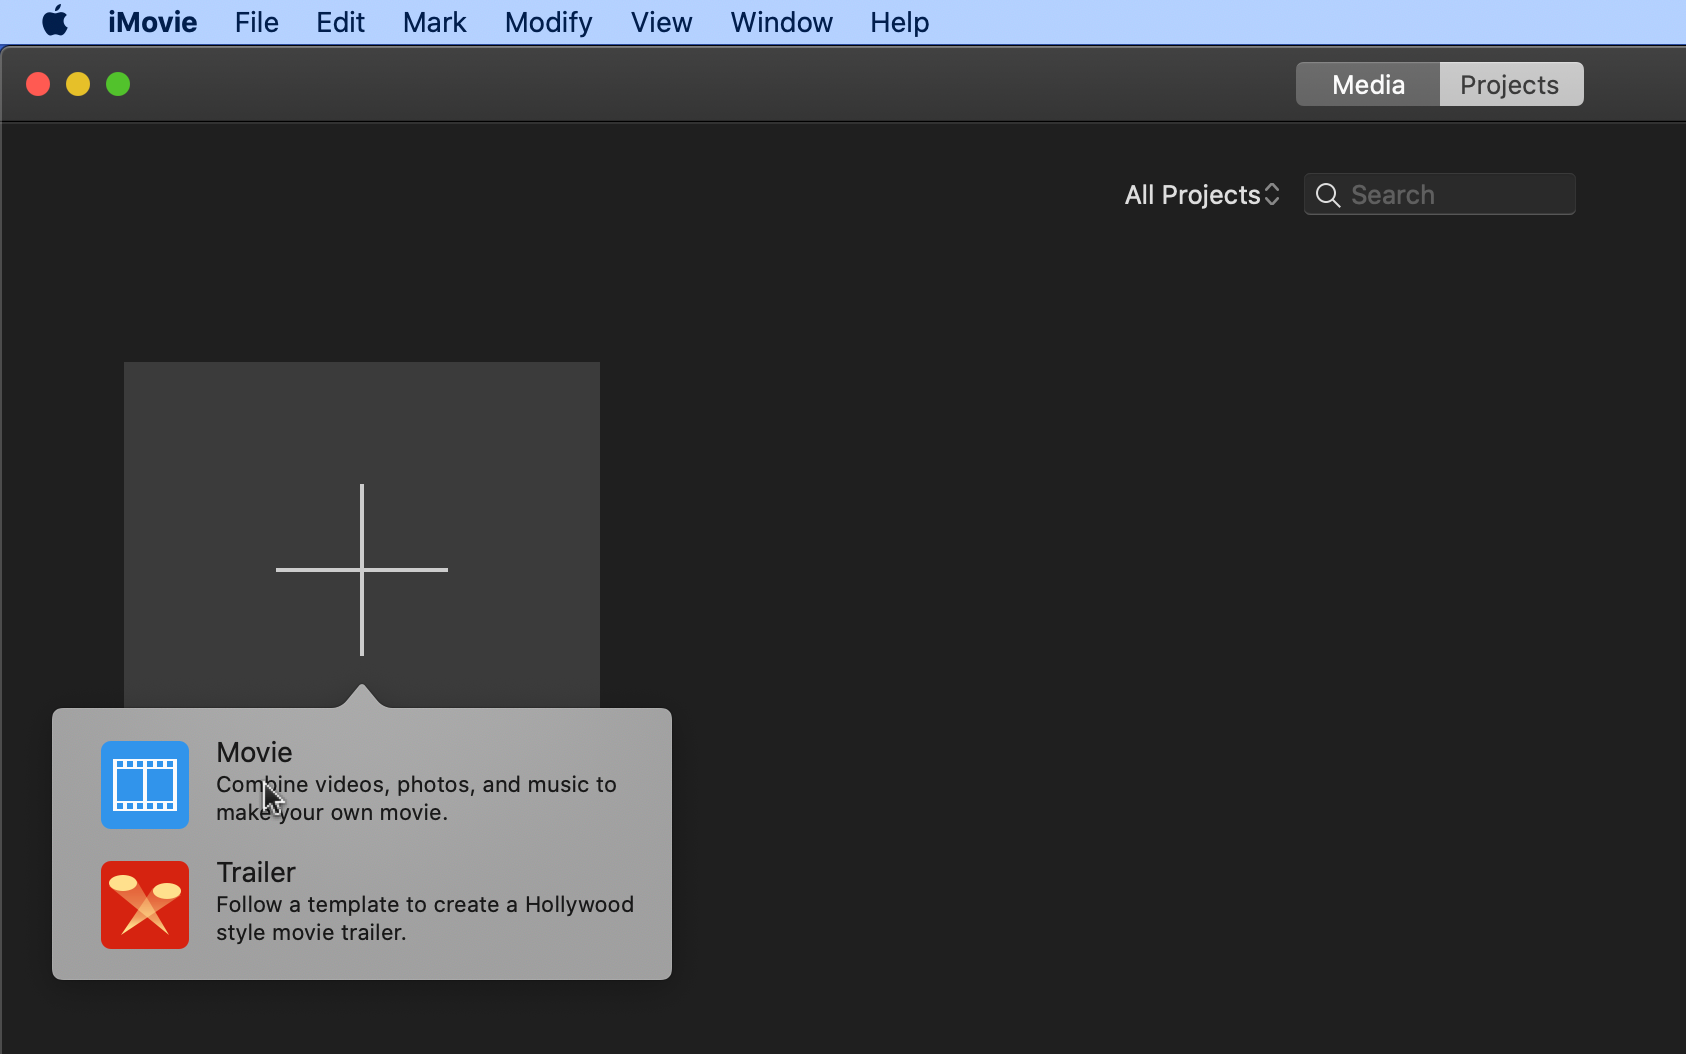
1. Open iMovie, click on Create New, and then choose Movie.
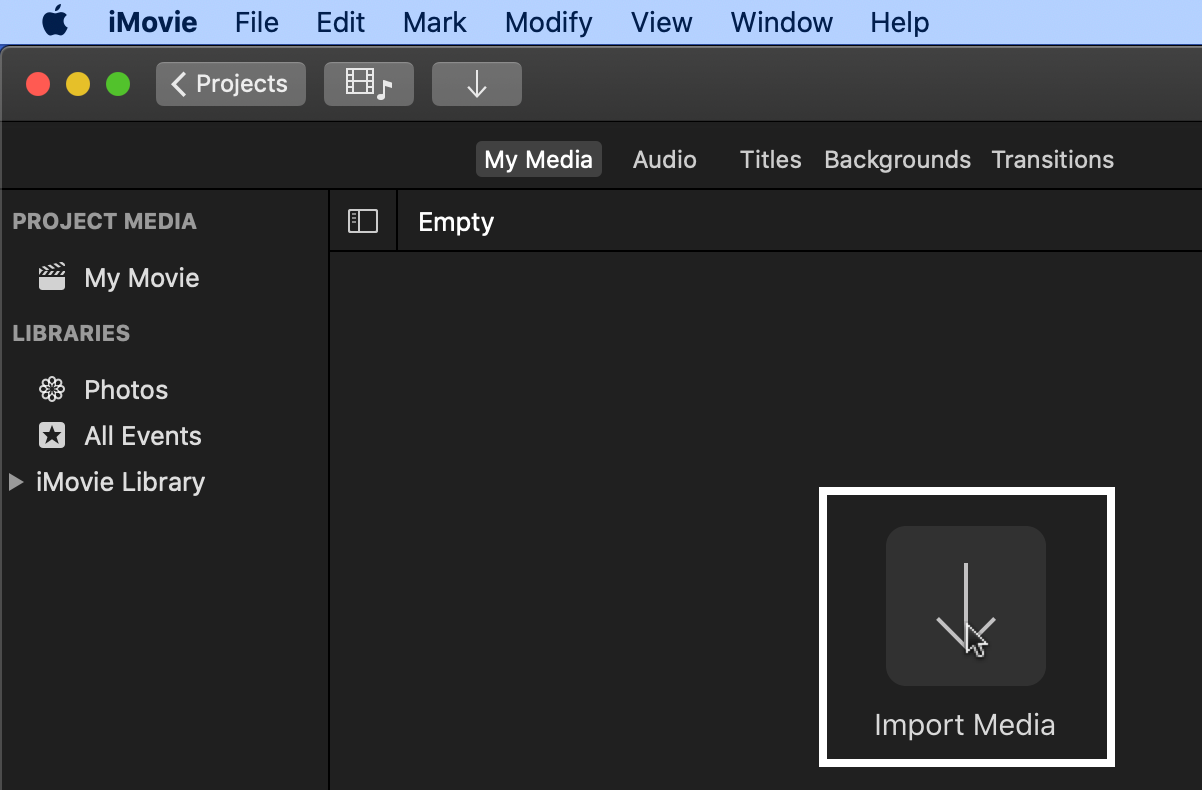
2. Click on Import Media. Navigate to the location of the image you want to convert, and open it in iMovie.
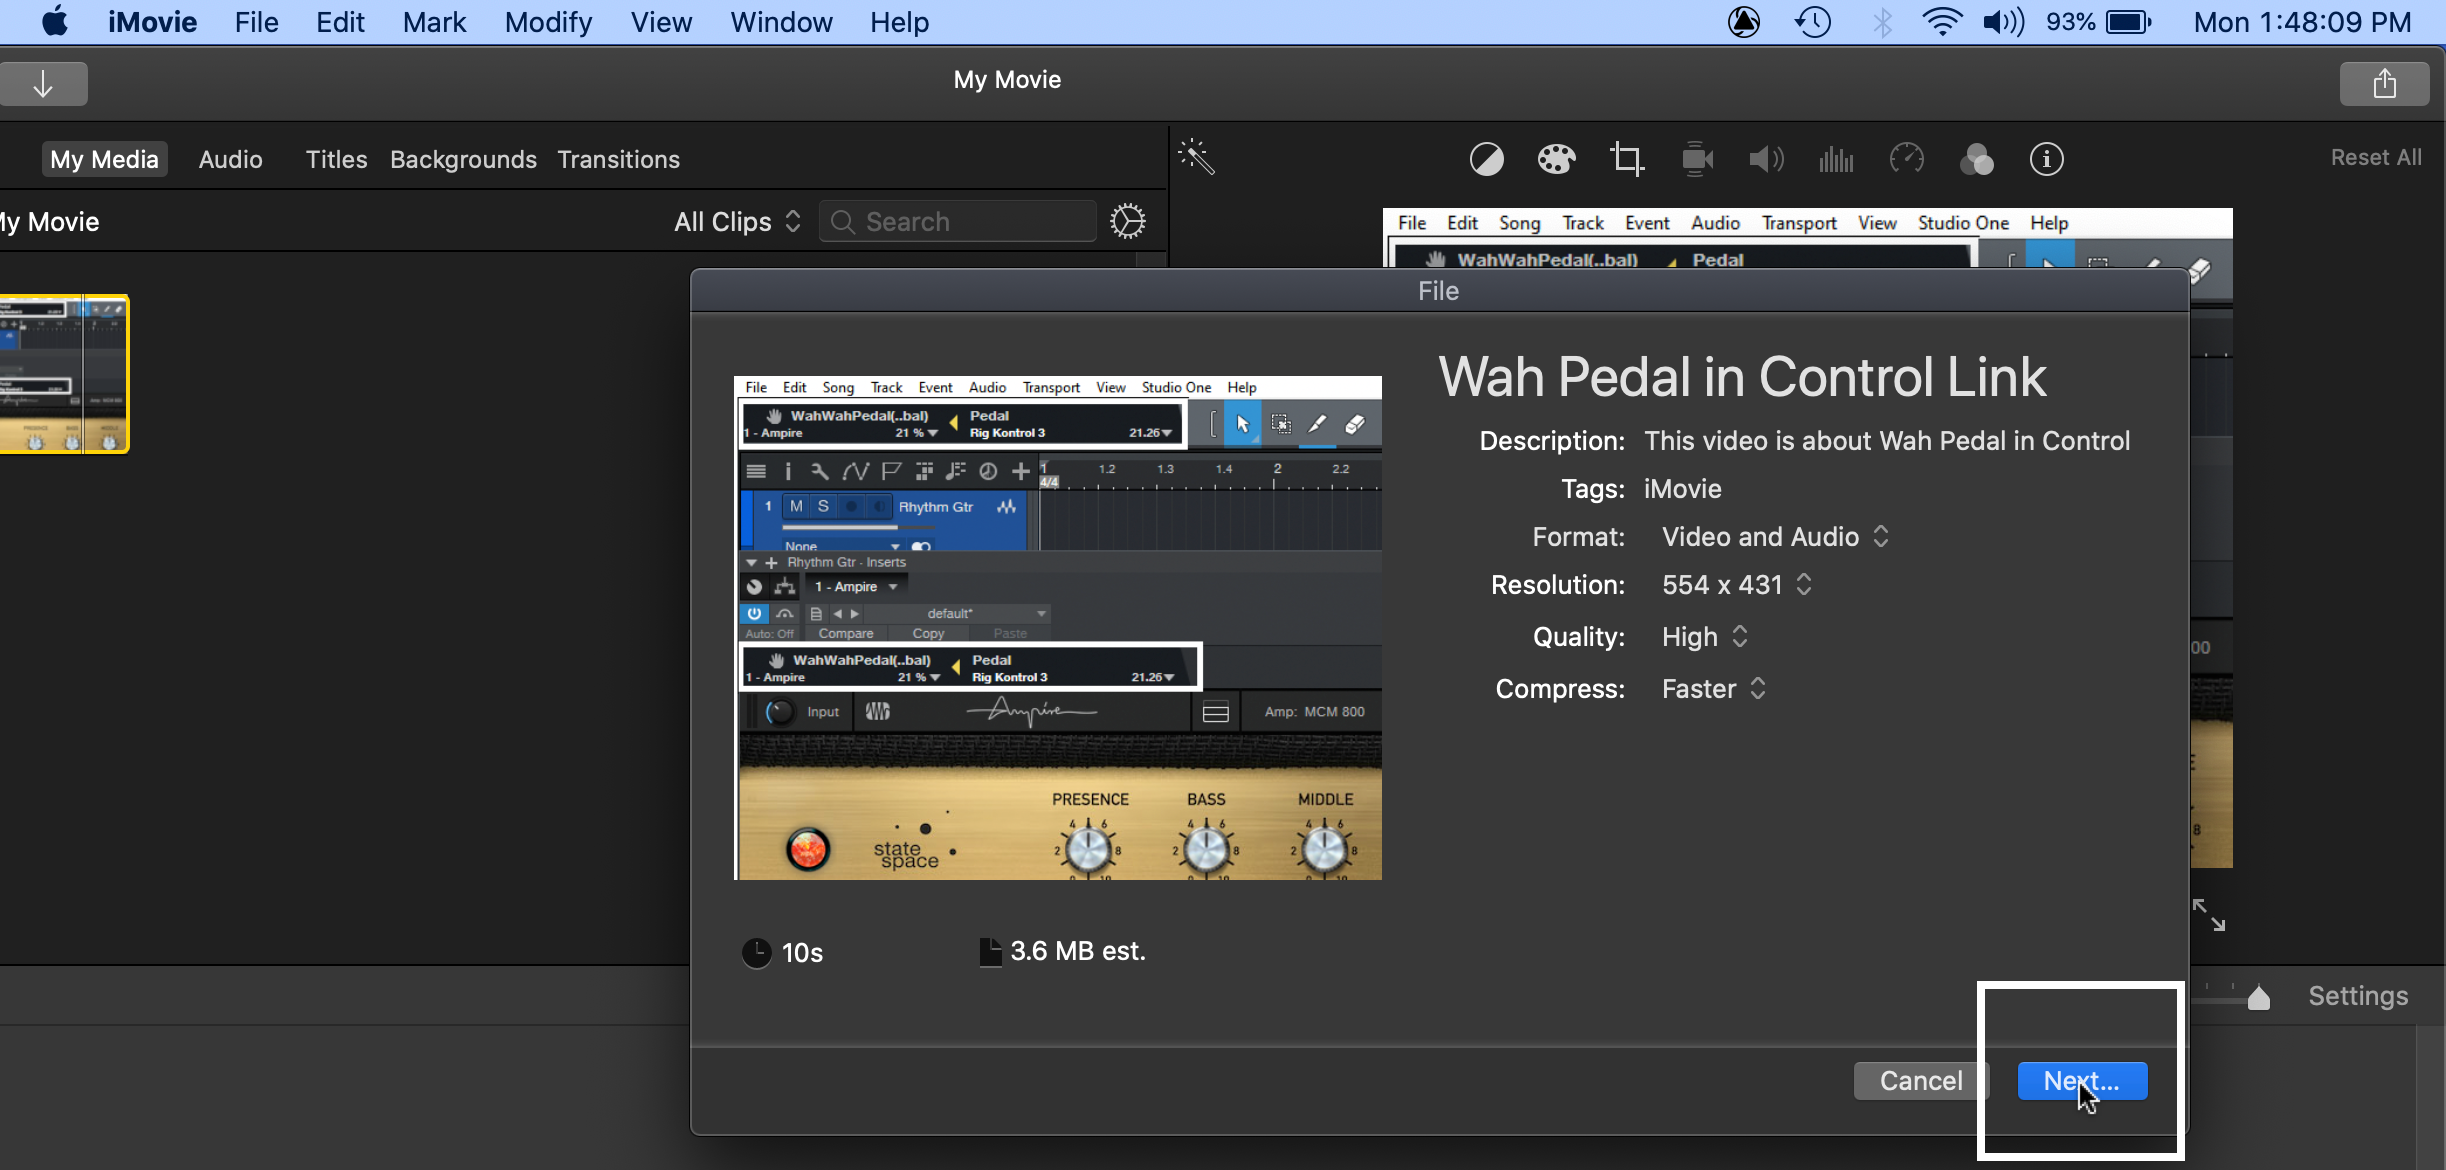
3. Choose File > Share > File.
4. In the window that opens, click Next…
5. Navigate to where you want to save the file, and click on Save. You now have an MP4 file.
If you need a longer video than the default 3 seconds, drag more copies of the file to the timeline before saving. Or, drag the file into Studio One multiple times.
Converting with Windows
1. Open Video Editor (it’s not necessary to install Clipchamp). Click on New Video, and name it.
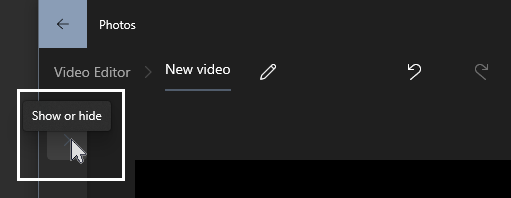
2. Click on the nearly invisible Project Library button.
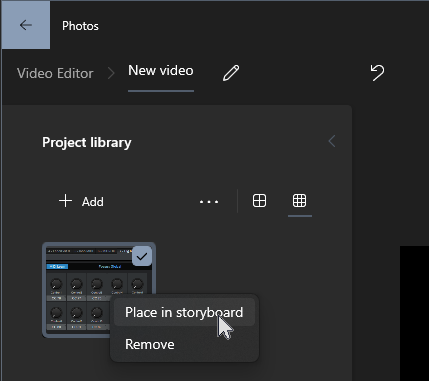
3. Drag the image you want to convert into the Library. Then right-click on the image, and choose Place in Storyboard. The default length is 3 seconds. If it needs to be longer, select Place in Storyboard again. Or, drag the finished file into Studio One multiple times.
4. Click on Finish video (in the upper right), then click on Export.
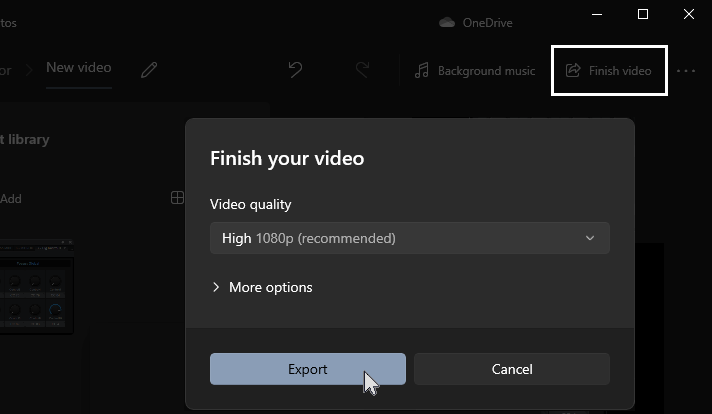
5. Name the file, navigate to where you want to save it, then click on Export. Done! Your image is now an MP4 video you can insert into Studio One.
Basic Video Editing in Studio One
Studio One 6’s enhanced video track now includes basic editing. Yes! You can cut out the section of your band’s live video where the drunk guy came up and started singing along. Instead, just go directly to the part after the drunk was kicked out, and you re-started the song from the beginning.
You’ve likely heard the expression about something being “left on the cutting room floor.” Cutting out sections quickly and precisely is a crucial part of video editing. This requires being able to “jog” the cursor to locate the exact spot you want to split the video, down to individual frames (or even milliseconds). After the cursor is in place, then you can type Alt+X/Opt+X to split at the cursor.
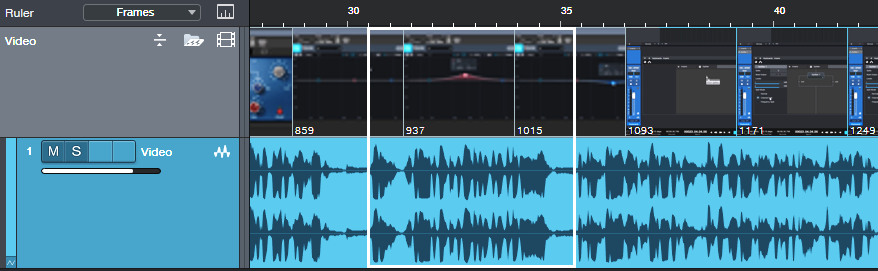
For example, suppose I want to cut the section outlined in white in fig. 1. This is from a video I did on how to create a Pro Tools-like Multi-Mono plug-in mode in Studio One.
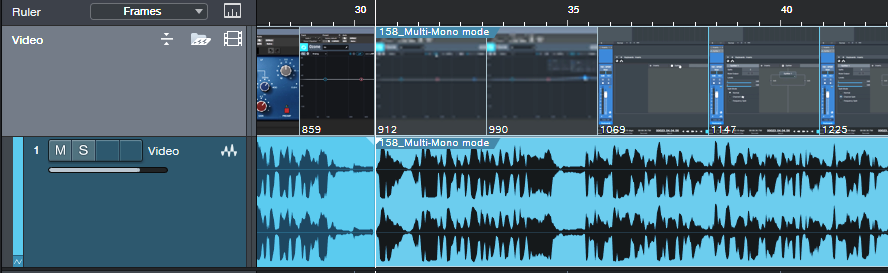
Choose the jog calibration you want to use. For precise cursor positioning, use frames or seconds (fig. 2).

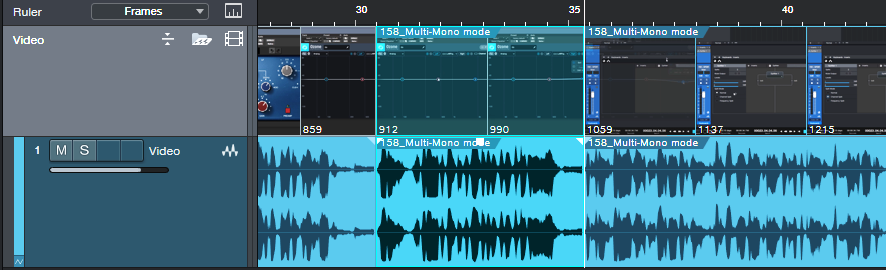
If you chose frames, click in the transport’s frames field. Now, every mouse scroll click will jog the cursor forward or backward by one frame. In fig. 3, the cursor has been positioned exactly as desired. After being positioned, select the audio and video events that include the section to be split. Alt+X/Opt+X splits the audio and video events at the cursor position.
Of course, you don’t have to edit with single-frame resolution. For less critical edits, you can just place the cursor at the approximate position, and split.
Note: In a real-world situation, you’d have the video window open to confirm that the video is in the right location, and you’d probably zoom much closer in to make sure the cursor is at the exact split point. However, I wanted the screenshots to accommodate those reading this blog post on a smartphone 😊
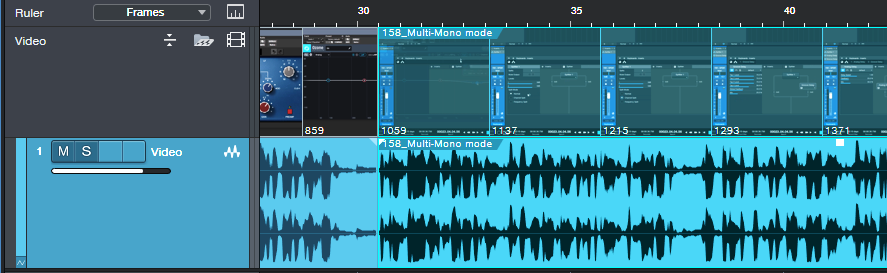
Split at the end of the section you want to cut, and then select the video and audio sections to be cut (fig. 4).
Select Ripple editing (fig. 5). Ripple editing moves the video after the removed section earlier on the timeline, so it starts where the removed section started. This closes up the “hole” left by a cut section.

Delete the section you wanted to remove, and now the video closes up so that there’s no gap (fig. 6).
A Couple Other Tips
- Splits must be separated by at least one second. So, don’t expect to use splits to edit out a single cough or breath inhale. That needs to be done in a video editor, prior to working on the audio in Studio One.
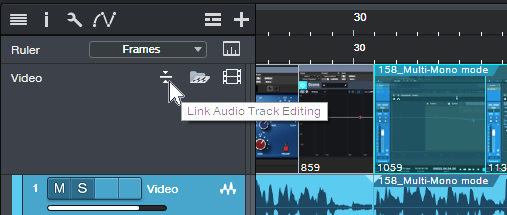
- You can link or unlink audio track editing from the video (fig. 7). In this example, we wanted them linked. But suppose you did some time-stretching to the audio track. You might want to split it at a different place than where you would split the video.
To move around the video, click and drag on the mini-timeline in the video window (fig. 8).

Super-Simple Dim Solo Functionality
Dim solo is a variation on the standard solo function. With dim solo, non-soloed tracks are still audible, but at a lower level than any soloed track or tracks. This is great for many applications, including comping. Often, when auditioning comps, you want to hear them in context with the mix, but with the mix at a lower level. Dim solo is also helpful when checking out a track’s processing in isolation, or listening to a pair of tracks (like bass and drums) in context with the mix.
Studio One’s Listen bus offers a comprehensive dim solo function, but this tip is about a fast, easy way to add dim solo functionality, without needing the listen bus—or even having to actually solo tracks.
1. Select all the tracks in your project (e.g., click on the first track and shift+click on the last one).
2. De-select the track(s) you want to solo. You also need to de-select any channels that are already assigned to a VCA Channel. However, the VCA Channel that controls them should remain selected, so it can be dimmed along with the other tracks.
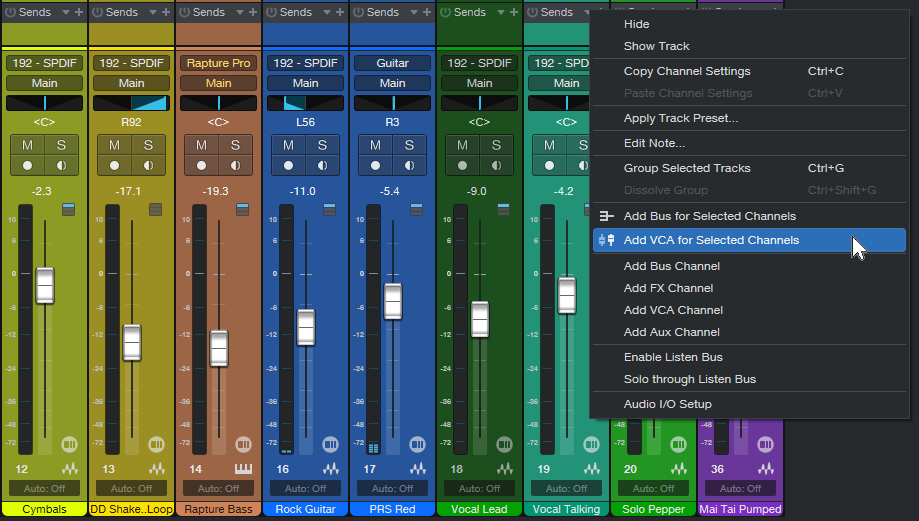
3. Choose Track > Add VCA for Selected Channels, or right-click on one of the selected tracks to add a VCA Channel for the selected channels (fig. 1).
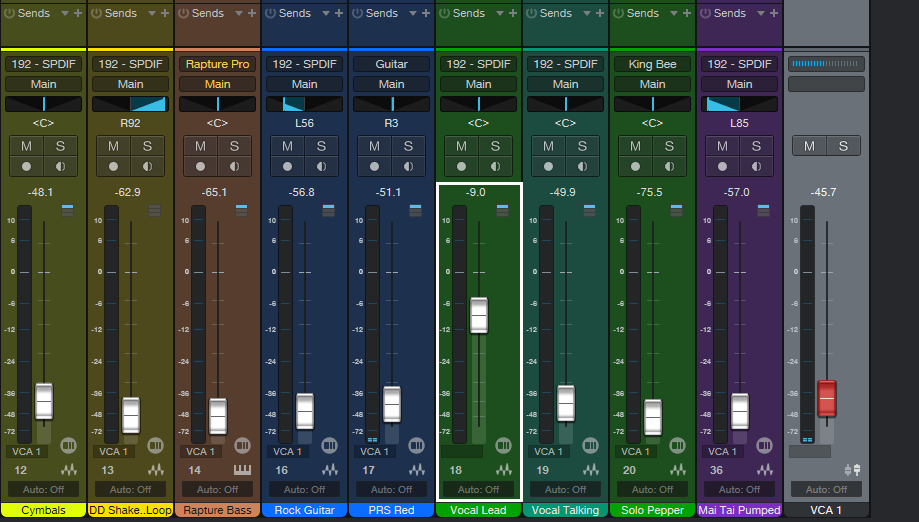
4. All the selected tracks now show VCA1 under their faders (or a different number if there are already VCA Channels in the project), to confirm that their gain is being controlled by the VCA Channel. When first added, the VCA Channel’s initial level will be 0.0.
5. Now, vary the VCA Channel level to set the dimmed level for the selected tracks. The level for the unselected track (or tracks) will stay the same. Turning the VCA Channel all the way down provides the traditional solo function that mutes, rather than dims, the other tracks.
6. Do your edits on the soloed track(s). When you’re done, ctrl+click on the VCA Channel’s fader to return the VCA Channel to its initial value (0.0). After that, the levels of all the selected tracks and buses will return to what they were prior to step 1.
Once you use dim solo functionality, you’ll wonder how you got along without it.
Bonus Solo Tips
- For an Exclusive Solo function that solos one track while muting all others, click on Solo while holding Alt (Windows)/Option (Mac).
- If several tracks are soloed, to unsolo them all at once, hold Cmd/Ctrl while clicking on one of the solo buttons. To restore the same state, click on any Solo button while holding Cmd/Ctrl, and Studio One will revert to the previous solo button state.
Errata (fancy author word for “I messed up”): In The Huge Book of Studio One tips and Tricks, version 1.3, Chapter 2, page 181, fig. 2.77, the right-most panpot of the Dual Panpot should pan fully to the right, not to center. This is corrected in version 1.4, which is being updated for Studio One version 6. The update will be free to owners of any previous version of the book. Estimated publication date is early 1st quarter, 2023.
Metal Guitar Attack Pro
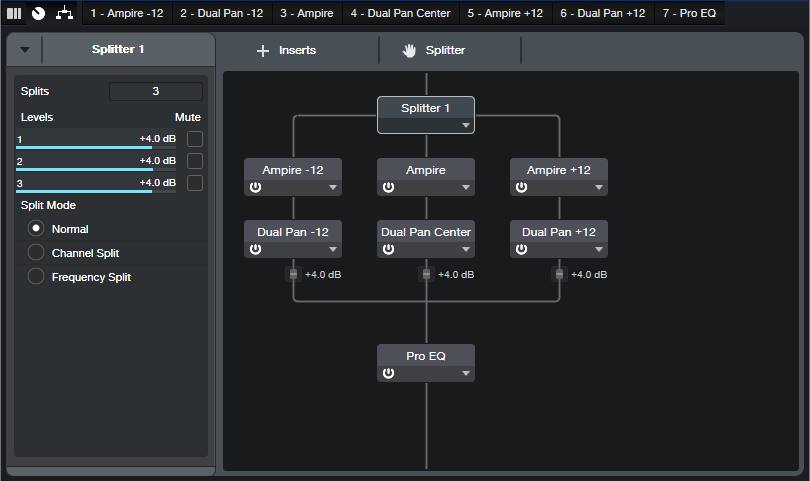
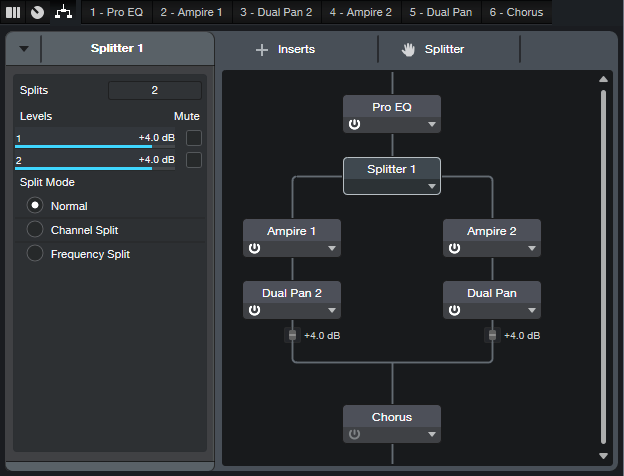
In June 2021, the blog post Metal Guitar Attack! described how to create a big sound for guitar power chords using Studio One Artist. Since then, I’ve ended up using this technique quite a bit. So, I wanted a version for Studio One Pro with an FX Chain that could fit in a single track, have a Macro Controls panel, and include some quick tone switches. Fig. 1 shows the FX Chain signal flow, which you can download at the end of this post. (Note that you need the High Intensity Pack for this tip.)
First of all, set the guitar channel’s mode to stereo, even if you recorded the guitar in mono. The Splitter will turn the mono into stereo anyway, which is necessary for the various Dual Pan modules. I also recommend using the neck pickup and rolling down your tone control, but see what works best for you.
The Splitter splits into three Ampires. In this FX Chain, all three use the default MCM 800 amp and 4×12 M65 cab. Feel free to substitute whatever amp/cab you want, but note that the Macro Controls for Dynamics on/off, Comp/Limit, OD on, Reverb On, Reverb Mix, and Preamp Gain all tie in to the main Ampire in Split 2. You’ll need to re-assign the macros if you substitute different stomp boxes. However, if you leave the stomp boxes in place, you can change the cab without altering the macro controls. For the amp itself, you’ll need only to re-connect the macro’s Preamp Gain control to the new amp’s preamp gain.
Split 1 goes to an Ampire with two pre-amp effects. The first is a 10-band EQ to condition the audio going into a Pitch Shifter, which transposes the audio -12 semitones. Split 3 goes to an identical setup, except that the EQ settings are different, and the Pitch Shifter transposes +12 semitones. All three splits then go to Dual Pans, so you can place the splits anywhere in the stereo field. The Pro EQ at the chain’s end connects to four Macro switches for Bass Cut, Bass Boost, Scoop, and Bright.
Speaking of the Macro Controls, fig. 2 shows how they’re laid out.
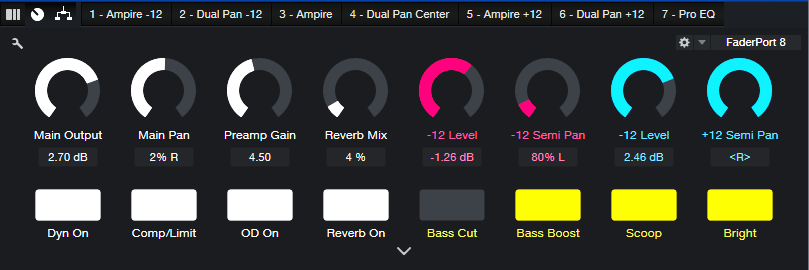
Because this FX Chain uses three Ampires and two Pitch Shifters, it eats up a lot of processing power. You’ll probably want to Transform to Rendered Audio after nailing your settings. (By the way, someone commented in a previous tip that transforming Ampire to save CPU doesn’t work, because it doesn’t return to your settings if you later decide it needs editing. This is not true! As long as you remember to check “Preserve Realtime State,” you can transform and return to real-time audio as many times as you want.)
Panning
The same tips apply here as in the June 2021 blog post. We’ll close out with an audio example that has panning set for the biggest sound—standard pitch full left, +12 center, -12 full right. The first half is chords, the second half is more single-note oriented. Remember, this is only one guitar—no overdubs
download Metal Guitar Attack Pro.multipreset
Deconstructed Guitar—a New Approach to Tone
Maybe you’ve seen food done as a deconstructed dish, where ingredients typically put together are served separately. For example, a deconstructed spring roll would plate all the ingredients inside it separately, with a dipping sauce on the side. You could wrap up the ingredients in whatever way you liked to construct your spring roll.
Wait—what does this have to do with guitar? Well, I had an opportunity to talk with Chris Jenkins, who won an Academy Award for the sound in “Mad Max – Fury Road” and worked on the documentary “The Beatles: Eight Days A Week — The Touring Years.” He mentioned how for the surround mix of ancient Beatles concert footage, instead of upmixing, they deconstructed it by sending pre-equalized sound into special-purpose, acoustical spaces optimized for different instruments. Re-recording the ”acoustified” sounds created the 5.1 mix. This is why footage from the 60s could sound natural and organic in 5.1 surround.
Sound effects sometimes use a related approach. If they don’t sound right laid into a film’s soundtrack, they’re sometimes played back in an acoustic space, re-recorded, and then added to the film. This makes them sound more “real world.”
So…what if you took a dry guitar sound, pre-equalized the sound, split it into stereo, and fed it into two virtual cabinets from Ampire (no amps, no effects) for a deconstructed guitar sound? Listen to the audio example, and judge for yourself. Audio Example 1 is direct-injected, dry Tele.
Audio Example 2 is also DI Tele, but split into two cabs. Note how the deconstructed guitar opens up space in the center, and no longer has that flat “DI sound.” What’s more, every time you change one of the cabs, you end up with a totally different tone. This approach is also ideal for LCR mixes, and the stereo image collapses well to mono.
Let’s look at how to set this up in Artist, and then how to make an FX Chain in Professional (go to the end to download the FX Chain).
Artist Setup
Fig. 1 shows the setup for Artist. The dry guitar track’s Pro EQ3 pre-conditions the sound going into the cabs. This is done to taste; there’s no specific “desirable” curve. Just create a curve that sounds good with the cabs you use.
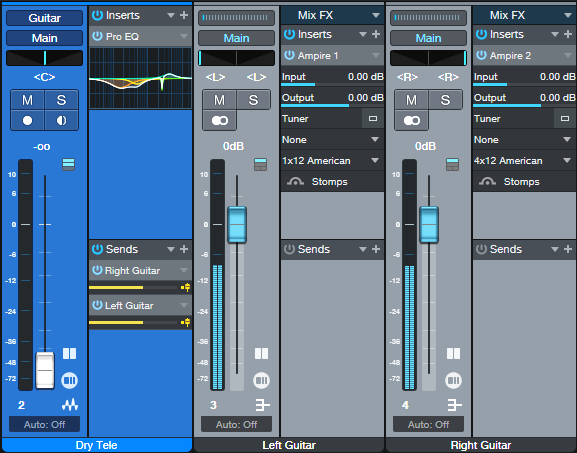
Each of the dry guitar track’s pre-fader sends goes to a bus. Each bus has an Ampire inserted, but with no amp or effects—only a cab. One bus has a 1×12 American cab, while the other has a 4×12 American cab. But there’s nothing magic about those particular cabs, they just gave a sound I liked. In developing this tip, I tried a lot of cab combinations, and there were plenty of great-sounding options. Pre-conditioning with the EQ extended the options even further. For example, if a cab emphasized the bass too much, just trim the EQ’s low frequencies.
The Bus panpots are set to the Dual Pan option. That gives more imaging choices, although in the screen shot, they’re panned oppositely (hard left and hard right). To bring up the center, mix in some of the dry guitar track.
Pro Version FX Chain
With the Pro version, all this can fit into an FX Chain (fig. 2).
The Splitter uses Normal mode. The comments above about the Pro EQ3 and Ampires apply here. The Dual Pans are set to pan hard left for one cab and hard right for the other one, but you can use these plug-ins to “weight” the sound more to one side or the other. For example, in one Dual Pan, the left panpot could go could full left, and the right panpot to center. The other Dual Pan could pan the left panpot to center, and the right panpot hard right.
The Chorus at the end is just an extra little goodie. The .multipreset has it turned off, but feel free to enable it. So, simply download the .multipreset, insert it in your dry guitar track of choice…and have fun with deconstructing your guitar.
De-Esser Meets Amp Sims
Some guitarists feel amp sims don’t sound “warm” or “smooth,” but that can also be an issue with physical amps. This is why guitar players often turn down a guitar’s tone control to reduce highs. Distortion adds harmonics, so distorting highs just piles on more highs.
Single-coil pickups have a naturally brighter sound than humbuckers, so they tend to highlight potential high-frequency issues. One fix is a narrow, sharp cut at a specific frequency to sweeten the sound, as described in The Ampire Sweetener. However, now that version 6 has a De-Esser, we can use its dynamic response for “intelligent” sweetening.
How the De-Esser Works
A de-esser reduces excessive vocal sibilants (“s” sounds) by compressing only high frequencies. This lowers the sibilants’ level, while leaving the rest of the vocal relatively untouched.
Although the EQ3’s dynamic EQ can produce this effect, for guitar the De-Esser is more plug-and-play. The controls that narrow in on “ess” sounds make it easy to narrow in on the guitar sounds you want to tame.
How to Set the Controls
The de-esser can go either before or after an amp sim. Placing the de-esser after the sim can clean up the highs that the sim generates, but pre-amp sim placement lets you suppress high frequencies before they’re distorted (fig. 1). Try both options—the effect is quite different.
To zero in on the best pre-amp sim De-Esser settings:
1. Loop your guitar, and listen to the amp sim output.
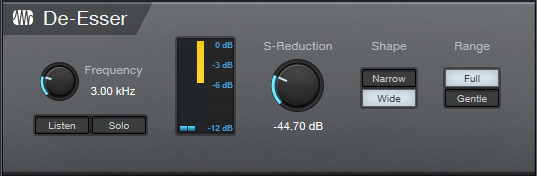
2. Set Range = Full, Shape = Narrow, and S-Reduction to 0.00.
3. Enable Listen, and vary the Frequency control. The sound will be nasty, because you’re trying to highlight where an amp sim performs at its worst. Find the most objectionable-sounding frequency, which will likely be around 4 to 7 kHz.
4. Turn off Listen, and turn S-Reduction counter-clockwise to reduce the highs feeding the amp.
In the audio example, the first part doesn’t have the De-Esser inserted. The second part does. Remember that the De-Esser functions dynamically, so the effect will be most obvious on the loudest chords. In this example, compare the last two measures of each part. You’ll hear how the de-esser in the second part removes that slight high-frequency “edge.”
Post-Amp Sim De-Essing
When inserted after the amp sim, the De-Esser becomes more of an effect that can modify the amp sim sound. I’d recommend the following to become familiar with this effect:
1. Loop your guitar, and listen to the amp sim output.
2. Start with Range = Full, Shape = Narrow, and S-Reduction at -60.00.
3. Use the Frequency control to dial in the high-frequency range you want to reduce.
4. Vary the S-Reduction control for the amount of attenuation.
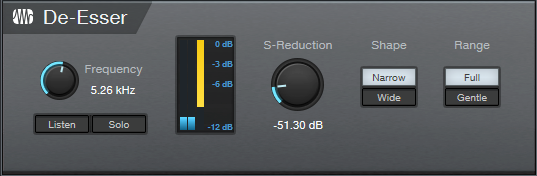
For more of a humbucker character with single-coil pickups, choose Wide instead of Narrow. Wide splits the audio into two bands, and reduces levels above the Frequency setting. Narrow splits the audio into three bands, and reduces levels in the middle band. Then, vary the Frequency control. The optimum setting will likely be at 6 kHz and below (fig. 2). Again, choose the amount of high-frequency attenuation with the S-Reduction control.
Final Thoughts
Whether to insert the De-Esser pre- or post-amp sim depends on the amp sim. The audio example uses Ampire, which is one of the better amp sims. Inserting the De-Esser before the amp is really all that’s needed. Sims with “nastier” high frequencies benefit more from post-amp placement, because the De-Esser can give a more drastic effect.
In any case, the above suggested settings are starting points. The best approach is to loop your guitar, enable your amp sim, and play with the controls. You might be surprised at how the De-Esser can add the extra touch that’s needed to turn an amp sim from good to great.
Better Drum Stretches with Melodyne
Here’s the origin story: I had a 177 BPM drum loop that played the perfect part for a song. Audio Example 1 is the sound of the original 177 BPM file.
However, the song I wanted to use it in had a tempo of 120 BPM. That’s a lot to ask of a stretch algorithm! Audio Example 2 used the Timestretch Drums algorithm to slow the tempo to 120 BPM. It’s remarkable it sounds as good as it does, but there’s occasional flamming that’s particularly noticeable in the fill at the end.
Audio Example 3 used the Tape Stretch algorithm to stretch the original part to 120 BPM. Although this solved the flamming problem, the pitch shift was too drastic to fit with the song.
I’m not sure what possessed me to edit Audio Example 2 with Melodyne (this technique works with all versions), but after switching to the Percussive algorithm and re-detecting the part, I was shocked to hear that the flamming was gone. The part even sounded tighter, and had more punch. Check out Audio Example 4, and compare it to Audio Example 2 (particularly the fill at the end).
I thought this might have been a fluke, but I tried the same technique with other fast-to-slow time stretches, and they worked just as well. This technique’s only limitation is that it doesn’t do as convincing a job with cymbal-heavy parts. But for the purposes of the song, the kick and snare were by far the most important elements. So, I just overdubbed a hi-hat part. Here’s the step-by-step procedure for implementing this technique:
1. In Song Setup, check Stretch audio files to tempo. Click Apply if needed, then OK.
2. Bring the file whose tempo needs to be slower into Studio One. If the file includes tempo information, it will stretch to fit the current tempo. The file’s Inspector Tempo field will show Timestretch, and the Timestretch field will show Drums. If the file doesn’t include tempo information, right-click on the file, and enter the tempo in the File Tempo field. If you don’t know the tempo, alt+click+drag on the right edge to extend the tempo to fit the correct number of measures.
3. With Timestretch and Drums still active in the Inspector, select the event and type ctrl+M (or right-click on the event, and choose Edit with Melodyne).
4. Select the Percussive algorithm, and choose Redetect. The result will look like fig. 1.

5. To make this change permanent, select the Event and type ctrl+B.
If anyone has any theories as to why this works, or other comments, please share your thoughts in the comments section below.
Version 1.3 of The Huge Book of Studio One Tips and Tricks is available as a free update to owners of previous versions ($19.95 to new buyers). Download this book with 230 tips from your PreSonus or Sweetwater account, the same way you downloaded your previous version. Please note: version 1.3 does not cover the new features in version 6, although when version 1.4 is done, it will be a free update for owners of any previous edition. If you have questions about the tips, suggestions for future updates, or want news about the next version, please visit the dedicated support forum.
Dual-ing Vocoders
What’s better than one vocoder? Two vocoders, of course 😊. This tip is more about a technique than an application, although we’ll cover an application to illustrate the technique. But the main goal is to inspire you to try stereo vocoding and come up with your own applications, so there are additional tips at the end.
Long-time blog readers may have noticed my fascination with fusing melodic and percussive components. The easiest way to do this is to have a drum track (or reverb, pink noise, hand percussion, whatever) follow the Chord Track via Harmonic Editing. Although this tip takes that concept further, it’s about more than just percussion. Inserting a Splitter in an FX Chain, and following it with two vocoders, opens sonic options you can’t obtain any other way.
The FX Chain and Track Layout
Fig. 1 shows the stereo vocoder FX Chain. This technique will also work with Artist. However, it requires three tracks:
- One with the modulator signal
- Two tracks whose inputs are set to the modulator track output. The vocoders go into these tracks.
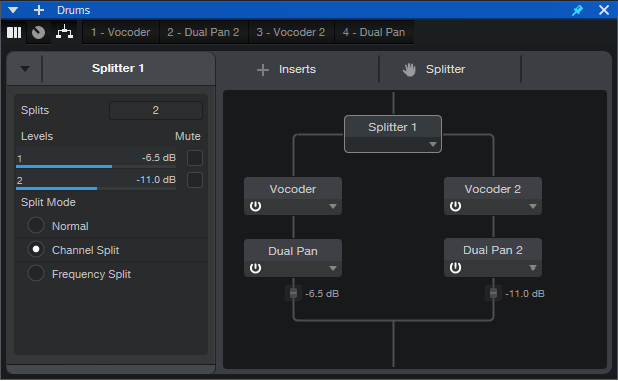
This application uses stereo drums, so the Splitter mode is Channel Split. The Dual Pan modules at the vocoder outputs provide stereo imaging. I typically pan one vocoder full left and the other full right, but sometimes I’ll weight them more to center, or to one side of the stereo field.
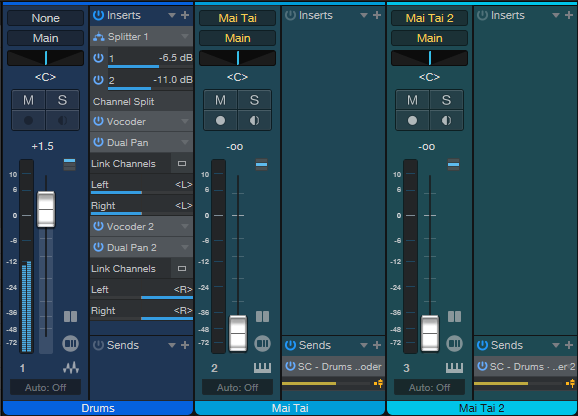
Fig. 2 shows the track layout. Each Mai Tai instrument track has a Send. These feed the sidechains for the two vocoders to provide the carrier audio. Although the Mai Tai faders are at minimum, mixing in some instrument sound provides yet another character.
Applications
This brief audio example adds a melodic component to drums. The two Mai Tai MIDI tracks are offset by an octave.
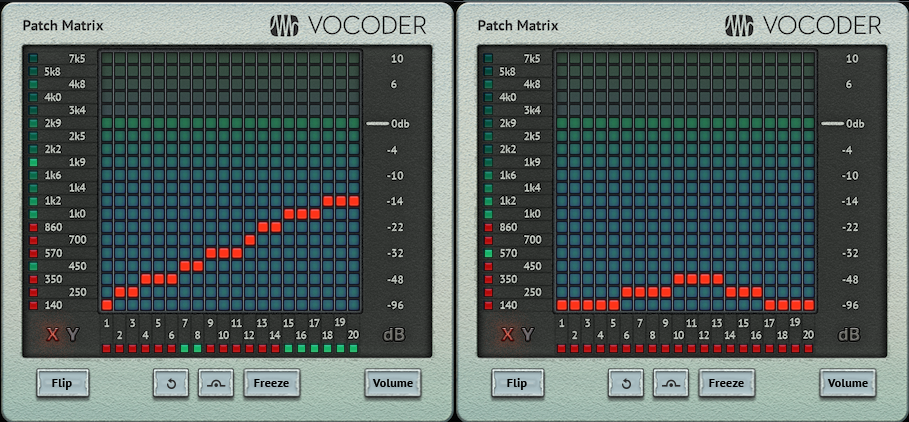
Fig. 3 shows the vocoder patch matrices. These particular settings are of no real consequence, they just emphasize that using different patch matrix settings for the left and right channel vocoders can have a major impact on the sound.
As to other applications:
- Depending on the source, using the Splitter’s Normal and Frequency Splits can work well.
- With anything percussive, try a Send from the Modulator track to a bus with Analog Delay, set to a rhythmic value.
- The vocoder Mix controls are the best way to introduce some of the modulator signal in with the “vocoded” signal.
- Adding Noise for Unvoiced Replacement fills out the sound in interesting ways. Turning up the modulator Attack and Release allows effects that are somewhat like mixing in a shaker or other hand percussion instrument.
- Try using audio as a carrier for one vocoder, the internal carrier for the other vocoder, and pan both vocoders to center.
- Using drums to modulate bass, and adding this as an almost subliminal effect to the main bass instrument sound, locks the bass tightly to a sense of rhythm.
EZ Voiceovers with the Lyrics Track
I narrate an average of a video a week, so I’m always looking for better workflow options—and version 6 came through with the Lyrics Track. This tip is about one workflow, but the concept is flexible enough that you may find something that works better for you.
The Recording Process
Recording narration is different from laying down a guitar part. First, I record a reference narration track that breaks the narration down into smaller pieces. Typically, they’re around 20 seconds. Then, the narration for each section becomes a separate phrase in the Lyric Track.
Because I never get narration right the first time (hey, at least I admit it!), I loop-record the narration five or six times. This is where the Lyrics Display is invaluable. Normally, Studio One is on the main monitor, and the second, smaller monitor is dedicated to working with plug-ins and such. But for narration, the Lyrics Display goes on the main monitor. I’m only recording, not editing or arranging, so placing Studio One on the smaller monitor isn’t an issue (figs. 1 and 2). The Lyrics Display’s maximum font size (60.00) allows seeing the text while being at least a couple meters away from the computer. By using a ribbon mic and pointing the mic’s null response at the computer, there’s virtually zero background noise.


Before V6, I opened a text file with narration in the main monitor. However, this required scrolling for longer narrations. Paging up and down with a wireless keyboard worked, but was distracting (and I had to edit out the noise it made). With V6, while recording, the Lyrics Display jumps automatically to the next section of text, and highlights it in blue. This is way more convenient.
Editing
The standard comping tools are less useful because narration isn’t cut to a beat. Due to the slight variations, I unpack the layers to Tracks, and use the Listen Tool to decide which version has the best narration for any given section. The preferred sections are cut, and moved to a composite track. Keyboard shortcuts are essential here to choose among select, cut, and listen.
Some Events may have issues where the narration is good, but there’s a potential deal-breaker problem (e.g., a prominent mouth click). The Inspector comes into play here. V6’s Customize option pares the interface down to what’s needed needed to work with narration. Sometimes an Event processing plug-in will solve the problem, but if not, I add a marker to indicate where more editing is needed. That may mean substituting a section from a different take, or coming back to it later and recording replacement narration.
After selecting individual Events and bouncing them to single file, next is overall processing. The Pro EQ’s linear-phase low-cut filter reduces some of the ribbon mic’s boomy qualities, and a bit of high-end boost adds intelligibility. iZotope RX takes care of mouth de-clicking. Then, the Limiter and Gain Envelope even out any unwanted level variations, while V6’s new De-Esser reduces any overbearing sibilance. This group of processors cleans up the narration well.
Once the narration is exactly as desired, then it’s time to render, lay it on the timeline with the visuals…and send the invoice 😊