Pro EQ2: More than Just a Facelift
Yes, Studio One 5’s Pro EQ2 has a more “pro” look…but there are also some major improvements under the hood, so let’s investigate.
Linear-Phase Low-Cut Filter
This is arguably the most significant change, and appears as an eighth filter stage just below the left of the frequency response display (Fig. 1).

Figure 1: The phase-linear Low-Cut filter section offers three cutoff frequencies and two different slopes.
There’s much mythology around linear-phase EQ, so here are the basics. Traditional EQ introduces phase shifts when you boost or cut. With multiple EQ stages, these phase differences can produce subtle cancellations or reinforcements at particular frequencies. This may or may not create a sometimes subtle, sometimes obvious effect called “smearing.” However, it’s important to note that these phase shifts also give particular EQs their “character” and therefore, can be desirable.
Linear-phase EQ technology delays the signal where appropriate so that all bands are in phase with each other. This tends to give a more “transparent” sound. You might wonder why there’s only one linear-phase stage, with a low-cut response, but there’s a good reason for this. Many engineers like to remove unneeded low frequencies for utilitarian purposes (e.g., remove p-pops or handling noise from vocals), or for artistic reasons, like reducing lows on an amp sim cab to emulate more of an open-back cab sound. Standard EQ introduces phase changes above the cutoff frequency; with linear-phase EQ, there are no phase issues. This can be particularly important with doubled audio sources, where you don’t want phase differences between them due to slightly different EQ settings.
The Pro EQ2 is very efficient, but note that enabling linear-phase EQ requires far more CPU power, and adds considerable latency—it’s not something you’ll want to add to every track. Fortunately, in many cases, it’s a setting that you apply and don’t think about anymore. This makes it a good candidate for “Transform to Rendered Audio” so you can reclaim that CPU power, and then use conventional EQ going forward.
By the way, an argument against linear-phase EQ is that it can create pre-ringing, which adds a low-level, “swooshing” artifact before audio transients. Fortunately, it’s a non-issue here, because pre-ringing is audible only at low frequencies, with high gain and Q settings. (Note that traditional EQ can add post-ringing, although you usually won’t hear it because the audio masks it.)
Level Range Options
I’ve wanted this feature for a long time. Some EQ changes are extremely subtle, particularly when mastering. With range set to 24 dB, it’s difficult to drag nodes around precisely. What’s more, when making fine gain changes, with the 24 dB view it’s easy to move slightly to the right or left, and end up editing frequency instead. Holding Shift provides fine-tuning, but for fast EQ adjustments, the 6 dB view is welcome (Fig. 2).
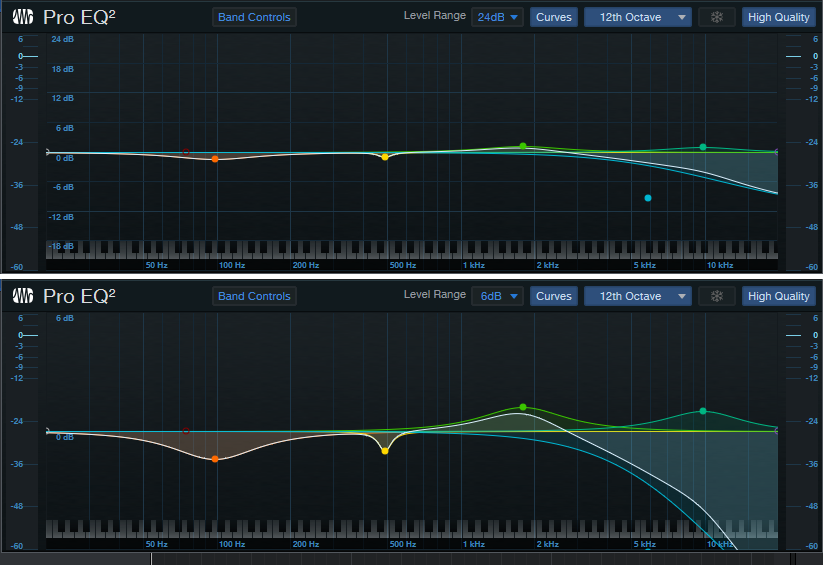
Figure 2: It’s much easier to see subtle EQ changes by setting the level range to 6 dB.
Granted, you adjust EQ with your ears, not your eyes—but learning how to correlate sound to frequency is important. I knew one guitar player who when he said something like “that track really needs to come down about 2.5 dB at 1.25 kHz,” he was 100% spot-on. When mixing, he could zero in on EQ settings really fast.
And there’s another implication. Those learning how to use EQ often overcompensate, so at seminars, I advise applying what I call “the rule of half”: if you think a sound needs 6 dB of boost, try 3 dB of boost instead and get acclimated to it before adding more boost. If you choose the 6 dB view, you’ll be forced to use smaller boost and cuts in order to adjust or see them graphically—and you might find those smaller changes are all you need.
12th Octave Frequency Response Display
The Third-Octave Display is good eye candy, and gives a rough idea of how EQ affects the sound. The new 12th-Octave resolution option gives far better definition. In Fig. 3, note how many of the peaks and dips visible in the 12th-Octave display are averaged out, and lost, in the Third-Octave version.
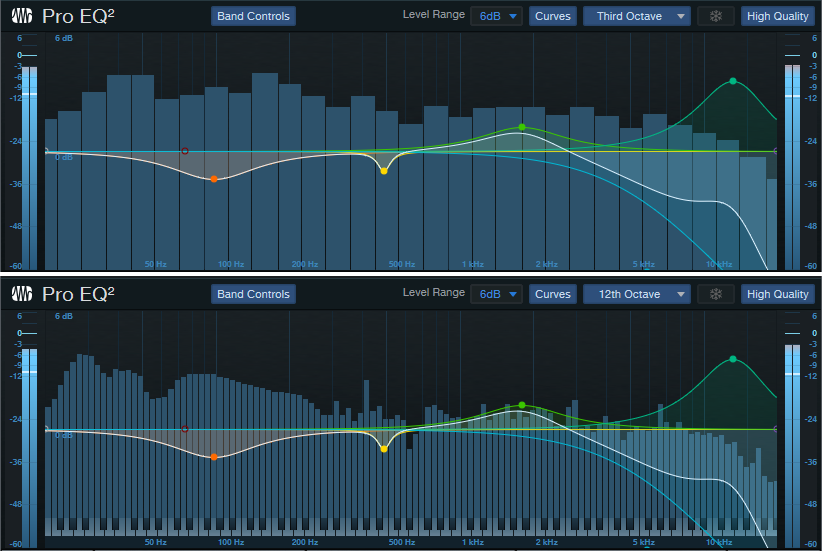
Figure 3: The 12th-Octave display in the lower view gives far greater detail and resolution.
Workflow Improvements
In addition to the more “marquee” improvements, several other additions make working with Pro EQ2 a better experience than the original Pro EQ.
Keyboard Display. Now you can correlate frequency to note pitches; note that these line up with the bars in the 12th-octave display.
Band Controls. In Studio One 4, there was a little, almost invisible arrow between the controls and the frequency response display. Clicking on this hid the controls. The Band Controls button does the same thing, and you won’t overlook it.
Curves Button. Similarly, Studio One 4’s All/Current buttons that control how curves are displayed have been consolidated into a single Curves button.
Sidechaining. We already covered Pro EQ sidechaining in the blog post The Sidechained Spectrum. However, when choosing the FFT curve, now there’s a sidechain spectrum peak hold button for the sidechain input. Clicking on the “snowflake” button freezes peaks (hence the name) until you click the button again.
Better Metering. Studio One 4’s Pro EQ had only output metering, whereas Pro EQ2 has metering for both input and output. This is a highly useful addition. If the output is too hot, you can always turn down the output level, but you won’t know if the reason why it’s hot is because you’ve boosted some frequencies too much, or the input level is hitting the EQ too hard. Now you’ll know. As with Studio One 4, the metering shows both peak and average levels.
And that’s a wrap for Pro EQ2. I guess you could say the newer version is ahead of the curve…the EQ curve, that is ?

Add Studio One 5 to your workflow today!