Improve MIDI Drum Loop Flow
MIDI drum loops have a bad rap, because some musicians consider them metronomic and boring. But they don’t have to be. Subtly leading or lagging the beat at strategic moments, like physical drummers do, can give a better “feel.” You can also introduce slight, random variations with Studio One’s humanize function.
This tip covers yet another option: pitch changes. Harder hits raise the pitch of acoustic drums. Sometimes, electronic drums are programmed to emulate this effect. Furthermore, pitch changes can go beyond subtlety to create special effects.
Impact XT responds to pitch bend, but bending affects all drums that trigger at the same time. This technique is more selective. It uses automation to vary the Tune parameter for Impact XT’s individual pads.
The following drum loop is for reference, prior to any automated pitch changes.
Creating Automation Data
You can automate individual pads in the Arrange View or Edit View. I prefer creating automation in the Edit View. This makes it easy to see the correlation between a pad’s notes and the associated automation data. Here’s how to add automation in the Edit View:
1. Click on the three dots … at the left of the controller labels in the Edit View’s Automation Lane. This brings up the Add/Remove automation dialog (fig. 1).
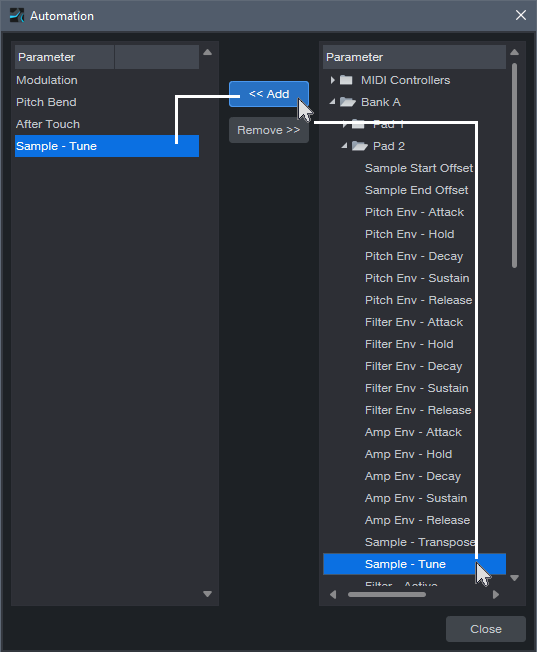
2. In the Parameter column on the right, locate the pad you want to automate. For example, in fig. 1 the snare is on Pad 2 in Bank A.
3. Click on the Sample – Tune parameter to select it.
4. Click on <<Add. The target parameter will appear in the left Parameter (automation type) column.
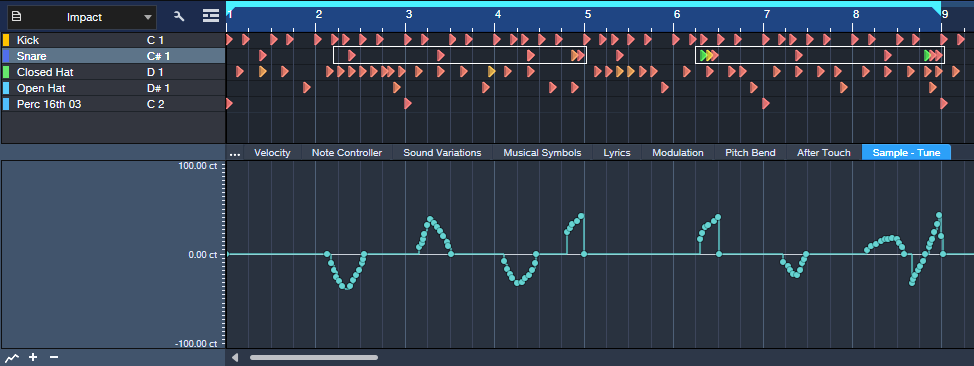
5. This adds a Sample – Tune tab to the Edit View’s existing controller lane options. Now you can click on this tab when you want to draw automation that changes the drum’s pitch (fig. 2).
Viewing Automation
As you add automation for more pads, you can view the automation in two ways:
- See the automation data for one pad at a time in the Edit View’s Automation Lane. As you add automation for the same parameter (e.g., Sample – Tune) in different pads, each new automation envelope adds its own tab for that controller. To switch among the different pads’ automation data, click on their associated tabs. However, this can be confusing because different pads that use the same type of controller have the same controller name for their tabs. You won’t know which pad a particular tab controls, unless you remember that tabs are added from left to right as you assign more automation.
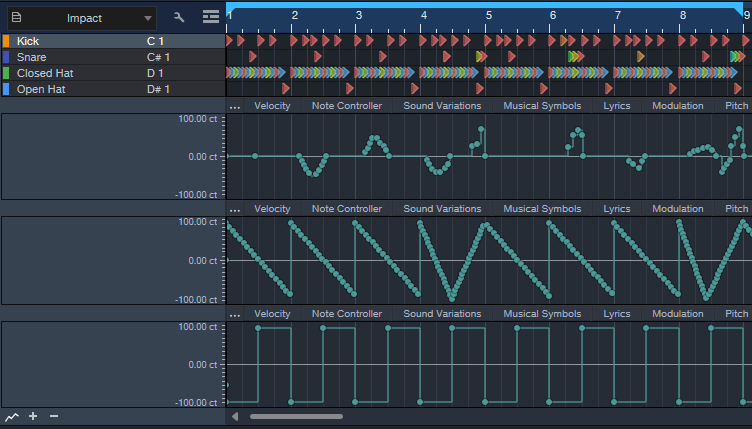
- Add multiple Automation Lanes so you can see the automation data for several pads at once (fig. 3). Again, you can’t see the target pad’s name in the Automation Lane, but you can see them all at the same time.
With the second option, the Edit view can become cluttered. So, after creating automation in the Edit view, I often use a third option:
1. Create an automation track in the Arrange View that’s the same as an Automation Lane in the Edit View.
2. Copy the automation in the Edit view.
3. Paste it into the Arrange view’s automation track. Note: Studio One recognizes a MIDI track’s start as its first piece of data. To paste automation data at the beginning of an Arrange View’s automation track, prior to copying the data, add a node at the beginning of the Edit View’s Automation Lane.
4. Delete the automation in the Edit View. Now the Edit View’s Automation Lane is available for displaying new automation data.
Transferring automation data in this way provides two main benefits:
- In the Arrange view, you can set Auto: Off to turn off existing automation data while you add new automation data in the Edit View.
- To show the full name of the target parameter being automated, right-click on the parameter name in the Automation Track.
Additional Creative Options
To change drum pitches in novel ways, try drawing automation waveforms (fig. 3) and sometimes, using the Transform tool. For example, draw a downward sawtooth for hi-hat automation, using 1-measure quantization. Now, the pitch descends over the course of a measure. With kick, use square wave automation to create a lower pitch for a measure’s first half, and a higher pitch for the second half. This gives a less static feel.
The following example includes the automation edits shown in fig. 3. This isn’t intended to showcase an ideal application, but demonstrates how subtle and selective changes can alter the loop’s sound. When mixed with other tracks, you “feel” the difference more than hear it as an obvious effect.
But of course, you don’t have to be subtle—automate Transposition instead of Tune, and you’ll have semitone changes. That can work well with hand percussion parts where the hits have short decays. In any case, automating pitch can add a new flavor to MIDI drum loops.