Category Archives: Studio One
Pro EQ2: More than Just a Facelift
Yes, Studio One 5’s Pro EQ2 has a more “pro” look…but there are also some major improvements under the hood, so let’s investigate.
Linear-Phase Low-Cut Filter
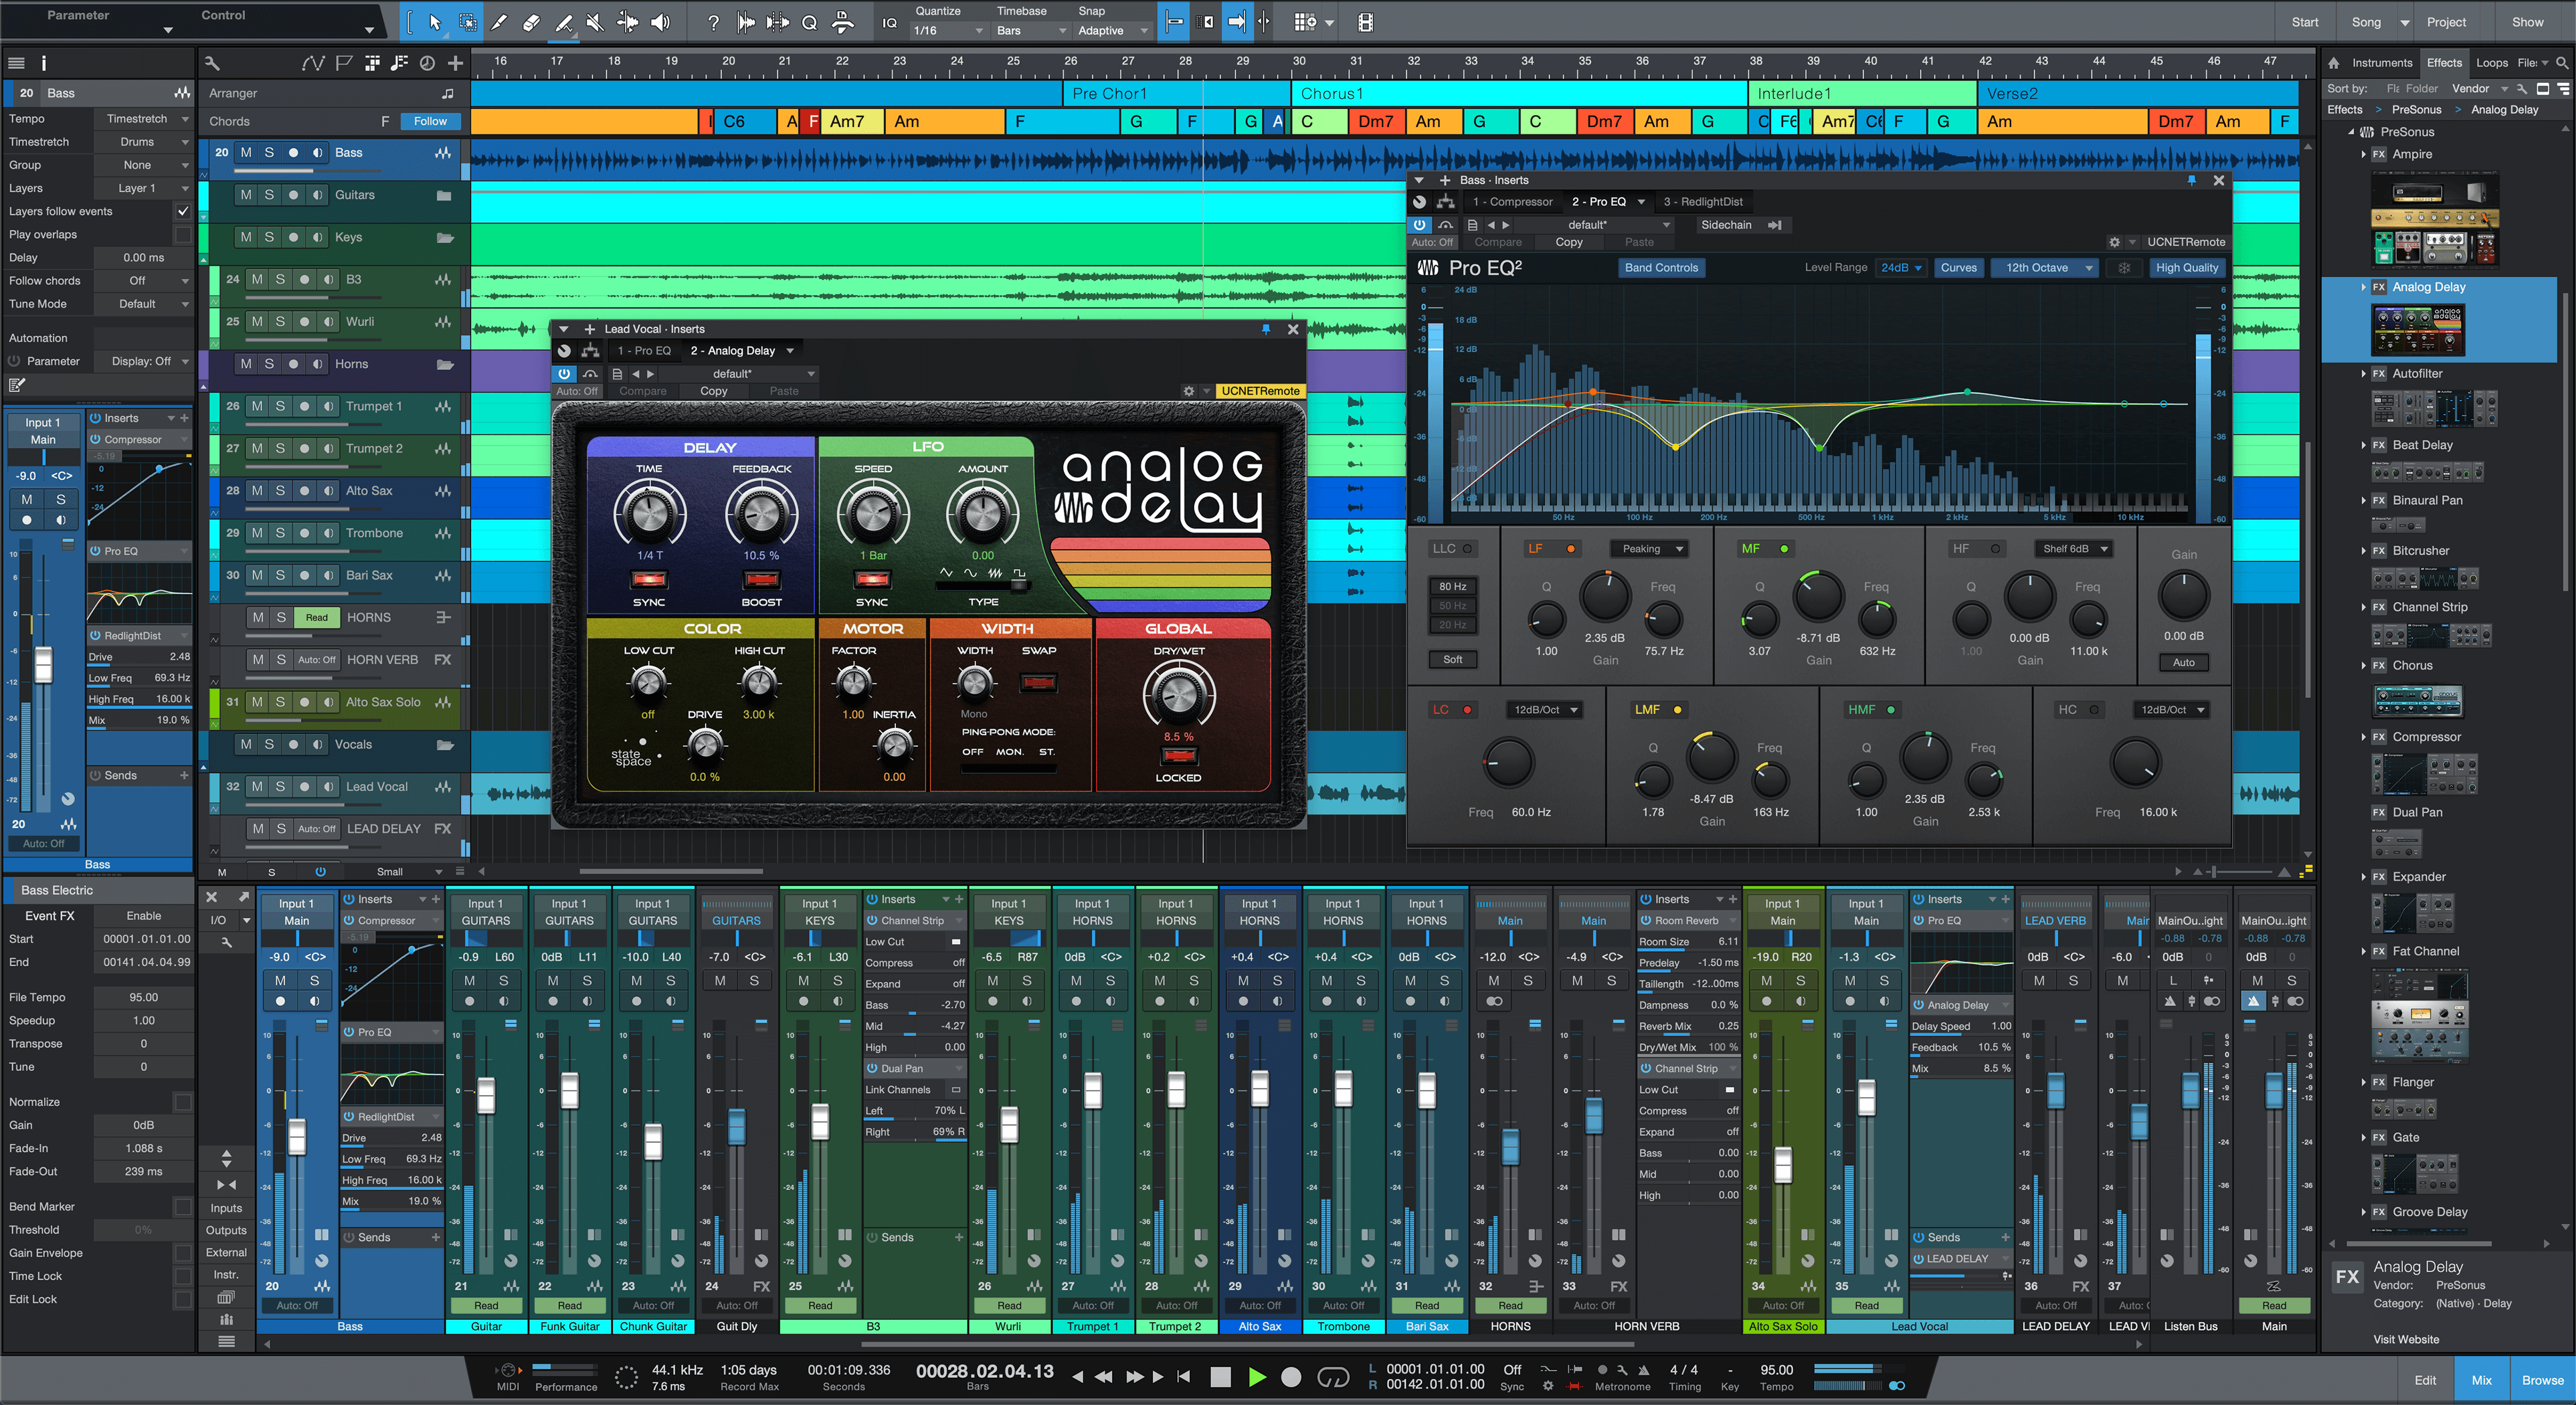
This is arguably the most significant change, and appears as an eighth filter stage just below the left of the frequency response display (Fig. 1).

Figure 1: The phase-linear Low-Cut filter section offers three cutoff frequencies and two different slopes.
There’s much mythology around linear-phase EQ, so here are the basics. Traditional EQ introduces phase shifts when you boost or cut. With multiple EQ stages, these phase differences can produce subtle cancellations or reinforcements at particular frequencies. This may or may not create a sometimes subtle, sometimes obvious effect called “smearing.” However, it’s important to note that these phase shifts also give particular EQs their “character” and therefore, can be desirable.
Linear-phase EQ technology delays the signal where appropriate so that all bands are in phase with each other. This tends to give a more “transparent” sound. You might wonder why there’s only one linear-phase stage, with a low-cut response, but there’s a good reason for this. Many engineers like to remove unneeded low frequencies for utilitarian purposes (e.g., remove p-pops or handling noise from vocals), or for artistic reasons, like reducing lows on an amp sim cab to emulate more of an open-back cab sound. Standard EQ introduces phase changes above the cutoff frequency; with linear-phase EQ, there are no phase issues. This can be particularly important with doubled audio sources, where you don’t want phase differences between them due to slightly different EQ settings.
The Pro EQ2 is very efficient, but note that enabling linear-phase EQ requires far more CPU power, and adds considerable latency—it’s not something you’ll want to add to every track. Fortunately, in many cases, it’s a setting that you apply and don’t think about anymore. This makes it a good candidate for “Transform to Rendered Audio” so you can reclaim that CPU power, and then use conventional EQ going forward.
By the way, an argument against linear-phase EQ is that it can create pre-ringing, which adds a low-level, “swooshing” artifact before audio transients. Fortunately, it’s a non-issue here, because pre-ringing is audible only at low frequencies, with high gain and Q settings. (Note that traditional EQ can add post-ringing, although you usually won’t hear it because the audio masks it.)
Level Range Options
I’ve wanted this feature for a long time. Some EQ changes are extremely subtle, particularly when mastering. With range set to 24 dB, it’s difficult to drag nodes around precisely. What’s more, when making fine gain changes, with the 24 dB view it’s easy to move slightly to the right or left, and end up editing frequency instead. Holding Shift provides fine-tuning, but for fast EQ adjustments, the 6 dB view is welcome (Fig. 2).
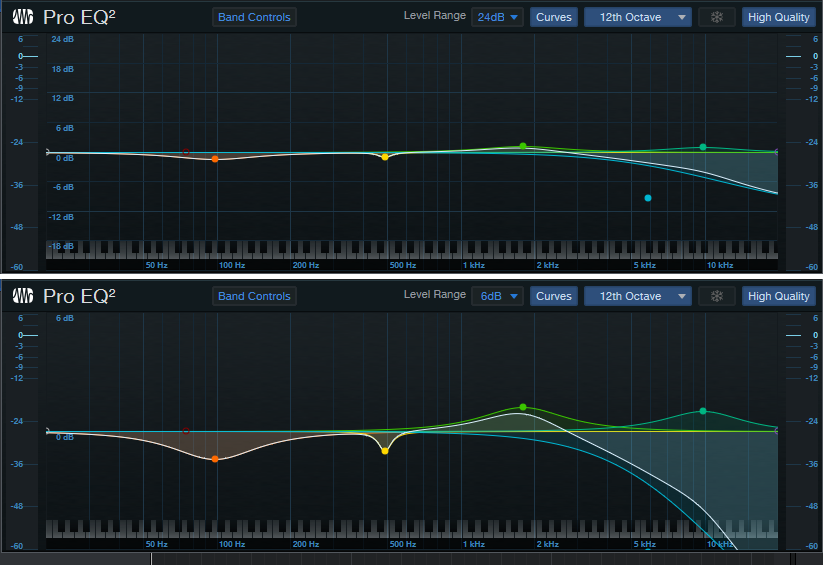
Figure 2: It’s much easier to see subtle EQ changes by setting the level range to 6 dB.
Granted, you adjust EQ with your ears, not your eyes—but learning how to correlate sound to frequency is important. I knew one guitar player who when he said something like “that track really needs to come down about 2.5 dB at 1.25 kHz,” he was 100% spot-on. When mixing, he could zero in on EQ settings really fast.
And there’s another implication. Those learning how to use EQ often overcompensate, so at seminars, I advise applying what I call “the rule of half”: if you think a sound needs 6 dB of boost, try 3 dB of boost instead and get acclimated to it before adding more boost. If you choose the 6 dB view, you’ll be forced to use smaller boost and cuts in order to adjust or see them graphically—and you might find those smaller changes are all you need.
12th Octave Frequency Response Display
The Third-Octave Display is good eye candy, and gives a rough idea of how EQ affects the sound. The new 12th-Octave resolution option gives far better definition. In Fig. 3, note how many of the peaks and dips visible in the 12th-Octave display are averaged out, and lost, in the Third-Octave version.
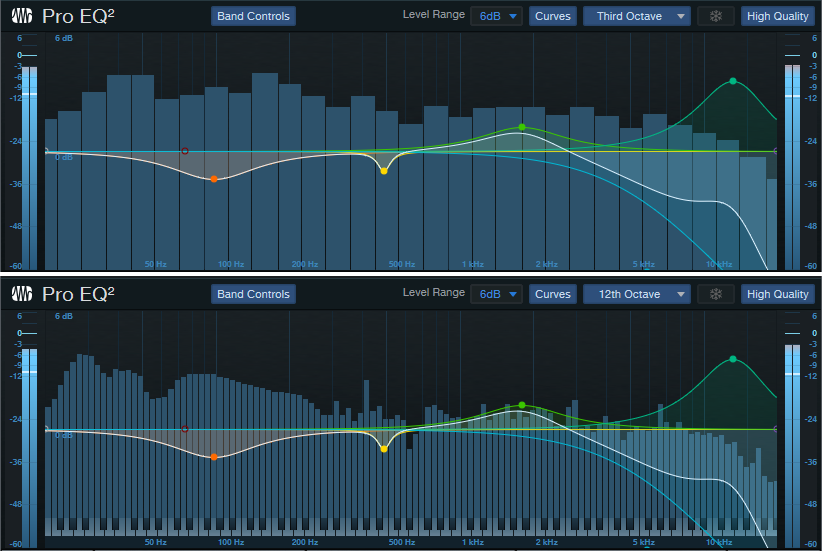
Figure 3: The 12th-Octave display in the lower view gives far greater detail and resolution.
Workflow Improvements
In addition to the more “marquee” improvements, several other additions make working with Pro EQ2 a better experience than the original Pro EQ.
Keyboard Display. Now you can correlate frequency to note pitches; note that these line up with the bars in the 12th-octave display.
Band Controls. In Studio One 4, there was a little, almost invisible arrow between the controls and the frequency response display. Clicking on this hid the controls. The Band Controls button does the same thing, and you won’t overlook it.
Curves Button. Similarly, Studio One 4’s All/Current buttons that control how curves are displayed have been consolidated into a single Curves button.
Sidechaining. We already covered Pro EQ sidechaining in the blog post The Sidechained Spectrum. However, when choosing the FFT curve, now there’s a sidechain spectrum peak hold button for the sidechain input. Clicking on the “snowflake” button freezes peaks (hence the name) until you click the button again.
Better Metering. Studio One 4’s Pro EQ had only output metering, whereas Pro EQ2 has metering for both input and output. This is a highly useful addition. If the output is too hot, you can always turn down the output level, but you won’t know if the reason why it’s hot is because you’ve boosted some frequencies too much, or the input level is hitting the EQ too hard. Now you’ll know. As with Studio One 4, the metering shows both peak and average levels.
And that’s a wrap for Pro EQ2. I guess you could say the newer version is ahead of the curve…the EQ curve, that is ?

Add Studio One 5 to your workflow today!
Big Fun with Tape Resampler
Tape Resampler, a new Studio One 5 feature, replicates an “old school” time-stretch technique that varied pitch and tempo simultaneously and proportionately. Today’s DSP can change pitch and tempo independently, which is cool. But the price you pay is artifacts, because when changing tempo or pitch, you need to either delete or add data.
With resampling, the data stays the same—so there are no artifacts, and the sound is natural. Although extreme speedups give the “Chipmunks” sound and extreme slowdowns evoke Darth Vader on tranquilizers, subtler speed changes were used all the time with tape. It was common to speed up a master tape by a few per cent to give the tempo a slightly faster, “peppier” sound, as well as some added brightness. (If you’ve ever tried to play along with a song that was several cents sharp, it was probably sped up a bit.)
The manual mentions using Tape Resampler to fit loops to tempo (assuming accurate pitch isn’t crucial), but there’s another application that at least to me, is worth the update price by itself. With tape, it was common to slow the tape down or speed it up, play along with the part, and then return the speed to normal. This produced a timbral and formant shift, and was popular for background vocals. For example, if a song was in the key of A, you’d slow down to the key of G, sing along with it in G, then return the tape to normal. The vocal would have a brighter formant change that often worked well. This could also help you hit notes that were just out of your range. (We covered similar techniques in the blog post Varispeed-Type Formant Changes, but because they used DSP, at least some artifacts were unavoidable.)
How to Do It
- Create a premix of the song from start to finish. The premix must begin at the start of the timeline, even if the actual tracks don’t come in until later. An easy way to create a premix is with Song > Export Mixdown, and under Options in the dialog box, choose Import to Track.
- Solo the premix and select the track. In the Inspector, choose Timestretch, and Tape for the Timestretch method.
- Look at the handy transposition chart that lists how to edit the Speedup parameter to transpose an Event up or down a specific number of semitones. For example, suppose you want to lower the premix pitch two semitones down so you can sing along with it. Select it, then enter 0.89 for the Speedup.
The Handy Transposition Chart
| Semitones | Pitch Up | Pitch Down |
| 1 | 1.06 | 0.94 |
| 2 | 1.12 | 0.89 |
| 3 | 1.19 | 0.84 |
| 4 | 1.26 | 0.79 |
| 5 | 1.33 | 0.75 |
| 6 | 1.41 | 0.70 |
| 7 | 1.50 | 0.67 |
| 8 | 1.59 | 0.63 |
| 9 | 1.68 | 0.59 |
| 10 | 1.78 | 0.56 |
| 11 | 1.89 | 0.53 |
| 12 | 2.00 | 0.50 |
- Sing along with the premix, which is now playing back two semitones lower and somewhat slower.
- When you’re done, extend the overdub’s beginning to the start of the timeline (e.g., use the Pencil to draw an event from the beginning to the start of the overdub, select them both, then type Ctrl+B to glue them together).
- Select the overdub, and again, choose Tape for the Timestretch method. This time, set the Speedup value to 1.12 to transpose the pitch up 2 semitones so it will match the song’s original pitch (Fig. 1).
- You no longer need the premix, so either remove it, or change its speedup value back to 1.00 to return it to its normal pitch. (If you select the overdubbed Event and type Ctrl+B, the new pitch will become a destructive edit, and the Speedup value will return to 1.00.)
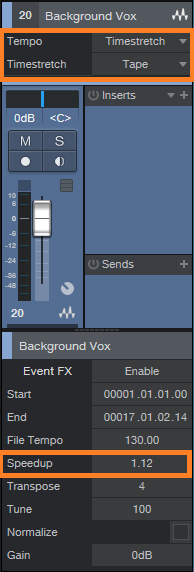
Figure 1: The overdub is being raised two semitones.
Calling All Rocket Scientists!
Note that the transpose numbers relate to the 12th root of 2. This irrational number (its numerical value has been taken out to over twenty billion decimal digits, but it still doesn’t repeat!) sets the ratio between semitones of the even-numbered scale. Fortunately, three significant digits covers our needs.

Learn more about Studio One 5 here!
90 Day Grace Period Information
The response to Studio One 5 and the launch of PreSonus Sphere has been OVERWHELMING, to say the very least… We are blown away and extremely grateful for our customers’ enthusiasm! We are working non-stop to respond to specific issues any customers may run into. We wanted to take a minute and answer a few questions about the grace period we’re offering to our customers.
Join PreSonus Sphere here.
PreSonus is providing a super-sized 90 day grace period for Studio One version 5. This means if you registered a copy of Studio One 4 on or after April 1, 2020, you are within the grace period. Here are all the specifics:
- If you registered Studio One 4 Professional within the grace period, you will receive either Studio One 5 Professional or enjoy a full year as a member of PreSonus Sphere. Just choose which option you prefer in your MyPreSonus account.
- If you registered Studio One 4 Artist within the grace period, you will have a choice between a complimentary upgrade to Studio One 5 Artist or a 4-month membership in PreSonus Sphere. Just choose which option works best for you.
- If you registered a piece of PreSonus hardware that came with Studio One 4 Artist included within the grace period, you will receive 4 months membership in PreSonus Sphere for free. Studio One 5 Artist is not an option in this scenario, however, your Studio One 4 license is still yours and you can purchase an upgrade if you prefer. Please note: you must be the original owner of the registered PreSonus hardware to qualify.
Note: If you registered a copy of Studio One 4 Artist that was bundled with a third-party product during the grace period, we are sorry but you are not eligible for an upgrade.
During this grace period, if you have multiple copies of Studio One Professional or Studio One Artist in your account, all copies are stamped as upgraded automatically. However, only you only get one copy of Studio One 5 or PreSonus Sphere per account, not per product. This is only a rule for those registrations that occurred during the grace period.
Instructions to Redeem:
- Log in to your MyPreSonus account
- Go to “Products.” This will take you to the Products page.
- Select the qualifying software that you would like to upgrade.
- You should see a green “Redeem” button. Click it to begin the process. If you don’t see the Redeem button, it may be necessary to log out of your my.presonus.com account and log back in to refresh the page.
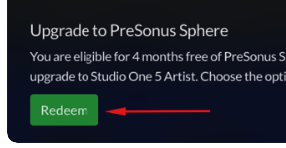
After clicking the Redeem button above you will see a screen similar to the one pictured below. Depending on how you acquired your product or your product type you may not have both buttons:

Studio One 5 has arrived. What’s New?
Studio One 5.0 is here, and it’s packed with major new features. As usual with Studio One upgrades and updates, we’ve added a combination of innovative new features and your most-requested features.
The Show Page
Studio One 5 introduces a powerful, fully-integrated, live performance environment capable of running complete shows from a single computer. The Show Page combines playback of backing tracks with patch management for virtual and real instrument players inside a single window. Studio One Song channel strips, mixdowns, and virtual instrument patches can be directly exported to the Show, simplifying setup. Setlist items can be rearranged and skipped on the fly. With a dedicated full-screen performance view, adaptive real-time controls and a large meter, running a show is simple and reliable, whether you’re playing with backing tracks, controlling virtual instruments, running plug-ins as a virtual effects rack, or all three at the same time.
Composition Tools
Composers and arrangers will appreciate Studio One 5’s new dedicated Score View for the Note Editor. Based on PreSonus’ Notion® music composition and notation software, the new Score View is available on its own or as a companion side-by-side view with the Piano and Drum views, allowing users to enter, view, and edit notes in standard music notation. The Score View is available per track, so you can edit note data in Score View on one track while using Piano or Drum View on other tracks. Any number of tracks can be viewed simultaneously, so you can work on just one melody line or on chords over an entire orchestral section at once. Notes can be entered manually, in real-time or step recording modes. A basic set of musical symbols is provided, and the symbols directly control playback, allowing you to add tremolos, crescendos, and more and hear it all in real time.
Native Effects Overhaul
Native Effects plug-ins have undergone a major revision, including new features and a new modern interface with separate dark and light themes.
Studio One’s Native Effects plug-in set has a well-earned reputation for exceptional sound quality, and now they’re even better. With version 5, Native Effects have undergone a major revision, adding new features and improvements for many effects, along with a new modern interface with separate dark and light themes. All dynamics effects now have sidechain inputs, and plug-ins with a filter option now have the filter added to the sidechain input as well, enabling more control over the sidechain signal and eliminating the need to add a separate filter up front. Several plug-ins with a Drive parameter now have a State Space Modeled drive stage for natural analog-sounding saturation. The Pro EQ plug-in adds major new features, including a linear-phase low-cut filter, 12th-octave spectrum display, and input and output meters with adjustable range and peak hold. Several other plug-ins have received significant enhancements for sound quality or better handling. The Studio One plug-in suite never looked or sounded this good.
Workflow Improvements
Producers will be delighted with the expanded mixer scenes in Studio One 5. Users can now capture snapshots of the entire mixer at any time and can recall snapshots in a variety of different ways, with an assortment of recall options. In addition to limiting scene recall to specific parameters, recalling a scene may be limited to selected channels only. A dedicated Listen bus is also among the improvements to the Studio One mixer, letting users monitor Solo signals through a separate output channel or tune their room using advanced calibration plug-ins while leaving their main mix unaffected.
Studio One 5 includes many more new features, such as audio Clip Gain Envelopes, which provide an additional layer of gain control applied directly on an audio clip—perfect for repairing sections of audio that are too loud or too soft without using a dynamics processor. Aux inputs now allow external audio sources to be fed directly into the mixer without requiring an associated track, so external instruments can be used like virtual instruments within Studio One. (Quantum 4848 interface owners take note: This is also great for outboard processor returns!) Version 5 also adds support for key switch articulations, chasing external timecode (MTC), MPE and MIDI Poly Pressure support, recording in 64-bit floating-point WAV format, and cross-platform support for hardware-accelerated graphics.
With version 5, Studio One Artist now has built-in support for VST and AU plug-ins, ReWire, and Studio One Remote control software for iPad and Android tablets. These features were formerly available for Studio One Artist only as separate Add-ons.
How to get it
Studio One 5 Professional is available now for a U.S. street price of $399.95; updates from Studio One 4 Professional are $149.95. Studio One 5 Artist is available now for a U.S. street price of $99.95; updates from version 4 are $49.95. For additional upgrade and crossgrade options and educational pricing, check with your PreSonus dealer or visit our online shop.
Studio One 5 Professional is also available as part of the new PreSonus Sphere. A global community of creative enthusiasts and respected professionals, PreSonus Sphere membership benefits provide access to PreSonus’ entire library of software, including Studio One Professional; award-winning Notion notation software; every Studio One and Notion Add-on; the complete collection of PreSonus-developed plug-ins; over 100 sample and loop libraries; cloud storage; collaboration tools; and much more. PreSonus Sphere membership rates are available either monthly ($14.95) or annually ($164.95).
For more information about Studio One 5, including system requirements, please visit www.presonus.com/products/Studio-One.
Jakubu Griffin: using the StudioLive 24R as a USB Audio Interface
 [Jakubu Griffin is truly one of Las Vegas and NYC’s most versatile drummers. Son of trombonist Dick Griffin (who played with the legendary Rahsaan Roland Kirk), he has been surrounded by music from an early age. Growing up with many musical instruments and influences around him, he was always drawn to percussion and can remember playing the drums as early as age 3 or 4. He started studying classical piano at age 5, and later added the trumpet.
Jakubu has performed and led groups all over the world. While living in Las Vegas in the early 2000s, He was featured in David Cassidy and Sheena Easton’s “At The Copa” at the Rio Resort. After that, he was musical contractor and drummer on a show featuring Chaka Khan, Peabo Bryson, and Melissa Manchester called Signed, Sealed, Delivered: a Celebration of Stevie Wonder’s Music at the Venetian Resort.

Griffin has also been a musical director for Kings Productions, as well as Norwegian and Premier cruise lines. Back in the NYC area where he grew up, he has performed and recorded with award winning jazz trumpeter Dave Douglas, Ryko/Warner recording artist Matt White, and Broadway stars Tracie Thoms (Rent, Case) and Shoshana Bean (Wicked). Jakubu is currently playing with the legendary Las Vegas singer Clint Holmes. He was also the house drummer for Cirque Du Soleil’s production of Zarkana which premiered at NYC’s world famous Radio City Music Hall in June of 2011, moving on to Madrid, as well as having a historic run at the Kremlin Theater in Moscow in 2012. Jakubu’s powerful, yet very musical drumming reputation has been highly appreciated by many musicians and music lovers both here and abroad.
When not on the road, he’s kept busy at home recording and teaching. But, with the recent stay-at-home measures implemented due to COVID-19, working in his own studio has become his primary focus.
Jakubu has graciously given us a virtual “walk-through” of his home studio environment, where the StudioLive 24R is the centerpiece and his dedicated audio interface to his DAW of choice, Studio One. Let’s check out his setup and how he’s been using our products in action at home.]
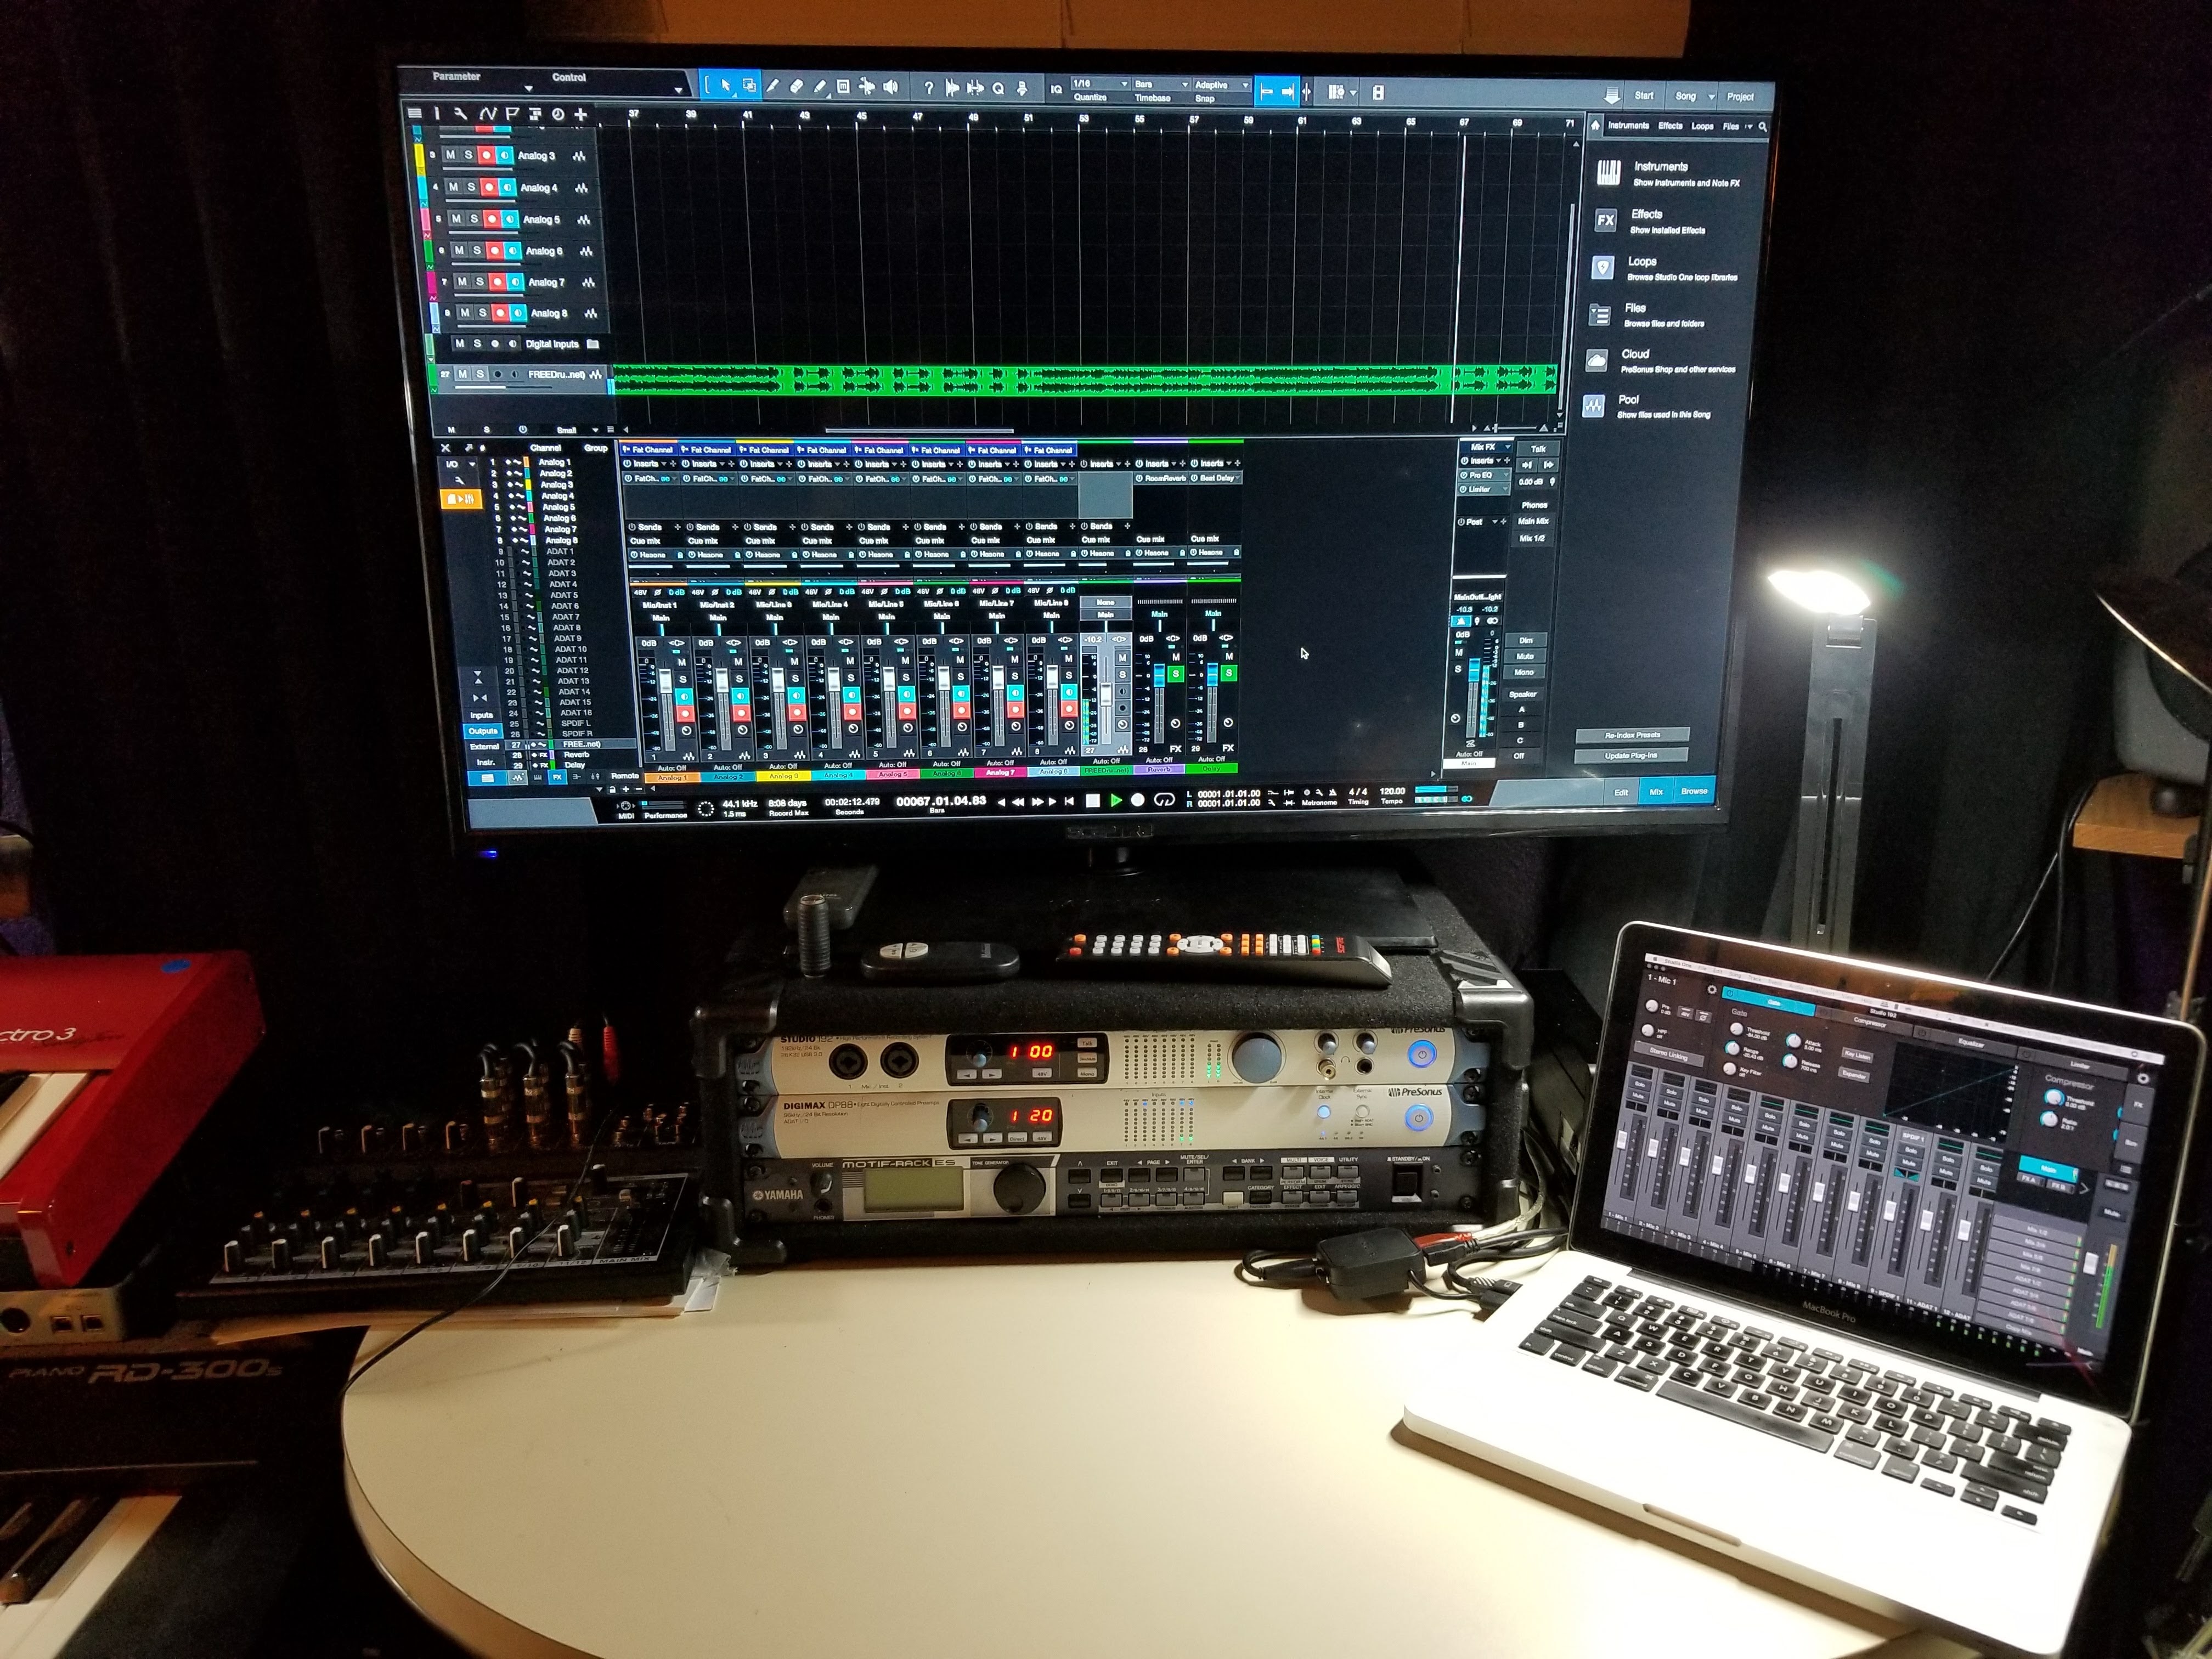 Jakubu: My first audio interface was the PreSonus Studio 192 along with the DigiMax DP88. As a drummer, I need to have at least 8 channels dedicated to drums in my space at all times for my own use. With the Studio 192 and DP88 giving me 16 total channels and great preamps, I was able to stack them in a rack and run my 8 drum channels into the DP88 using the Studio 192 rear channels for my keyboards, bass, extra drum channels etc. and even leaving the 2 front channels open for a vocalist or instrument to plug right in. As my studio evolved, I graduated to the StudioLive 24R rack mixer, as well as the NSB 8.8 AVB Networked Stage Box to expand channel inputs in my other rooms.
  Since I don’t have the space for a console mixer on my workstation, the StudioLive 24R is the perfect solution for me with UC Control as my console. I use the HP60 for 6 stereo headphone mixes. With a router plus the network control via Wi-Fi of the StudioLive 24R, my clients have the option of using the QMix-UC app to control their own headphone mixes. The PreSonus Monitor Station allows me flexibility to switch between my different sets of of studio monitors and speakers, and also gives me 4 more headphone outputs if needed. I’ve used other DAWs, but I’m completely sold on Studio One Professional because it’s just more user/musician friendly. I understood more about using Studio One in 24 hours than I’ve learned on other DAWs after countless months of usage. I’m a musician first, not an engineer.
Jakubudrum Studios is my home as well as my recording space. I have three isolated rooms on one floor. I have eight CCTV cameras installed, and video monitors in every room for visual communication. My main “studio” room is my acoustically-treated drum and keyboard room, as well as my control booth. 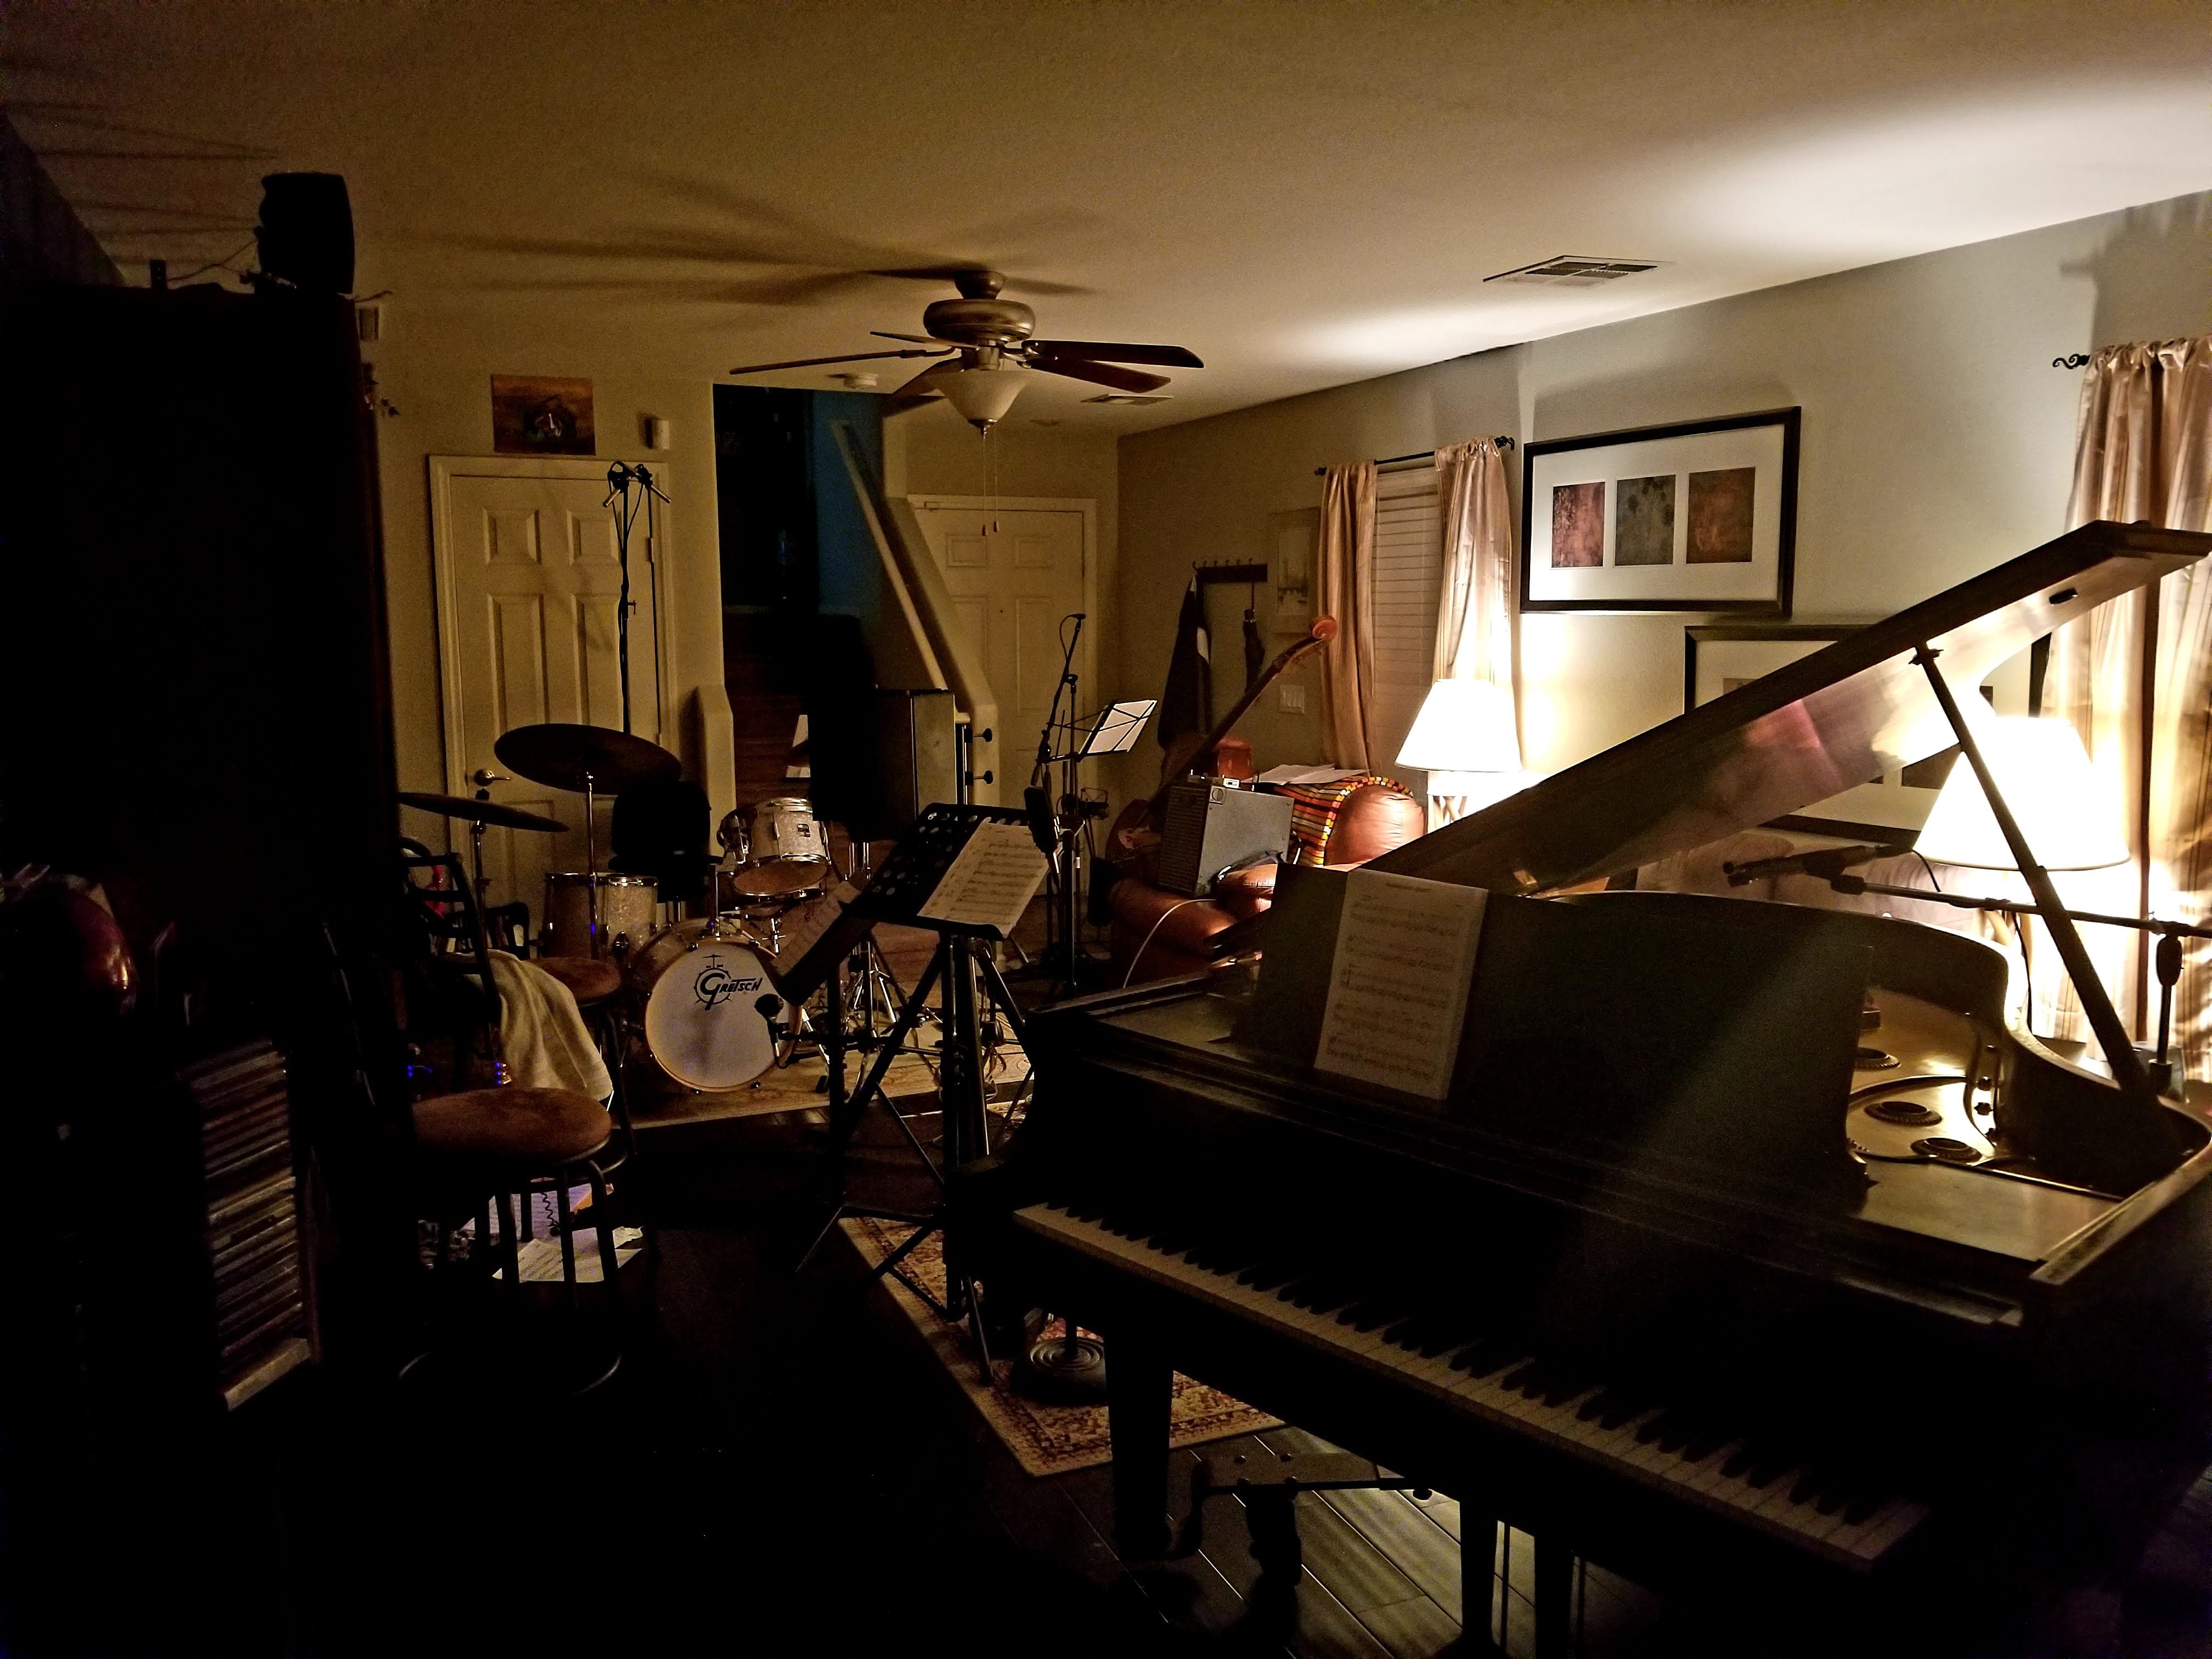 My living room is my large room and features my Baldwin L grand piano. My smaller acoustically-treated room is great for acoustic bass as well as other instruments, and it also serves as a vocal booth and isolated amp miking room. I’ve done several live recording sessions in the studio with different configurations ranging from solo piano to live strings… and various band sizes, genres, horn combinations, etc. I do a lot of drum and percussion tracking for projects myself, but I’ve also engineered tons of keyboard track layering sessions, instrument tracking sessions, vocal tracking, and my space is perfect for tracking bass and drums together. I record voice-overs as well, and I’m currently producing an audiobook session.
Now that I have the StudioLive 24R, I have the luxury of using 14 dedicated drum channels just for myself. I usually use two different sets of overhead mics simultaneously, another stereo room mic, and a subkick along with my normal kick, snare, hi hat, and tom mic combinations. 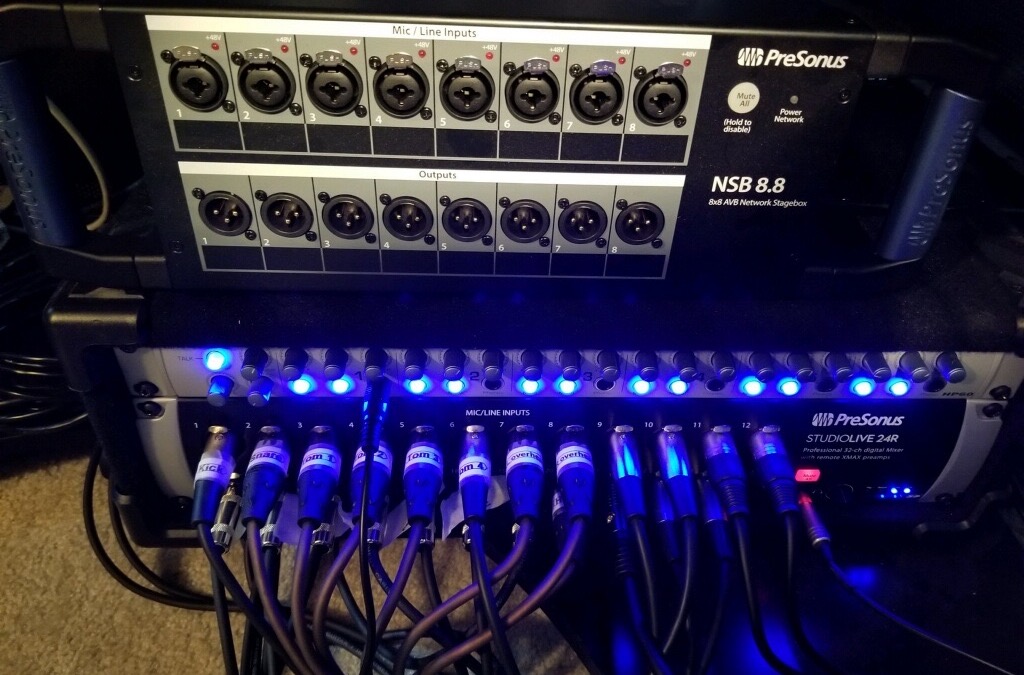
I also use seven channels for my keyboards, and a channel for my bass amp to run direct with a pre amp. I use the NSB 8.8 Stage Box in the other rooms to mic the piano, horns, strings, vocals, etc. I use the 12 outputs from the 24R mixer to sum 2 outputs to each of the 6 stereo inputs of the HP60 headphone amp and made them stereo mixes from UC Control. Again, I have a router connected to the 24R mixer and a network setup so people have the option of using QMix-UC to control their own headphone mixes. I have two sets of studio monitors, but I also have small PA for the keyboards, rehearsals, gigs etc. The monitor station is actually one of my favorite pieces of PreSonus gear to be honest. I love the versatility I have with 2 sets of monitors, but I even use the PA as a 3rd reference sometimes. The Monitor Stations onboard talkback routed through the HP60 is perfect for my setup, plus I’m the type of guy that just needs a big volume knob in my life since I don’t have a console.
So, funny story: I actually learned about PreSonus through another drummer, Dre Boyd, who is also an Artist with them. We both met and quickly became good friends working for the Cirque Du Soleil company. I finally had the space and needed an interface to start getting into recording and he highly recommended the Studio 192 and DP88. I’m an impulse buyer, but he told me to wait so he could “hook me up” with his representative at PreSonus. Well I’m impatient and went ahead with the purchase of the interfaces anyway. I was ecstatic, but then a couple weeks later Dre let me know that the PreSonus Artist Relations Manager was none other than my college buddy, Perry Tee… so I should have waited!!! Not only do I love the products, PreSonus reconnected me with an old friend, who happens to be on guitar in this video below that we produced remotely with 4 other buddies using Studio One Professional:
I love the power and versatility that I have with the StudioLive 24R mixer, especially for low-end instruments. Now I have the ability to mic an acoustic bass and get a warm, powerful tone without any need for a DI or outboard preamp. Its considerably better for my drum miking as well. I get better headphone mixes, and I have plenty of room and power to hear my kick drum perfectly which can be a problem in regular interfaces without external pre amps. The ability to control mixes across Wi-Fi is a true bonus allowing my clients the flexibility to control their own mixes with QMix-UC. The HP60 is a great solution for my headphone needs with 6 channels, and stereo mixes plus the Monitor Station is one of my favorite additions to the studio, and has made my work flow much smoother and faster. The onboard talkback is perfect for my space. Studio One is absolutely the best DAW available, in my opinion. I know has everything I could possibly need for my studio. Everything in my setup works seamlessly. I couldn’t be more satisfied with the sounds, and results I get with my gear.
Every piece of gear is perfectly matched and catered to the needs of my workflow and studio ecosystem… thank you, PreSonus!
For professional inquiries, contact: jakubudrum@gmail.com
[Incidentally, from now until Aug 31, 2020, anybody who buys a qualifying StudioLive Rack Mixer will get a PX-1 microphone for free!]

Mastering Martha Davis—for Vinyl!
Martha Davis is best known for her string of hit singles in the 80s with the Motels.
Songs like “Suddenly Last Summer” and “Only the Lonely” were Top 10 hits that remain on playlists to this day, but her varied (and ongoing) career includes solo albums, an acting stint in “Bill & Ted’s Excellent Adventure,” creating music for several films (including “Moscow on the Hudson,” “Teachers,” “The Golden Child, and her “Soul Man” duet with Sly Stone), and working in theater. She still tours—at least when there’s not a pandemic—and amazingly, her voice is better than it was in the 80s. But, it took Studio One’ Project Page to bring a solo album back to life that had been all but written off ten years ago.
The collection of songs on “I Have My Standards” (Fig. 1) was meant to be an album of jazz standards, with orchestration—but the twist was that Martha had written the “standards.” She cut a demo album with longtime musical collaborator Marty Jourard (piano, tenor sax), Allen Hunter (bass), Paul Pulvirente (drums), and Felix Mercer (clarinet). However, the budget to do the orchestration never materialized, and the record was never finished.
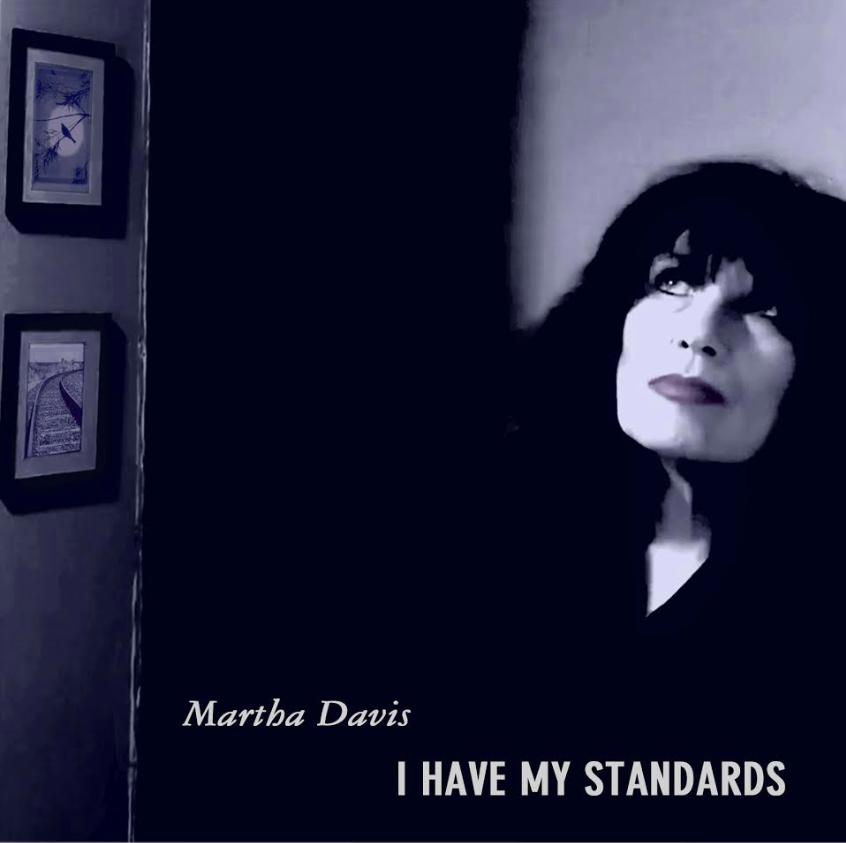
Figure 1: The cover of “I Have My Standards.”
When Martha found out I did mastering, she mentioned “the album that never was” and being curious, I asked to listen to it. I was floored. The songs were deep, the vocals flawless, and the instrumentation excellent. I heard the lack of orchestration as an advantage because the sparse, emotional treatments were compelling in themselves.
Except…being a demo, there were technical problems. Among other issues, the acoustic bass overpowered the song on some of the demos, the mic had a boxy quality that was no friend to Martha’s voice, and there were mix and level issues that resulted in a lack of clarity. I asked if she could locate the multitracks so I could remix before mastering, yet no one had any idea where they were. Oh, and the project had to be mastered for vinyl—she wanted to put it out on 180-gram vinyl for her nascent record label, Remarkable Records.
ENTER STUDIO ONE
Fortunately, the songs were recorded with the same basic setup. Although I’m usually not a fan of “one size fits all” mastering chains, in this case, there weren’t too many variations among the songs (Fig. 2).
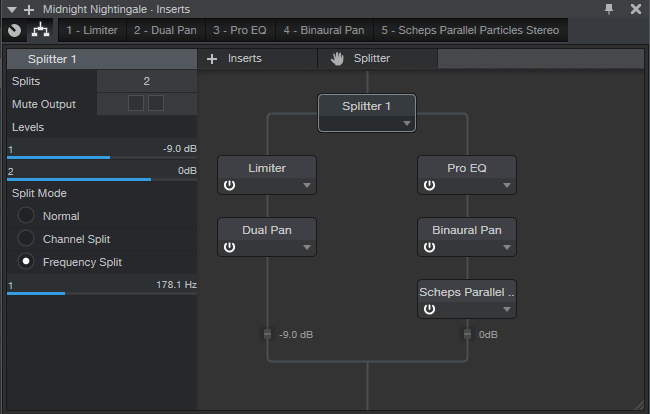
Figure 2: The Project Page mastering chain.
The Splitter separated the frequencies below 178 Hz from the rest of the audio. With vinyl, bass needs to be centered, and the dynamics need to be controlled—hence the Limiter, and the Dual Pan. with both left and right channels set to center.
Another reason for the Splitter was that in some songs, the acoustic bass overpowered the mix. Note the fader at the end of the Dual Pan, set to -9.0 dB to help keep the bass under control. This setting worked for most of the songs but for one of them, I had to pull the level down by -13.8 dB to get the right balance. The frequency splitting was crucial.
For the rest of the audio, EQ was by far the most important process. Fig. 3 shows the setting that was used on most of the songs. Remember that the RIAA curve for vinyl (which boosts treble massively on the vinyl, then cuts it on playback) isn’t a fan of high frequencies, so the highs were often cut on vinyl masters. Although the steep high-cut filter wasn’t needed on all the songs, when necessary this gave a sound that was more consistent with vinyl records.
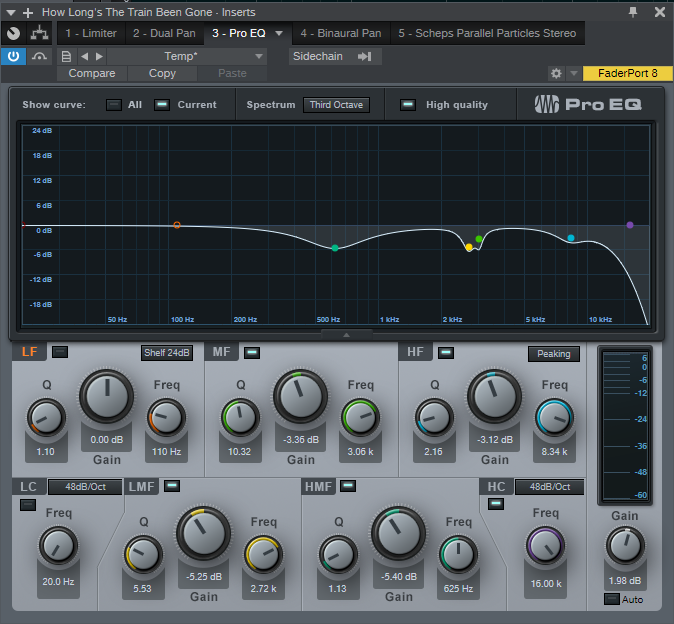
Figure 3: Initial EQ settings for the songs.
The substantial dip at 625 removed the muffled quality by making the highs more prominent. The dips at 2.72 and 3.06 kHz were tricky—they were essential in removing a resonance on Martha’s voice that took away from of the openness and intimacy. Almost all the songs needed the dip at 8 kHz, where treble energy from recording the individual tracks “bunched up.” Bass wasn’t an issue, because the split took care of that.
The Binaural pan was set between 124% and 137%, depending on the song. This mainly had the effect of spreading out the reverb more than the instruments, which enveloped the sound in an ambiance it didn’t have otherwise. This also moved the reverb a bit out of the center, so there could be more focus on the voice.
Finally, I’m not much of a believer in “special sauce” processors, but the Scheps Parallel Particles from Waves was ideal (Fig. 4).

Figure 4: The Scheps Parallel Particles plug-in added just the right amount of “air.”
After taming the highs to accommodate vinyl mastering, I wanted to restore a perception of high frequencies. Adding a significant amount of the Air parameter, with just a touch of Thick and Bite for a little more midrange presence, did exactly what was needed.
FINAL TOUCHES
I was aiming for a LUFS of -12. This was a bit of a compromise between vinyl and streaming. A little compression would make it easier for the vinyl cutter to optimize the levels for vinyl, and besides, being a little “hotter” than the typical streaming target of -14 LUFS was fine. For the last stage of dynamics control, I used IK Multimedia’s Stealth Limiter (which is designed for mastering), in the Project Page’s Post slot. It’s a transparent but CPU-intensive plug-in, hence using only one instance as the final limiter. The songs were the levels I wanted, so they needed only very slight tweaks to hit the Stealth Limiter a little harder or softer to reach the -12 LUFS goal.
It was easy to generate timings from the Project Page, so that those cutting the vinyl would know where to put the bands between cuts…and we were on our way. The vinyl hits the world in August (available from themotels.com and specialty record stores). The digital release is available now on iTunes, Apple Music, Spotify, Amazon Music, Amazon Disk on Demand, and you can hear it on Pandora, Shazam, iHeart Radio, and YouTube Music. Most of these have ways to preview the songs, and I think it’s well worth following some of the links to check out music that sounds like it’s frozen in time, yet curiously modern.
I checked out some of the customer reviews on Amazon. While they’re all over-the-top about Martha’s voice and songs, as you might expect my favorite is the one that said “The album is mastered in such a way that you would think that Martha Davis is actually in the same room with you.” Mission accomplished (Fig. 5)!

Figure 5: Martha with the author.
Punch Up Analog Drums with CTC-1
Remember those old drum machines, like E-Mu’s Drumulator and Roland’s TR-808? In an amazing twist of fate, those relics from the 80s are back in fashion—but I find it difficult to wrest a lively, modern sound out of them. Usually, the solution involves choosing separate outputs from Impact XT, EQ, a careful choice of room ambiance, short delays, limiting, and maybe some saturation.
However, the CTC-1 can get you most of the way there with a single effect, which has helped my workflow when it’s time to have vintage drum sounds fit in a modern context. (Note that you need the CTC-1 for this; the bundled, free Console Emulator doesn’t have the console emulation or controls that seem to work best with dinosaur drums.)
Mono Tracks with a Stereo Mix
We need a more sophisticated mix setup than just sending the drums to Impact’s mixed stereo output. After all, a Console Emulator doesn’t do much good if you’re not mixing the drum sounds the way you would in a console. So, each drum goes to its own mono mixer channel, like the way drums were mixed in the days of Tapeosaurus Rex. You then add effects to individual drums and pan them as appropriate. This mixing paradigm is also what allows the CTC-1 to apply its crosstalk mojo.
Fig. 1 shows the setup used for the audio example. It’s basically just drums and the CTC-1, aside from a little Open Air reverb and a touch of EQ on the snare.
Figure 1: The individual drums go to their own mono channels in Studio One, and then sum into a drum bus that includes the CTC-1.
However, I recommend not putting insert effects on the drums until after you’ve set up the CTC-1. It has its own way of changing the sound, and you might want to accentuate, or de-emphasize, those changes.
Tweaking the CTC-1
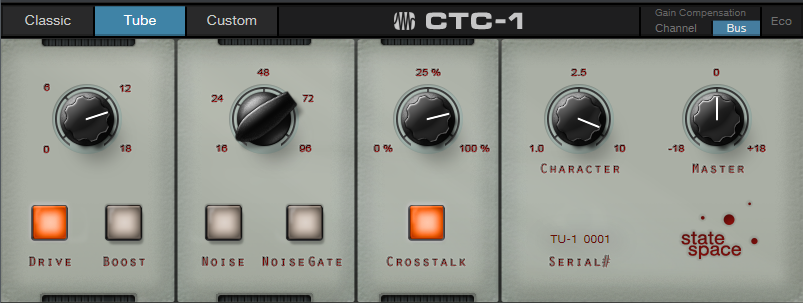
Figure 2: CTC-1 control settings for the audio example.
I much prefer the Tube console emulation for this application. Turning up Drive adds just the right amount of grit for my taste, but the Crosstalk control is the star of the show. Instead of having each drum be a pinpoint in the stereo field, the various mono tracks “glue” together in a way that sounds more like miked physical drums. Generally, I don’t feel the need to add lots of Character. But in this case, the CTC-1 is being pushed somewhat beyond doing only console emulation. Character brings up the highs a bit and adds “snap” to those normally dull, 8- or 12-bit sounds recorded at compromised sample rates (remember, back in those days, memory was expensive).
But of course, the proof is in the listening! In the following example, the first four measures bypass the CTC-1, while the second four measures enable the console emulation effect. In addition to the crisper sound, note how the crosstalk makes the toms, cowbell, and rim feel more integrated with the overall mix instead of sounding isolated…enough said.
River City Session: Sydney and The SAMS
Music is essential.
And that’s why we’re excited to share the next episode of River City Sessions. This month, we’re sharing an original song titled “Papi Chulo,” by South Louisiana natives Sydney and The SAMS. Read more about the band, the song, and how it was recorded below.
Follow Sydney and The SAMS here!
Give us some background on yourself and the band. How long have you guys been making music?
We have been a band surprisingly for less than a year! I think we have a natural friendship and chemistry that makes people think that we’ve been together for years.

Follow Sydney on Instagram
“Papi Chulo” Such a great song! Can you tell us when you wrote it? What’s the inspiration?
“Papi Chulo” was actually the first song I ever wrote! I (Sydney) recorded three years ago when I first started making music. When we got together as a band, we started incorporating some of my originals into our sets and this song became an instant hit with our fans.“Papi Chulo” is about liking a guy and wanting to hang out and smoke. It was actually about a guy I liked at the time and all we did was hang out in the car and talk.
Does writing a melody come naturally to you?
It depends. The beat has to be catchy. I have to find the melody and it kinda has to come to me. If I don’t feel it in a few minutes, I usually move on.
Where do your ideas for songs come from?
All my music comes from personal experiences. I feel like songwriting is therapy to me. The fact that it’s relatable to listeners is just extra. It feels good to know my lyric is relatable and people have been in the same positions as me and felt like I’ve felt at some point. That’s the point of music; to touch people in some way whether it be a happy emotion or a sad one.
Can you describe the first time you wrote a song?
I found this cool beat on YouTube and just started writing. It’s always something I’ve wanted to do but never really tried to do. One day I was like, “whatever, I’ll try.” I did a rough record on my phone and sent to NJ (my engineer) and told him “If this sucks, tell me. If not, I wanna book a session.” And it’s been history ever since.
Do you prefer performing your own music or covers? What’s the difference?
I enjoy both because even when we do covers, we always put our own little spin on it or rearrange it so it’s more our own. We also do medleys with our originals to kinda bring the crowd back and make them interact with us. Ultimately it’s about having a good time and making sure the crowd has an amazing, memorable time.
How has the Coronavirus affected your music?
We used to gig so much and it really put all our gigging and traveling at a complete halt. At first it was creatively discouraging but we decided to virtual concerts to continue to perform and connect with our fans in a different way. People really loved them and received it really well. Livestreaming is a way for us to reconnect and stay fresh. It also gave us time to finish our EP which will be released this July!

Follow Sydney and THE SAMS
Now that the coronavirus has thrown a wrench in everything, What do you miss most about performing live?
I miss having fun with the crowds mostly. Dancing and singing with them was the most fun part of it all. As a concertgoer, that was my most memorable time and now as an entertainer, I want every person in the room dancing and having an amazing time! I hope we do that every time.
Do you plan on doing any live streams?
We’ve done two live-stream virtual concerts. We’ll be live streaming our EP release concert and party as well. So y’all join the fun!
WATCH the performance here.
Connect with Sydney and THE SAMS on Facebook
Follow Syndey on Instagram!
Rockin’ Rhythms with Multiband Gating
We’ve covered multiband processing before, but now it’s time for something different: multiband gating.
You send a drum or percussion track to three buses, each with an EQ covering a different frequency range—e.g., kick, snare, and cymbals. These provide three control signals…and here’s what we do with them.
A guitar track feeds an FX Chain with Ampire, which goes into a Splitter that splits by frequency. There’s a gate in each split, and they’re driven by the control signals. So when the kick hits, the guitar’s low frequencies come through. When snare and upper toms hit, the mids come through and when there are high-frequency sounds like percussion, they trigger the highs. You can think of the effect as similar to a mini-vocoder.
The audio example has some Brazilian rhythms triggering the gates, and you can hear the kind of animation this technique adds to the guitar part. The first four measures have the drums mixed with the processed guitar, while the second four measures are processed guitar only.
SETTING IT UP
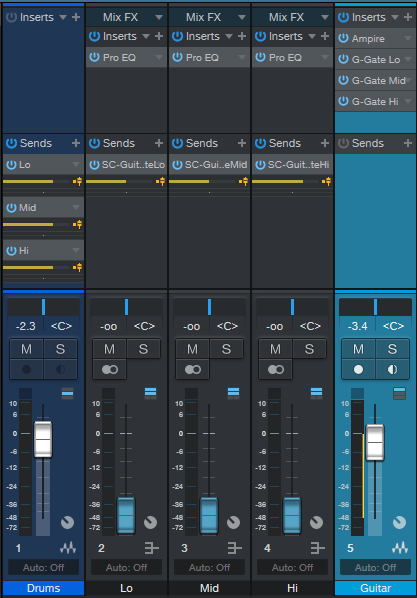
Fig. 1: The track layout for multiband gating.
The Drums track has three pre-fader sends, which go to the Lo, Mid, and Hi frequency buses. Each bus has a Pro EQ to emphasize the desired low, mid, and high frequencies. Then, each bus has a send that goes to its associated Gate sidechain in the Guitar track (Fig. 2).
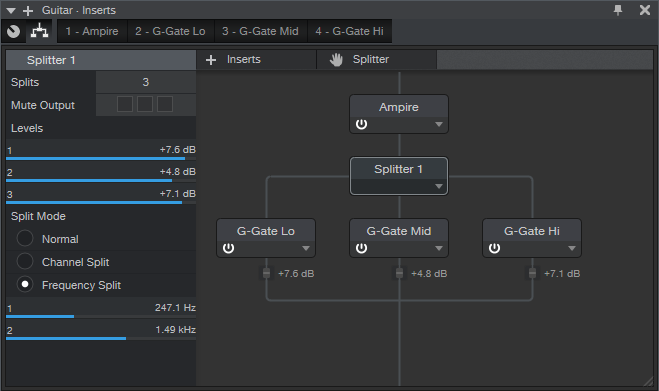
Fig. 2: Splitter and Gate setup for multiband gating.
The guitar goes to Ampire, which splits into three frequencies bands thanks ot the Splitter’s Frequency Split magical powers. Each split goes to a Gate, and the sends from the Lo, Mid, and Hi buses feed their respective gate sidechains.
Inserting a Dual Pan after the Mid and Hi gates can enhance the sound further, by spreading these frequencies a bit to the left or right to give more of a stereo spread. You’ll probably want to keep the low frequencies centered.
You don’t have to get too precise about tuning the EQs in the buses, or setting the Splitter frequencies. I set up the Splitter frequencies by playing guitar through the Splitter, and adjusting the bands so that the guitar’s various frequency ranges seemed balanced. As for the Pro EQs in the buses, I just tuned those to the drum sounds until the guitar rhythm was rockin’ along.
This takes a little effort to set up, but multiband gating can add a unique rhythmic kick to your music. Interestingly, you may also find that you don’t need as much instrumentation when one of them is blurring the line between melody and rhythm.
Add Studio One to your workflow today for 30% off!
Craig Anderton’s Big Book Round-Up
If you’ve spent a couple of spare evenings at home poking around the web for tips on music and audio production, it’s really very likely that you’ve run into some posts, articles, or comments from Craig Anderton. In fact, you may have had to update your search criteria to sort by “most recent,” because it’s fairly common for Google to show you some Craig Anderton posts from the dawn of the internet age, which—while cool—may not be particularly full of insight on Studio One version 4.
Fact is Craig is our industry’s most acclaimed writers, and he’s spoken about Studio One in-person at more events than I can count, and is of course responsible for the Friday Tips section of this very blog. In short, Craig’s contributions to the success and proliferation of Studio One can’t really be counted.
But his Studio One books? Those can be counted. There are five.
We wanted to take a minute to thank Craig for all of his hard work, broadly-reaching creative output, and continued support of PreSonus and Studio One. Let’s take a closer look at what he’s got over at shop.presonus.com. Chances are one or more of these will prove valuable to you and your process. Note that these are eBooks, not hardcover books, and will be downloaded as PDFs.
How to Record and Mix Great Guitar Sounds in Studio One
Essential reading for anyone who records guitars in Studio One, this definitive book covers invaluable production and engineering techniques.
- 274-page, beautifully-illustrated eBook is the fifth book in this acclaimed series of how to get the absolute most out of Studio One
- Covers all aspects of recording and mixing guitar, from how to choose the right strings for a particular tone, to advanced techniques that bring out the best in amp modeling plug-ins
- Applicable to all genres, from acoustic folk to heavy metal
- Links from contents page to topics—find specific subjects quickly
- Find out how to use DSP, effects, real-time control, and much more
 The Big Book of Studio One Tips and Tricks
Consolidates, updates, expands on, and categorizes 130 tips from Craig’s popular “Friday Tip of the Week” blog posts that you probably have been checking out right here. Essential reading. This massive book includes tips on how solve problems, enhance sound quality, improve workflow, achieve greater expressiveness, create signature sounds, and much more.
- 289 pages with 278 four-color illustrations to help streamline the learning process
- Includes 39 free presets (28 Multipresets, 10 Mai Tai presets, 1 Presence XT preset) that support the tips
 How to Create Compelling Mixes in Studio One
A comprehensive, practical, and above all inspiring guide on how to use Studio One’s sophisticated toolset to craft the perfect mix.
- 258-page eBook with over 180 four-color illustrations
- Downloadable PDF format, with links from the contents to book topics
- “Key Takeaways” section for each chapter summarizes chapter highlights
- “Tech Talk” sidebars do deep dives into selected topics
- Covers all aspects of mixing with Studio One
 More than Compressors: The Complete Guide to Dynamics in Studio One
The ultimate guide to becoming an expert on Studio One’s dynamics processors and dynamics-oriented features.
- 258-page eBook with over 180 four-color illustrations
- Downloadable PDF format, with links from the contents to book topics
- “Key Takeaways” section for each chapter summarizes chapter highlights
- “Tech Talk” sidebars do deep dives into selected topics
- Covers all aspects of mixing with Studio One
 How to Record and Mix Great Vocals in Studio One
The ultimate guide to capturing, producing, and mixing superb vocal performances in Studio One.
- Profusely illustrated, 121-page eBook
- Covers everything from microphones to the final mix
- Tips on creating compelling vocal performances
- Links from contents page to topics
- Filled with practical, real-world examples