Category Archives: Studio One
Multiband Harmonic Tremolo
If you’ve been following the Friday Tip blog posts, then you know two things: I actually use the stuff I write about, and ask “What if?” a lot. Those attributes come together into this post, which is more like a mod of two previous posts.
The March 26, 2018 post was The “Harmonic Tremolo” FX Chain. Unlike a standard tremolo, which does periodic modulation between high and low volume levels, a harmonic tremolo does periodic modulation between high and low frequency bands. In other words, the modulation is frequency-based instead of amplitude-based.
Then on June 3 of this year, the post was Spruce Up Your Mono Guitar’s Image. This split the signal to two Ampire graphic EQs only (no amp and no cab), with their sliders set oppositely—if one band’s slider was up on one graphic EQ, the same band’s slider was down on the other EQ. The result is a stereo image from a mono instrument like guitar or vintage synths. However, this particular effect can also impart some very interesting sounds to pads when you slow the X-Trem speed way down.
The “Aha!” Moment
When using both tips in one project, I wondered what would happen if I inserted the X-Trem from “The Harmonic Tremolo FX Chain” before the Splitter in “Spruce Up Your Mono Guitar’s Image.” Bingo! This creates a multiband harmonic tremolo that sounds pretty darn cool. Simply make the following mods in the June 3 post.
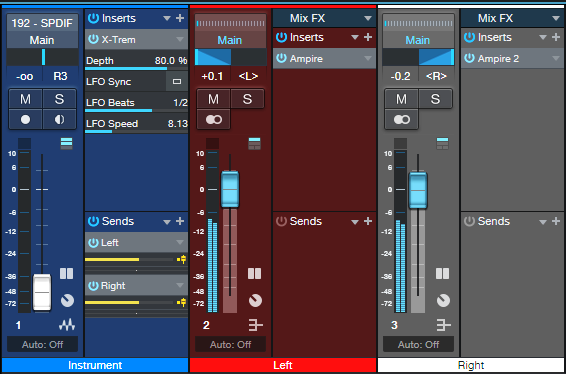
For the Studio One Artist version, which uses pre-fader Sends and Buses, insert the X-Trem into the Instrument track. Choose Pan mode (fig. 1).

The two pre-fader sends from the Instrument track go to two buses hosting their own Ampires, each with the graphic EQ settings shown in the June 3 post. These then feed into the Main Bus (fig. 2). However, note that we can simplify this particular implementation, because we’ll usually want to vary the levels and panning of the Left and Right buses. For example, panning Right to center and Left to hard left spreads the sound from center to left.
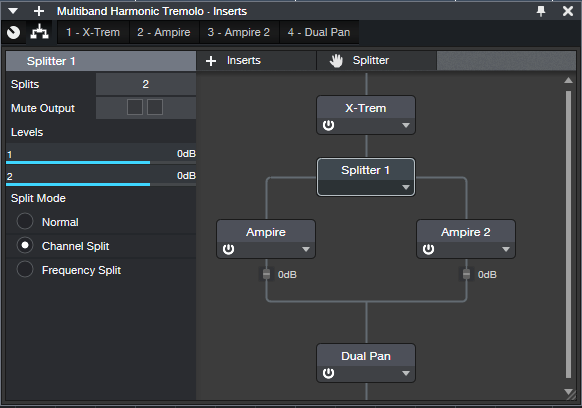
The downloadable Multiband Harmonic Tremolo FX Chain for Studio One Professional doesn’t need a control panel, because it can expose the crucial parameters (X-Trem Depth and Speed, Dual Pan Left and Right controls) when you expand the related plug-ins (fig. 3).

The routing (fig. 4) is the same as for the Harmonic Tremolo in the 2018 post, except that the Ampire graphic EQs replace the two Pro EQs.
That’s all there is to it. If you thought tremolo effects didn’t have any more life to them—this sucker just might change your mind! And I’ve learned that just because there’s a standard definition of what a harmonic tremolo does, that doesn’t mean we can’t invent new approaches.
Download the appropriate FX Chain for your version of Ampire:
Multiband Harmonic Tremolo.multipreset for standard Ampire
Multiband Harmonic Tremolo HD.multipreset for Ampire with the High-Density pack
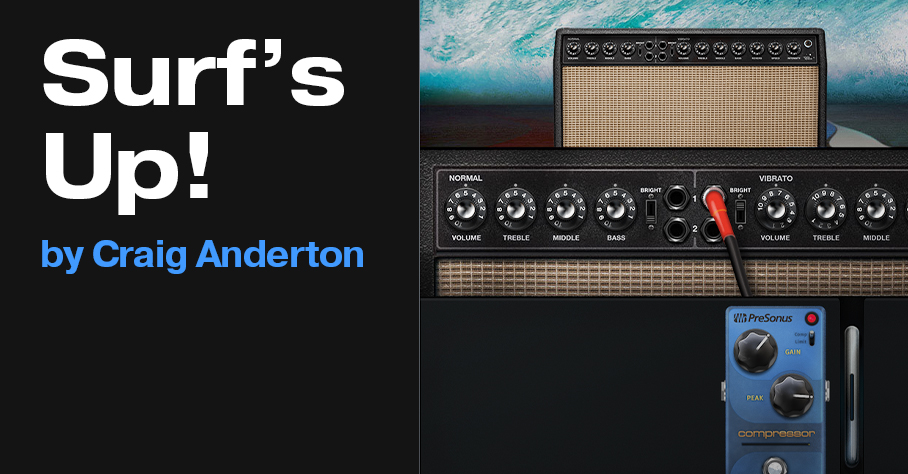
Surf’s Up
The July 4th weekend is approaching, so it’s time to hit the beach—but you can’t have surfing without surf music, right? So before you start scouting for the impact zone, grab your guitar, import the epic downloadable Ampire preset, and play your guitar until you have noodle arms. Surf’s up!
The Surf Sound—Axe
It starts with the guitar, and your playing technique. Ideally, your guitar will have single-coil pickups, a whammy bar, at least .010 gauge strings (preferably a little heavier), and a hard pick to go with the heavy strings. If your guitar doesn’t have single-coil pickups, no worries—check out the Pro EQ-based Friday tip from November 2018, Humbucker to Single-Coil Conversion with EQ.
The Surf Sound—Amp
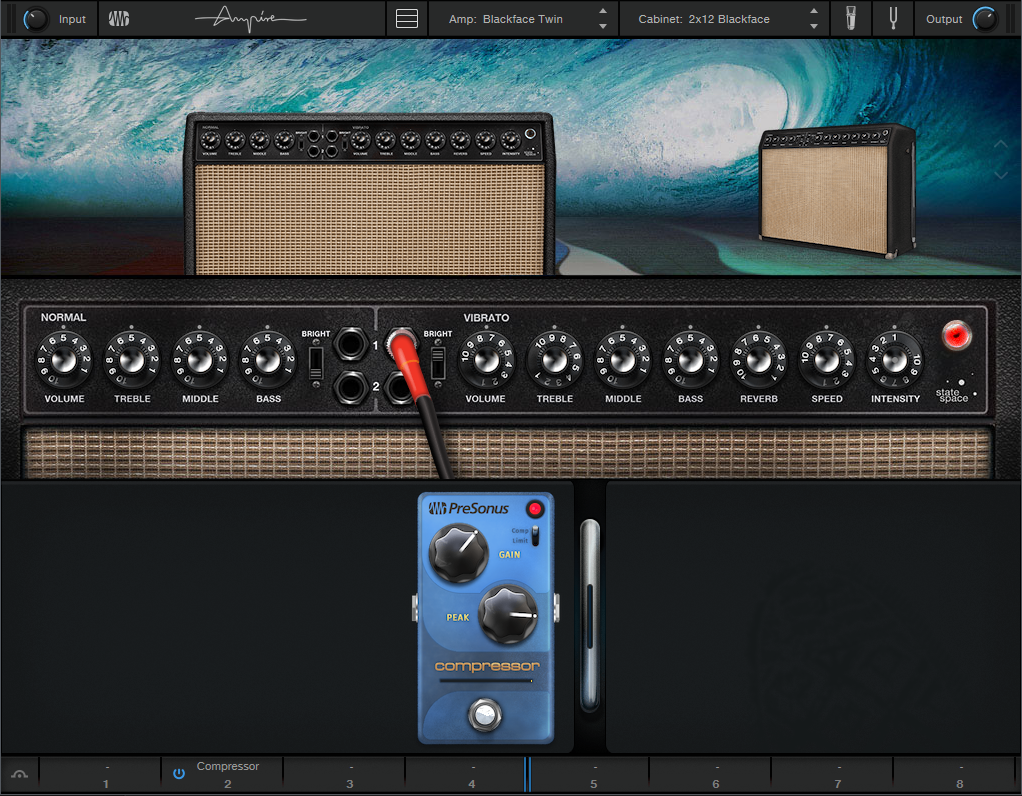
As luck would have it, Ampire has exactly what we need (fig. 1). Surf music wants a clean amp (well, maybe just a hint of distortion), lots of treble, and spring reverb. Tremolo is optional. I also use a compressor before the amp, to bring up decaying strings after playing with the whammy bar.
Check out the audio example, I think it nails that mythical guitar sound. And just to be clear, this isn’t about cultural appropriation of surf music, nor is it a parody. This is a tribute—my high school band opened for the Ventures, and I still think the surf guitar sound represents a unique moment in time. Have fun!
Download the Ampire preset CA Surf Music.preset
Play Faster with Tape Stretch
How to Play Faster—By Playing Slower covered how to slow down tempo of non-MIDI based music without changing pitch. This allows playing a difficult part at a slower speed, and then speeding the part back up to the desired tempo. However, this method may produce artifacts, because time-stretching algorithms aren’t perfect (yet…).
With tape, musicians used variable-speed recorders to implement the same technique. However, because this approach locked pitch and tempo together, slowing down the tempo also lowered pitch. So, you’d need to learn the song in a different key, or retune your instrument to match the lower pitch. Speeding the tape back up to its original tempo sped up the slower overdub, and raised its pitch as well.
Studio One’s “Tape” stretch mode works the same way as variable-speed tape, and unlike other stretch methods, produces zero artifacts. You still need to learn the part in a different key, but sometimes this is a good thing. When you play along at the slower tempo and then speed the part back up again, the instrument’s timbre becomes brighter—which might be just what a song needs. Similarly, you can record at a faster speed, and then slow back down for a sound that’s more like downtuning. What’s more, with stringed instruments, it’s possible to record with a different voicing that might be more effective, or provide additional contrast if you’re layering parts.
How to Do It
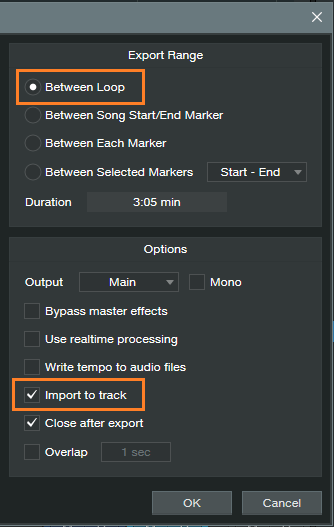
1. Rather than try to slow down an entire Song, position the loop markers at the beginning and end. Choose Song > Export Mixdown to create a premix of the Song. Under Export Range, choose “Between Loop.” Under Options, check “Import to Track” (fig. 1).
2. Mute all Song tracks except the imported premix.
3. Select the premix, and open its Inspector (F4).
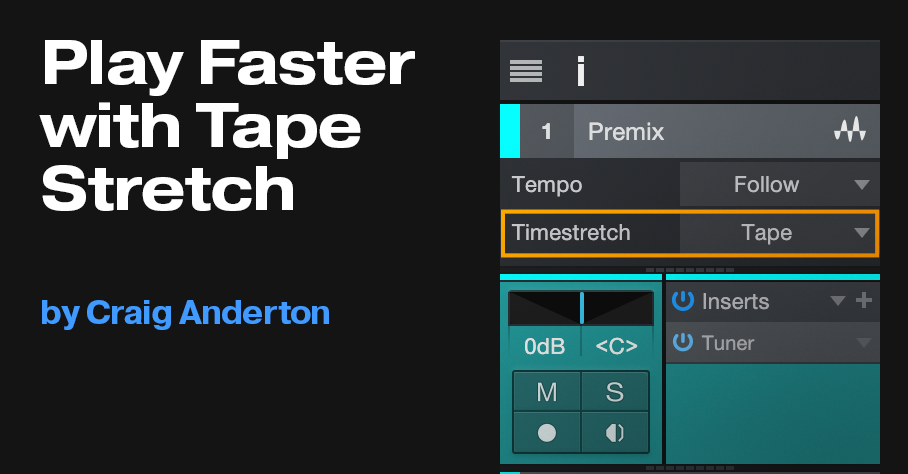
4. For Timestretch mode, choose “Tape” (fig. 2).
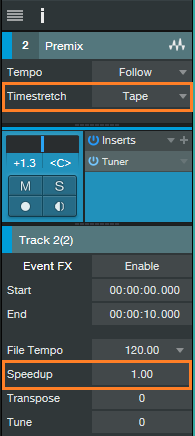
5. Further down in the Inspector, locate the “Speedup” parameter.
6. Enter a Speedup value that “lands” on a key, as shown in fig. 3. For example, a Speedup setting of 0.89089 slows the tempo to 89% of its current value, and transposes pitch down 2 semitones. Enter all 6 digits for correct tuning, even though Speedup displays only 3 digits (Studio One knows the extra digits are there). Hit Return.
7. Create a new track, and record your overdub at the slower tempo, in the different key.
8. When you’re done, make sure your overdub extends to the song’s beginning. If there’s a gap, use the Paint tool to create a blank event that extends from the song’s beginning to the overdub. Select the blank clip and overdub, and then type Ctrl+B to turn them into a single event.
9. Click on the overdub event, and set Timestretch to Tape. transpose it up by as much as it was transposed down. For example, if the track was transposed down 2 semitones, enter a Speedup time of 1.12246 to transpose it back up two semitones. Hit return.
10. Done!

That Vintage Airy Sound
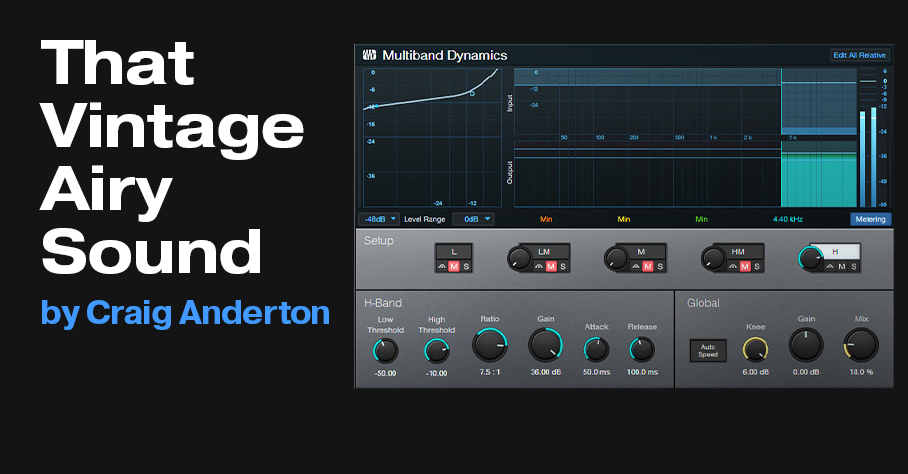
…as in, 10cc’s “I’m Not In Love.” Back in those days, to minimize tape hiss, noise reduction compressed and increased highs when recording, then expanded and reduced highs on playback. Many recordings of that era enhanced the highs on some tracks (especially vocals) by using noise reduction when they printed to tape, but then they didn’t “undo” the sound on playback. Once you’ve heard that sound, you’ll recognize it—a present, bright, yet not overbearingly trebly sound.
You may remember the “cassette,” a primitive form of audio recording invented over half-century ago, and intended for dictation. If so, you may also remember that when you turned off noise reduction, the cassette sounded brighter and more present. It’s the same principle.
How It Was Done
The early days, “studio standard” noise reduction was a broadband unit that applied the noise reduction process in four separate bands. The “hack” was to disable two of the bands, and use only the high bands (basically, shelving EQ around 3 and 9 kHz) to compress and increase highs.
But the reason why this worked so well is because lower-level, high-frequency signals were compressed the most. The higher the level, the lower the compression ratio. This is why the treble increase wasn’t overbearing when you used noise reduction to enhance the highs. Amazingly, we can obtain a very similar effect with stock plug-ins.
How to Do It
We’re not constrained to trying to sound like the original hardware unit, so we can optimize our approach for musical applications in Studio One instead of noise reduction with tape recorders. The Multiband Dynamics plug-in is well-suited for the “more-compression-at-low-levels” trick (fig. 1).
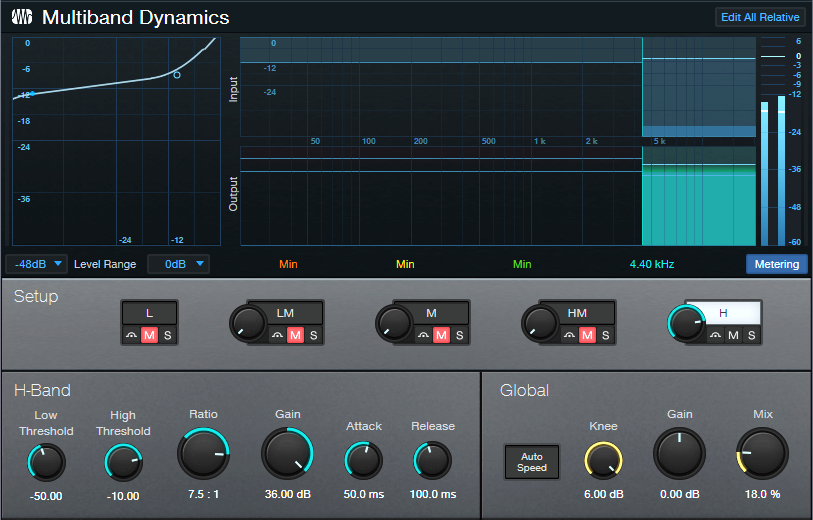
As the curve shows, there’s a lot of compression at lower levels, but as the input gets higher, the ratio approaches 1:1. That’s exactly the effect we want. A maximum Knee setting makes for a smooth transition along the compression curve.
These are not necessarily the optimum settings for your application, so feel free to experiment. My intention was to create settings that avoided having too much or too little of a compression curve.
The Mix control determines the amount of the effect. Note that the Low Threshold, High Threshold, and Ratio controls all interact. The settings shown (which are also used in the downloadable preset) worked for me and give a pretty obvious effect. For something more subtle, set the Ratio to 3.0:1, and the Low Threshold to around -63. As to the preset, after downloading, import it into the Multiband Dynamics, or just drag it on top of the plug-in’s interface.
Anyway, hearing is believing, so listen to the audio example. I’ve added a fair amount of the effect so that it’s obvious. In a full mix, you might use less. The following audio demo alternates between an unprocessed version and processed version. The sounds are choir, 12-string guitar, vocal, and piano. I dug up a scratch vocal with loud sibilants because it really gets the point across—the sibilants are not more pronounced in the processed version, even though the overall sound is much brighter. Also, the piano is interesting. The portions with soft dynamics still have increased brightness, but the brightness doesn’t get out of hand when the dynamics hit hard (which even when unprocessed, are brighter anyway). You can hear the music these came from at youtube.com/thecraiganderton.
So download the preset, drag it to your Multiband Dynamics, and…be happy you didn’t have to buy a piece of hardware to get this sound!
Download the CA_Vintage Airy preset here!
5 Mai Tai Tips & Tricks

We already covered Mai Tai’s FM synthesizer secret identity—but that was the start of “fun things to do with Mai Tai,” not the end. Here are five more Mai Tai tips, along with a couple bonus presets you can import.
1. The Character section. If you didn’t get into this feature, maybe it’s because you tried the top three options, thought “whatever,” and moved on. But this section doesn’t start hitting its stride until you get to CharacterSaw, Subvox, Talky, and Voxil, with honorable mention going to the bottom five options. The associated Sound and Amount parameters are the key to creating versatile variations (the effects are most pronounced with Amount between halfway and all the way up). Do yourself a favor: loop a big fat sawtooth chord, and play around with the Character section controls to hear what they do.
2. Random Phase. Enabling RP emulates the analog synth characteristic where an oscillator doesn’t always start from the same point when you press a key. With the two oscillators panned to center, this produces some mild timbral differences—but the magic happens when you enable RP for both oscillators, and pan them hard left and right. Put on headphones, and the slight differences between the two waveforms create animated psychoacoustic motion inside your head.
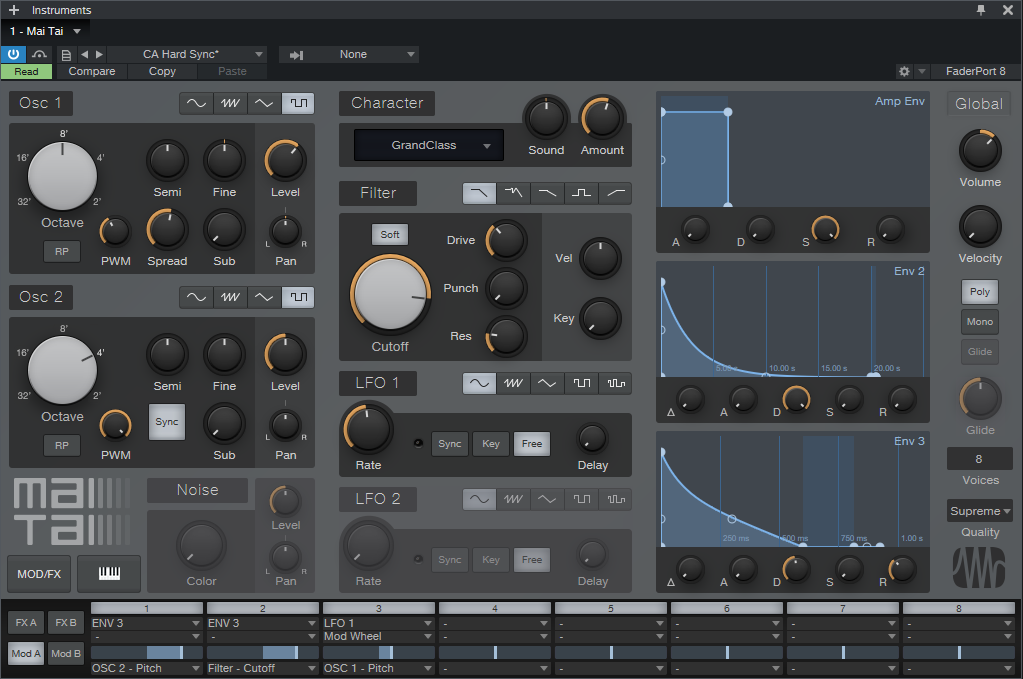
3. Hard sync. The Sync button in Osc 2 produces this classic synth effect, but be aware that:
- Osc 2’s Octave range must be equal to, or higher than, Osc 1.
- For the smoothest sync sweep sound, modulate Osc 2’s pitch with an envelope rather than modulating the Semi control.
Import the preset CA Hard Sync.preset (fig. 1), which is just waiting to be customized. Change the Osc 2 octave, edit the Env 3 shape that goes to the Osc 2 Pitch, try different PWM settings, see what else the Character and Filter sections can do…there are a lot of options.
4. You can automate almost anything, including the effects. Automating the Character section’s Sound and Amount controls can add ever-changing timbral variety, although it also reminds me that I really wish Studio One’s Paint tool could draw smoothed random waveforms. However, I do like to use the Paint tool to draw square wave modulation, and automate the Osc 2 Semi parameter when doing hard sync. This flips the sound between two timbres, like a crazy sample-and-hold.
5. The Modulation Matrix. My “Faux Feedback” preset (fig. 2) depends on the modulation matrix, and emulates what happens with electric guitar as feedback starts to build up.
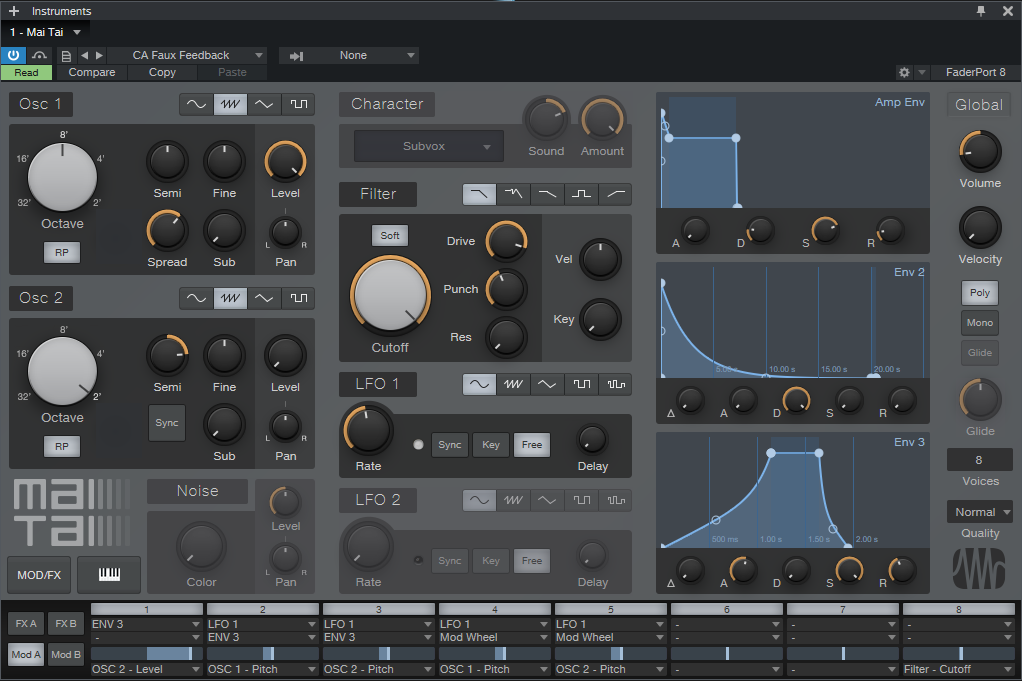
The interesting programming aspects are:
- Osc 2 is tuned an octave and fifth above Osc 1. This produces the feedback “whine.”
- To bring in feedback as the note develops, Env 3’s slow attack increases Osc 2’s Level. If you’re impatient and want the feedback to come in sooner, shorten the attack time.
- Env 3 also applies vibrato to both oscillators as the feedback comes in. Guitar players often add vibrato as the string sustains.
- If you want manual control over vibrato, the Mod Wheel introduces vibrato in parallel with Env 3’s delayed vibrato.
Import the CA Faux Feedback.preset, and play slowly at first—hold the note until the “feedback” appears, because this will give you a feel for how the sound develops. Don’t forget to include a lot of pitch-bending action when doing single-note solos (although the preset also sounds good with chords). And there are plenty of opportunities for customization…so have at it!
Download the CA Hard Sync.preset
Download the CA Faux Feedback.preset
Spruce Up Your Mono Guitar’s Image
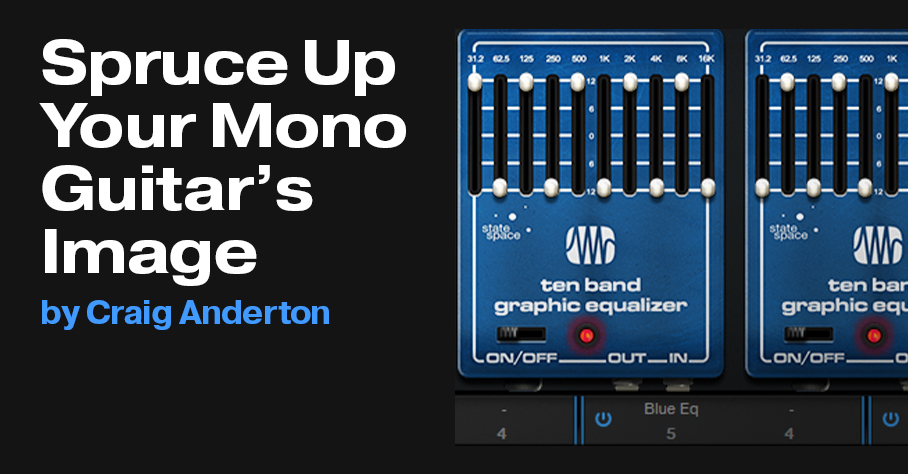
Almost all guitars, and many vintage keyboards, have mono outputs—but when it comes to recording and mixing, it’s a stereo world. Ooops. Although you can always follow guitar with a stereo effect (like reverb or chorusing) to create a stereo image, the guitar itself is still mono. You can also do tricks with time delays or phase changes, but these usually produce comb filtering, and don’t collapse well to mono.
So, here’s a solution for giving your guitar a stereo spread that collapses back into mono without any problems. As a bonus, once you’ve converted the guitar to stereo, you’ll also get the most out of any stereo effects that follow it.
The Secret Sauce
This technique works in Studio One Artist, but at the end, we’ll also cover a tidier alternative for Studio One Professional. The stereo image comes from splitting the guitar into two parallel Ampire Blue EQs. The EQ sliders are set to equal and opposite positions so that when one EQ’s band is boosting, the same band on the other EQ is cutting, and vice-versa (fig. 1). Panning one Graphic EQ to the left and the other to the right splits the frequencies into different channels, which creates the stereo image.
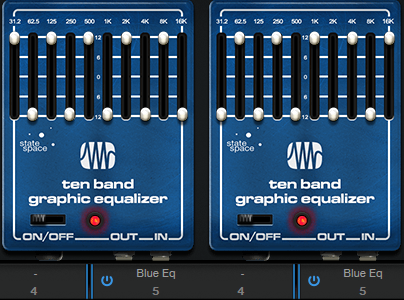
If all you want is the stereo image, bypass the Ampire amps and cabinets. But wait—there’s more! If you set up different amps and cabs in the two channels, you’ll have a gorgeous stereo “stacked’ amp setup. Note that the graphic EQs will affect the amp’s tone; you’ll have a different sound depending on whether the EQs precede or follow the amp+cab. See which option you like best.
Routing and Setup
Referring to fig. 2, the guitar track has two pre-fader sends, which send the guitar’s audio to two buses (these buses become the left and right channels). Each bus has an Ampire inserted, with the graphic EQ settings shown in fig. 1.
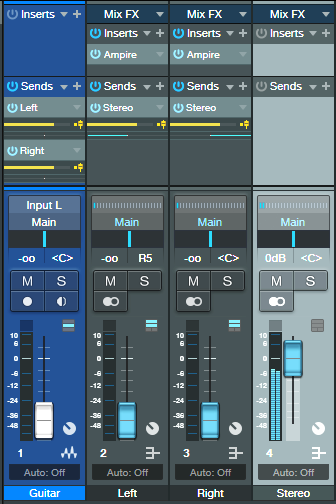
The two buses go through their own pre-fader sends, with one send panned left and the other panned right. The sends end up at the last bus in the setup, which provides the final stereo guitar signal.
Note that with this setup, you can also “weight” the stereo image more to one side. For example, pan the left channel’s send left, but the right channel’s send to center. Now the guitar will sound like it’s coming more from the left channel. Because the panning isn’t acting like a typical stereo pan control (which is really a balance control), both channels are equally prominent—they’re just mixed together.
Studio One Professional Version
With Professional, you can build all of this into an FX Chain (fig. 3) that inserts in your guitar’s track.
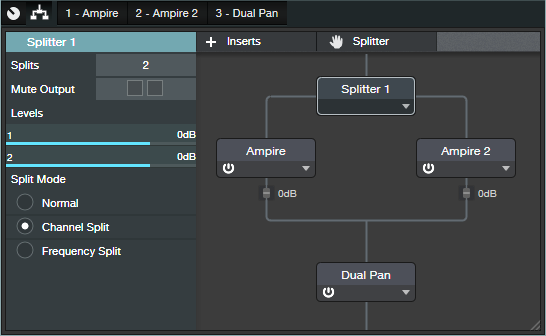
The Splitter, in Channel Split mode, splits the guitar into left and right channels. Each has the same Ampire setup described earlier (only graphic EQs, or graphic EQs with amps and cabs). The Dual Pan is optional. Because we’re not using pannable sends, the Dual Pan allows the kind of weighting described previously, where you can tilt the image more to the left or right side.
And now, guitar players of the world—go forth and stereo!
Mixmaster Magic FX Chain
This Main bus FX chain is all about an easy-to-adjust, useful set of controls for processing a stereo mix (or other buses, like background vocals or drums). Want more kick? More voice? Add some “fairy dust”? Widen the mix? Make it louder? No problem.
This doesn’t substitute for a final, deeply-thought-out mastering chain…or maybe it does, depending on what your mix needs. In any event, insert this chain in your Main bus, and I think you’ll like how it can spice up a mix. (Note: although designed for Studio One Professional, you can apply the same concept in Studio One Artist by using buses to “deconstruct” the chain.)

Default Settings
Fig. 1 shows the settings used in the audio example. However, the default initial setting for all controls is fully counter-clockwise, except for the Master Out. When it’s centered, and the controls are at their defaults, you’ll hear the same level whether you enable or bypass the FX Chain. Here’s what the controls do:
- Louder: Lowers the Limiter Threshold from 0 to -6 dB. You won’t win the loudness wars, but this gives a tasty boost to the average level.
- More Center: The FX Chain uses mid-side processing. The More Center control boosts the mid component by 0 to 3.5 dB, so turning it up will typically give you more voice, bass, kick, snare, and anything else that’s panned to center.
- More Sides: Boosts the sides by 0 to 9 dB. Turning this up widens the stereo image.
- More Kick: Bass boost at 65 Hz, 0 to +6 dB. Turn up for more low-end punch.
- Less Mud: Cuts at 300 Hz, from 0 to -5 dB. If your mix sounds muddy, turn this up to reduce mud.
- More Voice: Boosts at 3.2 kHz, from 0 to 4.8 dB. Turn up for more intelligible vocals, and to add some zing to midrange instruments (like acoustic guitar).
- Fairy Dust: Boosts at 9 kHz, from 0 to 9 dB (with a fairly narrow Q). Be sparing—use this power only for good.
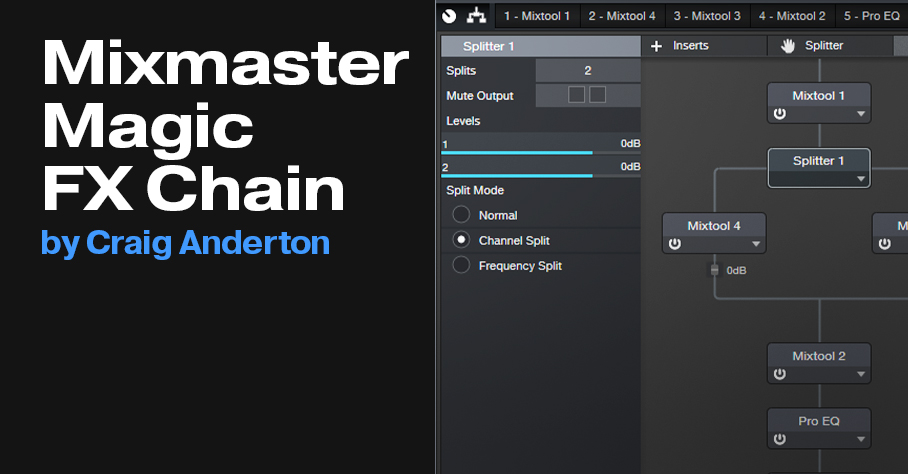
FX Chain Block Diagram
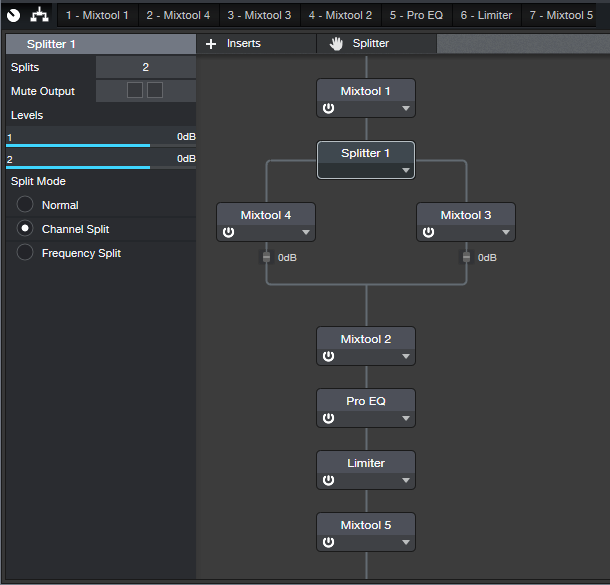
Here’s what the various processors do:
- Mixtool 1: Transforms the input into mid/side audio.
- Splitter: Sends the Mid audio to Mixtool 4, and the Sides audio to Mixtool 3. Altering their gains alters the mid and sides level, respectively.
- Mixtool 2: Transforms the mid/side audio back to stereo.
- Pro EQ: Uses four stages to control the kick, mud, vocal, and “fairy dust” frequencies.
- Limiter: Increases the average level.
- Mixtool 5: Compensates for the lower level going through the FX chain by adding a 6 dB boost.
To hear what kind of difference this chain can make, here’s a short before-and-after excerpt from We Are Looping. The first half bypasses the FX Chain, while the second half uses the control settings in fig. 1. Both sections are normalized to the same peak level.
And of course, you’ll want to download the FX Chain—so go grab it!
Download the Mixmaster Magic FX Chain here
Studio One’s FM Synthesizer

On the surface, Mai Tai is an easy-to-program, fine-sounding virtual analog subtractive synthesizer. But let’s dig deeper—and unlock its unique FM synthesis talents (fig. 1).
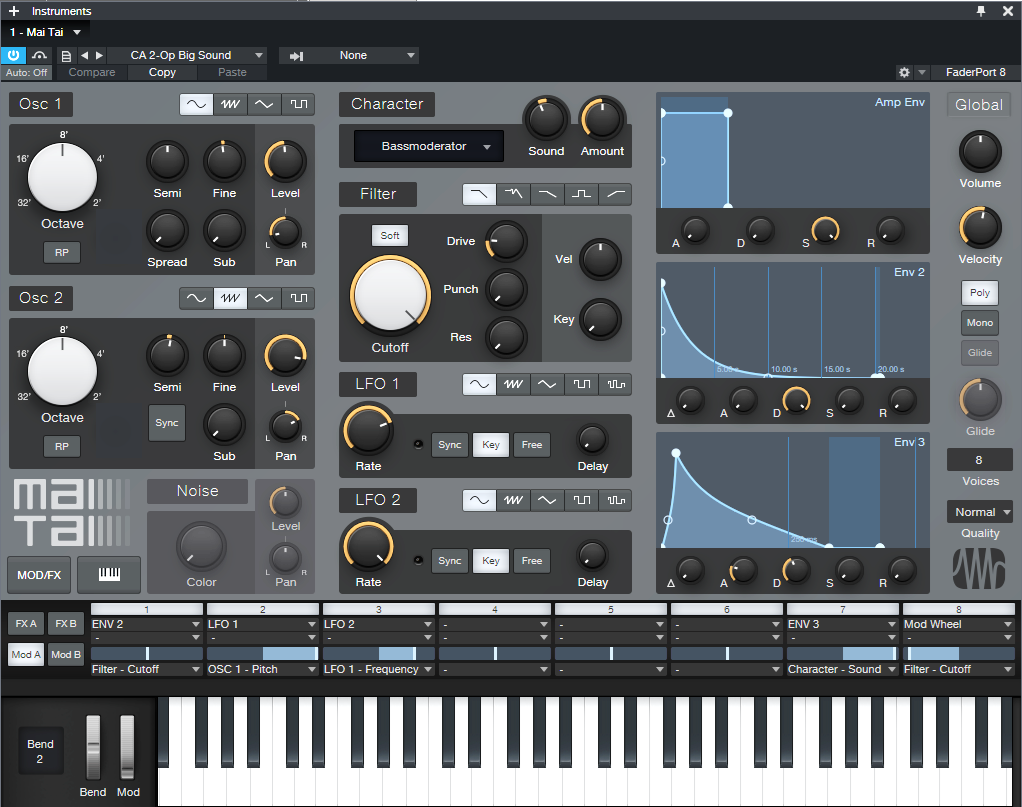
Mai Tai FM synthesis is possible because the LFOs go up to 8 kHz, and can also track the keyboard. So, using an LFO in the audible range to modulate oscillator pitch provides the basics of FM synthesis. What’s more, LFO 2 can modulate LFO 1’s frequency, which allows for 2-operator FM synthesis. However, note that you’ll probably want to use either the 80s or Normal quality setting. Oversampling with the High or Supreme settings can add more unpredictability because of the higher bandwidth…but then again, it can also add interesting variables.
For basic FM synthesis , try this: set Osc 1 to a sine wave. Set LFO 1’s waveform to sine, and enable its Key button. Assign LFO 1 to modulate Osc 1, and turn up modulation all the way. Vary the LFO frequency control in the audio range, and you’ll be greeted with a huge variety of bell and chime-like effects. Then, throw some delay and reverb on it—instant ambient sounds.
You can also try other LFO waveforms, but let’s take this further. Turn up Osc 1’s Spread control past 80%, and you start to enter a world of tremolo and psycho-acoustic panning. Note that the following audio example uses no effects—just a long release time on the amplitude envelope. Changing the modulation depth gives wildly different sounds; for the next audio example it’s up about halfway.
Let’s do one more “nice” sound before we get nasty. This uses the LFO to modulate Osc 1’s Pan instead of pitch, which creates a stereo image from Osc 1’s output.
Okay, it’s time for some sci-fi sound design. Here’s what happens when you modulate both Osc 1 Pitch and Pan, choose Sawtooth for Osc 1 and LFO, turn up Spread, and bend pitch up. Again, there are no effects.
How about a nasty bass? The previous presets are all simple, but this one brings in another oscillator, adds envelopes for both the filter and VCA, and overlays a hint of distortion. Rather than take up the space to describe the parameters, you can just download the CA Nasty Bass.preset.
Note that for “pitched” sounds, the LFO setting is quite critical. Sometimes, offsetting the pitch for the Osc the LFO is driving can fine-tune the preset.
Finally, here’s a 2-Operator FM preset, where LFO 1 is modulating Osc 1, and LFO 2 is modulating LFO 1. Feel free to download the preset, I think it’s a pretty cool sound.
However, tuning is extremely tricky when one LFO is modulating another. This preset plays back 1 semitone sharp compared to concert pitch—sorry. Of course, there are plenty of ways to transpose it, either by shifting your controller down a semitone, or transposing the rendered audio. Like most FM synth presets, when you find something you like, save it! You may never find it again, and changing just one parameter might bring the whole house of cards falling down.
Now go have fun with your shiny new FM synth…that’s been around since Studio One 3 😊
Download the CA Nasty Bass preset here!
Download the CA 2-Op Big Sound here!
PreSonus Sound: Chiara Luzzana
“I don’t need a musical instrument when life plays the best notes”
Chiara Luzzana (2022)
We at PreSonus are extremely thrilled to hear and see Chiara Luzzana put her unique spin of sampling and *PLAYING* our hardware and software products musically in the creation of her performance video above. This performance was captured and edited using recordind software / DAW Studio One. Learn more about Studio One here.
Be sure to also watch her accompanying behind-the-scenes video (below) to learn how she hears and creates sound compositions from objects found in her world!
Chiara talks about her love of the Analog Delay and the Ampire Pedalboard plug-ins in the behind the scenes video around 4:58 and 7:01 respectively.

Chiara is a highly innovative and visionary sound designer. She designs the sound of the most important brands in the world.
She has defined a real compositional method, unique in the field of sound branding. As a kid, she studied guitar, clarinet and piano, but something in that method of teaching blocked her creativity. As she developed into an eclectic artist, she wanted to break the rules imposed by musical notation, to create music starting from noise to create visionary soundtracks.

As a former student at Berkelee College of Music, Chiara investigated how the brain reacts to sounds and vice versa, in order to structure every project with a specific mission.
Her sound works are a journey into the soul and psycho-acoustics, not just music.
She studied to become an audio engineer in 2005, and has collected certifications and specializations in every field, from the neurobiology of musical cognition to the construction of microphones, to nourish her obsessive passion regarding every single detail related to sound.
Chiara made use of the ATOM SQ in this production (seen at :50 and 2:04 in the performance video) both as an instrument and as a performance tool to trigger sounds created in Studio One. Learn more about the power of the ATOM SQ
“It is in the noise and in its harmonious imperfection that my creativity finds inspiration”
Chiara Luzzana (2022)
Chiara is also a public speaker from the Italian and foreign stages; through talks and sound performances, she tells the importance of sound in communication and in everyday life.
Chiara has made more than 100 talks from 2015 to today, including an invitation as a speaker to the Senate of the Italian Republic, several TED talks, and was even shared the same stage with Elon Musk, at Tech Week 2021.
Her workshops are held in Milan and Shanghai.
Winner of the “Muse Creative Award” 2017 for the “Best Soundtrack”. Winner of the “Muse Creative Award” 2019 for the “Best Sound Project”. Finalist of “Music + Sound Award” in 2016. Winner of “Best Soundtrack” for the Sandretto Re Rebaudengo Foundation.
Capturing The UNLV Symphonic Wind Ensemble with Quantum 2626 and Studio One
“The way I found out about Studio One and PreSonus: I had lunch with Bob Moses (president of the Audio Engineering Society at one time)… and I asked him some questions about what he would recommend: what company was reliable, had integrity and specifically he said ‘you should look at PreSonus’ so that’s what I came away with”
Kevin Paez, Musician/Audio Engineer @bunnytonemusic (2022)
Under the musical direction of Conductor, Thomas Leslie and the production team of Wendell Yuponce, executive producer, David Garcia, recording engineer and mixer and Kevin Paez, assistant recording engineer; the award winning University of Nevada at Las Vegas (UNLV) Symphonic Wind Ensemble recently worked with special guest artists: John Patitucci (Chick Corea, Part Metheny, Herbie Hancock, numerous others), Eric Marienthal (Chick Corea, Elton John, Billy Joel, numerous others), Mitchell Forman (Phil Woods, Carla Bley, Wayne Shorter, numerous others) and Bernie Dresel (Count Basie, Maynard Ferguson, Woody Herman, numerous others) and have recently completed initial tracking of a new recording project with a slate of all new wind orchestra works.
PreSonus Studio One DAW and Quantum 2626 audio interface captured the creative musical magic that flowed out over the span of nine days as the musicians tracked live onstage at the Artemus W. Ham Concert Hall on the UNLV campus.
This musical collection was commissioned to highlight the groundbreaking curriculum at the UNLV Wind Studies Department, which has an extensive history in expanding the repertoire of wind orchestra compositions and allowing students within the program the unique opportunity to interact with living composers of note while adding to the overall evolution of musical expression within the field of wind orchestra.