Category Archives: Studio One
Control Ableton as a ReWire Client with ATOM SQ

It’s not surprising a lot of Studio One users also have Ableton Live, because they’re quite different. I’ve always felt Studio One is a pro recording studio (with a helluva backline) disguised as software, while Ableton is a live performance instrument disguised as software.
Fortunately, if you like working simultaneously with Live’s loops and scenes and Studio One’s rich feature set, Studio One can host Live as a ReWire client. Even better, ATOM SQ can provide full native integration with Ableton Live when it’s ReWired as a client—once you know how to set up the MIDI ins and outs for both programs.
Studio One Setup
- Under Options > Advanced > Services, make sure ReWire Support is enabled.
- Insert Ableton Live (from Instruments > ReWire). Click “Open Application” in the dialog box, but if Live won’t open (it doesn’t for me), open Live manually. Note that Live must be version 10.1.15 or higher.
- In Studio One, go Options > External Devices. Click on ATOM SQ, and then click on Edit.
- Select None for both Receive From and Send To. Click OK, then click OK again to leave the Options menu.
- In the ReWire track, set the MIDI input to ATOM SQ so that ATOM SQ’s knobs can control Ableton Live.

Ableton Live Setup
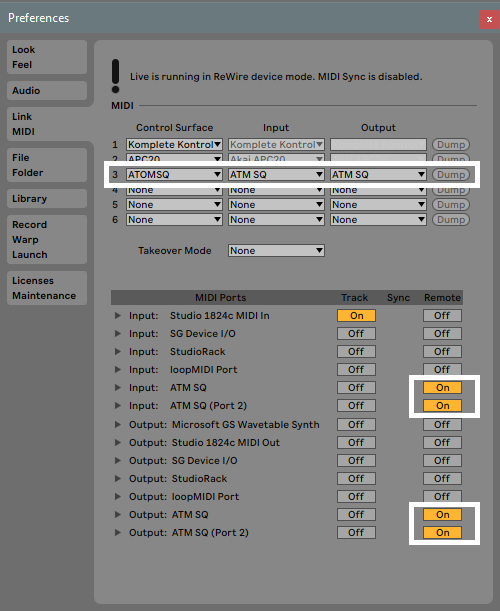
- Choose Options > Preferences > Link MIDI tab.
- Set the MIDI and Ports connections as shown.
Now ATOM SQ will act as an integrated controller with Ableton Live while it’s ReWired into Studio One. Cool, eh?
Returning to Studio One
To return control to Studio One, reverse the process—in Live, set Control Surface to None, and toggle the MIDI Ports that relate to ATOM SQ from On to Off. In Studio One’s Options > External Devices, For ATOM SQ, reconnect ATOM SQ to Receive From and Send To.
Note that with ATOM SQ controlling Studio One, the Transport function still controls both Live and Studio One. Also, if Live has the focus, any QWERTY keyboard assignments for triggering Clips and Scenes remain valid. So even while using ATOM SQ in the native mode for Studio One, you can still trigger different Clip and Scenes in Live. If you switch the focus back to Studio One, then any QWERTY keyboard shortcuts will trigger their assigned Studio One shortcuts.
Note: When switching back and forth between Live and Studio One, and enabling/disabling Studio One and Ableton Live modes for ATOM SQ, to return to Live you may need to “refresh” Live’s Preferences settings. Choose None for the Control Surface and then re-select ATOM SQ. Next, turn the various MIDI Port options off and on again.

Learn more about the ATOM SQ here!
Studio One 5’s Tape Emulator
Although Studio One 5 doesn’t have a tape emulator plug-in per se, it can emulate some of the most important characteristics that people associate with “the tape sound.” Truly emulating tape can go down a serious rabbit hole because tape is a complicated signal processor; no two vintage tape recorders sounded the same because they required alignment (influenced by the engineer’s preferences), used different tape formulations, and were in various states of maintenance. However, emulating three important characteristics provides what most people want from tape emulation.
- Tape saturates, which rounds off waveform peaks and affects dynamic range. This gives a higher average level, which is part of why tape sounds “punchy.”
- Head “bump.” The frequency of a bass range peak (around 2 dB) depends on the tape speed and the tape machine. At 15 IPS, a typical peak is in the 40-70 Hz range, and at 30 IPS, in the 70-150 Hz range. However, at 30 IPS, the bass response drops off below the bump—sometimes drastically, sometimes gently. Even though in theory 30 IPS offered better fidelity, many engineers preferred to work at 15 IPS due to the bass response characteristics (and they saved money by using half as much tape for the same recording time).
- Tape is a flawed recording medium that trades off noise, high-frequency response, and distortion. For example, some engineers aligned their machines to underbias the tape, which increased distortion but gave more highs; other engineers did the reverse and made up for the lack of highs with subsequent equalization.
Check out the audio example to hear what this FX Chain can do. The first part is unprocessed, while the second part uses the default FX Chain control settings with a little underbiasing and head bump. The difference is subtle, but it adds that extra “something.”
The Tape Emulator FX Chain
This FX Chain starts with a Splitter, which creates three signal paths: one for saturation, one for hiss, and one for hum (Fig. 1).
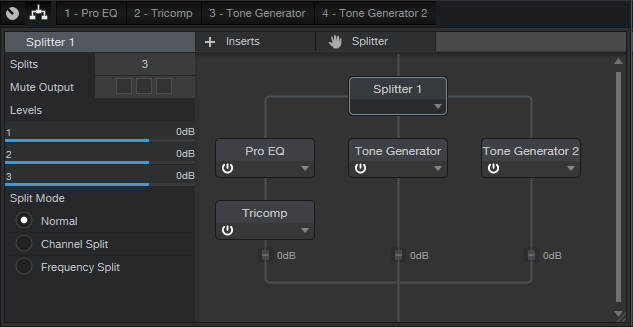
Figure 1: FX Chain block diagram.
After auditioning all available Studio One 5 saturation options, I liked the TriComp best for this application. The Pro EQ stage preceding the TriComp provides the head bump EQ and has a control to emulate the effect of underbiasing tape (more highs, which pushes more high-frequency level into the TriComp and therefore increases distortion in that range) or overbiasing (less highs, less distortion).
At first, I wasn’t going to include tape hiss and hum, but if someone needs to use this FX Chain for sound design (i.e., an actor starts a tape in a theatrical production), then including hiss and hum sounds more authentic. An additional knob chooses 50 or 60 Hz hum, which represents the power standards in different countries. (Note that the closest you can get to these frequencies is 50.4 and 59.1 Hz, but that’s good enough). However, I draw the line at including wow and flutter! Good riddance to both of them.
Because creating three splits reduces each split’s level, the TriComp Gain control provides makeup gain.
Turning Bump on adds a boost at the specified frequency, but also adds a 48 dB low-cut filter around 23 Hz to emulate the loss of very low frequencies due to the head bump. As a result, depending on the program material, adding the bump may increase or decrease the total apparent bass response. For additional flexibility, if you turn Bump Amount down all the way, the Bump On/Off switch enables or disables only the 48 dB/octave low-cut filter.
Fig. 2 shows some typical spectra from using the FX Chain.
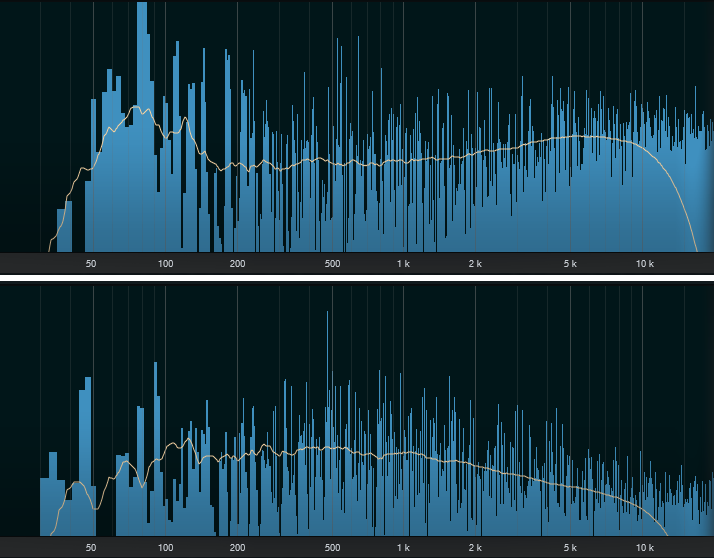
Figure 2: The top curve shows the head bump enabled, with underbiasing. The lower curve shows minimal added bump, but with the ultra-low cut filter enabled, and overbiasing.
Roll Tape!
The controls default to rational settings (Fig. 3), which are used in the audio example. But as usual with my FX chains, the settings can go beyond the realm of good taste if needed.
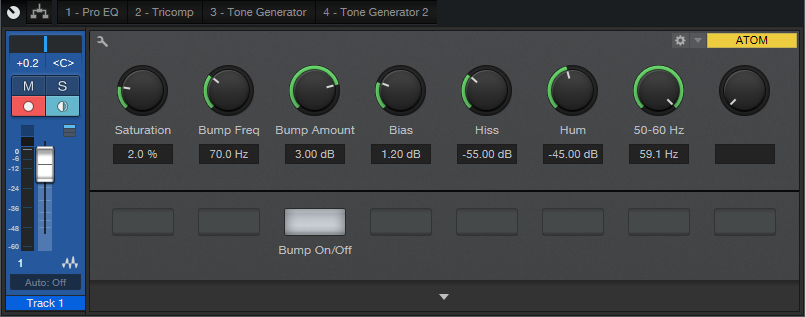
Figure 3: Control panel for the Tape Emulator.
For example, I rarely go over 2-3% saturation, but I know some of you are itching to kick it up to 10%. Ditto tape hiss, in case you want to emulate recording on an ancient Radio Shack cassette recorder—with Radio Shack tape. Just remember that the Bias control is clockwise to overbias (less highs), and counter-clockwise to underbias (more highs).
There’s a lot of mythology around tape emulations, and you can find some very good plug-ins that nail the sound of tape. But try this FX Chain—it may give you exactly what you want. Best of all, I promise you’ll never have to clean or demagnetize its tape heads.
Download the Tape Emulator.multipreset here!
What’s New in Studio One 5.1
Studio One 5.1 has arrived! This update is free to PreSonus Sphere members, or anyone else who owns Studio One 5—Artist or Professional editions. Fire up Studio One and click “Check for Updates” to get it!
This update addresses many user requests, particularly in the realms of composition and notation, but if you’re less old-school and more no-school, don’t fret! We’ve got plenty of updates for you including Retrospective Record, External Instrument support for the Show Page, and a ton of workflow streamlining. All are detailed below.
1. Score Printing
Version 5.1 adds score printing to Studio One Professional. Scores and individual parts can now be printed directly from Studio One! Printing is supported for any number of tracks, from single instruments to full orchestral arrangements. Several other composition enhancements along with Score Printing are featured in this video:
2. Retrospective Recording
Never miss another great song idea again! Retrospective Recording captures everything you play on your keyboard or controller—even without hitting record! It works invisibly in the background on a track-by-track basis.
3. Powerful Track/Channel search and filter options
Managing large projects with a huge track and channel count is now faster and easier than ever with the addition of powerful search and filter options.
4. Bypass option for Clip Gain Envelopes
Clip Gain Envelops can now be bypassed from the Event context menu and the Event Inspector, making it quick and easy to compare the result of your Gain Envelopes without losing any of your adjustments.
5. Combined Time/Key Signature Track
The Score View will reflect any Key Signature changes added to Studio One’s new Signature Track. These will also transfer to Notion when sending a score between applications.
6. Secondary Timeline Ruler option
View minutes:seconds with bars and beats at the same time! A must for film composers.
7. Global Tracks in Editors
Global Tracks can now be displayed inside Editors and used as guides when editing audio or Note Events in Piano View and Drum View.
8. External Instruments support on Show Page
External MIDI instruments are now supported using Virtual Instrument Players. Patches can include program change and bank change messages so you can control an entire MIDI rig from your Show!
9. Ampire/Pedalboard Update
Drag and drop stompbox settings between Ampire and Pedalboard, so go ahead and steal that Big Fuzz tone from your guitarist… we won’t tell!
10. TONS of Extended Integration with ATOM controller
Note Events in the Pattern Editor are now colorized to match the pad colors in Impact, ATOM and ATOM SQ, so you always know which sound is being triggered and which pad is controlling it. And there’s a new library of inspirational drum patterns and variations patterns in Musicloops format for easy, drag-and-drop saving and export.
Too much to list!
Studio One 5.1 is a significant update and is free to owners of Studio One 5 Artist and Professional. Click here for the full change log, and click “Check for Updates” in Studio One’s start page to get all these new features now!
How to Make Spotify Happy

With physical audio media in its twilight, streaming has become the primary way to distribute music. A wonderful side effect has been the end of the loudness wars, because streaming services like Spotify turn levels up or down as needed to attain a specific, consistent perceived level—squashing a master won’t make it sound any louder.
However, the “garbage in, garbage out” law remains in effect, so you need to submit music that meets a streaming service’s specs. For example, Spotify prefers files with an LUFS of -14.0 (according to the EBU R128 standard), and a True Peak reading of -1.0 or lower. This avoids adding distortion when transcoding to lossy formats. If the LUFS reading is above -14.0, then Spotify wants a True Peak value under -2.0.
Fortunately, when you Detect Loudness for a track on the mastering page, you’ll see a readout of the LUFS and LRA (a measure of overall dynamic range), as well as the True Peak, RMS (average signal level), and DC offset for the left and right channels. Fig. 1 shows an example of the specs generated by detecting loudness.
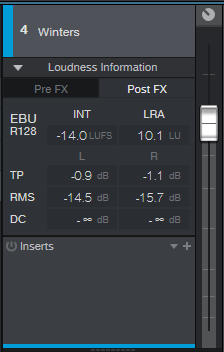
Figure 1: Although the LUFS reading meets Spotify’s specs, True Peak doesn’t, and the RMS value of the left and right channels isn’t balanced.
Note that this hits Spotify’s desired LUFS, but the left channel’s True Peak value is higher than what’s ideal. This readout also shows that the average RMS levels for each channel are somewhat different—the left channel is 1.2 dB louder than the right one, which also accounts for the higher True Peak value. This may be the way the artist wants the mix to sound, but it could also indicate a potential problem with the mix, where the overall sound isn’t properly centered.
A simple fix is to insert a Dual Pan into the Inserts section. Use the Input Balance control to “weight” the stereo image more to one side for a better balance. After doing so and readjusting the LUFS, we can now give Spotify exactly what it wants (Fig. 2). Also note that the left and right channels are perfectly balanced.
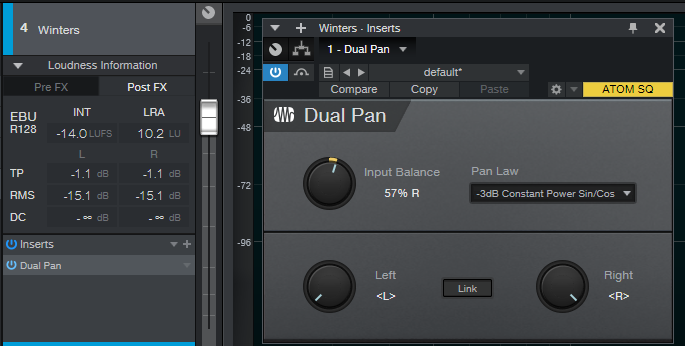
Figure 2: The True Peak and RMS values are now identical, so the two channels are more balanced than they were without the Dual Pan.
A Crucial Consideration!
You don’t want to mix or master based on numbers, but on what you hear. If you set up Dual Pan to balance the channels, make sure that you enable/bypass the plug-in and compare the two options. You might find that balancing the left and right channels not only accommodates Spotify’s requirements, but improves the mix’s overall balance. If it doesn’t, then leave the balance alone, and lower the track’s overall output level so that True Peak is under -1.0 for both channels (or under -2.0 for LUFS values above ‑14.0). This will likely lower the LUFS reading, but don’t worry about it: Spotify will turn up the track anyway to reach -14.0 LUFS.
Coda: I always thought that squashing dynamic range to try and win the loudness wars made listening to music a less pleasant experience, and that’s one of the reasons CD sales kept declining. Does the end of the loudness wars correspond to the current music industry rebound from streaming? I don’t know… but it wouldn’t surprise me.
My Craziest Mastering Salvage Job (So Far)

My mastering specialty is salvage jobs, which has become easier to do with Studio One. But this gig was something else.
Martha Davis’s last solo album (I Have My Standards, whose mastering challenges were covered in this blog post) has done really well. Since the pandemic has sidelined her from touring as Martha Davis and the Motels or going into the studio, she’s releasing a new song every month online. These involve excellent, but unreleased, material.
That’s THE good news. The bad news is that her latest song choice, “In the Meantime,” had the drum machine kick mixed so loud the song should have been credited as “Solo Kick Drum with Vocal Accompaniment.” With a vocalist like Martha (listen to any of her many hits from the 80s), that’s a crime. She was hoping I could fix it.
Don’t tune out, EDM/hip-hop fans. What about those TR-808 “toms” that are always mixed way too high? When I was given a Boy George song to remix, those toms were like sonic kryptonite before I figured out how to deal with them. And let’s not get into those clichéd 808 claps, okay? But we have a solution.
What Didn’t Work
I tried everything to deal with the kick, including EQ, iZotope RX7 spectral reduction, mid-side processing using the Mixtool, and more. The mix was mostly mono, and the kick was full-frequency—from low-frequency boom to a nasty click that was louder than the lead vocal. Multiband dynamics didn’t work because the kick covered too wide a frequency range.
What Did Work
In desperation, I thought maybe I could find an isolated kick sound, throw it out of phase, and cancel the kick wherever it appeared in the song. Very fortunately, the song intro had a kick sound that could be isolated as an individual sample. So instead of going directly to Studio One’s mastering page, I went into the Song page, imported the stereo mix into one track, created a second track for only the kick, and dragged the copied kick to match up with every kick instance in the song (yes, this did take some time…). It wasn’t difficult to line up the copied kicks with sample- (or at least near-sample) accuracy (Fig. 1).
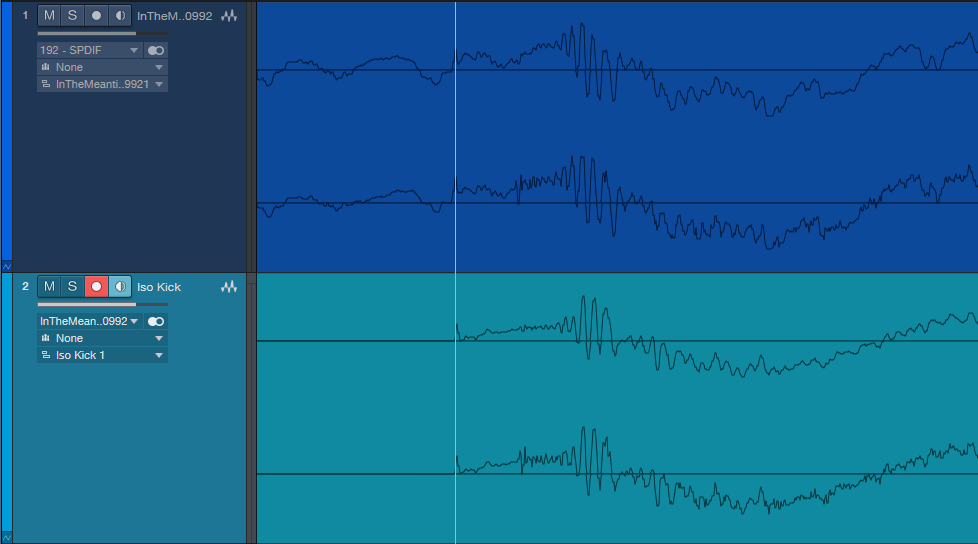
Figure 1: The top track is from the original song, while the lower track is an isolated kick. After lining the sounds up with respect to timing, flipping the kick track phase removed the kick sound from the mixed tracks.
The payoff was inserting Mixtool in the kicks-only track and flipping its phase 180 degrees. It canceled the kick! Wow—this physics stuff actually works.
But now there was no kick. So, I added the Waves LinEQ Broadband linear-phase equalizer (a non-linear-phase EQ can’t work in this context) in the kick drum track. This filtered out some of the kick drum’s lower frequencies so there was less cancellation while leaving the highs intact so they would still cancel as much as possible. Adjusting the shelving frequency and attenuation let in just enough of the original kick, without overwhelming the track. Even better, because the kick level was lower, I could bring up the low end to resurrect the bass part that had been overshadowed by the kick.
The Rest of the Story
The mix traveled to the mastering page for a little more processing (Studio One’s Pro EQ and Binaural Pan, IK Multimedia’s Stealth maximizer, and Studio One’s metering). After hitting the desired readings of -13.0 LUFS with -0.2 True Peak readings, the mastering was done. Sure, I would much rather have had the individual tracks to do a remix, but it was what it was—a 28-year-old two-track mix.
To hear how this ended up, the audio example first plays an excerpt from the mastered version. Then there’s a brief pause, followed by the same section with the original file. I’m sure you’ll hear the difference in the kick drum.
Listen to an audio example from In the Meantime here:
Pigface: Everywhere All At Once
Saturday, October 10th
(click)?Pigface will go live online HERE at 6PM (CST)?(click)
 (Concert photography by: Bobby Talamine)

Martin Atkins has been a longstanding PreSonus artist/endorser and we’re excited that both he and his audio engineer, Mark Williams have embraced our StudioLive 64S Series III console mixers are their go-to “mission control” for their studio recording workflows.
Let’s find out more about them and what’s new in the Pigface camp in these surreal times we’re in:

Martin: I’ve had a long storied career – starting in 1979 when I joined Public Image Limited (the band started by Johnny Rotten when the Sex Pistols imploded) for a 5 year spell that included world tours and their most successful albums. A few years with Killing Joke (who just opened for Tool last year) some work with Nine Inch Nails (appearing on the Grammy award winning Wish) touring with Ministry and founding my own band Pigface – an industrial ‘supergroup’ that has included Mary Byker (PWEI, Gaye Bykers On Acid), Chris Connelly (Revolting Cocks, Ministry), Randy Blythe (Lamb Of God), Danny Carey (Tool), Curse Mackey (Evil Mothers), En Esch (KMFDM), Lesley Rankine (Silverfish, Ruby), Charles Levi (My Life With The Thrill Kill Kult), Bobdog Catlin (Evil Mothers), Bradley Bills (Chant), Andrew Weiss (Ween, The Rollins Band), Greta Brinkman (Moby, Druglord), Orville Kline (Porn and Chicken), Gaelynn Lea, Dirk Flanigan (77 Luscious Babes), Leanne Murray (Beer Nuts), Chris Harris (Project 44), Mike Reidy (Worm), Leyla Royale, Andrew Apocalypse, Ali Jafri, Roger Ebner, Bruce Lamont, Jesse Hunt, Dai, C.A.M., J Lamar, Just Chris (courtesy of Add-2) and Rona Rougeheart.
I started my own label Invisible Records in 1988 and, after a few short years it was obvious I should open my own studio – I bought Steve Albini’s tape machines (an 8 Track ½” and a ¼” machine both by Otari.) As digital started to enter our lives my studio became a hybrid of cool quirky analog, circuit bent pieces, and whatever digital interfaces were affordable at the time.
More and more of my time was spent either in the studio or out recording live events with my band in the US or over in China where I travelled a couple of times. I’ve always been impressed by how supportive PreSonus is to artists– either with no nonsense customer support when needed or by carefully crafting new pieces of equipment that just make sense. I think the piece that illustrated their support of artists for me was the now “classic” Faderport– when most companies were trying to sell multi-fader automation they (and then I) realized that most of us only needed one channel to write volume and pan automation – so, that, I guess, cemented everything for me.
It feels like things are really coming to fruition now, with support from PreSonus and my good friend and audio engineer, Mark Williams. I got to see the StudioLive 64S Series III console mixer in action first at Mark’s studio in Baton Rouge where he laid out all of the tracks, but then we got to work at River City Studio, which is an amazing recording facility, right there at the PreSonus office building. Everyone was so welcoming, people jumping out of meetings to say hi that I had met speaking at PreSonuSphere years ago (you should bring that back!) and I even met the CEO. Mark and I were able to tweak the tracks there and then finish up any tweaks remotely from Chicago.
All of this made the need for a StudioLive 64S console essential for my studio– with so much catalog and multi-track sessions it will be an essential hub of our next few years of activity as a band and as a label. I have the ability to quickly communicate the power of these live shows we have been creating. We recorded many of the shows during our 2019 tour – the line up was just AMAZING and, just be reading through the names you’ll know this was nothing to roll the dice with – the new format allows seamless passing of sessions, follow up tweaks, and easy workflows. Not only has the StudioLive 64S made the mixing of the live tracks from the last tour possible, it’s enabling possibilities of making other shows available for the fans who want more material from us.

Mark: I met Martin the first time in 1993 while working in college radio at the University of Alabama. I worked for him as a field representative for Invisible Records for about 5 or 6 years. Martin contacted PreSonus about one of his ACP88’s and became an Endorser for the company. Throughout the years, PreSonus has outfitted his studio with products including: the ADL600, Central Station, Fadeport, Digimax 96, and their award-winning DAW software, Studio One.
I’ve worked on numerous recording projects and mixes throughout the years with Martin and in November 2016, we recorded the Pigface 25th anniversary concert at the Chicago House of Blues using 2 StudioLive RM32 rackmount mixers and Capture recording software.
In 2019, I supplied Martin with a Quantum interface to record all Pigface live concerts with. The front-of-house (FOH) engineer for the final concert at Thalia Hall sent me all 32 channels of the recording. I synced up the 26 channels from the multitrack with 6 additional channels from the board mix and FOH feed.
Breaking down the 32 channels, 48khz recording down by song was quite an undertaking, as it was a massive amount of data to go through.
Martin flew down the last week of February 2020 so we could mix the album in my studio. The heart of our system was an IMAC with 32 gigs of RAM with a few external terabyte drives, a StudioLive SL64 console mixer, Scepter 8 monitors and Avantone Mixcubes. We went through each song to evaluate what we would use. As we did that, we created template fat channels for each musician. We had 3 drummers, 3 bassists, 2 guitarists, a DJ, 3 saxophones, cello, viola, violin, sitar and more vocalists than I can remember.
Basically we mixed everything “live” using the StudioLive 64S, relying on the console for dynamics processing and effects. We did some simple edits in Studio One. However, to maintain the integrity of the recording, we didn’t repair or fix anything. We used the recording as is in all its chaos and beauty. We didn’t correct any timing, pitch (i.e. no Auto-Tune!). I wanted to stay true to the Pigface form for the live energy.
A couple of days went by of mixing in my studio and then went to River City Studio. I was able to store the presets for the StudioLive 64 on the iMac. We just carried it up to the studio and plugged it in. The scenes loaded up quickly and easily. The transition from my studio to the PreSonus studio was seamless. We were able to get a different perspective in PAE HQ due to the different room and monitoring.
Then, we finalized the mixing in my studio and I uploaded the mixes online for filesharing, as Martin had to fly home to Chicago. He and I tweaked the final mixes over the next month easily to get to the final product that has been pressed to a beautiful Double LP. Y’all need to check it out… click on the link below for more info!
The mix that we did there is what is being used for the live video concert on October 10th.

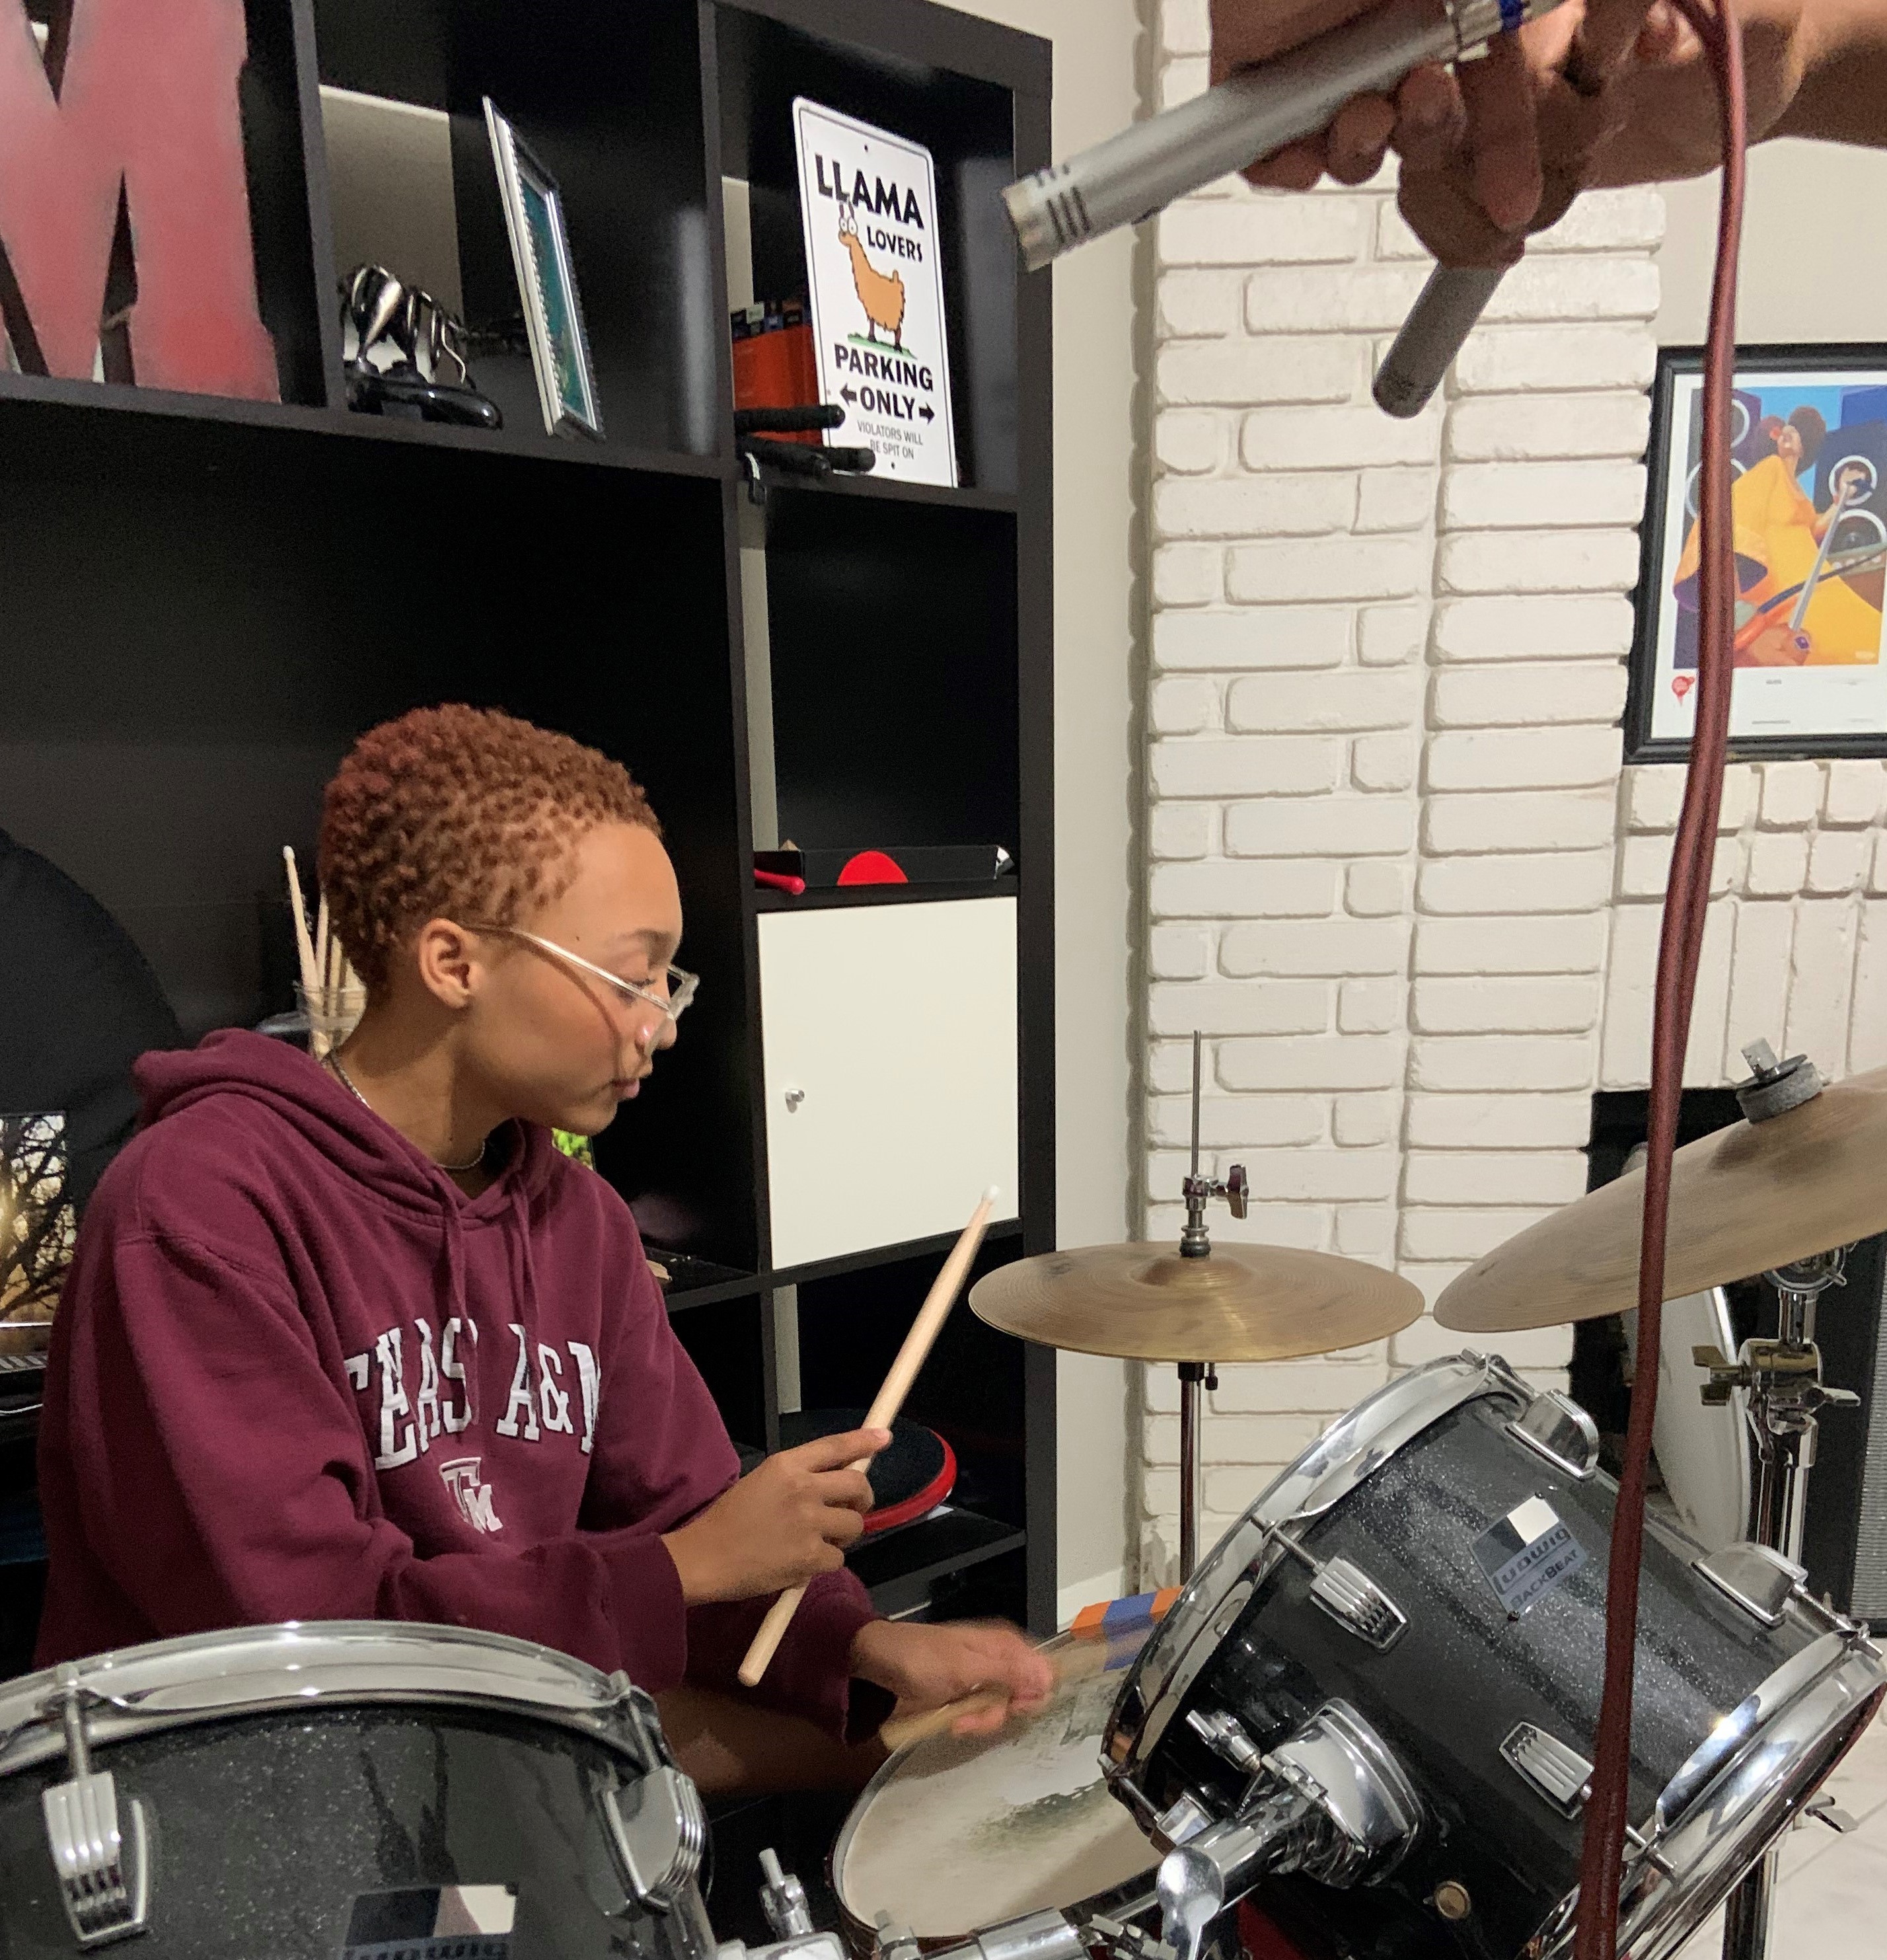
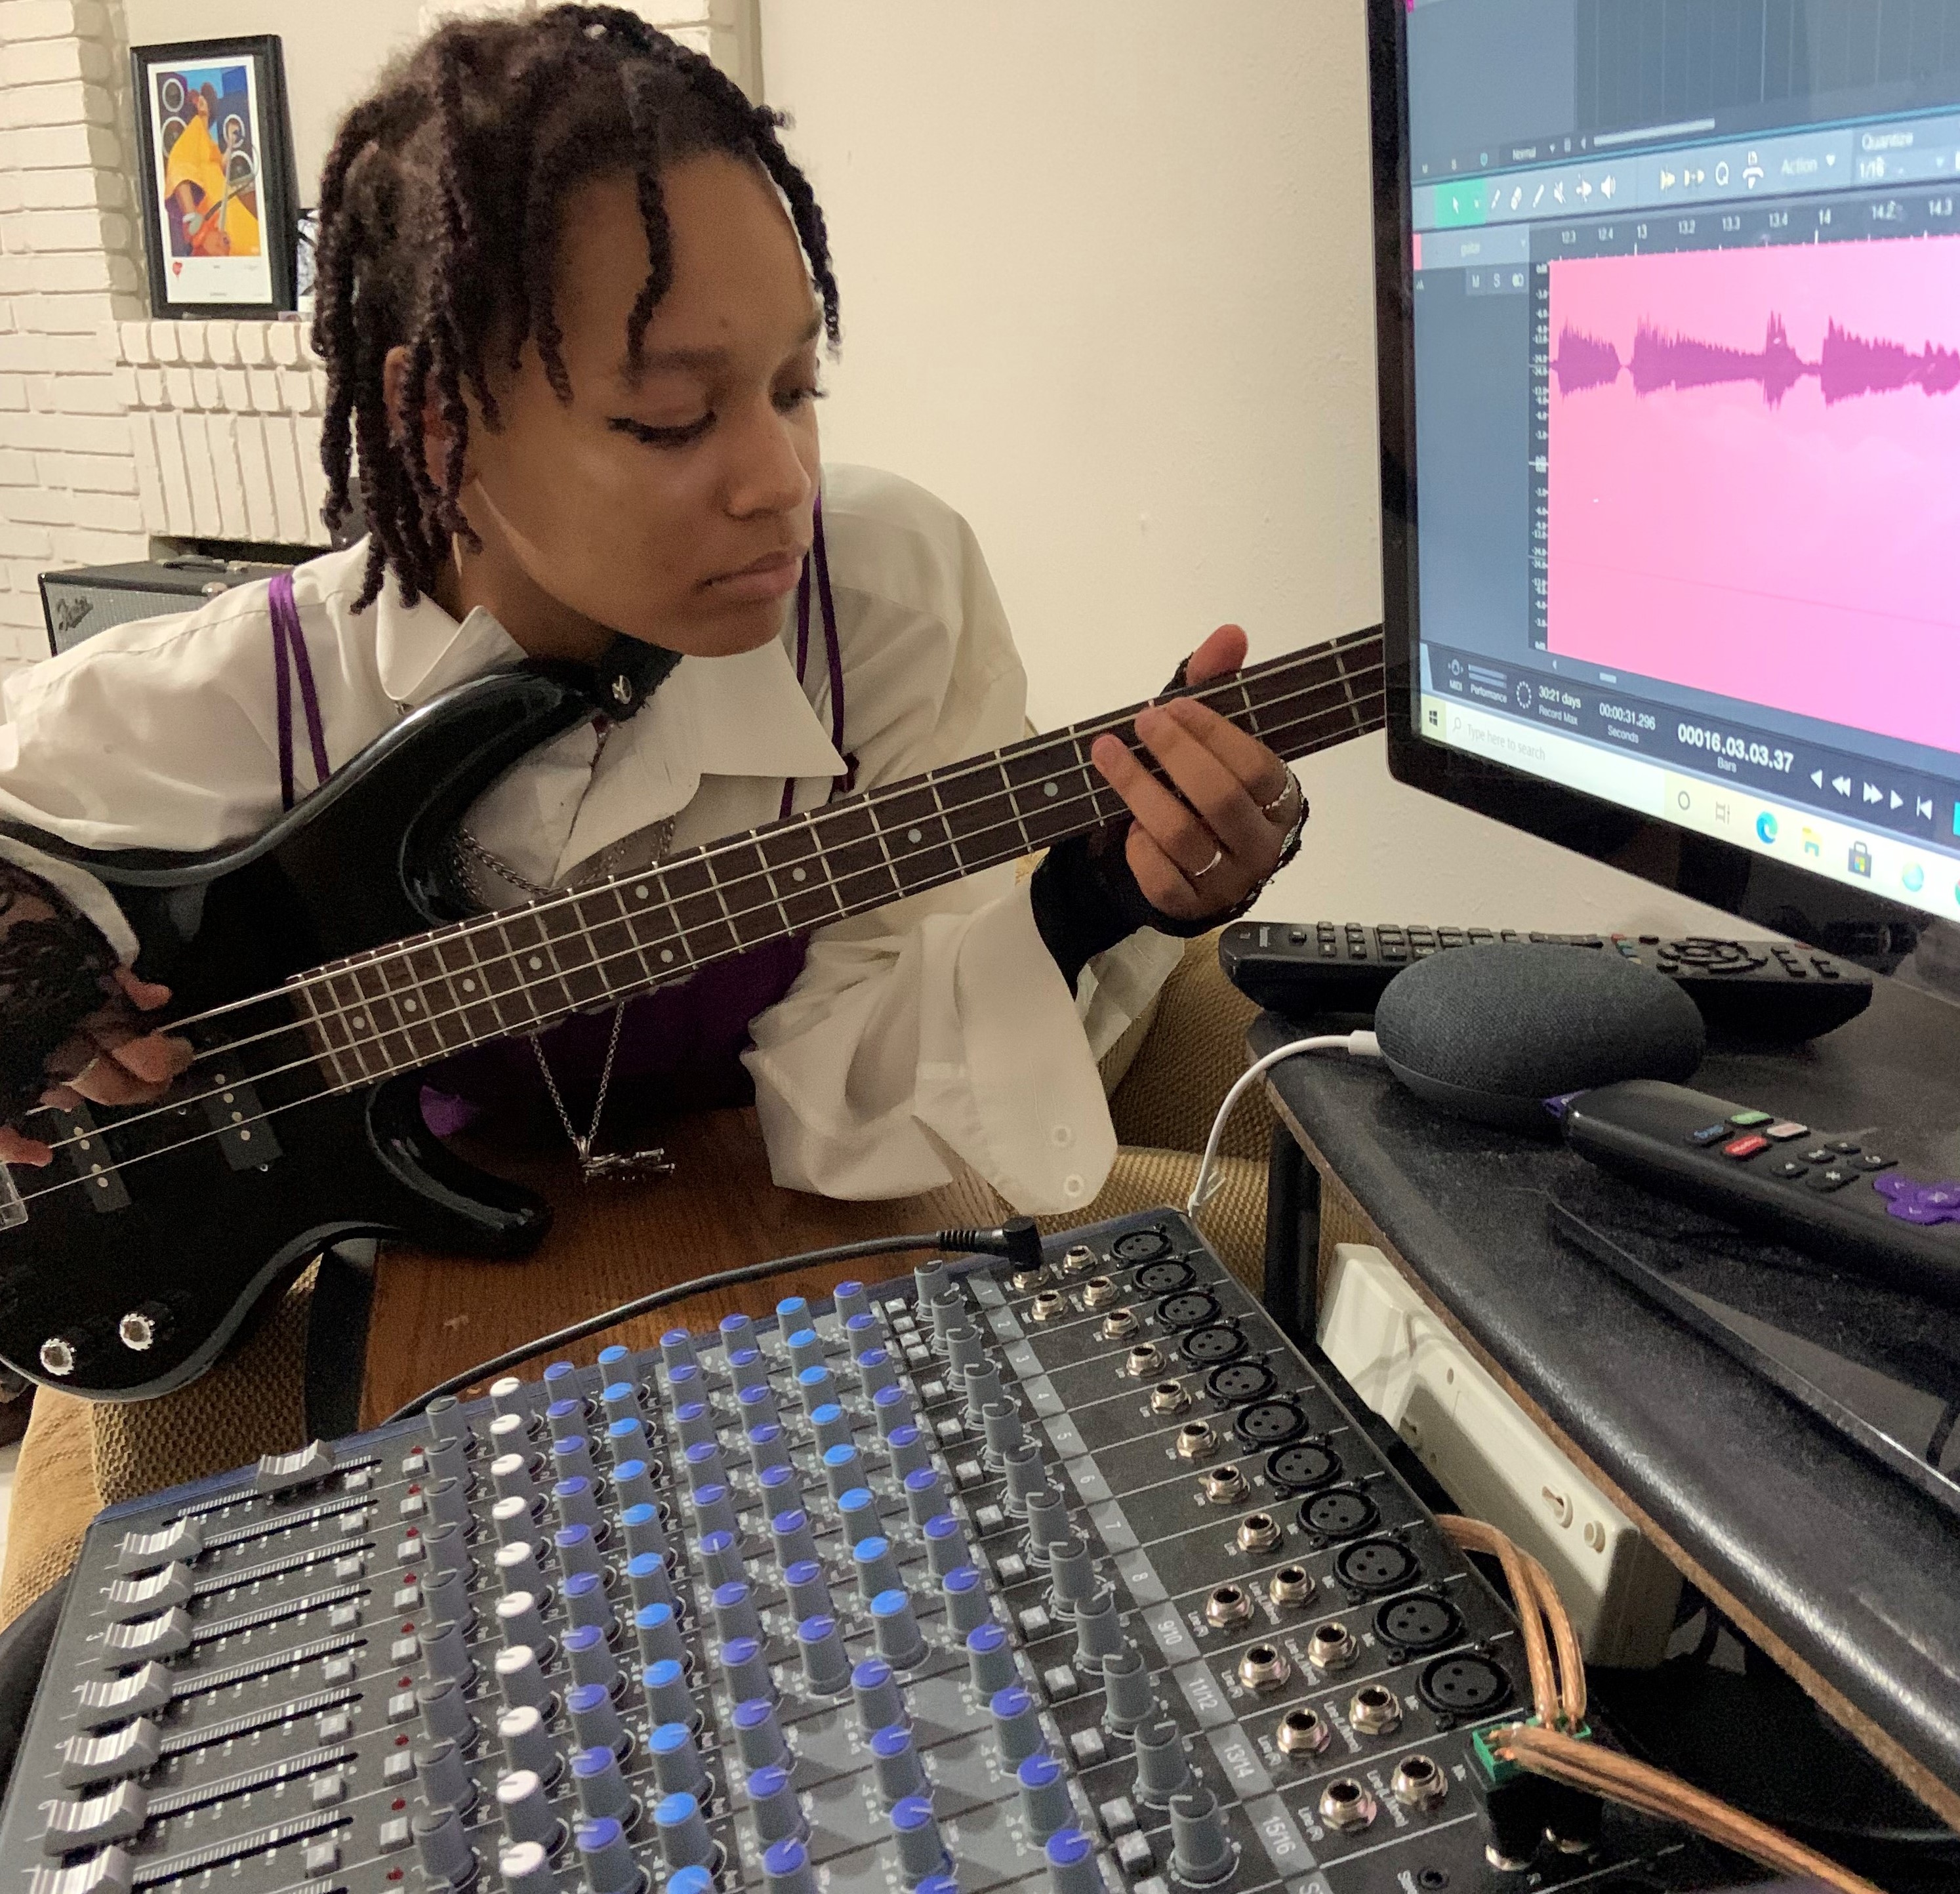
We Don’t Ride Llamas… yes. WDRL!
Afropunk. Counterculture. Art. Rock Music. Weird things. Generation Z.

These 4 siblings hail from Austin, TX and have been a band for 6 years now.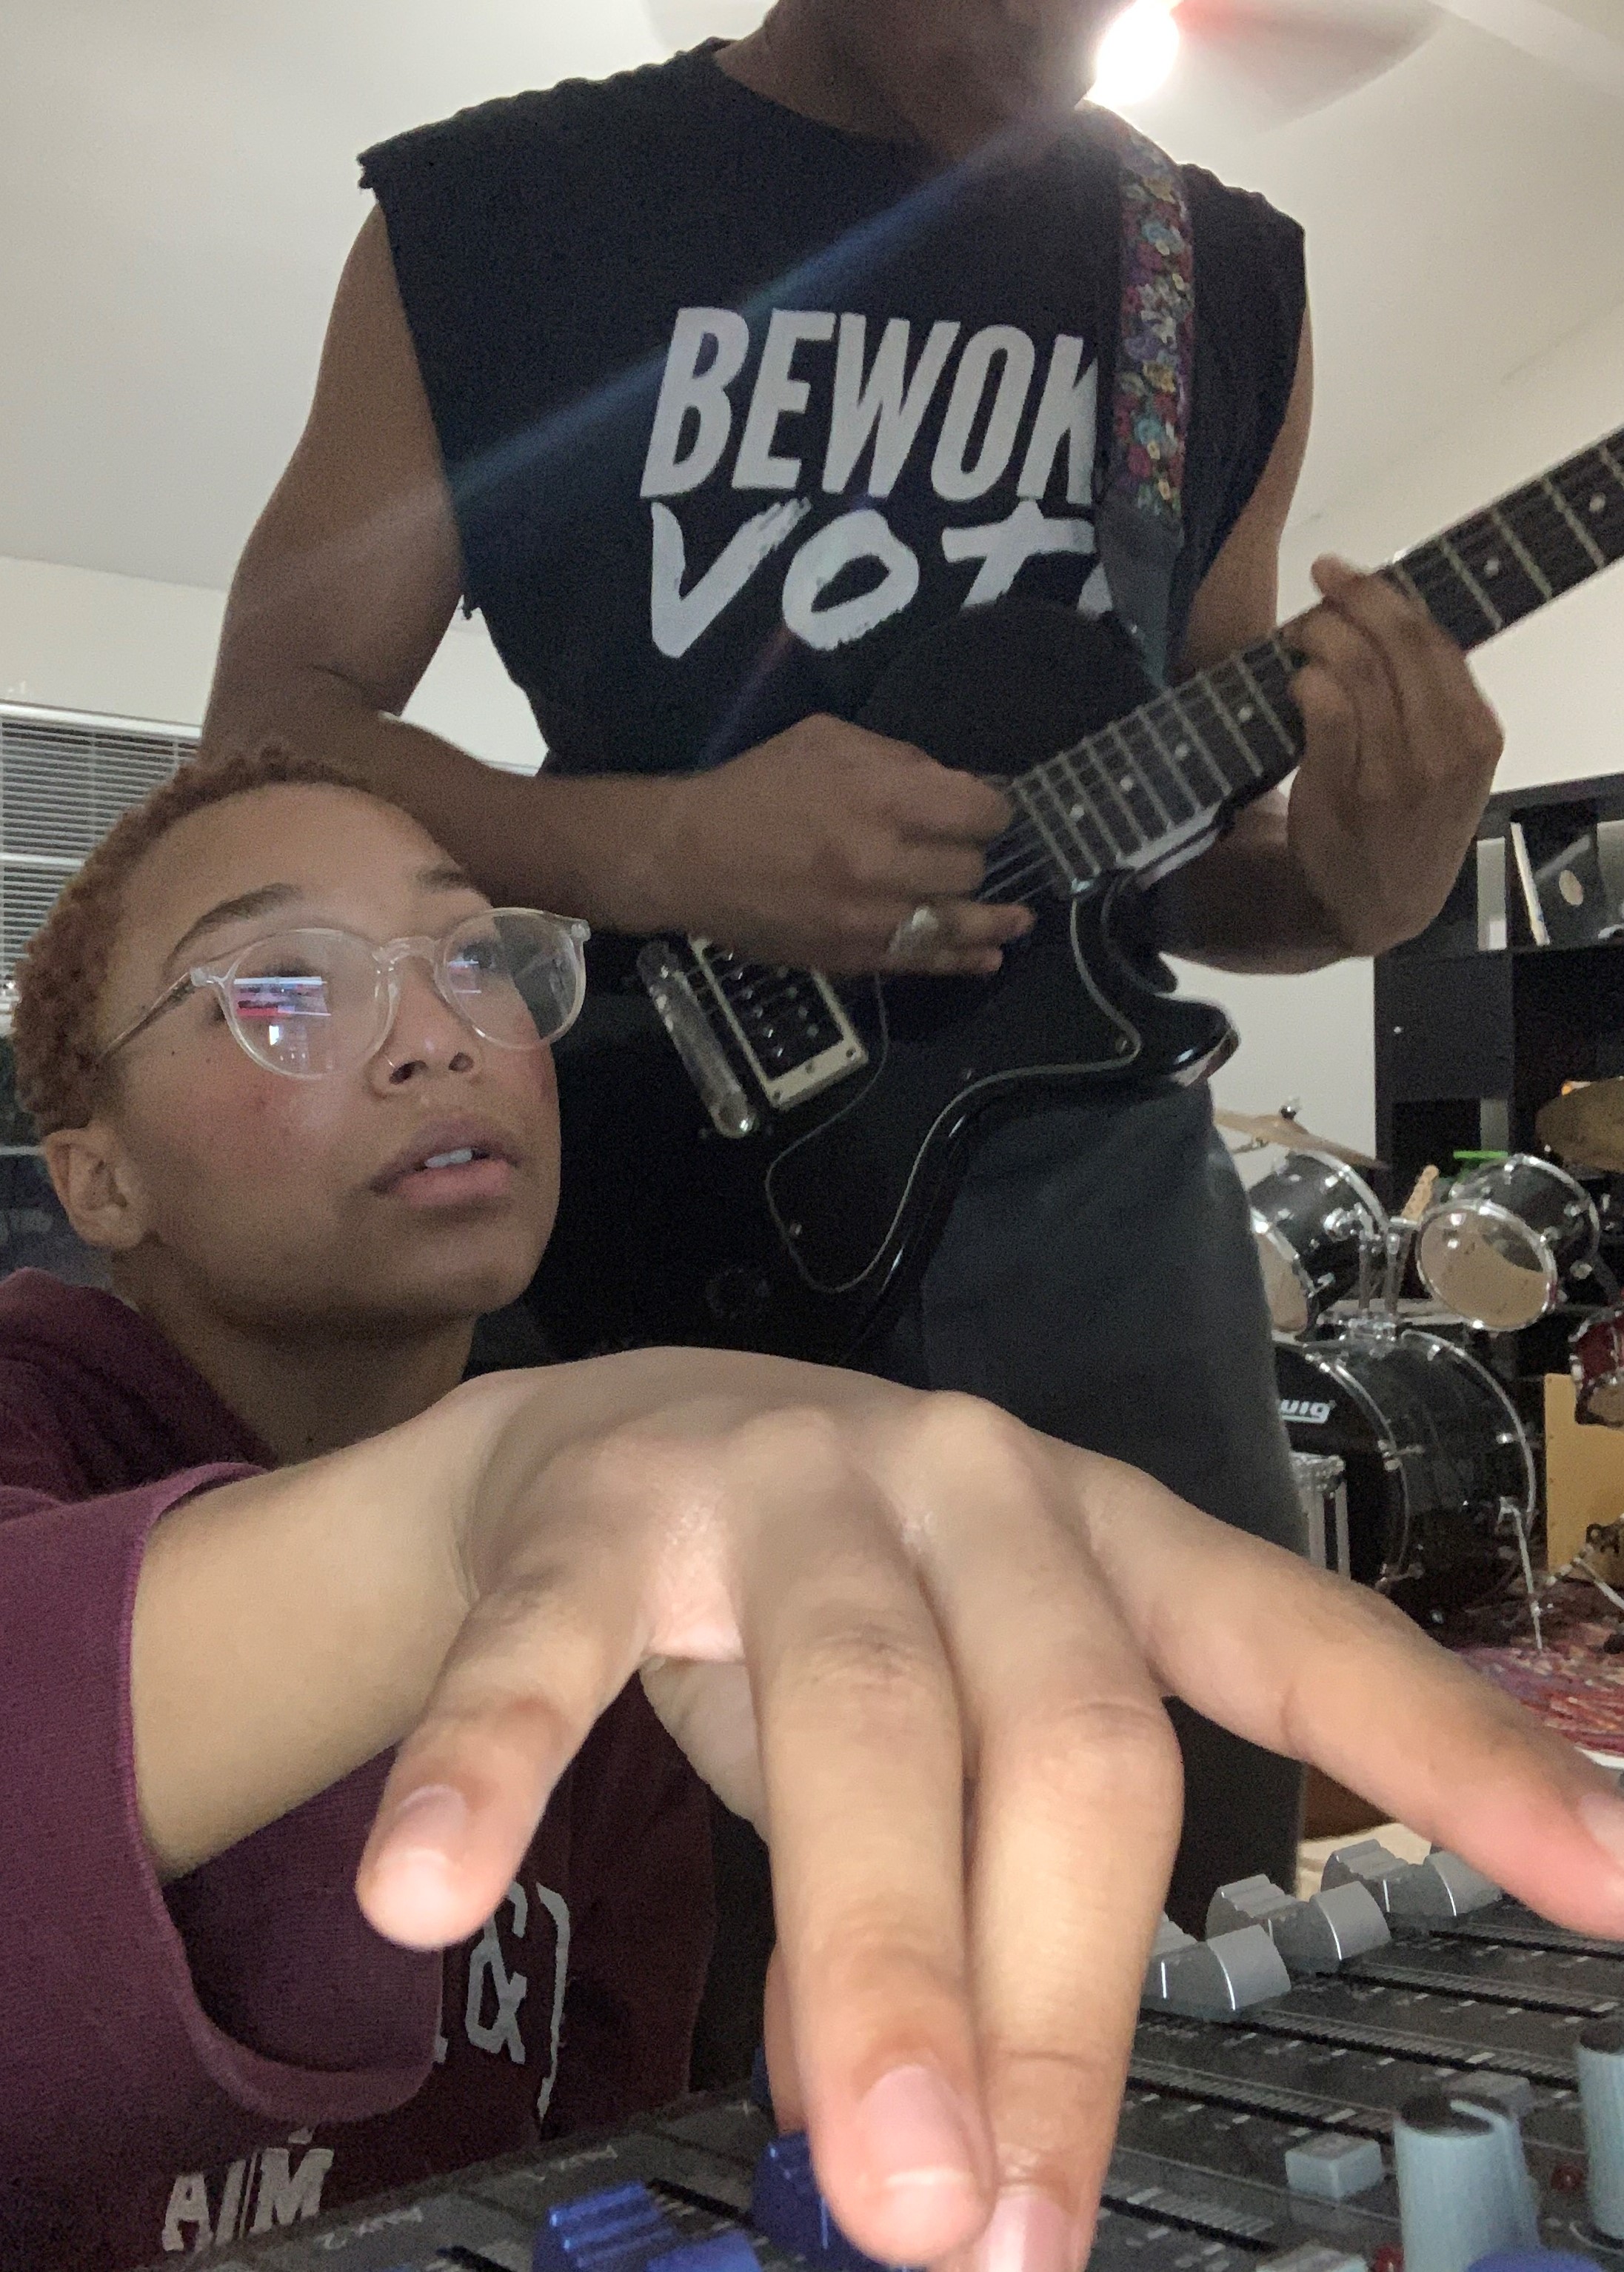
Around the end of 2019, We Don’t Ride Llamas (WDRL) was introduced to PreSonus by Grammy nominated music producer, King Michael Coy (Dr. Dre, H.E.R, Anderson .Paak, Ms Lauryn Hill, Busta Rhymes, Snoop Dogg, Bilal, Kendra Foster, Frank N Dank) who has been a Studio One Professional endorser for several years now.
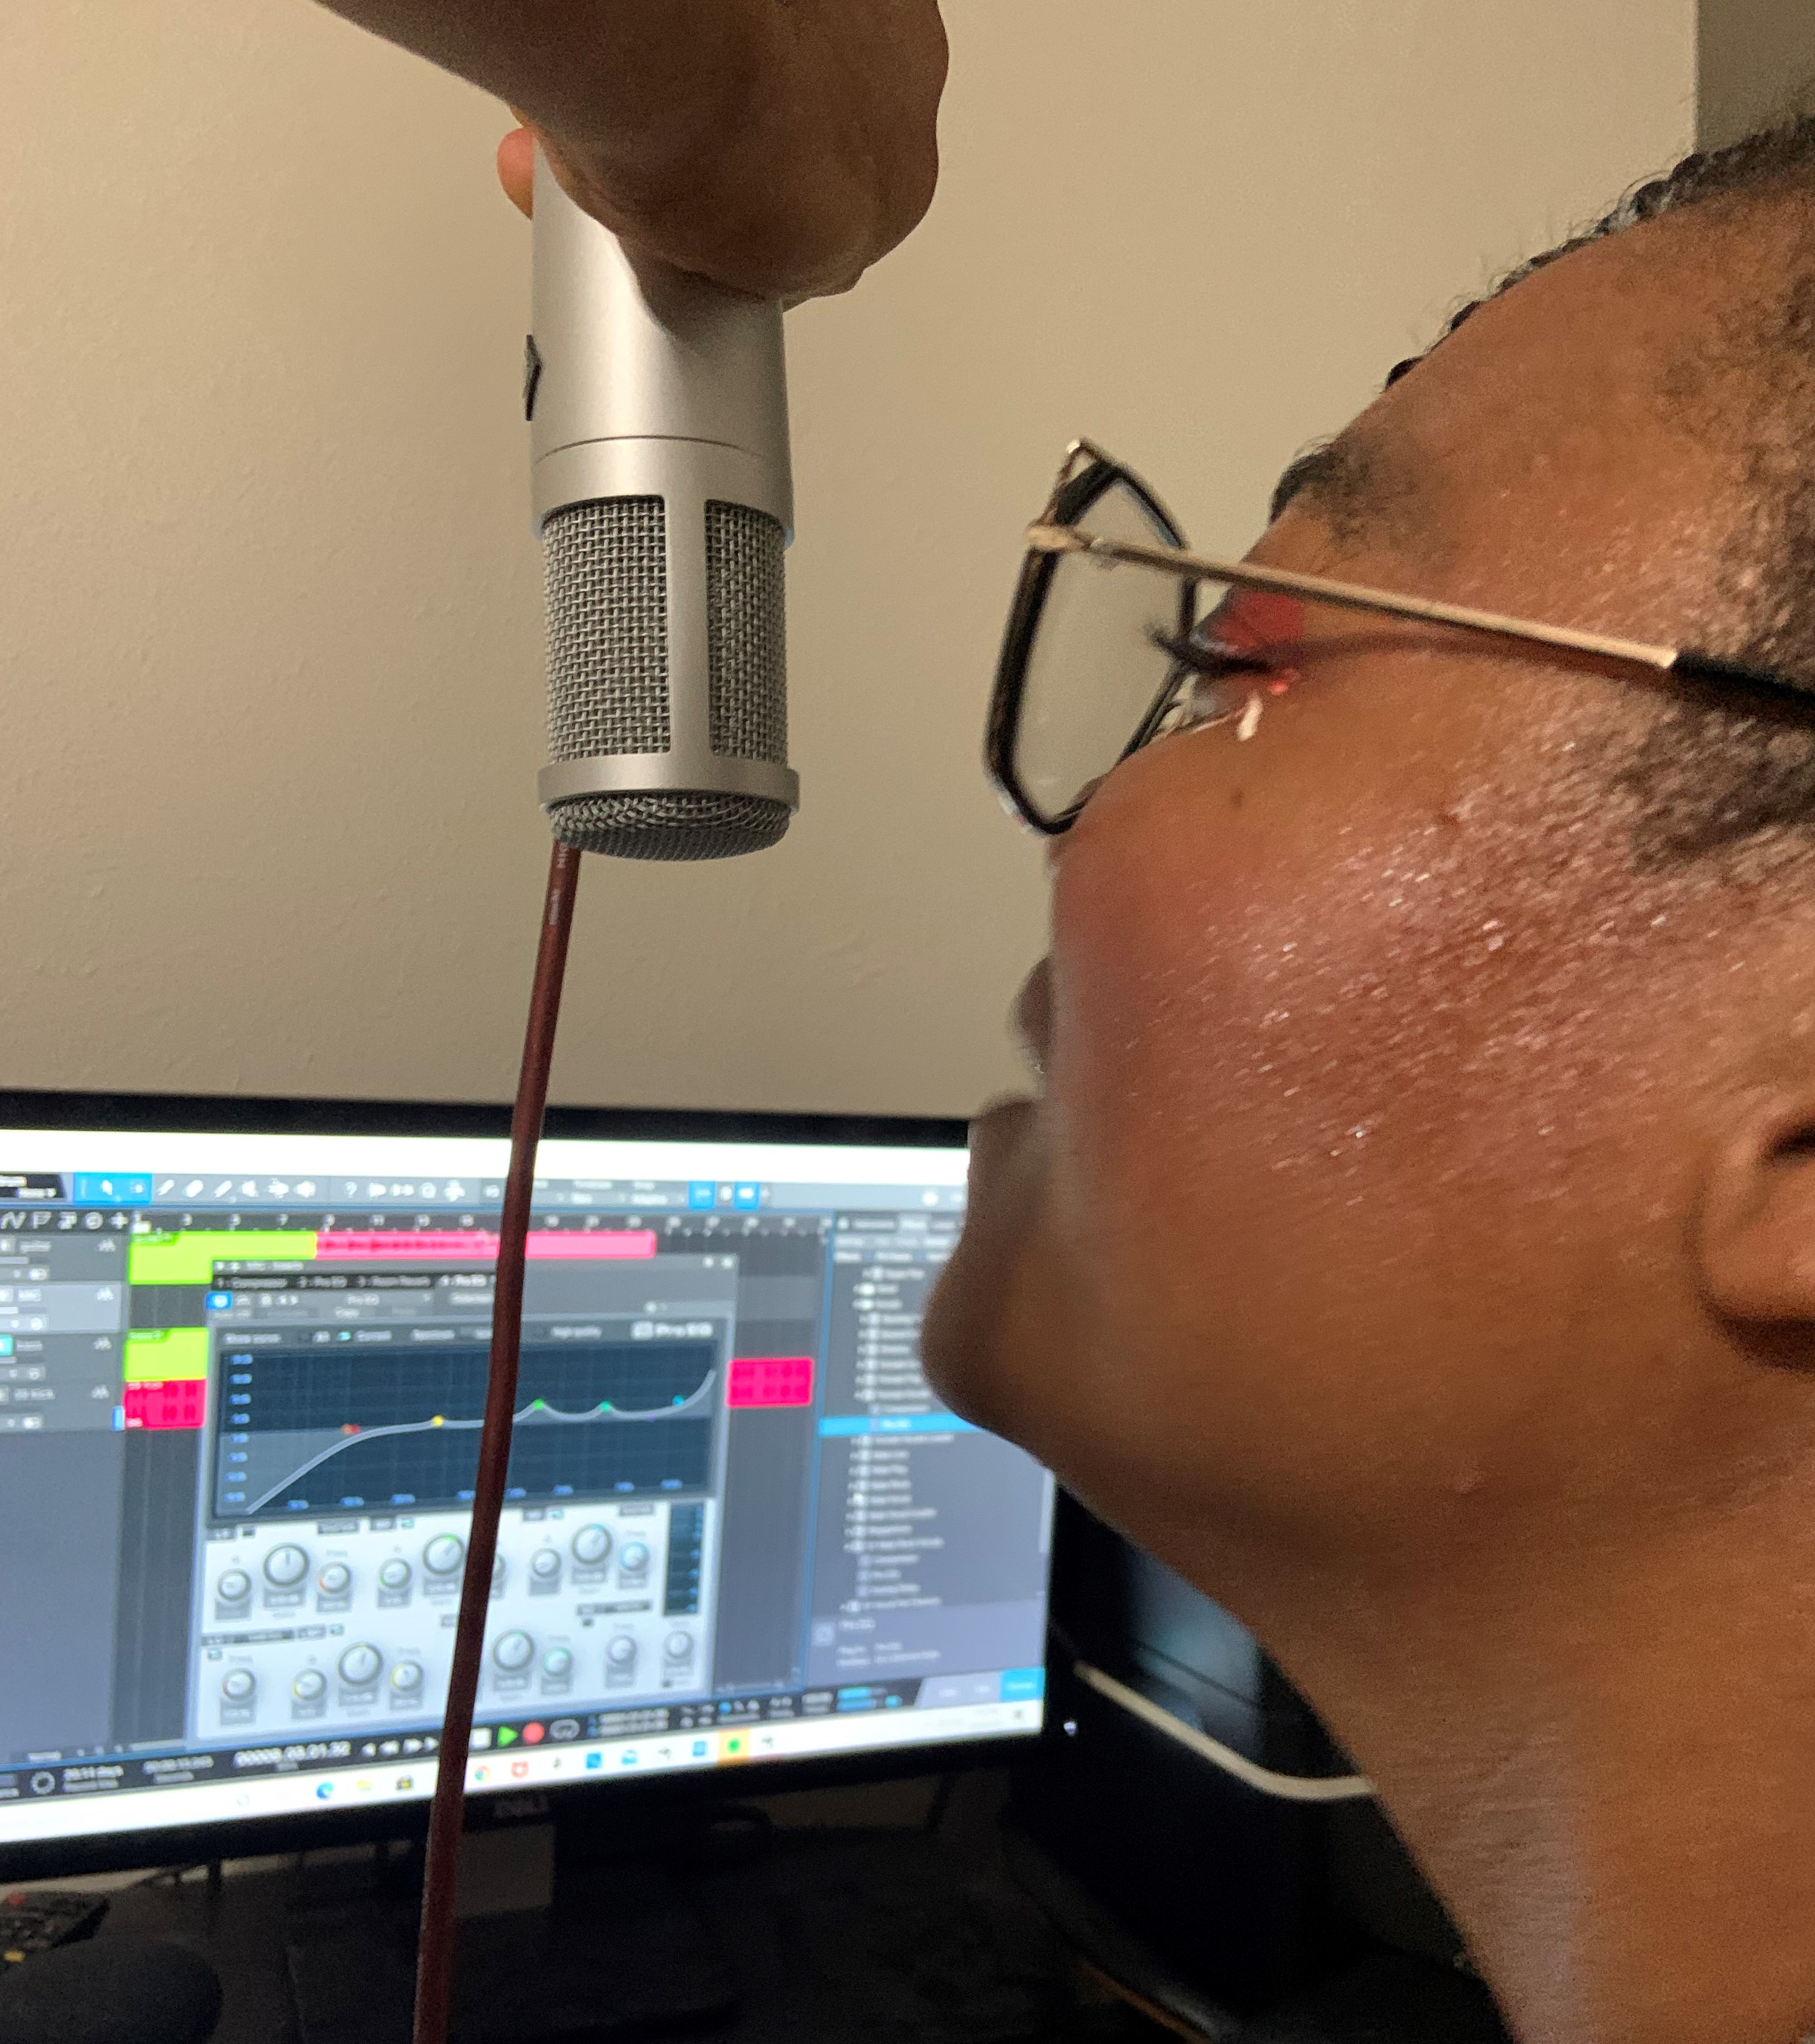
By March of 2020, the group was armed with an AR16c mixer, a PX-1 condenser microphone, the PM-2 stereo pair mics and Studio One Professional DAW software, the kids have been upping their recording game while staying home during the time of COVID-19.
Being the super-duper creative explorers that they are, WDRL has maximized their use of these products in true DIY fashion:
From creating cool voice-overs (did y’all ? the trailer video above ☝️ yet?), producing band interviews and promotional videos to the more obvious use case of recording original music and cover songs… the band can now achieve high quality recorded or live streamed audio that kids from previous generations would not have been able to do.
As a matter of fact, We Don’t Ride Llamas recently just wrote a song called “Buddy” that is featured in Welcome To Sudden Death, now streaming on Netflix. You can check out both the “Groove” and “Dance” mix versions on Spotify here!!!
Synecdoche is the long awaited EP that’s on the horizon for release. The recording is an extremely personal project for WDRL as it explores feelings of being displaced, yearning for the future, their general melancholy at the current state of the world and how everything (for them at least) always comes full circle.
Here are a few things they had to say to us:
“We knew that he company has a longstanding reputation for products that are easy to use, sound great and within the budget for most rock bands. These are the reasons we initially were interested in PreSonus. Can’t wait to get our hands on one of those ATOM pad controllers (hint, hint)… :)”
“We love how user friendly and multifunctional everything is! Your products make us feel like sound alchemists even though we’re still fairly new to recording our own stuff at home.”
“The fact that the AR16c mixer is pretty simple to understand and we can just pick it up and go record somewhere is amazing. Also the amount of product videos and training tutorials PreSonus has available online now makes a huge difference.”
Instagram | Official Website
The Vocal Repair Kit
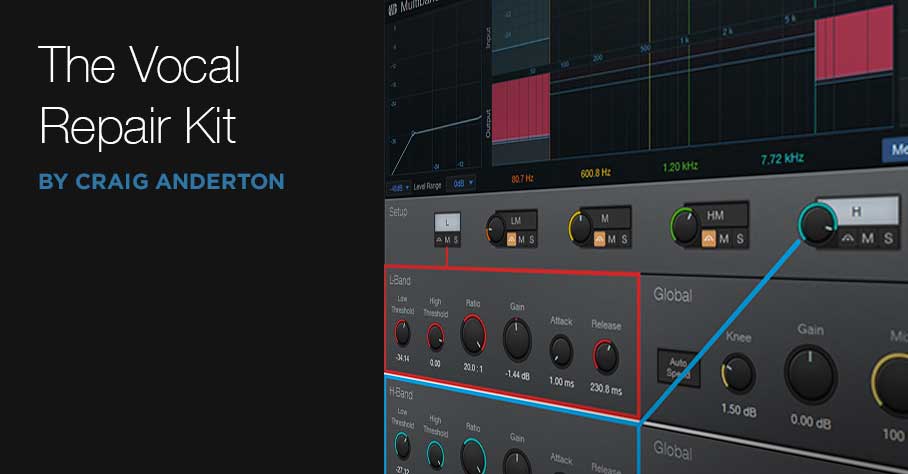
Although it’s always better to fix issues at the source, here’s a tip to help repair recorded vocals during the mixing phase. The technique (which is featured in the new book How to Record and Mix Great Vocals in Studio One – 2nd Edition) combines multiband dynamics processing with equalization to both de-ess and reduce plosives. Although the screen shot shows the Multiband Dynamics processor in Studio One 5, this technique will work with previous Studio One versions if you duplicate the settings.

In the screen shot, the Multiband Dynamics’ Low band settings are outlined in red, and the High band settings are outlined in blue. (Note this is not the actual interface; the high band panel is pasted into the image from a different screen shot so you can see both the Low and High band settings simultaneously.)
The High band acts as a de-esser, because it applies compression to only the high frequencies. This helps tame sibilance. The Low band compresses only the low frequencies, which reduces pops. However, this preset also takes advantage of the way Multiband Dynamics combines equalization with dynamics control. Turning down the Low stage Gain all the way further reduces the low frequencies, where pops like to hang out and cause trouble.
For the High band, vary compression to taste. The compression settings are less critical for the Low band if you turn the Gain down all the way, but in either case, you’ll need to tweak the settings for your particular vocal track.
And that’s all there is to it. When a loud pop or sibilant sound hits the Multiband Dynamics, it’s compressed to be less annoying, while leaving the rest of the vocal intact. Vocal repaired!
The Studio One Cover-Up
Studio One 5 has many little features that might fly under the radar, but are surprisingly useful.
Like being able to change what happens when one Event overlaps (covers over) a different Event.
Prior to Version 5, overlapped Events were treated the same. The overlapping Event became translucent, so you could see the waveform or note data of the Event underneath it. This is ideal for making audio crossfades, which is one of the main reasons for overlapping audio Events. To create a crossfade, type X, and optionally, click and drag up/down at the crossfade junction to shape the crossfade curve. Then you can shift+click on the overlapped Event, type ctrl+B, and combine them into a single Event. With note data, overlapping Events is helpful when combining, for example, the main snare hits on one track with alternate snare hits on a different track.
Another option after overlapping Events is mixing them together. Shift+click on the overlapped Event to include it with the overlapping Event on top. Then type Ctrl+B to mix audio, or G to merGe note data.
However, if you don’t crossfade or mix, then the region below the overlapping Event is still there. The overlapping Event is grayed, which can get confusing if you have a lot of muted sections; and if you remove the overlapping Event because you want to replace it with something else, it’s not obvious where the overlap occurred.
Meet “No Overlap” Mode
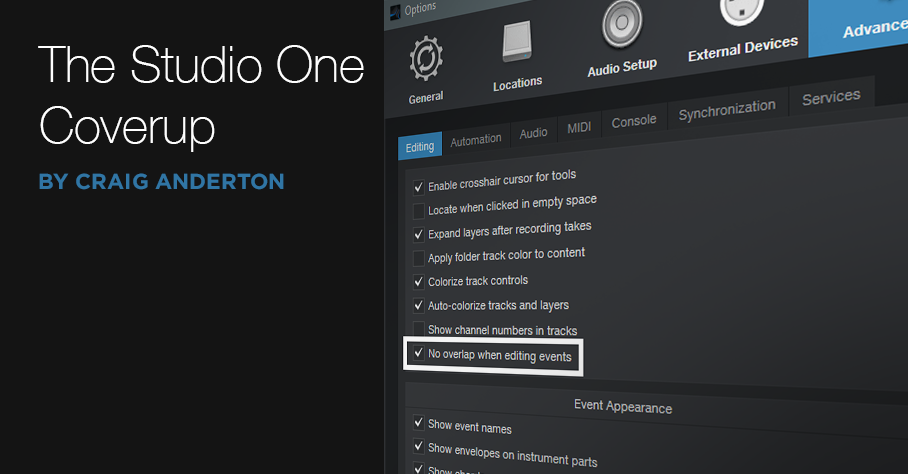
Some programs default to deleting, not just covering over, a section that’s being overlapped by another clip. This is useful when you’re doing lots of edits, because you’re not left with vestigial pieces of regions that still exist, but don’t do anything. To accommodate this type of workflow, Studio One 5 now offers a “no overlap” mode for Events. There are three ways to access this (Fig. 1).
- In Arrangement view, click the options Wrench and check “No overlap when editing events.”
- In Options/Advanced/Editing, check “No overlap when editing events.”
- Use the keyboard shortcut Ctrl Alt – [minus sign] to toggle between overlap and no overlap.
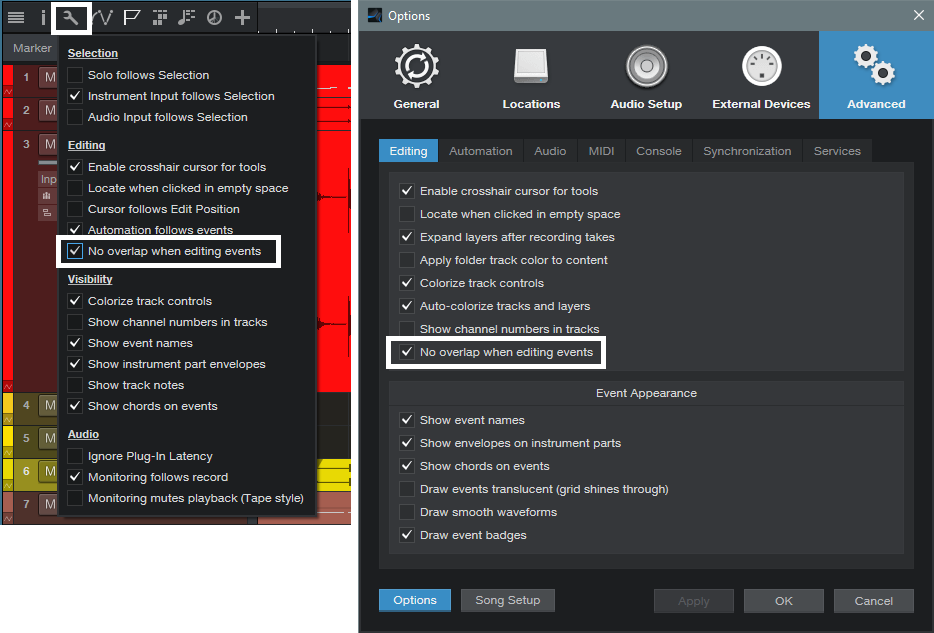
Figure 1: In addition to using a keyboard shortcut, Studio One can default to “No overlap when editing events,” as chosen in the Arranger view or under Options.
Selecting “No overlap when editing events” deletes the overlapped part of an Event, and the replaced section looks like it’s part of the track (i.e., not grayed). However, if you later decide you didn’t really want to delete the overlapped region, then just remove the section that overlapped it. Now you can slip-edit the edge of the underlying Event back to where it was.
(Note that if you enabled Play Overlaps in a track’s Inspector, or chose “Enable Play Overdubs for New Audio Tracks” in Options/Advanced/Audio, so that you could overdub over an existing track and hear both the original track and the overdub on playback, enabling “No overlap when editing events” overrides this setting.)
Granted, this may seem like a small change, but it accommodates more workflow possibilities—especially if you learn the keyboard shortcut, and choose the right option at the right time.
The Vocal QuickStrip
This tip is excerpted from the updated/revised 2nd Edition of How to Record and Mix Great Vocals in Studio One. The new edition includes the latest Studio One 5 features, as well as some free files and Open Air impulses, but also has 35% more content than the first edition—it’s grown from 121 to 194 pages. And as a “thank you” to those who bought the original version, you’re eligible for a 50% discount on the 2nd edition. There’s also a bundle with the book and my complete set of 128 custom impulses for Open Air…but so much for how I spent my summer vacation, LOL. Let’s get to the tip.
Suppose you’ve laid down your raw vocal—great! Now it’s time to overdub some instrumental parts and background vocals. Unfortunately, though, that raw vocal is kind of…uninspiring. So you start browsing effects, tweaking them, trying different settings—and before you know it, you’re going down a processing rabbit hole in the middle of your session.
Next time, open up the Vocal QuickStrip. Insert this vocal processing’s “greatest hits” FX Chain in your vocal track, tweak a few settings, admire how wonderful the vocal sounds, and then carry on with your project.
There’s a download link for the Vocal QuickStrip.multipreset file, so you don’t need to assemble the chain yourself. It works with Studio One 4 as well as 5 (note that the Widen button for the Doubler is functional only in Studio One 5).
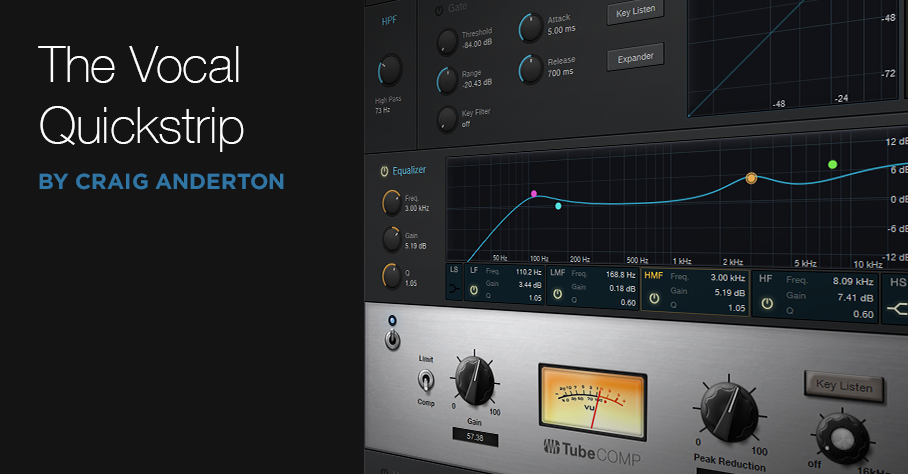
The Effects
The Fat Channel (Fig. 1) is the heart of the chain. Of its three available compressors, the Tube Comp model emulates the iconic LA-2A compressor—the go-to vocal compressor for many engineers.
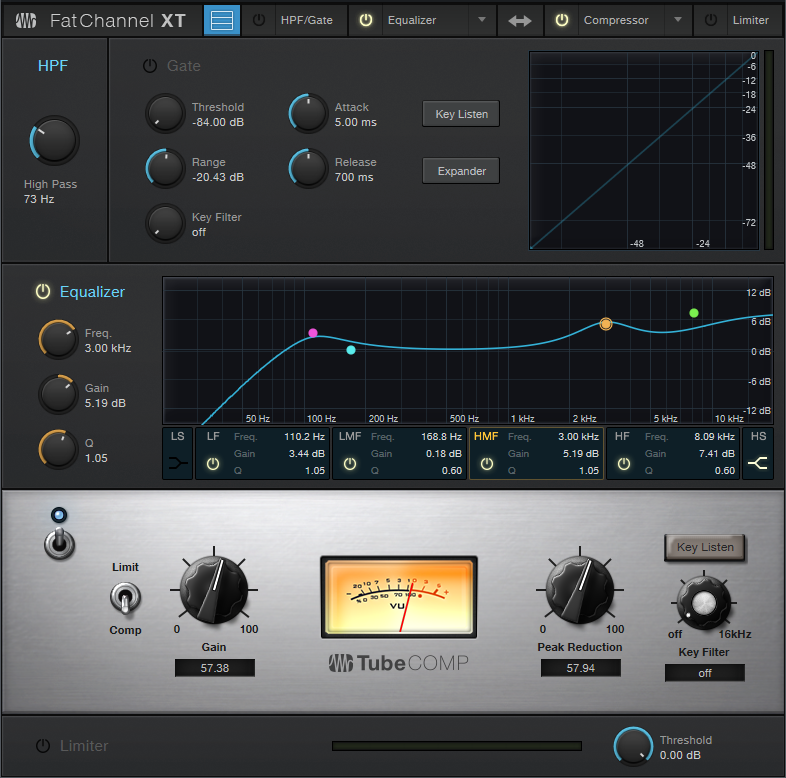
Figure 1: Fat Channel settings for the Vocal QuickStrip FX Chain.
The Fat Channel also includes a built-in high-pass filter. You can place the EQ either before or after the compressor; here, the EQ is before the compressor because boosting certain frequencies “pushes” the compressor harder. This contributes to the Vocal QuickStrip’s character.
The EQ uses all four stages. The most interesting aspect is how the Low Frequency and Low-Mid Frequency stages interact subtly when you edit the Bottom control. The Low-Frequency stage is fixed at 110 Hz with 1 dB of gain, but its Q tracks the Low-Mid Frequency stage’s Gain control. So, when you pull the LMF Gain down, the LF stage’s Q gets broader; increase Gain, and the Q goes up somewhat.
The High-Mid Frequency stage sits at 3 kHz, because boosting in this frequency range can improve intelligibility. The High-Frequency section adds “air” around 10 kHz. However, as you increase the Top control, the frequency goes just a bit lower so that the boost covers a wider section of the high-frequency range. This makes the effect more pronounced.
The Chorus is the next processor in the chain, but it’s used for doubling, not chorusing (Fig. 2).

Figure 2: The Chorus provides a voice-doubling ADT effect.
The parameters are preset to a useful doubling effect, and there are only two control switches—one to enable/bypass the effect, the other to increase the stereo spread.
For echo/delay effects, the Analog Delay comes next (Fig. 3). Although many of the parameters are well-suited to being macro controls, there had to be a few tradeoffs to leave enough space for the crucial controls from other effects.
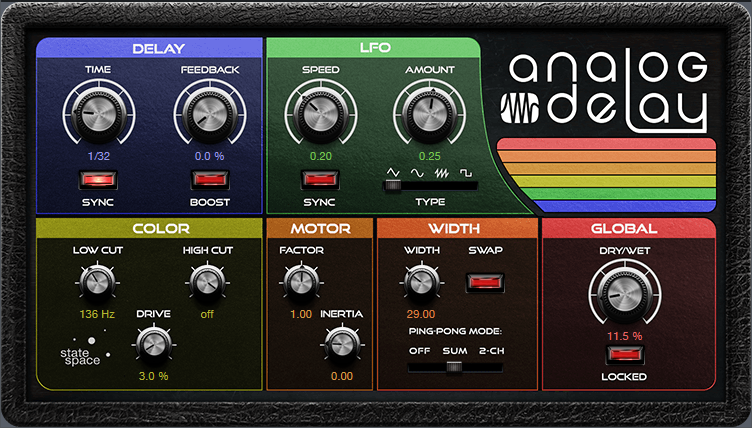
Figure 3: The Analog Delay is set up for basic echo functionality.
For example, the Delay Time controls beats rather than being able to choose between beats and sweeping through a continuous range. Feel free to change the Macro control assignment. Also, the LFO isn’t used, so if you want to modify the ping-pong effects, you’ll need to open the interface and do so manually. In any event, the Delay Beats, Feedback, and Mix parameters cover what you need for most vocal echo effects.
The final link in the chain is the Open AIR reverb (Fig. 4). Normally I use my own impulse responses (see the Friday Tip Synthesize Open AIR Reverb Impulses in Studio One for info on how to create your own impulse responses), but of the factory impulses, for vocals I’m a big fan of the Gold Plate impulse. (If you have my Surreal Reverb Impulse Responses pack that’s available from the PreSonus shop, I’d recommend using the 1.2 Fast Damped, 1.5 Fast Damped, or 2.25 Fast Damped vocal reverbs. However, note that these three files are also included for free with the second edition of the Vocals book)
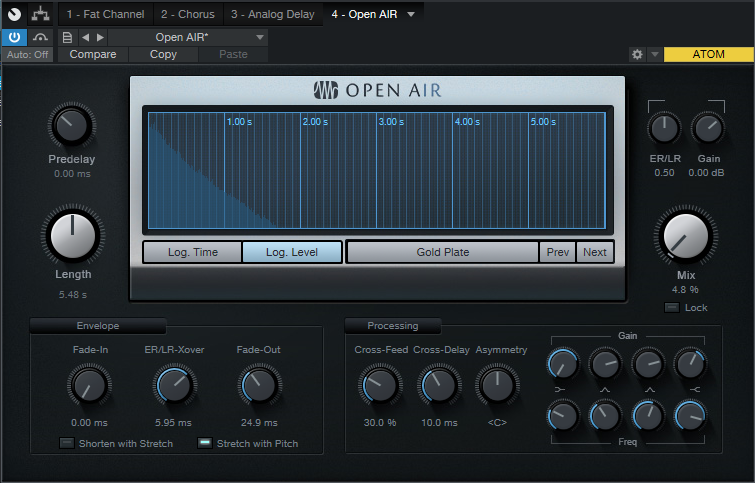
Figure 4: The Open AIR reverb plug-in’s Gold Plate impulse response is one of my favorite factory impulses for vocals.
The Macro Controls
When designing an FX Chain with so many available parameters, you need to choose which parameters (or combinations of parameters) are most important for Macro controls (Fig. 5).
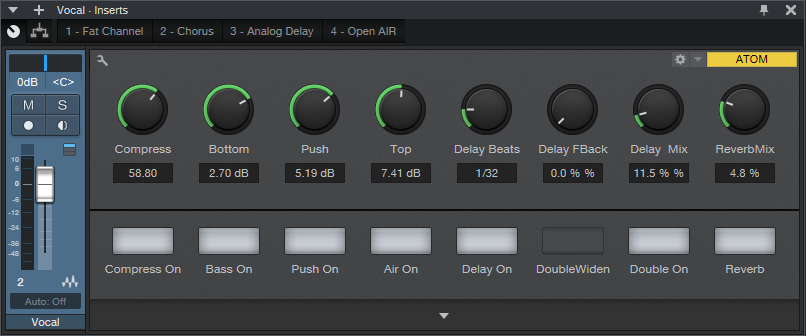
Figure 5: The Vocal QuickStrip Macro controls.
Compress varies both the Peak Reduction and Gain to maintain a fairly constant output—an old trick (see the EZ Squeez One-Knob Compressor tip), but a useful one. Bottom, Push, and Top control three EQ stages. All of these, and the Compressor, have bypass switches so it’s easy to compare the dry and processed settings.
Delay also has a bypass switch, as well as controls for delay time in beats, delay feedback, and dry/wet delay mix. The only switches for the chorus-based doubling function are bypass and narrower/wider. Reverb includes a bypass button and dry/mix control, because that’s really all you need when you have a gorgeous convolution reverb in the chain.
So go ahead and download the Vocal QuickStrip, use it, and have fun. But remember that an FX Chain like this lends itself to modifications—for example, insert a Binaural Pan after the Open AIR reverb, or optimize some EQ frequencies to work better with your mic or voice. Try the other two compressors in the Fat Channel (or if you’re a PreSonus Sphere member, then try the other eight compressors—they all have different characters). With a little experimentation, you can transform an FX Chain that works for me (and will hopefully work well for you) to an FX Chain that’s perfect for you. Go for it!
Download the Vocal QuickStrip FX Chain here
Purchase How to Record and Mix Great Vocals in Studio One here