Category Archives: Studio One
Create Track Presets for Parallel Processing
Parallel processing splits a signal into two or more parallel channels. Bi-amping is a common example of parallel processing:
- One channel processes low frequencies.
- The other channel processes high frequencies.
The two channels then mix together to a common output (e.g., the Main output bus). You generally don’t want the original audio that was split to appear in the mixed output of the two channels.
Parallel processing has many applications, like altering stereo image, emphasizing transients, doing creative compression effects, super-wide reverbs, and more. Studio One Professional has a Splitter module that makes parallel processing easy within an FX Chain. However, this isn’t always a perfect solution, for reasons described later. And Studio One Artist doesn’t have a Splitter—so let’s look at an alternate way to do splits.
Splitting with Buses
The traditional way to create a split for parallel processing uses buses. You insert pre-fader sends in the channel with the track you want to process. These go to two FX or Bus Channels (fig. 1). With pre-fader sends, the original channel’s fader can turn down all the way. This prevents the signal from going to the Main bus, yet audio still proceeds to the parallel paths.
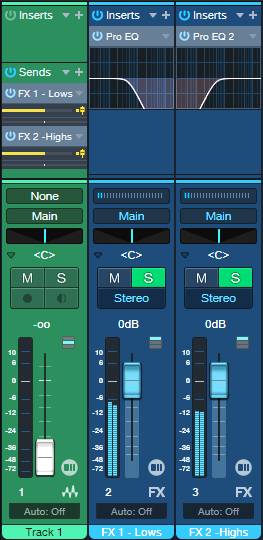
Figure 1: This example of traditional bus-based splitting provides bi-amping.
However, Track Presets can’t save a combination of tracks and buses, only tracks. So, let’s speed up your sessions with a Track Preset-friendly solution.
Splitting with Tracks
This option accomplishes the same goal, but you can save the setup as a Track Preset for instant recall. First, we need to do a little prep work. The parallel channels receive their inputs from Track 1’s output (note that the parallel tracks’ input fields in fig. 3 show “Track 1”). So, we can’t turn the Track 1 fader down to have the equivalent of a bus’s pre-fader send. Although there are some instances where you may want the original sound mixed in with parallel processing, most of the time you want to hear only the outputs from the parallel-processed tracks.
Fortunately, there’s an easy way to do a pseudo pre-fader send. In Song Setup, create a Dummy Output and don’t assign it to anything (fig. 2). We don’t want it to go anywhere. This lets the parallel processed tracks still receive their inputs from Track 1, but Track 1’s output feeds the Dummy bus instead of the Main bus. So, you won’t hear Track 1’s original audio.
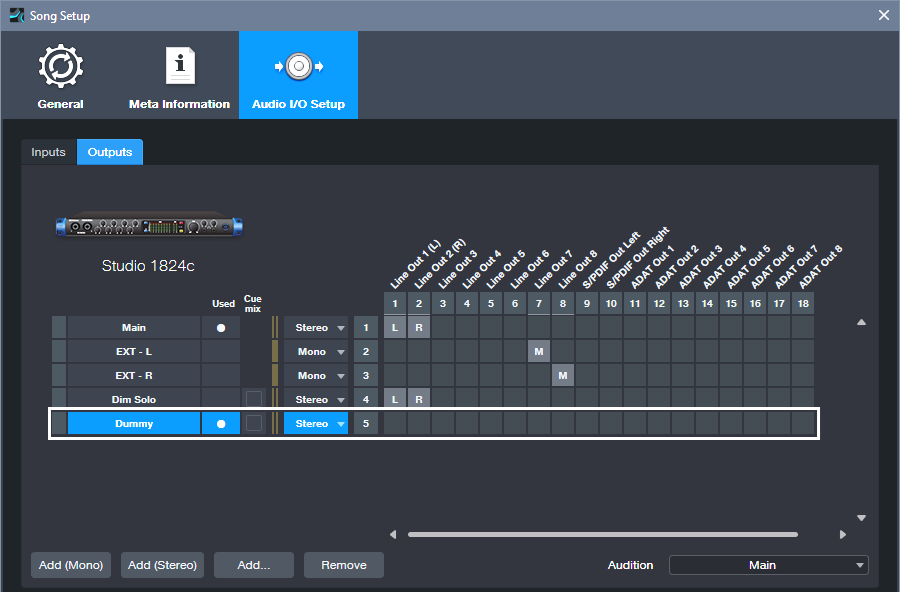
Figure 2: Use Song Setup to create a Dummy bus to nowhere.
Fig. 3 shows the track-based splitting configuration. Aside from assigning the source track to the Dummy bus instead of the Main bus, here are the differences compared to fig. 1:
- The parallel channels need to have their Monitor buttons enabled.
- If you want to blend in the original sound, assign its output to the Main bus instead of the Dummy bus. Because Track 1’s fader serves as a master input level control for the audio feeding the parallel paths, you have the equivalent of a post-fader send if needed.
- Solo Safe isn’t enabled automatically. To enable it, Shift+Click on the Solo buttons in the parallel channels.
- And (drum roll, please!) here’s the big advantage: You can select all three tracks, and save the configuration as a Track Preset. Just remember that any project in which you use this track-based configuration needs to have a Dummy output available in Song Setup.
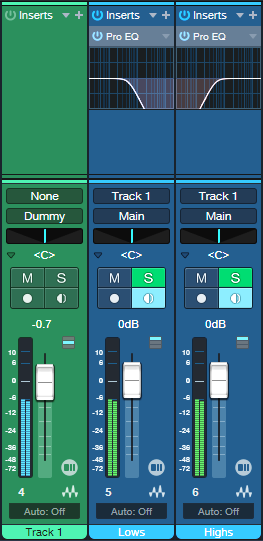
Figure 3: You can save this parallel processing configuration as a Track Preset.
Disadvantages Compared to Studio One Professional’s Splitter Module
- Unlike an FX Chain, this parallel processing method doesn’t insert neatly in a track, and requires an additional channel for each split you want to add. (The FX Chain’s Splitter can have five splits within a single channel and can do frequency-based splits, which is ultra-cool.) A mitigating factor is that once you set the level for the audio track that splits into the parallel tracks, you can hide it.
- Another limitation is there’s no panel for Macro Controls. For complex FX Chains with multiple splits and processors, Macro Controls can save a lot of time when you need to tweak the sound.
Advantages Compared to Studio One Professional’s Splitter Module
- With channel-based parallel processing, the effects providing the processing are exposed. You don’t have to open up the FX Chain to edit, delete, or replace them.
- Because the effects are in channels, you can expand the micro-view. This lets you modify parameters and see characteristics (like EQ curves) at a glance.
- It’s not possible to have inter-effect sends within an FX Chain. With the track-based approach, the splits can have sends that go to effects in other splits. For example, a sound in one split could trigger a dynamic EQ’s sidechain in a different split.
The bottom line is for Studio One Artist, track-based splits are a great way to create parallel effects. And with Studio One Professional, FX Chains provide exceptional functionality—but even so, track-based splits can perform some tricks that FX Chains can’t do.
Easy Atmos: Grab Headphones, Mix, Have Fun!
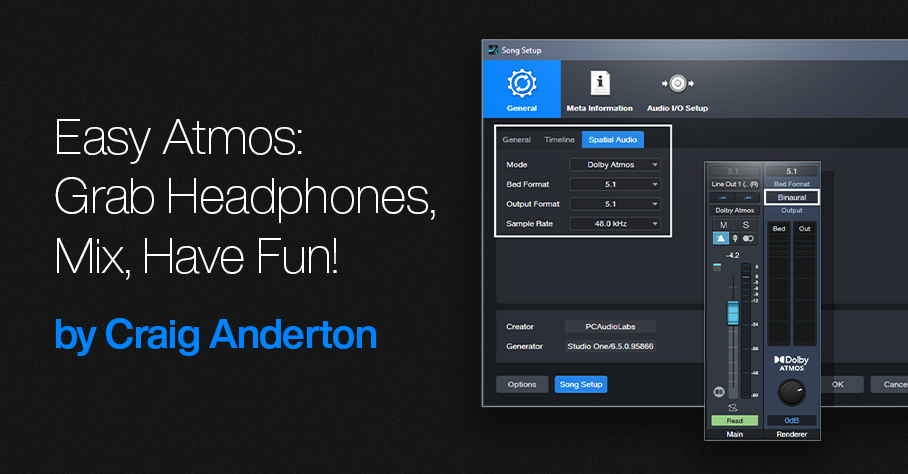
Everyone talks about the importance of Dolby® Atmos for post-production, but the implications go further than that. Atmos really does change how you create and experience music. I’d almost compare it to the switch from mono to stereo.
This blog post is about the simplest, quickest way I’ve found to start exploring the 5.1 format with Atmos: remix one of your pre-Version 6.5 songs for headphones, using Atmos’s immersive panning options and binaural rendering. (Note: Save the song you want to remix to a new folder, and work with the copy. Then if you hit Save accidentally, you won’t overwrite the original song.)
1. Open your pre-6.5 song in Studio One. It will look like it did in previous versions.
2. Choose Song > Spatial Audio. In the Spatial Audio tab under General, for Mode select Dolby Atmos. For Bed Format and Output Format, choose 5.1 (fig. 1). If you’re not familiar with the concept of a Bed, see last week’s blog post. Although you’re locked into choosing 48.0 or 96.0 kHz as the sample rate, Studio One will convert your song automatically if it was done at a different sample rate.
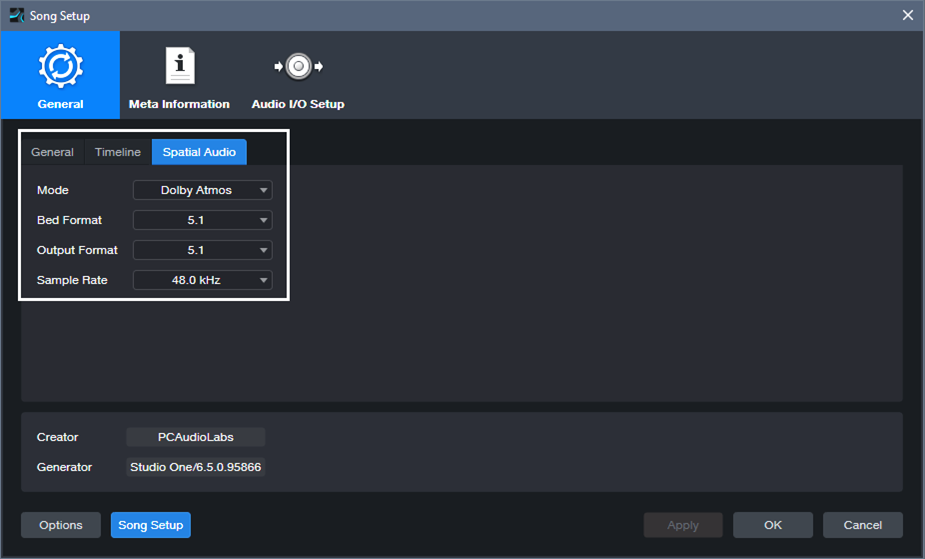
Figure 1: Song Setup for Spatial Audio.
3. Click Apply.
4. Under Audio I/O Setup, Outputs tab, select 5.1 for the Main output (fig. 2).
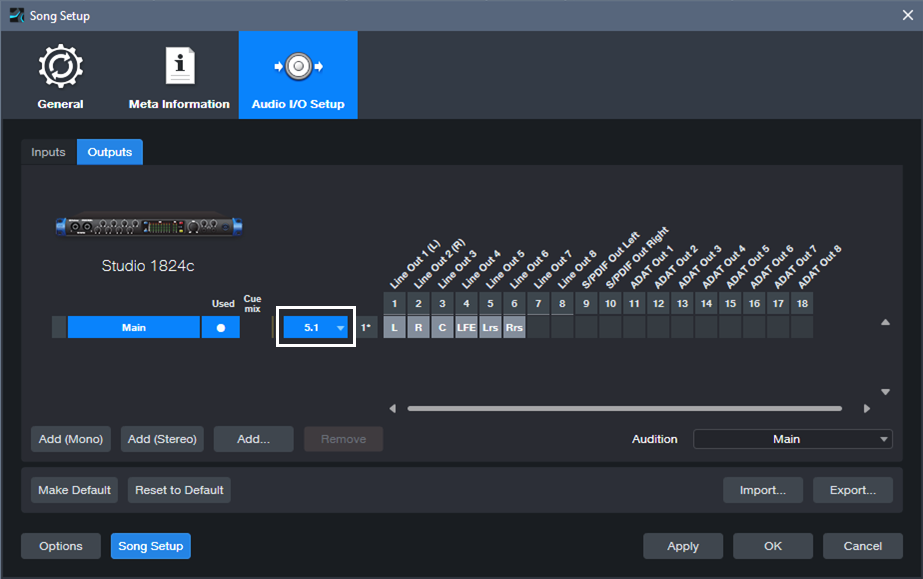
Figure 2: Audio I/O Setup for experimenting with Atmos.
5. Click Apply and OK.
6. Open the Console (F3). Your panpots have now been promoted to Surround Panners. (Regarding Sends and Surround Panning, please see the note at the end.)
7. In the Renderer section at the Console’s right-hand side, choose 5.1 for the Bed Format, and Binaural for the Output. Remember, you’ll need to do all your monitoring on headphones. To avoid blasting your ears, I highly recommend turning down the Renderer’s level, and then bringing it up to a comfortable listening level during playback.
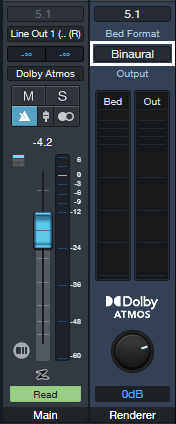
Figure 3: The Renderer section produces the binaural output for monitoring over headphones.
8. Start playback. It won’t sound exactly like the mix did previously, but that’s the point—now you can remix it for Atmos.
Of course, this is just a start. All we’re doing is setting up a sandbox so you can play with this shiny new Atmos toy in Studio One. Start your experiments with panning. Double-click on a Surround Panner to open it. You can change the width of the stereo field, its position, and whether the sound is close to the listener or further away. And yes, it’s all automatable. Choose Disable Center (which is more about dialog placement for movies, so we don’t need it). Also, LFE isn’t all that necessary for most music, unless one of your instruments is an explosion.
Right-click on a panpot, and you can replace the Surround Panner with a Spatial Object Panner, which places the sound anywhere in an immersive space that also emulates height. But we’re getting ahead of ourselves…for now, just have a good time playing around, and we’ll get deeper into how to actually mix with Atmos from an artistic/musical standpoint in later blog posts. Who knows? You might enjoy the process enough to set up a speaker-based surround system, and be seduced by the full impact of Atmos mixing.
About Sends
To have Surround panners for Sends, the Bus they go to needs to be configured for Surround. Do this by selecting 5.1 from the drop-down menu in the field below the Mute and Solo buttons (fig. 4).
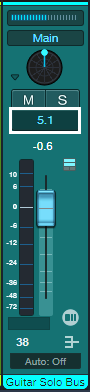
Figure 4: Where to choose the bus Speaker Configuration.
Note that Bus Channels, FX Channels, Aux Channels, and Send panpots can’t be Spatial Object Panners, only Surround Panners.
You Can Do Immersive Audio. Right Now.
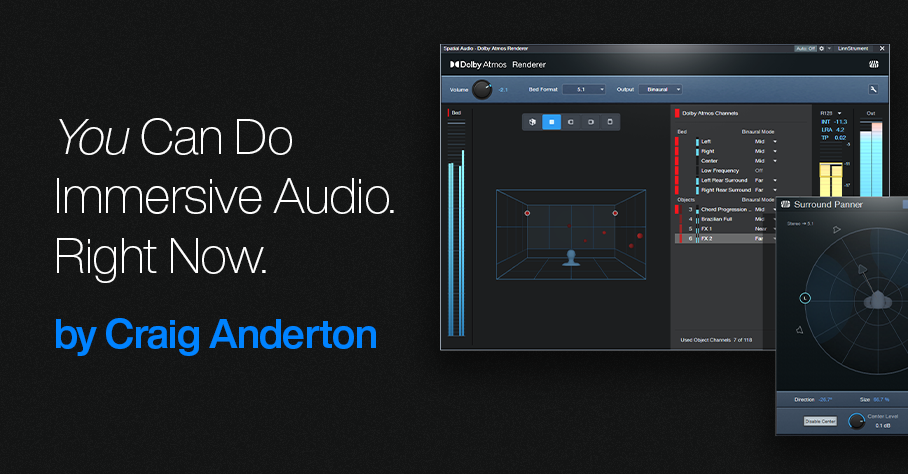
You don’t need a massive surround system with speakers wired all over your studio to create immersive audio. Whether you want surround or Dolby® Atmos mixes, Studio One Professional 6.5 delivers immersive sound over not just speakers, but the headphones you already have. Although it’s counterintuitive that headphones pressed up against your ears can deliver immersive audio, binaural audio makes it possible—here’s why.
Binaural recordings capture audio using a dummy human head with molded, lifelike ear canals. There are two mics, one for each ear. Whether sounds are reaching human ears or microphones in dummy ears, sounds coming from the sides or back have different levels, frequency responses, and delay times compared to those sounds reaching your ears from the front. Incorporating these differences in audio played back through headphones makes it sound like you’re hearing audio from front, sides, above, and behind you. In other words, listening to a binaural recording through headphones sounds like you’re hearing sound in a real-world space. Which brings us to…
Surround
Before headphones can reproduce the effect of hearing immersive audio, we need to create music in the studio that provides a feeling of space. One option is surround sound, which has been applied to movies for almost half a century.
Surround places sound all around you by supplementing stereo’s left and right channels with four more speakers: center channel for dialog, left rear, right rear, and a subwoofer for a movie’s bass requirements—explosions, earthquakes, and so on. When mixing music for surround, the center isn’t as important as it is for movies, because placing the same audio in the left and right channels creates a phantom center. Also, subwoofers are more about effects than reproducing notes. You can’t differentiate note pitches below 20 Hz anyway.
Mixing for surround is kind of like mixing for stereo, except you direct audio files to multiple speakers. So, panpots are now surround panners (fig. 1).
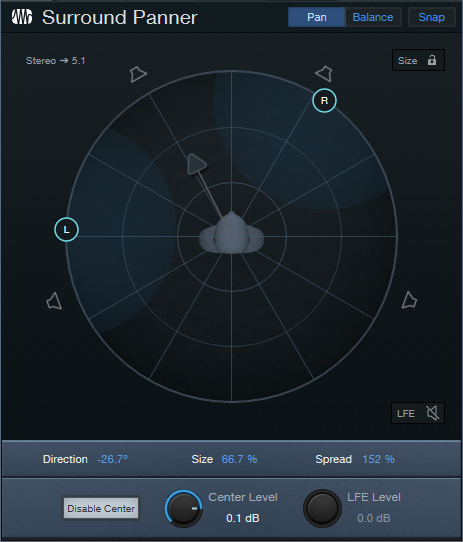
Figure 1: Studio One’s Surround Panner.
Enter Dolby Atmos
Dolby Atmos is a bigger leap from surround than surround was from stereo. First, Atmos adds an element of height. Now you’re not just surrounded by sound, but immersed in a space. Second, Atmos isn’t audio, like a WAV file. Unlike surround, where your choices of where to place sound are limited by the number of speakers, Atmos is about metadata that places mono or stereo sounds in a virtual 3D world.
The optimum way to experience Atmos is with speakers, although that involves some complications and calibrations. For example, to hear sound above you, your “height” speaker (often part of a soundbar) bounces sound off the ceiling. You also need a room that accommodates multiple speakers. However, there’s a brilliant alternative to speakers: binaural sound through headphones. You don’t need a complex multichannel setup, because thanks to binaural audio, you can mix with Atmos and hear the results over headphones. After creating your mix in Atmos’s 3D space, just render that as binaural audio, and voilà—people listening to your rendered mix over headphones will hear what you heard as you mixed it.
Check out Dolby’s short YouTube demo while listening on headphones, and you’ll hear how well an Atmos mix gives a sense of space with headphones.
What Atmos Metadata Defines
Atmos differentiates between a Bed and an Object. A bed is very much like a massive stem based on a conventional, channel-based mix with specific channel restrictions—like 2.0 (stereo), 5.1, or 7.1 surround. (Note that Atmos supports multiple beds.) Conceptually, this is no different than using the console in previous Studio One versions, except that the mix for the bed can include elements that go beyond stereo. These include multi-channel panning for 5.1 or 7.1 surround, and multichannel-friendly effects (fig. 2).
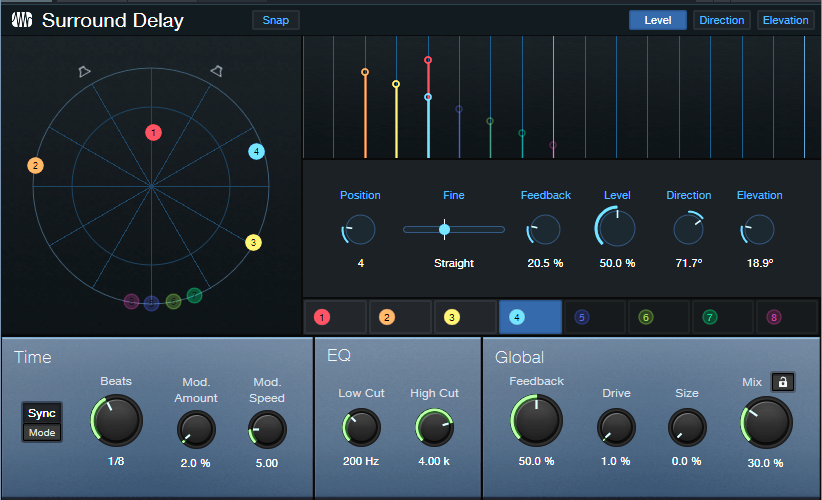
Figure 2: The new Surround Delay is pretty wild—just wait until you try it.
Spatially speaking, the bed has a fixed position in space. For example, consider a movie, where characters are seated in a casino. The bed would consist of the casino sounds in the background, people talking, gamblers, and wait staff moving around based on conventional surround panning.
An Object is discrete mono or stereo audio that can be placed anywhere in the 3D Atmos space. It’s not tied to particular channels, like the bed, but is “floating in space.” For example, in the casino example above, James Bond could be an object. He walks down a staircase in the back of the casino, saunters toward the front, moves to one side of a baccarat table, stands for a while to observe the action, and then walks over to where he can find a seat. Atmos’s dedicated object panning makes it easy to have objects move around in your 3D space (fig. 3).
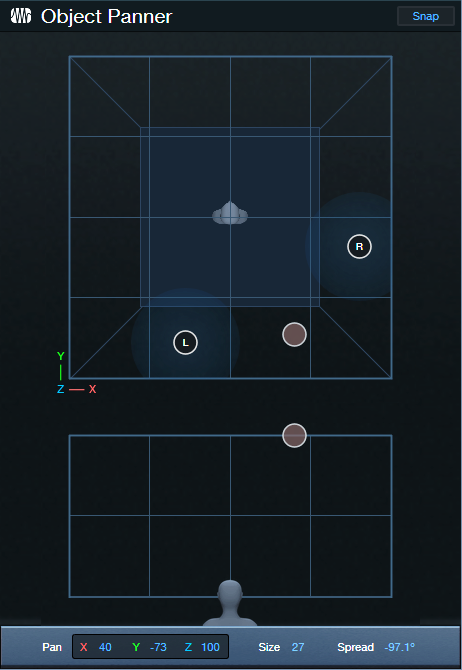
Figure 3: The Object Panner can move objects in a 3D space. You can automate these changes.
Another way to think of beds and objects is a band playing on stage. The drummer, bassist next to the drummer, keyboard player, and background singers remain at their spots on stage. They’re the bed. The lead singer who prances around and the lead guitarist who uses a wireless system to go into the crowd are the objects.
Metadata and Tracks
Atmos defines up to 128 tracks, including objects, to create the spatial field. For movies, this typically involves mixing 10 tracks for a 9.1 surround bed, and up to 118 objects. However, you can distribute the 128 tracks any way you want. This is where the metadata comes into play. It specifies location or panning data, including how fast an object moves, the level of the audio, and the like. Basically, it’s the audio’s traffic director, and routes audio in the 3D soundfield.
Rendering with Atmos
The Dolby Atmos Renderer included in version 6.5 complements and adds functionality to, not replaces, your usual workflow. It can convert your mix into any of several formats, including stereo or surround. For those without multi-channel speaker systems, Binaural Rendering (fig. 4) reproduces the effect of listening over a multi-channel loudspeaker system using headphones.
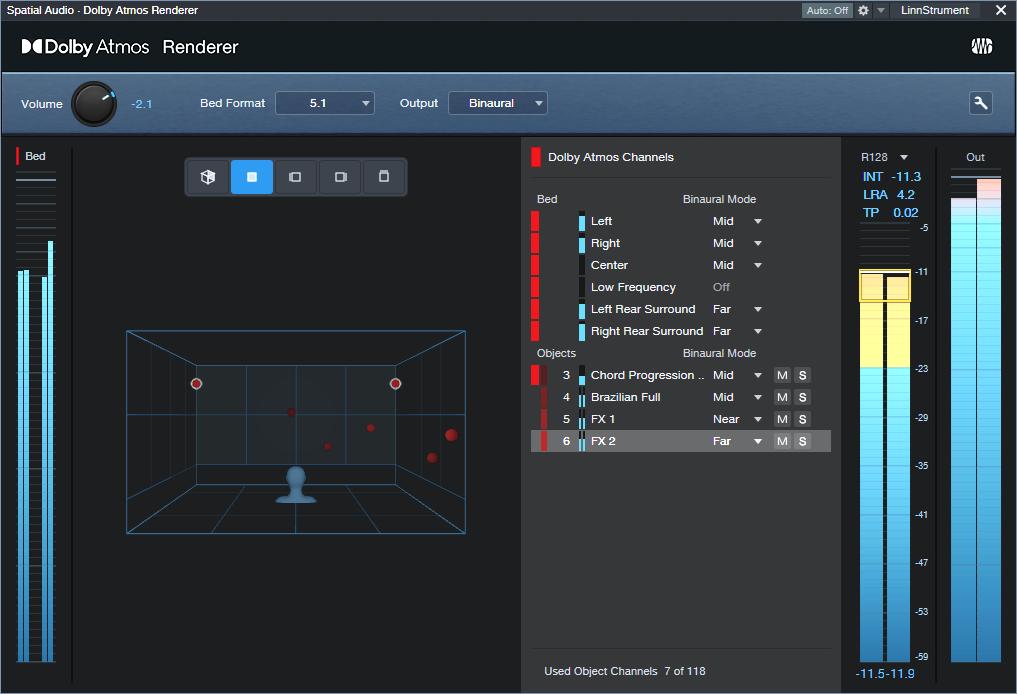
Figure 4: The Dolby Atmos renderer is rendering the mix to binaural.
And we’re back to where we started: just as binaural playback reproduces the spatial sense of a real-world 3D space, it can just as easily reproduce the spatial sense of a 3D space created with Atmos. With Studio One 6.5 and headphones, you can start playing with immersive audio now.
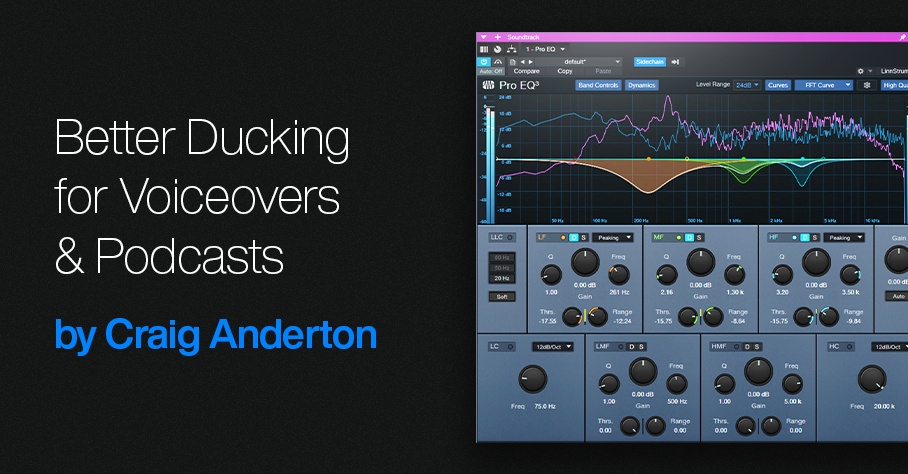
Better Ducking for Voiceovers & Podcasts
By Craig Anderton
Background music or environmental sounds are usually an essential part of commercials, movies, presentations, podcasts, and more. When doing vocal work for these kinds of projects, it’s crucial to attain the correct balance between the voice and the background.
The background level generally needs to duck under the voice when it’s present, and come back up when the voice is absent. With traditional ducking, a compressor processes the background. The voice provides a sidechain signal to the compressor. When the voice is present, it compresses the background. So, its level is lower than the voice.
This tip describes how to use dynamic EQ as an alternate, equally automatic approach that can produce more natural-sounding results. A standard compressor compresses all frequencies. Dynamic EQ can compress only the frequencies that affect vocal intelligibility…which is pretty cool.
First, Analyze Your Voice
Insert the Spectrum Meter in the voice track, after any EQ (if present). Use the settings shown in fig. 1. Play through the narration with the Spectrum Meter’s Hold parameter set to infinity. The resulting curve will show an overall average of the voice’s spectral energy. The cursor can identify where the peak responses occur. Most of my vocal energy falls in the 100 to 600 Hz range, with peaks around 1.3 and 3.5 kHz.
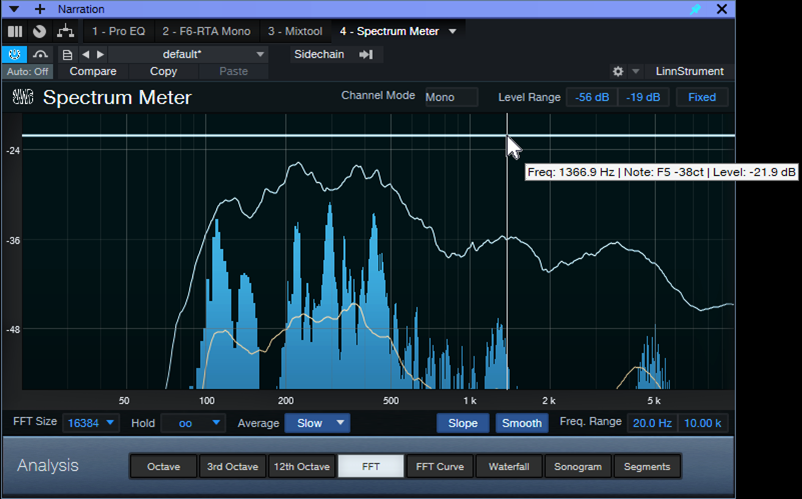
Figure 1: Spectral energy distribution for my voice. Placing the crosshairs over the curve shows the frequencies for various peaks.
Next, insert a Pro EQ3 in the soundtrack’s audio track. Add a pre-fader send to the voice track, and route the send to the Pro EQ3’s sidechain (fig. 2).
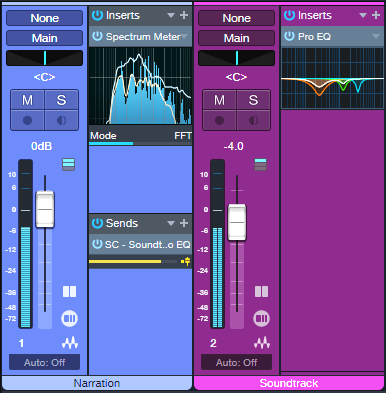
Figure 2: The voice drives the Pro EQ3’s dynamic response via a sidechain.
Finally, create a curve in the Pro EQ3 that’s the inverse of your vocal spectrum. Choose the frequencies you want to reduce, and the appropriate bandwidth for those frequencies. Set negative Range values to determine how much the frequency ranges will be cut. Then, set the Thresholds so that the voice’s peaks trigger the desired amount of gain reduction over that range. Now, the voice’s dynamics will push down the soundtrack’s frequencies that correlate with vocal intelligibility.
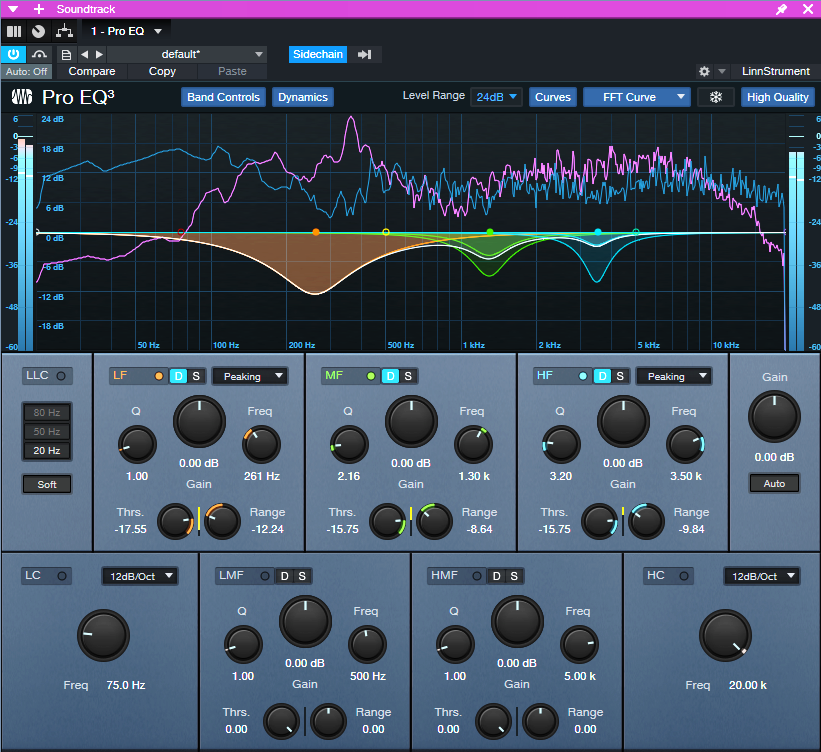
Figure 3: Typical dynamics settings for the Pro EQ3. The dips reduce peaks in the voice’s spectral energy distribution.
To quiet down all soundtrack frequencies when the voice is present, compression is still the best solution. But when you want a scalpel instead of a sledgehammer to produce a more natural ducking effect, try using dynamic EQ.
Now, if only the people mixing movie sound start doing this so we can understand the dialog…!
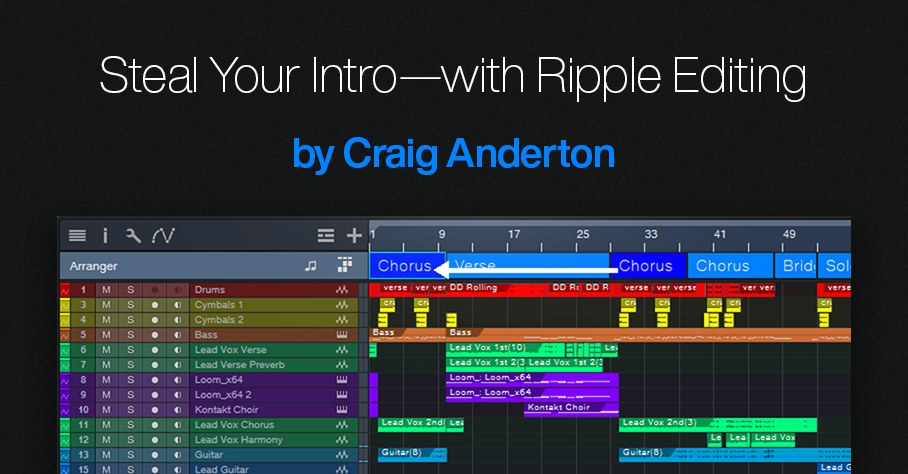
Steal Your Intro—with Ripple Editing
The post Mixing à la Studio One had a great response, so here’s another tip that relates more to making better music than making better-sounding music. We’ll focus on the all-important intro, because the most crucial part of any pop song is the first 10 seconds. If the intro doesn’t grab the listener’s attention, someone else’s song is only a click or two away.
However, you don’t always have to rack your brain coming up with a great intro—it might be hiding in plain sight. Stealing a bit of the chorus for the intro transfers some of the chorus’s excitement to the beginning. It also foreshadows where the song is heading. My most recent single, I Feel So Alive, used the following technique to replace a “meh” intro with something far more compelling.
Studio One’s Ripple Edit feature is ideal for chorus larceny. Ripple editing is a common video editing technique (see the blog post Basic Video Editing in Studio One). But let’s look at ripple editing with audio. Fig. 1 shows how ripple edits affect cuts.
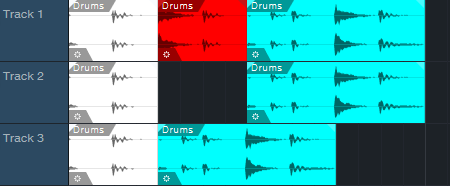
Figure 1: In track 1, the section in red is going to be cut. Track 2 cuts the section without using ripple editing, so the cut section disappears. Track 3 cuts the section but uses ripple editing. The part after the cut moves to the left, to close up the “hole” left by the cut.
Fig. 2 shows how ripple editing affects pastes.
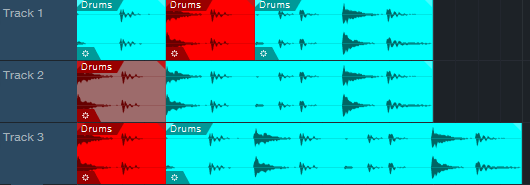
Figure 2: In track 1, the section in red is going to be copied at the beginning of the Event. Track 2 copies the section without ripple editing, so the copied section ends up on top of the original Event. Track 3 copies the section with ripple editing. Copying at the beginning of the Event moves the Event to the right, which opens up space for the copied audio.
Let’s Use Ripple Editing to Steal a Chorus
I often do song intros last. By then the song has solidified, so the intro can provide an appropriate introduction. Fig. 3 shows a song’s original arrangement. It started with two verses (shown as Verse in the Arranger track), followed by a chorus. It needed some kind of intro. At this point, I’d normally choose Edit > Insert Silence at the beginning, add enough measures for an intro, and come up with something suitable.
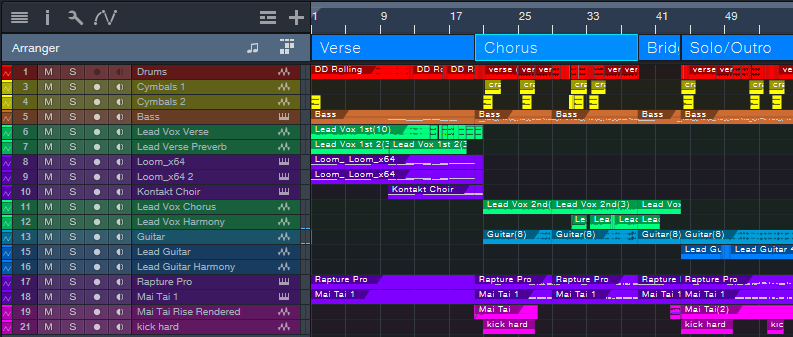
Figure 3: The original song arrangement. It needed a compelling intro before the verse.
This song contrasts soft verses with a hard rock chorus. No matter what I did, creating an intro based on the verse always seemed too chill to qualify as an exciting intro. Then when the verse went into the chorus, there was a sort of “where the heck did that come from?” effect. So, I stole the first part of the chorus by:
1. Using the Arranger track to cut the chorus in half.
2. Enabling Ripple Edit (Ctrl+Alt+R).
3. Alt+dragging the first part of the chorus to copy it at the song’s beginning (fig. 4).
The Ripple Edit function pushed the song to the right to create a space for the “half-chorus.” Now it could provide the intro. (Instead of using Ripple Edit, you could cut the chorus section, copy, select all, move the song to the right, and paste. However, Ripple Edit is faster.)
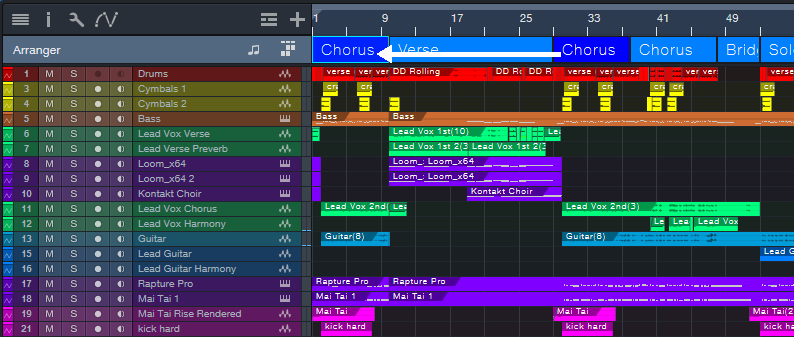
Figure 4: The first half of the chorus is now providing the song’s intro. Ripple editing has pushed the original song start to the right, to make room for the “half chorus.”
After copying and moving the first part of the Chorus, I renamed it to Intro. Additional edits ensured that the music in the new intro would lead smoothly into the verse (fig. 5).
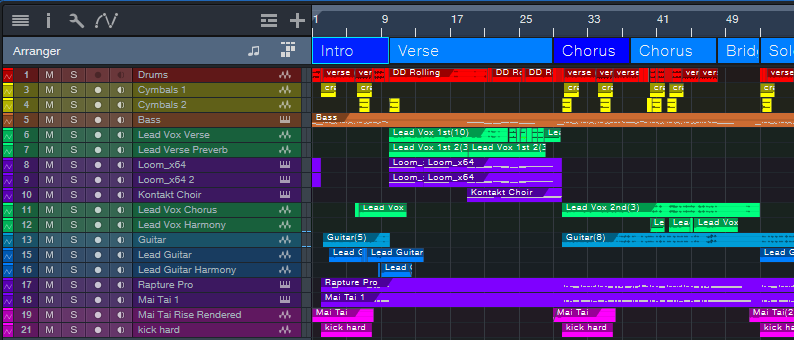
Figure 5: The final arrangement.
The main edit was replacing the leftover lead vocal from the chorus. Fortunately, a vocal phrase from later in the song sang the title. After filtering it heavily and adding some echo, it had an intriguing vibe. It also exposed the listener to the title (repetition can be good!). Adding a short lead guitar part foreshadowed the lead that comes in at the end. Moving some drum beats around, and tweaking the bass line, completed the needed edits to create an intro.
You can hear the results in I Feel So Alive, which is posted on my YouTube channel. The intro plays the “stolen” part of the chorus before going into the verse. If you keep listening past the verse, you’ll hear the chorus come in—as previewed by the intro.
Finally, let’s close with an important tip: Whenever you use Ripple Edit, turn it off as soon as you’ve made your edit! If you forget and leave it on, the next time you cut or paste, you may be dealing with unintended consequences.
Quick EQ Fixes with Dynamic “Tilt” EQ
This FX Chain’s inspiration is the Tilt filter circuit created by Tonelux® designer Paul Wolff. First used in the Tonelux MP1A mic preamp, the Tilt filter has since been virtualized by Softube and Universal Audio. However, this tip’s FX Chain not only creates the traditional tilt curve, but uses the Pro EQ3’s dynamic response to add more flexibility to the tilt EQ concept.
How It Works
The Pro EQ3’s low- and high-frequency shelf EQ stages have 6 dB slopes. Turning the Tilt macro control clockwise turns up the high-shelf Gain, while simultaneously turning down the low-shelf Gain (fig. 1). Turning Tilt counter-clockwise does the reverse. The original hardware unit tilts around a fixed 700 Hz frequency, but this FX Chain has a variable center frequency.
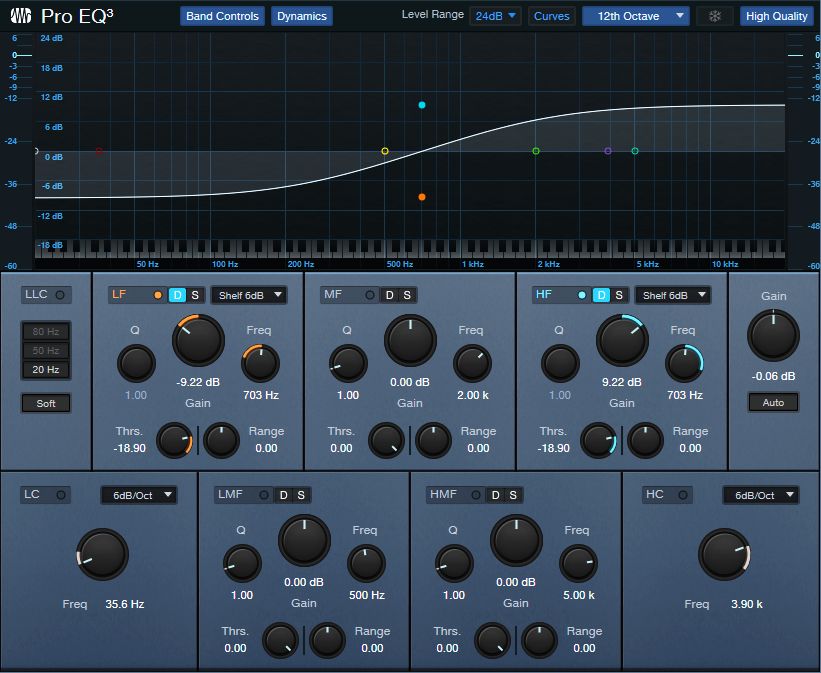
Figure 1: This curve is the result of setting the Tilt control full clockwise, which boosts treble and cuts bass.
With Range at 0.00, tweaking is easy. Center the Tilt macro for a flat response. Rotate the macro clockwise for a brighter sound, or counterclockwise for a warmer sound. This may seem simplistic, but the tilt filter concept is a brilliant design. Even with minimal effort, your tweaks will often end up sounding “just right.”
Having the EQ respond to the input signal’s dynamics makes this FX Chain different from a standard Tilt filter. Threshold sets the level above which the dynamics-based changes kick in. With Range at center, the audio’s dynamics have no effect. Turn Range clockwise for more treble and less bass when the input exceeds the Threshold, or counterclockwise for less treble and more bass. Dynamics control allows using extreme tilt settings for softer signals, but the boosts and cuts needn’t be excessive with louder input signals.
But Wait, There’s More!
The virtualized version of the Tilt EQ hardware incorporates a highpass and lowpass filter, each with a 6 dB/octave slope. It’s easy to emulate these filters with the Pro EQ’s Lo Cut and Hi Cut filters (fig. 2). Each filter has its own macro control for frequency, and an in/out button. Both filters share the Filter Slopes macro control.
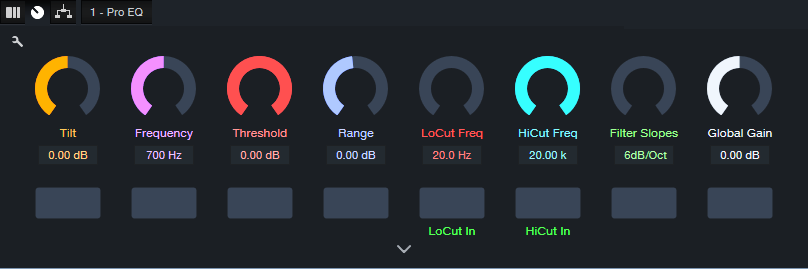
Figure 2: Macro controls for the Dynamic Tilt EQ.
I’m a sucker for simple devices that work well, and the Tilt Filter EQ is no exception. Try it—and see if you don’t agree this ultra-simple FX Chain is an ideal solution for a variety of EQ scenarios.
Create Authentic, Customizable EDM Pumping with X-Trem
But first, some breaking news: Version 1.5 of The Huge Book of Studio One Tips and Tricks is now available from the PreSonus shop. Like previous versions, it’s a free update to those who already own the book. V1.5 includes 743 pages with over 280 innovative tips, 156 free presets, 175 audio examples, and incorporates the latest changes in Studio One 6. Many previous tips have been updated, and the audio examples are better categorized. For new owners, the price is $19.95. Okay…on to the tip!
The EDM “pumping” effect has been popular for over a quarter-century. Traditionally, this effect inserts a compressor in the channel with the audio you want to pump. Then, the kick or another rhythmic element feeds the compressor’s sidechain and triggers compression. The tip Pump Your Pads and Power Chords describes how to create this effect. In this audio example, you can hear the pad in the back pumping behind a Mai Tai solo. A more limited option was presented in a tip that didn’t require a sidechain.
Setting X-Trem to a positive-going sawtooth eliminates the need for the sidechain+compressor combination. However, it doesn’t produce an authentic pumping sound. With traditional pumping, the waveform that does the pumping depends on the compressor’s setting. Typically, an exponential attack settles into a sustained section (fig. 1).
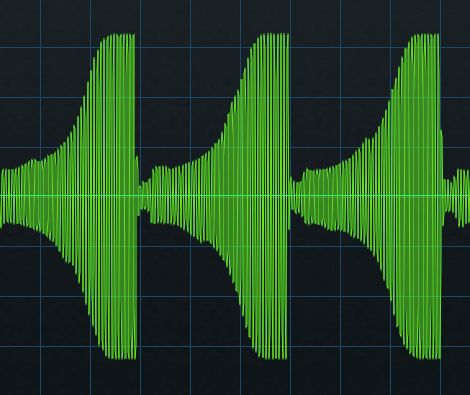
Figure 1: Studio One’s (vastly underrated) Scope plugin shows the amplitude of the pumping curve created by a compressor/sidechain combination.
The X-Trem’s sawtooth has a linear rise time (fig. 2). This doesn’t sound like traditional pumping.
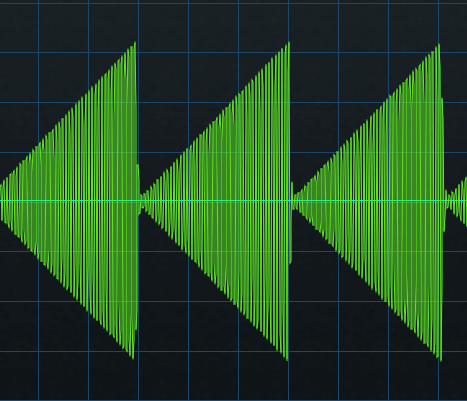
Figure 2: The X-Trem’s Sawtooth waveform.
Although you can use a single X-Trem’s step waveform to create an LFO shape that resembles compressor/sidechain-based pumping, you can hear the transition between the 16 steps. Fortunately, using two X-Trems in series can create an authentic pumping sound. The first X-Trem generates a sawtooth wave, while the second X-Trem shapes the sawtooth into a smoother, more accurate modulation waveform (fig. 3). You can even customize the pumping’s shape, like you would by altering a compressor’s controls.
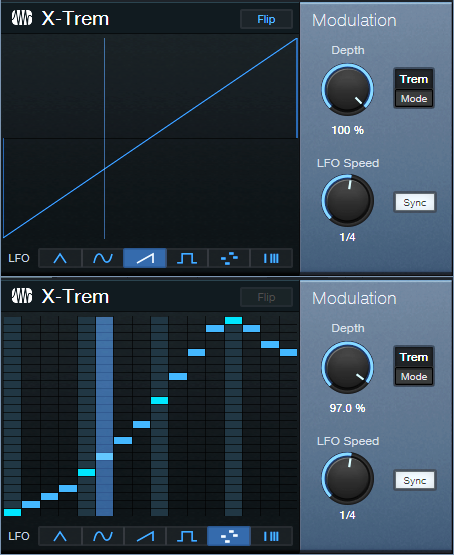
Figure 3: The secret to X-Trem-based pumping is using two in series.
This creates a waveform like fig. 4. The ultimate shape depends on how you set the levels of the 16 steps in the second X-Trem. For example, in my ideal world the pumping would start from a minimum level—so that’s what it does.
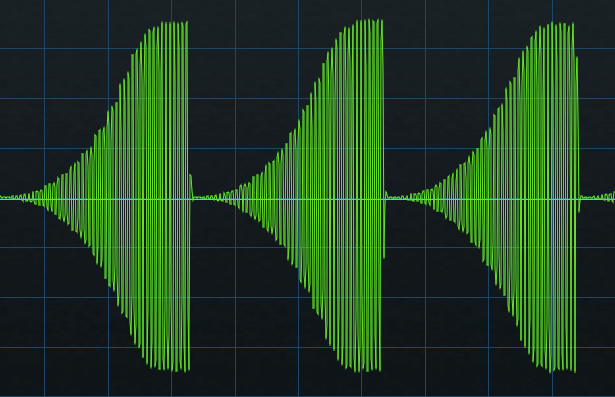
Figure 4: The waveform created by two X-Trems in series emulates the shape of sidechain+compressor-based pumping.
To make using the EDM Pumper even easier for Studio One Professional users, there’s a download link to a Pumper FX Chain. Fig. 5 shows the control panel.
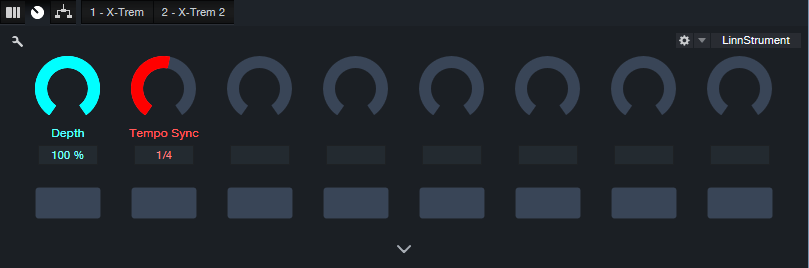
Furthermore, users of Studio One Artist or Professional can download five X-Trem presets. These create pumping curves with five different shapes (Pumper Wave 1.preset is the one I use the most.) So, now it’s easier than ever to pump anything—without needing a complex sidechain+compressor setup.
Download the EDM Pumper.multipreset FX Chain here.
Download the folder with five X-Trem Presets here.
Superspeed Comping with Studio One 6.2
Studio One 6.2 reworked Layer and Take handling, and some of the new functionality is exceptionally useful. For example, suppose you want to record comp vocals for two choruses, and a harmony part for the second chorus. Previously, you had two options: set a comping range that covered both choruses, and then do a separate set of comped Takes for the harmony. Or, comp one verse, then stop. Set up to comp the next verse. After completing that, set up to comp the harmony.
With version 6.2, you can do all your Takes, for both choruses and the harmony, in a single comping operation. The same technique works for any parts in a song that occur more than once, like verses. The only constraint is that the sections need to have equal lengths. Here’s how the process works.
Fig. 1 shows the first chorus set up for comping. Below it are 12 Takes: 4 for the first chorus, 4 intended for the second chorus, and 4 intended for the second chorus harmony. (Personal bias alert: I try to avoid doing more than 4 comps for any given part. If I can’t nail a take in four tries, it’s probably time to move on and try again some other time.)
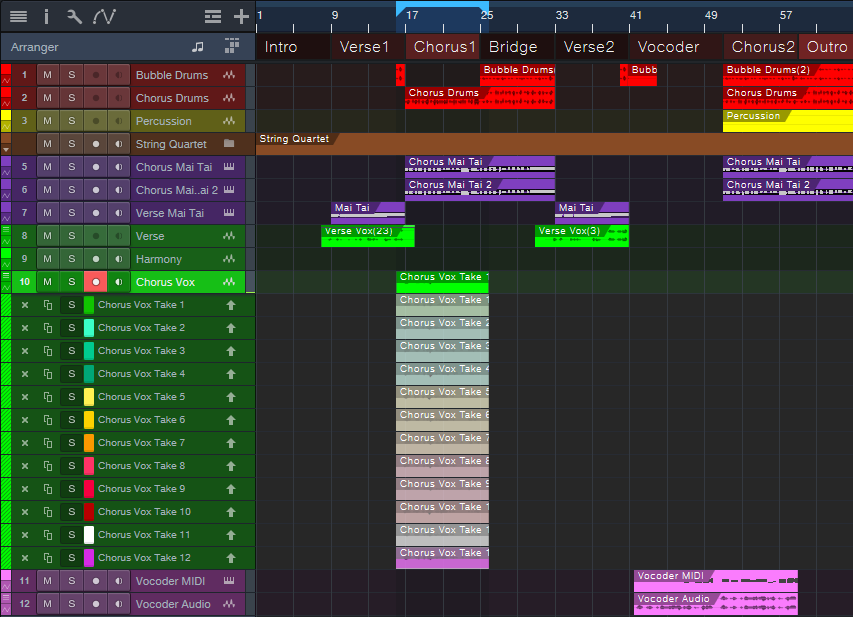
Figure 1: All the needed Takes have been recorded for both choruses and the harmony.
With v6.2, you can move layers around as easily as any other Event. Click on a layer while holding Ctrl/Cmd, and drag. Fig. 2 shows the second group of Takes moved to the second chorus.
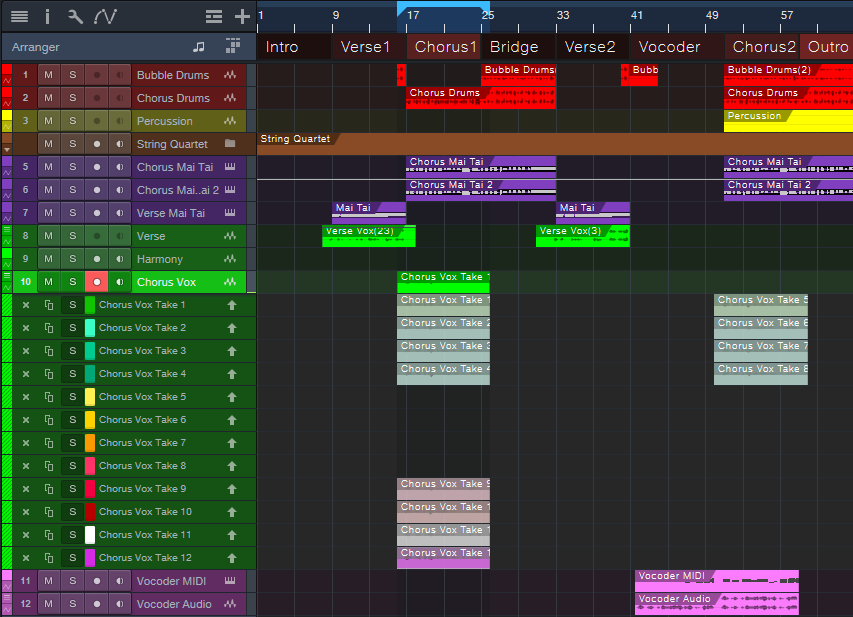
Figure 2: The next group of Takes has been moved to the second Chorus.
The four Harmony Takes need to go in the Harmony track instead of the original parent track. Creating four layers for the Harmony track provides a place to move the Harmony Takes (fig. 3). Now all the comps are in place, and ready for editing.
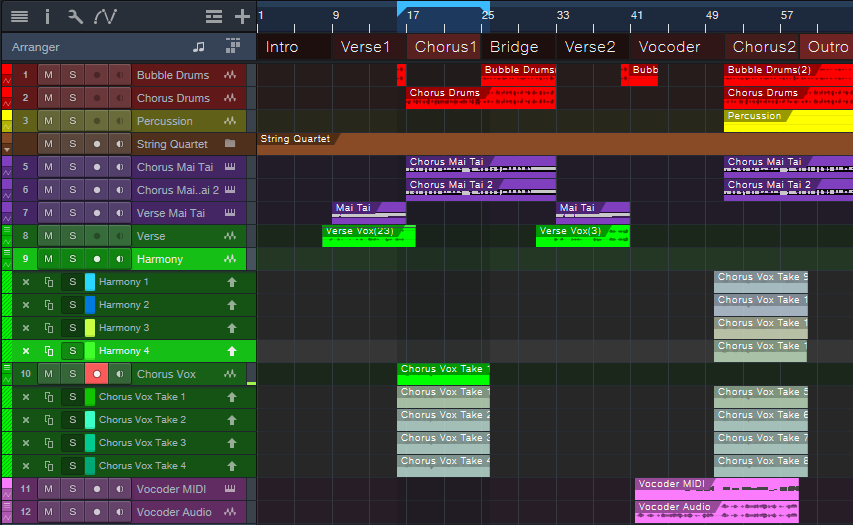
Figure 3: Adding four layers to the Harmony track provides a home for the harmony Takes.
Fig. 4 shows the final result: the edits are done for the two verses and the harmony. Complete the process by deleting the unneeded layers.
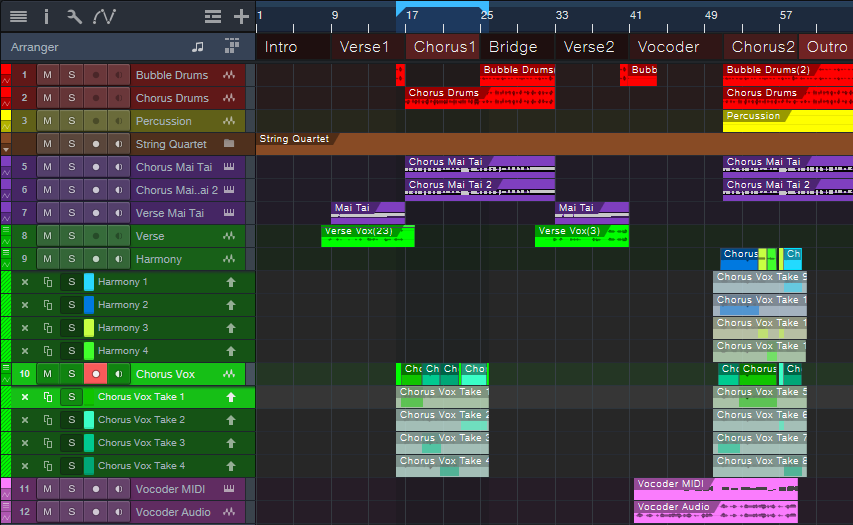
Figure 4: All the Takes have been edited to create the final composite vocals.
But Wait…There’s More!
This is only one application of Studio One 6.2’s enhanced layering. In the example above, suppose I messed up a word in the second chorus, but the first chorus had two Takes with a good version of the word. Previously, you needed to promote the alternate word to the parent track, move it, and then promote the original word. It’s now possible to select part of any layer with the Range tool, and unlike the Arrow tool, this avoids promoting the selection to the parent track. Click on the selected part while holding Ctrl/Cmd, and drag it out of its layer to use it elsewhere.
It’s great that comping and layers continue to improve, but don’t overlook the existing shortcuts and advanced techniques. If you haven’t checked out the Help section on comping and layers in a while, it’s worth re-visiting.
The PhaseTone Warper

We haven’t done a “boutique digital effect” for Studio One Professional in a while, so let’s use a plugin in a totally wrong way—yet end up with something cool. This unconventional tone control is based on phase interactions in different frequency bands. You’ll find a download link for the PhaseTone Warper FX Chain at the end of this post.
It’s a Feature…Not a Bug!
Like traditional analog filters, the Splitter’s frequency-splitting crossover produces varying amounts of phase shift at different frequencies. Normally, these phase shifts are not significant. However, mixing a dry signal in parallel with the Splitter, and changing the frequencies of the Splitter’s Frequency splits, creates phase additions and cancellations at various frequencies. The result is a novel tone shaper. I’ve used the PhaseTone Warper with synths, guitars, cymbals, amp sims, and more…it’s fun, and different. One application is creating subtle (or not-so-subtle!) timbral differences in the same instrument for different verses or choruses.
How It Works
The FX Chain starts with a Splitter in normal mode. It splits the incoming audio into a dry channel that incorporates a Mixtool, and a second Splitter in Frequency Split mode (fig. 1).
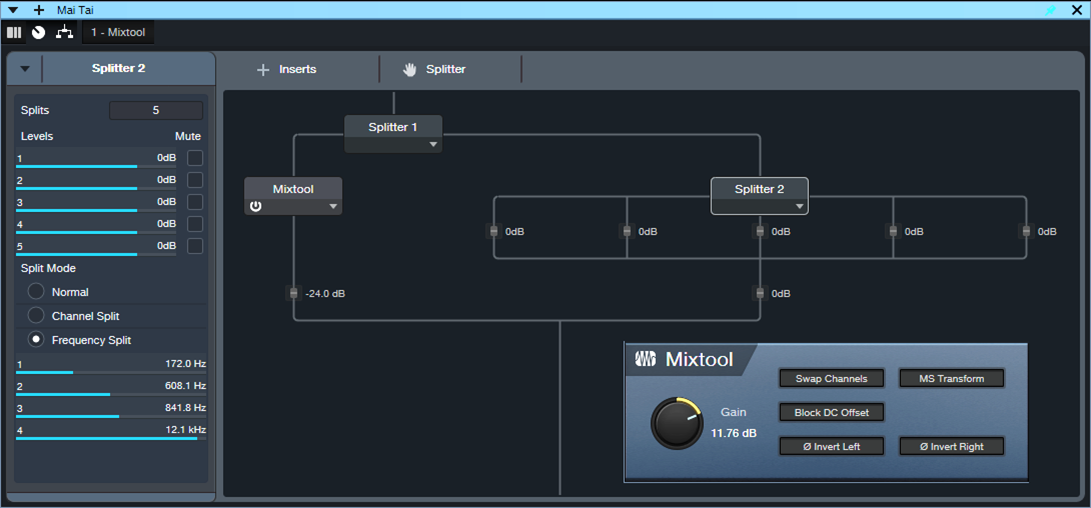
Figure 1: The FX Chain block diagram.
Varying Splitter 2’s frequencies produces a variety of unusual, phase-based equalization changes. They’re difficult to describe, and sound somewhat like a voicing control. The audio example gives some representative sounds, as applied to distorted guitar. The first phrase has no processing. Subsequent repetitions use various PhaseTone Warper settings.
Fig. 2 shows the control panel. The effect is most pronounced with Intensity turned up all the way. Turning it down gives more subtle effects. The buttons alter the stereo image in unpredictable ways.
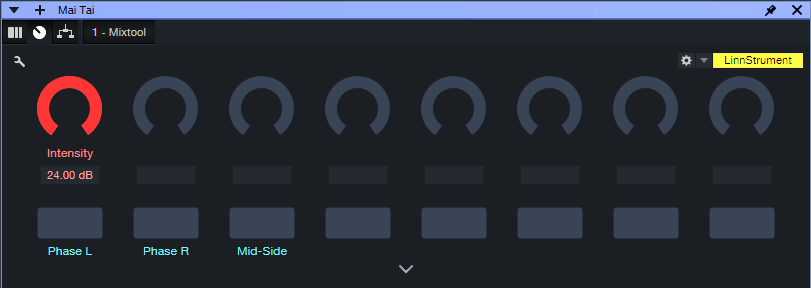
Figure 2: Channel Editor macro controls.
Unfortunately, Splitter 2’s frequency settings are not automatable and can’t be assigned to control panel parameters. So, you have two ways to access the Splitter’s four frequency parameters:
- Open up the Splitter 2 module in the FX Chain
- Expand Splitter 2 in a Mixer channel (fig. 3). This makes adjusting the parameters easy.
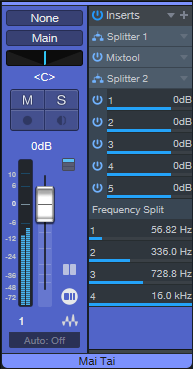
Figure 3: Expanding Splitter 2 makes the Frequency Split controls available for easy editing.
So…when you’re looking for that “sound-I-haven’t-gotten-before,” give the PhaseTone Warper a try. Although the demo shows it with a distorted guitar, also try synthesizer sounds with lots of harmonics, cymbals, noise, orchestral sounds, and more. (And don’t overlook dry guitar—you’ll hear an almost varitone-like effect.)
Download the PhaseTone Warper FX Chain
Improve MIDI Drum Loop Flow
MIDI drum loops have a bad rap, because some musicians consider them metronomic and boring. But they don’t have to be. Subtly leading or lagging the beat at strategic moments, like physical drummers do, can give a better “feel.” You can also introduce slight, random variations with Studio One’s humanize function.
This tip covers yet another option: pitch changes. Harder hits raise the pitch of acoustic drums. Sometimes, electronic drums are programmed to emulate this effect. Furthermore, pitch changes can go beyond subtlety to create special effects.
Impact XT responds to pitch bend, but bending affects all drums that trigger at the same time. This technique is more selective. It uses automation to vary the Tune parameter for Impact XT’s individual pads.
The following drum loop is for reference, prior to any automated pitch changes.
Creating Automation Data
You can automate individual pads in the Arrange View or Edit View. I prefer creating automation in the Edit View. This makes it easy to see the correlation between a pad’s notes and the associated automation data. Here’s how to add automation in the Edit View:
1. Click on the three dots … at the left of the controller labels in the Edit View’s Automation Lane. This brings up the Add/Remove automation dialog (fig. 1).
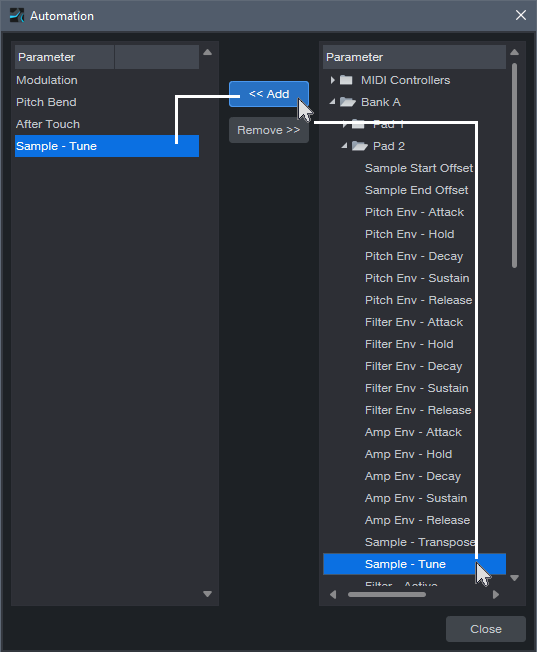
2. In the Parameter column on the right, locate the pad you want to automate. For example, in fig. 1 the snare is on Pad 2 in Bank A.
3. Click on the Sample – Tune parameter to select it.
4. Click on <<Add. The target parameter will appear in the left Parameter (automation type) column.
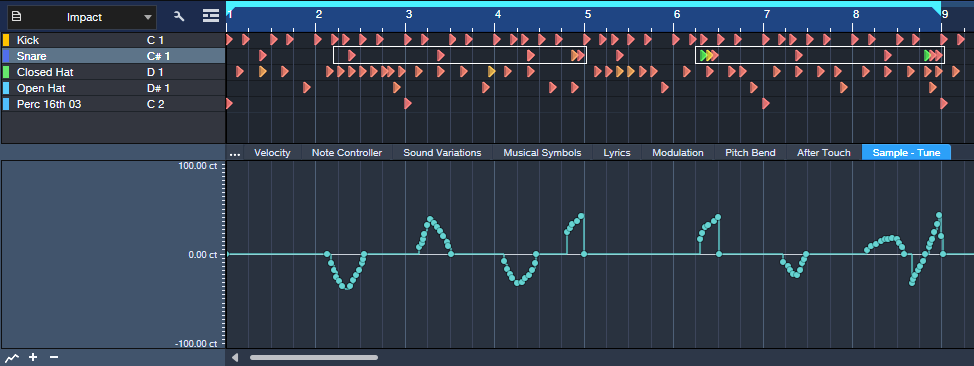
5. This adds a Sample – Tune tab to the Edit View’s existing controller lane options. Now you can click on this tab when you want to draw automation that changes the drum’s pitch (fig. 2).
Viewing Automation
As you add automation for more pads, you can view the automation in two ways:
- See the automation data for one pad at a time in the Edit View’s Automation Lane. As you add automation for the same parameter (e.g., Sample – Tune) in different pads, each new automation envelope adds its own tab for that controller. To switch among the different pads’ automation data, click on their associated tabs. However, this can be confusing because different pads that use the same type of controller have the same controller name for their tabs. You won’t know which pad a particular tab controls, unless you remember that tabs are added from left to right as you assign more automation.
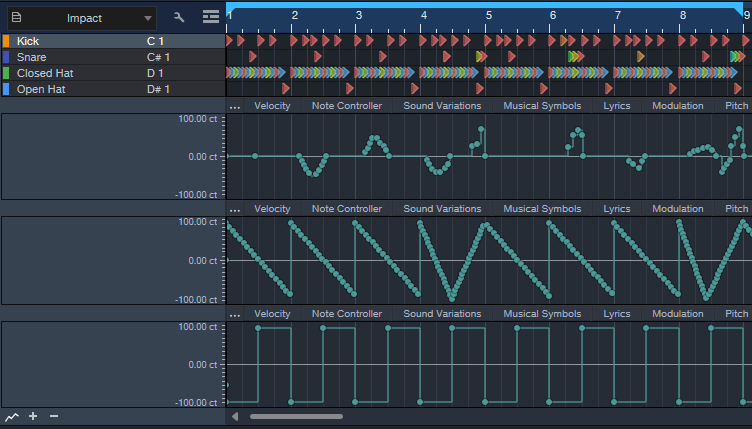
- Add multiple Automation Lanes so you can see the automation data for several pads at once (fig. 3). Again, you can’t see the target pad’s name in the Automation Lane, but you can see them all at the same time.
With the second option, the Edit view can become cluttered. So, after creating automation in the Edit view, I often use a third option:
1. Create an automation track in the Arrange View that’s the same as an Automation Lane in the Edit View.
2. Copy the automation in the Edit view.
3. Paste it into the Arrange view’s automation track. Note: Studio One recognizes a MIDI track’s start as its first piece of data. To paste automation data at the beginning of an Arrange View’s automation track, prior to copying the data, add a node at the beginning of the Edit View’s Automation Lane.
4. Delete the automation in the Edit View. Now the Edit View’s Automation Lane is available for displaying new automation data.
Transferring automation data in this way provides two main benefits:
- In the Arrange view, you can set Auto: Off to turn off existing automation data while you add new automation data in the Edit View.
- To show the full name of the target parameter being automated, right-click on the parameter name in the Automation Track.
Additional Creative Options
To change drum pitches in novel ways, try drawing automation waveforms (fig. 3) and sometimes, using the Transform tool. For example, draw a downward sawtooth for hi-hat automation, using 1-measure quantization. Now, the pitch descends over the course of a measure. With kick, use square wave automation to create a lower pitch for a measure’s first half, and a higher pitch for the second half. This gives a less static feel.
The following example includes the automation edits shown in fig. 3. This isn’t intended to showcase an ideal application, but demonstrates how subtle and selective changes can alter the loop’s sound. When mixed with other tracks, you “feel” the difference more than hear it as an obvious effect.
But of course, you don’t have to be subtle—automate Transposition instead of Tune, and you’ll have semitone changes. That can work well with hand percussion parts where the hits have short decays. In any case, automating pitch can add a new flavor to MIDI drum loops.