Tag Archives: Studio One
How to Create Compelling Mixes in Studio One—New from Craig Anderton
Available NOW at shop.presonus.com from Craig Anderton… How to Create Compelling Mixes in Studio One! This is Craig’s third book on Studio One, and it weighs in at a whopping 258 pages!
Click here to read more and shop!
Mixing is where you create an experience that transports the listener into your musical world. And now, renowned music technology expert Craig Anderton brings his years of production and mixing expertise to an easy-to-understand, comprehensive guide about all aspects of mixing. Chapters include Mixing Philosophies, Technical Basics, Mixing with Computers, How to Use Plug-Ins, Mixing and MIDI, Prepare for the Mix, Adjust Equalization, Dynamics Processing, Sidechaining, Add Other Effects, Create a Soundstage, Mix Automation, Final Timing Tweaks, and Review and Export.
Profusely illustrated, and loaded with constructive, practical, meaningful advice that will improve your mixes dramatically, this 258-page eBook sets the standard for discovering how to make compelling mixes in Studio One.
- 258 pages, 67,500 words, over 180 four-color illustrations
- Downloadable PDF, with links from the contents to book topics
- “Key Takeaways” section for each chapter summarizes chapter highlights
- “Tech Talk” sidebars do deep dives into selected topics
- Covers all aspects of mixing with Studio One
Chapter 1: Mixing Philosophies
Chapter 2: Technical Basics
Chapter 3: Mixing with Computers
Chapter 4: How to Use Plug-Ins
Chapter 5: Mixing and MIDI
Chapter 6: Prepare for the Mix
Chapter 7: Adjust Equalization
Chapter 8: Dynamics Processing
Chapter 9: Sidechaining
Chapter 10: Add Other Effects
Chapter 11: Create a Soundstage
Chapter 12: Mix Automation
Chapter 13: Final Timing Tweaks
Chapter 14: Review and Export
Appendix A: Mixing with Noise
Appendix B: Calibrating Levels
Friday Tip: Percussion Part Generator
Just as we can use plug-ins to process audio, Studio One’s Note FX are plug-ins for MIDI data. They tend to be overshadowed by our shiny audio plug-ins, but have a lot of uses…like generating cool percussion parts.
This may sound like a stretch (“c’mon, can it really generate a musical percussion part?”), but the audio example will convince you. The first four measures are a percussion part created by the Arpeggiator NoteFX, the second four measures combine the percussion part with a house drum loop, and the final four measures are the house drum loop by itself—so you can hear how boring the loop sounds without the added percussion part.
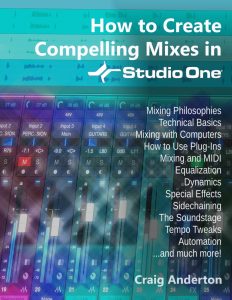
This part was created with three conga and two bongo samples, each assigned to its own MIDI note. The initial “part” was just those five notes, each with a duration of four measures. It doesn’t really matter how long the notes are, you just want them to be continuous for the duration of the drum part. I then added the Note FX Arpeggiator plug-in to arpeggiate the notes (Fig. 1).

Figure 1: The Note FX Arpeggiator, set up to play different drums at different velocities.
By themselves, the standard up/down and down/up patterns tend to sound overly repetitive. The Random option (outlined in red above) helps, but then you have a random percussion part, which doesn’t relate to the music. So let’s introduce the secret sauce: automation (Fig. 2).
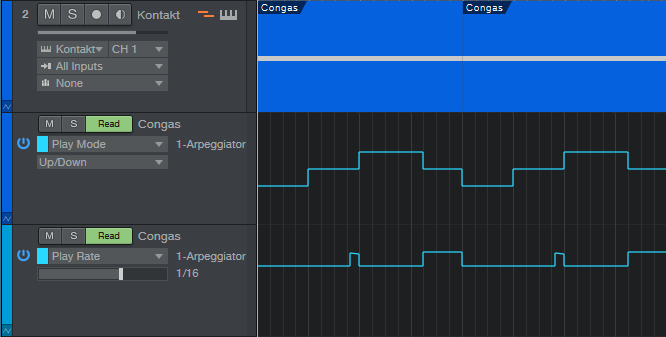
Figure 2: The automation lanes control Note FX parameters.
The key here is automating the Play Mode and Rate. The Play Mode automation starts with up/down for a measure, then down/up, then random for a bit more than a measure, and then down/up again. This adds variety to the part, and when it repeats, the random section creates additional variations so that all the parts don’t sound the same.
But what really adds the human element is varying the Rate. It starts off as 1/16th, but then just before the third measure starts, does one beat that starts with 1/32nd notes and ramps down over the beat to 16th-note triplets. The last three beats of the four measures uses a 32nd-note Rate so that the “robot percussion” adds some tasty, faster fills to lead into the next measure. I used down/up during these faster parts, but random can sound good too.
The final touch is Swing, which is set to around 70% in the audio example. Note how even though the drum loop is metronomically correct, adding swing to the percussion part lets it “dance” on top of the drums.
Now, here’s a very important consideration: You may look at the above and think “this sounds too easy,” or maybe “but what are the exact settings I should use?” The answers are yes, it really is that easy; and the exact settings really don’t matter all that much—feel free to experiment. Studio One’s little robot percussionist is full of surprises, and the way to uncover those is to play around with the settings, and automate them to create variations.
Finally, I’d like to mention that I have a new eBook out! At 258 pages, “How to Create Compelling Mixes in Studio One” is considerably longer than my two previous Studio One books. I’ve been working on it for the past year, and it’s finally available in the eBook section of the PreSonus shop. Check it out—I sincerely hope it helps you make better mixes.
10 Presence XT Techniques
September is winding down, but we still have one week left to celebrate Studio One’s 10th anniversary—so it’s time for another Friday Tip with 10 Tips! Let’s take a look at some practical, convenient techniques you can do with Presence XT. And yes, there’s a fun downloadable preset at the end.
- “Tighten” and “Loosen” Drum Kits

The Artist Instruments folder has a bunch of drum kits. However, I like to fine-tune drum pitches—higher pitches for a tighter, more beatbox/analog drum sound, or lower for a big rock vibe. Although the Sample Shift control can change pitch, it also changes where the drum appears on the keyboard. For example, if you Sample Shift a snare on the F key by +3, then the drum is lower in pitch, but it now plays back on D instead of F.
There’s a simpler way to tune your drums. Set Env 2 to Full Sustain, and modulate Pitch with it. Turn the modulation amount up to tighten the sound, or down to loosen.
- Control Presence Effects with the Mod Wheel

According to Presence, you can’t control effects parameters with the mod wheel—but there are a lot of useful techniques you can do with a mod wheel, other than control vibrato. Here’s one way to control the effects with your keyboard controller’s mod wheel.
- Choose Studio One > Options, and click on External Devices.
- Click on Add, and choose New Control Surface. Set Receive from your keyboard. You’ll get a scary message warning you “This port is already in use,” but just ignore it and click OK.
- Click OK on the Add Device menu, and now Studio One thinks your keyboard is a control surface.
- In the Mix view, click on the External button toward the left. When the External Devices column appears, double-click on New Control Surface.
- Click on MIDI Learn, and move your mod wheel. Name it to make it feel welcome, and then disable MIDI Learn.
Now you can link anything you want with the mod wheel, including effects. For example…
- Control Distortion Drive with the Mod Wheel
Adding distortion to bass is a beautiful thing, and it’s even more beautiful when you can control the distortion amount with the mod wheel.
- Click on the Edit Mapping button in Presence’s upper right (the somewhat inscrutable gear symbol). Now you can see the control mapping in Presence—which is really important if your monitor isn’t wide enough to show the Edit Mapping option in the toolbar.
- Contrary to the help, which assumes you’re rational and using a separate hardware control surface, move the Mod wheel and it should show up in the right side of the Edit Mapping section.
- Move the Distortion Drive control, which will show up on the left side of the Edit Mapping section.
- Click the “assign” triangle in the middle of the Edit Mapping section, and now the Mod Wheel will control the Drive control. (Another tip: distortion gourmets recommend “Bad Tube” as the best choice for bass distortion.)
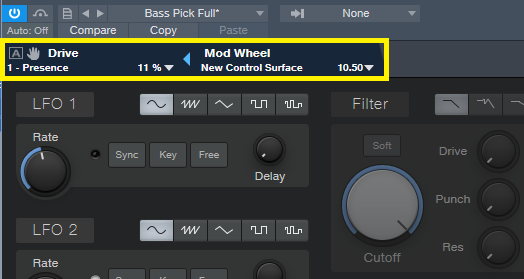
- More Expressiveness
The Sample Start Mod control can add major expressiveness because it lets you control the attack’s character via velocity. Here’s how it works: when Sample Start Mod turned counter-clockwise off-center, with low velocities playback starts further into the sample, past the initial attack. But higher velocities trigger the full attack sound. For example, with an instrument like Slap Bass, this technique can emphasize the slap component with high velocities, while lower velocities bypass the slap. However, Sample Start Mod can affect any instrument with a defined attack.
Because a sample may not start at a zero-crossing, you may hear a click with some velocity values. Adding a little bit of Amp Env attack (usually only a millisecond or two) fixes this.
- Change the Female Choir into Monks
Call up the Vox > Choir > Choir Full preset. Set Transpose to -12, and Sample Shift to Semi-Tone: 12. You might also want to slather on some more reverb by turning up the Size and Mix, but regardless, you’re ready for your next moody movie soundtrack, or Gregorian chants dance remix.
- Get Saxy
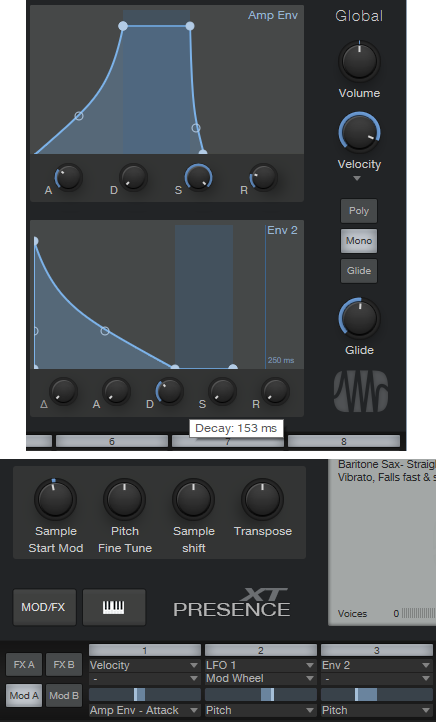
Let’s face it, John Coltrane fans—a sampler will never replace a sax player. However, the Winds > Baritone Sax > Baritone Sax Full preset is pretty good, so it seemed like a useful starting point for something a little more expressive. There are several treaks, but the main action is with the modulation.
- Set Sample Start Mod to -7000. If you play softly, this starts playback further into the sample, so you don’t hear the attack. However, as mentioned previously, modulating sample start can produce clicks because playback may not start on a zero crossing, so…
- Set the Amp Env Attack to 83 ms. This gets rid of any clicks. However, we want a fast attack with high velocities, so…
- In the Mod section, use Velocity to apply negative modulation to the Amp Env attack (you don’t need much) so that hitting the keys harder gives a faster attack.
- We also want to have notes bend up to pitch somewhat, so set the Decay for Env 2 to 153 ms. Again in the Mod section, use it to apply negative modulation to pitch. This causes the pitch to start off somewhat flat, then slide up to the correct pitch.
The penultimate touch is some vibrato by modulating Pitch. I used LFO set to about 4.5 Hz, with 680 ms of Delay time, controlled by the Mod Wheel (although I think Aftertouch is an even better choice, if your controller supports it). And of course, we want some reverb. The existing reverb is okay, but push the Size to 2.45 seconds, and Mix to 45%. Yeah, that’s the ticket! You might also want to choose Mono, unless you know any saxes that play chords. And yes, I’ve provided a downloadable preset for your playing pleasure—scroll down to the end.
- Foolproof Bass Slides

Set the bend to +7 for bend up, and 0 for bend down. Now when you want to slide down to a note, start at the top of the mod wheel, and then bring it down at whatever rate you want. It’s impossible to “overshoot” the target note, even when using the virtual mod wheel on the instrument GUI, with bend down set to 0.
- Add Analog Synth “Drift”
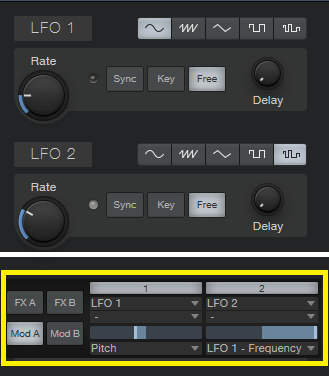
The pitch of analog synths drifts over time. Although Presence XT has a random LFO waveform, it’s stepped, and there’s no way you can “round off” the corners to create smooth variations. But there’s a solution (isn’t there always…). Use the sine waveform for LFO 1 and set it to a low rate, like 0.1 Hz. Select the random waveform for LFO 2, set to a slightly faster rate (like 0.4 Hz), and use it to modulate LFO 1. Meanwhile, use LFO 1 to modulate pitch; you don’t need to use much modulation to obtain a useful effect. Try this with Artist Instruments > Synths > Analog Fifths—you’ll be impressed.
- The Presence XT Editor Is Worth It

There might be a tendency to overlook the editor because Presence XT does enough on its own. And yes, I know the editor is $79.99. But, it’s cheaper than getting another sampler, and the capabilities are impressive. It’s easy to figure out, and it doesn’t take long to add samples—for example, you can specify the root note, high note, and low note by hitting keys. When using per-note samples, you can do fine-tuning, as well as add expressive features like sample start. Presence XT Editor is also a development system, so if you come up with some amazing presets, you can put them into a saleable bundle, and even password-protect it. If you’re into sound design and creating sample-based instruments, I highly recommend unlocking Presence XT’s Editor page.
- But Wait—There’s More!
Presence XT can load sounds from other formats—EXS, Giga, Kontakt version 4 (and below), and Sound Fonts. Finally, check out Tip 1 in the September 13 Friday Tip on using ATOM as an auxiliary keyboard. This makes it easy to access the keyswitching in Presence XT presets that contain this feature, even if you have only a four-octave keyboard.
I hope y’all enjoyed this month’s special editions of the Friday Tip. Happy birthday, Studio One!
Download the saxy sax preset, CA Baritone Sax Full
PULL N WAY and the 24 hour Studio One Challenge!
Take a second and consider all the things you accomplish in 24 hours…
We’ll wait.
Now. Think about re-writing, producing, mixing, and mastering a song in that amount of time and putting it out for the public. Sound reasonable? Oh, and be sure to book a photographer to shoot the cover art for the single.
Did we just give you an anxiety attack? Sorry.
That’s the exact challenge that was presented to PULL N WAY, a female pop duo from Central Switzerland. Fortunately, Studio One was there to help tackle the assignment.
LATTESSO is a “cold coffee to go” brand in Switzerland. They connected with PULL N WAY for the launch of their latest vegan products. LATTESSO based the 24-hour challenge on the idea to have PULL N WAY re-write one of their existing songs—which would include tracking new vocals and creating new cover art, including photography. Watch the whole challenge here:
We had the opportunity to chat with PULL N WAY and their producer, Andy Prinz about the challenge.
During the challenge, did you want to give up? What kept you going?
Well to be honest, the hours between 3 a.m. and 6 a.m. were the hardest. We just came back to the studio after our photoshoot in Zurich. We almost fell asleep but our passion kept us motivated to continue the challenge! We managed it to finish the song and we sang tons of other songs to stay awake.
 What do you like about PreSonus? What caught your eye?
All the gear is fantastic and affordable. We use Studio One to track all our vocal recordings, edit/comp the vocal tracks, and create basic ideas in pre-production. For monitoring, we have two Sceptre S8s and a Tremblor, and for the recording a Studio 192 USB interface with two priceless headphone outputs and latency-free monitoring. Studio One is a fantastic piece of software, for both composing and producing—and it’s super fast with all the drag & drop functionality. Plus, we love the graphical interface!
When did you first hear about Studio One?
Andy, one of our producers, is a long-time Studio One user… I think from version 1.6 on! So all our first recordings from four years ago had been done in Studio One, and with further PreSonus gear already, so it’s basically the DAW we’re introduced to from the very beginning.
What features are you most impressed with your gear?
The drag & drop functionality, vocal comping, Melodyne & VocALign integration via ARA, new gain functions and the GUI. We totally fell in love with the ATOM controller, which we’re starting to use as a live tool to trigger samples or vocal/drum loops from our existing songs.
How easy/difficult was Studio One to learn during the 24-hour challenge?
It was super easy to record and edit all vocals in this short time, and we made it all on our own. For the final product, we had help from Andy.
Where did you go for support?
We had a basic introduction by our producer, and just learned by doing in Studio One Artist—and we used some YouTube tutorials as well.
Where did you go for inspiration?
We worked with a really cool film crew, they are as old as we are so we had a great time together which made it easy to think about the new lyrics which represent those happy and positive vibes. So we didn‘t really need to go to a certain place to get inspired.
Any other thoughts on Studio One or PreSonus gear?
The gear is affordable and offers a huge variety of functions for semi pro’s and professionals alike! We also like that we don’t have to carry a dongle for Studio One! PreSonus is part of our musical journey for a long time and we’ll continue using it for all current and future recordings. At the moment we’re writing and producing new songs for various collaborations and new Pull N Way songs.. so stay tuned. Equipment: We just found out on Instagram that PreSonus has released some microphones! We’ll definitely try these out!
Recent projects? What’s next for you?
We have released our debut album “Colours” this year but–after several live gigs during Summer–we’ve already started working on new material for our upcoming releases, ranging from Pop to Electronic. We’ll also try to make at least 1-2 cloud trap songs… therefore we’re actually looking for a suitable French rapper. Besides that, we have loads of featuring requests, mainly from the EDM scene/DJs and we’re currently evaluating what’s best for us and what’s the best fit!
Follow PULL N WAY on Instagram here!
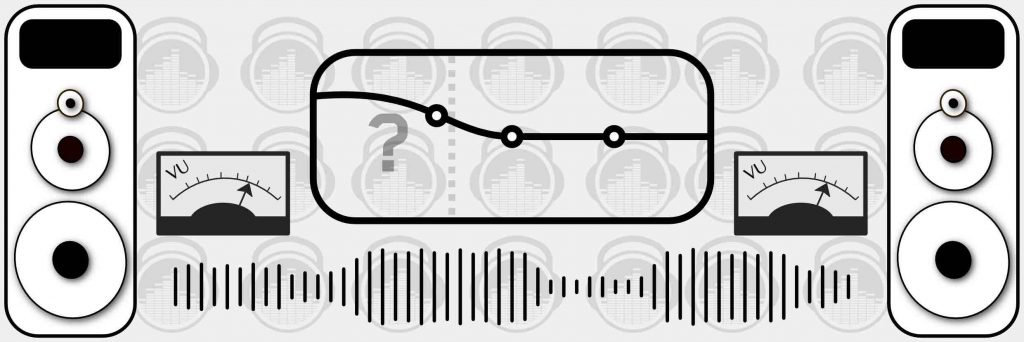
Mastering the low end with BASSROOM

Tom Frampton
This blog post will tell you how to get the perfect amount of bass when mastering audio using BASSROOM.
This is where so many potentially awesome tracks fail. Too much bass and your track will sound bloated and lack clarity. Not enough bass and your track will sound weak.
I have a process that helps me set the perfect amount of bass for my clients every time. Since I implemented this technique I can honestly say that my mastering business has dramatically improved (more than doubled!)
I hope that this technique helps you too, whether it’s growing your studio business or simply nailing the master of a track that will further your career as an artist.
Let’s start with why nailing the low-end is so difficult:
- Monitors with great low-end response are super expensive.
- Acoustic treatment is expensive BUT essential for any monitors (expensive or not) to be effective.
- Even when we have great monitors and acoustic treatment how can we be sure of what the perfect low-end level is?
So we’re up against a few hurdles here, but the technique I’ll explain will improve the low- end of your masters, even in the most basic studio set-ups.
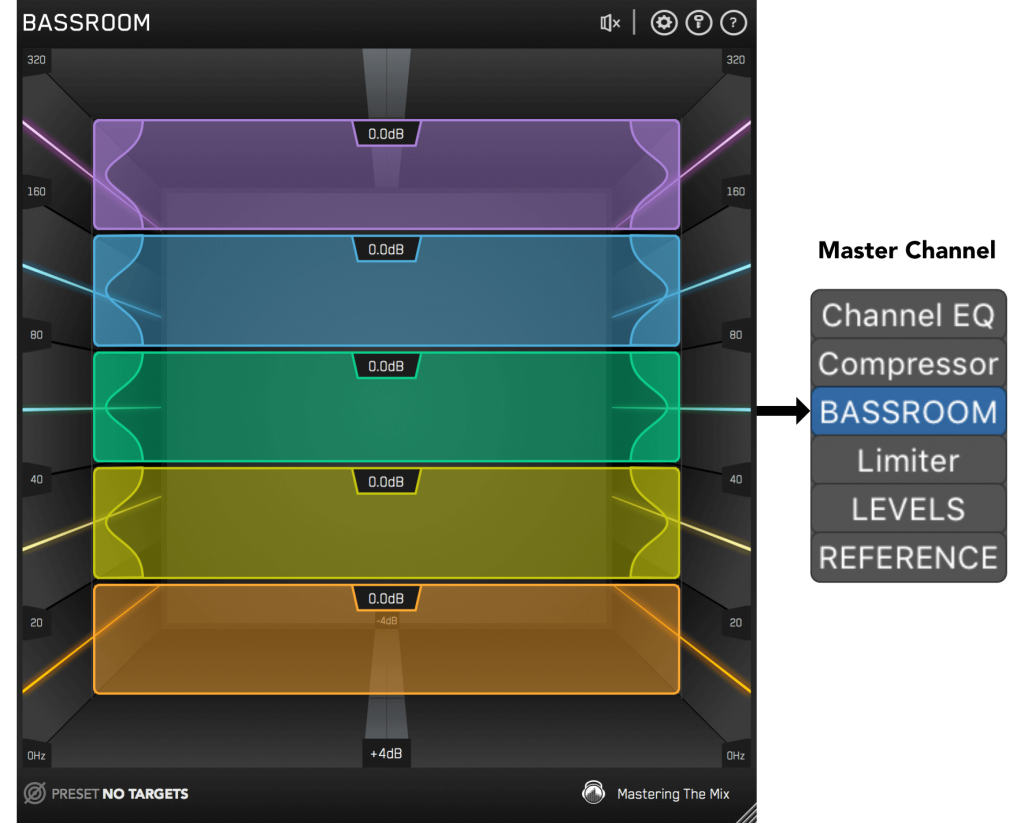
Step 1: Load Up Our Mixing and Mastering EQ BASSROOM on The Master Channel
BASSROOM uses complex algorithms that accurately identifies how the human ear perceives low-frequencies relative to the balance of the whole mix. For that reason it should be loaded on your master channel so it can analyse and be applied to your whole mix.
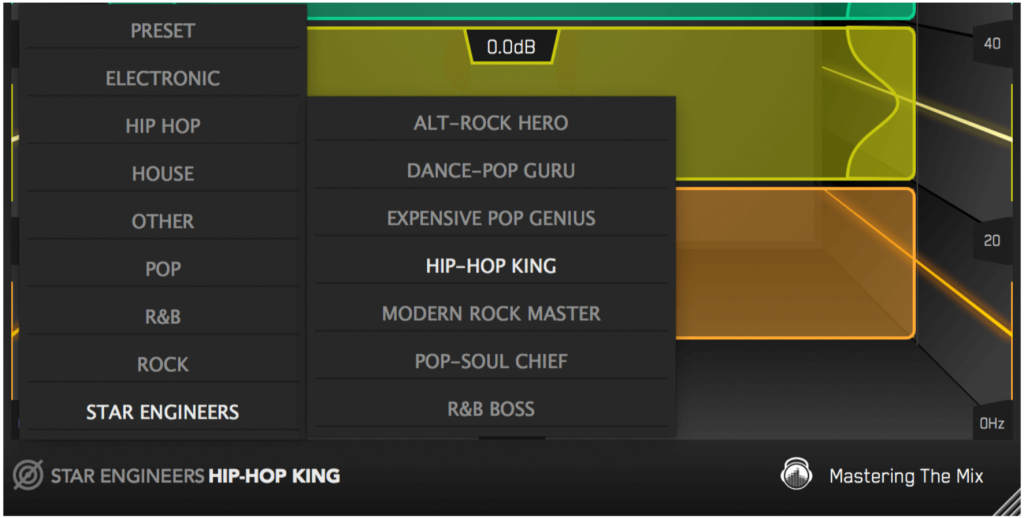
Step 2: Choose A Preset
To get the most value from BASSROOM, start by selecting a preset that best suits the material you’re working on.
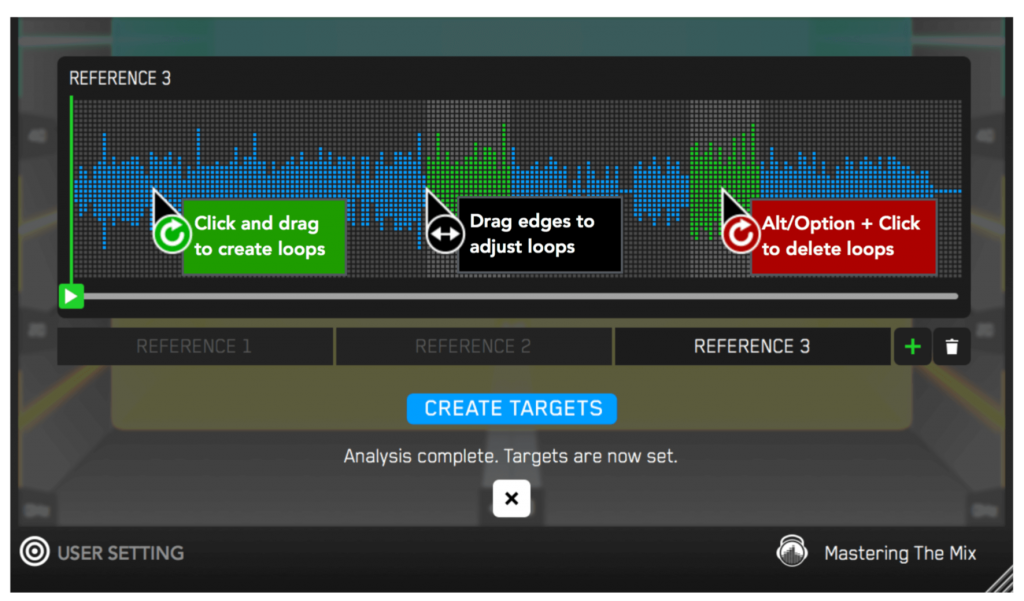
Step 3: Create A Target
Rather than choosing a preset, you can create your own target values by clicking the target icon in the bottom left corner and importing reference tracks. If you’re creating targets, we recommend clicking and dragging on the waveform to select the drop or chorus for the analysis, as this is usually the material with the best representation of the bass in the track. BASSROOM will create targets based on all the tracks loaded into the analysis window.
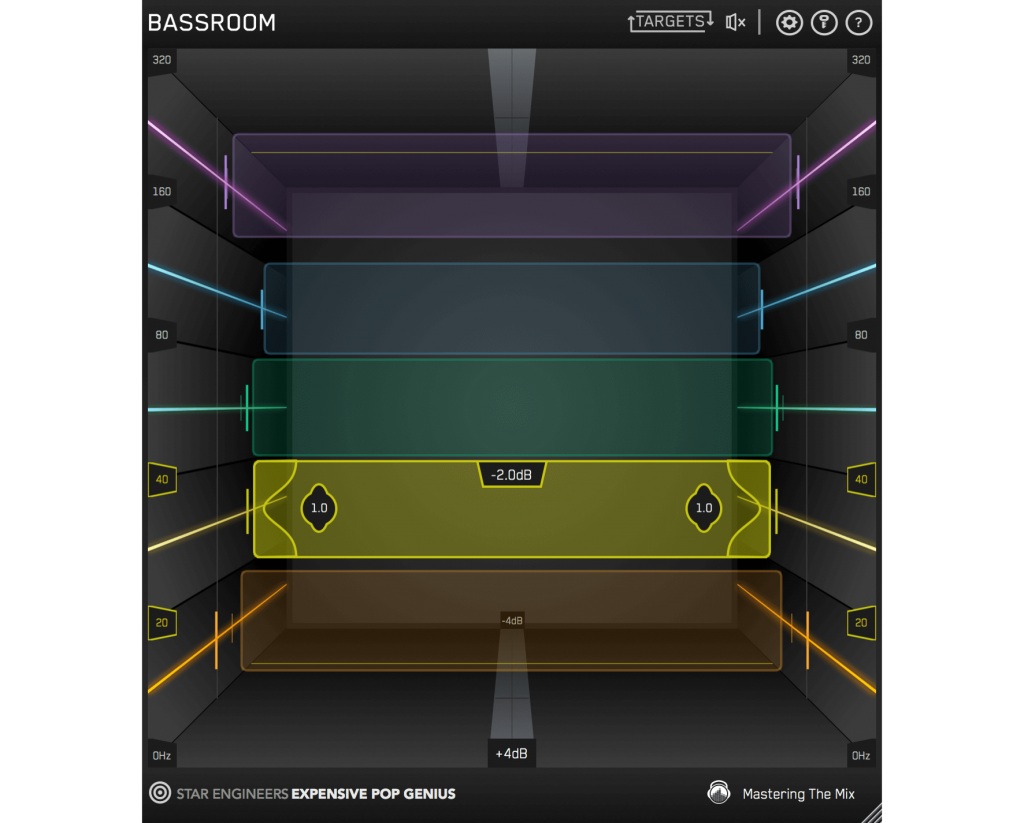
Step 4: Shape Your Low End
Now monitor a bass heavy section of your production (i.e. the drop or chorus), and you’ll see the targets move to the suggested EQ positions based on the tonal balance of your mix compared to the tonal balance of your preset. Use the targets to get a great starting point, then adjust by ear to tweak your low-end to perfection. The algorithm accounts for differences in loudness, so the targets will be accurate and relevant whether you’re mixing or mastering.
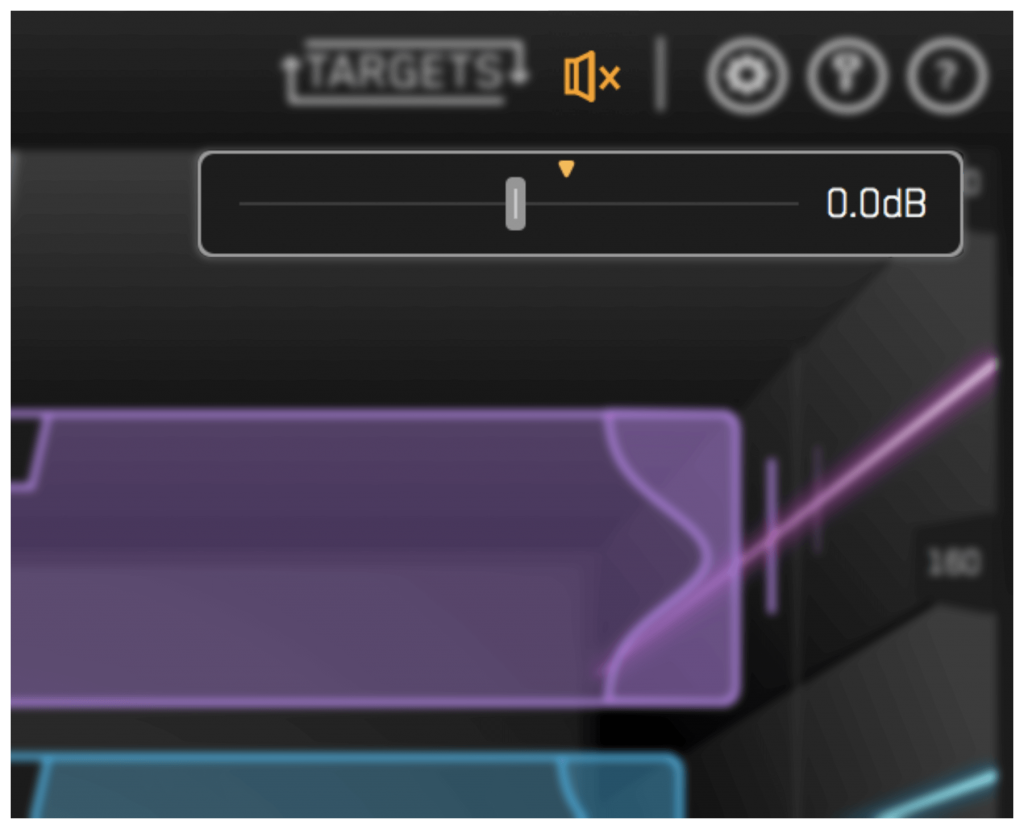
Step 5: The Level Match
The EQ adjustments may have changed the overall gain of your audio. If the gain has changed by more than 2dB the speaker icon will turn orange. Hover your mouse over the bypass icon to open the output gain and level match pointer. Match the gain slider to the level match pointer to match the perceived loudness of your audio before it passed through BASSROOM.
HEAR THE DIFFERENCE!!
Not only will your low-end fall into place, but the level matching will give you a well-balanced sound across the whole frequency spectrum. Toggle bypass on and off to hear the difference.
Click here to get BASSROOM!
Save 30% on Woodwind Bundle for Notion in July 2019!
 Get six Notion Add-ons for one low price! T his bundle includes the following woodwind instruments:
- Alto Flute
- Legato, Vibrato, Staccato, Flutter Tongue, Trills
- Bass Flute
- Legato, Vibrato, Staccato, Flutter Tongue, Trills
- Contrabass Clarinet (wooden)
- Legato, Staccato, Trills
- Basset Horn
- Legato, Staccato, Trills
- Oboe d’amore
- Legato, Vibrato, Staccato, Trills
- Bass Oboe
- Legato, Vibrato, Staccato, Trills
This offer ends July 31 – act fast!
Click here to shop!
Friday Tips: The Best Flanger Plug-In?
Well…maybe it actually is, and we’ll cover both positive and negative flanging (there’s a link to download multipresets for both options). Both do true, through-zero flanging, which sounds like the vintage, tape-based flanging sound from the late 60s.
The basis of this is—surprise!—our old friend the Autofilter (see the Friday Tip for June 17, Studio One’s Secret Equalizer, for information on using its unusual filter responses for sound design). The more I use that sucker, the more uses I find for it. I’m hoping there’s a dishwashing module in there somewhere…meanwhile, for this tip we’ll use the Comb filter.
Positive Flanging
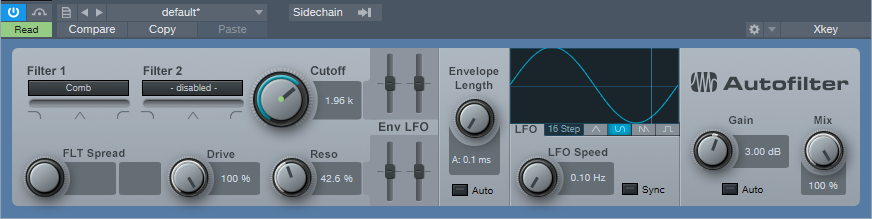
Figure 1: When set properly, the Autofilter’s comb filter can make a superb flanger.
Flanging depended on two signals playing against each other, with the time delay of one varying while the other stayed constant. Positive flanging was the result of the two signals being in phase. This gave a zinging, resonant type of flanging sound.
Fig. 1 shows the control settings for positive flanging. Turn Auto Gain off, Mix to 100%, and set both pairs of Env and LFO sliders to 0. Adding Drive gives a little saturation for more of a vintage tape sound (or follow the May 31 tip, In Praise of Saturation, for an alternate tape sound option). Resonance is to taste, but the setting shown above is a good place to start. The Gain control setting of 3 dB isn’t essential, but compensates for a volume loss when enabling/bypassing the FX Chain.
Varying the Cutoff controls the flanging effect. We won’t use the Autofilter’s LFO, because real tape flanging didn’t use an LFO—you controlled it by hand. Controlling the flanging process was always inexact due to tape recorder motor inertia, so a better strategy is to automate the Cutoff parameter, and create an automation curve that approximates the way flanging really varied (Fig. 2)—which was most definitely not a sine or triangle wave. A major advantage of creating an automation curve is that we can make sure that the flanging follows the music in the most fitting way.
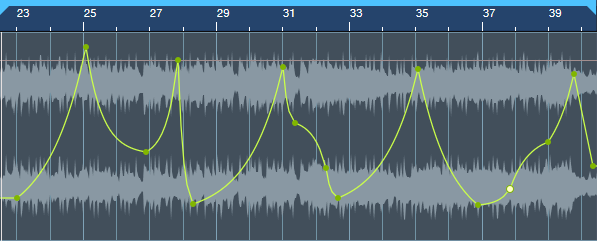
Figure 2: The Cutoff frequency automation curve used for the audio examples.
Negative Flanging
Throwing one of the two signals used to create flanging out of phase gave negative flanging, which had a hollower, “sucking” kind of sound. Also, when the variable speed tape caught up with and matched the reference tape, the signal canceled briefly due to being out of phase. It’s a little more difficult to create negative flanging, but here’s how to do it.
- Set up flanging as shown in the previous example, and then Duplicate Track (Complete), including the Autofilter.
- Turn Resonance all the way down in both Autofilters (original and duplicated track). This is important to obtain the maximum negative flanging effect. Because of the cancellation due to the two audio paths being out of phase, there’s a level drop when flanging. You can compensate by turning up both Autofilters’ Gain controls to exactly 6.00 dB (they need to be identical). This gain increase isn’t strictly necessary, but helps maintain levels between the enabled and bypassed states of the Negative Flanging FX Chain.
- In the duplicated track’s Autofilter, turn off the Autofilter’s Automation Read, and turn Cutoff up all the way (Fig. 3).
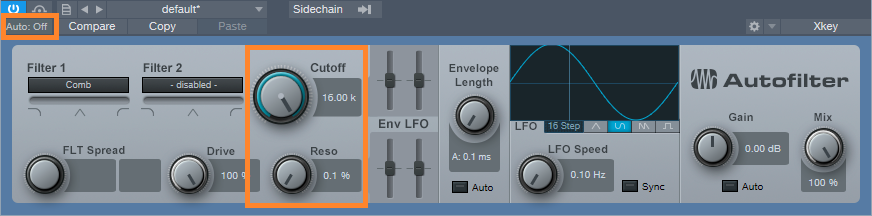
Figure 3: Settings for the duplicated track’s Autofilter.
- Insert a Mixtool after the Autofilter in the duplicated track, and enable both Invert Left and Invert Right (Fig. 4). This throws the duplicated track out of phase.

Figure 4: Mixtool settings for the duplicated track.
- Temporarily bypass both Autofilters (in the original and duplicated tracks). Start playback, and you should hear nothing because the two tracks cancel. If you want to make sure, vary one of the track faders to see if you hear anything, then restore the fader to its previous position.
- Re-enable both Autofilters, and program your Cutoff automation for the original track (the duplicated track shouldn’t have automation). Note that if you mute the duplicate track, or bring down its fader, the sound will be positive flanging (although with less level than negative flanging, because you don’t have two tracks playing at once).
So is this the best flanger plug-in ever? Well if not, it’s pretty close…listen to the audio examples, and see what you think.
Both examples are adapted/excerpted from the song All Over Again (Every Day).
The Multipresets
If you like what you hear, download the multipresets. There are individual ones for Positive Flanging and Negative Flanging. To automate the Flange Freq knob, right-click on it and choose Edit Knob 1 Automation. This overlays an automation envelope on the track that you can edit as desired to control the flanging.
Download the Positive Flanging Multipresets Here!
Download the Negative Flanging Multipresets Here!
And here’s a fine point for the rocket scientists in the crowd. Although most flangers do flanging by delaying one signal compared to another, most delays can’t go all the way up to 0 ms of delay, which is crucial for through-zero flanging where the two signals cancel at the negative flanging’s peak. The usual workaround is to delay the dry signal somewhat, for example by 1 ms, so if the minimum delay time for the processed signal is 1 ms, the two will be identical and cancel. The advantage of using the comb filter approach is that there’s no need to add any delay to the dry signal, yet they can still cancel at the peak of the flanging.
Finally, I’d like to mention my latest eBook—More Than Compressors – The Complete Guide to Dynamics in Studio One. It’s the follow-up to the book How to Record and Mix Great Vocals in Studio One. The new book is 146 pages, covers all aspects of dynamics (not just the signal processors), and is available as a download for $9.99.
Artist Denny White Discusses Career and Studio One!
We were recently introduced to Denny White via his artist bro and Studio One fan Josh Cumbee. Denny combines pop and electronic beats, soulful blues vocals, and a singer/songwriter style that takes listeners on a trip! Living in Los Angeles has awarded him opportunities to play alongside acts such as Young the Giant, Dawes, and Tove Styrke. He JUST released some vocal sample packs with our friends at Splice, and he’s currently working on a collection of singles leading up to his debut full-length album coming out soon! We recently had the opportunity to chat with him about his career and his gear.
Give us some background on yourself. How long have you been making music?
I grew up in a sleepy California suburb called Hemet and music was always at the centerpiece of everything we did. I fell slowly into making music as a career, and still find it crazy that I call this my “job.” My freshman year of college, I met my good buddy Brent Kutlze, who produced my first solo EP and mentored me early on. I saw first hand how he wrote & produced for other artists, while also being a full-time one himself in his band OneRepublic. Releasing that first EP led to me meeting a manager, doing hundreds of co-writes, moving to LA, and eventually signing a publishing deal with Warner Chappell.
How has the music industry changed since your early days?
It’s such a catch-22… everything’s changed while nothing has at the same time. I was technically streaming music in high school with Limewire and MySpace, but couldn’t have dreamed it would morph into streaming as we know it today. On the recording side, I’m still producing on a laptop like I was in college, but everything is light years better and faster than anything I could have imagined then. One of the biggest changes is the vast amounts of knowledge and resources available to everyone now. The industry once sounded like some mysterious faraway place that only a few had access to, but now that glass ceiling has been shattered. I’ve written with kids who know about publishing, licensing, producing, and even their own frequency preferences on a vocal, thanks to amazing resources like Pensado’s Place, or podcasts like Ross Golan’s And the Writer is.
 Describe the first time you wrote a song.
My first song was written for a school talent show, and I hope to find a dusty VHS tape someday with a little me on it, most likely singing a mid-tempo Ben Folds-esque piano tune.
Who has been an influence in your life?
Hands down my wife’s been the biggest influence in my life. Musically, I’ve been the benefactor of so many talented friends and collaborators who’ve had an influence on me as well over the years, Brent Kutlze, Michael Brun, David Hodges, Alex Delicata, Steve Wilmot, and Jeff Sojka to name a few!
Have you ever wanted to give up on music? What keeps you going?
I’ve never wanted to give up on music per se, but have definitely contemplated other career paths, as this one has the propensity to drive you mad; you really have to love it despite the wild ebb and flow of the industry and embrace the process daily. My faith and family keep me going on days I don’t want to.
How did you first hear of PreSonus?
I’ve always known about PreSonus but knew little about the products until really hearing about Studio One from my freakishly talented friend Josh Cumbee last year.

What do you like about PreSonus? What caught your eye?
I remember being in Josh’s studio and was immediately intrigued when I saw the Start Page of Studio One. It felt so unique and custom to Josh. The first feature that caught my eye was the window in the middle where you can upload your own art, that prints on every mixdown. Also, the organization of seeing all recent files on the left, without having to scroll through a list or search your hard drive immediately spoke to my OCD-ness.
What PreSonus products do you use?
I use Studio One, Monitor Station v2, and just snagged the newest FaderPort for even more control!
What features are you most impressed with in Studio One?
I really dig Console Shaper, and the immediate vibe it can give to any blank start. The hybrid dual buffer engine is insane and makes it possible to work in large projects that historically would have been a cluster cuss, and allows me to use instances of soft synths that are taxing on CPU like Kontact or Vengeance Avenger up until the finish line. Tracklist organization, Fat Channel, and “Candleblower” bass in Mai Tai are a few of the other million things I love in it.
Any user tips or tricks or interesting stories based on your experience with Studio One?
Recently I released a Vocal pack on Splice, and Sample One XT made all my vocal chops feel so much more creative and important-sounding than anything I could have accomplished in my sad old DAW’s sampler. First I’d record pass of adlibs, tune with the integrated Melodyne (insanely fast,) then map individual samples across 3-5 keys and quickly explore new melody ideas. Another huge lifehack is I have “W” set to “Locate Mouse Cursor.” It’s insane how much time these things have saved me, and now I’m able to be creative almost immediately.
How easy/difficult was Studio One to learn?
The transition was so easy. I was very reluctant at first, thinking It’d take way too much time, but after doing a few sessions in it I was back at full speed with a whole new perspective on producing.


Where do you go for support?
From the Knowledgebase to millions of videos on YouTube, or texting one of my friends about Studio One, there’s never a shortage of support.
Recent projects? What’s next for you?
Last week I released my first Vocal Sample Pack on Splice that I’m really proud of. Currently, I’m in the middle of writing for my album, while also producing a record for Gabriel Conte!
Keep up with Denny on Instagram!
Check out his work on Spotify!
Buy his Vocal Sample Pack from Splice Here!

Studio One’s Percussion Part Generator
Shakers, tambourines, eggs, maracas, and the like can add life and interest to a song by complementing the drum track. But it’s not always easy to play this kind of part. It has to be consistent, but not busy; humble enough to stay in the background, but strong enough to add impact…and this sounds like a job for version 4.5’s new MIDI features.
We’ll go through the process of creating a cool, 16th-note-based percussion part, but bear in mind that this is just one approach. Although it works well, there are many ways you can modify this process (which we’ll touch on at the end).
First, Choose Your Sound
Ideally, you’ll have a couple different samples of the percussion instrument you want to use. But if you don’t, there’s a simple workaround. I use Impact for these kinds of parts, and if there’s only one sample of something like a shaker, I’ll drag it to two pads, and detune one of the pads by -1 semitone so they sound different. In the following example, we’ll call the original sample Sound 1, and detuned sample, Sound 2.
The Process
Let’s create a two-bar percussion loop to start. Grab the Draw tool, and set the Quantize value to 1/4. Drag across the two measures to create a hit at every quarter note for Sound 1 (Fig. 1).
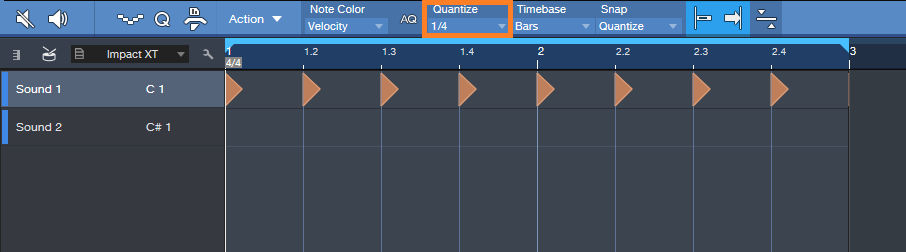
Figure 1. Having a constant series of 1/4-note hits anchors the rhythm so we can alter other hits.
Next, set the Quantize value to 1/16. Drag across the two measures to create a hit at every 16th note for Sound 2 (Fig. 2). Hit Play, so you can marvel at how totally unmusical it sounds.
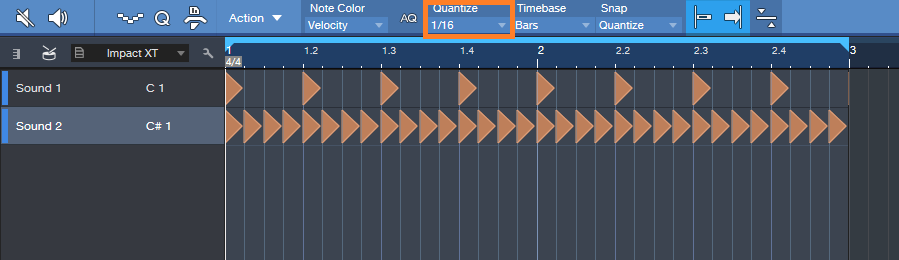
Figure 2: We’ll be modifying the series of 16th notes to add interest.
Now let’s make the part sound good. The key here is not to alter the 1/4 note hits—we want them rock solid, so that the rhythm won’t get pulled too far astray when we start adding variations to the 16th notes.
Select only the 16th notes for Sound 2, and let’s use version 4.5’s new Thin Out Notes command. I’m a fan of Delete notes randomly, and we’ll delete 40% of the notes. Choose the 1/16 grid, since that matches the part. Click OK, and now the part isn’t quite so annoyingly constant (Fig. 3).
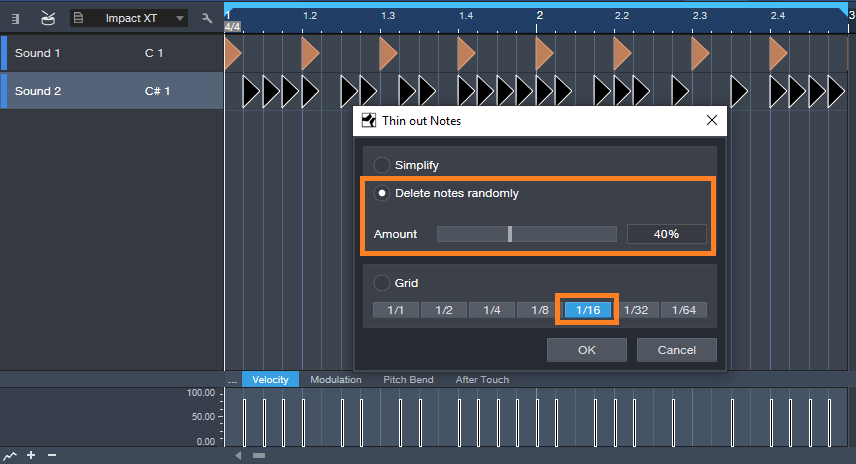
Figure 3: Dropping out the occasional random note adds interest.
But we still need to do something about the velocity, which is way too consistent—the real world doesn’t work that way. Select the string of 16th notes again, and this time, choose Humanize. Set a Velocity range and Note start range (like -40/40% and -.0015/0.0015 respectively), and then click OK (Fig. 4). Now look at the velocity strip: it’s a lot more interesting. The timing changes are also helpful, but they don’t have the “drunken percussion player” quality that you get a lot with randomized timings, because those rock-solid quarter note hits are still establishing the beat.
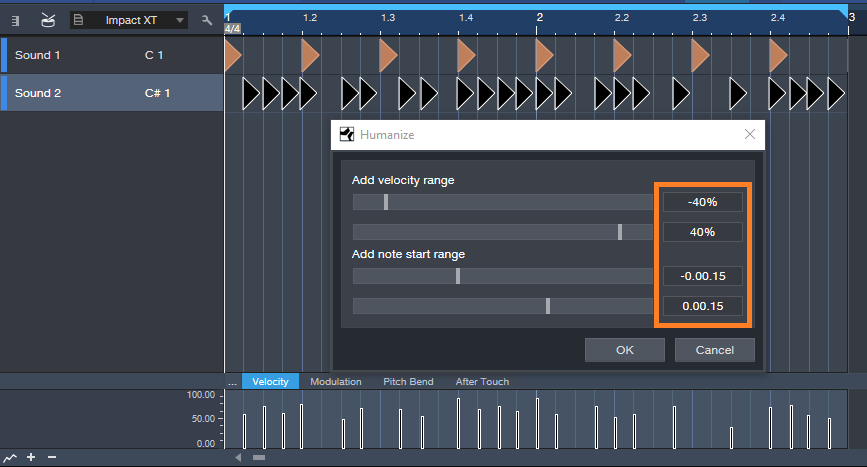
Figure 4: Humanizing velocity and start times for only the 16th notes adds variations that make the part more lively.
So now we have an interesting two-measure loop, but let’s not loop it—instead, we’ll create a part that lasts as long as we want, and it will still be interesting. Here’s how.
Duplicate the two measures for as long as you want. Select all the notes in the Sound B row, and choose Randomize notes. Uncheck everything except Shuffle Notes. Click on OK. All the notes will stay in the same position, and because there are no other candidate notes for shuffling, the timing won’t change. What will Shuffle is velocity. If you created a Shuffle Macro for the May 24 tip on End Boring MIDI Drum Parts, it will come in handy here—keep hitting that macro until the pattern is the way you want. After you de-select the notes, if you’ve chosen Velocity for note color, you’ll have a pretty colorful velocity strip (Fig. 5).
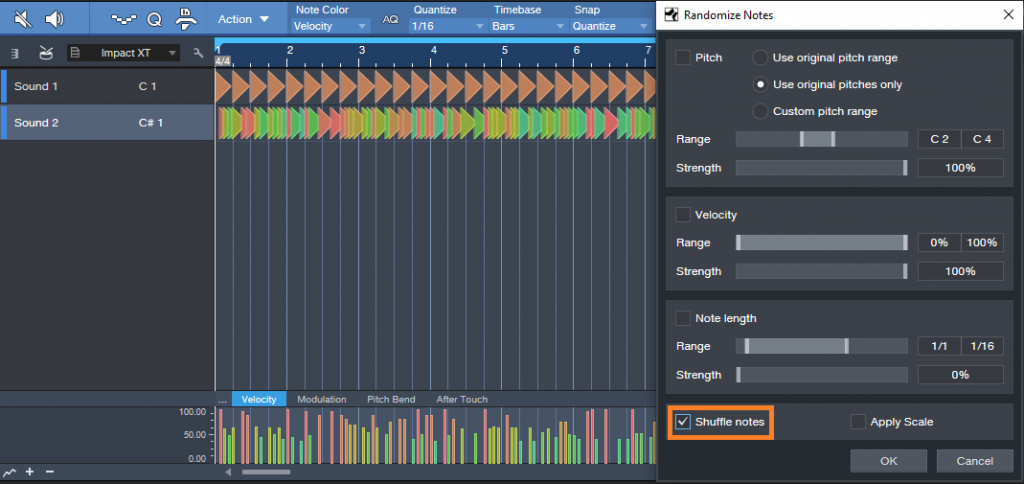
Figure 5: Shuffling velocity in a longer part adds more interesting dynamics.
Now you have a part that sounds pretty good, and once you become familiar with the process, you’ll find it takes less time to generate a part than it does to read this. Here are some options to this technique.
- Instead of creating a short loop, duplicating it, and then shuffling velocity, you can start off with a much longer event using the same basic principle (a row of quarter notes and another of sixteenth notes). Then, when you drop out notes randomly, there will be more variations within the pattern compared to dropping out notes for a couple measures and duplicating them.
- Another way to do something similar to dropping notes is with the Randomize function—set the lower end of the velocity range to 0. This can even be useful to thin out a part further after dropping random notes, for example, if there’s a lot going on with other instruments in a section.
- Some percussion instruments have samples of multiple hits. This allows using the Shuffle function, as described in the May 24 tip, to mix up the pitches a bit.
- A little processing can also be cool—like the Analog Delay, set for a dotted 8th-note delay, mixed in the background…or a little reverb.
- Re-visit Humanizing, with more drastic velocity changes.
The bottom line: there are a lot of possibilities!
The “QuickStrip” Bass FX Chain
Sometimes when you get inspired, you don’t have time to wait before laying down some tracks. But then you want a compressor, and maybe a bit of dirt for an amp sound, some EQ, and a little doubling for flavor…maybe a touch of funk…and by the time you’ve inserted and tweaked everything, you’ve forgotten what you were going to play. No more! The Bass QuickStrip FX Chain is here to help you dial up a sound in seconds.
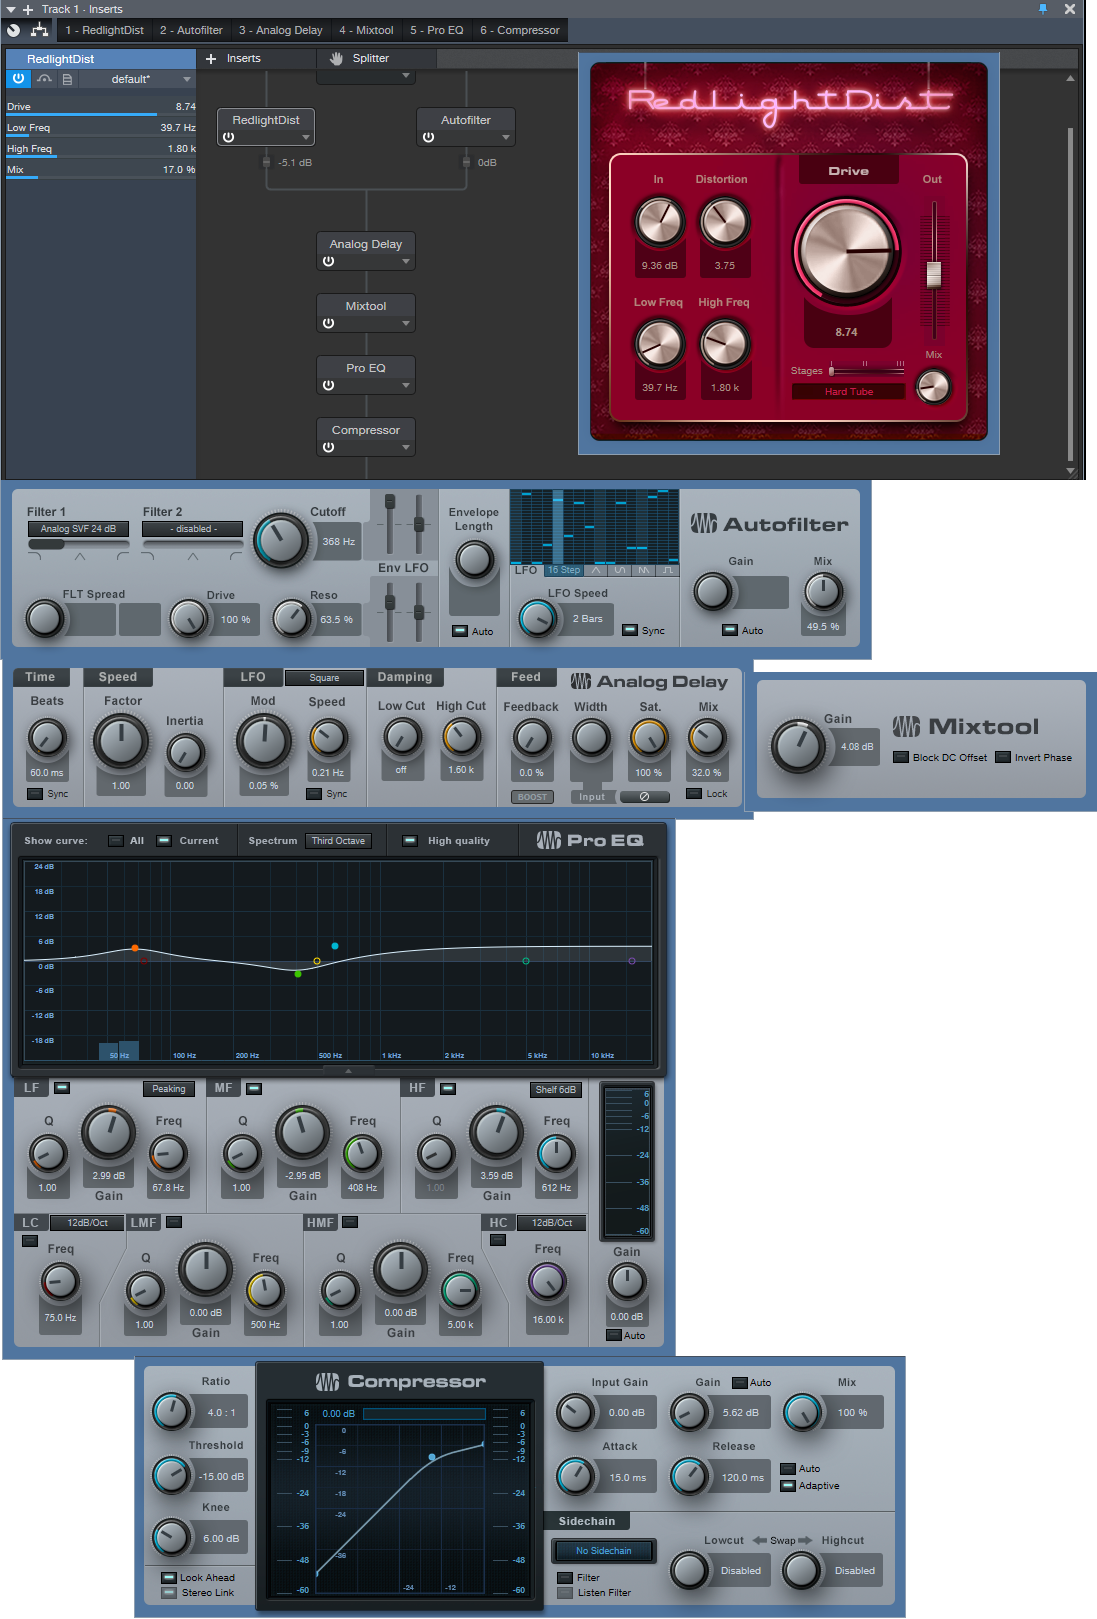
Rather than go through all the backstory on how it’s done, just download the FX Chain, and reverse-engineer it to your heart’s content. Here are the highlights, along with crucial controls you can customize to make the chain your own.
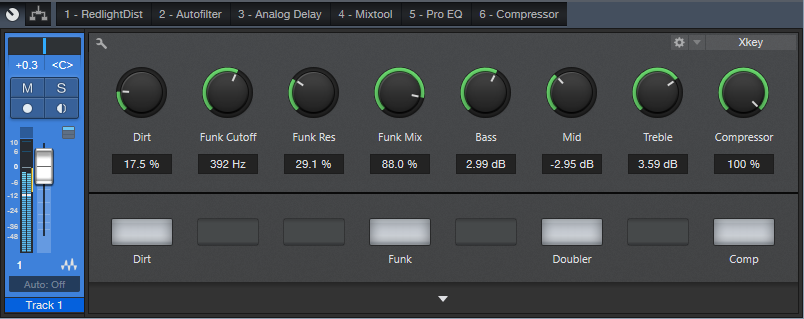
Dirt Control: This is the Mix control for the RedLightDist processor, whose settings have been optimized for bass. For more highs, turn up the processor’s High Freq control, or turn down for a bassier growl. This stage has an associated enable/bypass button.
Funk Cutoff, Funk Res, and Funk Mix: These are the essential Autofilter controls for when you want to lay some funk on your bass. Cutoff covers the general range to match your playing, Res is the filter resonance, and because envelope filters are best for bass when placed in the parallel, Mix controls the dry/filter balance. It has an associated enable/bypass switch.
Note that the RedLightDist and Autofilter are fed off a split, so they do parallel processing. This is in addition to the parallel processing done within the processors themselves.
Bass, Mid, and Treble: This “tone stack” for the Bass QuickStrip controls parameters in the Pro EQ. They don’t cover the full boost/cut range, but if you want to get more extreme, be my guest.
Compressor: The compression is optimized for bass, so the single control is a dry/compressed mix, paired with an enable/bypass switch. Any customization would be to taste—for example, a lower Threshold, or higher Ratio, for a more compressed sound. But if you want more variation and the ability to change the compression from light to heavy, another option is to use the settings for the EZ Squeez one-knob compressor, which was the subject of the Friday tip for August 24, 2018.
Doubler: This switch brings in a doubling effect, courtesy of the Analog Delay. It also bumps up the gain a bit using the Mixtool, so that the doubled and dry sounds have the same apparent level.
So download away—and lay down the low.
DOWNLOAD THE BASS QUICKSTRIP HERE!