Studio One’s Percussion Part Generator
Shakers, tambourines, eggs, maracas, and the like can add life and interest to a song by complementing the drum track. But it’s not always easy to play this kind of part. It has to be consistent, but not busy; humble enough to stay in the background, but strong enough to add impact…and this sounds like a job for version 4.5’s new MIDI features.
We’ll go through the process of creating a cool, 16th-note-based percussion part, but bear in mind that this is just one approach. Although it works well, there are many ways you can modify this process (which we’ll touch on at the end).
First, Choose Your Sound
Ideally, you’ll have a couple different samples of the percussion instrument you want to use. But if you don’t, there’s a simple workaround. I use Impact for these kinds of parts, and if there’s only one sample of something like a shaker, I’ll drag it to two pads, and detune one of the pads by -1 semitone so they sound different. In the following example, we’ll call the original sample Sound 1, and detuned sample, Sound 2.
The Process
Let’s create a two-bar percussion loop to start. Grab the Draw tool, and set the Quantize value to 1/4. Drag across the two measures to create a hit at every quarter note for Sound 1 (Fig. 1).
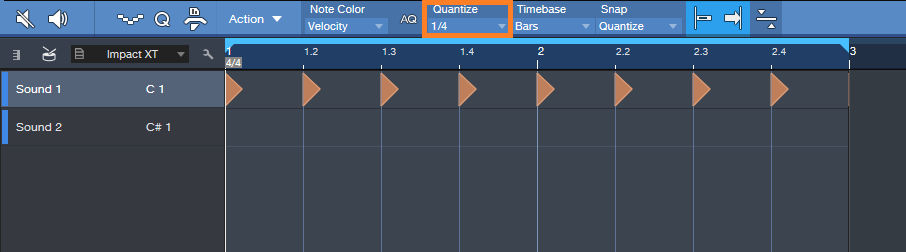
Figure 1. Having a constant series of 1/4-note hits anchors the rhythm so we can alter other hits.
Next, set the Quantize value to 1/16. Drag across the two measures to create a hit at every 16th note for Sound 2 (Fig. 2). Hit Play, so you can marvel at how totally unmusical it sounds.
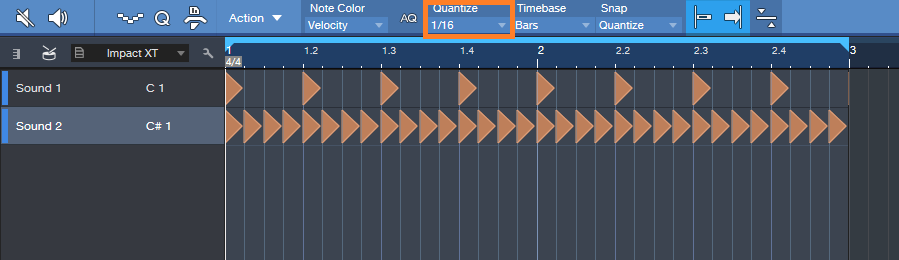
Figure 2: We’ll be modifying the series of 16th notes to add interest.
Now let’s make the part sound good. The key here is not to alter the 1/4 note hits—we want them rock solid, so that the rhythm won’t get pulled too far astray when we start adding variations to the 16th notes.
Select only the 16th notes for Sound 2, and let’s use version 4.5’s new Thin Out Notes command. I’m a fan of Delete notes randomly, and we’ll delete 40% of the notes. Choose the 1/16 grid, since that matches the part. Click OK, and now the part isn’t quite so annoyingly constant (Fig. 3).
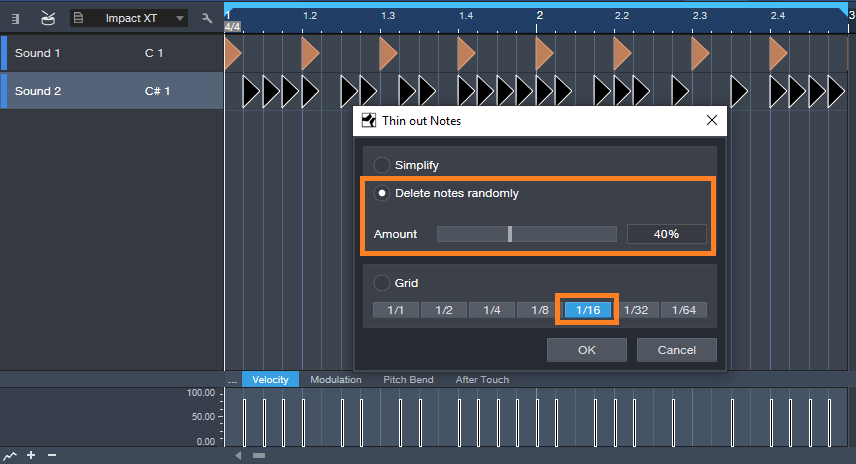
Figure 3: Dropping out the occasional random note adds interest.
But we still need to do something about the velocity, which is way too consistent—the real world doesn’t work that way. Select the string of 16th notes again, and this time, choose Humanize. Set a Velocity range and Note start range (like -40/40% and -.0015/0.0015 respectively), and then click OK (Fig. 4). Now look at the velocity strip: it’s a lot more interesting. The timing changes are also helpful, but they don’t have the “drunken percussion player” quality that you get a lot with randomized timings, because those rock-solid quarter note hits are still establishing the beat.
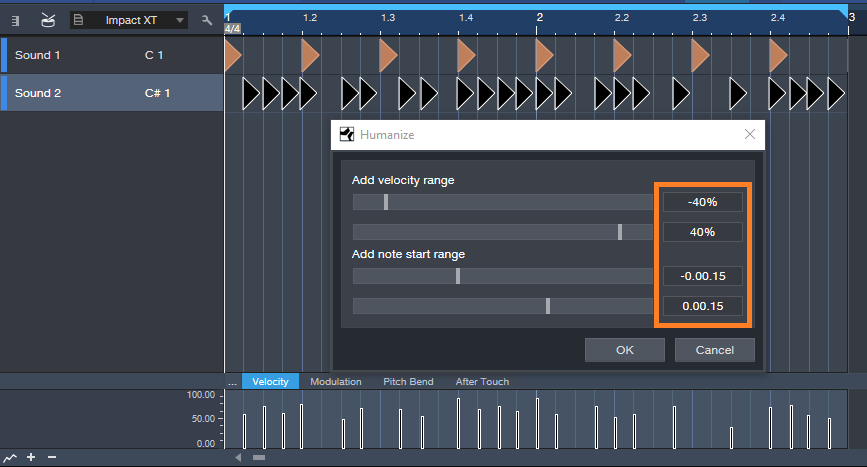
Figure 4: Humanizing velocity and start times for only the 16th notes adds variations that make the part more lively.
So now we have an interesting two-measure loop, but let’s not loop it—instead, we’ll create a part that lasts as long as we want, and it will still be interesting. Here’s how.
Duplicate the two measures for as long as you want. Select all the notes in the Sound B row, and choose Randomize notes. Uncheck everything except Shuffle Notes. Click on OK. All the notes will stay in the same position, and because there are no other candidate notes for shuffling, the timing won’t change. What will Shuffle is velocity. If you created a Shuffle Macro for the May 24 tip on End Boring MIDI Drum Parts, it will come in handy here—keep hitting that macro until the pattern is the way you want. After you de-select the notes, if you’ve chosen Velocity for note color, you’ll have a pretty colorful velocity strip (Fig. 5).
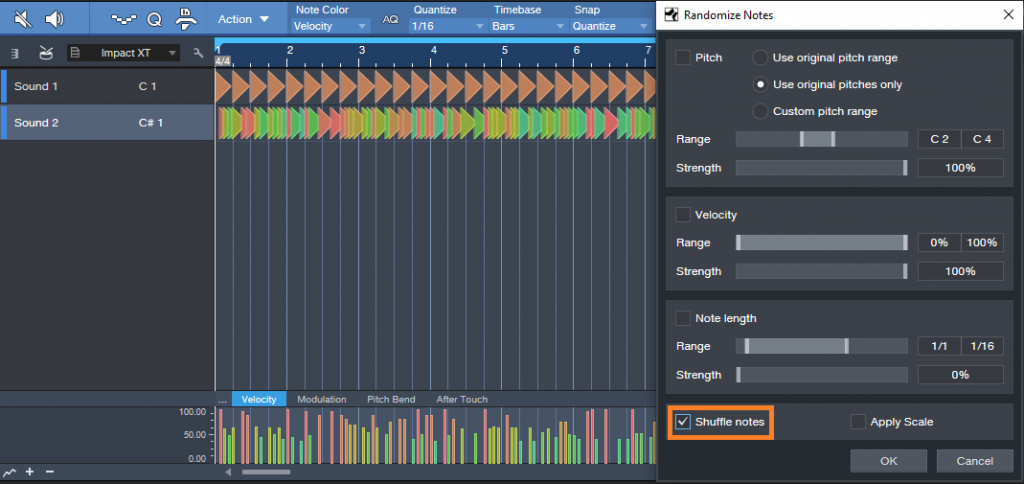
Figure 5: Shuffling velocity in a longer part adds more interesting dynamics.
Now you have a part that sounds pretty good, and once you become familiar with the process, you’ll find it takes less time to generate a part than it does to read this. Here are some options to this technique.
- Instead of creating a short loop, duplicating it, and then shuffling velocity, you can start off with a much longer event using the same basic principle (a row of quarter notes and another of sixteenth notes). Then, when you drop out notes randomly, there will be more variations within the pattern compared to dropping out notes for a couple measures and duplicating them.
- Another way to do something similar to dropping notes is with the Randomize function—set the lower end of the velocity range to 0. This can even be useful to thin out a part further after dropping random notes, for example, if there’s a lot going on with other instruments in a section.
- Some percussion instruments have samples of multiple hits. This allows using the Shuffle function, as described in the May 24 tip, to mix up the pitches a bit.
- A little processing can also be cool—like the Analog Delay, set for a dotted 8th-note delay, mixed in the background…or a little reverb.
- Re-visit Humanizing, with more drastic velocity changes.
The bottom line: there are a lot of possibilities!