Tag Archives: Studio One
Studio One 4.1.3 is here!
Studio One 4.1.3 is a free maintenance update for all Studio One 4 users and includes a variety of improvements. Click “Check for Updates” in Studio One’s Start Page to get it!
- Support for new Studio Series USB-C™-compatible Interfaces
- FX Sends are now visible by default on the console
Please click here to check out the latest release notes for a full list of fixes and improvements. in 4.1.3
In case you missed it, this release is hot on the heels of 4.1.2, which included the following:
- AAF Import/Export now supports volume automation
- AAF Export is now compatible with MOTU Digital Performer 9 (using legacy mode)
- A safety query has been added to the “Reset recent songs list” function
- Saving versions of a song is now more flexible with added control over how they affect the original song
- The song key signature is now included in the song meta data
- Quantize macros have been updated
- Multi-touch support now prevents “Mouse-as-Pointer” emulation for Plug-ins
- Time-stretching events in Arrangement is now reflected in the Audio Editor
Please click here to check out the latest release notes for a full list of fixes and improvements in 4.1.2.
Friday Tip: Colorization: It’s Not Just About Eye Candy
Some people think colorization is frivolous—but I don’t. I started using colorization when writing articles, because it was easy to identify elements in the illustrations (e.g., “the white audio is the unprocessed sound, the blue audio is compressed”). But the more I used colorization, the more I realized how useful it could be.
Customizing the “Dark” and “Light” Looks
Although a program’s look is usually personal preference, sometimes it’s utilitarian. When working in a video suite, the ambient lighting is often low, so that the eye’s persistence of vision doesn’t influence how you perceive the video. For this situation, a dark view is preferable. Conversely, those with weak or failing vision need a bright look. If you’re new to Studio One, you might want the labels to really “pop” but later on, as you become more familiar with the program, darken them somewhat. You may want a brighter look when working during daytime, and a more muted look at night. Fortunately, you can save presets for various looks, and call up the right look for the right conditions (although note that there are no keyboard shortcuts for choosing color presets).
Figure 1: From left to right: dark, moderate, and bright luminance settings.
You’ll find these edits under Options > General > Appearance. For a dark look, move the Background Luminance slider to the left and for a light look, to the right (Fig. 1). I like -50% for dark, and +1 for light. For the dark look, setting the Background Contrast at -100% means that the lettering won’t jump out at you. For the brightest possible look, bump the Background Contrast to 100% so that the lettering is clearly visible against the other light colors, and set Saturation to 100% to brighten the colors. Conversely, to tone down the light look, set Background Contrast and Saturation to 0%.
Hue Shift customizes the background of menu bars, empty fields that are normally gray, and the like. The higher the Saturation slider, the more pronounced the colorization.
The Arrangement sliders control the Arrangement and Edit view backgrounds (i.e., what’s behind the Events). I like to see the vertical lines in the Arrangement view, but also keep the background dark. So Arrangement Contrast is at 100%, and Luminance is the darkest possible value (around 10%) that still makes it easy to see horizontal lines in the Edit view (Fig. 2).

Figure 2: The view on the left uses 13% luminance and 100% contrast to make the horizontal background lines more pronounced.
Streamlining Workflow with Color
With a song containing dozens of tracks, it can be difficult to identify which Console channel strip controls which instrument, particularly with the Narrow console view. The text at the bottom of each channel strip helps, but you often need to rename tracks to fit in the allotted space. Even then, the way the brain works, it’s easier to identify based on color (as deciphered by your right brain) than text (as deciphered by your left brain). Without getting too much into how the brain’s hemispheres work, the right brain is associated more with creative tasks like making music, so you want to stay in that mode as much as possible; switching between the two hemispheres can interrupt the creative flow.
I’ve developed standard color schemes for various types of projects. Of course, choose whatever colors work for you; for example, if you’re doing orchestral work, you’d have a different roster of instruments and colors. With my scheme for rock/pop, lead instruments use a brighter version of a color (e.g., lead guitar bright blue, rhythm guitar dark blue).
- Main drums – red
- Percussion – yellow
- Bass – brown
- Guitar – blue
- Voice – green
- Keyboards and orchestral – purple
- FX – lime green
Furthermore, similar instruments are grouped together in the mixer. So for vocals, you’ll see a block of green strips, for guitar a block of blue strips, etc. (Fig. 3)
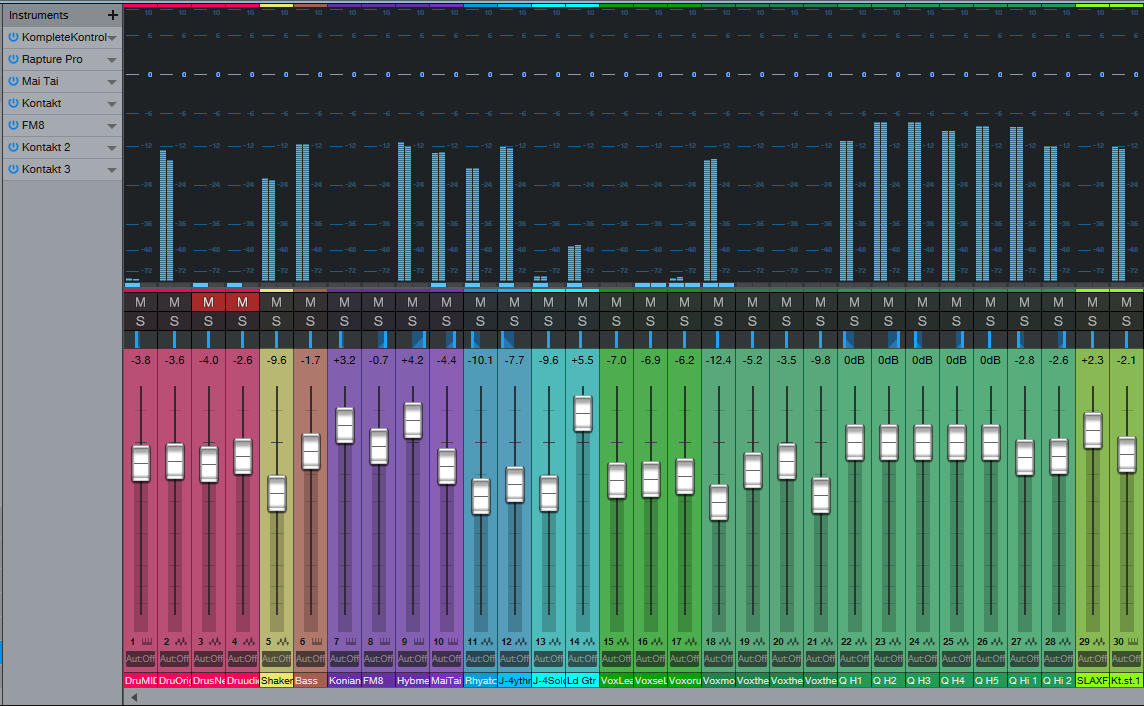
Figure 3: A colorized console, with a bright look. The colorization makes it easy to see which faders control which instruments.
To colorize channel strips, choose Options > Advanced tab > Console tab (or click the Console’s wrench icon) and check “Colorize Channel Strips.” This colorizes the entire strip. However, if you find colorized strips too distracting, the name labels at the bottom (and the waveforms in the arrange view) are always colored according to your choices. Still, when the Console faders are extended to a higher-than-usual height, I find it easier to grab the correct fader with colored console strips.
In the Arrange view, you can colorize the track controls as well—click on the wrench icon, and click on “Colorize Track Controls.” Although sometimes this feels like too much color, nonetheless, it makes identifying tracks easier (especially with the track height set to a narrow height, like Overview).
Color isn’t really a trivial subject, once you get into it. It has helped my workflow, so I hope these tips serve you as well.
Extra TIP: Buy Craig Anderton’s Studio One eBook here for only $10 USD!
Friday Tips: Studio One’s Hybrid Reverb
The previous tip on creating a dual-band reverb generated a fair amount of interest, so let’s do one more reverb-oriented tip before moving on to another topic.
Studio One has three different reverbs—Mixverb, Room Reverb, and OpenAIR—all of which have different attributes and personalities. I particularly like the Room Reverb for its sophisticated early reflections engine, and the OpenAIR’s wide selection of decay impulses (as well as the ability to load custom impulses I’ve made).
Until now, it never occurred to me how easy it is to create a “hybrid” reverb with the best of both worlds: using the Room Reverb solely as an early reflections engine, and the OpenAIR solely for the reverb decay. To review, reverb is a continuum—it starts with silence during the pre-delay phase when the sound first travels to hit a room’s surfaces, then morphs into early reflections as these sounds bounce around and create echoes, and finally, transforms into the reverb decay—the most complex component. Each one of these components affects the sound differently. In Studio One, these components don’t all have to be from the same reverb.
THE EARLY REFLECTIONS ENGINE
Start by inserting the Room Reverb into an FX Channel, and calling up the Default preset. Then set the Reverb Mix to 0.00 and the Dry/Wet Mix to 100%. The early reflections appear as discrete vertical lines. They’re outlined in red in the screen shot below.
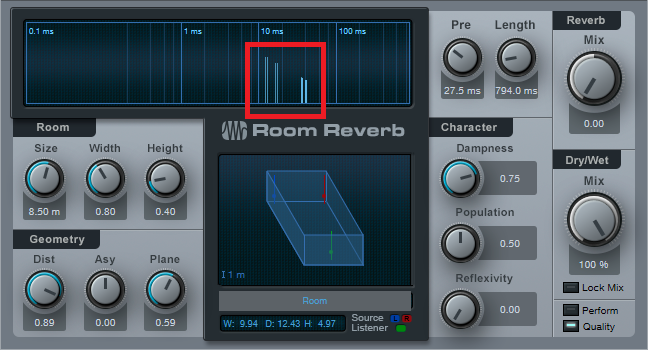
If you haven’t experimented with using the Room Reverb as a reflections engine, before proceeding now would be a good time to use the following evaluation procedure and familiarize yourself with its talents.
- From the Browser, load the loop Crowish Acoustic Chorus 1.wav (Loops > Rock > Drums > Acoustic) into a stereo track. This loop is excellent for showcasing the effects of early reflections.
- Create a pre-fader send from this track to the FX Channel with the Room Reverb, and bring the drum channel fader all the way down for now so you hear only the effects of the Room Reverb.
- Let’s look at the Room parameters. Vary the Size parameter. The bigger the room, the further away the reflections, and the quieter they are.
- Set the Size to around 3.00. Vary Height. Note how at maximum height, the sound is more open; at minimum height, the sound is more constricted. Leave Height around 1.00.
- Now vary Width. With narrower widths, you can really hear that the early reflections are discrete echoes. As you increase width, the reflections blend together more. Leave Width around 2.00.
- The Geometry controls might as well be called the “stand here” controls. Turning up Distance moves you further away from the sound source. Asy varies your position in the left-right direction within the room.
- Plane is a fairly subtle effect. To hear what it does, repeat steps 3 and 4, and then set Size to around 3.00, Dist to 0.10, and Asy to 1.00. Plane spreads the sounds a bit more apart at the maximum setting.
Now that you know how to set up different early reflections sounds, let’s create the other half of our hybrid reverb.
THE REVERB DECAY
To provide the reverb decay, insert the OpenAIR reverb after the Room Reverb. Whenever you call up a new OpenAIR preset, do the following.
- Set ER/LR to 1.00.
- Set Predelay to minimum (-150.00 ms).
- Initially set Envelope Fade-in and Envelope ER/LR-Xover to 0.00 ms.
There are two ways to make a space for the early reflections so that they occur before the reverb tail: set an Envelope Fade-in time, an Envelope ER/LR-Xover time, or both. Because the ER/LR control is set to 1.00 there are no early reflections in the Open AIR preset, so if you set the ER/LR-Xover time to (for example) 25 ms, that basically acts like a 25 ms pre-delay for the reverb decay. This opens up a space for you to hear the early reflections before the reverb decay kicks in. If you prefer a smoother transition into the decay, increase the Envelope Fade-in time, or combine it with some ER/LR-Xover time to create a pre-delay along with a fade-in.
The OpenAIR Mix control sets the balance of the early reflections contributed by the Room Reverb and the longer decay tail contributed by the OpenAIR reverb. Choose 0% for reflections only, 100% for decay only.
…AND BEYOND
There are other advantages of the hybrid reverb approach. In the OpenAIR, you can include its early reflections to supplement the ones contributed by the Room Reverb. When you call up a new preset, instead of setting the ER/LR, Predelay, Envelope Fade-In, and Envelope ER/LR-Xover to the defaults mentioned above, bypass the Room Reverb and set the Open AIR’s early reflections as desired. Then, enable the Room Reverb to add its early reflections, and tweak as necessary.
It does take a little effort to edit your sound to perfection, so save it as an FX Chain and you’ll have it any time you want it.
New: Overdose Drums from Craft Audio

Click here to hear Overdose Drums and shop!
New from UJAM!

Friday Tips: Keyswitching Made Easy
As the quest for expressive electronic instruments continues, many virtual instruments incorporate keyswitching to provide different articulations. A keyswitch doesn’t play an actual note, but alters what you’re playing in some manner—for example, Presence’s Viola preset dedicates the lowest five white keys (Fig. 1) to articulations like pizzicato, tremolo, and martelé.
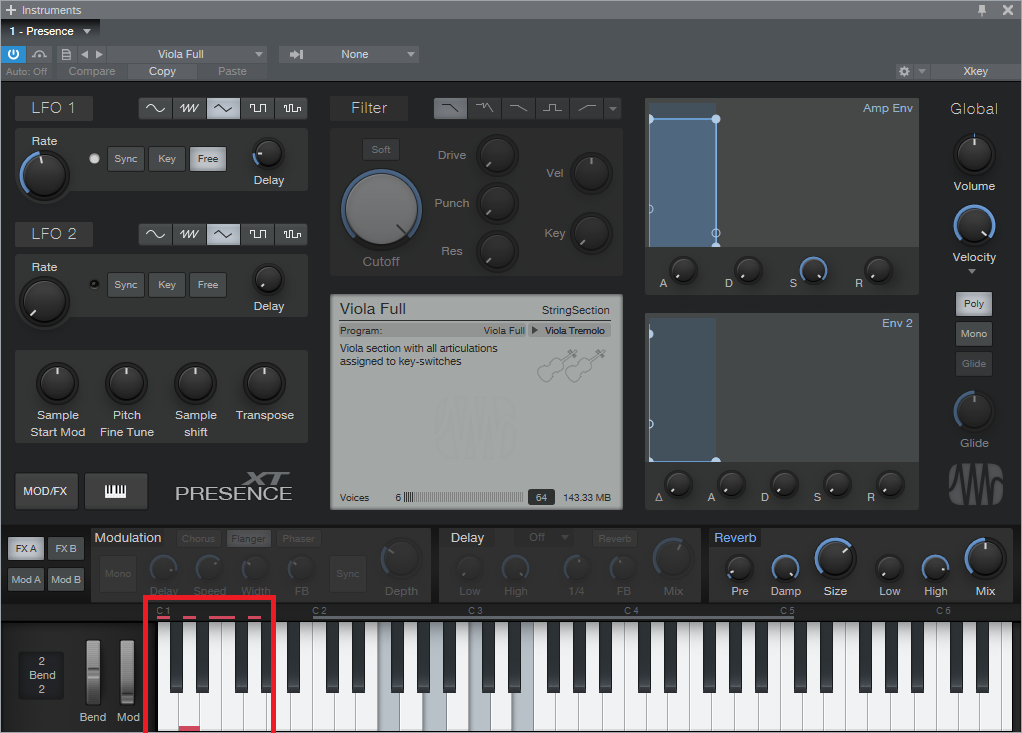
Fig. 1: The five lowest white keys, outlined in red, are keyswitches that provide articulation options. A small red bar along the bottom of the key indicates which keyswitch is active.
This is very helpful—as long as you have a keyboard with enough keys. Articulations typically are on the lowest keys, so if you have a 49-key keyboard (or even a 61-note keyboard) and want to play over its full range (or use something like a two-octave keyboard for mobile applications), the only way to add articulations are as overdubs. Since the point of articulations is to allow for spontaneous expressiveness, this isn’t the best solution. An 88-note keyboard is ideal, but it may not fit in your budget, and it also might not fit physically in your studio.
Fortunately, there’s a convenient alternative: a mini-keyboard like the Korg nanoKEY2 or Akai LPK25. These typically have a street price around $60-$70, so they won’t make too big a dent in your wallet. You really don’t care about the feel or action, because all you want is switches.
Regarding setup, just make sure that both your main keyboard and the mini-keyboard are set up under External Devices—this “just works” because the instrument will listen to whatever controllers are sending in data via USB (note that keyboards with 5-pin DIN MIDI connectors require a way to merge the two outputs into a single data stream, or merging capabilities within the MIDI interface you’re using). You’ll need to drop the mini-keyboard down a few octaves to reach the keyswitch range, but aside from that, you’re covered.
To dedicate a separate track to keyswitching, call up the Add Track menu, specify the desired input, and give it a suitable name (Fig. 2). I find it more convenient not to mix articulation notes in with the musical notes because if I cut, copy, or move a passage of notes, I may accidentally edit an articulation that wasn’t supposed to be edited.
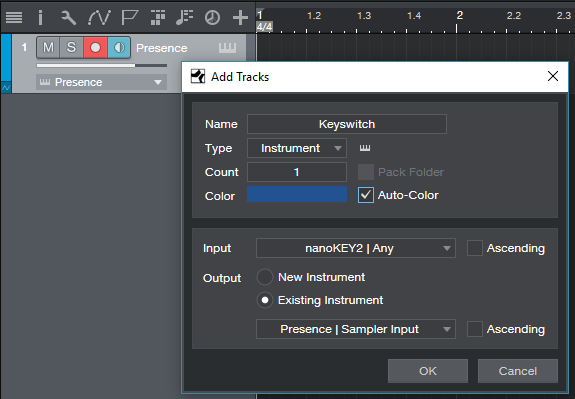
Fig. 2: Use the Add Track menu to create a track that’s dedicated to articulations.
So until you have that 88-note, semi-weighted, hammer-action keyboard you’ve always dreamed about, now you have an easy way take full advantage of Presence’s built-in expressiveness—as well as any other instrument with keyswitching.
PreSonus Atom Workflow in SampleOne XT
This just in from Craftmaster Productions—a good look at the PreSonus ATOM workflow using SampleOne XT in Studio One.
CMP has been producing excellent Studio One content for years. Head on over to YouTube and give him a Subscribe for more!
Friday Tips: Easy Song Level Matching
As you’ve probably figured out, these tips document something I needed, and the solution. If you’ve ever put together an album or collection of songs, you know how difficult it can be to match levels—which I was reminded of all too clearly while preparing the album Joie de Vivre for upload to my YouTube channel. It’s rock-meets-EDM, and is done as a continuous mix that includes not just songs, but transitions. So, all the levels had to be matched very carefully. Fortunately, Studio One’s Project Page made it easy.
The key was using the Project Page’s LUFS meter readings; for a complete explanation of LUFS, please check out the article I wrote for inSync magazine. In a nutshell, it’s a way to measure audio’s perceived level that’s more sophisticated than the usual average, VU, or peak readings. If two songs have the same LUFS reading, they’ll be perceived as having a similar (if not the same) level.
This measurement standard was created in response to issues involved in broadcasting and streaming services, and also in part as a backlash against “the loudness wars.” For example, YouTube doesn’t want you to have to change the level every time a video changes, so they’ve standardized on making all audio -13 LUFS. It doesn’t matter if you squash your master recording until it looks like a sausage, YouTube will adjust the perceived level so that it can slip into a playlist with something like a live acoustic jazz recording.
In Studio One’s Project Page, the Loudness Information section for each song (Fig. 1) shows a song’s LUFS as well as readings for the RMS average level (somewhat like a VU meter) and True Peak, which indicates not just peaks, but whether any peaks are exceeding the maximum headroom on playback, and by how much. The Loudness Information can come from before or after the track’s effects, so to see how editing these alters the LUFS reading, choose the Post FX tab.
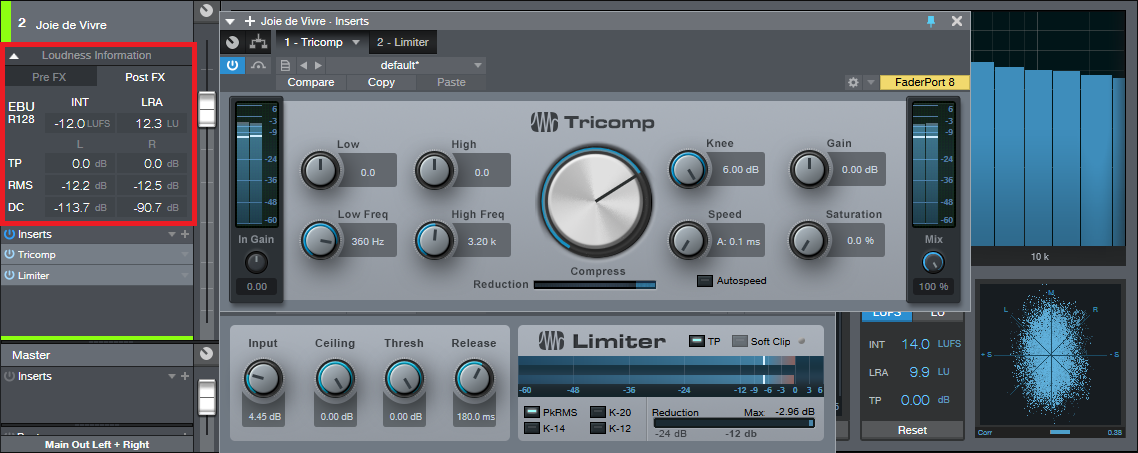
Fig. 1: The Tricomp/Limiter combination makes it easy to “fine-tune” the perceived loudness of your songs in the Project Page, as shown by the Loudness Information section (outlined in red).
Leveling the Levels
Now that we know how to measure levels, here’s one way to tweak them for consistency. We’ll assume you want something fairly compressed/limited, but not enough to become collateral damage in the loudness wars.
For each track (likely all of them) that needs to be set to a certain LUFS measurement, insert the Tricomp compressor followed by the Limiter. The screen shot shows my preferred Tricomp settings, but note that the optimum Compress knob setting depends on the material. You don’t want to compress too much, because the limiter will do most of the leveling anyway. If the gain reduction peaks reach the last “s” in “Compress” on the Limiter’s Reduction meter, you probably won’t hear too many artifacts, but you might not want to go any higher.
Next, decide what your target LUFS reading should be. As a very general rule of thumb, most rock songs are around -8 to -10 LUFS. -11 to -14 LUFS is considered as having a decent amount of dynamics, while classical music hangs out around -23 LUFS. Of course, this is all subjective—you can choose whatever level sounds “right.”
Now turn up the Limiter’s input control. The Loudness Information label will change to “Update Loudness.” Click on this; Studio One will analyze the track, and show the LUFS reading. (Note: You can force a reading by right-clicking on the song in the track column, and choosing “Detect Loudness.”)
Adjust the limiter Input level, then update the loudness. If the LUFS is below your target, turn up the Input. If the result is higher than the desired LUFS, turn down the Input. It takes a little trial and error, but eventually you’ll hit the target.
With the Tricomp and Limiter, once you get much above -13 LUFS you can “hear” the limiter because it’s stereo. With a phase-linear multiband maximizer like the Waves L3 Multimaximizer, you can push for higher LUFS readings while still sounding reasonably free of artifacts. Still, I wouldn’t want to go much above -10 LUFS—but as always, that’s a subjective call and there are no rules. If you like the way it sounds, that’s what matters.
However, be aware that even slight tweaks can make a difference, especially with the Tricomp. The Tricomp and the Limiter work together, and you can fine-tune the sound by fine-tuning each processor. For example, having Knee up all the way on the Tricomp gives more perceived loudness, and a narrower dynamic range…which may or may not be what you want. Turning on Autospeed also makes a difference.
When you listen to Joie de Vivre, I think you’ll hear that it benefited considerably by being adjusted in Studio One to a consistent LUFS reading. There’s a decent amount of dynamics, but the average perceived level of all the cuts is very consistent…and that’s what this tip all about.
Rent-to-Own Studio One Pro on Splice!
Click here to learn more!
PreSonus Symphonic Orchestra—Even More Powerful with Chord Track and Harmonic Editing
The PreSonus Symphonic Orchestra is something of a secret weapon over at shop.presonus.com. With over 14 gigs of samples and musicloops, it combines a complete symphonic orchestra instrument library with ready-to-use Studio One Musicloops for lightning-fast arranging and production. The instruments not only comprise a full symphony orchestra, but also a contemporary strings library. More than 1,200 Musicloops allow for creating full arrangements on the fly while retaining complete control over tempo, key, chords and sound character.
If you’re currently running Studio One 4 and have passed on the PSO before, now is a great time to give it another look—because with the release of the new Chord Track and Harmonic Editing features, the PSO becomes a lot more versatile and powerful with no increase in price!
PreSonus beta tester and content creator Lukas Ruschitzka recently created some new videos and audio demos showcasing not only the PSO’s sound quality and ease-of-use, but also how much stronger it has become when paired with Studio One’s new Chord Track and Harmonic editing. Check out these videos below, and…
…Click here to get the PreSonus Symphonic Orchestra!
PSO Construction Kits
PreSonus Symphonic Orchestra contains more than 1,200 Musicloops organized into 28 Construction Kits that cover various musical styles like classical film music but also contemporary genres like ambient, pop, groove and hip-hop. This video provides a short overview of the included Construction Kits.
Working with PSO Construction Kits
Being creative with the PSO Construction Kits is pretty straightforward. Just drag some Musicloops into your own songs and take advantage of Studio One’s Chord Track to change chords and try different harmonic patterns with just a few clicks. This video shows how easy it is to access PSO Construction Kits, preview different Musicloops in the song tempo and adapt them to the song via Harmonic Editing.
New PSO Audio Demos