10 Presence XT Techniques
September is winding down, but we still have one week left to celebrate Studio One’s 10th anniversary—so it’s time for another Friday Tip with 10 Tips! Let’s take a look at some practical, convenient techniques you can do with Presence XT. And yes, there’s a fun downloadable preset at the end.
- “Tighten” and “Loosen” Drum Kits

The Artist Instruments folder has a bunch of drum kits. However, I like to fine-tune drum pitches—higher pitches for a tighter, more beatbox/analog drum sound, or lower for a big rock vibe. Although the Sample Shift control can change pitch, it also changes where the drum appears on the keyboard. For example, if you Sample Shift a snare on the F key by +3, then the drum is lower in pitch, but it now plays back on D instead of F.
There’s a simpler way to tune your drums. Set Env 2 to Full Sustain, and modulate Pitch with it. Turn the modulation amount up to tighten the sound, or down to loosen.
- Control Presence Effects with the Mod Wheel

According to Presence, you can’t control effects parameters with the mod wheel—but there are a lot of useful techniques you can do with a mod wheel, other than control vibrato. Here’s one way to control the effects with your keyboard controller’s mod wheel.
- Choose Studio One > Options, and click on External Devices.
- Click on Add, and choose New Control Surface. Set Receive from your keyboard. You’ll get a scary message warning you “This port is already in use,” but just ignore it and click OK.
- Click OK on the Add Device menu, and now Studio One thinks your keyboard is a control surface.
- In the Mix view, click on the External button toward the left. When the External Devices column appears, double-click on New Control Surface.
- Click on MIDI Learn, and move your mod wheel. Name it to make it feel welcome, and then disable MIDI Learn.
Now you can link anything you want with the mod wheel, including effects. For example…
- Control Distortion Drive with the Mod Wheel
Adding distortion to bass is a beautiful thing, and it’s even more beautiful when you can control the distortion amount with the mod wheel.
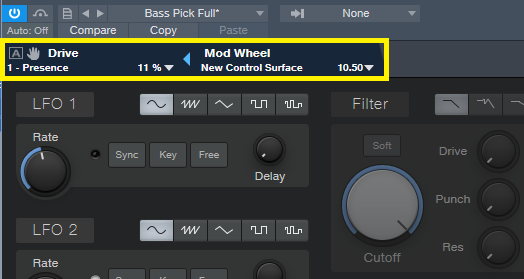
- Click on the Edit Mapping button in Presence’s upper right (the somewhat inscrutable gear symbol). Now you can see the control mapping in Presence—which is really important if your monitor isn’t wide enough to show the Edit Mapping option in the toolbar.
- Contrary to the help, which assumes you’re rational and using a separate hardware control surface, move the Mod wheel and it should show up in the right side of the Edit Mapping section.
- Move the Distortion Drive control, which will show up on the left side of the Edit Mapping section.
- Click the “assign” triangle in the middle of the Edit Mapping section, and now the Mod Wheel will control the Drive control. (Another tip: distortion gourmets recommend “Bad Tube” as the best choice for bass distortion.)
- More Expressiveness
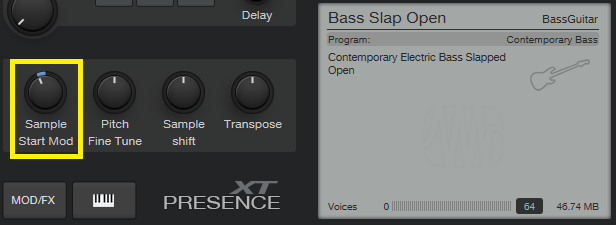
The Sample Start Mod control can add major expressiveness because it lets you control the attack’s character via velocity. Here’s how it works: when Sample Start Mod turned counter-clockwise off-center, with low velocities playback starts further into the sample, past the initial attack. But higher velocities trigger the full attack sound. For example, with an instrument like Slap Bass, this technique can emphasize the slap component with high velocities, while lower velocities bypass the slap. However, Sample Start Mod can affect any instrument with a defined attack.
Because a sample may not start at a zero-crossing, you may hear a click with some velocity values. Adding a little bit of Amp Env attack (usually only a millisecond or two) fixes this.
- Change the Female Choir into Monks
Call up the Vox > Choir > Choir Full preset. Set Transpose to -12, and Sample Shift to Semi-Tone: 12. You might also want to slather on some more reverb by turning up the Size and Mix, but regardless, you’re ready for your next moody movie soundtrack, or Gregorian chants dance remix.
- Get Saxy
Let’s face it, John Coltrane fans—a sampler will never replace a sax player. However, the Winds > Baritone Sax > Baritone Sax Full preset is pretty good, so it seemed like a useful starting point for something a little more expressive. There are several treaks, but the main action is with the modulation.
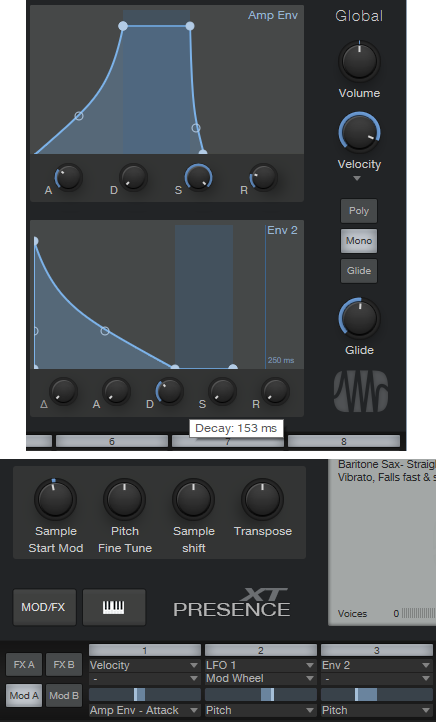
- Set Sample Start Mod to -7000. If you play softly, this starts playback further into the sample, so you don’t hear the attack. However, as mentioned previously, modulating sample start can produce clicks because playback may not start on a zero crossing, so…
- Set the Amp Env Attack to 83 ms. This gets rid of any clicks. However, we want a fast attack with high velocities, so…
- In the Mod section, use Velocity to apply negative modulation to the Amp Env attack (you don’t need much) so that hitting the keys harder gives a faster attack.
- We also want to have notes bend up to pitch somewhat, so set the Decay for Env 2 to 153 ms. Again in the Mod section, use it to apply negative modulation to pitch. This causes the pitch to start off somewhat flat, then slide up to the correct pitch.
The penultimate touch is some vibrato by modulating Pitch. I used LFO set to about 4.5 Hz, with 680 ms of Delay time, controlled by the Mod Wheel (although I think Aftertouch is an even better choice, if your controller supports it). And of course, we want some reverb. The existing reverb is okay, but push the Size to 2.45 seconds, and Mix to 45%. Yeah, that’s the ticket! You might also want to choose Mono, unless you know any saxes that play chords. And yes, I’ve provided a downloadable preset for your playing pleasure—scroll down to the end.
- Foolproof Bass Slides

Set the bend to +7 for bend up, and 0 for bend down. Now when you want to slide down to a note, start at the top of the mod wheel, and then bring it down at whatever rate you want. It’s impossible to “overshoot” the target note, even when using the virtual mod wheel on the instrument GUI, with bend down set to 0.
- Add Analog Synth “Drift”
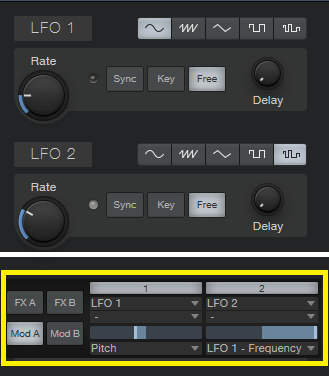
The pitch of analog synths drifts over time. Although Presence XT has a random LFO waveform, it’s stepped, and there’s no way you can “round off” the corners to create smooth variations. But there’s a solution (isn’t there always…). Use the sine waveform for LFO 1 and set it to a low rate, like 0.1 Hz. Select the random waveform for LFO 2, set to a slightly faster rate (like 0.4 Hz), and use it to modulate LFO 1. Meanwhile, use LFO 1 to modulate pitch; you don’t need to use much modulation to obtain a useful effect. Try this with Artist Instruments > Synths > Analog Fifths—you’ll be impressed.
- The Presence XT Editor Is Worth It

There might be a tendency to overlook the editor because Presence XT does enough on its own. And yes, I know the editor is $79.99. But, it’s cheaper than getting another sampler, and the capabilities are impressive. It’s easy to figure out, and it doesn’t take long to add samples—for example, you can specify the root note, high note, and low note by hitting keys. When using per-note samples, you can do fine-tuning, as well as add expressive features like sample start. Presence XT Editor is also a development system, so if you come up with some amazing presets, you can put them into a saleable bundle, and even password-protect it. If you’re into sound design and creating sample-based instruments, I highly recommend unlocking Presence XT’s Editor page.
- But Wait—There’s More!
Presence XT can load sounds from other formats—EXS, Giga, Kontakt version 4 (and below), and Sound Fonts. Finally, check out Tip 1 in the September 13 Friday Tip on using ATOM as an auxiliary keyboard. This makes it easy to access the keyswitching in Presence XT presets that contain this feature, even if you have only a four-octave keyboard.
I hope y’all enjoyed this month’s special editions of the Friday Tip. Happy birthday, Studio One!
Download the saxy sax preset, CA Baritone Sax Full