Category Archives: Friday Tip of the Week
Friday Tip: MIDI Guitar Setup with Studio One
I was never a big fan of MIDI guitar, but that changed when I discovered two guitar-like controllers—the YRG1000 You Rock Guitar and Zivix Jamstik. Admittedly, the YRG1000 looks like it escaped from Guitar Hero to seek a better life, but even my guitar-playing “tubes and Telecasters forever!” compatriots are shocked by how well it works. And Jamstik, although it started as a learn-to-play guitar product for the Mac, can also serve as a MIDI guitar controller. Either one has more consistent tracking than MIDI guitar retrofits, and no detectable latency.
The tradeoff is that they’re not actual guitars, which is why they track well. So, think of them as alternate controllers that take advantage of your guitar-playing muscle memory. If you want a true guitar feel, with attributes like actual string-bending, there are MIDI retrofits like Fishman’s clever TriplePlay, and Roland’s GR-55 guitar synthesizer.
In any case, you’ll want to set up your MIDI guitar for best results in Studio One—here’s how.
Poly vs. Mono Mode
MIDI guitars usually offer Poly or Mono mode operation. With Poly mode, all data played on all strings appears over one MIDI channel. With Mono mode, each string generates data over its own channel—typically channel 1 for the high E, channel 2 for B, channel 3 for G, and so on. Mono mode’s main advantage is you can bend notes on individual strings and not bend other strings. The main advantage of Poly mode is you need only one sound generator instead of a multi-timbral instrument, or a stack of six synths.
In terms of playing, Poly mode works fine for pads and rhythm guitar, while Mono mode is best for solos, or when you want different strings to trigger different sounds (e.g., the bottom two strings trigger bass synths, and the upper four a synth pad). Here’s how to set up for both options in Studio One.
- To add your MIDI guitar controller, choose Studio One > Options > External Devices tab, and then click Add…

Figure 1: Check “Split Channels” if you plan to use a MIDI guitar in mono mode.
- To use your guitar in Mono mode, check Split Channels and make sure All MIDI channels are selected (Fig. 1). This lets you choose individual MIDI channels as Instrument track inputs.
- For Poly mode, you can follow the same procedure as Mono mode but then you may need to select the desired MIDI channel for an Instrument track (although usually the default works anyway). If you’re sure you’re going to be using only Poly mode, don’t check Split Channels, and choose the MIDI channel over which the instrument transmits.
Note that you can change these settings any time in the Options > External Devices dialog box by selecting your controller and choosing Edit.
Choose Your Channels
For Poly mode, you probably won’t have to do anything—just start playing. With Mono mode, you’ll need to use a multitimbral synth like SampleTank or Kontakt, or six individual synths. For example, suppose you want to use Mai Tai. Create a Mai Tai Instrument track, choose your MIDI controller, and then choose one of the six MIDI channels (Fig. 2). If Split Channels wasn’t selected, you won’t see an option to choose the MIDI channel.
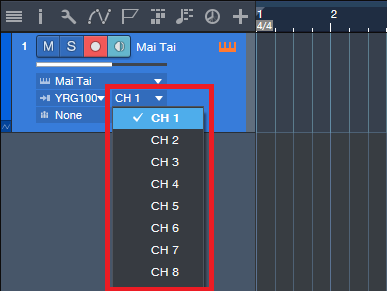
Figure 2: If you chose Split Channels when you added your controller, you’ll be able to assign your instrument’s MIDI input to a particular MIDI channel.
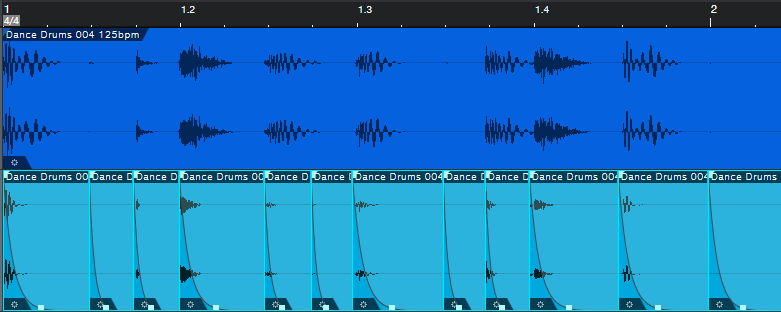
Next, after choosing the desired Mai Tai sound, duplicate the Instrument track five more times, and choose the correct MIDI channel for each string. I like to Group the tracks because this simplifies removing layers, turning off record enable, and quantizing. Now record-enable all tracks, and start recording. Fig. 3 shows a recorded Mono guitar part—note how each string’s notes are in their own channel.
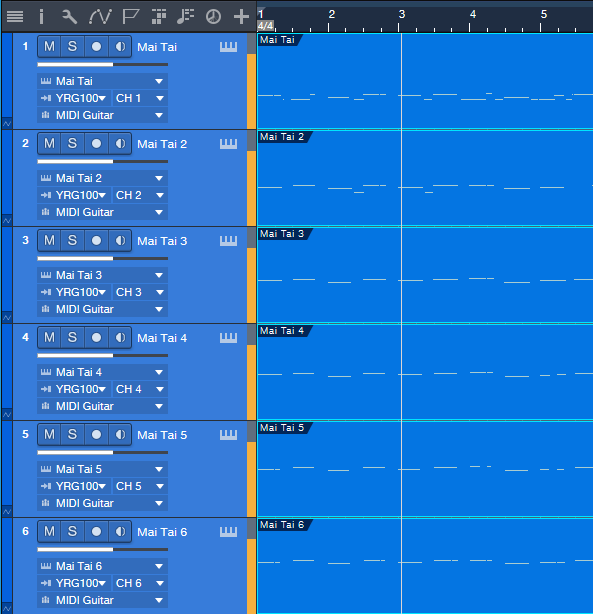
Figure 3: A MIDI guitar part that was recorded in Mono mode is playing back each string’s notes through its own Mai Tai synthesizer.
To close out, here are three more MIDI guitar tips.
- In Mono mode with Mai Tai (or whatever synth you use), set the number of Voices to 1 for two reasons. First, this is how a real guitar works—you can play only one note at a time on a string. Second, this will often improve tracking in MIDI guitars that are picky about your picking.
- Use a synth’s Legato mode, if available. This will prevent re-triggering on each note when sliding up and down the neck, or doing hammer-ons.
- The Edit view is wonderful for Mono mode because you can see what all six strings are playing, while editing only one.
MIDI guitar got a bad rap when it first came out, and not without reason. But the technology continues to improve, dedicated controllers overcome some of the limitations of retrofitting a standard guitar, and if you set up Studio One properly, MIDI guitar can open up voicings that are difficult to obtain with keyboards.
In Mono mode with Mai Tai (or whatever synth you use), set the number of Voices to 1 for two reasons. First, this is how a real guitar works—you can play only one note at a time on a string. Second, this will often improve tracking in MIDI guitars that are picky about your picking.
Friday Tips: The Virtual Pop Filter
Hate those p-pops and breath noises? So do I, especially when I’m being paid the big bucks for voiceovers and have to edit the pops out by hand. Granted, the Pauly pop filter is a fantastic solution—it’s the best pop filter I’ve ever tried—but its $300 price tag is pretty daunting. And no matter how hard you try to control pops at the source, sometimes those pesky, problematic pops work their way into a track anyway. So, it’s time for a do-it-yourself pop filter project. And because it’s virtual, this one doesn’t involve taking panty hose and stretching it over a hanger. Instead, we’ll stretch the Pro EQ into being a virtual pop filter.
The key is creating an ultra-steep cutoff frequency that kills the low frequencies, but lives below the range of the voice so it doesn’t thin out the vocal. The easiest way to create a steep cutoff is with multiple sharp notches (Fig. 1). There are four notches, all with a Q of 12 and a gain of -24 dB. Frequencies are 130, 140, 150, and 160 Hz.

Figure 1: Use notch filters to create a super-steep low frequency slope.
Now we need to get rid of the low frequencies. Enabling the Low Cut filter helps, but if we turn it up too far, it starts rounding off the slope, which makes it not as steep. A slope of 48 dB/octave, with a frequency around 90 Hz seems about right (Fig. 2).

Figure 2: Adding a Low Cut filter starts carving away at the low frequencies.
That’s better, so it’s time for the coup de grâce—the Low Frequency Shelf stage. This gets rid of the remaining low frequencies, while still keeping the insanely steep slope (Fig. 3).

Figure 3: The Low Frequency Shelf completes the virtual pop filter.
However, note that the Low Frequency Shelf is also the key to versatility. By increasing the Q, you can add a low-frequency “bump” that’s just above the cutoff frequency. This adds extra depth, and a deep kind of vocal resonance that still keeps the p-pops under control.
Of course, every voice and mic is different, so you may want to edit the parameters somewhat. To preserve more bass, drop the frequency of all filter stages by 10 Hz and see if that helps. Conversely, if the p-pops are still too prominent, raise the frequency of all filter stages by 10 Hz until you hit the desired response…or if you’re impatient, use 20 to 30 Hz jumps.
In any event, you now have a super-steep low cut filter that can remove plosives, wind noises, most breath noises, earthquake sounds, and even the rumble from those pesky UFO flyovers—you might be surprised at just how effective this little project can be in banishing pops from your life.
Friday Tips: Studio One’s Zero-Latency/Zero-Artifact Transient Shaper
Studio One doesn’t have a transient shaper plug-in…in theory. In practice, there’s a zero-latency, artifact-free transient shaper that’s ideal for emphasizing the attack in drum parts (and other percussive sounds as well, from bass to funky rhythm guitar). Here’s how to do it.
- Copy the clip to which you want to add transient shaping.
- Right-click in the copy, and choose Detect Transients.
- Right-click in the copy again, and choose Split at Bend Markers. The copy now has slices at each transient.
- With all the slices still selected, click on any slice’s fadeout handle, and drag it all the way to the left so that each slice has a sharp decay. Tip: De-select one slice before doing this, because once you drag all the fadeouts to minimum, it’s very difficult to change them. By de-selecting a slice, you can select all the slices, and use the de-selected slice’s fadeout handle to change all the slice fadeouts at once, regardless of the other slices’ settings.
- Click the node in the middle of the fadeout curve, and drag the node down to make all the slices even more percussive.
The top waveform is the original drum part, while the lower waveform adds a sharp decay to each drum transient.
The copy now has the transients isolated from the rest of the loop. Vary the mix of the copied track and the original track to set the balance of the emphasized attack with the loop’s “body.” (Studio One programmer Arnd Kaiser suggests this process might be a good candidate for a macro—that’s an excellent point.)
This technique is particularly effective with acoustic drum loops, because the drums tend to ring longer—so creating a copy as described makes for a super-percussive sound compared to the original loop.
Try this, and you’ll be shocked at how this can make drum parts become more vibrant and “alive.” However, there is one unfortunate side effect: now I wish I could go back and remix all my songs that have drum tracks!
Friday Tips: Keyswitching Made Easy
As the quest for expressive electronic instruments continues, many virtual instruments incorporate keyswitching to provide different articulations. A keyswitch doesn’t play an actual note, but alters what you’re playing in some manner—for example, Presence’s Viola preset dedicates the lowest five white keys (Fig. 1) to articulations like pizzicato, tremolo, and martelé.
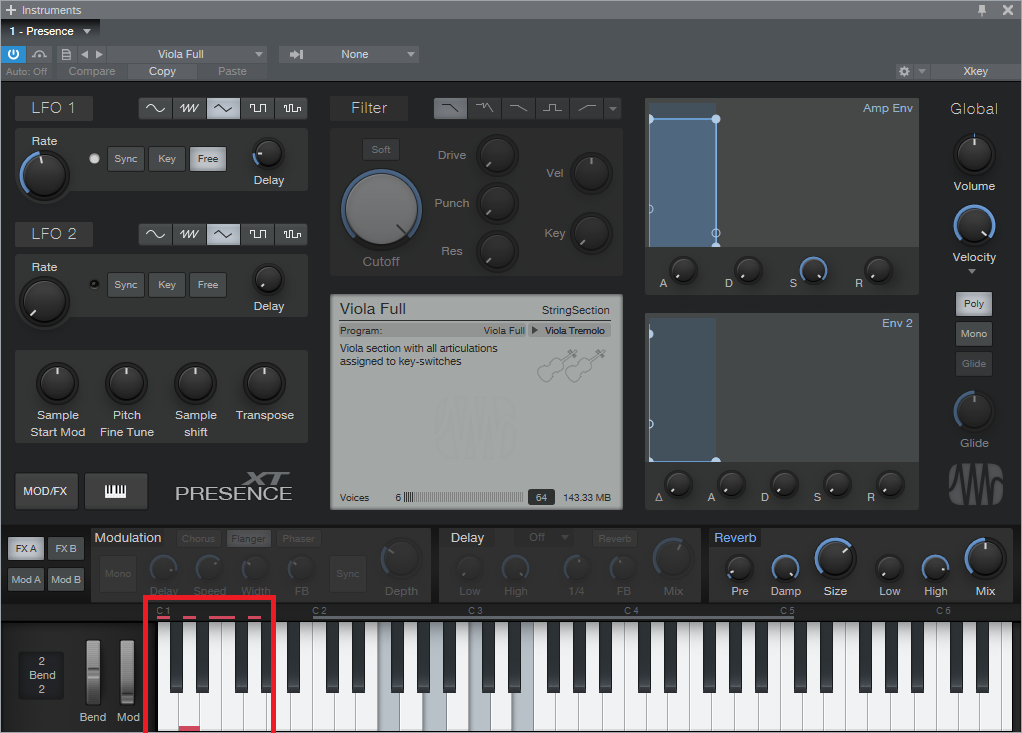
Fig. 1: The five lowest white keys, outlined in red, are keyswitches that provide articulation options. A small red bar along the bottom of the key indicates which keyswitch is active.
This is very helpful—as long as you have a keyboard with enough keys. Articulations typically are on the lowest keys, so if you have a 49-key keyboard (or even a 61-note keyboard) and want to play over its full range (or use something like a two-octave keyboard for mobile applications), the only way to add articulations are as overdubs. Since the point of articulations is to allow for spontaneous expressiveness, this isn’t the best solution. An 88-note keyboard is ideal, but it may not fit in your budget, and it also might not fit physically in your studio.
Fortunately, there’s a convenient alternative: a mini-keyboard like the Korg nanoKEY2 or Akai LPK25. These typically have a street price around $60-$70, so they won’t make too big a dent in your wallet. You really don’t care about the feel or action, because all you want is switches.
Regarding setup, just make sure that both your main keyboard and the mini-keyboard are set up under External Devices—this “just works” because the instrument will listen to whatever controllers are sending in data via USB (note that keyboards with 5-pin DIN MIDI connectors require a way to merge the two outputs into a single data stream, or merging capabilities within the MIDI interface you’re using). You’ll need to drop the mini-keyboard down a few octaves to reach the keyswitch range, but aside from that, you’re covered.
To dedicate a separate track to keyswitching, call up the Add Track menu, specify the desired input, and give it a suitable name (Fig. 2). I find it more convenient not to mix articulation notes in with the musical notes because if I cut, copy, or move a passage of notes, I may accidentally edit an articulation that wasn’t supposed to be edited.
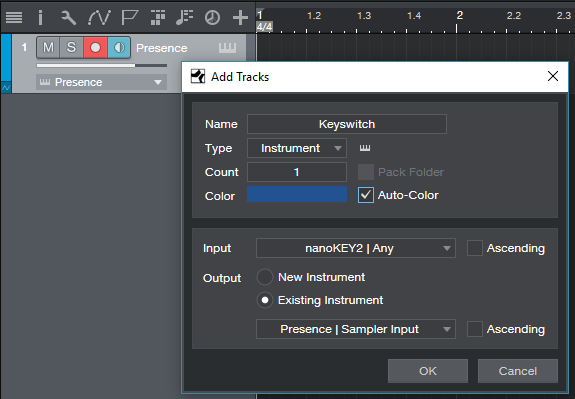
Fig. 2: Use the Add Track menu to create a track that’s dedicated to articulations.
So until you have that 88-note, semi-weighted, hammer-action keyboard you’ve always dreamed about, now you have an easy way take full advantage of Presence’s built-in expressiveness—as well as any other instrument with keyswitching.
Friday Tips: Easy Song Level Matching
As you’ve probably figured out, these tips document something I needed, and the solution. If you’ve ever put together an album or collection of songs, you know how difficult it can be to match levels—which I was reminded of all too clearly while preparing the album Joie de Vivre for upload to my YouTube channel. It’s rock-meets-EDM, and is done as a continuous mix that includes not just songs, but transitions. So, all the levels had to be matched very carefully. Fortunately, Studio One’s Project Page made it easy.
The key was using the Project Page’s LUFS meter readings; for a complete explanation of LUFS, please check out the article I wrote for inSync magazine. In a nutshell, it’s a way to measure audio’s perceived level that’s more sophisticated than the usual average, VU, or peak readings. If two songs have the same LUFS reading, they’ll be perceived as having a similar (if not the same) level.
This measurement standard was created in response to issues involved in broadcasting and streaming services, and also in part as a backlash against “the loudness wars.” For example, YouTube doesn’t want you to have to change the level every time a video changes, so they’ve standardized on making all audio -13 LUFS. It doesn’t matter if you squash your master recording until it looks like a sausage, YouTube will adjust the perceived level so that it can slip into a playlist with something like a live acoustic jazz recording.
In Studio One’s Project Page, the Loudness Information section for each song (Fig. 1) shows a song’s LUFS as well as readings for the RMS average level (somewhat like a VU meter) and True Peak, which indicates not just peaks, but whether any peaks are exceeding the maximum headroom on playback, and by how much. The Loudness Information can come from before or after the track’s effects, so to see how editing these alters the LUFS reading, choose the Post FX tab.
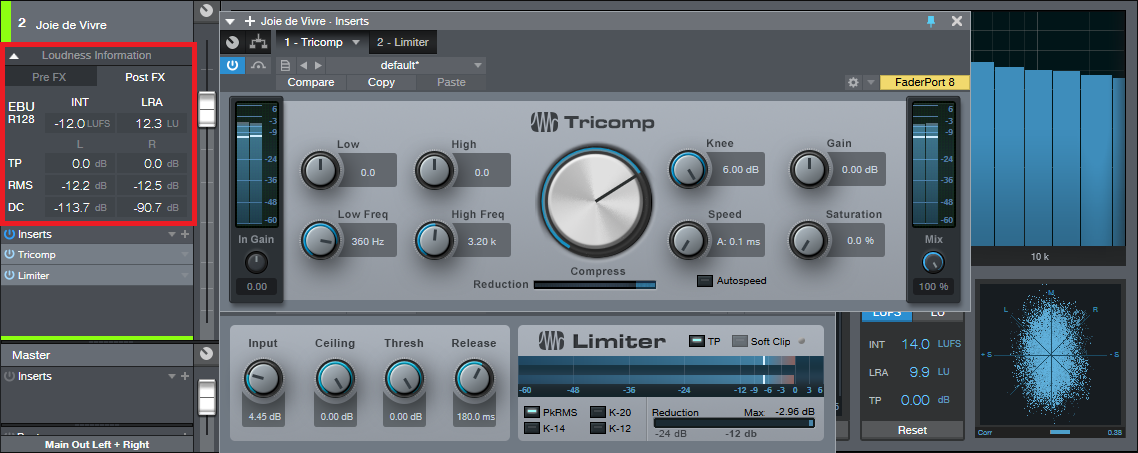
Fig. 1: The Tricomp/Limiter combination makes it easy to “fine-tune” the perceived loudness of your songs in the Project Page, as shown by the Loudness Information section (outlined in red).
Leveling the Levels
Now that we know how to measure levels, here’s one way to tweak them for consistency. We’ll assume you want something fairly compressed/limited, but not enough to become collateral damage in the loudness wars.
For each track (likely all of them) that needs to be set to a certain LUFS measurement, insert the Tricomp compressor followed by the Limiter. The screen shot shows my preferred Tricomp settings, but note that the optimum Compress knob setting depends on the material. You don’t want to compress too much, because the limiter will do most of the leveling anyway. If the gain reduction peaks reach the last “s” in “Compress” on the Limiter’s Reduction meter, you probably won’t hear too many artifacts, but you might not want to go any higher.
Next, decide what your target LUFS reading should be. As a very general rule of thumb, most rock songs are around -8 to -10 LUFS. -11 to -14 LUFS is considered as having a decent amount of dynamics, while classical music hangs out around -23 LUFS. Of course, this is all subjective—you can choose whatever level sounds “right.”
Now turn up the Limiter’s input control. The Loudness Information label will change to “Update Loudness.” Click on this; Studio One will analyze the track, and show the LUFS reading. (Note: You can force a reading by right-clicking on the song in the track column, and choosing “Detect Loudness.”)
Adjust the limiter Input level, then update the loudness. If the LUFS is below your target, turn up the Input. If the result is higher than the desired LUFS, turn down the Input. It takes a little trial and error, but eventually you’ll hit the target.
With the Tricomp and Limiter, once you get much above -13 LUFS you can “hear” the limiter because it’s stereo. With a phase-linear multiband maximizer like the Waves L3 Multimaximizer, you can push for higher LUFS readings while still sounding reasonably free of artifacts. Still, I wouldn’t want to go much above -10 LUFS—but as always, that’s a subjective call and there are no rules. If you like the way it sounds, that’s what matters.
However, be aware that even slight tweaks can make a difference, especially with the Tricomp. The Tricomp and the Limiter work together, and you can fine-tune the sound by fine-tuning each processor. For example, having Knee up all the way on the Tricomp gives more perceived loudness, and a narrower dynamic range…which may or may not be what you want. Turning on Autospeed also makes a difference.
When you listen to Joie de Vivre, I think you’ll hear that it benefited considerably by being adjusted in Studio One to a consistent LUFS reading. There’s a decent amount of dynamics, but the average perceived level of all the cuts is very consistent…and that’s what this tip all about.
Friday Tips: Humbucker to Single-Coil Conversion with EQ
Humbuckers are known for a big, beefy sound, while single-coil pickups are more about clarity and definition. If you want the best of both worlds, you can warm up a soldering iron, ground the junction of the humbucker’s two coils, and voilà—a single coil pickup. But there’s an easier way: use the Pro EQ, which gives the added benefit of not losing the pickup’s humbucking characteristics.
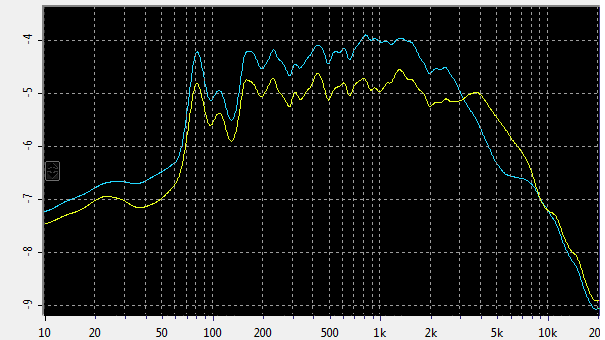
Fig. 1: Humbucker and single-coil response compared.
The main difference between humbucker and single coil pickups is the frequency response. The blue line in Fig. 1 shows a humbucker’s spectral response, while the yellow line shows the same humbucker split for single-coil operation. Unlike the single-coil’s response, which is essentially flat from 150 Hz to 3 kHz, the humbucker has a bump in the 500 Hz to 2 kHz range that contributes to the “beefy” sound. Starting at 3 kHz the humbucker response drops off rapidly, while the single coil produces more high-frequencies than the humbucker from 3 kHz to 9 kHz.
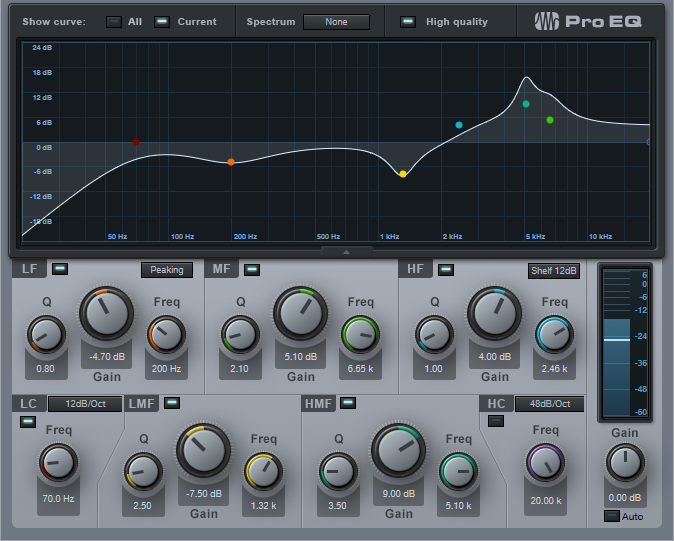
Fig. 2: Bridge humbucker to single-coil conversion EQ curve.
Fig. 2 shows an equalizer curve that modifies a bridge humbucker for more of a single-coil response. Of course different humbucker and different single-coil pickups sound different, so this kind of EQ-based “modeling” is an inexact science. However, I think you’ll find that the faux single-coil sound delivers the distinctive, glassy character you want from a single-coil pickup. Feel free to tweak the EQ further—you can come up with variations on the single-coil sound, or “morph” between the humbucker and single-coil characteristics.
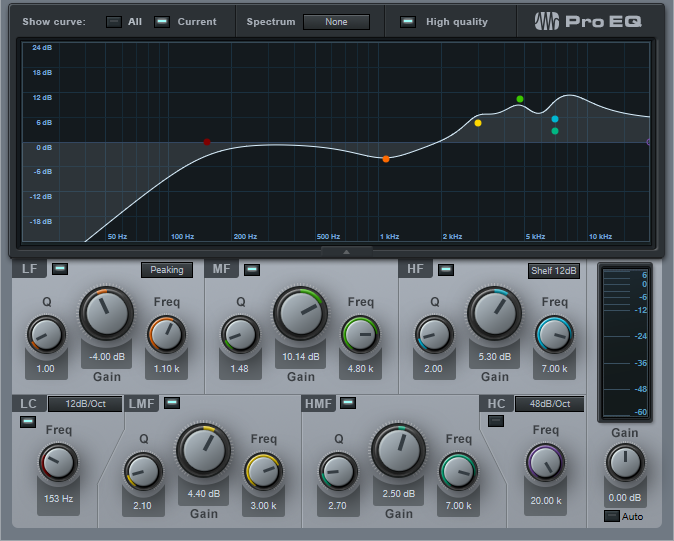
Fig. 3: Neck humbucker to single-coil conversion EQ curve.
The difference between a neck humbucker and single-coil response isn’t as dramatic, but the curve in Fig. 3 replicates the neck single-coil character, and provides yet another useful variation for your guitar tone.
The bottom line is that you don’t need to break out a soldering (or void your guitar’s warranty) to make your humbucker sound more like a single-coil type—all you need is the right kind of EQ.
Friday Studio One Tips: The Guitar Sustainer
This signal processing setup is optimized for single-string guitar solos where you want a lot of sustain—but it has a secret ingredient that puts it ahead of typical guitar stompbox sustainers.

The compression aspect is pretty straightforward. A sustainer is all about a high compression ratio and low threshold, which are set to 20:1 and -35 dB, respectively. The sharp knee keeps the sustain going as long as possible, and a short attack time clamps down the attack. The release time isn’t too critical, although this depends on your playing style; a relatively long one (300-500 ms) usually works best.
This is one of those rare instances where you don’t want to enable the compressor’s Auto or Adaptive feature, because the goal here isn’t the most natural sound—it’s an effect. However, enable Lookahead because it helps to tame the attack.
Because of the extreme amount of compression, you’ll need about 30 dB of makeup gain to compensate for the gain reduction due to compression.
And now, the secret ingredient! With most sustainers, after the release time ends, if there’s a pause between notes you’ll hear a loud “pop” when you play a new note because of the compression kicking back in. A fast attack and lookahead helps, but it’s almost impossible to avoid some kind of nasty transient. If you follow the compressor with an amp sim, the distortion will hide the pop somewhat but it can still lead to an ugly attack.
Enter the noise gate. This doesn’t just remove hum, noise, and other low-level signals from being sustained, but the 55 ms attack time (coupled with the enabled lookahead button) means that when you hit a note after a pause, the note attack ramps up more slowly, so the compressor can “grab” the note without creating a pop (or if it does, the pop will be greatly reduced). If there’s an amp sim involved, you’ll hear a cleaner attack, and better overall sound. Note that depending on how fast you play and the compressor’s release time, you may need to shorten the Noise Gate’s Release and Hold times. In any event, when you want serious ssssssuuuuussssstttttaaaaaiiiiinnnnn for your single-note guitar solos, this is the ticket.
Friday Tips: Studio One’s Transient Shaper for Kick and Snare
As with so many aspects of audio, the subject of compression presets polarizes people. The purists say there’s no point in having presets, because every signal is different, and the same compressor settings will sound very different on different sources. On the other hand, software comes with presets, and there are plenty of recording blogs on the web that dispense advice about typical preset settings. So who’s right?
And as with so many aspects of audio, they all are. If a preset works “out of the box,” that’s just plain luck. However, there are certain ranges of settings that work well in many cases for particular types of signals. In any case, the effects of compression are totally dependent on the input signal level anyway—if the threshold is set to -10, then signals that peak at 0 will sound very different compared to signals that peak at -10.
The most effective way to approach compression is to decide what effect you want the compression to accomplish, then adjust the compression settings accordingly. It’s also important to remember that compression isn’t just some monolithic effect that “squashes things.” For example, with kick and snare, compression can act just like a transient/decay shaper due to a drum’s rapid decay.
The usual goal for compressing kick is an even sound, yet one that doesn’t reduce punch. However, you have a great deal of latitude in deciding how to implement that goal.
Figure 1: A starting point for kick (and snare) compression.
The preset in Fig. 1 uses a fairly high ratio, and hard knee, to even out the highest levels. You want the compression to take hold relatively rapidly, but not take away from the punch. The best option is to start with the attack time at 0, and increase it until you hear the initial hit clearly (but don’t go past that point). Because a kick decays fast, release can be fast as well.
For transient shaping, slowing the attack time softens the attack. Raising the ratio increases the sustain somewhat, while making space for the attack (assuming an appropriate attack time). Between the attack and ratio controls, you can pretty much tailor the kick drum’s attack and sustain characteristics, as well as even out the overall sound. A higher threshold is another way to emphasize the attack, by letting the decay occur naturally. Lowering the threshold reduces the level difference between the attack and decay.
Snare responds similarly to kick, however with an acoustic drum kit, the kick is more isolated physically than the snare. As a result, compressing the snare has the potential to emphasize leakage. Fortunately, the snare is often the focus of a drum part. As a result, you can simply compress the snare, and accept that leakage is part of the deal. With individual, multitracked drums (including electronic drums) where leakage is not a problem, it’s still usually the snare and kick that get compression.
With snare, you may want to use a lower ratio (2:1 – 3:1) for a fuller snare sound. Or, increase the ratio to emphasize the attack more. Again, use the attack time to dial in the desired attack characteristics.
With both kick and snare, you’ll usually want a hard knee. However, the knee control is a fantastic way to fine-tune the attack—and once you have that dialed in, you’ll be good to go.
Friday Tips: Rhythmic Reverb Splashes
Summer may be over in the northern hemisphere, but we can still splash around. This is one of those “hiding in plain sight” kind of tips, but it’s pretty cool.
The premise: Sometimes you don’t want reverb all the time, so you kick up the send control to push something like a snare hit into the reverb for a quick reverb “splash” (anyone who’s listened to my music knows this is one of my favorite techniques). The reverb adds a dramatic emphasis to the rhythm, but is short enough that it doesn’t wear out its welcome—listen to the audio example, which demos this technique with Studio One’s Crowish Acoustic Chorus 1 drum loop.
However, although this technique is great with drums, it also works well with rhythm guitar, hand percussion, synths, you name it… even kick works well in some songs. I’m not convinced about bass, but aside from that, this has a lot of uses.
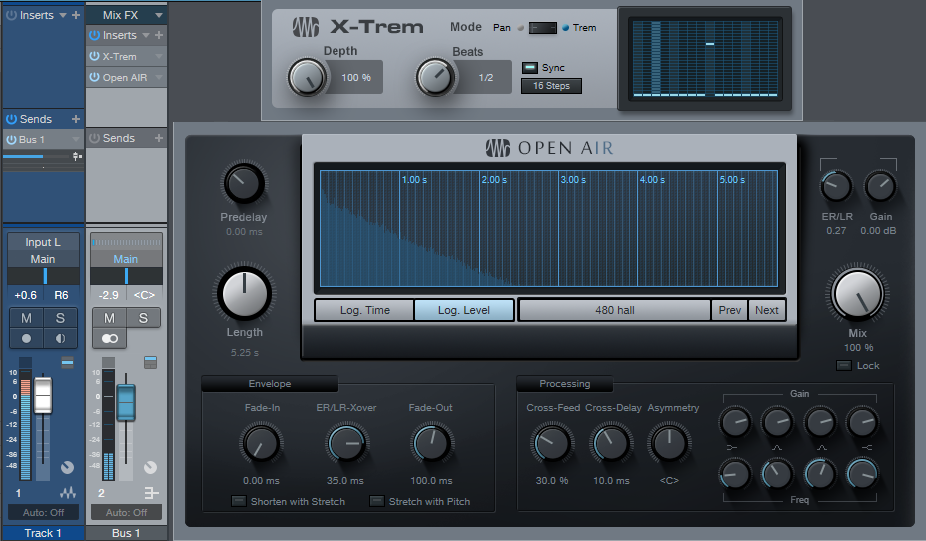
Studio One offers an easy way to produce regular splashes automatically (like on the second and fourth beats of a measure, where an emphasizing element hits). Insert X-Trem before the reverb, select 16 Steps as the “waveform,” click Sync, and choose your rhythm. The screenshot shows Beats set to 1/2 so that the reverb splash happens on 2 and 4, which in the case of the audio example, adds reverb to the snare on 2, and to the closed high-hat on 4.
And that’s pretty much it. Because the reverb is in a bus, set Mix to 100%. The 480 Hall from Halls > Medium Halls is one of my faves for this application, but hey… use whatever ’verb puts a smile on your face.
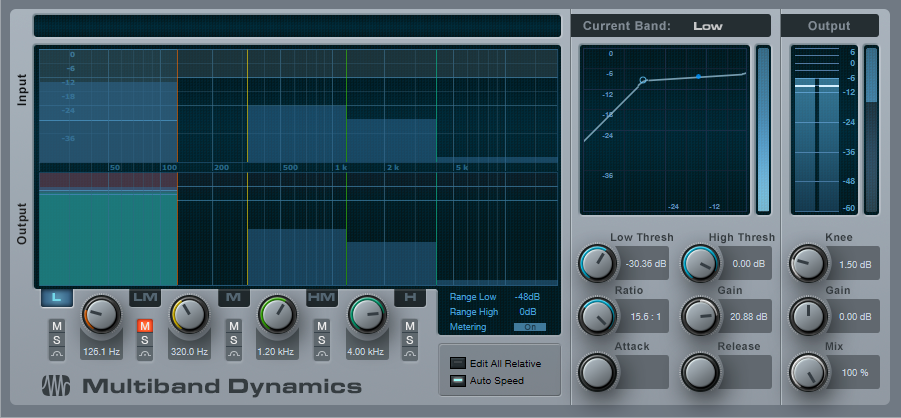
Friday Tips: Multiband Dynamics for Bass? Yes!
I’m not one of those people who wants to do heavy compression all the time, but I do feel bass is an exception. Mics, speakers, and rooms tend to have response anomalies in the bass range; even if you’re using bass recorded direct, compression can help even out the response for a smoother, rounder sound.
Although stereo compressors are the usual go-to for bass, I often prefer a multiband dynamics processor because it can serve simultaneously as a compressor and EQ. Typically, I’ll apply a lot of compression to the lowest band (crossover below 200 Hz or so), light compression to the low-mid bands (as well as reduce their levels in the overall mix), and medium compression to the high-mid band (from about 1.2 kHz to 6 kHz). I often turn down the level for the band above 5-6 kHz or so (there’s not a lot happening up there with bass anyway), but sometimes I’ll set a ratio below 1.0 so that the highest band turns into an expander. If there’s any hiss in the very highest band, this will help reduce it. Another advantage of using Multiband Dynamics is that you can tweak the high and low band gain parameters so that the bass fits well with the rest of the tracks.
The preset in the following screenshot gives a sound like “Tuned Thunder,” thanks to heavy compression in the lowest band. To choose a loop that’s good for demoing this sound, choose Rock > Bass > Clean, and then select 08 02 P Ransack D riff.audioloop. Insert the Multiband Dynamics processor, and start with the default preset.
As with most dynamic processing presets, the effect is highly dependent on the input level. For this preset, normalize the bass loop. Then change the L band to 125 Hz, with a ratio of 15:1, and a Low Threshold of -30 dB. Mute the LM band.
With the Multiband Dynamics processor bypassed, observe the peak value for the bass track. Now enable Multiband Dynamics, and adjust the Low band’s Gain until the peak value matches the peak value with the Multiband Dynamics bypassed-—you’ll hear a big, fat, round sound that sort of tunnels through a mix.
Now let’s go to the other extreme. A significant treble boost can help a bass hold its own against other tracks, because the ear/brain combination will fill in the lower frequencies. The next screen shot shows settings for extreme articulation so the bass really “pops,” and cuts through a track. Again, start with the default preset but set the Low band frequency to 110 Hz or so.
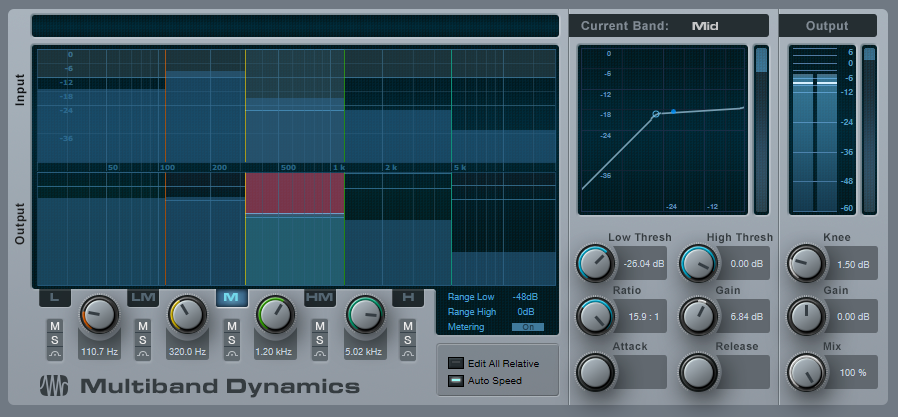
The only band that’s compressed is the Mid band (320 – 1.2 kHz, with parameter settings shown in the screen shot). A bit of gain for the High Mid band emphasizes pick noise and harmonics—5 dB or so seems about right—and to compensate for the extra highs, add some gain to the low band below 110 Hz. Again, about 4-5 dB seems to work well.
When adjusting the Multiband Dynamics processor, note that you can zero in on the exact effect you want for each band by using the Solo and Mute buttons on individual stages. So next time you want to both compress and equalize bass, consider using Multiband Dynamics instead—and get the best of both worlds.