Category Archives: Friday Tip of the Week
Friday Tip: Smoother, Gentler Sidechain Gating
I’ve always been fascinated with using one instrument to modulate another—like using a vocoder on guitar or pads, but with drums as the modulator instead of voice. This kind of processing is a natural for dance music, and using a noise gate’s sidechain to gate one instrument with another (e.g., bass gated by kick drum) is a common technique.
However, the sound of gating has always seemed somewhat abrupt to me, regardless of how I tweaked a gate’s attack, decay, threshold, and range parameters. I wanted something that felt a little more natural, a little less electro, and gave more flexibility. The answer is a bit off the wall, but try it—or at least listen to the audio example.
Setup requires copying the track you want to modulate (the middle track below), and then using the Mixtool to flip the copy’s audio 180 degrees out of phase (i.e., enable Invert Phase). This causes the audio from the original track and its copy to cancel. Then, insert a compressor in the copy, and feed its sidechain with a send from the track doing the modulating. In this case, it’s the drum track at the top.
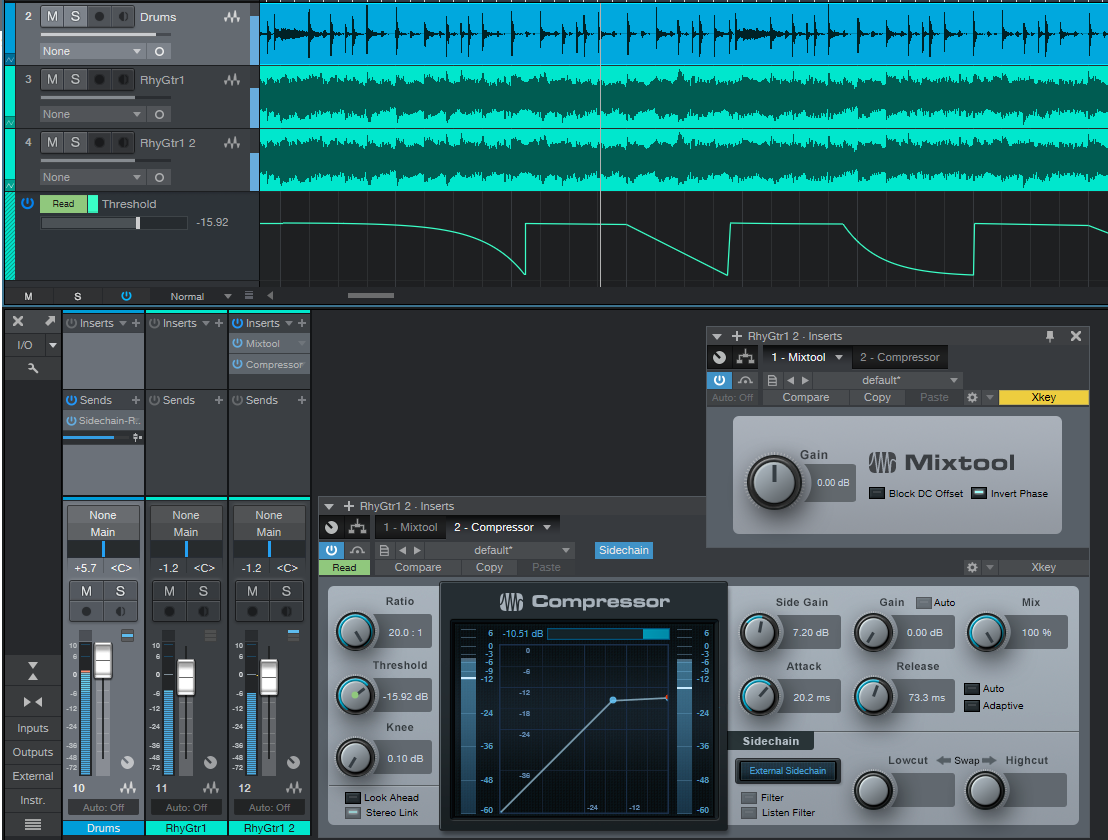
When the compressor kicks in, it reduces the gain of the audio that’s out of phase, thus reducing the amount of cancellation. However, as you’ll hear in the example, the gain changes don’t have the same character as gating.
You can also take this technique further with automation. The screen shot shows automation that’s adjusting the compressor’s threshold; the lower the threshold, the less cancellation. Raising the threshold determines when the “gating” effect occurs. Also, it’s worth experimenting with the Auto and Adaptive modes for Attack and Release, as well as leaving them both turned off and setting their parameters manually.
Using a compressor for “gating” allows for flexibility that eluded me when adjusting a standard noise gate. If you want super-tight rhythmic sync between two instruments, this is an unusual—but useful—alternative to sidechain-based gating.
Friday Tip: Perfect Pads!
Pads that Loop Perfectly—Yes, It’s Possible!
Pads are hard to loop, because their flowing, continuous sound exposes loop points that are anything less than seamless—there will often be a click, pop, or other glitch. But there is a solution, so keep reading for how to create perfect loops for just about any pad.
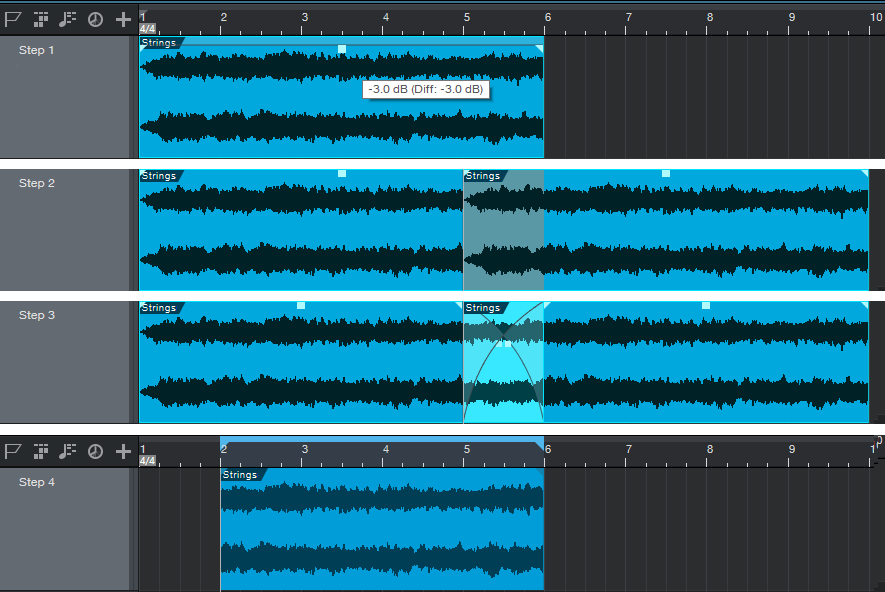
Step 1. Record a pad that’s one measure longer than what you want to loop. For example, record five measures to create a loopable four-measure pad. Normalize, then reduce the level by -3 dB or so to accommodate peaks that may result from later crossfading. Then, bounce the clip to itself to make this level change permanent.
Step 2. Copy the clip, and then paste it (or alt+drag the clip) so the first measure of the copy overlaps the last measure or the original clip. In this example, the overlap extends across measure 5.
Step 3. Shift+click on the original clip and the copied clip so they’re both selected, then type X to create a crossfade. Move the crossfade nodes up to create a logarithmic fade.
Step 4. With both clips still selected, bounce to create a single clip. Split at the end of the first measure and at the end of where the clips overlapped (in this case, measure 6). Delete both ends so what’s left extends from the start of measure 2 to the end of measure 6. Bounce what’s left to itself, loop it, and you’ll hear a perfect 4-bar loop.
Note: In some particularly challenging cases, you may need to overlap the clip’s first two measures over the clip’s last two measures to create a suitable crossfade. However, if the pad is relatively consistent you almost certainly won’t encounter any issues.
Friday Tip: Reverb Chord Progressions? Why Not!
The more I play with Harmonic Editing, the more I find it can do things I never expected. Check this out…
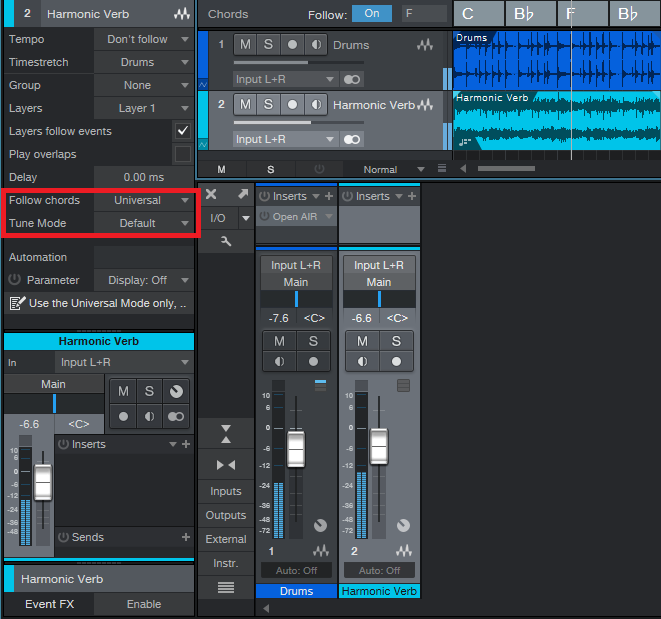
One very useful Studio One feature is being able to record a track output into another track’s input. I take advantage of this sometimes by recording effects like reverb or envelope filter (set to effect sound only) into a track. This allows using Inspector features like transpose and delay, as well as have easier control during the mix.
So imagine my surprise when I set the reverb-only track to follow the Chord Track—and ended up with a tuned reverb chord progression! The following audio example gets the point across. The first four measures have the original reverb sound, the second four measures have the reverb processed by the Chord Track…pretty amazing.
There’s one caution: The only Follow chords mode that works for this is Universal. The Tune Mode doesn’t seem to matter, so I just use Default.
Extra bonus coolness tip! Drums can follow the Chord Track, again in Universal Mode, for a “drumcoded” effect (i.e., similar to drums “vocoding” something like a pad). Although there’s no way to do a wet/dry balance of the melodic and non-melodic components, you can copy the track, have only the copy follow the Chord Track, and adjust the mix between the dry and Chord-Track-following track.
The mind boggles.
Friday Tip: The Secret of Virtual Octave-Divider Bass
Seems simple enough, right? Copy the bass track, edit with Melodyne, and drop all those adorable little orange blobs down an octave. So you do that and… well, it just doesn’t sound all that impressive.
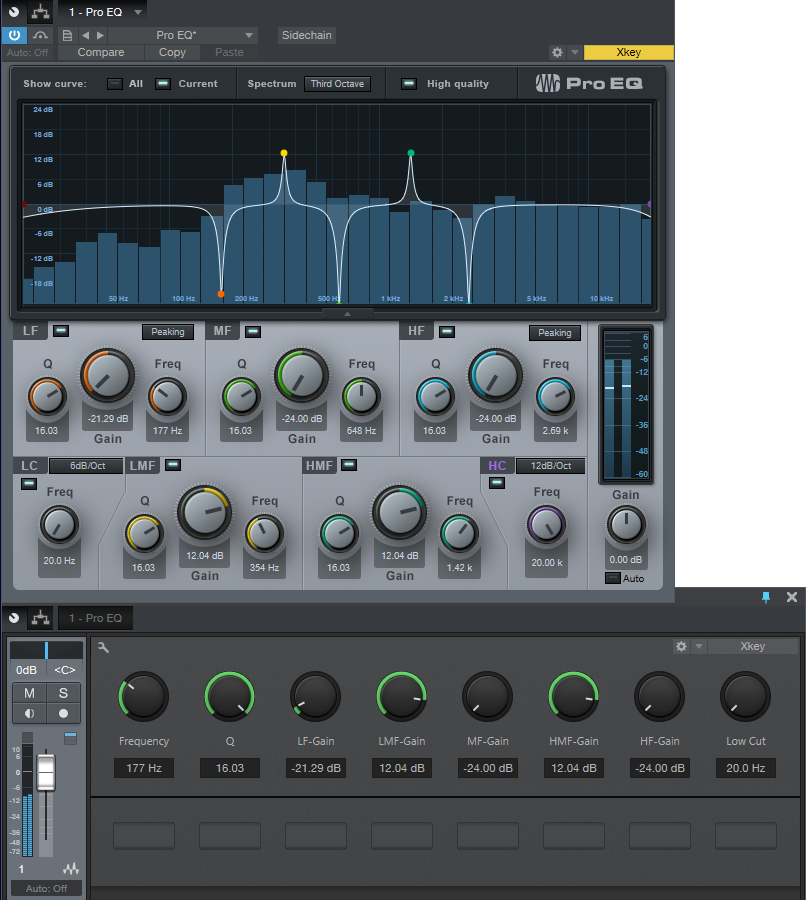
The secret to a great octave-divider bass sound is EQ. Insert a Pro EQ in the track you octave-divided with Melodyne, and edit the settings as shown in the screen shot. The goal is to remove most of the high frequencies that have pick and finger noises—we already have enough in the primary bass track, so adding more artifacts just clutters the sound.
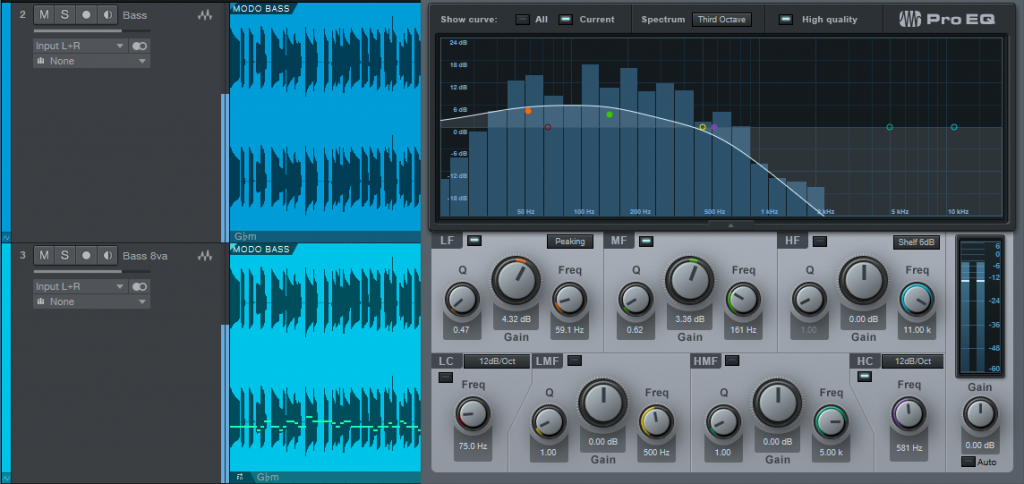
The screen shot shows a High Cut setting of about 600 Hz; you can take it down further, but when the frequency reaches about 200 Hz or so it sounds more like a synth sub-bass (not necessarily a bad thing, especially if you add a little limiting).
And that’s really all there is to it. When you bypass the EQ as a reality test, you’ll hear for yourself why EQ is indeed the secret of virtual octave-divider bass.
Friday Tip: Stereo to Virtual Mono
There are several ways to convert stereo into two mono tracks with Studio One (e.g., for processing the two channels separately, reversing one channel but not the other, etc.), but those ways can be somewhat convoluted. One simple way to convert a stereo track into mono involves going into the Browser, right-clicking on the track’s filename, and selecting Split to Mono Files. But if a track consists of multiple clips from multiple files, then you first need to bounce them to create a track—yet you might not want to bounce them until later. And you’re also creating additional files.
The approach in this tip doesn’t create true mono tracks, but it treats a stereo track as two different tracks that behave exactly like mono tracks—which is probably the desired goal anyway. This method also doesn’t create any additional files, and is non-destructive.
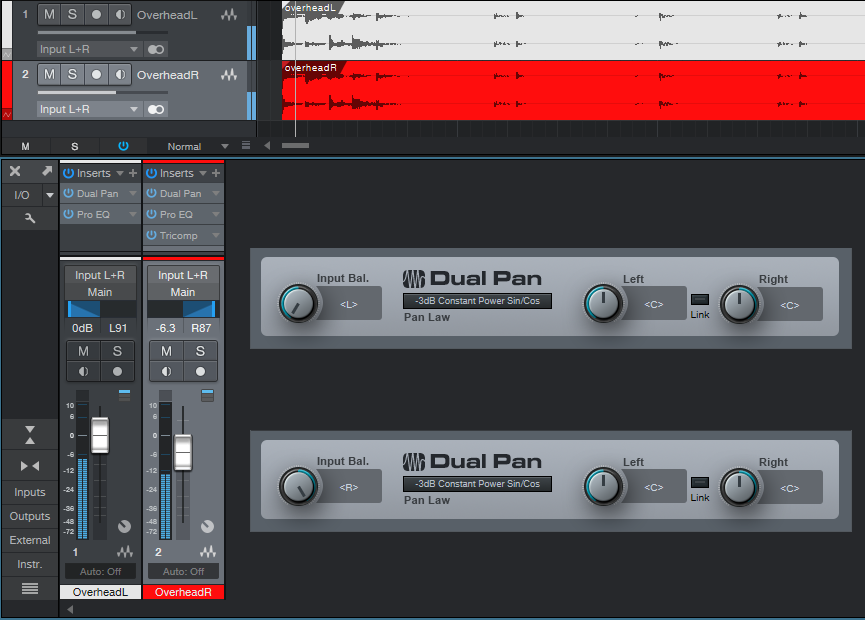
- Insert a Dual Pan into your stereo track. Set Input Balance to Left (fully counter-clockwise), and the Left and Right controls to Center.
- Select the track and choose Duplicate Track (Complete).
- In the duplicated track, set the Dual Pan Input Balance to Right (fully clockwise).
The original track becomes the left channel and the duplicated track, the right channel. Now you can process and pan each channel individually. To avoid confusion, rename one track so it includes the letter L, and the other so it includes the letter R. In the screen shot, the right track is red and the left track is white to follow the color scheme of RCA phono jack stereo connections in consumer electronics devices. Hey, why not?
Friday Tip: Make Mastered Songs Better with Tempo Changes
We covered tempo changes previously, with an emphasis on using tempo changes to add dramatic pauses, and also doing longer changes that are useful with DJ sets when transitioning from one song to another. This week, let’s go one step further.
In the process of researching an article for Sweetwater.com about what made classic rock sound “classic,” I analyzed tempo variations in songs without click tracks. The consistency of these changes was surprising. Although the changes did not have machine-like precision, they were far from being random or sloppy. They tended to follow particular patterns not only in different songs, but different genres.
The most prominent of these was speeding up a bit in the verse before a chorus. Sometimes there would be a slight slowdown after arriving at the chorus, and sometimes it would revert pretty close to the original tempo over the course of the chorus, but the speeding up was evident in virtually all the music I analyzed—rock, pop, R&B, soul, you name it. Also, songs often sped up imperceptibly over the course of a song.
Although you can record while Studio One is doing a tempo change, sometimes it’s a lot easier to play along with a regular click. Fortunately, there’s a way to add these tempo changes after the fact, to the final stereo mix—consider it a mastering technique done in the Song Page, not a tracking or mixing one.
PREPARATION
Working on the mixed track requires the highest fidelity possible. Choose Options > Advanced > Audio and check “Use cache for timestretched audio files.”
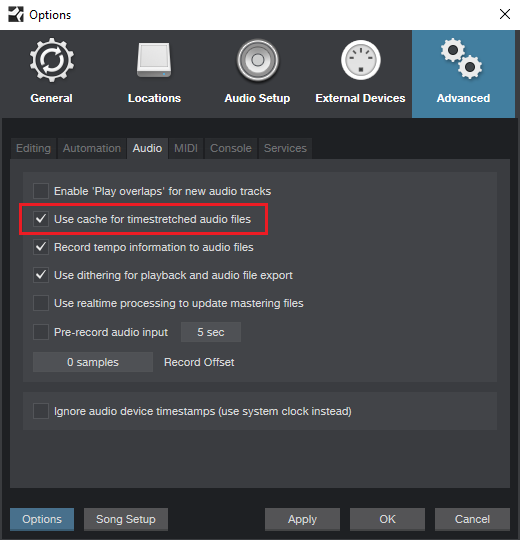
This uses a higher-quality timestretch algorithm than what’s used for real-time disk playback.
Next, open up a new song and load your mixed file into a track. It won’t have tempo information embedded so Studio One won’t know how to stretch it, but that doesn’t matter. Open the Inspector (F4), and enter a tempo under File Tempo, for example 120 BPM. It doesn’t have to match the original file’s tempo because we’re just introducing changes, not dealing with absolute tempos.
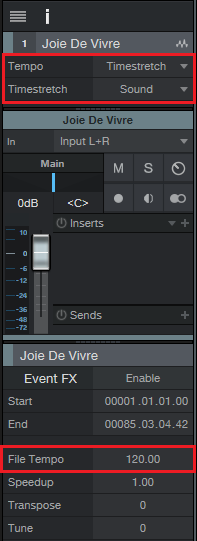
While you’re in the Inspector, choose Tempo = Timestretch, and Timestretch = Sound.
MAKING CHANGES
I generally do a linear speed up, because the changes (e.g., 2-5%) aren’t big enough that you’d notice a log curve anyway. While holding the Alt/Opt key, click with either the Paint or Line tool where you want the tempo to start speeding up, and drag to where you want the speedup to end. Note that you can also drag up or down to fine-tune the end tempo, and if you also hold Shift while doing this, you can change tempo in 0.1 BPM increments.
While the range of tempo changes is still selected, zoom in on the very first change. It will be slightly more than the tempo before it, which is usually what you want. If not, hover over the top of the first tempo change until it turns into a double up/down arrow. Click, and drag downward to even out the first tempo change with the tempo change right before it. The selected changes will follow along to preserve the line’s slope. Remember, we’re talking about small changes here that are more felt than heard as obvious tempo shifts. You can be off by a few tenths of a BPM, or even more—no one will notice.
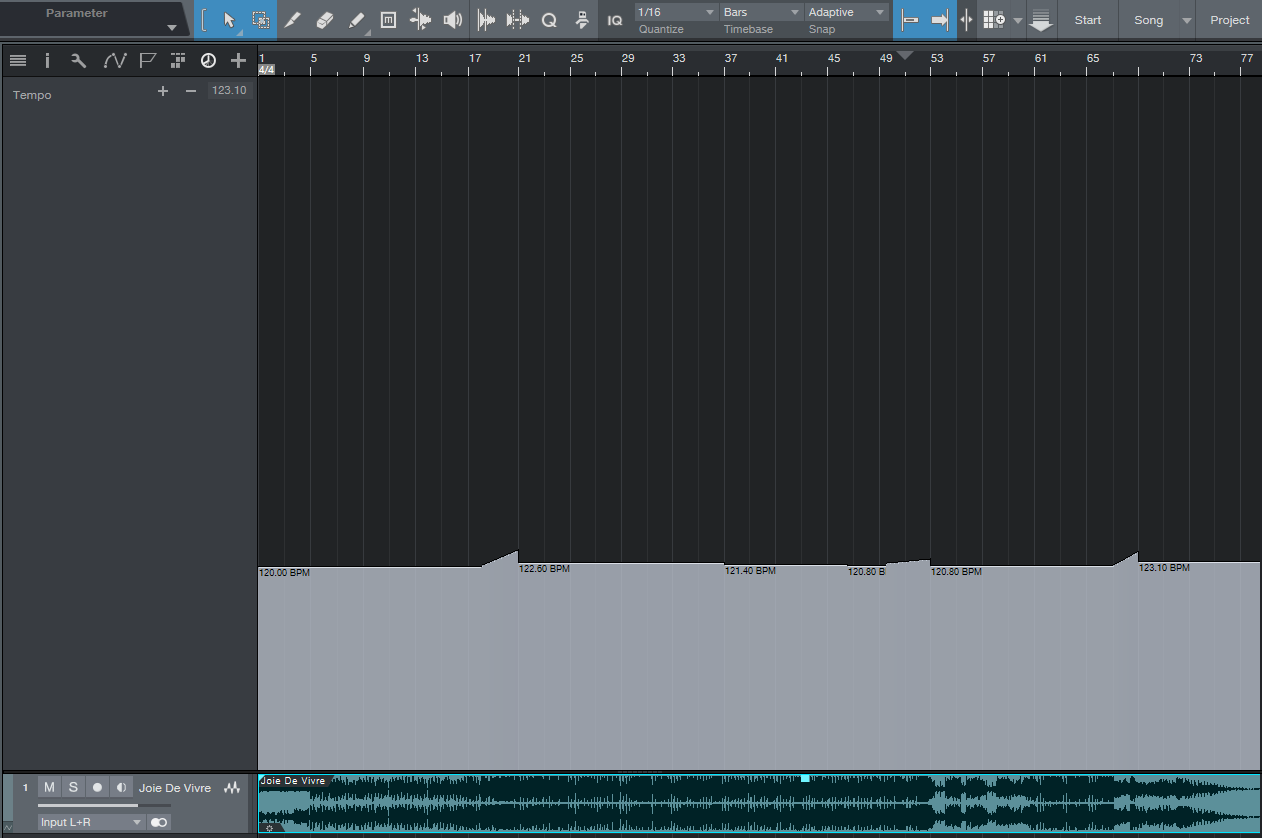
The screen shot shows a mastered song after having tempo changes made. I like to extend the tempo track height as much as possible so it’s easy to make fairly precise changes. Note the linear changes that happen before the two choruses about 1/3 and 2/3 through the song, and then another before the final fadeout on the main riff. In the middle, there’s also a slightly slower tempo change during the solo.
Try this technique on your finished songs—you might be surprised about how these can help a song “breathe” and flow more, even if it was recorded to a click track.
Friday Tip: The TonalVerb
Okay, Studio One isn’t lacking for reverb. Nor is the rest of the world. But we also aren’t lacking for tools to make new kinds of reverb sounds, and that’s what this week’s tip is all about.
Note that the TonalVerb is a bus effect, so don’t insert it in a track. (Or, do insert it in a track—you never know what might happen!) As with last week’s tip there’s a preset you can download, but I recommend reading about how this preset works. FX Chains are very powerful, and once you learn what you can do with them, you can create your own signature sounds instead of sounding like everyone else.
HOW IT WORKS

A Splitter, set to Normal mode, feeds two Mixverbs in parallel. One of the parallel paths goes through a Mixtool with both channel phases (polarities) inverted, so the summed audio cancels. Except… one Mixverb has damping fixed at 50%, while the other is variable (as set by the FX Chain Tone control). With both Damp controls at 50%, there’s no audio due to cancellation. However setting damping below 50% cancels the low frequency reverb components, yet the high frequency reverb components remain. With damping set above 50%, the reverse occurs—the high frequency reverb components cancel, while the low frequency components remain. The closer Tone is to 50%, the greater the cancellation so you may need to increase the bus level under these conditions.
This effect is very different compared to altering tone via equalization for several reasons, but the main one is that damping varies over time. At the onset of the reverb, there’s more cancellation because the two parallel signals have more in common. This reduces the attack of the signal being reverberated, which has its own uses—for example, you might want the crack of a drum to be more prominent, rather than being washed in reverb. With tone set to 0% and Size at a relatively high value (e.g., 70%), it’s almost like the reverb has an attack time of its own.
Regarding the other FX Chain controls, Predelay, Size, and Width all vary their respective Mixverb controls simultaneously over their full ranges. The only one that works differently, as noted above, is the Tone (damping) control.
So… why be normal? Here’s your chance to try a different type of reverb sound that’s especially well suited to EDM productions.
Friday Tip: Old School-Style Tape Variable Speed
Back in the days of variable-speed analog tape, we often cheated and sped up the master just a bit. This had three beneficial effects: it made the tempo a bit more lively, raised the pitch for a slightly brighter sound, and tightened timing. Even a 2% change could make a significant difference. (If you ever tried to play along with an old pop tune and found your instrument had to be tuned somewhat sharp, this is probably why.)
Digital technology gave us a major advance by making it possible to change tempo without changing pitch, or change pitch without changing tempo. Curiously, though, there aren’t as many options if you want to change both simultaneously. Fortunately, Studio One can do this easily.
The key is the Inspector’s Speedup and Tune parameters. A speedup of 2% is about right for making a noticeable, but not obvious change; however many older masters were sped up a lot more than that, so don’t feel too constrained. For Tune, 20 cents works well as a general-purpose setting but again, there are no rules about this other than to use your ears.
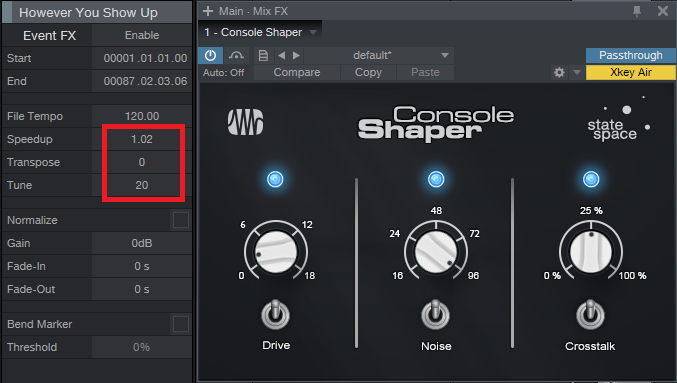
If you enter these changes and then go back to 0 for the two settings, the song will sound less lively. However it’s important to acclimate yourself to any changes, either speeding up or “bypassed,” before making any final decisions about what sounds best.
Note that I much prefer to do any master speed/tune change processing on the finished, two-track mix instead of while working on a song. That way I don’t need to remember to set the Speedup and Tune on each track, or render loops so I can use the needed parameters.
And since we’re in old school territory, consider adding a bit of Console Shaper as well from the Mix FX drop-down. I seldom push drive above 9 o’clock for program material, and some crosstalk makes the sound a bit more speaker-like when wearing headphones (with headphones, you don’t get acoustical crosstalk like you do with speakers, where the left ear hears some of the right speaker, and vice-versa). As to noise…well I’m not a fan of noise, but with some tracks, it does add a little “glue.” Or maybe it just triggers the psychological response of working with older gear.
The audio example plays an excerpt from the remix of “To Say No Would Be a Crime” (from my album “Simplicity”). The first 19 seconds are the original version, the rest of the example speeds it up by 1.02 with a pitch increase of 40 cents. The complete song is available on YouTube/thecraiganderton.
In any case, when you want your music to be a little more lively, brighter, and tighter, try raising the Speedup and Tune parameters just a bit. It really does make a difference.
Friday Tip of the Week: Patterns: Not Just for EDM
Some people see “Pattern” and think “step sequencing—not useful for anything other than EDM.” This tip shows how to use Patterns in a rock drum context to add humanized percussion easily and effectively.
First, let’s subject ourselves to a 16th-note pattern of shaker hits, which is the kind of sound that shows why people don’t like step sequencers. Someone who would use this in a musical context is either not a nice person, or perhaps a pharmaceutical company executive who wants to increase sales of headache remedies.
Let’s start improving matters by copying the shaker to two more pads, and creating some sonic variations.
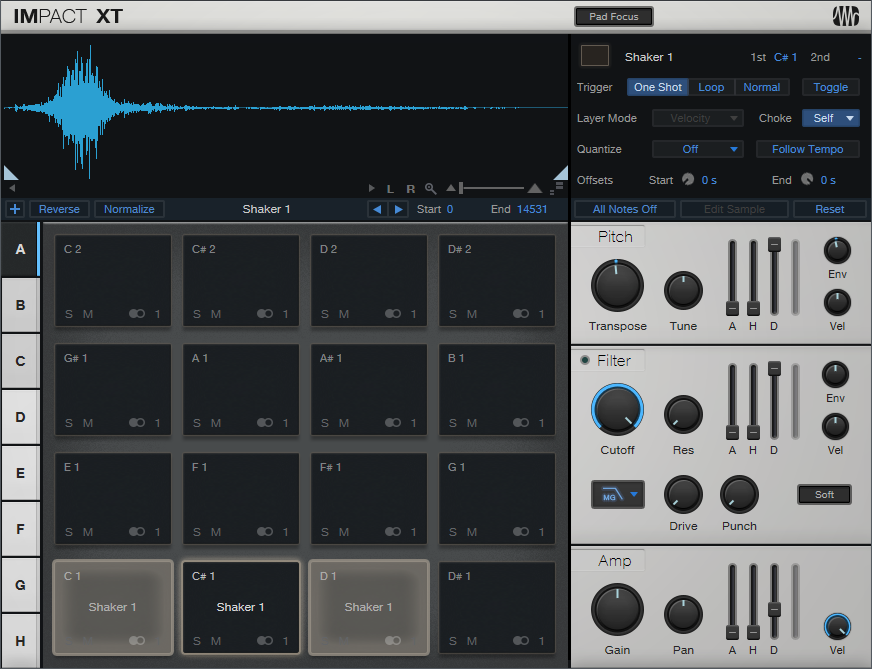
One copy is transposed down two semitones, and has a shorter decay. The other is transposed down three semitones. All three have slightly different filter settings. By alternating the different sounds, we have something that’s better. Well, at least slightly better.
Let’s make it a lot better. We’ll make sure the original shaker sound hits at maximum velocity on every beat to establish a rhythm.
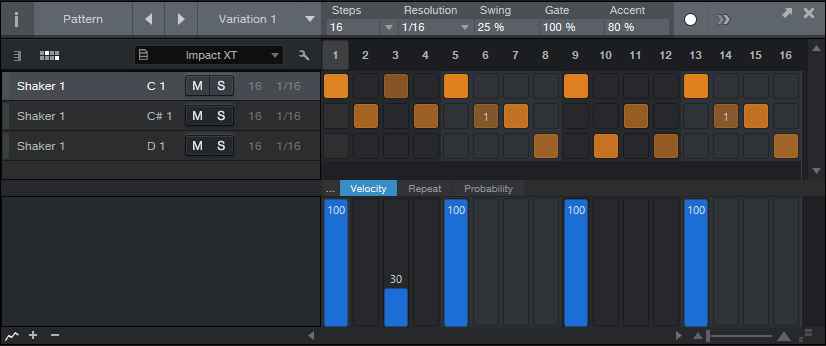
The second row uses a different shaker sound. Because this is a busier part, we’ll create some velocity variations.

Let’s also introduce some repeats so that two of the hits “stutter” a little bit.

However having repeats happen the same way every time doesn’t sound very realistic, and this is where the Pattern’s coolest feature (well, at least in my opinion) comes into play—Probability. The notes with repeats have a fairly low probability, so they’ll show up from time to time but not overstay their welcome. A few of the other notes have lower probability as well. Also, there’s some added swing—not only are Patterns not just for EDM, swing isn’t only for hip-hop.

Now we have a much more interesting shaker part.
If this is too inconsistent for you, it’s easy to make the velocity more similar, increase probabilities…whatever. And of course, we can create variations on these Patterns, make a few changes here and there, and have them sound similar yet different throughout the song.
Thankfully, Patterns don’t have to sound repetitive and boring…unless of course you want them to sound repetitive or boring. But that’s a whole other topic.
Friday Tip: The Customizable Phaser
Studio One’s Phaser is quite sophisticated, especially because you can set the number of stages from 2 to 20. This can emulate many classic phasers, as well as go beyond what was done with typical analog phase shifters. So why do we need yet another phase shifter?
As explained last week, a phaser’s response is like an EQ with multiple notches, because a pair of phase shift stages produces one notch. So for example, if you set Studio One’s Phaser to 8 stages, it produces four notches. The Customizable Phaser differs from standard phasers because every filter stage can be either a notch or peak, to any degree you want. Mixing resonant peaks in with notches produces a sound that recalls a phase shifter, but has a uniquely resonant quality.
Again like last week, the Pro EQ is the star of the show. The five parametric stages are spaced an octave apart and cover a four-octave range. The trick is having a single Frequency control alter all five stages simultaneously… here’s how.
Creating the FX Chain
Although there’s a downloadable preset, delving into how this effect works is instructive. Mapping a control panel knob to a stage’s gain control is easy; open up the control panel to access the Macro Controls Mapping, and for the five Gain knobs, chose the respective Gain parameter as a target. I limited the knob’s range to -24 dB and +18 dB, because a +24 dB peak can be too much gain. After adjusting one knob as desired, copy the graph and paste it into the graph for the other knobs. Map Q similarly; a range of 4 to 16 works well.
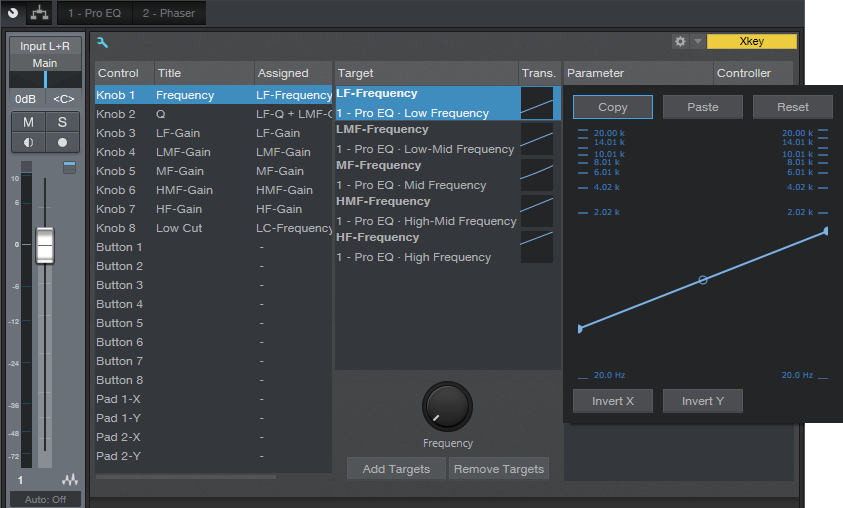
Mapping and offsetting multiple parameters from a single knob is a little more difficult. Start by pinning both the Pro EQ and the Macro Controls Mapping windows. I chose the initial frequencies for the five stages as 75, 150, 300, 600, and 1200 Hz. For the Knob 1 macro, add each stage’s Frequency control as a target.
Suppose you want to map the LF-Frequency target. Set the Frequency knob full counter-clockwise, click on the target’s graph, and while looking at the LF Freq knob on the Pro EQ, adjust the graph’s low node so that the LF Freq knob is at 75 Hz (or thereabouts). Now turn the Freq control fully clockwise, and set the graph’s high node four octaves higher (1.2 kHz) according to the LF Freq knob.
Proceed to the next filter Freq knob and use the same general procedure. For example for the LMF stage, the initial frequency would be 150 Hz, and the highest frequency would be 2.4 kHz. Continue mapping the remaining stages until all the filters cover the desired range when you move the Frequency control.
You’ll also note the Low Cut control is mapped to a knob that covers the range of 20 Hz to 1 kHz. Use this if the signal becomes too “boomy” with the frequency control set to a lower range.
In use
With all the Gain controls set to minimum and a fairly sharp Q, you have the equivalent of a 10-stage phaser. Now try increasing the LMF and HMF gains to around 8 or 9 dB—you’ll hear an immediate difference in the sound. Vary the Q for even more variations. You’ll find that between the Q and Gain controls, it’s possible to obtain phase-shifter sounds, but more importantly, you’ll be able to dial in combinations of resonant peaks and notches that aren’t quite like anything you’ve heard before. Ready for a new phase in phaser sounds? Check out this FX Chain.