Category Archives: Friday Tip of the Week
Four VCA Channel Applications
A VCA Channel has a fader, but it doesn’t pass audio. Instead, the fader acts like a gain control for other channels, or groups of channels. In some ways, you can think of a VCA Channel as “remote control” for other channels. If you assign a VCA to control a channel, you can adjust the channel gain, without having to move the associated channel’s fader. The VCA Channel fader does it for you.
Inserting a VCA channel works the same way as inserting any other kind of channel or bus. (However, there’s a convenient shortcut for grouping, as described later.) To place a channel’s gain under VCA control, choose the VCA Channel from the drop-down menu just below a channel’s fader…and let’s get started with the applications.
APPLICATION #1: EASY AUTOMATION TRIM
Sometimes when mixing, you’ll create detailed level automation where all the moves and changes are perfect. But as the mix develops, you may find you want to increase or decrease the overall level. There are several ways to do this, like inserting a Mixtool and adjusting the level independently of the automation, or using the automation’s Trim control. However, a VCA control is sometimes easier, and besides, it can control several channels at once if desired, without having to feed them to a bus. The VCA fader can even offset automation for multiple tracks that are located within a Folder Track (Fig. 1)
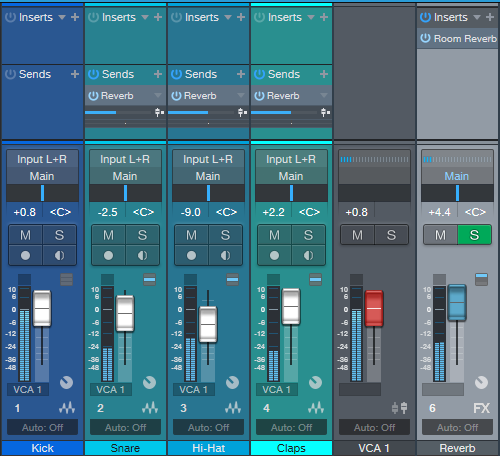
- Figure 1: Note how the label below each fader says VCA 1. This means each channel’s gain is being controlled by the VCA 1 fader on the right. If all these tracks have their own automation, VCA 1 can bring the overall level up or down, without altering the automation shape, and without needing to send all their outputs to the same bus.
If the automation changes are exactly as desired, but the overall level needs to increase or decrease, offset the gain by adjusting the VCA Channel’s fader. This can be simpler and faster than trying to raise or lower an entire automation curve using the automation Trim control. Furthermore, after making the appropriate adjustments, you can hide the VCA Channel to reduce mixer clutter, and show it only if future adjustments are necessary.
APPLICATION #2: NESTED GROUPING
One of the most common grouping applications involves drums—when you group a drum kit’s individual drums, once you get the right balance, you can bring their collective levels up or down without upsetting the balance. Studio One offers multiple ways to group channels. The traditional option is to feed all the outputs you want to group to a bus, and vary the level with the bus fader. For quick changes, a more modern option is to select the channels you want to group, so that moving one fader moves all the faders.
But VCAs take this further, because VCA groups can be nested. This means groups can be subsets of other groups.
A classic example of why this is useful involves orchestral scoring. The first violins could be assigned to VCA group 1st Violins, the second violins to VCA group 2nd Violins, violas to VCA group Violas, and cellos and double basses to VCA group Cellos+Basses.
You could assign the 1st Violins and 2nd Violins VCA groups to a Violins Group, and then assign the Violins group, Violas group, and Cellos+Basses group to a Strings group. Now you can vary the level of the first violins, the second violins, both violin sections (with the Violins Group), the violas, the cellos and double basses, and/or the entire string section (Fig. 2). This kind of nested grouping is also useful with choirs, percussion ensembles, drum machines with multiple outputs, background singers, multitracked drum libraries, and more.
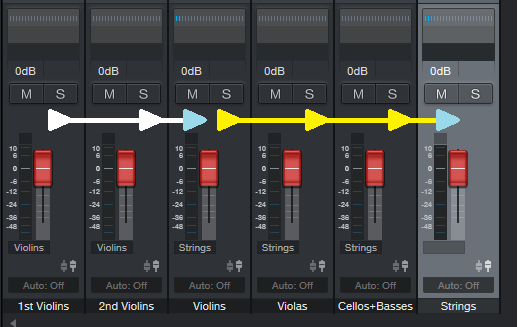
Figure 2: The 1st Violins and 2nd Violins have their own group, which are in turn controlled by the Violins group. Furthermore, the Violins, Violas, and Cellos+Basses groups are all controlled by the Strings group.
Although it may seem traditional grouping with buses would offer the same functionality, note that all the channel outputs would need to go through the same audio bus. Because VCA faders don’t pass audio, any audio output assignments for the channels controlled by the VCA remain independent. You’re “busing” gain, not audio outputs—that’s significant.
If you create a group, then all the faders within that group remain independent. Although with Studio One you can temporarily exclude a fader from a group to adjust it, that’s not necessary with VCA grouping—you can move a fader independently that’s controlled by a VCA, and it will still be linked to the other members of a VCA group when you move the VCA fader.
Bottom line: The easiest way to work with large numbers of groups is with VCA faders.
APPLICATION #3: GROUPS AND SEND EFFECTS
A classic reason for using a VCA fader involves send effects. Suppose several channels (e.g., individual drums) go to a submix bus fader, and the channels also have post-fader Send controls going to an effect, such as reverb. With a conventional submix bus, as you pull down the bus fader, the faders for the individual tracks haven’t changed—so the post-fader send from those tracks is still sending a signal to the reverb bus. Even with the bus fader down all the way, you’ll still hear the reverb.
A VCA Channel solves this because it controls the gain of the individual channels. Less gain means less signal going into the channel’s Send control, regardless of the channel fader’s position. So with the VCA fader all the way down, there’s no signal going to the reverb (Fig. 3)
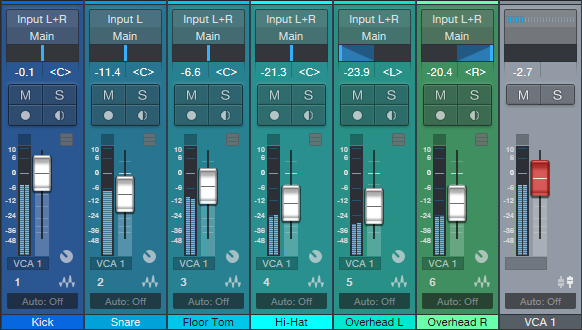
- Figure 3: The VCA Channel controls the amount of post-fader Send going to a reverb, because the VCA fader affects the gain regardless of fader position. If the drum channels went to a conventional bus, reducing the bus volume would have no effect on the post-fader Sends.
APPLICATION #4: BUS VS. VCA
There’s a fine point of using VCAs to control channel faders. Suppose individual drums feed a bus with a compressor or saturation effect. As you change the channel gain, the input to the compression or saturation changes, which alters the effect. If this is a problem, then you’re better off sending the channels to a standard bus. But this can also be an advantage, because pushing the levels could create a more intense sound by increasing the amount of compression or saturation. The VCA fader would determine the group’s “character,” while the bus control acts like a master volume control for the overall group level.
And because a VCA fader can control bus levels, some drums could go to an audio bus with a compressor, and some drums to a bus without compression. Then you could use the VCA fader to control the levels of both buses. This allows for tricks like raising the level of the drums and compressing the high-hats, cymbals, and toms more, while leaving the kick and snare uncompressed…or increasing saturation on the kick and snare, while leaving other drum sounds untouched.
Granted, VCA Channels may not be essential to all workflows. But if you know what they can do, a VCA Channel may be able to solve a problem that would otherwise require a complex workaround with any other option.
Tremolo: Why Be Normal?
Tremolo (not to be confused with vibrato, which is what Fender amps call tremolo), was big in the 50s and 60s, especially in surf music—so it has a pretty stereotyped sound. But why be normal? Studio One’s X-Trem goes beyond what antique tremolos did, so this week’s Friday Tip delves into the cool rhythmic effects that X-Trem can create.
TREMOLOS IN SERIES
The biggest improvement in today’s tremolos is the sync-to-tempo function. One of my favorite techniques for EDM-type music is to insert two tremolos in series (Fig. 1).

Figure 1: These effects provide the sound in Audio Example 1. Note the automation track, which is varying the first X-Trem’s Depth parameter.
The first X-Trem runs at a fast rate, like 1/16th notes. Square wave modulation works well for this if you want a “chopped” sound, but I usually prefer sine waves, because they give a smoother, more pulsing effect. The second X-Trem runs at a slower rate. For example, if it syncs to half-notes, X-Trem lets through a string of pulses for a half-note, then attenuates the pulses for the next half-note. Using a sine wave for the second tremolo gives a rhythmic, pulsing sound that’s effective on big synth chords—check out the audio example.
BUILD YOUR OWN WAVEFORM
X-Trem’s waveforms are the usual suspects: Triangle, Sine, Upward Sawtooth, and Square. But what if you want a downward sawtooth, a more exponential wave (Fig. 2), or an entirely off-the-wall waveform?
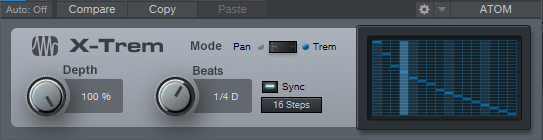
Figure 2: Let’s have a big cheer for X-Trem’s 16 Steps option.
This is where the 16 Steps option becomes the star (Fig. 2) because you can draw pretty much any waveform you want. It’s a particularly effective technique with longer notes because you can hear the changes distinctly.
But for me, the coolest part is X-Trem’s “Etch-a-Sketch” mode, because you can automate each step individually, choose X-Trem’s Automation Write, and go crazy. Just unfold X-Trem’s automation options, choose all the steps, add them to the track’s automation, and draw away (Fig. 3).
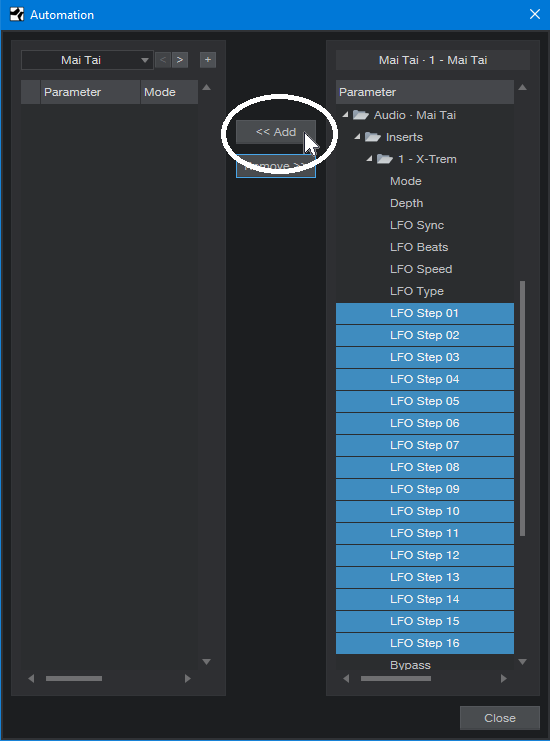
Figure 3: Drawing automated step changes in real-time takes X-Trem beyond “why be normal” into something that may be illegal in some states.
Of course, if you just draw kind of randomly, then really, all you’re doing is level automation. Where this option really comes into its own is when you have a basic waveform for one section, change a few steps in a different section and let that repeat, draw a different waveform for another section and let that repeat, and so on. Another application is trying out different waveforms as a song plays, and capturing the results as automation. If you particularly like a pattern, cut and paste the automation to use it repetitively.
And just think, we haven’t even gotten into X-Trem’s panning mode—similarly to its overachieving tremolo functions, the panning can do a lot more than just audio ping-pong effects. Hmmm…seems like another Friday Tip might be in order.
The “Double-Decker” Pre-Main Bus
This Friday tip has multiple applications—consider the following scenarios.
You like to mix with mastering processors in the Main bus to approximate the eventual mastered sound, but ultimately, you want to add (or update) an unprocessed file for serious mastering in the Project page. However, reality checks are tough. When you disable the master bus processors so you can hear the unprocessed sound you’ll be exporting, the level will usually change. So then you have to re-balance the levels, but you might not get them quite to where they were. And unfortunately, one of the biggest enemies of consistent mixing and mastering is varying monitoring levels. (Shameless plug alert: my book How to Create Compelling Mixes in Studio One, which is also available in Spanish, tells how to obtain consistent levels when mixing.)
Or, suppose you want to use the Tricomp or a similar “maximizing” program in the master bus. Although these can make a mix “pop,” there may be an unfair advantage if they make the music louder—after all, our brains tend to think that “louder is better.” The only way to get a realistic idea of how much difference the processor really makes is if you balance the processed and unprocessed levels so they’re the same.
Or, maybe you use the cool Sonarworks program to flatten your headphone or speaker’s response, so you can do more translatable mixes. But Sonarworks should be enabled only when monitoring; you don’t want to export a file with a correction curve applied. Bypassing the Sonarworks plug-in when updating the Project page, or exporting a master file, is essential. But in the heat of the creative moment, you might forget to do that, and then need to re-export.
THE “DOUBLE-DECKER,” PRE-MAIN BUS SOLUTION
The Pre-Main bus essentially doubles up the Main bus, to create an alternate destination for all your channels. The Pre-Main bus, whose output feeds the Main bus, serves as a “sandbox” for the Main bus. You can insert whatever processors you want into the Pre-Main bus for monitoring, without affecting what’s ultimately exported from the Main bus.
Here’s how it works.
- Create a bus, and call it the Pre-Main bus.
- In the Pre-Main bus’s output field just above the pan slider, assign the bus output to the Main bus. If you don’t see the output field, raise the channel’s height until the output field appears.
- Insert the Level Meter plug-in in the Main bus. We’ll use this for LUFS level comparisons (check out the blog post Easy Level Matching, or the section on LUFS in my mixing book, as to why this matters).

Figure 1: The Pre-Main bus, outlined in white, has the Tricomp and Sonarworks plug-ins inserted. Note that all the channels have their outputs assigned to the Pre-Main bus.
- Insert the mastering processors in the Pre-Main bus that you want to use while monitoring. Fig. 1 shows the Pre-Main bus with the Tricomp and Sonarworks plug-ins inserted.
- Select all your channels. An easy way to do this is to click on the first channel in the Channel List, then shift+click on the last channel in the list. Or, click on the channel to the immediate left of the Main channel, and then shift+click on the first mixer channel.
With all channels selected, changing the output field for one channel changes the output field for all channels. Assign the outputs to the Main bus, play some music, and look at the Level Meter to check the LUFS reading.
Now assign the channel outputs to the Pre-Main bus. Again, observe the Level Meter in the Master bus. Adjust the Pre-Main bus’s level for the best level match when switching the output fields between the Main and Pre-Main bus. By matching the levels, you can be sure you’re listening to a fair comparison of the processed audio (the Pre-Main bus) and the unprocessed audio that will be exported from the Main bus.
The only caution is that when all your channels are selected, if you change a channel’s fader, the faders for all the channels will change. Sometimes, this is a good thing—if you experience “fader level creep” while mixing, instead of lowering the master fader, you can lower the channel levels. But you also need to be careful not to reflexively adjust a channel’s level, and end up adjusting all of them by mistake. Remember to click on the channel whose fader you want to adjust, before doing any editing.
Doubling up the Main bus can be really convenient when mixing—check it out when you want to audition processors in the master bus, but also, be able to do a quick reality check with the unprocessed sound to find out the difference any processors really make to the overall output.
Acknowledgement: Thanks to Steve Cook, who devised a similar technique to accommodate using Sonarworks in Cakewalk, for providing the inspiration for this post.
Melodic Percussion
This week’s tip shows how to augment percussion parts by making them melodic—courtesy of Harmonic Editing.
The basic idea is that setting a white or pink noise track to follow the chord track gives the noise a sense of pitch. Although having a long track of noise isn’t very interesting, if we gate it with a percussion part, then now we’ve layered the percussion part’s rhythm with the tonality of the noise. Add a little dotted 8th note echo, and it can sound pretty cool.
Step 1: Bring on the Noise
Noise needs to be recorded in a track to be affected by harmonic editing, so open up the mixer’s Input section, and insert a Tone Generator effect in tracks 1 and 2. Set the Tone Generator to Pink Noise, and trim the level so it’s not slamming up against 0 (Fig. 1).
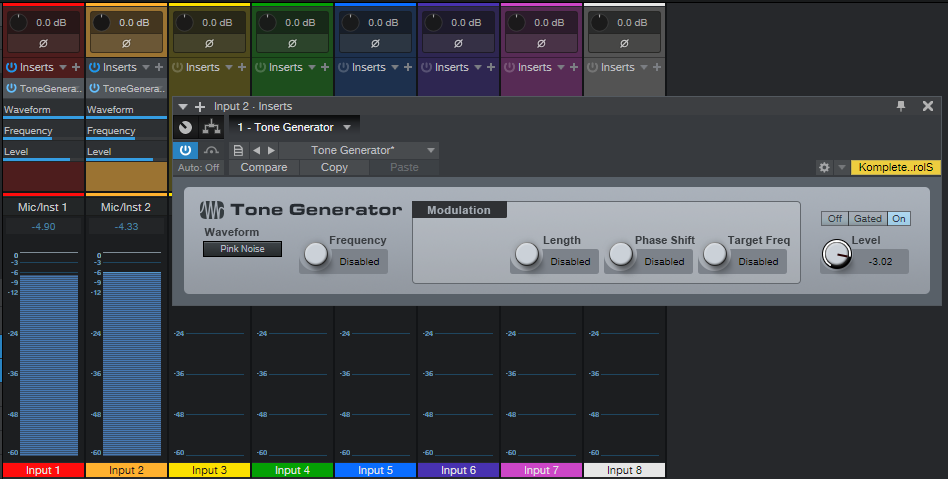
Figure 1: We need noise in each channel to implement this technique.
Record-enable both tracks (set them to Mono channel mode), enable Input Monitor, and start recording noise into the tracks. The reason for recording into two tracks is we want to end up with stereo noise, so the tracks can’t be identical.
Step 2: Make the Noise Stereo
Now that the noise is recorded, you can remove the Tone Generator effects from the track inputs. At the mixer, pan one channel of noise left, and one right. In each track’s Inspector, choose Universal Mode for Follow Chords, and Strings for Tune mode (Fig. 2).
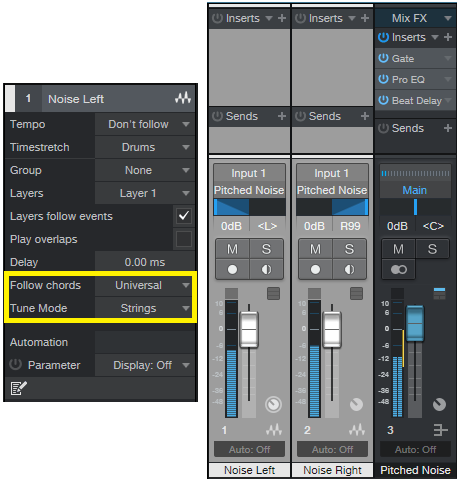
Figure 2: How to set up the tracks for stereo noise. The crucial Inspector settings are outlined in yellow.
Set each track’s output to a Bus, and now we have stereo noise at the Bus output. Insert a Gate in the Bus, and any other effects you want to use (I insert a Pro EQ to trim the highs and lows somewhat, and a Beat Delay for a more EDM-like vibe—but use your imagination).
Step 3: Control the Gate’s Sidechain
Choose the percussion sound with which you want to control the Gate sidechain, insert a pre-fader send in the percussion track, assign the send to the Gate, and then adjust the Gate parameters so that the percussion track modulates the noise percussively. Fig. 3 shows the track setup.
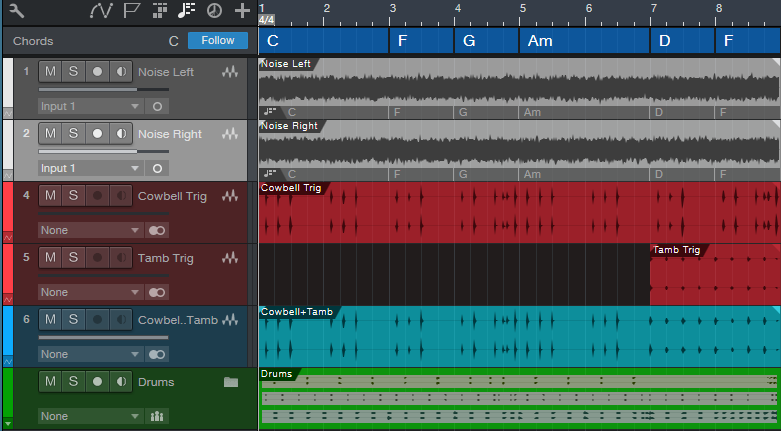
Figure 3: Track layout used in the audio example.
Tracks 1 and 2 are the mono noise tracks that follow the Chord Track, and feed the Bus. Tracks 4 and 5 both have pre-fader sends to control the Gate, so that for the first 7 measures only the cowbell controls the gate, but at measure 8, a tambourine part also modulates the Gate.
Track 6 has the cowbell and tambourine audio, which is mixed in with the pitched noise, while the folder track has the kick, snare, and hi-hat loops. (The reason for not using post-fader sends on the percussion tracks is so that the tracks controlling the Gate are independent of the audio, which you might want to process differently.)
But Wait…There’s More!
With a longer gate, the sound is almost like the rave organ sound that was so big at the turn of the century. And there are options other than gating, like using X-Trem…or following the Gate with X-Trem. Or draw a periodic automation level waveform for the bus, and use the Transform function to make everything even weirder. In any case, now you have a new, and unusual tool, for percussive accents.
Keyboard Meets Power Chords
Hey keyboard players!
Do you feel kind of left out because of the cool guitar amps that Studio One added in version 4.6? Well, this week’s tip is all about having fun, and bringing power chord mentality to keyboard, courtesy of those State Space amps. Listen to the audio example, and you’ll hear what I’m talking about.
And so you can get started having fun, you don’t even have to learn what’s going on to get that sound you just heard. Download Power Chordz.instrument, drag it into the track column, feed it from your favorite MIDI keyboard, and start playing.
Now, I know some of you prefer just to download a preset and get on with your life, and that’s fine—but for those who want some reverse engineering, here’s what’s under the hood.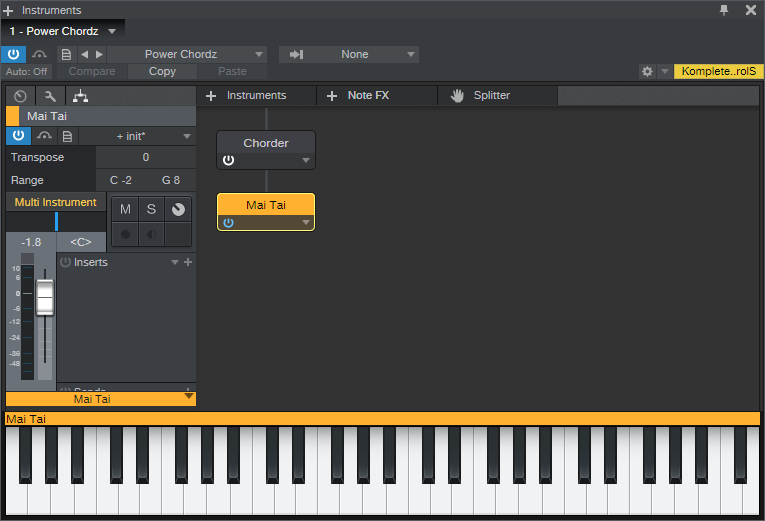
Figure 1: The Multi-Instrument is pretty basic—it just bundles a Chorder Note FX and Mai Tai together.
The preset starts with a Multi-Instrument (Fig. 1) that consists of the Chorder Note FX, and Mai Tai synthesizer. The Chorder plays tonic, fifth above, an octave above, octave+fifth above, and two octaves above when you hit a keyboard key—your basic “it’s not major, and it’s not minor” type of power chord.
The Mai Tai uses a super-simple variation on the Init preset. In Fig. 2, anything that’s not relevant is grayed out. Turn off Osc 2, Noise, LFO 1, and LFO 2. There’s no modulation other than pitch bend, and no FX. Envelope 2 and Envelope 3 aren’t used. I set Pitch Bend to 7 semitones to do whammy bar effects, but adjust to taste. Also, you might want to play around with the Quality parameter. I’m allergic to anything called “normal,” so if you are as well, try the 80s, High, and Supreme settings to see if you like one of those better.
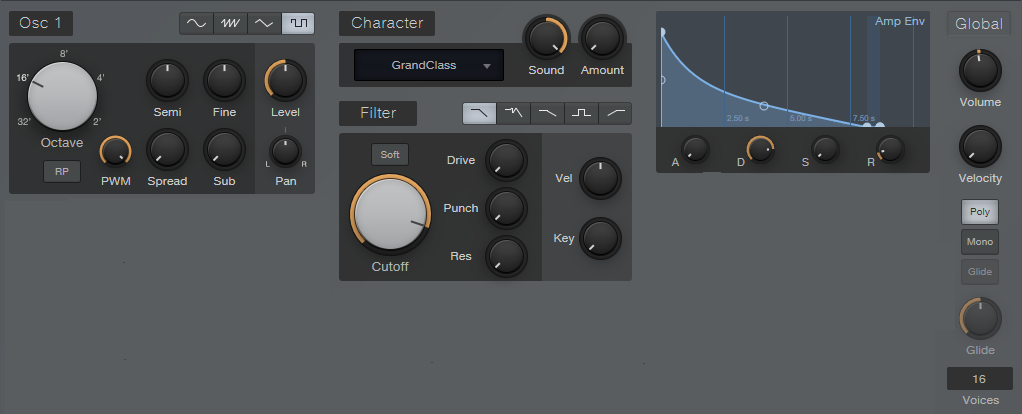
Figure 2: The Mai Tai preset uses simple waveforms, which is what you want when feeding amp sims and other distortion-oriented plug-ins.
Look in the instrument’s mixer channel, and you’ll see four Insert effects: Pro EQ, Ampire, Open Air, and Binaural Pan. You can check out their settings by opening them up, but the Ampire settings (Fig. 3) deserve a bit of explanation.
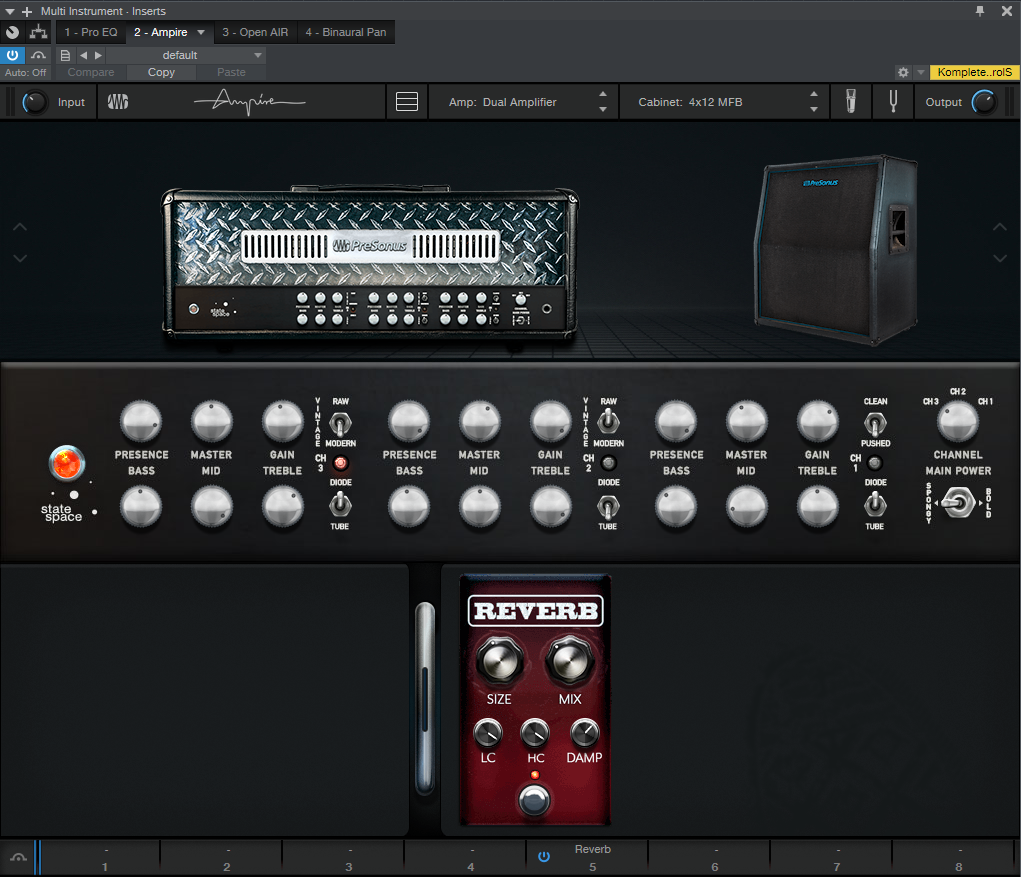
Figure 3: Ampire is using the Dual Amplifier and 4×12 MFB speaker cabinet, but just about any amp and cab has their merits.
The reason for choosing the Dual Amplifier is because it’s really three amps in one, as selected by the Channel knob on the right—I figured you’d appreciate having three separate sounds without having to do anything other than adjust one knob. Try different cabs and amps, but be forewarned—you can really go down an Endless Rabbit Hole of Tone, because there are a lot of great amp and cab sounds in there. I’ll admit that I ended up playing with various permutations and combinations of amps, effects, and cabs for hours.
You can also get creative with the Mai Tai, specifically, the Character controls. I didn’t assign any controls to a Control Panel, or set up modulation because having a pseudo-”whammy” bar pitch wheel was enough to keep me occupied. But, please feel free to come up with your own variations. And of course…post your best stuff on the PreSonus Exchange!
Up Your Expressiveness with Upward Expansion
Many people don’t realize there are two types of expansion. Downward expansion is a popular choice for minimizing low-level noise like hiss and hum. It’s the opposite of a compressor: compression progressively reduces the output level above a certain threshold, while a downward expander progressively reduces the output level below a certain threshold. For example, with 2:1 compression, a 2 dB input level increase above the threshold yields a 1 dB increase at the output. With 1:2 expansion, a 1 dB input level decrease below the threshold yields 2 dB of attenuation at the output.
Upward expansion doesn’t alter the signal’s linearity below the threshold—if the input changes by 2 dB, the output changes by 2 dB. But above the threshold, levels increase. For example, with 1:2 expansion, a 1 dB increase above the threshold becomes 2 dB of increase at the output. Fig. 1 shows the difference between downward and upward expansion.

Figure 1: The top screen shot shows how downward expansion attenuates levels below a threshold, while the lower one shows how upward expansion increases levels above a threshold.
That’s Nice…So What?
Upward expansion is a useful tool for drums, hand percussion, and other percussive instruments. One function is transient shaping, to emphasize attacks. Suppose you have a drum loop with too much room sound. Traditional expansion can make the room sound decay faster, but using upward expansion brings the peaks above the room sound, while leaving the characteristic room sound alone.
Another use is with percussion parts, like hand percussion, that are playing along with drums. A lot of times you don’t want the percussion hits to be too uniform in level, but instead, the most important hits should be a little louder compared to the rest of the part. Again, that’s where upward expansion shines. Dip the threshold just a tiny bit below the peaks—the peaks will stand out, and sound more dynamic.
Let’s listen to an audio example. The first two measures use no upward expansion with a drum track. The next two measures add a subtle amount of upward expansion. You’ll hear that the peaks from the kick and snare are still prominent, but the room sound and cymbals are a bit lower by comparison. The final two measures use the settings shown in Fig. 2. The kick and snare peaks are still there, but the rest of the part is more subdued, and the overall sound is “tighter,” with more dynamics.
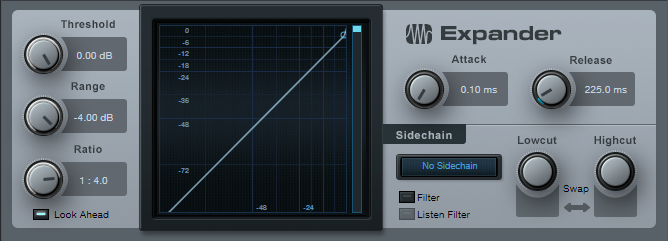
Figure 2: Expander settings for the Upward Expansion Demo.
The only difference among the two-measure sections is the Range control setting. For the first two measures, it’s 0.00 dB; nothing can be above the threshold, because there is no threshold. In the second two measures, the Range is -2.00, so anything above that threshold goes through 1:4 expansion. In the final two measures, the range is -4.00 (I rarely take it lower, as long as the Event hits close to 0 on peaks).
Here’s the coolest part: Automating the Range parameter lets you alter a drum part’s dynamics and feel, without having to change the part itself. This is particular wonderful for compressed drum loops, because you can lower the range to keep the peaks, while making the rest of the loop less prominent. When you want a big sound, slam the Range back up to 0.00.
But Wait! There’s More!
The Multiband Dynamics processor can do frequency-selective upward expansion. You can isolate just the high frequencies where a drum stick hits, and emphasize only that frequency. Another use is making acoustic guitars sound more percussive, as in this audio example.
The first two measures are the original acoustic guitar track, and the next two use Multiband Dynamics to accent the strums (Fig. 3).
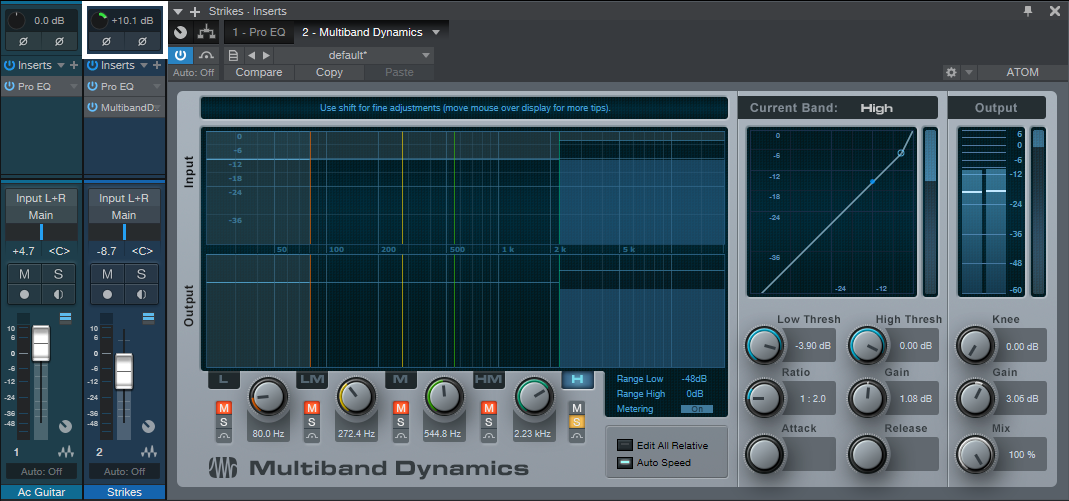
Figure 3: This setup takes advantage of the Multiband Dynamics’ ability to add upward expansion to a specific frequency range. Note the Input level control adding gain (outlined in white).
The Multiband Dynamics are in a separate, parallel track (you could build this into an FX Chain, but I think showing this in two channels illustrates the process better). Because the Multiband Dynamics is listening to only the high frequencies, which are quite weak and not sufficient to go over the expander threshold, the Input control is adding +10 dB of gain. Alternately, you could insert a Mixtool before the Multiband Dynamics.
This effect is best when used subtly, but next time you want to reach for a transient shaper, try this instead. It’s a flexible way to emphasize percussive hits and strums.
Taming the Wild Autofilter
I think the Autofilter is a great effect—which you probably already figured out if you saw my blog posts The Best Flanger Plug-In?, Attack that Autofilter, and Studio One’s Secret Equalizer. But the one effect that has always eluded me was the Autofilter effect itself, when used with guitar or bass. It never seemed to cover quite the right range—like it wouldn’t go high enough if I hit the strings hard, but if I compensated for that by turning up the filter cutoff then it wouldn’t go low enough. Furthermore, the responsiveness varied dramatically depending whether I was playing high up on the neck, or hitting low notes on the E and A strings. So basically, I’ve never really used the Autofilter for its intended purpose—until now, because I’ve finally figured out the recipe. Hey, better late than never!
This technique involves dedicating two tracks to the same guitar audio—the Autofilter processes one of the tracks, while the other track provides a pre-fader send to the Autofilter’s sidechain (Fig. 1). By processing the send, we can make the Autofilter respond pretty much any way we want.

Figure 1: Both tracks are being fed from the guitar audio. The track on the right processes the audio to control the sidechain of an Autofilter, which is inserted in the track on the left.
The Autofilter (Fig. 2) has a lower filter cutoff than what I would normally use, were it not for this technique; the envelope amount slider is up all the way (the LFO is at zero, so it doesn’t influence the envelope effect).
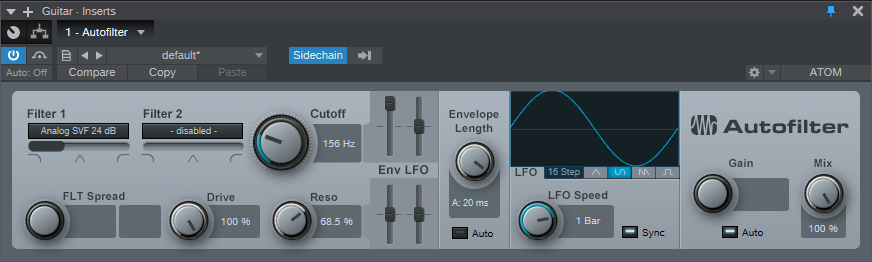
Figure 2: Initial Autofilter settings, when controlled by a processed sidechain signal.
As to what’s conditioning the send to make the Autofilter happy, it’s the underappreciated Channel Strip plug-in (Fig. 3). The strip is both compressing and expanding because, well, that’s what ended up sounding right. But the key here is also the EQ. The higher-output low strings are attenuated, so that the filter response for the lower strings is consistent with the upper strings—thanks to the massive high-frequency boost. Meanwhile, the Gain is slammed all the up, so that it drives the Autofilter to a suitably high frequency with strong input signals.

Figure 3: The Channel Strip is ideal for conditioning the signal controlling the Autofilter sidechain.
Here’s another tip: The technique of duplicating a track, and processing it to provide a custom sidechain signal, has a lot more uses than just this. Try using the X Trem as a step sequencer and control the sidechain in a compressor…or the Autofilter’s sidechain, for that matter.
Remember, if you want to come up with something novel, ask “what if?”—not so much “how to?” I guarantee you won’t find a single, click-bait YouTube video called “SECRET AUTOFILTER PRO TRICK YOU MUST KNOW!” I’d never claim this is a tip the pros use; the only reason I came up with it is because I was frustrated that I couldn’t get the Autofilter to do what I wanted, and thought “What if I process the signal going to sidechain?” I can’t help but wonder how many other “what ifs” are waiting to be discovered…well, see you next week!
Fun and Games with Alternate Mixes
There are many uses for alternate mixes, and Studio One makes it not only easy to create alternate mixes, but also to store them as part of a song. We’ll cover traditional uses for alternate mixes, and then get into some more unusual applications.
How to Create and Store Alternate Mixes
When sending a file off for mastering, sometimes the engineer will want two additional versions, one with the vocal up 1 dB and another with it down 1 dB. This is because during the course of mastering, the relationship of the vocal to the track might change. A more prosaic example is creating a mix without vocals for karaoke, and of course, remixes are common in EDM. You might also do an “unplugged” version with only the acoustic tracks.
After creating the alternate mix:
- Choose Song > Export Mixdown (Fig. 1).

Figure 1: The Export Mixdown dialog box. Note that Import to track (outlined in white) is checked to bring the exported file into the song.
- Choose a location for the mix, the export range, file resolution, and make sure you check Import to track. (If while exporting a warning says there was clipping, reduce the master fader to compensate—for example if the export was 1 dB over 0, reduce the master fader level by at least 1 dB.)
- The file will now appear as a track within your song. When you save the song, you’ll save the alternate mix.
If your mix changes are relatively extensive, save it as a Version so you can recall it later. Choose File > Save New Version, and name it (Fig. 2). Use a name that corresponds to the name of the alternate mix file, and then you can choose File > Restore Version to recall the version corresponding to that particular mix.

Figure 2: It’s easy to save a version of a song that corresponds to a particular alternate mix.
Processing Song Sections with Alternate Mixes
Suppose you want to add flanging to only a solo section of a song. You can insert a flanger in the main bus, and then adjust automation to enable it and set the parameters as desired. However, another option is to create a mix, and bring it into your song as a track. Then, create an alternate mix you bring into the song. Now you can experiment on the alternate mix with the effect(s) you want to use, and when you have the sound you want, render it. Cut the solo section you want to flange from the main mix, and insert the rendered solo section from the alternate mix.
Better Virtual Instrument and Amp Sim Feel
Last week’s tip covered how to save CPU power with amp sims by bouncing and/or transforming the track with the sim. One user commented “I can see how doing [this] reduces CPU load, but only after I’ve finished choosing and using an amp sim patch. My frustration is the latency or CPU hit when actually playing my guitar through an amp sim, deciding on what I’m going to play, rehearsing it, auditioning amp sim patches and so on.” Alternate mixes to the rescue: make a premix of all tracks except the one with the amp sim, and then disable the tracks themselves. With the tracks now placing no load on the CPU because you’re listening only to the premix, you can throttle the latency way down when playing around with your sim and adding a new part. After recording the part, you can use the tips presented last week to reduce the CPU drawn by the amp sim.
Auditioning Different Mixes for Albums
The renewed interest in vinyl has had a corollary effect: an interest in albums and collections of songs, not just singles. As a result, Studio One’s synergy between the Song and Project page—where you can edit songs after hearing them in context with the master file, and update the master file with that song’s changes—is brilliant. But even if you don’t produce albums, Studio One’s mastering options make it easy to obtain consistency among songs. That way, if someone switches from one song of yours to another on YouTube or Spotify, there won’t be a jarring difference.
But you might do various mixes of songs, so you can choose the best one when assembling an album. If you update the version in the mastering file after changing a mix, to compare it to a previous mix you need to open the file with the other mix (which may take a fair amount of time if you have lots of effects and virtual instruments), update the mastering version, and repeat with any other mixes.
A simpler option is to create alternate mixes in your song as described above (remember to save each alternate mix as a separate version), and mute all tracks in the song except for the track with the mix you want to audition. Update the mastering file with that track. To audition a different mix, mute all tracks except for the different mix, update the mastering file, and hear that mix in context. Once you decide which mix you like best, open the Version containing that mix, and then you can make further tweaks to it.
Using 3rd-Party Cabs with Ampire XT
There’s an old joke about guitarists:
“How many guitars does a guitar player need?”
“Just one more!”
…and sometimes I feel the same way about amp sims, because all of them are different. Ampire XT benefits from PreSonus’s “State Space” technology, and if you have no other amp sims, its collection of amps has pretty much all the essentials.
What’s more, you can load thrid-party cabinet impulse responses (IRs) that re-create the sound of various cabinets, mics, and mic positions. These go into the User Cabinet, whose unique feature compared to typical IR loaders is being able to load individual IRs for the three mics.
But you can take impulses even further by turning off an amp’s cabinet altogether, and following Ampire XT with the Open Air convolution processor. Although most people probably think of Open Air as a way to create a variety of reverb and other space-based effects, it’s also a flexible impulse response loader that plays nice with cabinet impulses.
There are many free cabinet impulses on the web to get you started. Admittedly, the sound quality varies—some are fine, some aren’t, but there’s also a middle ground where tweaking the Open Air controls can give the sound you want. http://cabs.kalthallen.de is a popular source for free impulses (click on the Free tab), but there are many other companies that offer free samples, or sell impulses commercially.
The Setup
Create an FX Chain with Ampire XT followed by Open Air. The Impulse Responses are only for cabinets, so set up Ampire XT’s amp and effects however you want, but turn off the cabinet section (Fig. 1).

Figure 1: Click the cabinet bypass button (middle left, outlined in white) and the cabinet field will show None (upper right, outlined in white).
Follow Ampire XT with the Open Air, and start with its Default preset. Drag an impulse into the Open Air waveform display window (or click on the impulse name field to open the file selector, and then navigate to the impulse you want). Turn Mix to 100% so that you hear only the cabinet output, and none of the pre-cabinet amp sound (Fig. 2).
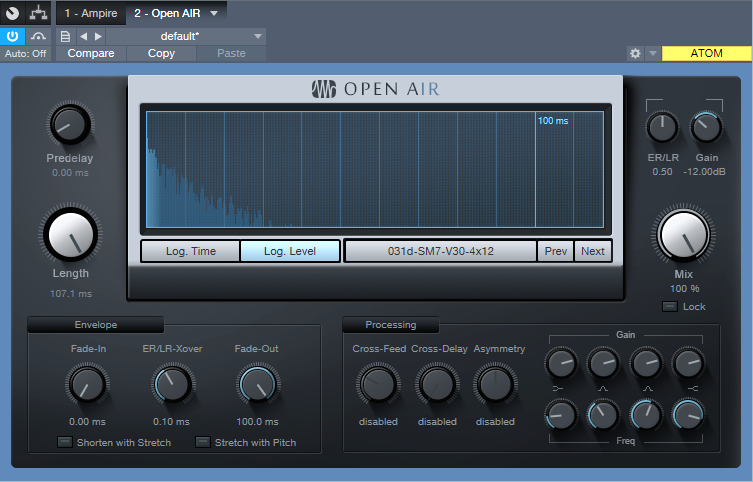
Figure 2: Make sure you set the Open Air Mix control to 100%, so that you don’t hear the pre-cabinet amp sound.
Tweaking the Tone
The Kalthallen impulse shown in the screenshot above didn’t need tweaking to sound good, but you’ll find that with a lot of the free impulse responses, you’ll need to tweak the Gain and Frequency controls. Often the main problem is a “thin” sound and Fig. 3 shows some tweaks that help remedy this issue—pull back on the highs, and boost the low end for a bigger, beefier tone.
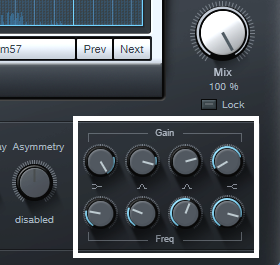
Figure 3: These EQ settings can help tame free impulse responses that sound too thin.
But the most dramatic tweaks come by enabling Shorten with Stretch and Stretch with Pitch, then varying the Length control. This can produce sounds that are similar to different mikings, or even cab sounds you’ve never heard before. The Predelay, ER/LR-Xover, and ER/LR controls can also affect the sound, although the differences aren’t as dramatic as stretching with the Length control.
Finally, although it’s great to have options, you don’t want to suffer from option overload (“maybe trying just one more impulse will give the sound I want…”). If you download a bunch of impulses, create a folder of favorites in a place where it’s easy to open it up, and drag-and-drop impulses into Open Air. If you find one you really like, save it as an Open Air preset for future use.
Open Air: Much More Than Just Reverb
After doing some fairly “normal” tips for the last few Fridays, let’s go a little crazy—and explore some interesting sound design and rhythmic possibilities.
Open Air is a wonderful convolution processor, but it’s helpful to remember it can load any audio file, not just room and reverb impulses. I’ve said many times it’s more fun to ask “what if?” than “how do I?”, because “what if” is all about experimentation. So I asked “What if I’m using a drum loop, and also load that same loop into Open Air as an impulse?” You might not use the resulting sound all the time, but give this technique a try—you’ll hear an entirely new type of percussive effect.
- Make sure the loop itself matches the song’s tempo, and it isn’t just stretched to fit. If it was stretched to fit, select the loop and type Ctrl+B to make the length change permanent.
- Copy the loop (e.g., to an empty track). Open Air doesn’t seem to like high-level drum loop impulses, so drag down the top envelope handle to reduce the level by at least -6 dB. Again, select the loop and type Ctrl+B to make this change permanent.
- Drag the copied loop into the Open Air waveform window, and now you have a cool drum impulse.
- The odds are it will sound pretty dreadful; if needed, start by reducing the Open Air Gain control to prevent distortion.
- The EQ settings are really important (Fig. 1). I’ve had the best results by cutting back on the low frequency shelf, and boosting the high frequency one. To adjust EQ, temporarily set the Mix to 100% so you can hear the results of any changes easily; after the EQ is tweaked, adjust the Mix amount to taste.
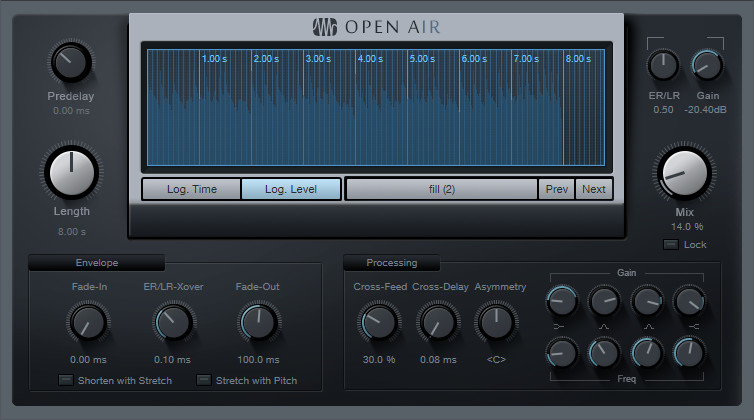
Figure 1: Typical Open Air settings when modulating a drum loop by itself.
Remember that the drum loop is still acting like a reverb, so it will build up a bit over time until the level stabilizes, and the processed sound will have a tail as long as the loop.
Next, there are several ways to add variations. First, you don’t have to convolve a loop with itself—check out the audio example.
The first four measures are a drum loop convolved with itself. The second four measures convolve the original drum loop with a tom loop, while the final four measures convolve the original drum loop with a percussion loop.
Altering the Open Air Length can create interesting effects, especially when using a rhythmically related length—like half or 1/3 the length. With sparse loops, longer lengths can work too, like 1.33, 1.5, or 1.66 the length (get out your calculator, and work with the number that’s shown under the Length control). Additional EQ and processing can add even more interest.
And remember to experiment with other types of impulse as well—pads, voices, guitar chords, whatever! You never know what you’ll discover.