Melodic Percussion
This week’s tip shows how to augment percussion parts by making them melodic—courtesy of Harmonic Editing.
The basic idea is that setting a white or pink noise track to follow the chord track gives the noise a sense of pitch. Although having a long track of noise isn’t very interesting, if we gate it with a percussion part, then now we’ve layered the percussion part’s rhythm with the tonality of the noise. Add a little dotted 8th note echo, and it can sound pretty cool.
Step 1: Bring on the Noise
Noise needs to be recorded in a track to be affected by harmonic editing, so open up the mixer’s Input section, and insert a Tone Generator effect in tracks 1 and 2. Set the Tone Generator to Pink Noise, and trim the level so it’s not slamming up against 0 (Fig. 1).
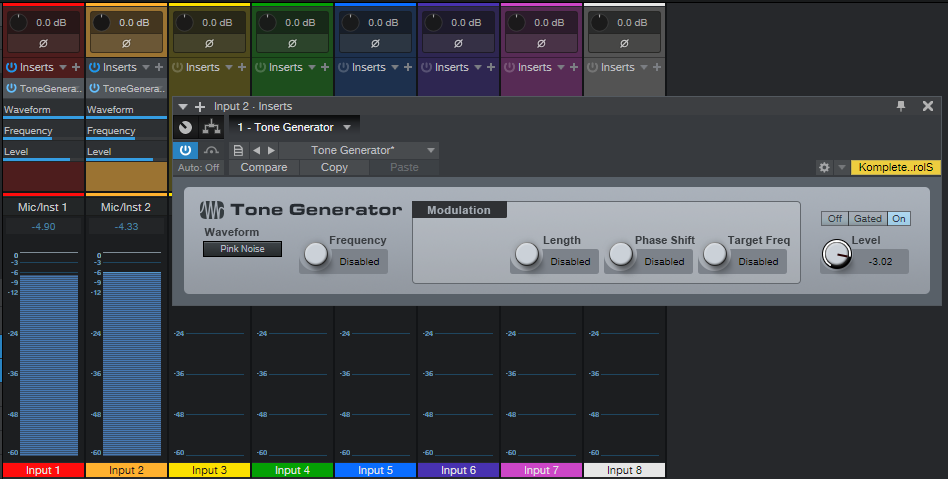
Figure 1: We need noise in each channel to implement this technique.
Record-enable both tracks (set them to Mono channel mode), enable Input Monitor, and start recording noise into the tracks. The reason for recording into two tracks is we want to end up with stereo noise, so the tracks can’t be identical.
Step 2: Make the Noise Stereo
Now that the noise is recorded, you can remove the Tone Generator effects from the track inputs. At the mixer, pan one channel of noise left, and one right. In each track’s Inspector, choose Universal Mode for Follow Chords, and Strings for Tune mode (Fig. 2).
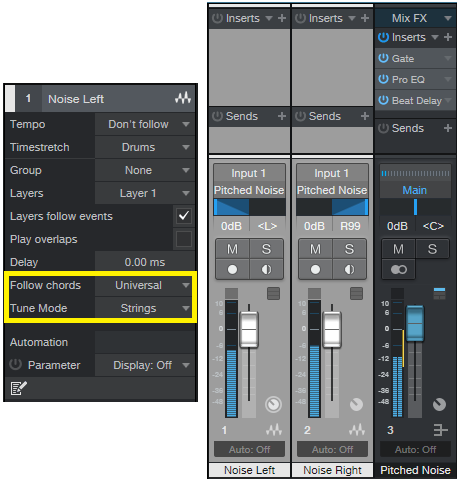
Figure 2: How to set up the tracks for stereo noise. The crucial Inspector settings are outlined in yellow.
Set each track’s output to a Bus, and now we have stereo noise at the Bus output. Insert a Gate in the Bus, and any other effects you want to use (I insert a Pro EQ to trim the highs and lows somewhat, and a Beat Delay for a more EDM-like vibe—but use your imagination).
Step 3: Control the Gate’s Sidechain
Choose the percussion sound with which you want to control the Gate sidechain, insert a pre-fader send in the percussion track, assign the send to the Gate, and then adjust the Gate parameters so that the percussion track modulates the noise percussively. Fig. 3 shows the track setup.
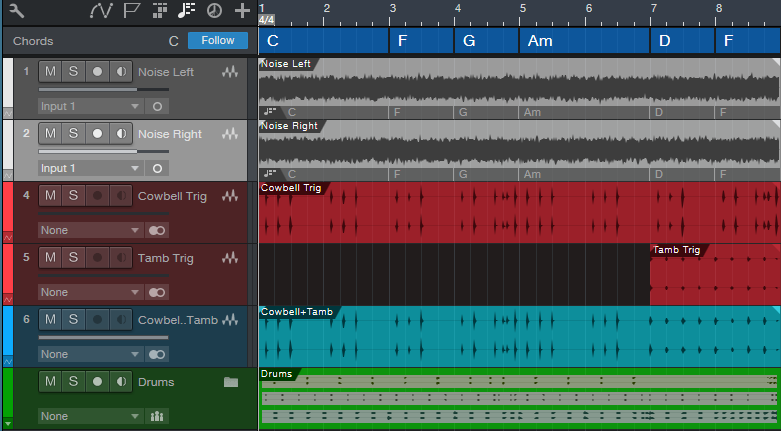
Figure 3: Track layout used in the audio example.
Tracks 1 and 2 are the mono noise tracks that follow the Chord Track, and feed the Bus. Tracks 4 and 5 both have pre-fader sends to control the Gate, so that for the first 7 measures only the cowbell controls the gate, but at measure 8, a tambourine part also modulates the Gate.
Track 6 has the cowbell and tambourine audio, which is mixed in with the pitched noise, while the folder track has the kick, snare, and hi-hat loops. (The reason for not using post-fader sends on the percussion tracks is so that the tracks controlling the Gate are independent of the audio, which you might want to process differently.)
But Wait…There’s More!
With a longer gate, the sound is almost like the rave organ sound that was so big at the turn of the century. And there are options other than gating, like using X-Trem…or following the Gate with X-Trem. Or draw a periodic automation level waveform for the bus, and use the Transform function to make everything even weirder. In any case, now you have a new, and unusual tool, for percussive accents.