Category Archives: Friday Tip of the Week
The Guitarist’s Hum Buster
Hum is like an unwanted house guest—when it shows up, all you really want to do is get rid of it. Unfortunately, I can’t help you with unwanted house guests…but we do have an answer on how to deal with hum.
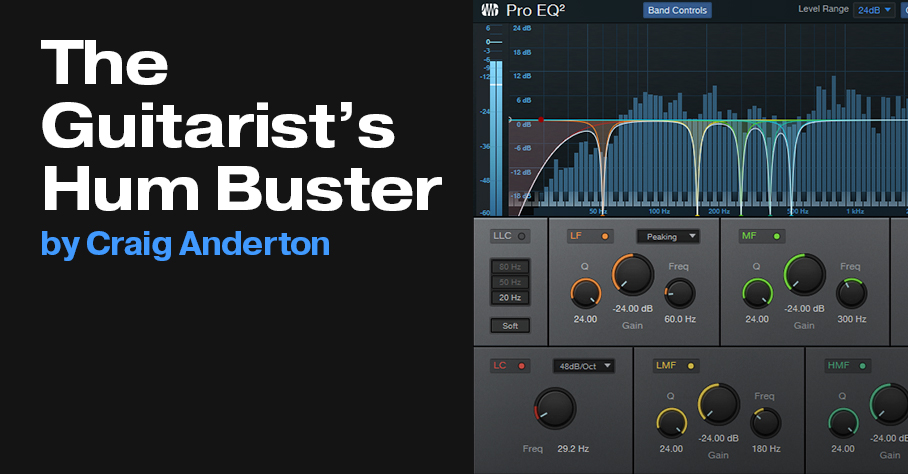
If you play guitar, you know how much of a problem hum can be. However, it’s not good enough to get rid of only the hum’s 50 or 60 Hz sine wave, because there will often be harmonics of the hum—we need to remove those as well.
Before going any further, let’s listen to an audio example, so you have the incentive keep reading. The first half has some nasty hum, while the second half has obviously read this week’s tip.
Fig. 1 shows the Pro EQ2 settings, but you don’t need to copy them—just download the 50 and 60 Hz presets from the links at the end of the tip. You’d insert this at the beginning of a chain of effects.
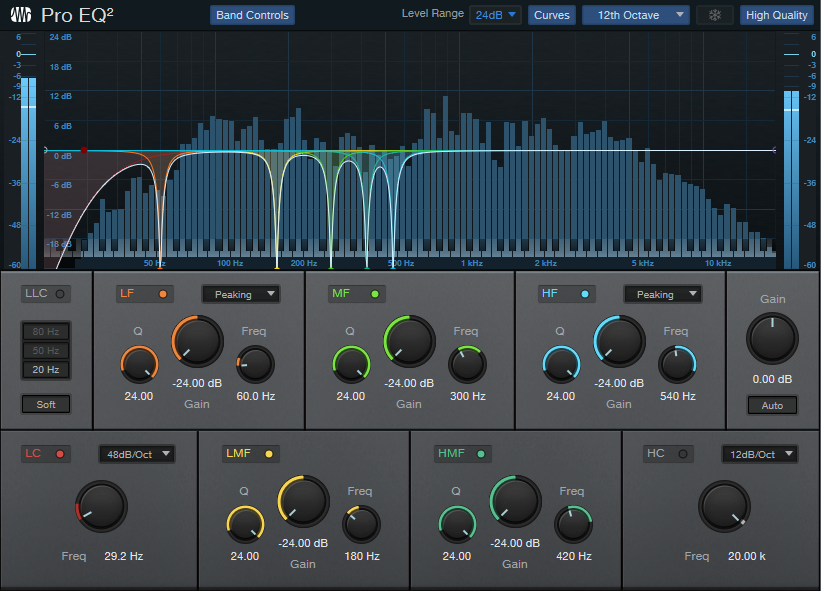
For 60 Hz, in addition to notching out 60 Hz, you want deep notches at 60 Hz’s odd harmonics: 180, 300, 420, and 540 Hz. For 50 Hz, the magic frequencies are 50, 150, 250, 350, and 450 Hz. Note that these notches are narrow enough so that they don’t interfere much with the original guitar sound. For less severe hum, you can try turning off some of the filter stages, because they may not be needed.
That’s all there is to it…so go ahead, download the preset that’s appropriate for your part of the world, and make the hum go away.
Download the 60 Hz Hum Remover.preset and 50 Hz Hum Remover.preset below
Your Virtual Listening Room
Listening to speakers is a different experience than listening to headphones. Instead of your head being one point of an equilateral triangle with speakers, headphones are more like having speakers at your left and right sides, an inch away from your ears, and pointing directly into them—while bunching up the center inside your head.
Several commercial plug-ins are designed to make headphones sound more like listening to speakers in a room. This tip’s implementation isn’t quite as sophisticated, but you’ll find that it makes listening over headphones more fun, less fatiguing, and gives your mix more depth. It takes full advantage of Studio One Pro’s Listen bus.
How It Works
When listening over speakers, left channel audio hits your right ear a couple milliseconds later than your left ear, at a reduced level, and with some high-frequency loss because your head acts as a high-cut filter in the audio’s path. A similar issue happens with right channel audio and your left ear. The Virtual Listening Room effects chain reproduces the crosstalk, delay, and high-frequency cuts in the Listen Bus, which you layer with the Main bus.
Although Studio One has several delay-based effects, they’re effects—we need a basic, boring, “all-it-does-is-stereo-delay” processor. Fortunately, the free Voxengo Sound Delay plug-in (VST2, VST3, and AU) does the job. Similar basic delays, like Eventide’s Precision Delay, also work.
The Effects Chain
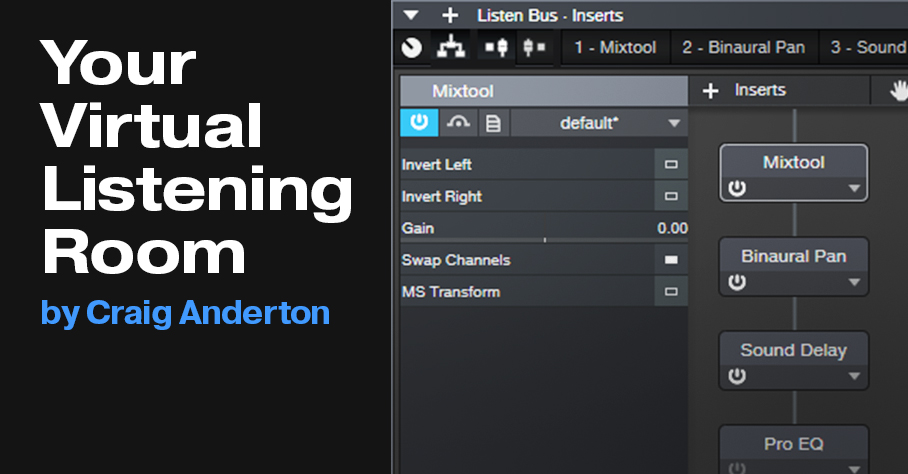
Fig. 1 shows the effects chain. For the Mixtool, simply drag it in, and click on the Swap Channels button. The Binaural Pan processor adds a little extra depth. Drag it in, and set the Width to 150. You may want to increase or decrease this later, but it’s a good starting point.
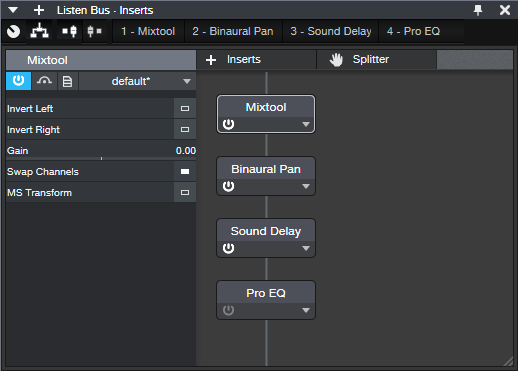
Set the stereo delay between 1 to 3 milliseconds. I usually choose 2 ms. Note that the Voxengo Sound Delay has an option to choose Stereo Swap for Routing instead of Stereo. If you choose Stereo Swap, then you don’t need the Mixtool to swap the channels.
Finally, the Pro EQ2 provides a simple, high-frequency rolloff. Enable the HC filter, choose 24 dB/octave slope, and a frequency of 6 to 7 kHz. Although this produces a more realistic effect, remember that we’re listening in a virtual listening room. I leave the filter bypassed because my virtual head is sonically transparent and passes high frequencies, so that makes the filter irrelevant.
The Listen Bus
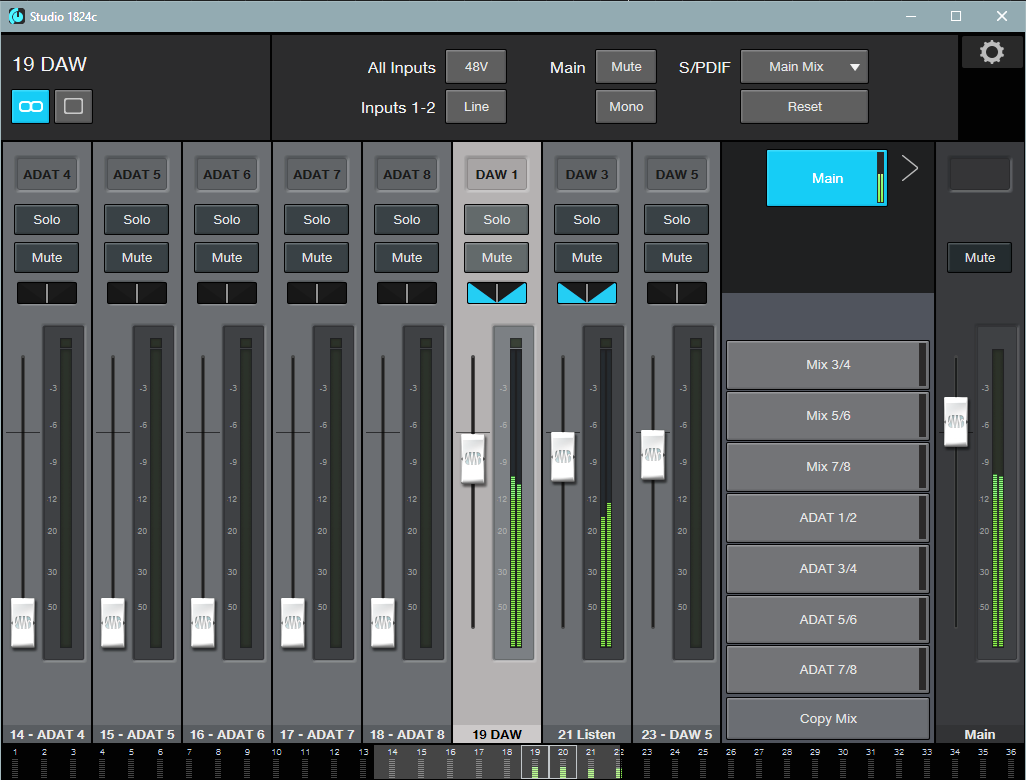
I use the PreSonus 1824c interface and Universal Control, and Studio One’s Listen Bus makes it easy to create the Virtual Listening Room. The Listen Bus goes to outputs 3+4, so the 1824c’s mixer faders for channels 3+4 are turned up (along with the Main Bus, which is channels 1+2; see fig. 2). Altering the Listen Bus fader changes the extent of the virtual room effect—between -3 and -9 dB at Studio One’s mixer seems about right. Of course, this technique isn’t limited to using a PreSonus interface. Any other way you can layer the Main Bus output and Listen Bus output works.
Because this involves the Main Bus, Listen Bus, and using headphones, I can’t really give an audio example. But if I could, and you could hear what this effect does, I’m pretty sure you would try it out. So—try it out!
Fix Mixes with Multiband Dynamics

Multiband compressors can seem daunting. However, they’re just several compressors stuffed into one plug-in (or in the case of Studio One, dynamics processors that can do more than just compression). If you know how compressors work, you’re halfway to understanding multiband compression. The other half is EQ, because each compressor processes a single frequency band. In fact, if you set the ratio controls for all to 1:1 so that there’s no compression, then the Multiband Dynamics processor turns into a “focusing” graphic EQ.
This week’s tip has two downloadable files:
- Original File.wav is included so you can experiment with the techniques in this tip. It’s part of a mixed but unmastered song (the finished version is here) that we’ll process with the Multiband Dynamics plug-in. It’s the same file used for the first audio example.
- Multiband Mix Fix.preset is the Multiband Dynamics preset we’re using. You can “reverse engineer” the settings, and experiment with making your own edits to hear how they affect the original file.
Multiband Compression and Mastering
Mastering engineers often receive mixed stereo files, so it’s not possible to change the mix. However, multiband compression can almost “get inside” the mix to change it. We’ll cover a practical example of how to use multiband compression with a mixed file.
The first step in mastering is to listen to a file several times, so that you can identify problems that need to be fixed. Here’s the file we’ll be processing.
There are three main issues:
1. The high end lacks the high-frequency “fairy dust” that’s often added to masters. Think of it like adding a pinch of salt to food.
2. The low end is weak. You can hear the bass and kick, but they don’t have enough power. This issue is especially noticeable with the bass slides between 12-16 seconds into the file, and in the downward slide at the end.
3. The upper midrange needs to be “crisper” when vocals are present, because the overall sound is a little boxy. This also affects the acoustic guitar, especially between 20-25 seconds. Finally, in the instrumental section that starts at 25 seconds, the drum attacks are too prominent. They need to be tamed so that the guitar and bass come more to the forefront.
Let’s Fix the Mix
Please note I’ve altered the Multiband Dynamics user interface artwork to include only the elements relevant to fixing the three problems above. No worries—this isn’t from some weird beta version of Studio One.
Fixing (1) is easy. The high band extends from 5.50 kHz on up (fig. 1). Although there’s no compression, the Gain control boosts the high frequencies. You could apply the same effect with EQ, but it’s more convenient with the Multiband Dynamics, because sometimes you want to make tweaks that relate to the other bands.

Fixing (2) takes a little more effort, and involves the Low and Low Mid bands (fig. 2).

The Low Band compresses frequencies below 105.5 Hz, and adds 6 dB of gain. The Low Mid band compresses frequencies between 105.5 and 500.5 Hz, and adds 5 dB of gain. This Low Mid range is where engineers often scoop the response slightly, to avoid a “muddy” sound. But this case is the exception that proves the rule, because we need more level in this range, not less.
The Mid Band applies no processing, which brings us to (3). This is the most difficult to adjust; overdo the High Mid range, and the sound becomes harsh. But without enough high mids, the sound lacks clarity.

This band covers 1.70 kHz to 5.50 kHz (fig. 3). The compression ratio is higher than the other bands, to tame the percussive drum peaks. Also, the threshold is low, and there’s almost 4 dB of gain. This gives a lift to the upper mids, and tames the drum peaks in the instrumental section.
Final Comments
The second audio example includes all the above changes. It has the same LUFS value as the first audio example, so a level difference doesn’t influence the comparison.
Note that the threshold on all the compressor’s bands is quite low. This is because the original file is around -16 LUFS. If it was higher, the thresholds wouldn’t need to be so low. The Multiband Dynamics brings the output up to around -14 LUFS. If you wanted a hotter sound, you could limit this further. But in any event, at least to my ears, the processed version sounds better than the original.
Downloads!
Download the original audio file below so you can follow along with this tip.
Download the final Multiband Mix Fix preset below. Try bypassing, soloing, and muting bands to hear what they contribute to the overall processing.
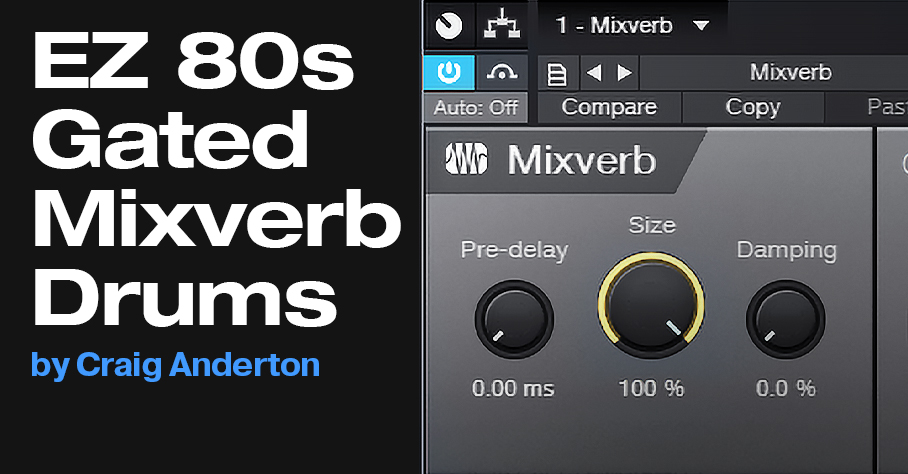
EZ 80s Gated Mixverb Drums
The gated reverb effect on drums was one of the signature sounds of the 80s, with probably the most famous example being Phil Collins’ “In the Air Tonight.” The dramatic moment when the drums came crashing in was all about gated reverb.
It may seem like this is an easy effect to create, but it’s not as easy as it might seem. Not just any reverb sound will do, and the gate parameters are critical.
Fortunately, the Mixverb is reasonably good at doing gated drum sounds, especially with drums like toms that have a decent amount of sustain or ring.
The downside is that the Mixverb’s gate section doesn’t have a sidechain, which is needed for the most flexible and authentic gated reverb effects. Because the gate is after the reverb, its gating action tracks the reverb’s decay, not the drum’s decay. Also, if a couple hits happen in quick succession, they’ll keep the reverb going. This keeps the gate opens, and forfeits the gated effect.
For best results, each drum whose reverb you want to gate will need a separate output, processed by its own Mixverb. Fortunately, it doesn’t draw much CPU, so your computer won’t complain. For next week’s tip, we’ll cover a more traditional (albeit more complex) solution for gated drum effects. Meanwhile, let’s hear what the Mixverb can do.
The first half is unprocessed drums, the second half has gated Mixverb on the toms and snare.
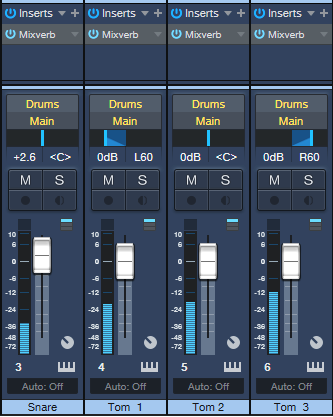
The mixer setup (fig. 1) is straightforward.
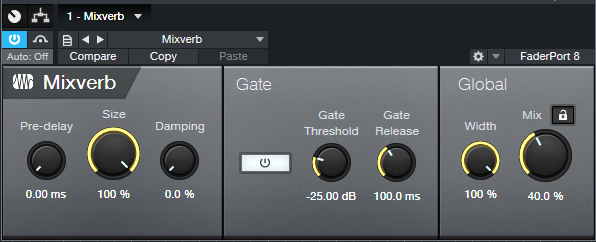
Start with the initial settings shown in fig. 2, which are fairly crucial. Because the Gate is post-reverb, the Size, Gate Threshold, and Gate Release interact.
Next, vary the Gate Threshold to alter how long the gated reverb effect lasts. The optimum settings will depend on the drum sound itself, and the incoming level to the Mixverb. Even a 1 or 2 dB change in the threshold can have a major influence. Then, vary the Mix control to obtain the desired blend of dry and gated reverb sound.
Finally, play around with the Size and Gate Release controls to see if you can optimize the sound any further. Note that the snare in the audio example had the same settings, except the Gate Threshold was at the lowest possible level, and the Gate Release was 50 ms.
After trying this, you might think “Nice try, Craig…it sounds okay in the audio example, but my drums don’t sound like that.” Well, remember that we just got lucky with the Mixverb, and it’s not equally accommodating to all drums. So tune in next week, when we’ll show a more universal way to do gated reverb drums—which can also be very cool with gated delay.
Studio One’s VCA Module
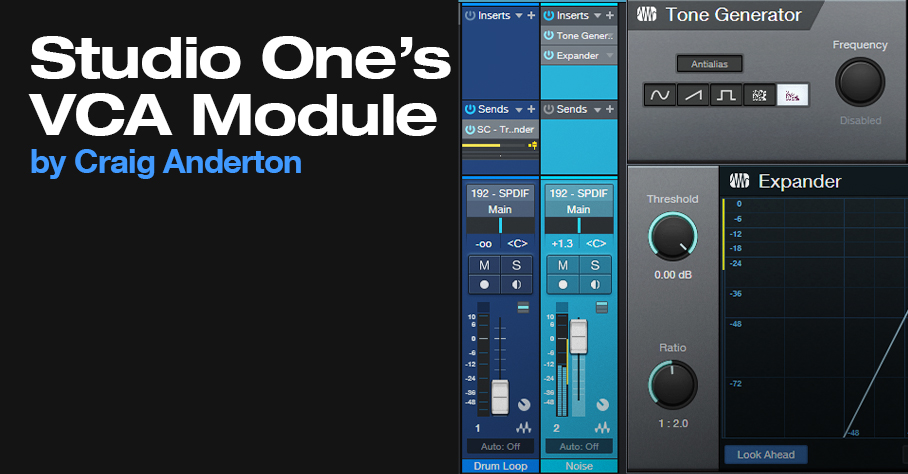
A modular synthesizer’s VCA (Voltage-Controlled Amplifier) changes gain in response to an input control voltage. One of my favorite applications is controlling a VCA with an envelope follower—for example, using an envelope follower on drums, and running power chords, pads, or sustained synth sounds through the VCA. Then, these sounds take on the percussive characteristics of the drum part. But Studio One doesn’t have a VCA, right?
Actually, it does—the Expander. You can set up the Expander to act like a VCA, with its gain controlled by a sidechain signal. So, in the example above, you can run sounds like guitar chords through the Expander, and feed the Expander’s sidechain from a drum track. Here’s what it sounds like.
[Caption] The first four measures, drums modulate the guitar. The second four measures use the Analog Delay to provide an additional 1/8th-note rhythm.
Test Setup
Fig. 1 shows a test setup to play around with this process, and hear how it works. Insert a drum loop in one track. Normalize it so the signal level is consistent. The drums provide the sidechain signal.
In another track, insert the Tone Generator set for pink noise, followed by the Expander. Using pink noise makes it easy to hear how adjusting Expander parameters alters the pseudo-VCA’s response to drums.
Start with the Expander settings shown in fig. 1, and assign a pre-fader send from the drum track to the Expander’s sidechain. Note that when you assign a sidechain to the Expander, it automatically selects Ducking mode. You don’t want this, so de-select Ducking.
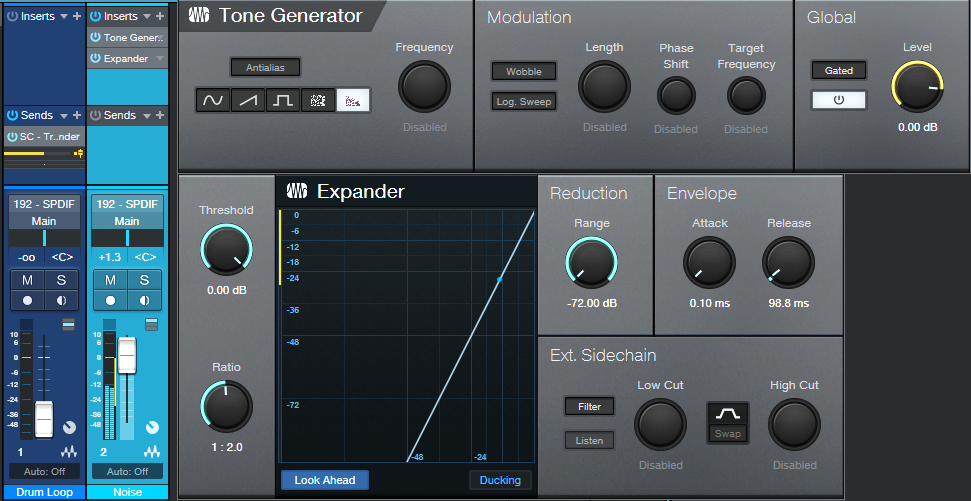
Start playing the drum loop, and you should hear the white noise’s amplitude being modulated by the drums. If not, make sure the drum track send provides enough level to the expander sidechain. Here’s how the Expander controls affect the sound.
- Release: Start by varying the Release. Longer times add a decay to the pink noise.
- Attack: This isn’t as useful with percussive sounds, because the sound is over before the attack can complete. But if the sidechain signal is coming from something like a pad, you’ll hear an attack time superimposed on the noise.
- Range: This acts like a bias voltage for the VCA, that always keeps it somewhat open. It’s good for when you want the VCA to be affected only by the drum peaks.
- Threshold: Lower this to pick up more of the peaks. It’s kind of like compressing the sidechain signal.
- Ratio: Higher ratios make the effect more percussive, to the point where the sound is so percussive you might not hear the drums anymore. Lower ratios create a less percussive sound, somewhat like changing the ratio.
Now that you know what this technique can do, start running other signals through the Expander. And by the way—automating Threshold and Release can add some serious animation to the percussive effects. Check it out!
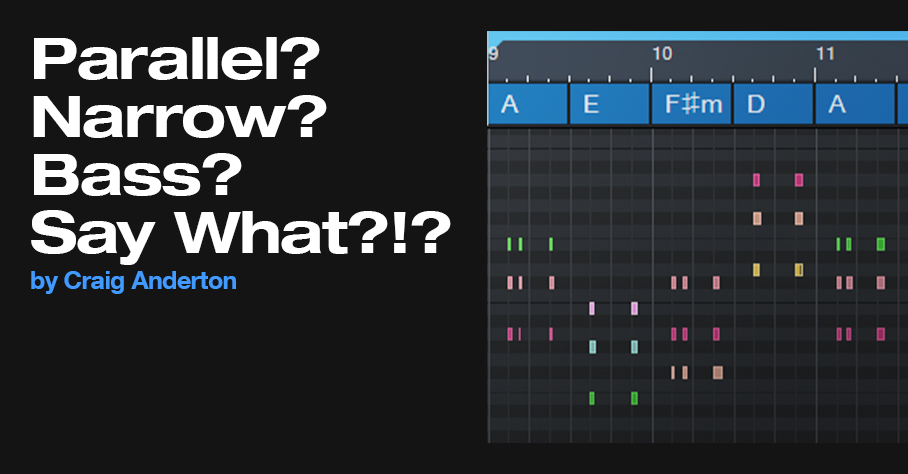
Parallel? Narrow? Bass? Say What?!?
It’s probably obvious that I love the Chords track. It’s so useful that if you haven’t made friends with it yet, look over the Reference Manual…then take it out for lunch. Meanwhile, here’s a way to have it create a rhythmic keyboard part—with very little effort.
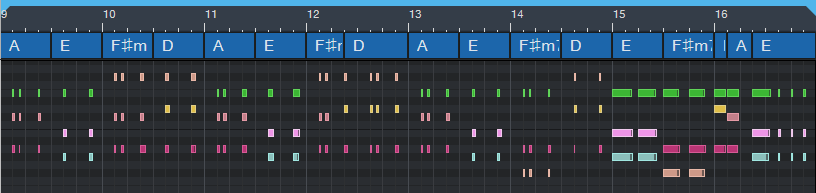
One of the Chords track’s (many) talents is generating a chord chart from your playing. Play an acoustic instrument like guitar (yes, chords are allowed) or a MIDI instrument like Presence, then drag the audio or MIDI data up to the Chords track. It automagically maps out your chord progression.
Tip: Quantize the part before you drag it up, so that chord changes happen on the beat where they’re supposed to change. Or quantize the Chords track after it’s extracted, so that the chord changes line up on the beat.
Once the Chords track extracts the progression, any subsequent audio or MIDI parts you record can follow the chord progression. Audio has more options than MIDI, so for this blog post, we’ll just consider the MIDI aspect.
The keyboard overdub shown in fig. 1 is not following the chord track that was extracted from guitar. Actually, all it’s doing is playing the same chord with different rhythms. But we’ll fix this.
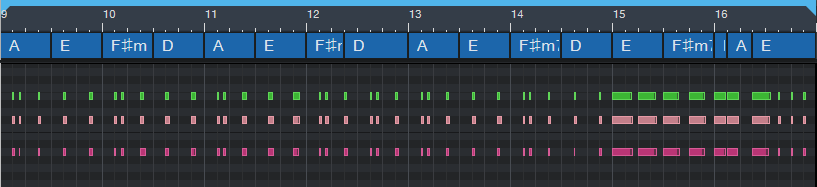
It sounds as useless as it looks—and to prove it, check out the following audio example. I’ve left the guitar, bass, and drums in for context. The keyboard part is panned right, and mixed up fairly high so you can hear the part easily.
Tip #2: When using the Chords track as a songwriting partner, don’t be too concerned about the notes you play—the Chords track will fix them. Just nail the timing, and play in the general vicinity of the note range you want the final part to cover.
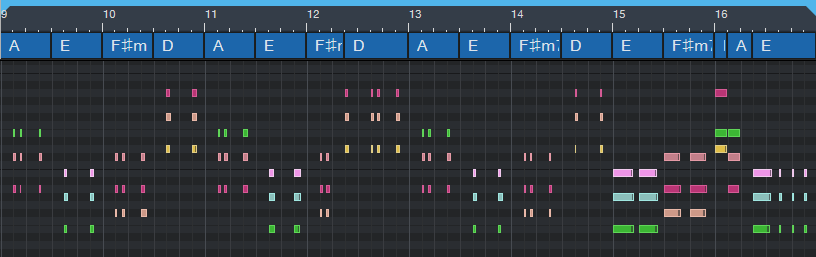
To have the MIDI notes follow the Chords track, click on the track, open the Inspector (F4), and from the Follow Chords drop-down menu, choose Narrow. This moves the notes to the nearest note that conforms to the chord specified in the Chords track (fig. 2). Looks a lot better, doesn’t it?
And it sounds a lot better, too, as you’ll hear in the next audio example.
The Parallel option shifts the notes in parallel, so that a chord’s root notes line up with the root note of the chord in the Chords track. This typically creates voicings that cover a wider pitch range, which may or may not be what you want. However, occasionally this will transpose some notes so they’re not in the right key. If so, you’ll need to do a little manual editing. Here’s what Parallel mode created (fig. 3).
And here’s what it sounds like.
Following the chord track in Bass mode isn’t relevant here, because it just aligns the chord’s lower note with the Chords track chord—the end result is the same as choosing Parallel, which definitely doesn’t generate a fun bass line. But as described previously in the blog post Studio One’s Session Bass Player, combining the Chords track with the Fill Notes option can create some pretty amazing bass parts.
Oh, and if someone wants to spoil the fun and say you’re “cheating,” remind them the only thing that matters about music is the emotional impact on the listeners—and if they like what they hear, they won’t care what you did to get there.
Lively Up Your Drums
One element that can help make drums exciting is including the room sound where the drums were recorded. If you don’t believe me, listen to the drum part in Led Zeppelin’s “When the Levee Breaks.”
I rest my case.
When mixing drums, if there wasn’t a separate track of miked room sound, or you’re using a pre-recorded loop, you do have options. You can add a room sound with reverb, but that won’t be the same as the room where you recorded the drums. Or, you can compress the drums, which will bring up the room sound—but also squash the peaks.
The best option would be bringing up the room sound without squashing the peaks. Fortunately, with parallel compression, you can do this. The trick is to set a super-low threshold, then add some compression. This brings down the peaks, but keeps the low-level audio intact. Turning up the Mix control just a bit brings in the low-level sounds, but because most of the mix contains the dry drums, you won’t squash any of its peaks. Now you have full peaks and room sound—as you’ll hear in the audio example. The first half is the drums by themselves. The second half enhances the room sound using this technique.
How It Works
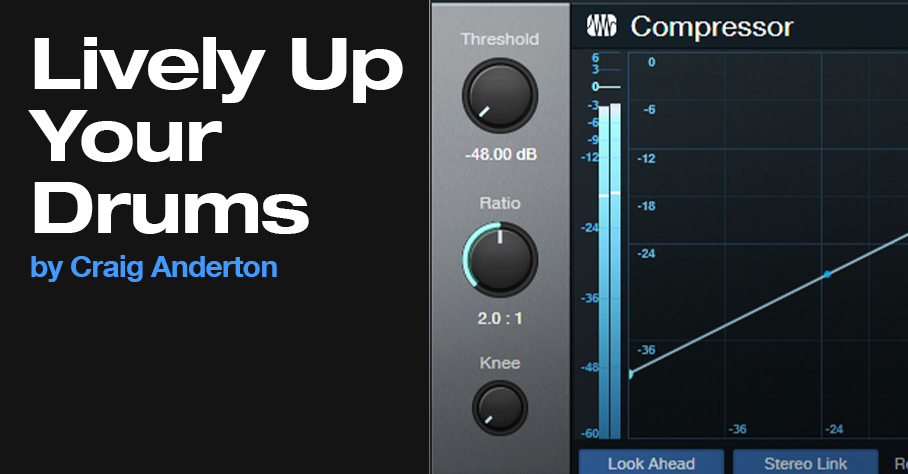
Insert the Compressor in your drum track, and set the compressor parameters as shown in fig. 1 (or just download the preset). Here’s what the controls do.
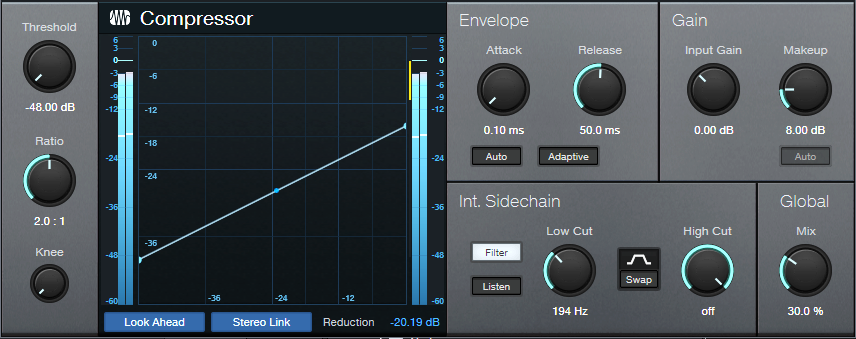
-48.00 is the lowest possible threshold. A 2.0:1 ratio adds enough compression to bring down the peaks so they don’t interfere with the dry signal, without sounding too compressed.
A tight compression sound is important for drums, so set the attack to minimum and about 50 ms of release. Don’t click Auto, because we’re not using the compressor in a standard way.
The Low Cut filter reduces the kick’s effect on the compression, so the lower-level sounds aren’t “pumped” by the kick. You’ll probably need to add some makeup gain; the preset uses 8.00 dB. The Mix control dials in the desired amount of room sound. With the settings shown, and a drum track that’s normalized to maximum, 30% seems about right.
And that’s all you need to do to lively up your drums. If you still want to squash the peaks too, then insert a Limiter2 after the compressor. But also note that this technique can bring up the body sound of acoustic guitars, bowing sounds with string sections, mouth sounds with vocals, and the like. Experiment!
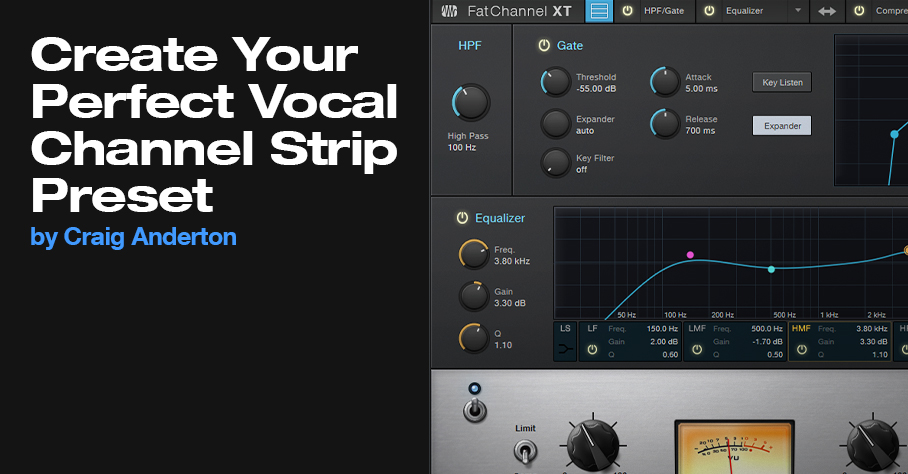
Create Your Perfect Vocal Channel Strip Preset
First, some news: If you own The Huge Book of Studio One Tips and Tricks, the free update to version 1.2 is available from the PreSonus shop. Just go to your account and re-download the book. Also, my 2021 album project was recorded entirely in Studio One, and the playlist is posted on YouTube. You’ll probably find the song “I Hope” of particular interest, because the keyboard part was created automatically (yes, it really was) using the tip about the “Fill Notes” function, and the guitar and keyboard parts use the Shimmer Reverb tip. Okay, on to this week’s tip…
We all know how important vocals are, and the Fat Channel is an excellent channel strip for creating vocal presets. So, let’s go step-by-step on how to create your own Fat Channel preset. We’ll cover the reasons for choosing the parameters in fig. 1, and the order in which you want to edit them. More importantly, we’ll describe how to customize parameters for your mic type and voice.
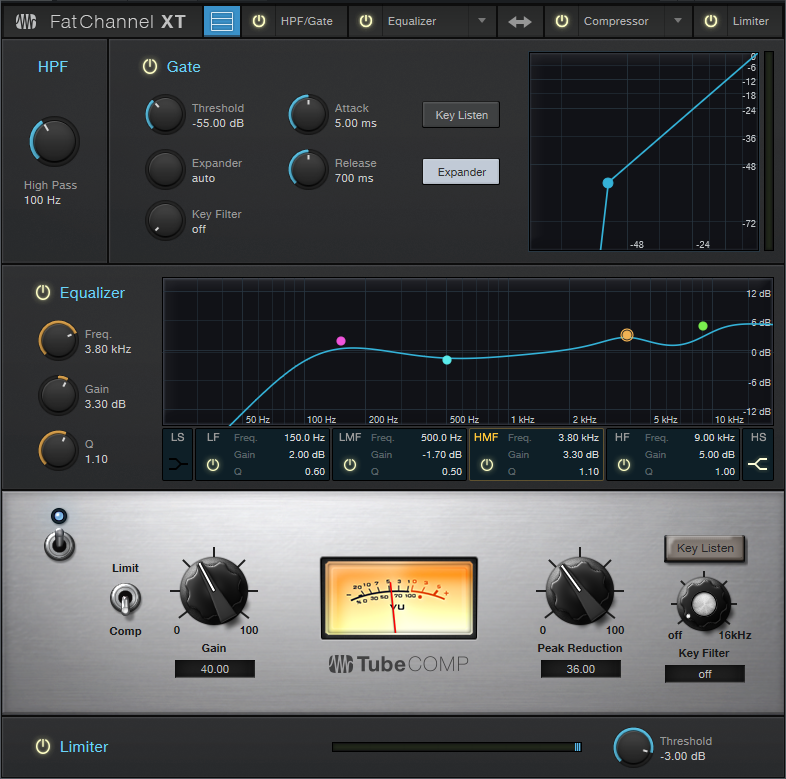
HPF/Gate
The HPF can reduce pops, as well as excessive bass from singing too close to the mic. Choose a frequency that tightens up the low end, but doesn’t thin the sound. With a ribbon mic, you might want a higher frequency.
To keep low-level noise out of a vocal, try setting the Expander threshold to -55 dB. This should be high enough to get rid of residual hiss and room noise, but low enough to retain vocal nuances.
Equalizer
EQ settings are like a combination lock—get them right, and your vocal opens up. As to signal chain placement, equalizer before compressor is more forgiving of substantial EQ boosts that create “character.” Let’s run through the order for adjusting the edits.
HS (High Shelf). This gives the vocal “air.” Freq will be in the 8 to 10 kHz range, but Gain depends on your mic. Some mics have a high-frequency lift, so you don’t need much gain. A ribbon mic might sound dull, and need more gain. Turn up the Gain to where you get sibilance problems, and then back off until the sibilance issues go away.
HMF. The frequency range from 2 to 5 kHz is all about intelligibility. A broad boost helps the vocal stand out in a mix. Turn up the Gain until you hear more definition and greater intelligibility, then back off just a bit. The ear is most sensitive in this range, so too much boost can sound harsh.
LMF. A broad cut in the lower mids between 200 and 500 Hz can reduce “muddiness.” This isn’t always necessary, but reducing the lower mid response leaves more room for other instruments. Besides, with the HMF and High Shelf boosts, the vocal should come through just fine. An easy way to adjust LMF is to temporarily increase the Gain in this range, and sweep the frequency for the most “boxy” sound. That’s where you want to cut.
LF. With the HPF active and LMF cutting, a slight boost here re-introduces a little more warmth into the vocal. With a ribbon mic, or if the vocal was recorded with a significant bass proximity effect from singing too close, you might want to cut here instead.
Compressor
The Tube Comp is a favorite for vocals, and it’s blissfully easy to adjust: Set Peak Reduction for the desired amount of compression, then use Gain to make up for any decrease in level caused by compression. I usually aim for 6 to 8 dB compression on peaks, but a lot of engineers like to slam the compression harder, especially for rock vocals.
Limiter
Setting this to -3.0 provides insurance against stray peaks going higher than desired.
The Preset
The downloadable preset has the parameters shown in fig. 1. Although it can serve as a point of departure, I strongly encourage you to tweak the parameters to perfection for your own voice and microphone. You’ll find the effort is worth it!
Download the Fat Channel preset here:
Slick Tricks for Stack and Strum
Version 5.5 introduced Chord Stack and Strum features, which are pretty cool (for the basics on how they work, check out Gregor Beyerle’s YouTube video). We’ll warp these functions in some novel ways.
Chord Stack Meets Arpeggio
You can combine creating a Chord Stack and arpeggiating it at the same time.
- Start by selecting the desired Key, Scale mode, note length, and clicking the Scale check box (fig. 1). I find the most reliable option is to click Q, which follows the current quantization setting (quantization doesn’t have to be enabled).
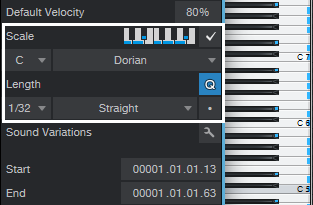
Figure 1: Select the appropriate parameters circled in white before proceeding.
- Choose the Paint tool.
- Hold down Alt (Windows) or Option (Mac).
- While still holding down Alt or Option, click where you want the note to start, and drag right (dragging left doesn’t work), while dragging up or down.
- The further you drag to the right, away from where you started, the more notes you’ll generate.
Past a certain point, some notes will repeat before moving on to the next note. The repeating is most likely to happen when using scales with few notes, like a Major Triad. The repeating notes can be a fun effect with sounds that have a fast decay.
When doing arpeggios, I like to drag up to the scale note just before the octave, and then create a second, downward arpeggio (fig. 2). You can turn this into an Event, and hit D to create as many iterations of the arpeggio as you want.
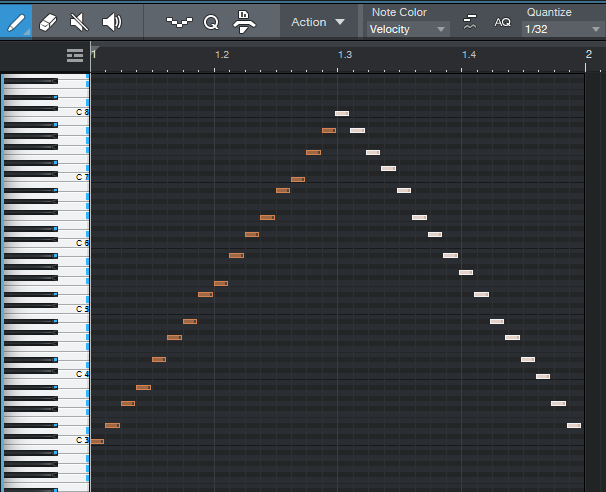
Figure 2: An arpeggio created by stretching a chord shape up, then creating a second arpeggio that stretches the chord shape down.
Strum Fun
Let’s turn our attention to strumming. One of my favorite alternatives to a conventional strum is that you don’t have to strum from the top or bottom of a chord, you can strum from the “inside out.” It sounds more like fingerstyle picking than strumming.
- Create your chord of choice.
- Select all the chord notes.
- Click somewhere toward the middle of the note where the strum should end (fig. 3 shows what happened when I chose the middle of the 7 notes) and hold down the mouse button.
- While still holding down the mouse button, hold down Alt+Ctrl (Windows) or Option+Cmd (Mac), and drag left or right. This is a wonderful effect—try it!

Figure 3: Inside-out strum.
Even better, we can take advantage of another new 5.5 editing feature. Set the end of the Event to where you want the notes to end. Select all the notes, right-click on one of them, and choose Musical Functions > Process > Extend to Note End. Now you’ll have a lovely, strummed attack, and all the notes will end at the same time.
More strum fun tips:
- You don’t need to strum all the notes of a chord. You can select, for example, just the top three chord notes, and strum those.
- Don’t overlook downstrokes. Click on the lowest note of a chord, hold the mouse button down, then hold down the Alt+Ctrl or Opt+Cmd and drag right. Now the top note will stay in place, and the strum will progress downward in pitch. If you want to end on the lowest note, choose the highest note instead of the lowest one, and drag left.
- Anyone who’s been following this blog knows I’m a fan of 12-string guitars and Nashville tuning. So, copy your strum, move it up an octave, and offset it slightly late compared to the original strum (see fig. 4, which once again takes advantage of the Extend to Note End function so that all the notes end at the same time).
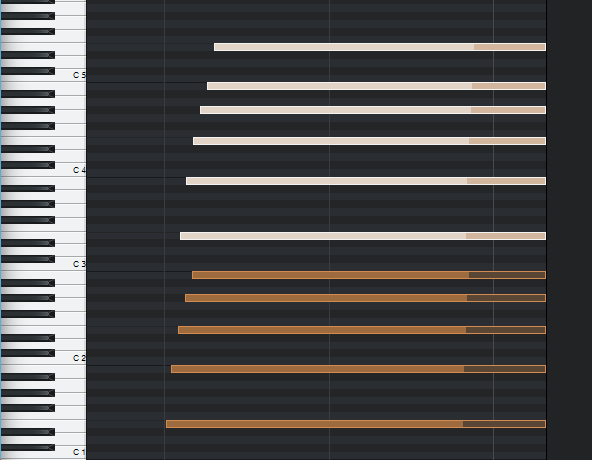
Figure 4: Octave strums have a different character when you offset the higher-octave notes.
Finally, it gets even better when you combine these techniques. For example, in fig. 4, you could strum the octave notes from outside in, and the lower notes from the inside out…or make one a downstroke, and one an upstroke.
Are we having fun yet?
“Melodify” Your Beats
 Wouldn’t it be cool to add a harmonic element to beats? Well, thanks to Harmonic Editing and a little pink noise, you can. The goal is to have your beat or drum loop follow a chord progression, embed the percussive qualities into the chords, and then mix the desired blend of beats and chords. First, you need to do a little prep work:
- Create a chord progression in your Chord Track.
- Add a track with a drum loop or drum part.
- Add a pink noise track.
How to Create a Pink Noise Track
- Insert the Tone Generator effect in a track.
- Set waveform to pink noise, level to -6.00, and then turn on the Tone Generator (fig. 1).
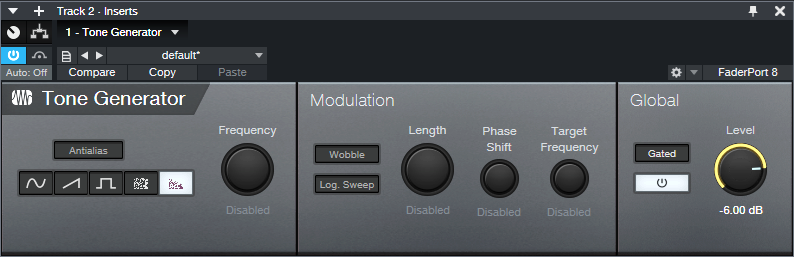
Figure 1: Tone Generator settings to generate pink noise.
- Create an Event that lasts as long as where you want noise, by dragging the pencil across the pink noise track.
- Select the track in the track header, and choose Transform to Rendered Audio. Now you have a track of pink noise.
- Open the Noise Track’s Inspector, and for Follow Chords, choose Universal (fig. 2). The Tune Mode doesn’t matter.
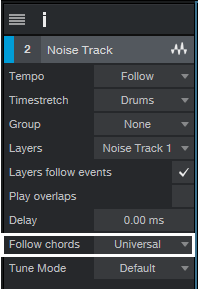
Figure 2: Choose Universal for the Follow chords mode.
Next, let’s have fun by blending the chords generated by the pink noise (from the Harmonic Editing) with the drums. Here are some examples.
Gate the Chords
Insert a Gate in the pink noise track. Send a sidechain from the drum track to the Gate. Adjust the Gate parameters so it triggers in sync with the drums (fig. 3).
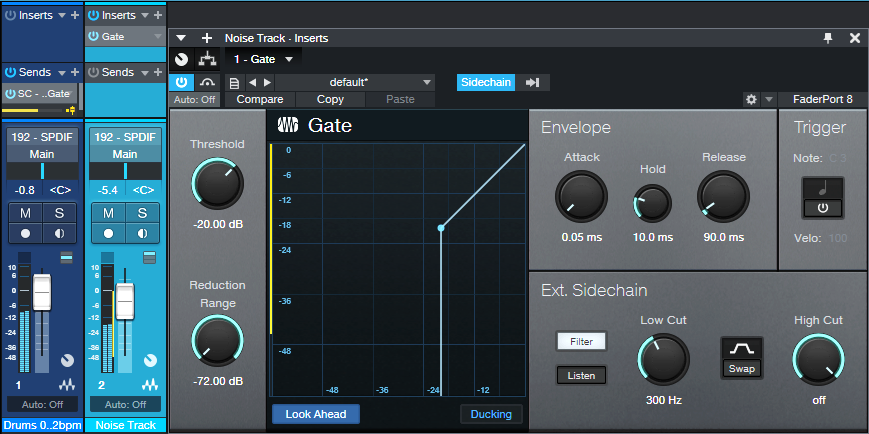
Figure 3: Typical Gate settings for opening and closing the Gate in sync with the drums. Make sure Ducking is not enabled. Also, I EQ’ed the sidechain to inhibit the kick from triggering the gate, so that the noise track followed only the higher-frequency percussion.
Here’s what it sounds like—fun stuff!
Automating the Gate parameters can be useful, too (especially Release and Threshold).
X-Trem the Chords
This sound inserts two X-Trems (fig. 4) in series in the pink noise track, and syncs them to tempo.
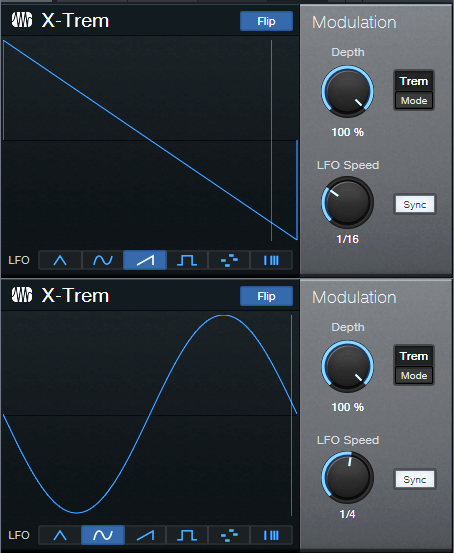
Figure 4: Settings for the two X-Trems.
And here’s what they do to the beat…it sounds very reggae.
This is another application where automation can add a lot of variety—particularly by varying the LFO Speed parameter in the second X-Trem.
X-Trem + AutoFilter the Chords
Now try replacing the second X-Trem with an AutoFilter, set as follows (fig. 5).

Figure 5: AutoFilter settings used in the audio example.
This audio example plays only the chord part, and doesn’t mix in the drums. You can introduce a lot of mileage in a song by varying the mix of drums only, chords only, and drum+chords.
Have fun!