Parallel? Narrow? Bass? Say What?!?
It’s probably obvious that I love the Chords track. It’s so useful that if you haven’t made friends with it yet, look over the Reference Manual…then take it out for lunch. Meanwhile, here’s a way to have it create a rhythmic keyboard part—with very little effort.
One of the Chords track’s (many) talents is generating a chord chart from your playing. Play an acoustic instrument like guitar (yes, chords are allowed) or a MIDI instrument like Presence, then drag the audio or MIDI data up to the Chords track. It automagically maps out your chord progression.
Tip: Quantize the part before you drag it up, so that chord changes happen on the beat where they’re supposed to change. Or quantize the Chords track after it’s extracted, so that the chord changes line up on the beat.
Once the Chords track extracts the progression, any subsequent audio or MIDI parts you record can follow the chord progression. Audio has more options than MIDI, so for this blog post, we’ll just consider the MIDI aspect.
The keyboard overdub shown in fig. 1 is not following the chord track that was extracted from guitar. Actually, all it’s doing is playing the same chord with different rhythms. But we’ll fix this.
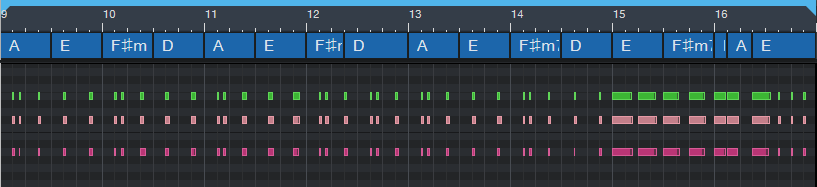
It sounds as useless as it looks—and to prove it, check out the following audio example. I’ve left the guitar, bass, and drums in for context. The keyboard part is panned right, and mixed up fairly high so you can hear the part easily.
Tip #2: When using the Chords track as a songwriting partner, don’t be too concerned about the notes you play—the Chords track will fix them. Just nail the timing, and play in the general vicinity of the note range you want the final part to cover.
To have the MIDI notes follow the Chords track, click on the track, open the Inspector (F4), and from the Follow Chords drop-down menu, choose Narrow. This moves the notes to the nearest note that conforms to the chord specified in the Chords track (fig. 2). Looks a lot better, doesn’t it?
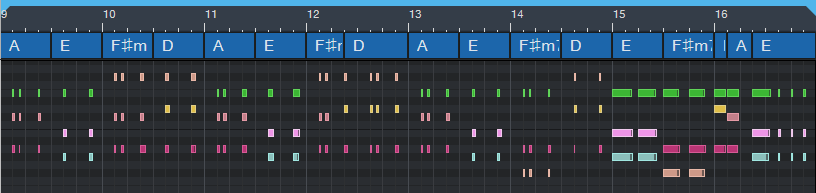
And it sounds a lot better, too, as you’ll hear in the next audio example.
The Parallel option shifts the notes in parallel, so that a chord’s root notes line up with the root note of the chord in the Chords track. This typically creates voicings that cover a wider pitch range, which may or may not be what you want. However, occasionally this will transpose some notes so they’re not in the right key. If so, you’ll need to do a little manual editing. Here’s what Parallel mode created (fig. 3).
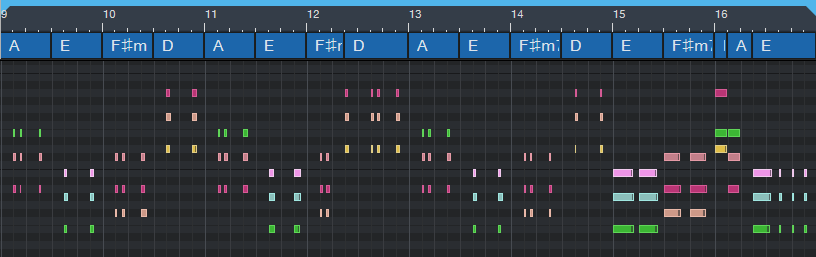
And here’s what it sounds like.
Following the chord track in Bass mode isn’t relevant here, because it just aligns the chord’s lower note with the Chords track chord—the end result is the same as choosing Parallel, which definitely doesn’t generate a fun bass line. But as described previously in the blog post Studio One’s Session Bass Player, combining the Chords track with the Fill Notes option can create some pretty amazing bass parts.
Oh, and if someone wants to spoil the fun and say you’re “cheating,” remind them the only thing that matters about music is the emotional impact on the listeners—and if they like what they hear, they won’t care what you did to get there.