Category Archives: Friday Tip of the Week
Studio One’s Session Bass Player
Studio One includes multiple algorithmic composition tools, but I’m not sure how many users are aware of them. So, let’s look at the way some of these tools can help expedite the songwriting process.
I’ve always prioritized speed when songwriting, because inspiration can disappear quickly. But, I’ve also found that good guide tracks (e.g., cool drum loops instead of metronome clicks) increase the inspiration factor. The trick is to create good guide tracks, without getting distracted into editing a guide tack into a “part.”
A solid bass line helps drive a song, but when songwriting, I don’t want to take the time to grab a bass and do the necessary setup. The blog post Studio One’s Amazing Robot Bassist describes a simple way to create a bass part by hitting notes on the right rhythm, and then conforming them to the Chord track. This week’s tip builds on that concept to let Studio One’s session bass player get way more creative, and generate parts even more quickly.
Fig. 1 shows a chorus being written. The process started with a rhythm guitar part (track 3), which I dragged up to the Chord track so it could parse the chord changes. I made a few changes to the Chord Track, then dragged it into a piano instrument track. This deposited MIDI notes for the chords, so now the piano played the chord progression. I then had the guitar follow the new Chord track, and the guitar and piano played together. Next up was adding a drum loop.
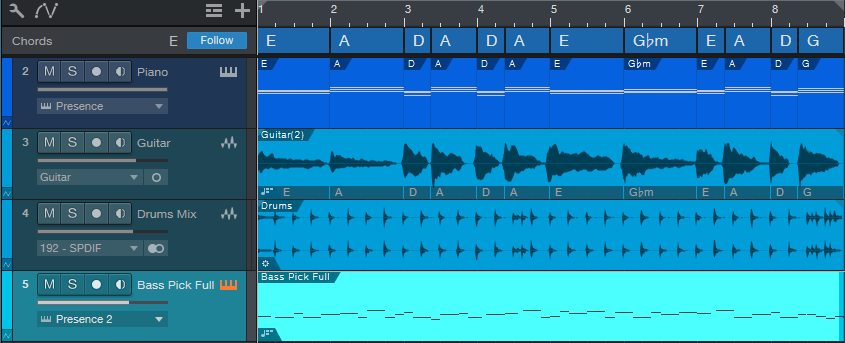
Figure 1: Studio One is set up for songwriting, and has just generated a bass part.
As to the bass part, there are three elements to having Studio One create a bass part.
1: Fill With Notes
After selecting the bass’s blank Note Event, open the Edit Menu and choose Action > Fill with Notes. You’ll want to customize the settings for best results (fig. 2).
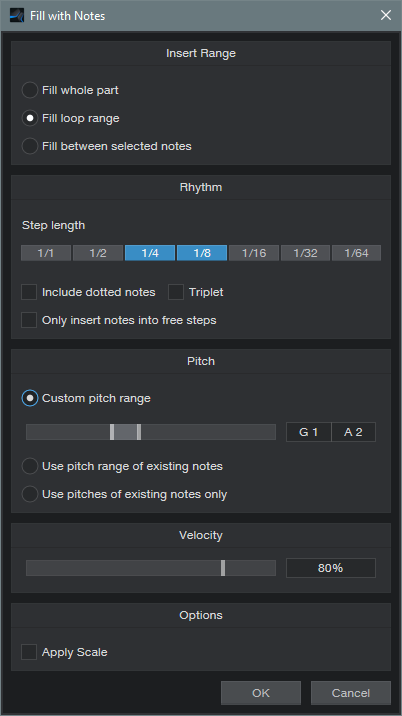
Figure 2: Studio One’s session bass player is thinking about what to play.
For example, choose a bass-friendly pitch range. For this song, I also wanted a fairly bouncy part, so the rhythm is made up of 1/4 and 1/8 notes. You might also want some half-notes in there. Click on OK, and you have a part.
Every time you invoke Fill with Notes, the notes will be different. If you don’t like the results, delete the notes, and try again. But don’t agonize over this—all you really want is notes with a rhythm you like, because the Chord Track and Scale will take care of the pitches.
Also note that if you don’t like the notes in, for example, the second half but like the first half, no problem. Delete the notes in the second half, set the loop to the second half, and try again.
2: Chord Track
Now have the part follow the Chord Track. Your follow options are Parallel, Narrow, and Bass. I usually prefer Narrow over Bass, but try them both. Now the notes follow the chord progression.
3: Choose and Apply Scale
This may not be necessary, but if the part is too busy pitch-wise, specify the scale note and choose Major or Minor Triad. Then, choose Action > Apply Scale. Now all the notes will be moved to the first, third, or fifth. Of course, you can also experiment with other scales—but remember, the object is to get an acceptable bass part down fast, so you can move on to songwriting.
Fig. 3 shows a bass part that Studio One’s session bass player “played.” This was on the second try.
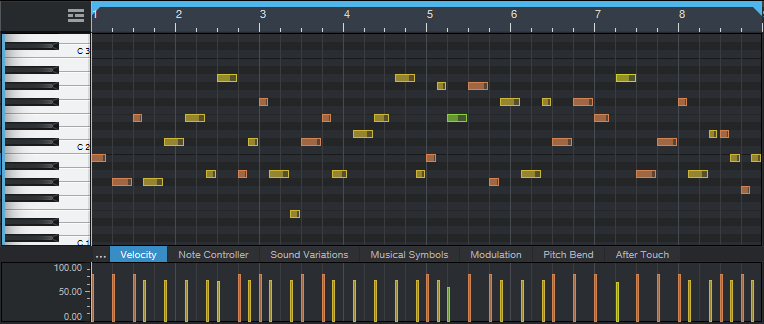
Figure 3: The session bass player came up with a pretty cool part. I applied Humanize to the velocities so it didn’t sound too repetitive.
Finally, let’s hear the results. The vitally important point to remember is that all this was created, start to finish, in under four minutes (which included tuning and plugging in the guitar). The end result was some decent guide tracks, so I could start work on the ever-crucial vocal lead line and lyrics. Thank you, session bass player!
Percussion in Motion

I’m a fan of hand percussion. Tambourines, cowbells, claves, guiros…you name it. But mixing it just right is always tricky. When mixed too high, the percussion becomes a distraction. Too low, and it might as well not be there. The object is to find the sweet spot between those extremes.
My solution is simple: use X-Trem’s Autopan function to give motion to percussion. The following audio example has cowbell (no jokes, please) and tambourine. The cowbell keeps a rock-solid hit on quarter notes, and is panned to an equally rock-solid center. But the tambourine is a different story. I’ve mixed both of them higher than normal, so you can clearly hear how they interact.
In the first half, both the tambourine and cowbell are panned to center. After a brief gap, the section repeats, with X-Trem moving the tambourine back and forth in the stereo field. In a real mix, both percussion parts would be mixed lower, so the tambourine’s motion would be something you sensed rather than heard. The end result is a feeling of more motion with the percussion, because the tambourine’s wanderings keep it from becoming repetitive.
X-Trem Setup
First things first: the track must be stereo. If you recorded it in mono, set the Channel Mode to stereo, select the clip, and type ctrl+B to bounce the clip to itself. This converts it to stereo.
I prefer not to have a regular, detectable panning change. A random LFO waveform would be ideal, but the X-Trem’s 16 Steps waveform is equally good. Slower pan rates are better, because you don’t want the pan position to change so fast that a percussion hit pans while it’s still sustaining or playing. I’d recommend 2 beats (changes every 1/8th note, as in the audio example) or every 4 beats for slower tempos or percussion that sustains.
Draw a pattern that’s as close as possible to seeming random (fig. 1). This prevents the panning from becoming repetitive.
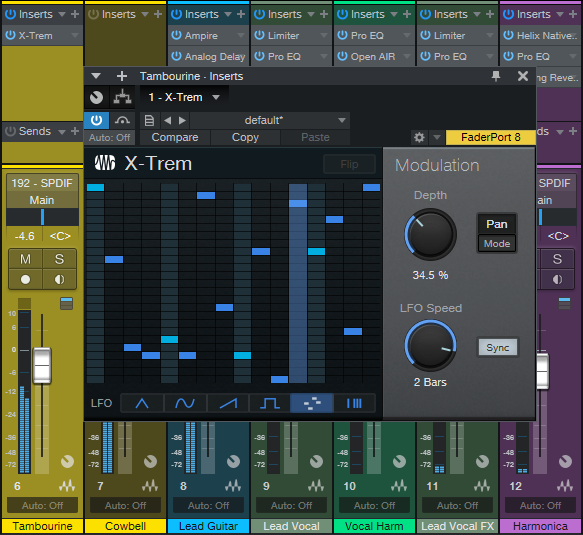
Figure 1: The 16 Steps option lets you create a custom LFO waveform.
Placement
If you want the panning to move around the center, fine—pan the track to center, and you’re done. But if you want the panning to move (for example) between hard left and center, remember that the pan control becomes a balance control in stereo. So if X-Trem pans the audio more toward the right, it will become quieter. To get around this, pan the channel to center, but follow the X-Trem with a Dual Pan that sets the actual panning range. Fig. 2 shows settings for panning between the left and center, while maintaining a constant level.
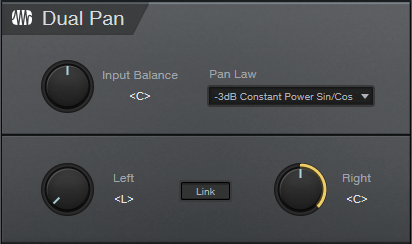
Figure 2: Dual Pan settings for varying the auto-panned position between the left and center.
As to the amount of X-Trem modulation depth…it depends. If you’ve been to my seminars where I talk about “the feel factor” with drum parts, you may recall that I like to keep the kick right on the beat, and change timings around it. A similar concept holds true with panning percussion. In the audio example, the cowbell is the anchor, and the tambourine dances around it. If both are moving, the parts can become a distraction rather than an enhancement.
Now you know how to make your percussion parts tickle the listener’s ears just a little bit more…and given the audio example, I’m proud of all of you for not stooping to a “more cowbell” joke!
Sneaky Mastering Page Tip
For this tip to make sense, I need to be upfront about two personal biases.
Personal bias #1: Drums should sound percussive. I can’t remember the last time I used compression on drums (although limiting or saturation is helpful to shave off extreme peaks).
Personal bias #2: I avoid using bus processors. The mix has to sound great without any bus processors, so the mastering process can take the mix to the next level.
Why I have these biases would take up a whole other tip. Besides, if your music sounds great with bus processors and compressed drums, then by all means—keep using bus processors, and compress your drums!
But There’s a Problem: “Super Peaks”
As a result of my biases, I send mixes with a wide dynamic range to the Mastering page, because that’s where I can control the precise amount of dynamic range processing in context with other related pieces of music. But, not restricting dynamics means that from time to time, there are “super peaks”—for example, if the kick, snare, cymbal, keyboard stabs, and a guitar power chord all hit at the same time (fig. 1).
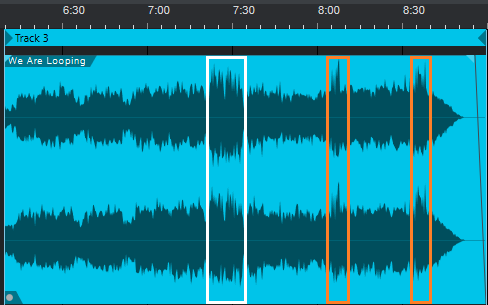
Figure 1: The super peaks are outlined in orange. Lower peaks are outlined in white.
These super peaks go way higher than most peaks, so if you normalize, the super peaks prevent any significant peak level increase. Using limiting or compression on the track works, but alters the percussive character. Of course, the beauty of the Song/Mastering page synergy is that you can tweak the mix in the Song page, and the Mastering page will reflect the results. However, with super peaks that combine multiple instrument sounds occurring simultaneously, tracking down which tracks to reduce, and by how much, gets complicated—especially if you have to deal with a dozen or so super peaks.
The Gain Envelope is the perfect tool for dealing with super peaks. You can bring down the peak and the area immediately adjacent to it, without neutering the percussive waveform (fig. 2). The Gain Envelope just lowers the peak’s level a bit—it doesn’t flatten the peak.
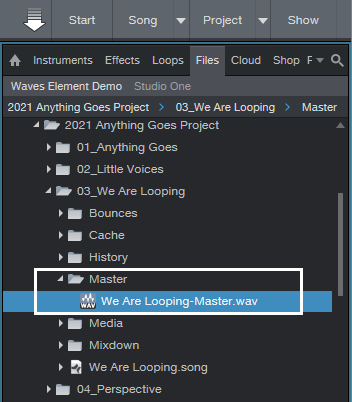
Figure 2: The super peak on the left has been lowered by -3 dB on the right.
Although the Mastering page doesn’t have Gain Envelopes, there’s still a way to apply that Song page advantage to the Mastering page. Usually, audio goes from the Song page to the Mastering page. In this case, we’ll do the reverse.
- Create a new Song.
- Open the Browser, and unfold the Project’s folder. Then, unfold the Song with the file that needs editing, and open the Song’s Master folder to expose the file used by the Mastering page (fig. 3).

Figure 3: Locate the Master file. Note the -Master.wav suffix.
- Drag the Master file into the new Song, and start editing.
- Use the Gain envelope to bring down the super peaks. While the file is open, you can make any other needed changes (e.g., increasing the level slightly at the beginning to pull listeners into the music).
- After making your changes, rename the existing Master file to something like “Song-Master Old.wav.” Then, drag the edited file from the Song into the Master folder, and rename it with the original name, like “Song-Master.wav.” Now your project will think the modified file is the Master file (fig. 4). Once it checks out as okay, you can delete the old Master file.
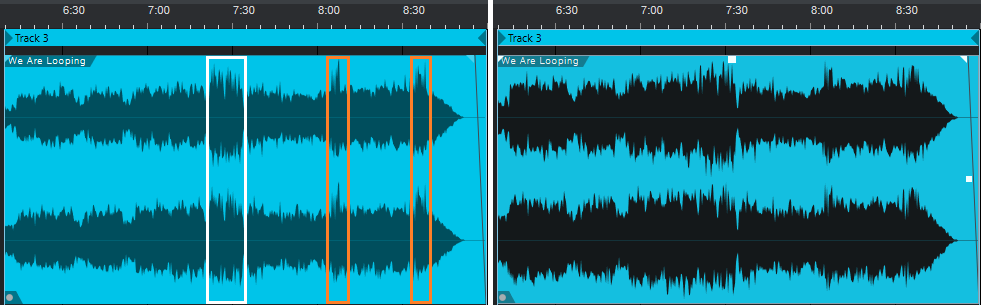
Figure 4: The original file is on the left. The version on the right had the super peaks reduced, and was then re-normalized.
Mission accomplished! Both files in fig. 4 were normalized, but compare the file on the right—it’s more consistent and louder, yet the dynamics remain intact. It was necessary to change only the levels of ten super-peaks by about -3 dB. I also brought up the level in the beginning section, to make a stronger entrance after the end of the previous song. The end result was about a +2.0 LUFS increase.
So there you have it: you can win the loudness wars—but with a bloodless coup that doesn’t squash your audio.
Shimmer Reverb
As reverb transitions from being simply a way to emulate an acoustic space to an effect in its own right, new reverb designs are becoming more popular. One of these is “shimmer” reverb, which uses pitch shifting before the reverb to add high-frequency content. Some of these recirculate the pitch-shifted output back to the input; although this implementation doesn’t do that, it still gives a solid shimmer effect—check out the audio examples.
After hearing the examples, you’ll probably want to download the multipreset included for Pro users. If you’re an Artist user and have the Ampire add-on, you can do this effect by using buses. Fig. 1 shows the Shimmer Reverb’s block diagram.
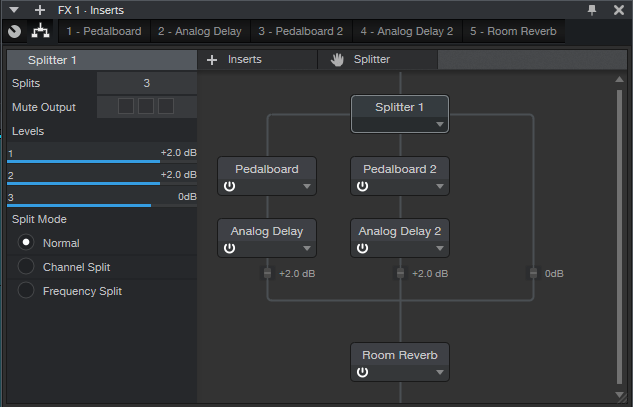
Figure 1: Shimmer Reverb FX Chain.
The Splitter has three splits. Two go to a Pedalboard with a Pitch Shifter module, set for an octave higher shift (fig. 2). The third provides a dry signal.
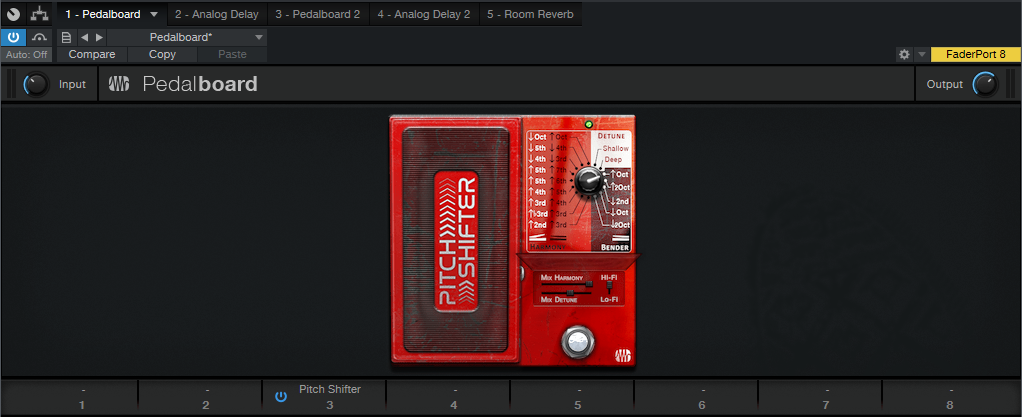
Figure 2: Pitch Shifter settings.
Because the fidelity drops off with extreme transposition, having two Pitch Shifters in parallel gives a smoother sound. Note that Mix Harmony is set full up, and Harmony Detune is up halfway. Feel free to experiment with the Detune parameter.
To smooth the sound further, an Analog Delay (fig. 3) follows each Pitch Shifter. They have identical settings, except that one is set for 31 ms of delay, and the other for 23 ms.
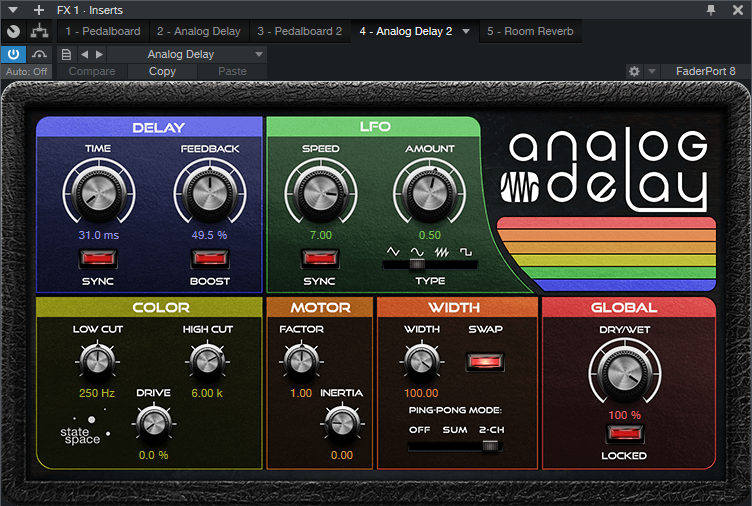
Figure 3: Analog Delay settings.
You’ll need to set the wet/dry balance in the FX Chain itself, using the level sliders for the three splits. Or, eliminate the dry split, and use this only as a bus or FX Channel effect.
And that’s all there is to shimmering your sound. Happy ambiance!
Download the Shimmer Reverb multipreset here.
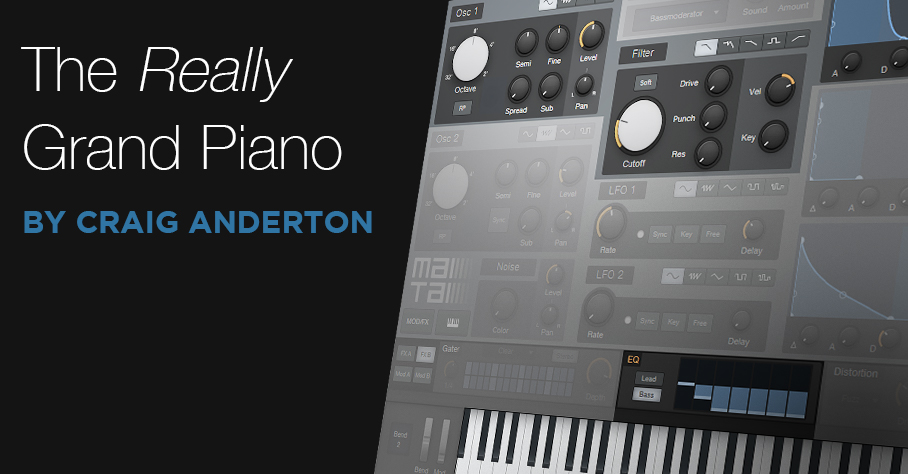
The Really Grand Piano
Having worked on several classical and piano-oriented sessions, I’ve had the opportunity to hear gorgeous grand pianos in their native habitat. But it spoiled me. When I had to use sampled pianos in other types of productions, it always seemed something was missing.
This tip puts some of the low-end mojo back into sampled pianos. Sure, it’s done with smoke and mirrors, not by having wood interact with a room—but check out the audio example at the end, and you’ll hear what Beethoven has to say about it.
How It Works
The bass enhancement occurs by mixing a sine wave behind the main piano sound, but only in the lower octaves, and very subtly. This adds bass reinforcement that you won’t find in samples.
Set up a Multi-Instrument (sorry Artist users, this is a Pro version-only feature) that combines the piano of your choice, like the Presence Acoustic Full, and Mai Tai (fig. 1).
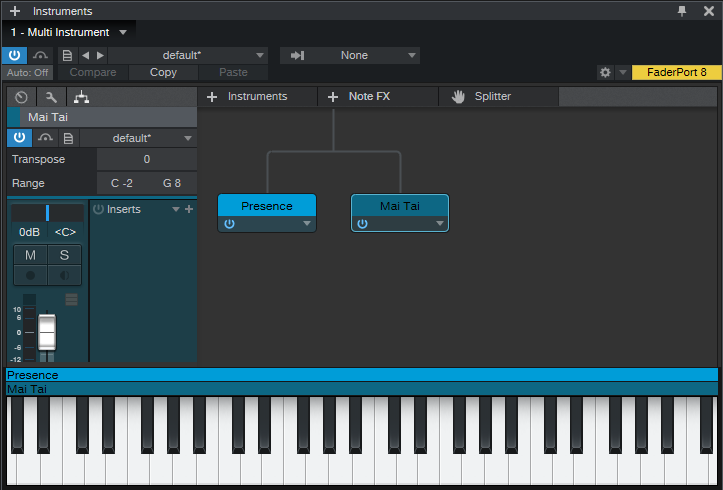
Figure 1: Multi-Instrument setup for grand piano reinforcement.
For Mai Tai, you want the simplest sound possible—one sine wave oscillator, no modulation except for an amplitude envelope, no random phase, and no effects other than EQ. By turning the Filter cutoff down to around 100 Hz or so, turning Key tracking all the way down, and using the EQ (in the bass range) to take out all the highs, we now have the sine wave tracking your playing on only the lowest notes (fig. 2).
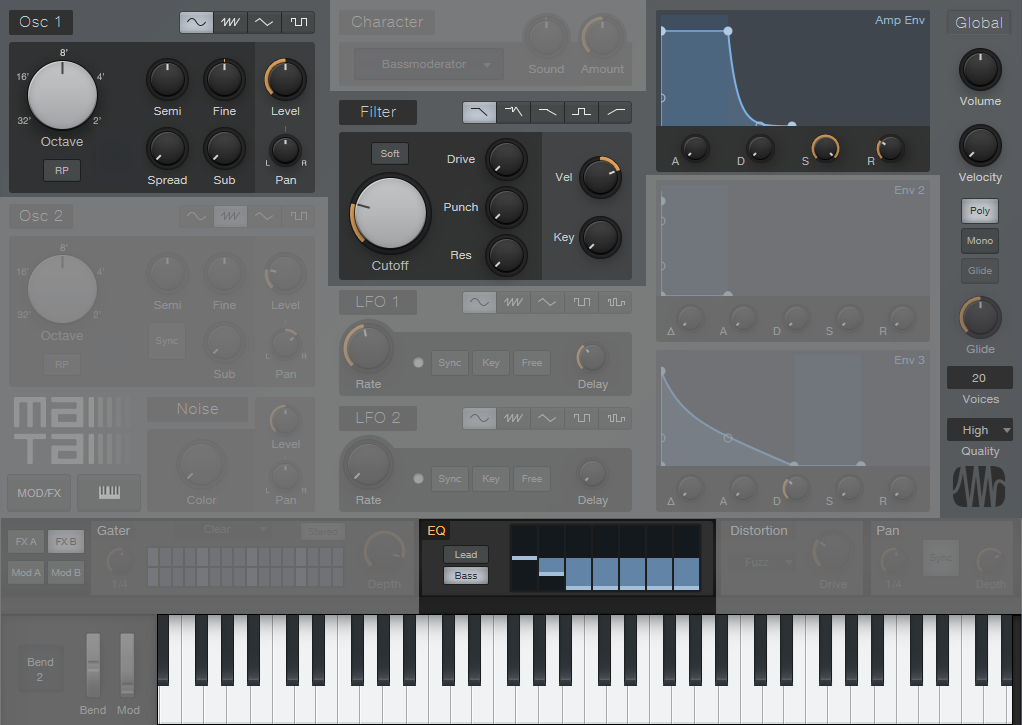
Figure 2: Mai Tai sine wave reinforcement preset. Sections that aren’t used are grayed out.
Tweaking
The Mai Tai’s level setting is crucial. You want an almost subliminal effect—something you don’t notice unless you mute the Mai Tai. Check out this audio example, but note that I’ve mixed the Mai Tai up higher than I normally would, so you can hear what the sine wave adds to the piano sound. Also note that even with the extra emphasis on the lower octaves, you can’t hear an added sine wave on the higher notes. This is important for a realistic sound.
Finally, although I’ve emphasized using this with piano, the same technique can add a commanding low end to other sampled instruments, like acoustic guitar—yes, you can change your parlor guitar’s body into a jumbo—no woodworking required!
Attack Delay—Done Right!

The Attack Delay effect, used primarily with guitar, fades in a note or chord over the initial attack to give a more pad-like sound. The effect feeds audio into a gate with an attack time, and triggers the gate when a note or chord hits.
However, you need a brief silence between notes or chords (I prefer using this with chords), so the gate can reset prior to initiating the next attack. It’s kind of annoying to have to modify your playing style to accommodate this pause. Also, if the gate threshold is too high, you won’t hear any note—and if it’s too low, you might lose the attack effect. Attack Delay stompboxes can be iffy, which may be one reason why you don’t see one on every pedalboard.
Nonetheless, this can be a beautiful effect when done right…and as the audio example shows, Studio One can do it right.
Attack Delay Setup
The key is to insert the Gate in the track you want to process, but not trigger the Gate from that track. Instead, you create a copy of the original track, and optimize it for triggering the Gate. The copy then controls the Gate through its sidechain (you don’t listen to the copied track).
(Optionally, before setting this up, consider compressing or limiting the original guitar track so that it has a longer sustain. You don’t want the guitar to fade too much before the attack fades in.)
Fig. 1 shows the mixer setup. The GtrPadTrig track’s pre-fader send goes to the Gate’s sidechain. Turn down this track’s channel fader, because we don’t want to hear the copied track. The guitar track in the audio example inserts Ampire before the Gate, and reverb after the Gate. The reverb adds an ethereal quality as the guitar fades into the chord.
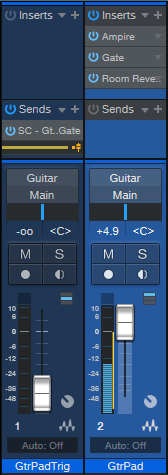
Figure 1: Mixer setup.
Next, prep the control track in the Edit window. Open the Audio Bend panel (to the right of the speaker icon in the Edit window toolbar), right-click on the Event, and choose Detect Transients. If necessary, adjust the Bend Marker Threshold (or remove and add Bend Markers) so that Bend Markers appear only at the beginning of chords or notes (fig. 2).
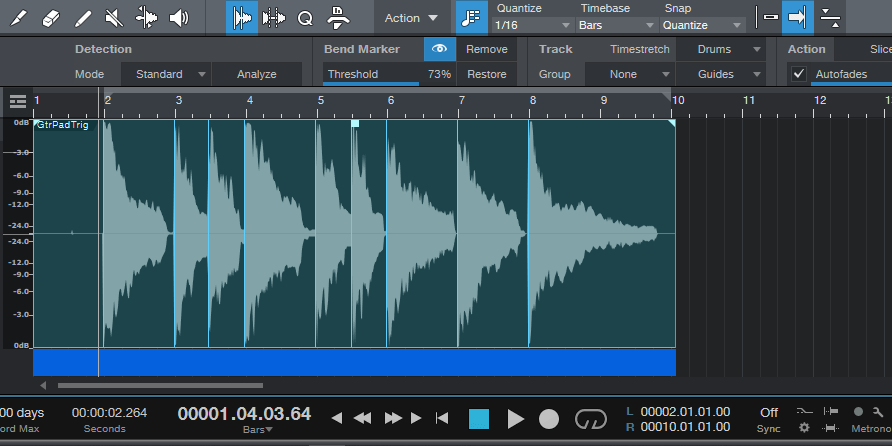
Figure 2: The beginning of each chord has a Bend Marker. This shows the waveform prior to splitting.
Mind the Gap
Right-click on the Event, and choose Split at Bend Markers. All the Events will be separate and selected. Click on the right edge of any Event, and drag to the left. Because all the Events are selected, this opens up a gap before all the chord attacks (fig. 3).

Figure 3: The control track is on the top, and the audio we listen to below it.
Now start playback, and adjust the Gate parameters. This is a little tricky at first, because you want the Threshold set so that triggers coming in from the sidechain open the Gate, coupled with a Release time that’s short enough so that the Gate doesn’t shut off immediately. I usually leave about a 100 ms gap between chord attacks, and set the Gate release time to 60 ms. Your mileage may vary.
If the triggering isn’t reliable, adjust the Threshold, gap length, or Release. To edit the gap, select all the events and vary the right edge of one of them—they’ll all move together. Sometimes, there might be one obstinate note that doesn’t trigger correctly, in which case you can select only the Event before it, and vary its gap for reliable triggering with the next chord.
Yes, this takes a little effort to set up, but it’s cool. Besides, there’s nothing wrong with exploring an effect that remains somewhat rare, because it’s hard to get right—fortunately, Studio One can get it right.
Drum Replacement with Melodyne

The problem: I was using one of Chris McHugh’s acoustic drum loops from the (sadly, no longer available) Discrete Drums sample library. However, it had been recorded at a slower tempo, and when sped up, it was a bit too “busy” in places.
The solution: Drum Replacement with Studio One, Pro EQ, Gate, and Melodyne, so I could edit Note data into the part I wanted.
Getting Started: Step by Step
- Copy the drum loop to a new track, because we’ll want to re-visit the original one for each drum. We’ll start by replacing the kick.
- Use the Pro EQ as an Event effect to dial in the kick drum’s fundamental (fig. 1.) Combine a steep high cut with a low-frequency boost at the kick’s main frequency to isolate the kick from the rest of the track. Note that the sound doesn’t matter, you just want readily identifiable peaks. However, do avoid distortion, so Melodyne can represent velocity well.
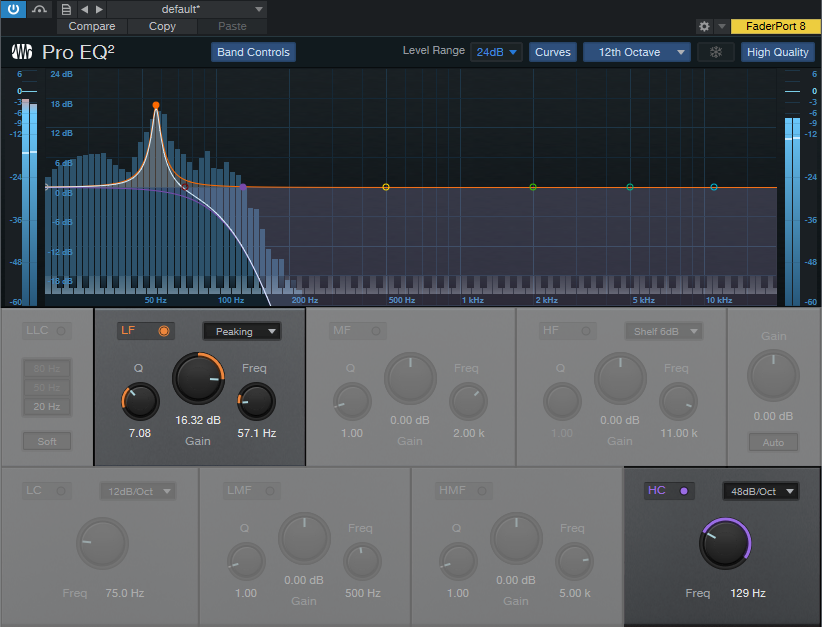
Figure 1: EQ settings to isolate the kick’s fundamental.
- Render the Event. This may leave some lower-level drum sounds or ambiance, so add a Gate, and set the Threshold to pick up only the kick drum’s peaks (fig. 2).
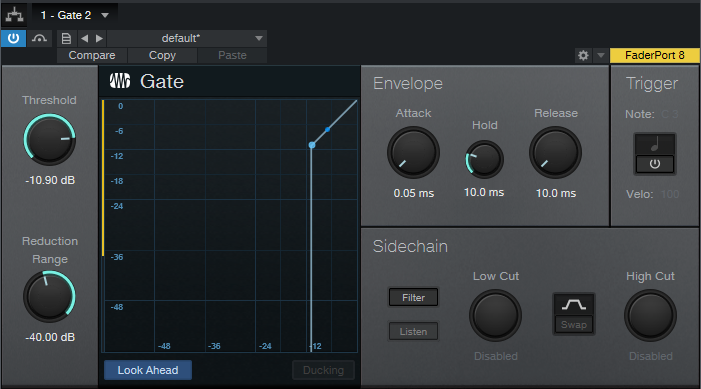
Figure 2: Gate settings to isolate the kick’s peaks.
- Render the Event again, select it, and choose Edit with Melodyne. Now the kick part looks like fig. 3.
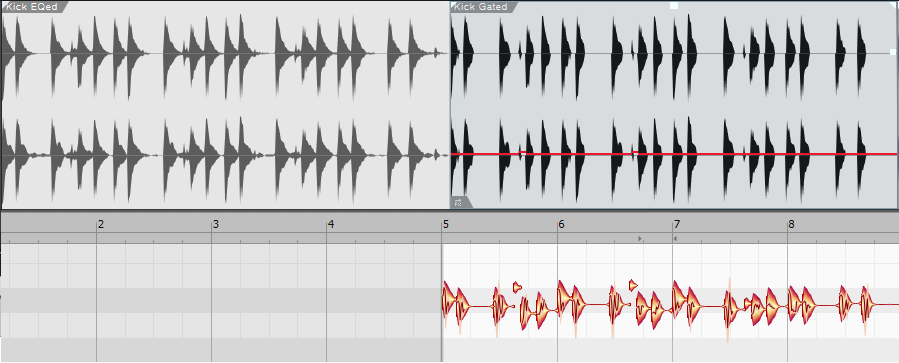
Figure 3: The Event on the left is the drum loop after EQing the kick. The Event on the right is the same one after gating. The lower blobs are the result of choosing Edit with Melodyne.
- Drag the Event track into an instrument track, and now you have note data for the kick.
Prepping the Note Data
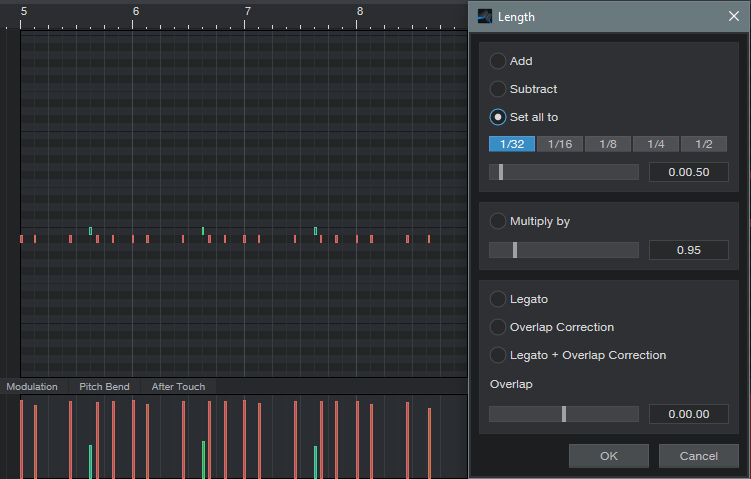
The note data length will vary. To tidy up the part, set all the drums to 16th or 32nd notes with Action > Length (fig. 4).
Note that Melodyne picked up on some low-velocity kick hits too (pretty cool). You could assign these to a different sample of a kick hit softly. Fortunately, the Discrete Drums library includes samples of the individual drums. So, I could load the samples into Impact XT, and this way the sound would work with other loops from the same collection. Since the drums are multi-sampled at different velocities, I selected all the notes, and used Studio One’s Transpose function to set them to the same pitch as the kick samples.
Hi-hat was the most difficult to convert to Note data, because snare hits can produce transients that extend into the hi-hat range. A 48 dB/octave low-cut combined with a major high-frequency peak did a decent job of isolating the hi-hat, but the frequency was extremely high and Melodyne wasn’t too happy about that. Transposing the Event down an octave or so before applying the gate made the hits more Melodyne-friendly.
Clean Up
I was taken aback at how well this technique was able to translate the acoustic drum loop into Note data. The best aspects were that it preserved the human timing of a real drummer, and Melodyne did a good job of preserving the dynamics. The only needed fix was removing a few notes caused by loud snare hits that came through on the hi-hat track, and of course, editing the data to create the part I wanted—done!
Stereo Cabs in a Single Ampire

Ampire has a User cab that can load impulse responses. You knew that, right? What you may not know is that you can load stereo cab impulses, and they magically make the User cab stereo. If you’re thinking “but creating impulses is such a hassle,” it’s not—let’s get started.
How It Works: Overview
Start by downloading the 44.1, 48, and 96 kHz stereo impulses. These are 1-sample spikes, so if you listen to them, don’t expect a thrilling audio experience. To create the impulse response, load a stereo impulse into an audio track, but no other audio—just the impulse. Send the audio to two cabs, set up in stereo (e.g., using two FX Channels, panned as desired). Don’t include any amps or effects—only the cabs. Bounce or otherwise mix/export the result. This is the stereo impulse response.
Step-by-Step Instructions
For the sake of example, we’ll assume you want a 4×12 M65 and a 2×12 VC 30 as your stereo cabs, but you can use any cabs you want, including cabs from other amp sims. Referring to fig. 1, this setup works for Artist or Pro.

Figure 1: Setup for creating a stereo impulse response.
- Create a stereo audio track, and load the impulse that matches the song’s sample rate.
- Create two FX Channels.
- Insert an Ampire into each FX Channel. Make sure that amps and effects are bypassed.
- Choose the 4×12 M65 cab for one Ampire, and the 2×12 VC 30 for the other one.
- Create a pre-fader Send to each FX Channel from the Stereo Impulse track, so you can turn the Stereo Impulse track’s fader down.
- Pan the FX buses as desired to create a stereo image for the two cabs.
- All the faders and Send levels should be set to 0 (except for the Stereo Impulse track fader, which should be all the way down). Note that the Send levels default to -6.0, so set these to 0.
Create the Impulse
- Click on the Stereo Impulse, then type Shift+P to set the loop indicators to the impulse length.
- Select Song > Export Mixdown. Choose the appropriate options (fig. 2). 64-bit float works fine for this application. Also check Import to Track.

Figure 2: Export your Impulse Response so you can use it with Ampire.
- Click on OK. This creates a track with an Impulse Response that’s the same length as the original impulse, and imports the new Impulse Response to a Song track.
- Normalize the Impulse Response you just created to around -3 dB.
- Create a folder for your stereo impulse responses, open it in the Browser, and drag the normalized Impulse response into it. Your work is done.
Fun Time!
Create an audio track, load Ampire, plug in your guitar, and select an amp. Choose the User cab, and then click on the + symbol in the Mic A: field. Navigate to where you saved the impulse response, load it, and kick back with your cool stereo cab.
To get you started, the folder you downloaded with the impulse also has stereo Impulse Responses for the M65+VC30 and 4x10American+2x12Boutique stereo cabs. Try them with the new High Gain and Painapple amps…you’re gonna love ‘em.
“Automating” the Unautomatable

You can record most hands-on control changes as automation by using Control Link, which has always been one of my favorite Studio One features. However, not everything exposes its parameters to automation—so let’s explore track-to-track recording, and embed your hands-on control changes as audio.
How to Set It Up
With track-to-track recording, you record the output from a Source track into a Target track. Set the Target track’s input to the Source track (fig. 1). You’ll monitor the Source track, not the Target track. So, turn the Target track’s fader down (the input monitoring setting doesn’t matter). Select record mode for the Target track. Note that track-to-track recording is inherently a real-time process.
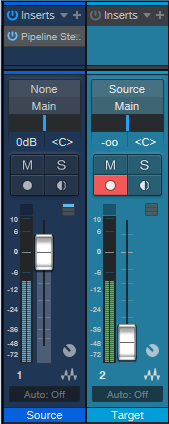
Figure 1: Setup for track-to-track recording.
Of course, you’re not limited to recording the output from another track—you can record any Output, Aux Track, or Bus (but not FX Channels). As to why this is useful, I’ve found four main applications.
Hands-on control for external hardware. Although you can automate some external hardware effects parameters with MIDI, that’s not always the case. Older effects, stompboxes, and analog hardware that was intended to be set-and-forget (e.g., tube preamps whose saturation you might want to vary over time) can’t be automated. Insert Pipeline in the Source track, set up Pipeline to bring the hardware’s ins and outs into the Source track, and then you can manipulate the effect’s controls while recording the results into the Target track. If you need to make changes, re-do the recording (although you may only need to punch a section).
Capture random effects processes. Several effects have randomized functions, so they never play back audio quite the same way twice. Recording audio from a Source track with this kind of effect inserted captures the resulting randomization. If you don’t like the results, try re-recording until you have something you prefer. Note that this can also record the output from an Instrument track that includes a randomizing insert effect.
Capture touchscreen control gestures. Studio One’s multitouch effects are very touch-friendly, and touchscreen gestures can connect with automation. But sometimes, it’s great having that palette of controls right in front of you, where you can change control settings on the fly while you get into the improvisational heat of the moment. When these effects are inserted in the Source track, you can record the audio caused by the real-time touchscreen changes into the Target track.
Accommodate what you can’t automate. This is a weird use case, but it’s another example of why track-to-track recording is useful. To compare the different cab sounds in the Line 6 Helix, I wanted to record an audio example of a guitar riff while I changed the amp sim cabs. But you can’t automate cab selection, and with 41 cabs, I didn’t want to have to stop, change the cab, and re-record the next example. So, I just looped the guitar riff, recorded into the Target track, and clicked on a different cab when I wanted to record it.
There are probably other applications I haven’t considered—so if you think of any, please mention them in the Comments section!
Melodyne Essential = Polyphonic MIDI Guitar

Many people think Melodyne Essential works only with monophonic tracks. That’s true for editing notes, but it can transform polyphonic guitar playing to MIDI note data. Granted, there’s a tradeoff: no pitch bend. But for laying down pads, power chords, and the like with electric guitar, then playing them back on virtual instruments—no problem.
- After recording your guitar part, select it and choose Edit with Melodyne (Ctrl + M). You’ll see the familiar blobs, but not chords—only single notes.
- Choose Polyphonic Decay for the Melodyne algorithm (fig. 1). Even though Essential is monophonic, you’ll be able to choose this option.
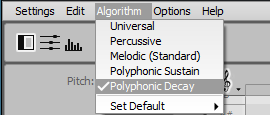
Figure 1: Choosing Polyphonic Decay is the key to transforming guitar parts into note data.
- You’ll see blobs that correspond to your chord notes, but they’ll be grayed out, because you can’t edit them. No worries.
- Create an Instrument track (Presence is always a fun choice) to play back your guitar part.
- Drag the audio that you processed with Melodyne into the instrument track, and you’ll see a polyphonic MIDI guitar part (fig. 2).
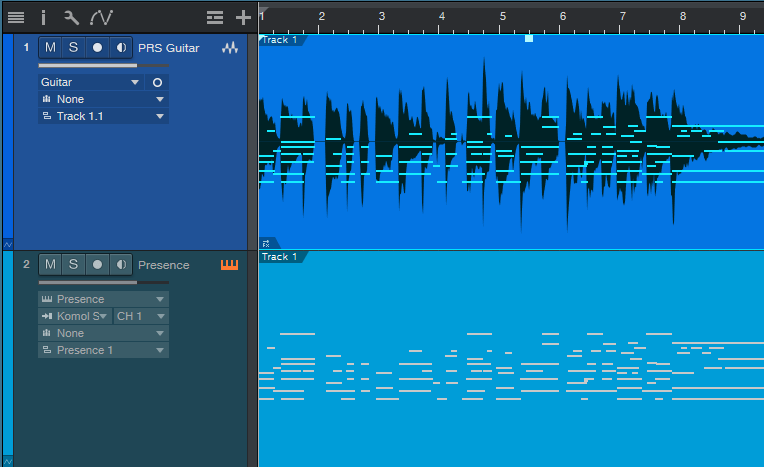
Figure 2: A polyphonic guitar part has been transformed into Note Data.
- Fig. 3 shows the unedited part. Translating guitar to MIDI is never perfect, and will almost always require some editing. Fortunately, Studio One can much of that for you, by automatically deleting notes with excessively low velocities and short durations.
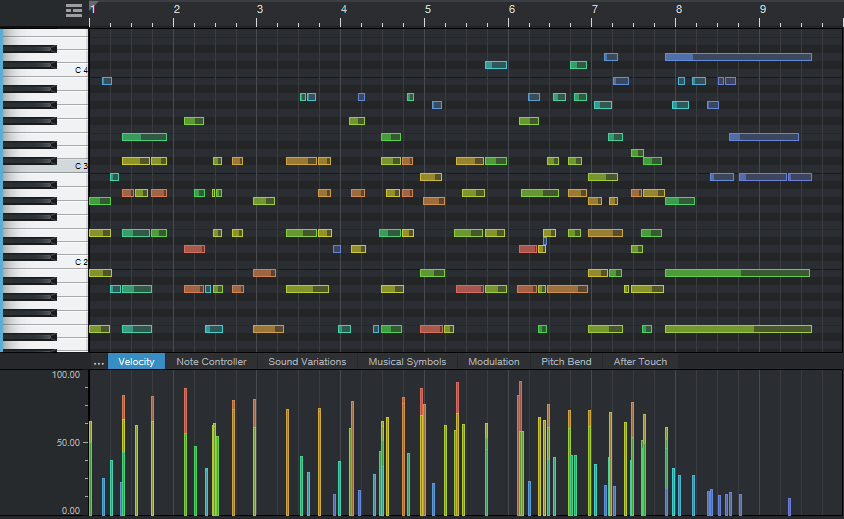
Figure 3: Check out all the low-velocity notes—they’re probably just glitches.
- Select all the notes, then choose Action > Select Notes. Choose Range, and select all notes with a velocity below 20% (fig. 4). Hit delete. If that doesn’t get rid of enough low-velocity notes, try again with a higher percentage (e.g., 30%).
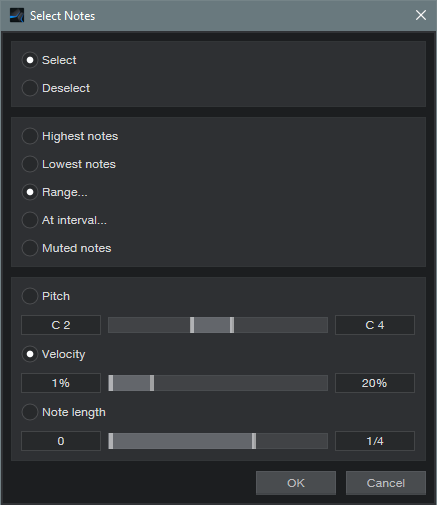
Figure 4: Initial settings to reduce low-velocity bogus notes.
- MIDI guitar may also produce “notes” that are more like short glitches. Go to Action > Delete Notes, and choose notes shorter than 0.0.1.50. If this doesn’t delete enough of the short notes, increase the duration (e.g., 0.0.1.80). Note that these two de-glitching processes would be good candidates for a Macro.
- Fig. 5 shows the results of applying the above processes in Studio One, and then doing about a minute’s worth of touch-up editing. (

Figure 5: The note data now looks ready for prime time.
Finally, let’s listen to the original guitar part, and the MIDI cello part it produced. Cool, eh?