Komplete Kontrol Integration, Part 3: Controlling Non-NKS Plug-Ins
Our prep work is in order: in part 1 we integrated the Komplete keyboard as a DAW navigation control surface, and in part 2, explored how to create general-purpose MIDI control surface templates. In the thrilling conclusion of this trilogy (soon to be a major motion picture!), we’ll now find out how to control non-NKS instruments and effects, running within Studio One, from the Komplete keyboard hardware control surface.
BUT FIRST: FOCUS VS. GLOBAL MAPPING
Because we’ll be mapping hardware controls to software parameters, it’s important to understand the difference between Studio One’s Focus and Global control mapping functions. When you program a controller in Global mode, it affects aspects common to all songs, like faders, pan, etc. In Focus mode, you program a controller for a specific instrument or effect. Focus mode has two wonderful attributes: You can program different settings on the same instrument or effect in the same project, and Studio One remembers this assignment for other songs. For example, I made a Komplete keyboard Mojito template so whenever I call up Mojito in any song or any instance in a single song, it has a hardware control surface.
To choose Focus mode (Fig. 1), click the gear button toward an instrument or effect’s upper right. From the drop-down menu to the right of the gear symbol, choose MIDI-OX (the MIDI utility we installed back in Part 1 of the series because it lets the Komplete keyboard talk to non-NKS plug-ins). You’ll also need to choose Focus mode for an instrument or effect when you want to use a previously created template.
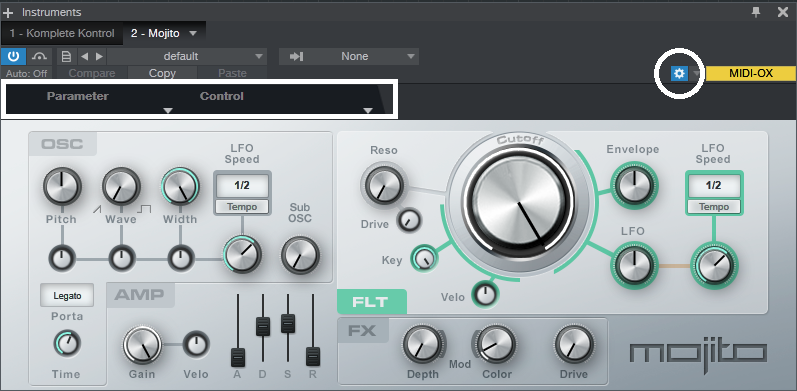
Figure 1: The Gear button (circled in white, upper right) opens the Focus mode Control Link functionality (outlined in white rectangle).
After entering Focus mapping mode, parameter and Control fields appear between the header and plug-in. This is where we do our hardware-control-to-parameter Control Link assignments. To complete a Control Link assignment, click on the arrow that points from a control to a parameter. This causes the arrow to flash yellow in Focus mode, or blue in Global mode.
Okay, let’s return to creating our control surface. To start with a clean slate, close MIDI-OX and Studio One if open, and turn off the Komplete Kontrol keyboard.
- Turn on the Komplete Kontrol keyboard. After it “boots,” open MIDI-OX, and verify that it shows the correct MIDI devices (see Fig. 1 in Part 2). Leave MIDI-OX open, although it can be minimized.
- Open the Komplete Kontrol stand-alone application. Click the application’s MIDI button in the upper-right corner, verify that you’ve chosen the desired template, and then click the MIDI button again to de-select the MIDI mode.
- Open Studio One, and Create a new song. Press the Komplete keyboard’s MIDI button so that it’s lit brightly (if it isn’t already).
- Click on Studio One’s Mix tab, and then on the External button toward the left. A column with External Devices appears.
- Click the MIDI-OX arrow under External Devices. Choose Setup, and verify that it’s sending to and receiving from the correct Komplete Kontrol ports, as described in Part 2 (Receive From = Komplete Kontrol -1, Send To = Komplete Kontrol Ext-1). Click OK.
- Now click on the MIDI-OX arrow again, and choose Edit. Click MIDI Learn, and prepare for an orgy of knob twiddling.
- Turn your attention to the Komplete Kontrol keyboard, whose MIDI button should be brightly lit. Choose the control surface’s Page 1 with the left/right arrow buttons (if it isn’t already selected; check the keyboard’s right display, in the lower right, to confirm that it shows 1/4).
- Turn all 8 keyboard knobs, below the display. Studio One’s External Devices window will sprout 8 controls. Widen the External Devices window so the 8 take up exactly one row, then choose page 2 with the keyboard’s right arrow button. Again, turn all 8 controls.
- Similarly, choose page 3 and turn all 8 controls, then page 4. You’re now populating the External Devices window with all the available controls.
- Similarly, do the same for the four pages of switches.
- Fig. 2 shows our masterpiece of total control. The Komplete keyboard’s controls, switches, and pages are now recognized as a control surface for Studio One.
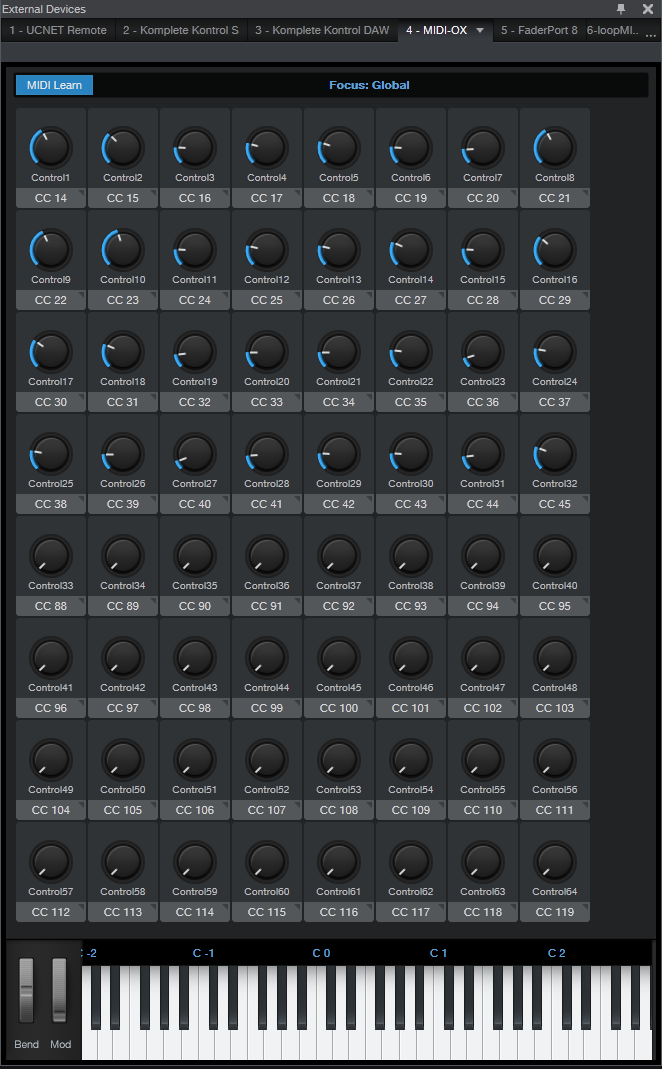
Figure 2: Studio One now recognizes the Komplete keyboard controls and switches as a control surface.
- While in MIDI Learn mode, you can change the control graphic to (for example) a switch instead of a knob. To do so, click on the arrow in the CC label below the knob, and choose the desired graphic.
- After setting up the control surface, turn off MIDI Learn (so you don’t brush up against a control and change something accidentally).
- We’ll use Mojito as an example. Bring Mojito into an Instrument track, and strategize what control layout would be best for each page. Fig. 3 shows what I chose; in the labels, the first number is the page, the second the physical control or switch.
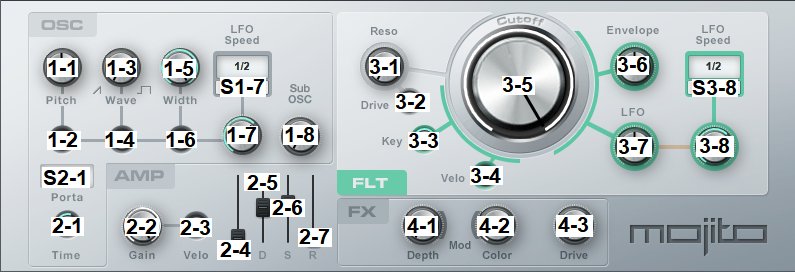
Figure 3. Komplete keyboard hardware assignments for Mojito.
- Next, use Control Link to link the control surface knobs with the Mojito parameters. With Mojito in Focus mode as described above, move Control 1 on the keyboard or the external devices page, click on (or move) the Mojito Pitch control, and then click on the Arrow between them. The arrow turns yellow to confirm the link. Proceed similarly through all the controls and switches until they’re all assigned. (It’s a little complicated with the LFO Speed, because when you switch between the two LFO Sync options, you would actually need two knobs – one to vary frequency, the other to vary beats. I figured I’d use beats 99% of the time, so I used the hardware to control the LFO when in beats mode. For frequency, you can use your mouse to move the knob, or program a couple of the spare knobs that will be available on page 4.)
- After programming your knobs, return to the Komplete Kontrol stand-alone app, click the MIDI button, and label the template’s knobs (Fig. 4). Now, when you choose the template, the knobs on the Komplete keyboard will show the parameters they affect. Done!
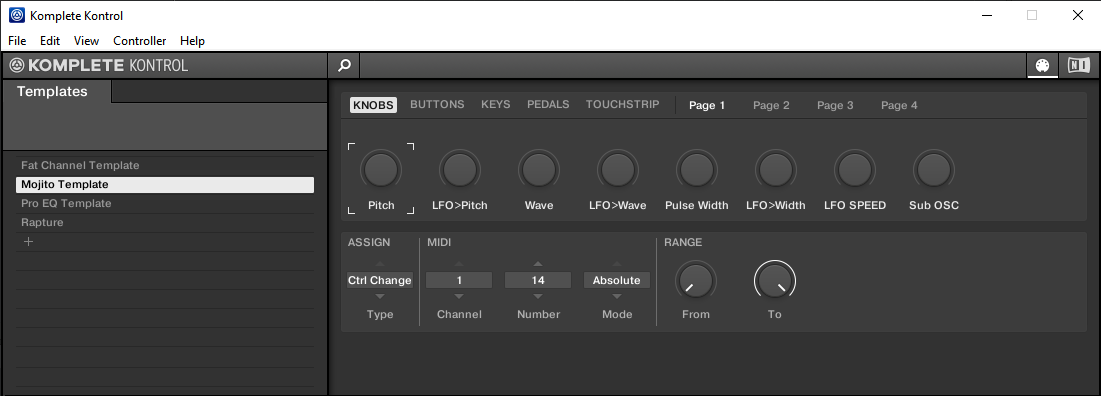
Figure 4: Labeling the template’s controls adds labels to the keyboard’s control surface.
After creating these templates, you won’t want to lose them—which you will if your hard drive crashes. Or maybe you’re going to do a re-install, or want your templates on a different computer. For more information, a helpful document on the NI web site tells where to find the Komplete Kontrol MK2 settings.dat file so you can copy it, or back it up.
NATIVE INSTRUMENTS/STUDIO ONE SYNERGY
If you have multiple templates and want to switch among them to control various instruments and effects while you work in a song, here’s the procedure.
- Make sure the stand-alone Komplete Kontrol application is open (a Komplete Kontrol instrument can be open at the same time in Studio One, there will be no conflicts).
- Enable the stand-alone Komplete Kontrol application’s MIDI button, choose the template, and then disable the MIDI button. (I usually minimize the Komplete Kontrol app after this, but it’s not necessary.)
- Open the instrument or track you want to tweak, and press the keyboard’s MIDI button to enable communication. The keyboard’s MIDI button must be shining brightly to control instruments or effects in Studio One.
You can switch between controlling an instrument loaded in Komplete Kontrol, and a Studio One instrument that uses the currently selected template. This is pretty much automatic; when you select a track with Komplete Kontrol, the PLUG-IN button toward the keyboard’s upper right lights. When you select a non-NKS track, the MIDI button lights. However, you do need to change templates if you switch to an instrument or effect that doesn’t use the currently selected template.
Note that when you want to use the Komplete keyboard as a hardware controller, or to test your programming, the stand-alone app’s MIDI button must be turned off. Then you can press the keyboard’s MIDI button to communicate with the instrument or effect.
GETTING CREATIVE WITH YOUR TEMPLATES
If you’re tweaking one parameter at a time, arguably just grabbing the mouse, clicking on a parameter, and dragging is easier. But where hardware control really comes into its own is being able to adjust multiple parameters at the same time, like varying filter gain and frequency, envelope parameters, or compressor controls that interact, like threshold and ratio.
Also note that knobs can control drop-down menus. For example, in the Pro EQ, you can choose the LC and HC slopes, or the LF and HF filter types, with knobs. Another trick is redundancy. With my Pro EQ template, the filter parameters are spread over different pages. However, the 7 active/bypass switches for the filter stages are available on every page. That way, no matter which filter stage I’m adjusting, it’s possible to bypass or enable any other stage for diagnostic or comparative purposes.
Yes, it takes a bit of effort to program templates for everything you might want to control. While this may seem arduous at first, you need to create a template only once (although of course you can edit it if needed). After a while it becomes second-nature to switch over to the Komplete Kontrol stand-alone application, choose the desired template, minimize Komplete Kontrol, and carry on tweaking parameters. And, a particularly outstanding feature is that you don’t need to switch templates when controlling the same plug-in. A good use case is adjusting EQ during the mixing process. Call up your Pro EQ template, and it can apply to whichever EQ you select.
So now we can use the Komplete keyboard’s control surface not only to tweak NKS-format plug-ins, but virtually any plug-ins from any manufacturer—it even works with prehistoric wrapped DX and DXi plug-ins. Pretty cool!