Tag Archives: Ampire
Grab Cab Impulses for Ampire from Any Amp Sim
By Craig Anderton
Some of my favorite guitar sounds involve using Ampire’s amp, bypassing its cab, and adding a cab from the Helix Native plugin. Others involve creating custom cabs using the Pro EQ, or putting two cabs in parallel and throwing one out of phase. But loading an additional amp sim or EQ, or setting up parallel routings, and then dialing in the right settings is a hassle. It also wastes CPU power. So, I was glad to find an alternative. Thanks to the mysterious IR Maker utility plugin, it’s easy to create IRs for Ampire’s User Cab from other amp sim cabs, equalization, and stacked parallel cabs.
Make sure you download the free IR—the download link and description are at the bottom.
Meet IR Maker
Here’s the overview:
- Choose a mono amp sim cab or cab substitute (e.g., EQ).
- IR Maker’s output sends a frequency-sweep signal to the new cab’s input.
- The new cab’s output feeds the IR Maker’s input.
- IR Maker analyzes the frequency response characteristics of the processed sweep signal, crunches some numbers, automatically places the impulse in an impulse folder, and voilà—a Cab IR you can load in Ampire’s User Cab.
Song Setup
For this to work, a patch cable needs to connect an audio interface output to an audio interface input. It’s helpful to create a Song Setup specifically for grabbing impulses:
1. Export your current Song Setup so you can return to it after grabbing your impulses.
2. Create a new Song Setup. Dedicate a mono input and mono output to IR Maker (fig. 1).
3. Add an audio input for your guitar, and a Main stereo output, so you can test the impulses in Ampire.
4. Export this new Song Setup preset for future use.
5. Patch a physical patch cord between the audio interface input and output selected for the IR Maker (in this case, it’s input 3 and output 3).
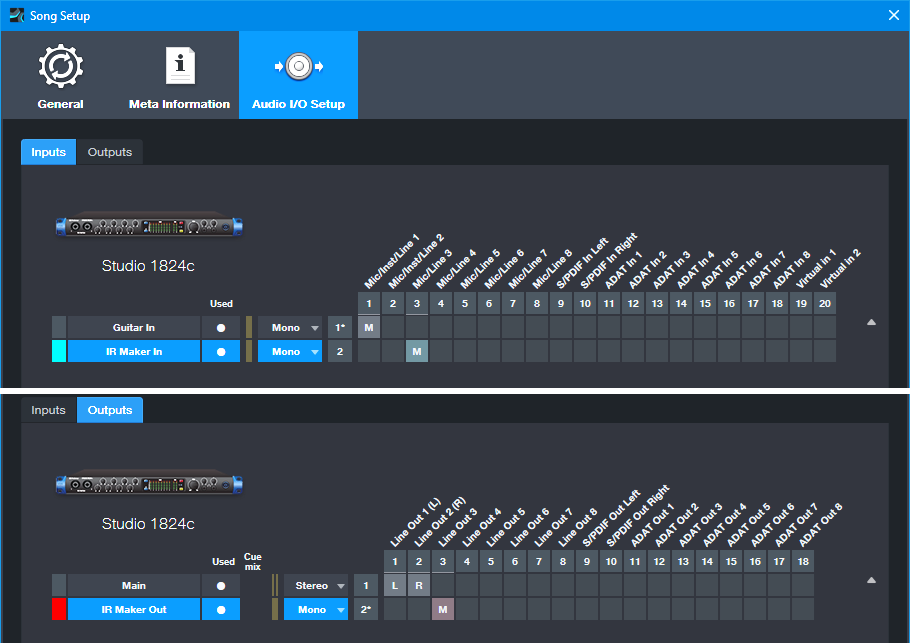
Figure 1: The IR Maker mono input comes from Mic/Line input 3. The IR Maker mono output goes to Line Out 3. An additional audio input allows testing the IRs by playing guitar through Ampire.
Mixer Channels Setup
1. Insert the amp sim or EQ-based cabinet you want to convert to an IR (fig. 2). Insert the IR Maker plugin after the cab. (The additional Pro EQ3 after the IR Maker is optional. We’ll cover that later.)
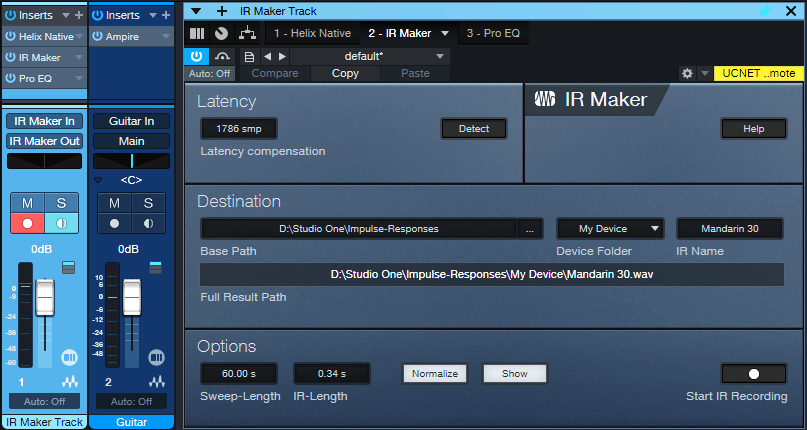
Figure 2: Channel setup and IR Maker UI. The setup is about to generate an IR from an edited Helix Native cab.
2. Assign the IR Maker channel input to IR Maker In, as created previously in Song Setup. Assign the IR Maker channel output to IR Maker Out, also created previously in Song Setup.
3. Record-enable the IR Maker trackand enable the input Monitor.
4. Open the IR Maker UI and test the setup. Click on Detect. If Latency shows 0, there’s a problem with either the physical patch cord, the input/output assignments, and/or the track not being record- and input monitor-enabled. Fix the issue, then proceed when Latency is a non-zero number.
5. Check the Normalize and Show boxes.
6. Options trades off calculation time and fidelity. For cabs, I use a 60 second sweep and 0.34 second IR time. This takes longer to create an IR compared to using a shorter sweep, but captures the best quality.
7. Destination shows where the impulses will be saved. Note: Because Show is selected, as soon as IR Maker creates the impulse, its associated folder opens. Then, you can just drag the impulse into Ampire’s user cab so you can hear what it sounds like.
Ready to Rock!
1. Test the levels. Click on Start IR Recording and check the sim’s or EQ’s input and output levels, as well as the IR Maker channel input. Avoid distortion. Any files are saved, so choose “Test” as an initial IR name. Then you can delete the “test” files easily after you’re finished testing levels. It may take a few tries to get the levels right.
2. Once the levels are set, give the IR a useful name (e.g., the cab’s name). Click on Start IR Recording. Wait for the calculations to complete, and your IR capture is done.
3. Drag the IR into Ampire’s User Cab graphic, and play guitar through the guitar track to hear the results.
About the Free IR Download
The free IR custom cab uses 12 stages of Pro EQ3. The IR is designed to give the VC 30 amp a more open sound, and works very well with power chords. Select the User Cab in Ampire, and drag the IR on top of the User Cab’s graphic.
Doing custom cabs with EQ usually needs more than one EQ’s worth of stages, so being able to preserve that as an IR is convenient. The IR is trimmed to 2048 so that it’s compatible with Helix Native as well as Ampire. I prefer the IR to the Helix Essex A30 amp’s default cab (2 x 12 Silver Bell).
Download the free CA VC 30 2048.wav IR here!
Comments
- The optional Pro EQ3 after the sweep shaves off the very highest frequencies (above 15 kHz, with a 24 dB/octave slope). This reduces high frequencies that could cause aliasing.
- The IR will be longer than needed. Ampire is tolerant of long IRs, but you can reduce the duration considerably. 50 ms is usually enough.
- This process may seem complicated, but it’s foolproof once the setup is correct. Just follow the steps above—and enjoy your alternate cabs!