Author Archives: Craig Anderton
Drum Replacement with Melodyne

The problem: I was using one of Chris McHugh’s acoustic drum loops from the (sadly, no longer available) Discrete Drums sample library. However, it had been recorded at a slower tempo, and when sped up, it was a bit too “busy” in places.
The solution: Drum Replacement with Studio One, Pro EQ, Gate, and Melodyne, so I could edit Note data into the part I wanted.
Getting Started: Step by Step
- Copy the drum loop to a new track, because we’ll want to re-visit the original one for each drum. We’ll start by replacing the kick.
- Use the Pro EQ as an Event effect to dial in the kick drum’s fundamental (fig. 1.) Combine a steep high cut with a low-frequency boost at the kick’s main frequency to isolate the kick from the rest of the track. Note that the sound doesn’t matter, you just want readily identifiable peaks. However, do avoid distortion, so Melodyne can represent velocity well.
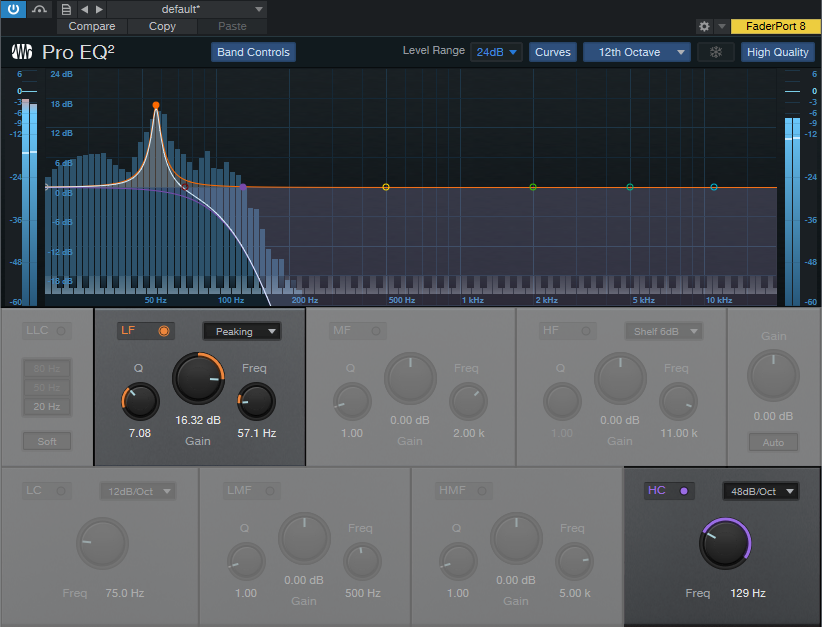
Figure 1: EQ settings to isolate the kick’s fundamental.
- Render the Event. This may leave some lower-level drum sounds or ambiance, so add a Gate, and set the Threshold to pick up only the kick drum’s peaks (fig. 2).
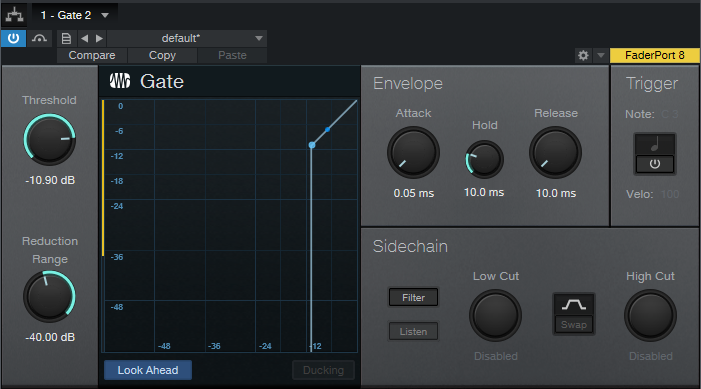
Figure 2: Gate settings to isolate the kick’s peaks.
- Render the Event again, select it, and choose Edit with Melodyne. Now the kick part looks like fig. 3.
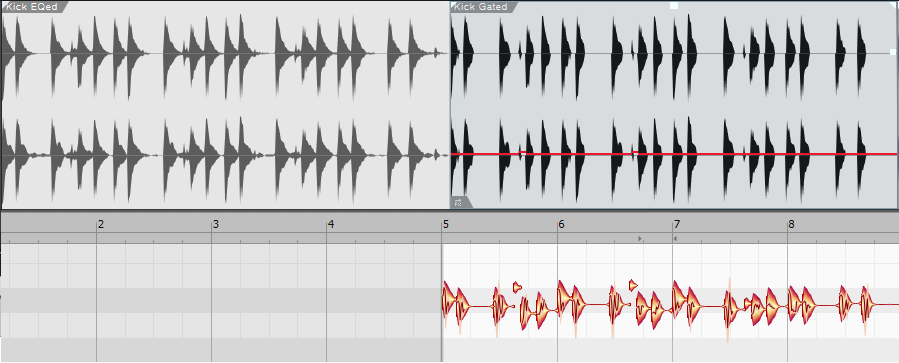
Figure 3: The Event on the left is the drum loop after EQing the kick. The Event on the right is the same one after gating. The lower blobs are the result of choosing Edit with Melodyne.
- Drag the Event track into an instrument track, and now you have note data for the kick.
Prepping the Note Data
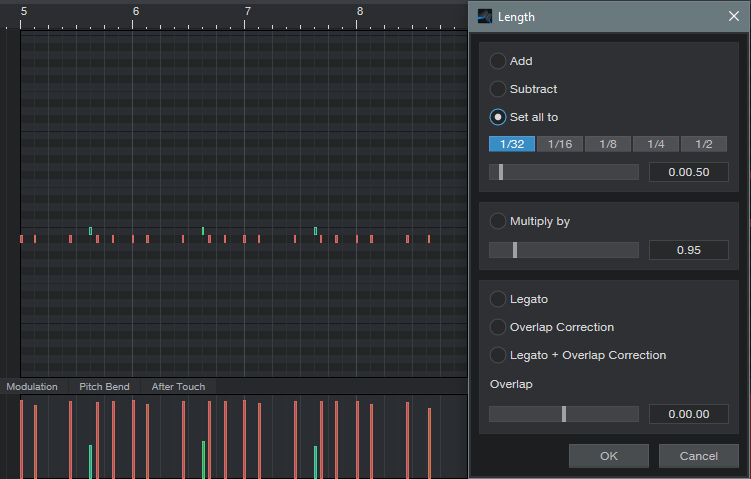
The note data length will vary. To tidy up the part, set all the drums to 16th or 32nd notes with Action > Length (fig. 4).
Note that Melodyne picked up on some low-velocity kick hits too (pretty cool). You could assign these to a different sample of a kick hit softly. Fortunately, the Discrete Drums library includes samples of the individual drums. So, I could load the samples into Impact XT, and this way the sound would work with other loops from the same collection. Since the drums are multi-sampled at different velocities, I selected all the notes, and used Studio One’s Transpose function to set them to the same pitch as the kick samples.
Hi-hat was the most difficult to convert to Note data, because snare hits can produce transients that extend into the hi-hat range. A 48 dB/octave low-cut combined with a major high-frequency peak did a decent job of isolating the hi-hat, but the frequency was extremely high and Melodyne wasn’t too happy about that. Transposing the Event down an octave or so before applying the gate made the hits more Melodyne-friendly.
Clean Up
I was taken aback at how well this technique was able to translate the acoustic drum loop into Note data. The best aspects were that it preserved the human timing of a real drummer, and Melodyne did a good job of preserving the dynamics. The only needed fix was removing a few notes caused by loud snare hits that came through on the hi-hat track, and of course, editing the data to create the part I wanted—done!
Stereo Cabs in a Single Ampire

Ampire has a User cab that can load impulse responses. You knew that, right? What you may not know is that you can load stereo cab impulses, and they magically make the User cab stereo. If you’re thinking “but creating impulses is such a hassle,” it’s not—let’s get started.
How It Works: Overview
Start by downloading the 44.1, 48, and 96 kHz stereo impulses. These are 1-sample spikes, so if you listen to them, don’t expect a thrilling audio experience. To create the impulse response, load a stereo impulse into an audio track, but no other audio—just the impulse. Send the audio to two cabs, set up in stereo (e.g., using two FX Channels, panned as desired). Don’t include any amps or effects—only the cabs. Bounce or otherwise mix/export the result. This is the stereo impulse response.
Step-by-Step Instructions
For the sake of example, we’ll assume you want a 4×12 M65 and a 2×12 VC 30 as your stereo cabs, but you can use any cabs you want, including cabs from other amp sims. Referring to fig. 1, this setup works for Artist or Pro.

Figure 1: Setup for creating a stereo impulse response.
- Create a stereo audio track, and load the impulse that matches the song’s sample rate.
- Create two FX Channels.
- Insert an Ampire into each FX Channel. Make sure that amps and effects are bypassed.
- Choose the 4×12 M65 cab for one Ampire, and the 2×12 VC 30 for the other one.
- Create a pre-fader Send to each FX Channel from the Stereo Impulse track, so you can turn the Stereo Impulse track’s fader down.
- Pan the FX buses as desired to create a stereo image for the two cabs.
- All the faders and Send levels should be set to 0 (except for the Stereo Impulse track fader, which should be all the way down). Note that the Send levels default to -6.0, so set these to 0.
Create the Impulse
- Click on the Stereo Impulse, then type Shift+P to set the loop indicators to the impulse length.
- Select Song > Export Mixdown. Choose the appropriate options (fig. 2). 64-bit float works fine for this application. Also check Import to Track.

Figure 2: Export your Impulse Response so you can use it with Ampire.
- Click on OK. This creates a track with an Impulse Response that’s the same length as the original impulse, and imports the new Impulse Response to a Song track.
- Normalize the Impulse Response you just created to around -3 dB.
- Create a folder for your stereo impulse responses, open it in the Browser, and drag the normalized Impulse response into it. Your work is done.
Fun Time!
Create an audio track, load Ampire, plug in your guitar, and select an amp. Choose the User cab, and then click on the + symbol in the Mic A: field. Navigate to where you saved the impulse response, load it, and kick back with your cool stereo cab.
To get you started, the folder you downloaded with the impulse also has stereo Impulse Responses for the M65+VC30 and 4x10American+2x12Boutique stereo cabs. Try them with the new High Gain and Painapple amps…you’re gonna love ‘em.
“Automating” the Unautomatable

You can record most hands-on control changes as automation by using Control Link, which has always been one of my favorite Studio One features. However, not everything exposes its parameters to automation—so let’s explore track-to-track recording, and embed your hands-on control changes as audio.
How to Set It Up
With track-to-track recording, you record the output from a Source track into a Target track. Set the Target track’s input to the Source track (fig. 1). You’ll monitor the Source track, not the Target track. So, turn the Target track’s fader down (the input monitoring setting doesn’t matter). Select record mode for the Target track. Note that track-to-track recording is inherently a real-time process.
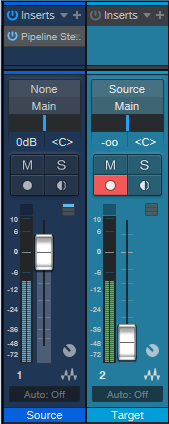
Figure 1: Setup for track-to-track recording.
Of course, you’re not limited to recording the output from another track—you can record any Output, Aux Track, or Bus (but not FX Channels). As to why this is useful, I’ve found four main applications.
Hands-on control for external hardware. Although you can automate some external hardware effects parameters with MIDI, that’s not always the case. Older effects, stompboxes, and analog hardware that was intended to be set-and-forget (e.g., tube preamps whose saturation you might want to vary over time) can’t be automated. Insert Pipeline in the Source track, set up Pipeline to bring the hardware’s ins and outs into the Source track, and then you can manipulate the effect’s controls while recording the results into the Target track. If you need to make changes, re-do the recording (although you may only need to punch a section).
Capture random effects processes. Several effects have randomized functions, so they never play back audio quite the same way twice. Recording audio from a Source track with this kind of effect inserted captures the resulting randomization. If you don’t like the results, try re-recording until you have something you prefer. Note that this can also record the output from an Instrument track that includes a randomizing insert effect.
Capture touchscreen control gestures. Studio One’s multitouch effects are very touch-friendly, and touchscreen gestures can connect with automation. But sometimes, it’s great having that palette of controls right in front of you, where you can change control settings on the fly while you get into the improvisational heat of the moment. When these effects are inserted in the Source track, you can record the audio caused by the real-time touchscreen changes into the Target track.
Accommodate what you can’t automate. This is a weird use case, but it’s another example of why track-to-track recording is useful. To compare the different cab sounds in the Line 6 Helix, I wanted to record an audio example of a guitar riff while I changed the amp sim cabs. But you can’t automate cab selection, and with 41 cabs, I didn’t want to have to stop, change the cab, and re-record the next example. So, I just looped the guitar riff, recorded into the Target track, and clicked on a different cab when I wanted to record it.
There are probably other applications I haven’t considered—so if you think of any, please mention them in the Comments section!
Melodyne Essential = Polyphonic MIDI Guitar

Many people think Melodyne Essential works only with monophonic tracks. That’s true for editing notes, but it can transform polyphonic guitar playing to MIDI note data. Granted, there’s a tradeoff: no pitch bend. But for laying down pads, power chords, and the like with electric guitar, then playing them back on virtual instruments—no problem.
- After recording your guitar part, select it and choose Edit with Melodyne (Ctrl + M). You’ll see the familiar blobs, but not chords—only single notes.
- Choose Polyphonic Decay for the Melodyne algorithm (fig. 1). Even though Essential is monophonic, you’ll be able to choose this option.
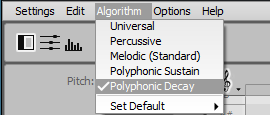
Figure 1: Choosing Polyphonic Decay is the key to transforming guitar parts into note data.
- You’ll see blobs that correspond to your chord notes, but they’ll be grayed out, because you can’t edit them. No worries.
- Create an Instrument track (Presence is always a fun choice) to play back your guitar part.
- Drag the audio that you processed with Melodyne into the instrument track, and you’ll see a polyphonic MIDI guitar part (fig. 2).
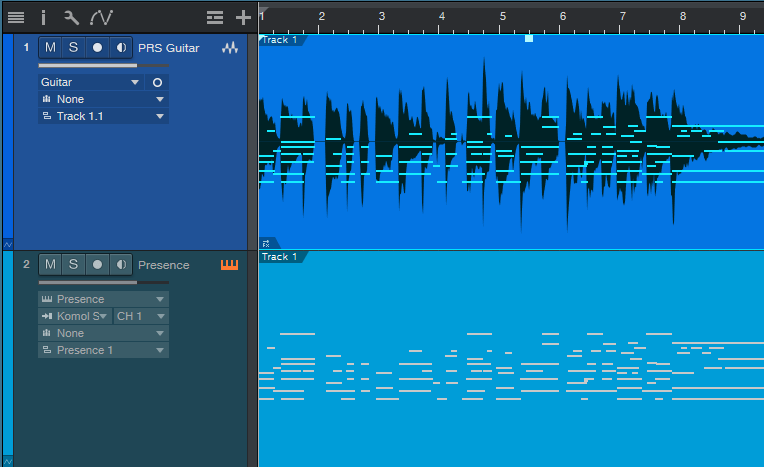
Figure 2: A polyphonic guitar part has been transformed into Note Data.
- Fig. 3 shows the unedited part. Translating guitar to MIDI is never perfect, and will almost always require some editing. Fortunately, Studio One can much of that for you, by automatically deleting notes with excessively low velocities and short durations.
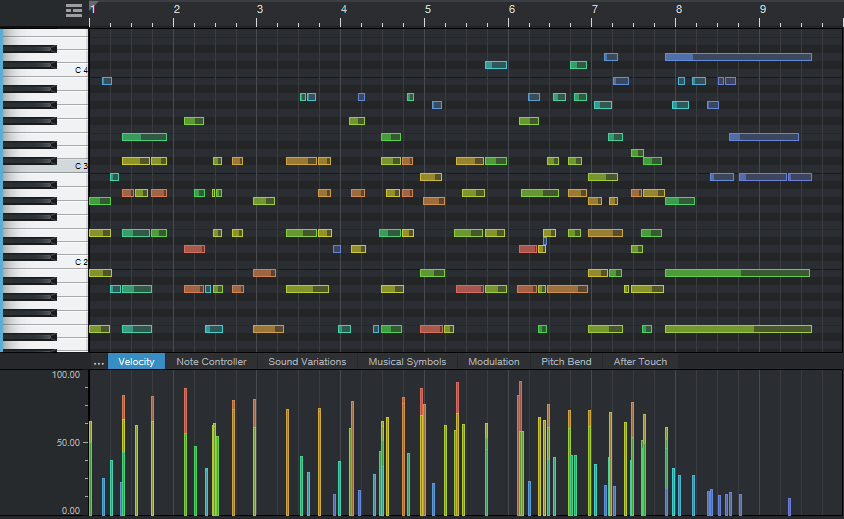
Figure 3: Check out all the low-velocity notes—they’re probably just glitches.
- Select all the notes, then choose Action > Select Notes. Choose Range, and select all notes with a velocity below 20% (fig. 4). Hit delete. If that doesn’t get rid of enough low-velocity notes, try again with a higher percentage (e.g., 30%).
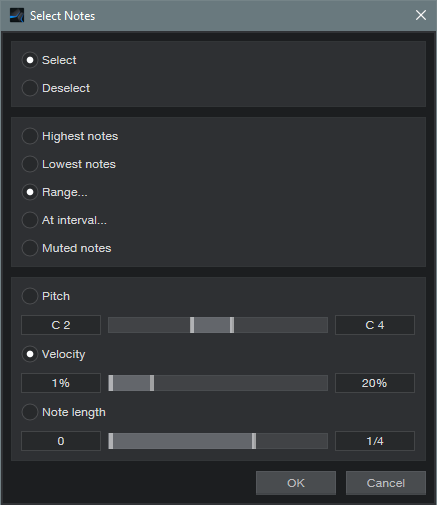
Figure 4: Initial settings to reduce low-velocity bogus notes.
- MIDI guitar may also produce “notes” that are more like short glitches. Go to Action > Delete Notes, and choose notes shorter than 0.0.1.50. If this doesn’t delete enough of the short notes, increase the duration (e.g., 0.0.1.80). Note that these two de-glitching processes would be good candidates for a Macro.
- Fig. 5 shows the results of applying the above processes in Studio One, and then doing about a minute’s worth of touch-up editing. (

Figure 5: The note data now looks ready for prime time.
Finally, let’s listen to the original guitar part, and the MIDI cello part it produced. Cool, eh?
Hi-Hat Humanizing
Nothing is more bothersome to me than a 16th note hi-hat pattern with a constant velocity—like the following.
Audio Example 1
“Humanizing,” which usually introduces random changes, attempts to add more interest. But human drummers don’t really randomize (unless they’ve had too many beers). Even if the beats are off a little bit, there’s usually some conscious thought behind the overall timing.
So, what works for me is a mix of deliberate tweaking and what I call “successive humanization,” which applies humanization more than once, in an incremental way. With hi-hats, my goal is rock solid downbeats to maintain the timing, slightly humanized offbeats, and the most humanizing on everything that’s not the downbeat or offbeat. This adds variety without negatively impacting the rhythm.
Let’s fix that obnoxious 16th-note pattern. To start, select all the notes, and bring them down to just below 30% (fig. 1).
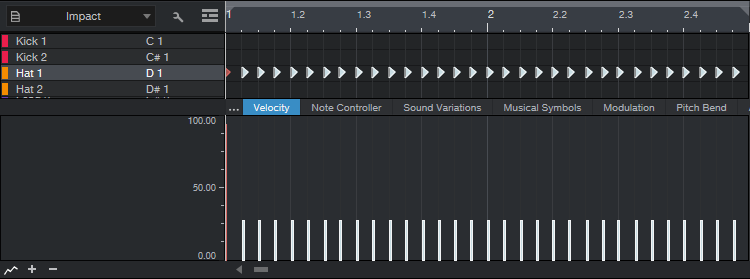
Figure 1: All the velocities are slightly below 30%.
Next, we’ll use Macros to select specific notes for editing. Select all the notes, click on the Macro View button (between Q and Action), click Action in the Macro Edit menu, and choose Note Selection > Select Notes Downbeat. Raise all the downbeats to just below 95% or so. Then, choose Note Selection again, but this time select Offbeat, and raise the offbeats to just below 50%. Now your notes look like fig. 2.

Figure 2: The downbeats are just below 95%, and the offbeats are just below 50%.
The part sounds like this…we’re on our way.
Audio Example 2
Close the Macro view. Now we’ll humanize the lowest-velocity notes a little bit. Select all the notes. Click on Action, and under Global, choose Select Notes. Choose Range, set Velocity from 1% to 30%, and click OK (fig. 3). This is why we wanted to set the notes slightly below 30%—to make sure we caught all of them in this step.
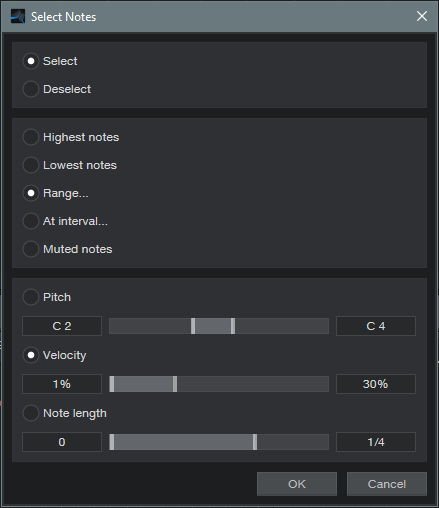
Figure 3: Getting ready to humanize notes with velocities under 30%.
Choose Action > Humanize. We’re going to Humanize the notes downward a bit, so set Add Velocity Range to -10% and 0% (fig. 4).
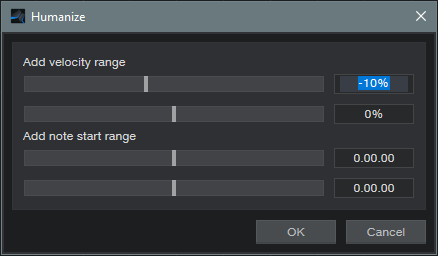
Figure 4: Humanizing has been restricted to lowering velocities somewhere between 0% and -10%, but only for notes with velocities under 30%.
Let’s introduce some successive humanization. Click on Action, and again, Select Notes. Choose Range, set Velocity from 1% to 50%, and click OK. Now we’ll humanize velocity for the notes that were originally under 50% and also those that were under 30%. Humanize again to -10%, as done in the previous step. There’s a little more variety in the following audio example.
Audio Example 3
Now let’s humanize the start times a bit, but only for the notes below 50%—we want rock-solid downbeats. Select the notes under 50% as you did in the previous step, but this time, for the Humanize menu don’t alter velocity. Just humanize the start time between -0.00.10% and 0.00.10% (fig. 5).
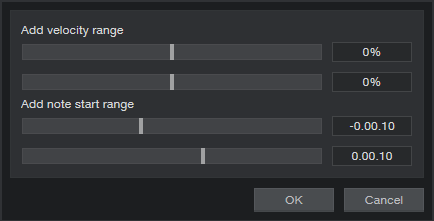
Figure 5: This will humanize start times for all notes currently below 50%.
Now our notes look like fig. 6. Look closely to see the changes caused by humanization.

Figure 6: The sequence now has humanized start times.
And it sounds like…
Audio Example 4
At this point, the Macros and humanization options have added some much-needed variations. Although I feel drum parts always need at least a little of the human touch, thanks to Studio One doing most of the work, at this point only a few small changes are needed. Also, a little filtering can make the harder hits brighter. (Tip: When editing the filter parameters, turning the Resonance way up temporarily makes the range that’s being covered far more obvious.) Fig. 7 shows the final sequence.
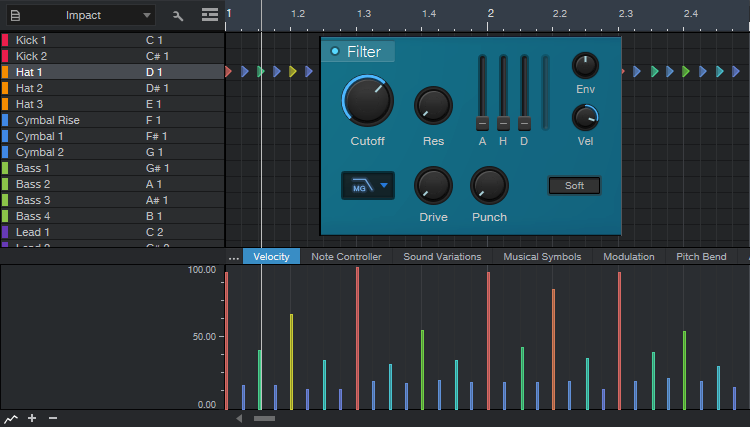
Figure 7: This adds a few manual velocity tweaks, along with filter editing to make higher-velocity sounds brighter.
The point of the filter was to give a more subdued hi-hat sound, as you’ll hear in the next audio example. If you want a more metronomic effect, you’d probably prefer the previous audio example…but of course, it all depends on context.
Audio Example 5
You can even try one final humanize on everything—a little velocity, and little start time—and see what happens. If you don’t like it…well, that’s why “undo” exists!
Add More Inputs to Your Audio Interface

I never liked patch bays. I certainly didn’t like wiring them, and I didn’t like having to interrupt my creative flow to patch various connections. In my perfect world, everything would patch to its own input and be ready to go, so that you never had to re-patch anything—just assign a track to an input, and hit record.
With enough audio interface inputs, you can do that. But many audio interfaces seem to default to 8 line/mic ins. This makes it easy to run out of inputs, especially as synth fanatics gravitate toward re-introducing hardware to their setups (and want to take advantage of Studio One 5’s Aux Channels). We’ll assume you don’t actually want to get rid of your interface with 8 mic/line ins…you just want more. There are three main solutions:
- Use a mixer with audio interfacing capabilities. A StudioLive will certainly do the job, but it could be overkill for a home studio, unless it’s also what you use for gigs.
- Aggregate interfaces. We’re getting closer—simply add another interface to work alongside your existing one. It’s easy to aggregate interfaces on the Mac using Core Audio, but with Windows, ASIO almost never works for this. So, you need to use Windows’ native drivers. The newer WASAPI drivers have latency that’s close to Core Audio, but aren’t widely supported. So, you may be stuck with the older (slooooow) drivers. Another issue is needing to give up another USB port for the second interface, and besides, using different applets to control different interfaces can be a hassle.
- ADAT optical interface. This is my preferred solution, which works with both Mac and Windows. It’s especially appropriate if you record at 44.1 or 48 kHz, because then you can add another 8 inputs per ADAT optical port. (At 88.2 or 96 kHz, you’re limited to 4 channels per port, and not all audio interfaces are compatible with higher sample rates for optical audio.)
Why ADAT Optical Is Cool
I started with a PreSonus Studio 192 interface, graduated to a PreSonus 1824c, but kept the Studio 192 as an analog input expander. The 192 has two ADAT optical ports, so it can send/receive 16 channels at 44.1 or 48 kHz over a digital audio “light pipe” connection. The 1824c has one ADAT port for input and one for output, so patching one of the Studio 192’s optical outs to the 1824c’s optical in gave a total of 16 analog inputs. This accommodates my gear without having to re-patch.
Another advantage is that the Studio 192 has +48V available for individual mic inputs, whereas the 1824c’s +48V option is global for all inputs. So, I can easily use a mix of ribbon, dynamic, and condenser mics with the 192, while leaving +48V off for the 1824c.
The interface being used as an “expander” doesn’t require a permanent USB connection to your computer (although you may need a temporary connection to change the interface’s default settings, if you can’t do that from the front panel). And, you don’t need an interface with lots of bells and whistles—just 8 inputs, and an ADAT out. A quick look at the used market shows plenty of ways to add another 8 channels to your audio interface for a few hundred dollars, although this could also be a good reason to upgrade to a better interface, and use the older one as an expander.
Because the 1824c has an ADAT input, both interfaces show up in the Song Setup menu. The inputs from the ADAT light pipe look, act, and are assigned like any other inputs (Fig. 1).
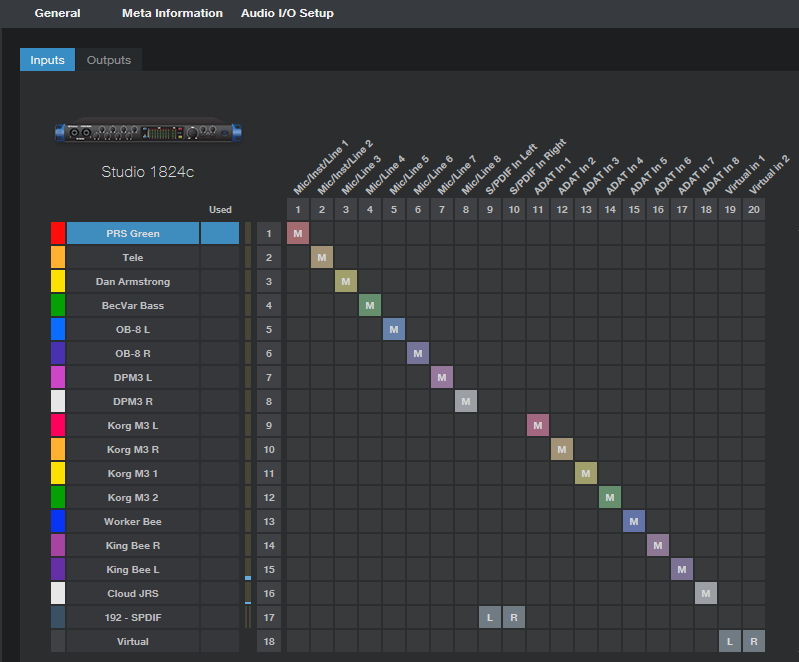
Figure 1: It even kind of looks like a patch bay, but I never have to patch any physical connections.
Time for a Caution…
…and that caution involves timing. Always set the ADAT expander as the master clock, so that it’s transmitting clock signals to the main interface, which is set to receive the clock (Fig. 2). If the main interface is the master, then the expander will be free-running and unsynchronized. The audio will seem to work, but you’ll get occasional pops and clicks when the units drift out of sync (which they will do over time).
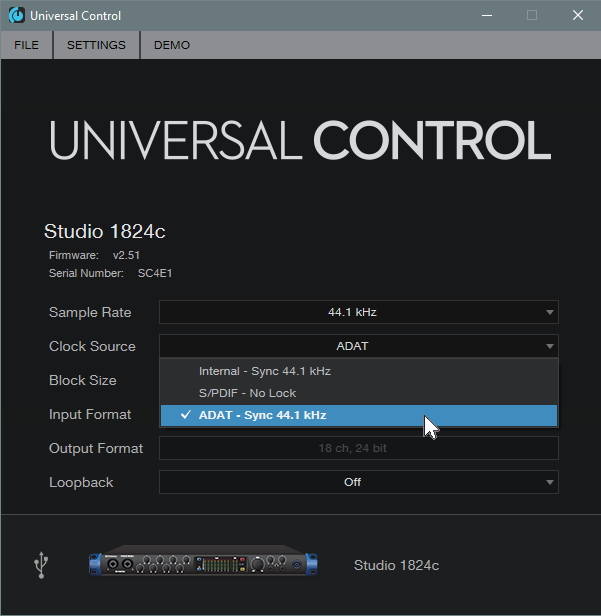
Figure 2: Make sure the main interface syncs to the expander’s clock.
Patch bays? Who needs ’em? I like virtual patch bays a lot more.
Claim Your 342 Free Ampire Cabs
Add the cabs from the 3rd gen Ampire with the ones from the High-Density expansion pack, and you have 19 cabs.
Surprise! You actually have 342 cabs. Not all of them sound fabulous, but some do—especially if you throw a Pro EQ into the mix. What’s more, with clean sounds, the new cabs give “varitone”-like filtering effects that almost sound like you have an infinite supply of different bodies and pickups. We’ll show how to take advantage of these new cabs with Studio One’s Pro and Artist versions.
How It Works (Pro Version)
With Pro, the Splitter is the star (fig. 1). The Ampire at the top provides your amp sound (optionally with effects), but don’t load a cabinet. Split the amp’s output into two parallel paths, each with an Ampire that has only a cabinet (no amps or effects). Insert a Mixtool in one of the parallel paths, and click its Invert button.
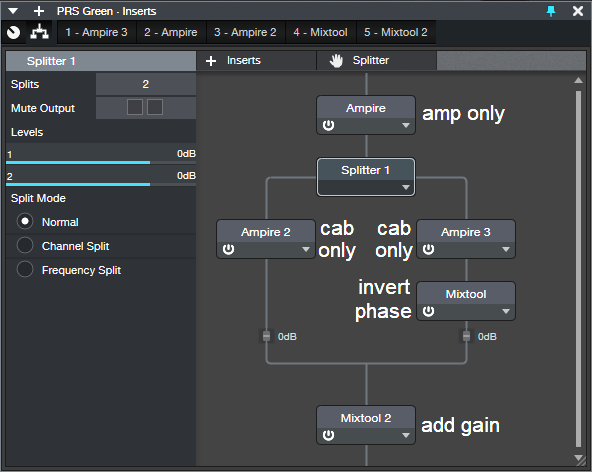
Figure 1: FX Chain setup for Studio One Pro.
If you select the same cab for both parallel paths, you won’t hear anything, because they cancel. But with two different cabs, what they have in common cancels, while their various modeled resonances remain. This creates the sound of a different, distinctive cab. Of course, you can also play with the cab mic positions to generate even more possible sounds…the mind boggles.
Finally, add another Mixtool at the output so you can increase the gain. This compensates for the reduced level due to one path being out of phase. If you want to add a Pro EQ (recommended), insert it before the Mixtool.
How It Works (Artist Version)
Fig. 2 shows how to set up busing to do this in Artist, although Pro users might prefer this option because the editable elements are more exposed.
- The Ampire in the PRS Green channel (which has an amp only, with no cab) has one send that goes to Bus 1, which has a cab-only Ampire.
- Another send goes to Bus 2, with another cab-only Ampire, as well as a Mixtool to invert the phase.
- The Bus 1 and 2 outputs go to the FX3 channel, which sums the standard and out-of-phase cabs together. The FX3 channel also has a Mixtool to provide makeup gain.
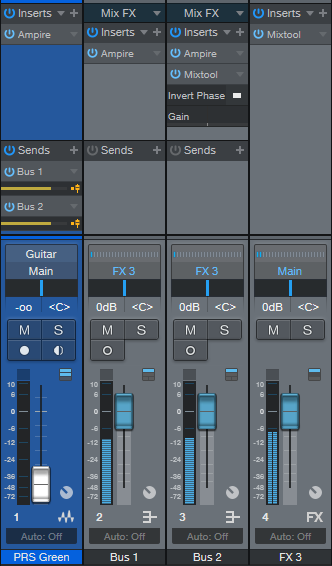
Figure 2: Setup for the Artist version.
Note that if you choose the same cab for the Ampires in Bus 1 and Bus 2, and your original channel’s fader (in this case, PRS Green) is all the way down, you should hear nothing due to the cancellation. If you hear something, either the sends to the buses, the bus levels, Ampire output controls, or mic settings are not identical for the two channels.
But Wait—There’s More!
The composite cab sound in the FX3 bus can often benefit from adding a Pro EQ before the final Mixtool. Typically you’ll roll off the bass, or make the treble less bright, depending on the cabs. And again, let me remind you to try this with clean sounds—it’s sort of like out-of-phase pickup wiring, but with hundreds of options.
One limitation is that there’s no way to change cabs with a control panel knob or with automation. To explore the various sounds, choose a cab for the Ampire in one of the buses, then run through the cabs in the other bus’s Ampire. Some sounds won’t be all that useful, others will be distinct and novel, and some that don’t appear to be useful at first come into their own with just a touch of EQ.
Want an audio example? Sure. This combines the VC 20 and with an out-of-phase British II, with a little low-frequency rolloff. The Open Air reverb uses an impulse from my Surreal Reverb Impulse Responses pack. You’re on your own for checking out the other 341 combinations!
When you find a combination of cabs that works, write it down—with this many cabs to choose from, you might not find it again.
Mid-Side Reverb for Studio One Artist (and Pro)
But first: free stuff news! The eBook How to Create Compelling Mixes in Studio One Version 2.0 is now available as a free update to anyone who bought the original version (for new buyers, it’s $14.95)—just go to your PreSonus account, and download it. There’s new material on mix referencing and LCR mixing, numerous tweaks, additional tips, and a new layout that’s more smartphone- and tablet-friendly.
Okay…back to reverb. The blog post Mid-Side Meets Reverb used the Splitter, which is included only in Studio One Pro. However, when the post got comments like “OMG! Just did this for a simple guitar and vocal demo, and now it sounds massive and super-professional. This technique really gives space and depth to the mix!,” I thought I’d better come up with an Artist-friendly version. Pro users might even prefer this bus-oriented implementation. And because the tip is dedicated to reverb, it’s simpler than the more general-purpose blog post on Mid-Side Processing with Artist (which includes a refresher course on mid-side processing, if you need more background).
How It Works
It’s common practice to use a track send to feed audio to a reverb bus. But with this mid-side technique, there are two sends, which feed two reverb buses. One bus has reverb for the Mid (centered) audio (like bass, kick, snare, etc.), while the other reverb processes the Sides (what’s panned more toward the left and right, like hi-hat, doubled guitars, background vocalists, room mics, etc.). This can give an outstanding stereo image, more flexible editing, and you can use different reverbs for the mid and sides. Also, for those who like to use a dedicated vocal reverb, if the vocal is mixed to center it won’t be influenced by the reverb used on other instruments.
Fig. 1 applies this technique to processing a mixed drum loop.
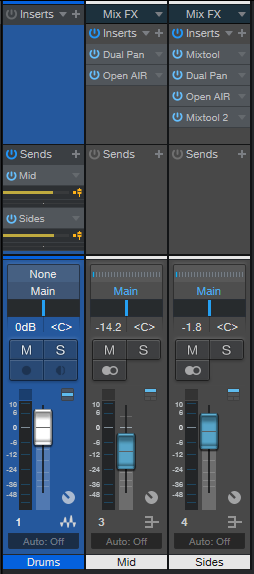
Figure 1: Mid and Sides reverb buses, being fed by a mixed drum loop.
The mid audio is just the sum of the left and right channels, so all we need is a Dual Pan before the mid reverb, with both controls panned to center (Fig. 2).
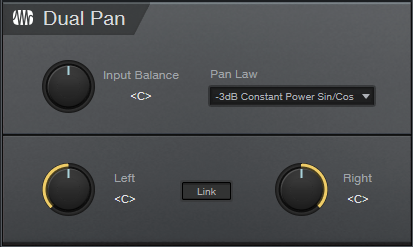
Figure 2: Dual Pan settings for the Mid reverb bus.
Fig. 3 shows the effects used in the Sides reverb bus.
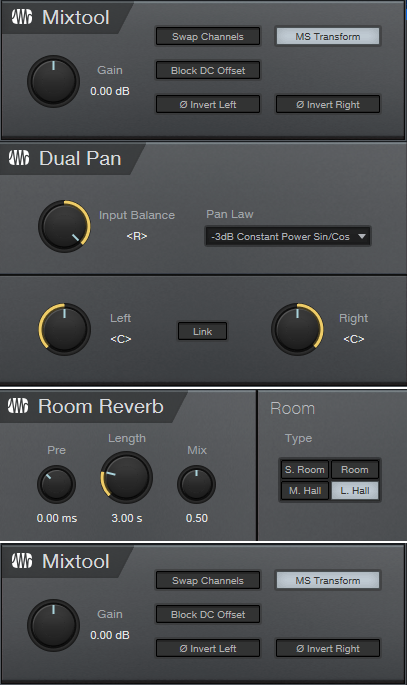
Figure 3: Effects for the Sides reverb bus.
When a signal enters the Sides bus, the first Mixtool encodes the audio. The sides end up on what would usually be a stereo signal’s right channel, while the mids occupy what would normally be the left channel. By setting the Dual Pan Input Balance to right, only the sides go to your reverb of choice (it doesn’t have to be Room Reverb). Then, the processed sides go to the bottom Mixtool, which decodes the sides back into standard stereo.
Now you’re ready to choose your balance of the Mid and Sides reverb. Note that bringing up the sides widens the stereo image. The audio example plays a 4-measure drum loop without reverb, then only the mid reverb, then only the sides, then both together, then fades out on the dry drums.
For the reverbs, my go-to is the Open Air reverb, with impulses from the Surreal Reverb Impulse Responses pack. The Sides reverb uses the 4.00s Bright impulse, while the Mid uses the 2.00s Thinner impulse. The “Thinner” impulse reduces the bass response, so instruments like kick and bass don’t clutter up the reverb, but snare and other midrange instruments panned to center get reverb.
Happy ambiance!
So…What Does the CTC-1 Really Sound Like?
Good question, because the effect is subtle. If you play with the various controls while listening to a mix, you can tell that something is different, but you may not know exactly what. So, let’s find out what the CTC-1 actually contributes to the sound.
Bear in mind that Mix FX work across multiple buses, and the overall effect depends on the audio being sent through them, as well as the control settings. So while this tip can’t tell you what the CTC-1 will sound like under various conditions, you’ll get a sense of the character associated with each of the CTC-1’s mixer emulations. Note that the audio examples are not mixed songs, but only the effect added by the CTC-1 to mixes, and amplified so you can hear the effect clearly.
Also, it doesn’t look like PreSonus is letting up on Mix FX development any time soon (PortaCassettes and Alps, anyone?), so this tip should be handy in the future as well.
The Test Setup
- Load a track with a stereo mix of a song you like.
- Duplicate (complete) the track, and invert the copy’s polarity (phase). To invert the polarity, you can insert a Mixtool and click on the Invert Left and Invert Right buttons. Or enable the channel’s Input Controls, and flip the polarity with those (as shown in fig. 1).
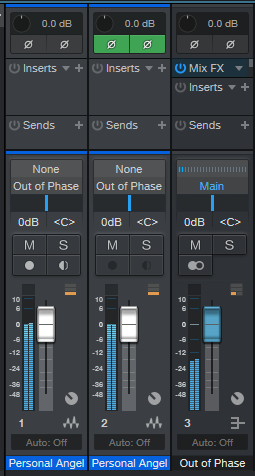
Figure 1: Test setup for evaluating the CTC-1 mixer’s various characters.
- Insert a Bus, and assign the out-of-phase track’s output to the Bus input. The Bus output goes to the Main output, as does the in-phase track output. Make sure the Main output’s Mix FX is set to None.
- Set all faders to 0 dB, and start playback. With the Bus’s Mix FX set to None, you should hear nothing—the only audio sources are the original track, and the out-of-phase track playing back through the Bus. If you hear anything, then the faders are not at the same levels, the out-of-phase track is somehow getting into the Main bus, or the Main bus has a Mix FX enabled.
Now you can check out various CTC-1 mixers. Fig. 2 shows the default setting used for the tests. In the audio examples, the only changes are setting the Character control to 1.0, or to 10. 1.0 is the most faithful representation of the console being emulated, while 10 adds the equivalent of a sonic exclamation mark.
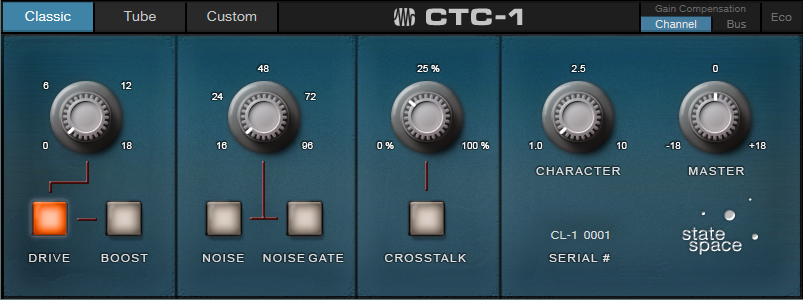
Figure 2: Default CTC-1 control settings used for these tests.
Let’s Start Testing!
Note that there’s a continuum of Character control settings between 1.0 and 10. Settings other than those in the audio examples can make a major difference in the overall sound, and you can really hear them with this kind of nulling test.
Here’s what the Classic mixer sounds like. Its main effect is in the midrange, which a Character setting of 10 really emphasizes. Among other things, this gives a forward sound for vocals.
The Tube sound kicks up the low end, but turning up the Character control emphasizes a slightly higher midrange frequency than the Classic sound, while retaining the bass.
The Custom mixer is about adding brightness mojo and bass. Bob Marley would probably have loved this. Turning up Character emphasizes lower midrange frequencies than the other two.
Snake Oil, or the Real Deal?
I don’t have the mixers on which these settings were modeled, so I can’t say whether this is the real deal. But I can say it’s definitely not snake oil. The effect is far more nuanced then just EQ, and the audio examples confirm that Studio One owners who say the CTC-1 adds some kind of mysterious fairy dust are right…it does add some kind of mysterious fairy dust.
These audio examples should make it easier to get the sound you want. For example, if you like the way the Custom hits the bass and treble, but it’s a bit much, then simply turn up the Character control for a little more midrange. If your mix is already pretty much where you want it, but it needs to pop a bit more, the Classic is the droid you’re looking for. The Tube really does remind me of all those years I spent on tube consoles, especially if I turn up Character a little bit.
Sure, you just turn select mixer emulations, and play with controls, until something sounds “right.” But I must say that running these tests have made it much easier to zero in, quickly, on the sound I want.
Combi-Band Processing
I’m a big fan of multiband processing, and setting the Splitter to split by frequency makes this easy. However, there’s more to life than bi-amping or multiband processing—so let’s look at what I call “combi-band processing.” It gets its name because although the signal is split into three frequency bands, the low and high bands are combined, and processed by a single effect. Meanwhile, a second effect processes the mid band.
Bi-amping is great for amp sims (choose the best amp for lows, and the best for highs). I find it doesn’t work so well for effects, because when you split an instrument (like guitar) into only lows and highs, many effects aren’t all that useful for low frequencies. But if you raise the crossover frequency so that the low effect covers a wider range of frequencies, then there aren’t enough high frequencies for the effect that processes the highs.
With the combi-band approach, one effect handles the all-important midrange frequencies, while the other processes the low and highs. As a result, both effects have an obvious impact on the sound—as you’ll hear in the audio example. This also results in a simpler setup than three or more discrete bands of processing.
Combi-Band Processing FX Chain
Apologies to Artist aficionados…this one requires Studio One Pro, because of the Splitter’s frequency-split talents. However, I’m trying to figure out an easy way to do this in Artist. If it works, you’ll see it in a future tip.
The FX Chain starts with a Splitter in Normal Mode, which feeds two Splitters in Frequency Split mode (fig. 1)
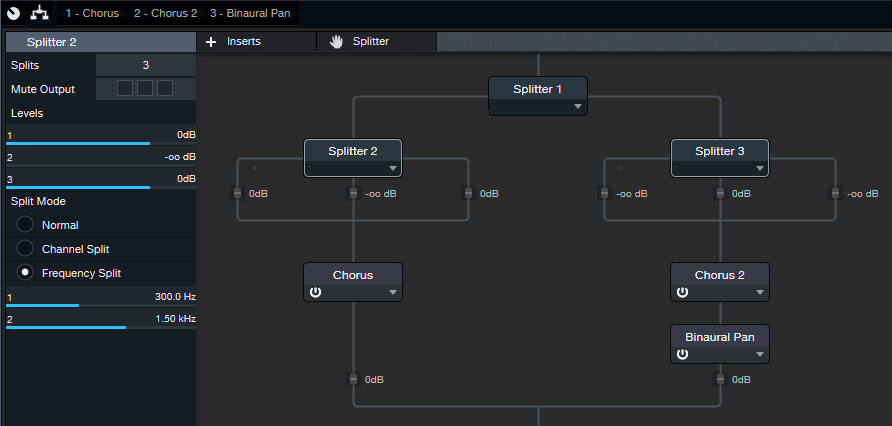
Figure 1: The FX Chain for Combi-Band Processing. The Chorus and Pan effects aren’t part of the process, but are the ones used in the audio example. Of course, other effects are just as suitable.
Both Splitters have almost identical parameters, including the split frequencies. In this case, they’re set to 300 Hz and 1.5 kHz, which seem to work well with guitar. Tweak the split frequencies as needed to optimize them for different instruments.
The parameters that differ are the various level controls. The level is pulled down for the middle band in Splitter 2, so its output consists of only the low and high frequency bands. Meanwhile for Splitter 3, the level for the low and high frequency bands is pulled all the way down, so its output consists of only the middle band. Fig. 2 shows what happens when you inject pink noise into the effects chain, and monitor the outputs of the two splitters.
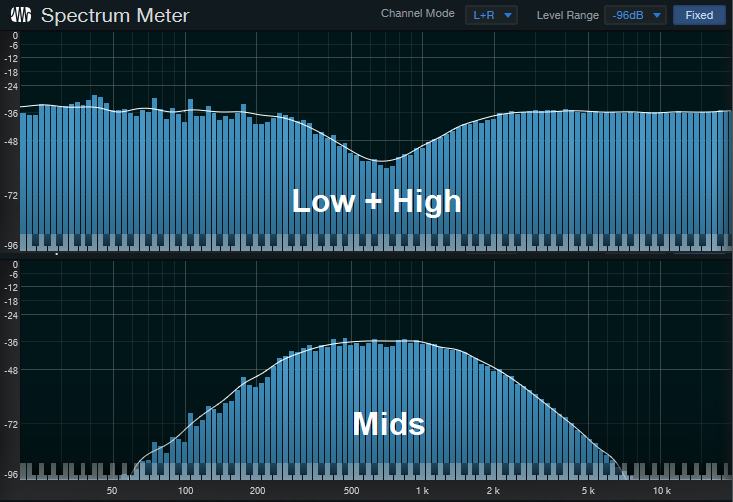
Figure 2: The top view shows Splitter 2’s frequency response, while the bottom view shows Splitter 3’s frequency response. If you sum these together, the response is flat.
About the Audio Example
Let’s listen to an example of Combi-Band Processing in action. There are three audio snippets. The first one is the midrange frequencies only, going through the Chorus, which is set to a fairly fast speed. The second snippet is the low and high frequencies only. It also goes through a Chorus, but set to Doubler mode. A Binaural Pan follows this to widen out the highs and lows.
The final snippet is the sound of combining the two paths together, which creates a gorgeous, rich chorusing sound. But plenty of other effects work well, like tempo-synched tremolos set to different LFO frequencies or waveforms, echoes with different delay times or feedback amounts, reverb on only the mids and echo on the highs and lows…you get the idea. So combi-up, and check out a different twist on signal processing.