Author Archives: Craig Anderton
Create Your Perfect Vocal Channel Strip Preset
First, some news: If you own The Huge Book of Studio One Tips and Tricks, the free update to version 1.2 is available from the PreSonus shop. Just go to your account and re-download the book. Also, my 2021 album project was recorded entirely in Studio One, and the playlist is posted on YouTube. You’ll probably find the song “I Hope” of particular interest, because the keyboard part was created automatically (yes, it really was) using the tip about the “Fill Notes” function, and the guitar and keyboard parts use the Shimmer Reverb tip. Okay, on to this week’s tip…
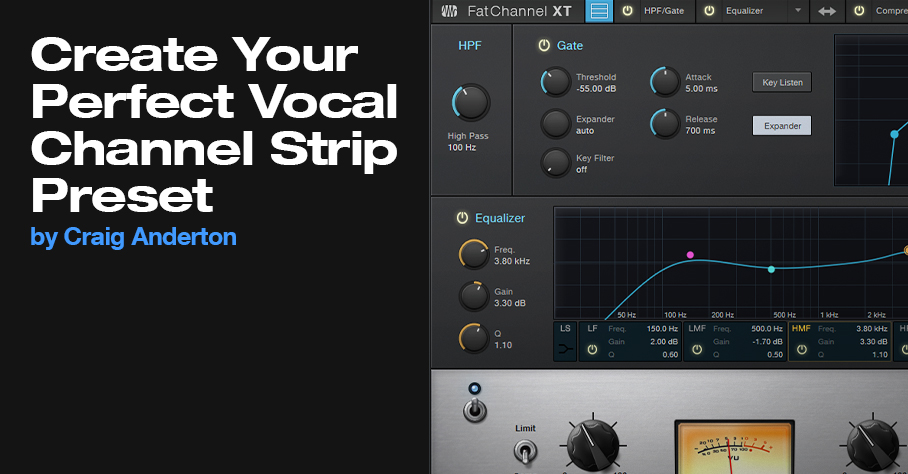
We all know how important vocals are, and the Fat Channel is an excellent channel strip for creating vocal presets. So, let’s go step-by-step on how to create your own Fat Channel preset. We’ll cover the reasons for choosing the parameters in fig. 1, and the order in which you want to edit them. More importantly, we’ll describe how to customize parameters for your mic type and voice.
HPF/Gate
The HPF can reduce pops, as well as excessive bass from singing too close to the mic. Choose a frequency that tightens up the low end, but doesn’t thin the sound. With a ribbon mic, you might want a higher frequency.
To keep low-level noise out of a vocal, try setting the Expander threshold to -55 dB. This should be high enough to get rid of residual hiss and room noise, but low enough to retain vocal nuances.
Equalizer
EQ settings are like a combination lock—get them right, and your vocal opens up. As to signal chain placement, equalizer before compressor is more forgiving of substantial EQ boosts that create “character.” Let’s run through the order for adjusting the edits.
HS (High Shelf). This gives the vocal “air.” Freq will be in the 8 to 10 kHz range, but Gain depends on your mic. Some mics have a high-frequency lift, so you don’t need much gain. A ribbon mic might sound dull, and need more gain. Turn up the Gain to where you get sibilance problems, and then back off until the sibilance issues go away.
HMF. The frequency range from 2 to 5 kHz is all about intelligibility. A broad boost helps the vocal stand out in a mix. Turn up the Gain until you hear more definition and greater intelligibility, then back off just a bit. The ear is most sensitive in this range, so too much boost can sound harsh.
LMF. A broad cut in the lower mids between 200 and 500 Hz can reduce “muddiness.” This isn’t always necessary, but reducing the lower mid response leaves more room for other instruments. Besides, with the HMF and High Shelf boosts, the vocal should come through just fine. An easy way to adjust LMF is to temporarily increase the Gain in this range, and sweep the frequency for the most “boxy” sound. That’s where you want to cut.
LF. With the HPF active and LMF cutting, a slight boost here re-introduces a little more warmth into the vocal. With a ribbon mic, or if the vocal was recorded with a significant bass proximity effect from singing too close, you might want to cut here instead.
Compressor
The Tube Comp is a favorite for vocals, and it’s blissfully easy to adjust: Set Peak Reduction for the desired amount of compression, then use Gain to make up for any decrease in level caused by compression. I usually aim for 6 to 8 dB compression on peaks, but a lot of engineers like to slam the compression harder, especially for rock vocals.
Limiter
Setting this to -3.0 provides insurance against stray peaks going higher than desired.
The Preset
The downloadable preset has the parameters shown in fig. 1. Although it can serve as a point of departure, I strongly encourage you to tweak the parameters to perfection for your own voice and microphone. You’ll find the effort is worth it!
Download the Fat Channel preset here:
Slick Tricks for Stack and Strum
Version 5.5 introduced Chord Stack and Strum features, which are pretty cool (for the basics on how they work, check out Gregor Beyerle’s YouTube video). We’ll warp these functions in some novel ways.
Chord Stack Meets Arpeggio
You can combine creating a Chord Stack and arpeggiating it at the same time.
- Start by selecting the desired Key, Scale mode, note length, and clicking the Scale check box (fig. 1). I find the most reliable option is to click Q, which follows the current quantization setting (quantization doesn’t have to be enabled).
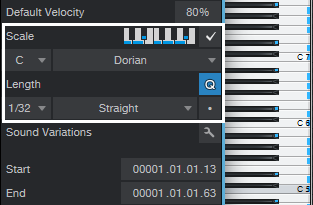
Figure 1: Select the appropriate parameters circled in white before proceeding.
- Choose the Paint tool.
- Hold down Alt (Windows) or Option (Mac).
- While still holding down Alt or Option, click where you want the note to start, and drag right (dragging left doesn’t work), while dragging up or down.
- The further you drag to the right, away from where you started, the more notes you’ll generate.
Past a certain point, some notes will repeat before moving on to the next note. The repeating is most likely to happen when using scales with few notes, like a Major Triad. The repeating notes can be a fun effect with sounds that have a fast decay.
When doing arpeggios, I like to drag up to the scale note just before the octave, and then create a second, downward arpeggio (fig. 2). You can turn this into an Event, and hit D to create as many iterations of the arpeggio as you want.
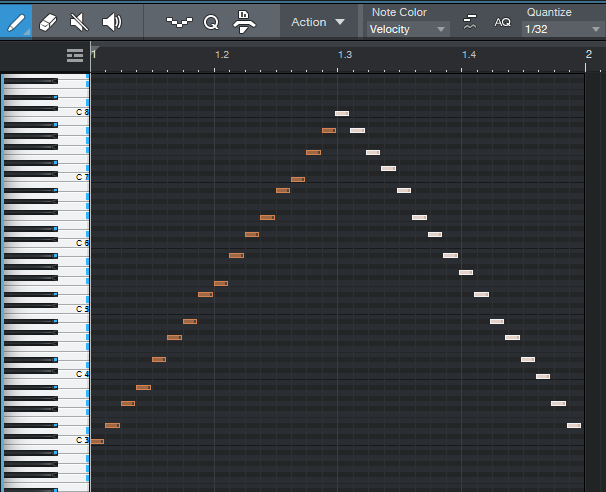
Figure 2: An arpeggio created by stretching a chord shape up, then creating a second arpeggio that stretches the chord shape down.
Strum Fun
Let’s turn our attention to strumming. One of my favorite alternatives to a conventional strum is that you don’t have to strum from the top or bottom of a chord, you can strum from the “inside out.” It sounds more like fingerstyle picking than strumming.
- Create your chord of choice.
- Select all the chord notes.
- Click somewhere toward the middle of the note where the strum should end (fig. 3 shows what happened when I chose the middle of the 7 notes) and hold down the mouse button.
- While still holding down the mouse button, hold down Alt+Ctrl (Windows) or Option+Cmd (Mac), and drag left or right. This is a wonderful effect—try it!

Figure 3: Inside-out strum.
Even better, we can take advantage of another new 5.5 editing feature. Set the end of the Event to where you want the notes to end. Select all the notes, right-click on one of them, and choose Musical Functions > Process > Extend to Note End. Now you’ll have a lovely, strummed attack, and all the notes will end at the same time.
More strum fun tips:
- You don’t need to strum all the notes of a chord. You can select, for example, just the top three chord notes, and strum those.
- Don’t overlook downstrokes. Click on the lowest note of a chord, hold the mouse button down, then hold down the Alt+Ctrl or Opt+Cmd and drag right. Now the top note will stay in place, and the strum will progress downward in pitch. If you want to end on the lowest note, choose the highest note instead of the lowest one, and drag left.
- Anyone who’s been following this blog knows I’m a fan of 12-string guitars and Nashville tuning. So, copy your strum, move it up an octave, and offset it slightly late compared to the original strum (see fig. 4, which once again takes advantage of the Extend to Note End function so that all the notes end at the same time).
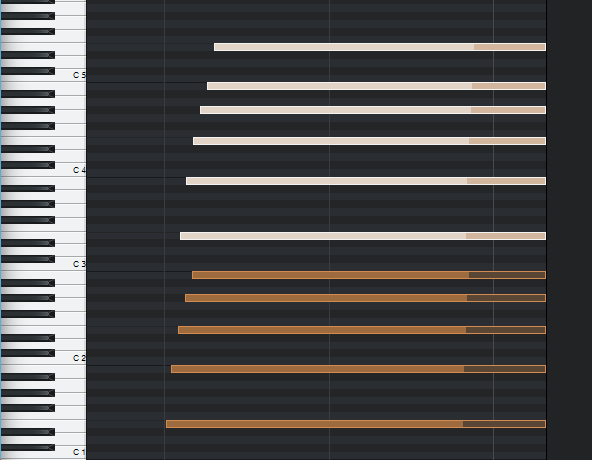
Figure 4: Octave strums have a different character when you offset the higher-octave notes.
Finally, it gets even better when you combine these techniques. For example, in fig. 4, you could strum the octave notes from outside in, and the lower notes from the inside out…or make one a downstroke, and one an upstroke.
Are we having fun yet?
“Melodify” Your Beats
 Wouldn’t it be cool to add a harmonic element to beats? Well, thanks to Harmonic Editing and a little pink noise, you can. The goal is to have your beat or drum loop follow a chord progression, embed the percussive qualities into the chords, and then mix the desired blend of beats and chords. First, you need to do a little prep work:
- Create a chord progression in your Chord Track.
- Add a track with a drum loop or drum part.
- Add a pink noise track.
How to Create a Pink Noise Track
- Insert the Tone Generator effect in a track.
- Set waveform to pink noise, level to -6.00, and then turn on the Tone Generator (fig. 1).
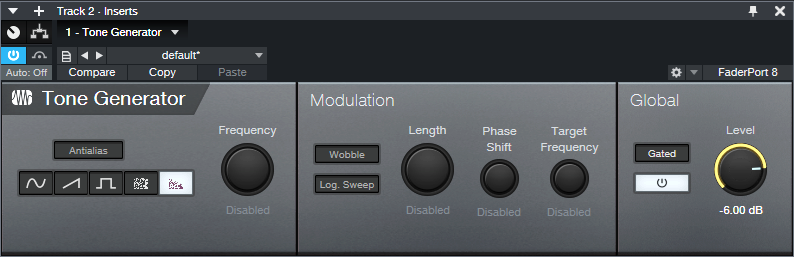
Figure 1: Tone Generator settings to generate pink noise.
- Create an Event that lasts as long as where you want noise, by dragging the pencil across the pink noise track.
- Select the track in the track header, and choose Transform to Rendered Audio. Now you have a track of pink noise.
- Open the Noise Track’s Inspector, and for Follow Chords, choose Universal (fig. 2). The Tune Mode doesn’t matter.
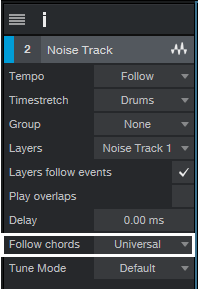
Figure 2: Choose Universal for the Follow chords mode.
Next, let’s have fun by blending the chords generated by the pink noise (from the Harmonic Editing) with the drums. Here are some examples.
Gate the Chords
Insert a Gate in the pink noise track. Send a sidechain from the drum track to the Gate. Adjust the Gate parameters so it triggers in sync with the drums (fig. 3).
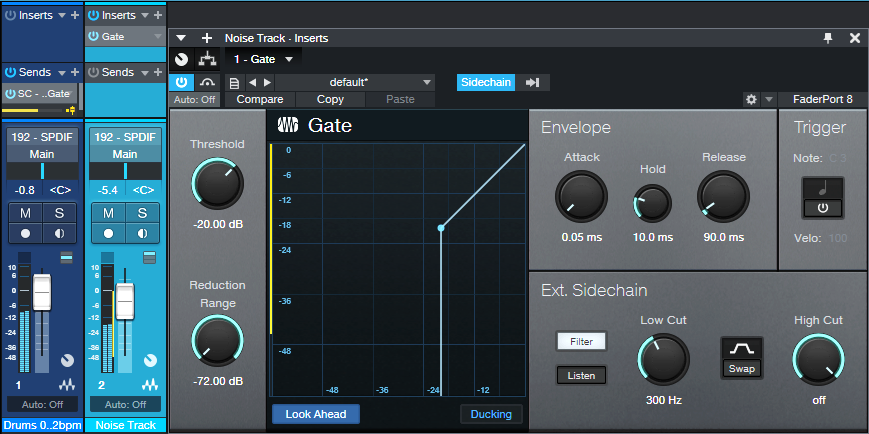
Figure 3: Typical Gate settings for opening and closing the Gate in sync with the drums. Make sure Ducking is not enabled. Also, I EQ’ed the sidechain to inhibit the kick from triggering the gate, so that the noise track followed only the higher-frequency percussion.
Here’s what it sounds like—fun stuff!
Automating the Gate parameters can be useful, too (especially Release and Threshold).
X-Trem the Chords
This sound inserts two X-Trems (fig. 4) in series in the pink noise track, and syncs them to tempo.
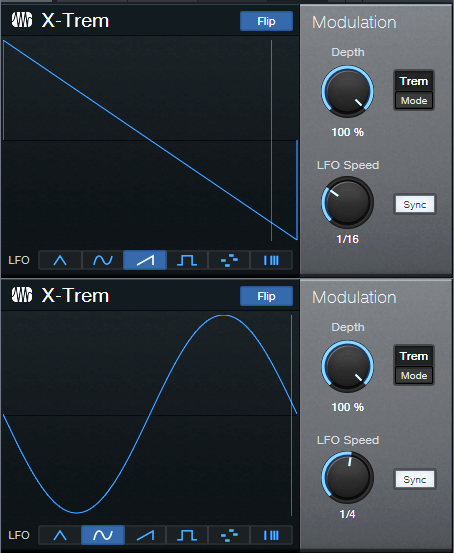
Figure 4: Settings for the two X-Trems.
And here’s what they do to the beat…it sounds very reggae.
This is another application where automation can add a lot of variety—particularly by varying the LFO Speed parameter in the second X-Trem.
X-Trem + AutoFilter the Chords
Now try replacing the second X-Trem with an AutoFilter, set as follows (fig. 5).

Figure 5: AutoFilter settings used in the audio example.
This audio example plays only the chord part, and doesn’t mix in the drums. You can introduce a lot of mileage in a song by varying the mix of drums only, chords only, and drum+chords.
Have fun!
Cool Reverb Trick, Bro!
 Let’s go right to the audio examples, because they’re worth a thousand words.
The problem: You want a big, lush reverb on drums. But that overpowers the drums, and turns them into a reverby mess…like this.
So sadly, you turn down the reverb, and give up your dream. But wait! Here’s the solution.
We haven’t changed the reverb settings at all, so there’s still plenty of reverb. But now it sounds tight, instead of like a reverby mess. The secret is creating a bus, and inserting X-Trem before the reverb (fig. 1).
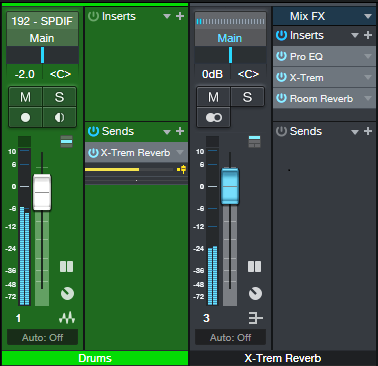
Figure 1: Setup for cool reverb drums.
You can ignore the Pro EQ, it’s there only because I usually insert a low-frequency rolloff prior to drum reverb (this prevents the kick drum from misbehaving). Fig. 2 shows the X-Trem settings. Make sure X-Trem and the drums are synced to the tempo.
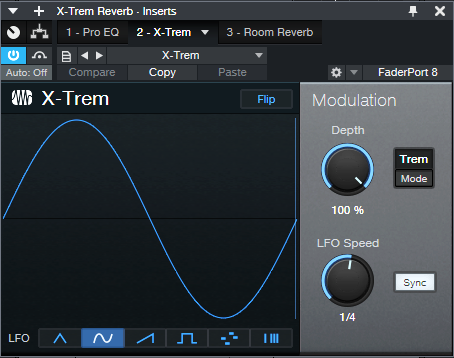
Figure 2: The X-Trem is using sine wave modulation, set for 1/4 note sync. 1/8 note sync can also work well for faster tempos, and 1/4 for slower tempos.
If you have other tracks feeding the Reverb bus, you might not want them subjected to the X-Trem (or you might). If not, then see fig. 3.
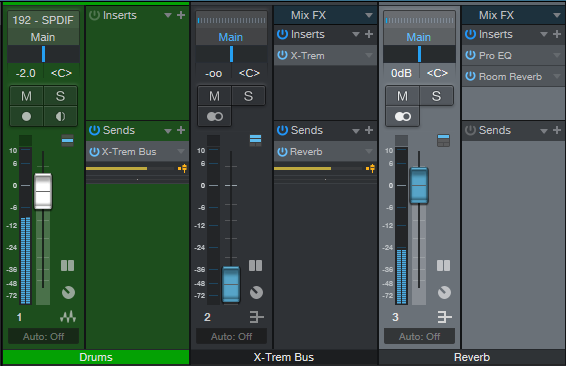
Figure 3: How to apply this effect only to drums, when you want other tracks to feed the reverb bus.
Use a pre-fader send from the drums to a bus, insert the X-Trem in that bus and turn down its fader, then create a pre-fader send from the X-Trem bus to the Reverb bus. Now you can feed other tracks directly into the Reverb bus.
Cool reverb trick, eh?
Don’t Ignore the Free VU Meter Plug-In
It may seem like VU meters are a relic of the past. However, the VU Meter plug-in that’s available for free in the PreSonus Shop is well worth the download—it’s more than just meter-based eye candy (fig. 1). This plug-in is particularly useful for mastering or as a master bus effect while mixing, because it shows several crucial aspects of a stereo mix.
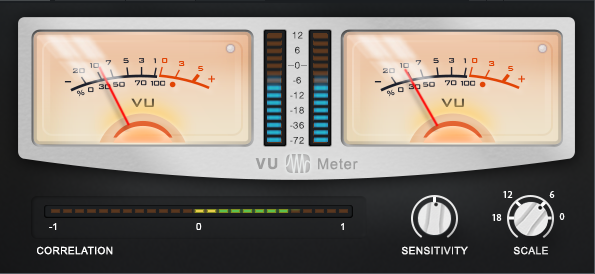
Figure 1: This VU meter isn’t just free, it’s useful. Grab it before someone at PreSonus decides they should probably charge something for it.
The LED meters in the middle indicate peak signal levels, while the VU meters indicate average signal levels. These can provide useful clues about your music. If the average levels are high compared to the peaks, then there may be too much compression or limiting being used. Conversely, if the peak levels are high and the average levels are low, you may need some dynamics processing to even out the dynamic range somewhat.
The Sensitivity control acts like a damping control on the meters, where lower sensitivity averages out the readings over a longer time period. Turning up Sensitivity tracks the average level over shorter periods. Turning down Sensitivity for the slowest response provides a good way to compare average song levels, or sections within a song.
Scale correlates peak levels to your preferred amount of headroom. For example, for 18 dB of headroom, set Scale to 18. Then, signals that hit -18 dBFS will register as 0 on the meter. Setting Scale to 6 can be a good way to trick yourself into respecting headroom a little more, because signals at -6 dBFS will show as 0.
Finally, the Correlation meter indicates if there are any potential phase issues with stereo audio. A correlation reading of 1 means the audio is mono, or with stereo, that the audio in both channels is in phase. A correlation reading of -1 means the audio streams in the left and right channels are 180 degrees out of phase with each other (oops). Although it’s not a problem to dip into the red (negative reading) from time to time, if the readings are often negative, then phase issues may be a problem. These could be caused by an effect on a track that generates an out-of-phase output signal, stereo miking where the XLR cables were wired incorrectly (yes, it happens), or other gremlins. It’s generally best if the Correlation meter reading fluctuates between 0 and 1.
It never hurts to be able to get different perspectives on your audio, and this isn’t only a useful tool…it’s free, which is everyone’s favorite price. What’s more, if you have PreSonus Hub installed, you can also use the VU Meter with other VST/AU/AAX-friendly programs. And finally, let’s hear it for software—no matter how hard you hit the VU meter, you won’t break the needle!
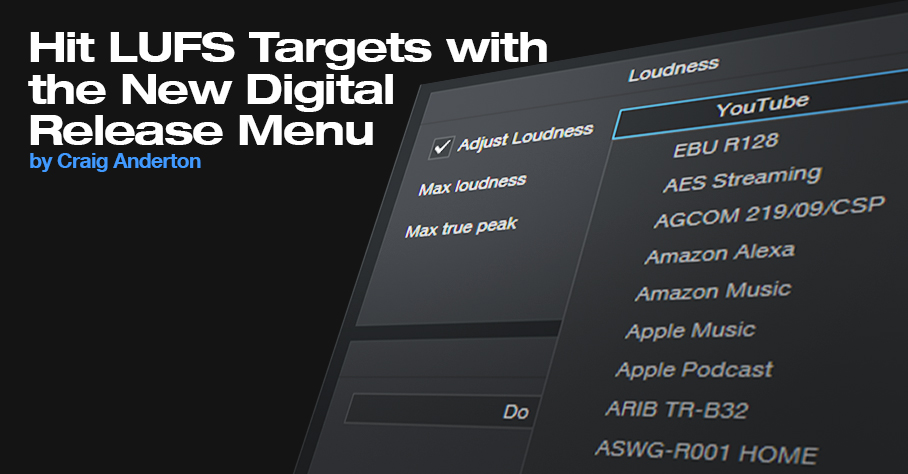
Hit LUFS Targets with the New Digital Release Menu
It’s a streaming world—and streaming services have their own audio standards with respect to LUFS and True Peak levels. LUFS is not the same as peak or average loudness. Instead, it measures perceived sound levels. In theory, if two songs have the same LUFS readings—whether it’s Billie Eilish whispering or hardcore 1999 Belgian techno—you won’t feel the need to get up and adjust the volume.
True peak measures the peak value after D/A conversion, which can be higher than the peak value prior to D/A conversion. Having a peak value below 0 minimizes the chance of distortion when transcoding a WAV file into a data-compressed format. For more about LUFS, see Understanding LUFS, and Why Should I Care?
The Easy Song Level Matching tip tells how to use the Tricomp and Limiter to match song levels in a collection of songs or an album, and it remains viable. However, if you’ve already mastered your songs the way you like, Studio One version 5.5 has added an export function to the Digital Release menu that can export your songs to any LUFS and true peak level you want. What’s more, it includes presets for all the most popular streaming services (fig. 1).
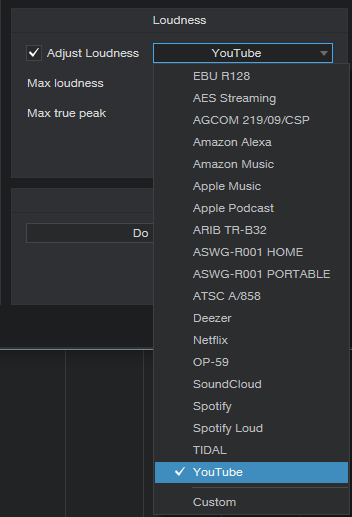
Figure 1: To meet the specs for particular streaming services, simply choose a preset, and export. Here. YouTube has been chosen.
Another convenient aspect is that once you release the drop-down menu, you can see a particular streaming service’s recommended specs (fig. 2). This is also where you can specify custom settings for LUFS and True Peak.
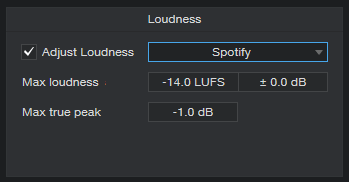
Figure 2: Choosing a streaming service shows its desired file specs. This shows that Spotify wants files with a max loudness of -14.0 LUFS, and Max true peak of -1.0 dB.
Let’s do a real-world test to check the effectiveness. Consider two songs in the Project Page, one at -6.8 LUFS with a true peak reading of +0.7, and the other at -12.2 LUFS with a true peak reading of +0.1 (fig. 3). We’ll export them to Spotify’s standard mode, which wants -14.0 LUFS and -1.0 true peak, and then load them back into the Project Page to see what happens.
The -6.8 LUFS file had to be turned down a lot to hit -14.0 perceived level. Turning down the level lowers the true peak reading; in this case, it ended up at -6.5. The -12.2 LUFS file didn’t need to be turned down much at all to hit -14.0 LUFS, and its true peak reading is now -1.7. When played back, even though the waveform levels look very different, they sound like they’re at the same level.
However, it’s important to note that this process won’t raise the level if the peaks already hit 0. For example, if one of the files was normalized and its LUFS reading was -15.0, it wouldn’t have increased to -14.0 LUFS because that would have required processing (e.g., limiting) to raise the level. Otherwise, any peaks would have exceeded the headroom.
The export function simply does what most (but not all) streaming services do—turn down levels above the target LUFS to reach the desired LUFS reading. This makes sense, because the main reason streaming services adopting LUFS targets was to prevent songs that were mastered “hot” from having a level advantage over songs mastered with more reasonable (and more listenable) dynamics.

Figure 3: The two files on the left are the original files. The versions on the right now have LUFS readings of ‑14.0.
Finally, you don’t have to master everything to hit a specific service’s specifics, because this new Studio One function does it for you. Master the music so it sounds good to you—go ahead and compress that rock track, or maximize an EDM set. If it has the right sound but its LUFS reading is -9 or whatever, don’t worry about it. When you export it to a specific target, the song will meet that service’s specs.
“Talk Box” Emulator for Guitar
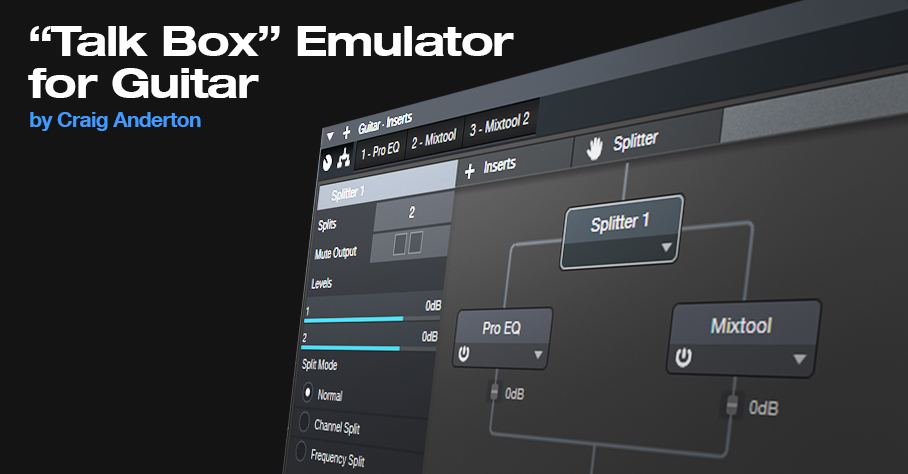
Although this isn’t an actual talk box, it does give humanized mouth sounds with Studio One Professional. This is possible because the human mouth is a filter, and Studio One has filters…so let’s do it! Check out the audio example, then download the .multipreset to try it out for yourself.
Talk Box.multipreset – Click to download
The Talk Box works by splitting the guitar (fig. 1). One split goes to a Pro EQ2, which uses a Channel Editor knob to sweep three bandpass filters simultaneously over the vocal range. The other split goes through a Mixtool that flips the phase, so it cancels all the audio from the Pro EQ2 except for the bandpass filter peaks.
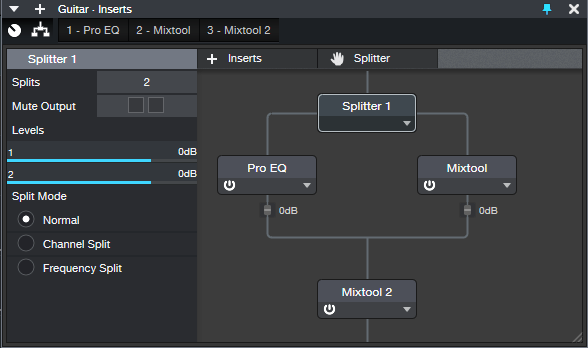
Figure 1: The Talk Box’s “block diagram.”
EQ Settings
The Pro EQ2 uses three stages (fig. 2). The LF stage, in Peaking mode, sweeps from about 250 to 500 Hz. The LMF stage sweeps from around 750 Hz to 1.5 kHz, while the MF stage sweeps from 1.5 to 3.0 kHz.
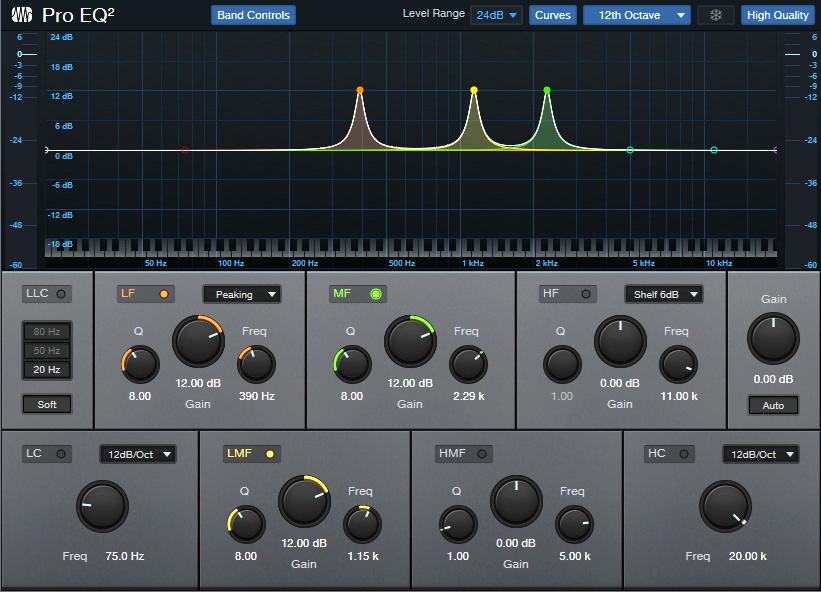
Figure 2: Pro EQ2 stages being used for the filtering.
Channel Editor Settings
Use the Channel Editor to assign the filter frequencies to a Macro control knob (fig. 3).
Figure 3: The Macro knob’s range has been edited to cover the Mid Frequency stage’s frequencies. Edit the other targets similarly
The second Mixtool at the output increases the level by 6 dB. This is necessary because one of the splits is out of phase. Because only the filter peaks come through, the output level is considerably lower than the input.
Everything described so far is included in the multipreset, but assigning the Macro knob to a MIDI controller or pedal is up to you. I did a blog post on a way to do this, and the information is also in The Huge Book of Studio One Tips and Tricks. (A heads-up for current owners of the book: a free update will be available soon with more tips, presets, and content, so stay tuned.)
Just remember that you can’t automate the Macro knob per se. You’ll need to add three Automation tracks, assigned to the Low, Low Mid, and Mid frequency parameters. Then, make sure they’re in Write mode when you move the Macro knob control, and they’ll automate the “talk box” changes.
Mix Referencing with Master Matching
Mix referencing, where you compare your mix to well-mixed music, can be a big help if you want a reality check on what you’re doing. There are even “curve-stealing” programs that can analyze the spectral response of one song and apply it to another one, but that won’t help train your ears, and you’ll usually need to make changes anyway. So, let’s explore how to customize the process in Studio One.
As examples, I chose two songs that are about as different as can be—”Kids of Summer” by Mayday Parade (rock), and “Spinback” by Comethazine (rap). The goal was to analyze each song’s spectral response, and come up with Pro EQ2 settings that could apply one spectrum to the other. Let’s hear now it turned out.
Fig. 1 shows the original spectra (the lower of the two lines in the graph is the most relevant). Kids of Summer is heavy on the upper mids around 1 to 2 kHz, where guitars and vocals live. Bass is relatively subdued, and the highs start rolling off above 5 kHz. Spinback is heavy on the bass, lighter on the lower mids, and spices up the treble from 5 to about 7 kHz.
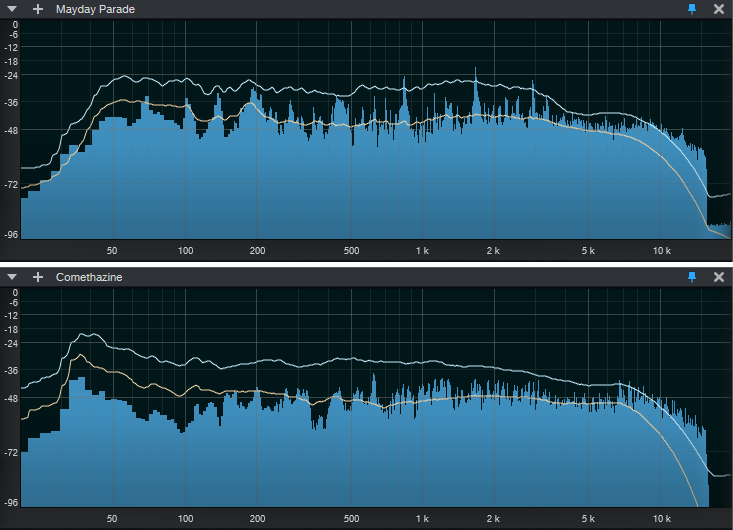
Figure 1: Spectra for Kids of Summer (top) and Spinback (bottom).
Let’s listen to the original songs that the spectra represent. Copyright-wise, I think we’re good to go from a fair use standpoint—the excerpts are under 30 seconds, used for educational purposes, transformative because the EQ is going to change them, and don’t diminish the value of the music.
Now let’s create a EQ to give Kids of Summer more of the Spinback spectral response. Fig. 2 shows the EQ settings.
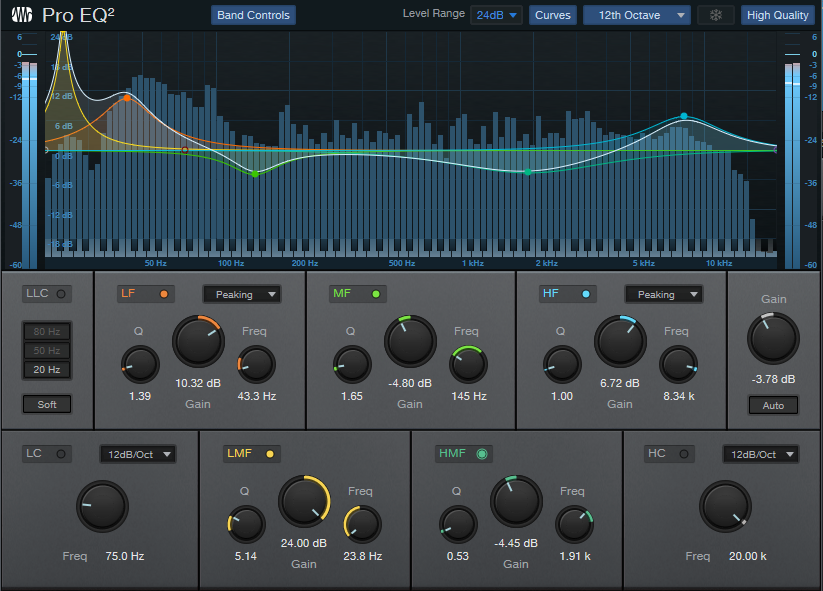
Figure 2: To come closer to the Spinback sound, this boosts lows and highs, and trims the mids.
Fig. 3 shows the spectral response for Kids of Summer after applying the EQ.
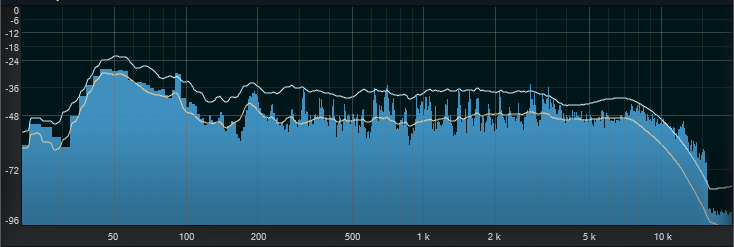
Figure 3: Kids of Summer spectra after EQ. Note how it’s much closer to the Spinback spectra.
And here’s what it sounds like.
I really like how this brings out the low-end fullness, although I’d definitely trim the highs a bit—still, it’s the start of a cool alternative. Note that for a fair comparison, the original and EQed versions were set to the same LUFS value.
Now let’s do the reverse. Figure 4 shows the Kids of Summer EQ curve we’ll apply to Spinback.

Figure 4: To approximate the Kids of Summer sound, this cuts the lows and highs, and boosts the mids.
Fig. 5 shows Spinback’s spectral response after applying the Kids of Summer EQ.
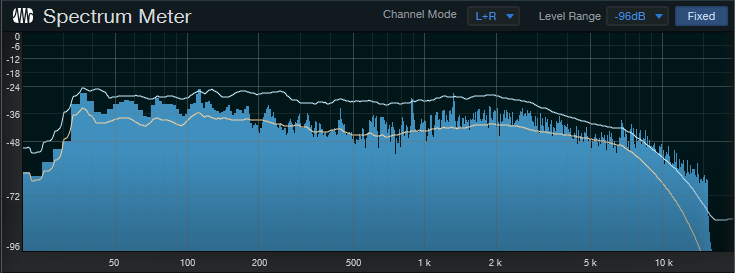
Figure 5: We’ve managed to make the Spinback spectrum much more like the one for Kids of Summer.
Let’s hear what Spinback sounds like now.
Again, the original and EQed versions were set for the same LUFS readings. The difference isn’t as dramatic as applying Spinback to Kids of Summer, because the Spinback arrangement is more sparse. However, the EQ’d version makes the vocals more prominent in comparison the more attenuated low and high frequencies, so the whole song comes more “forward” in the speakers compared to the original. This is something that would cut through better on AM radio and mobile device speakers, at the expense of the low-end fullness and high-end sizzle. Even if you’re an expert mixer, this technique can give you some fresh ideas, and new ways to look at music.
And finally, to all of you, thanks for your continued support of these blog posts—and a big thanks to all the behind-the-scenes folks at PreSonus, like Houston Dragna and Ryan Roullard, who turn them into reality. Have a happy, healthy, productive 2022—and make some great music, so we all can listen to it!
The Songwriter’s Assistant

It happens to everyone: creative blocks. You want to do something musical, but…you keep falling into the same old patterns, or you need something new and different to prod you into being creative. Well, that’s when it’s time to load the Songwriter’s Assistant preset into Studio One’s Chorder Note FX. And although this uses virtual instruments, you don’t even need to know how to play keyboards. Really!
Note FX Basics
A Note FX plug-in processes MIDI data coming from an external controller or Instrument track, before passing the data along to a virtual instrument. The Note FX inserts in an instrument track’s Inspector (fig. 1).
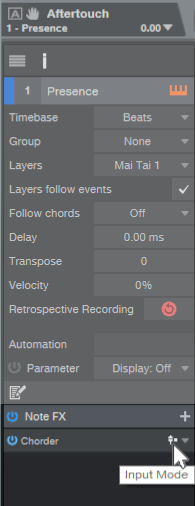
Figure 1: Insert Note FX in the Inspector, like you would insert an Event FX for audio. We’ll describe input mode later.
Studio One has several Note FX, but for assistance with smashing creative blocks, this tip uses Chorder as our Note FX of choice. And in the spirit of the holiday season, there’s a gift you can download—the Songwriter’s Assistant preset for Chorder.
Why Chorder Is Cool
Chorder can stack chords on a single key. This is why you don’t need to play keyboards—just hit a key, and a chord of whatever complexity you want will play. The Songwriter’s Assistant uses two keyboard octaves (fig. 2).
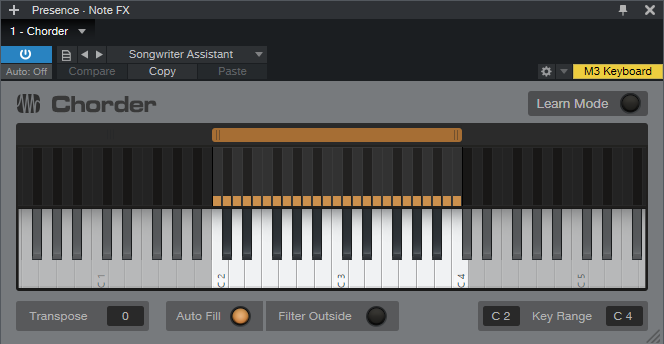
Figure 2: The Songwriter’s Assistant preset.
The range C2 – B2 plays major chords. C3 – C4 plays minor chords. So if you don’t know how to voice chords on a keyboard, no problem! And if you don’t even know what notes correspond to C2 through C4, no worries there, either. Just hit keys that sound good, and later on, we’ll deal with how to show what chords to play on guitar or other instruments.
Studio One’s Help file has plenty of information on how to create your own Chorder presets or modify existing ones (like adding more chord types, like 7ths, to other keyboard octaves), so we’ll just concentrate on using the Songwriter’s Assistant as a plug-and-play Note FX.
Using It
After downloading the Songwriter’s Assistant preset, import it into Chorder. Studio One saves Chorder presets in [drive]\Studio One\Presets\PreSonus\Chorder. Insert an instrument, and then insert Chorder as shown in fig. 1.
Now start playing notes, and come up with cool chord progressions. Record them in the Instrument track to build up your song’s chord progression. That’s all there is to it.
The instrument track can show the note(s) you played, or the notes Chorder generates. With Input Mode (fig. 1) set to “pre” (the same graphic as a send being pre), the track records Chorder’s output. With “post,” it records your original input, although you’ll still hear chords play back. If you selected post but want the track to include the Chorder-generated notes, right-click in the track, and choose Render Instrument Tracks. Now you’ll see what Chorder generated.
Finally, if you don’t play keyboards, just open the Chord Track and drag the instrument track up to it. Studio One will parse your chord progression, and show you the chord letters. Better yet, choose View > Chord Display to see giant chord letters marching across your screen.
And don’t overlook the factory presets, where you’ll find plenty more ideas for generating chord progressions. Is this cool, or what?
Add Lookahead to the Fat Channel Compressors
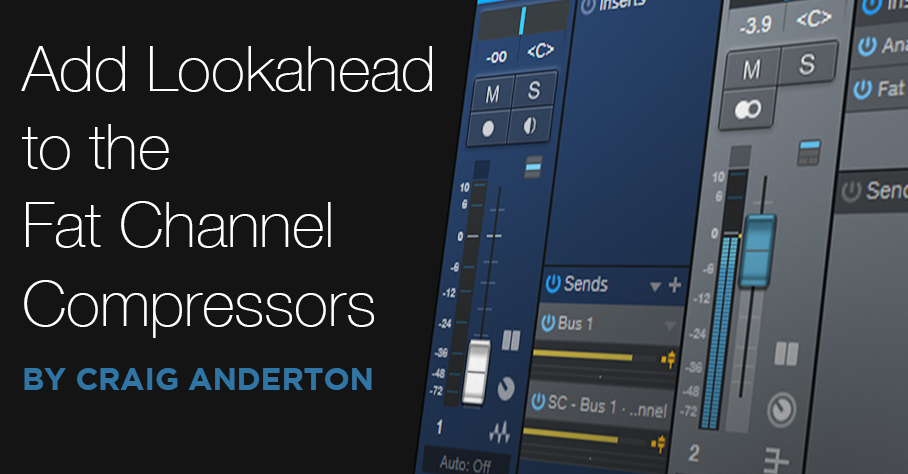
The Fat Channel is a versatile channel strip plug-in that, because of all the other cool Studio One individual processors, is easy to overlook. But it has several outstanding features, including the ability to choose from a variety of compressors—sort of like plug-ins within a plug-in (fig. 1). Three are stock; the rest are optional at extra cost from the PreSonus shop.
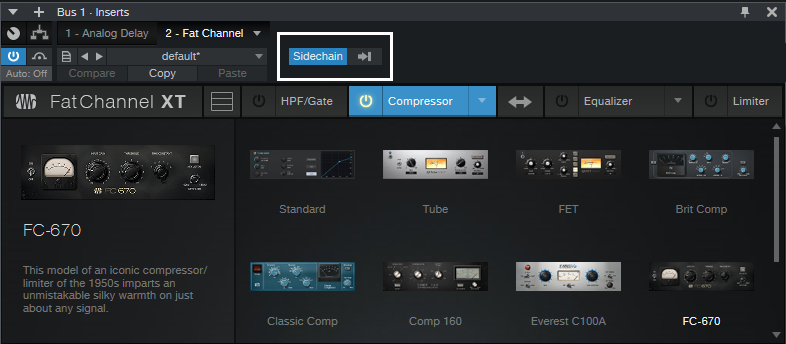
Figure 1: A fully loaded Fat Channel can choose from 11 compressors.
However, none of these compressors has a lookahead feature. Lookahead delays the audio we hear, but the compressor monitors the audio in real time. Thus, the compressor knows in advance when it needs to apply compression. Without lookahead, if you’re using heavy compression (like for guitar sustain), you’ll hear a nasty pop because the compression can’t kick in until the audio exceeds the threshold—and by that time, it’s too late. Some of the audio has already passed through uncompressed, which causes the pop. The first audio example exhibits this pop. Also note that the first and second audio examples are both normalized—but this one sounds really soft, because the pops are so loud you can’t raise the level any higher without bumping against the headroom.
The solution is simple. What’s more, it applies to not only the Fat Channel, but any dynamics processor, from any manufacturer, that doesn’t have lookahead.
Create a bus, and insert the Analog Delay. Edit the parameters for 2 ms of delay, delayed sound only, and no modulation (fig. 2). Insert the Fat Channel after the Analog Delay, and choose your favorite compressor.
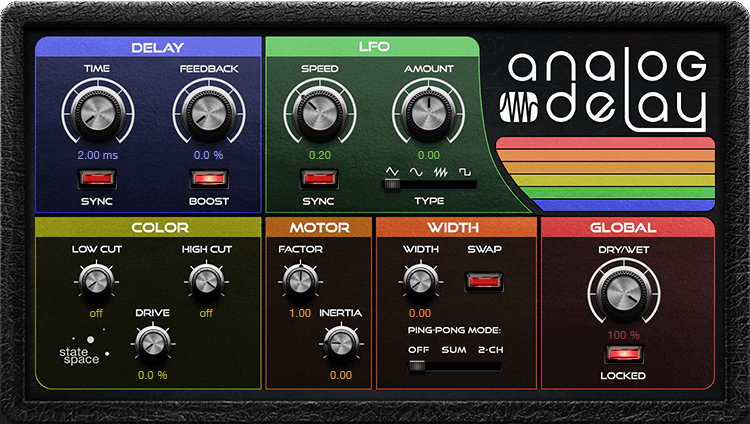
Figure 2: Analog Delay settings for the lookahead function.
At the audio track you want to process, create two pre-fader sends. One goes to the bus, and the other to the Fat Channel’s sidechain. Turn down the track’s fader so you hear only the audio coming from the bus. This accomplishes our goal: The audio applies compression to the Fat Channel 2 ms before the audio enters the compressor. So, the compressor is primed and ready to go when a transient hits (fig. 3).

Figure 3: Track and bus setup for Fat Channel lookahead.
Now compare the next audio example to the first one—the nasty pop is gone. Yeah! Also notice how it’s much louder, because the headroom doesn’t have to accommodate a pop.
However, there’s a catch. Studio One plug-ins with a lookahead function delay the signal by 1.5 ms, but apply plug-in delay compensation so that all the other tracks are delayed by 1.5 ms. This keeps the tracks in sync, and you don’t really notice a delay this short. However, our “faux lookahead” doesn’t have plug-in delay compensation.
Then, move the track forward on the timeline by 2 ms to align it with the other tracks. You can do this via the Delay setting in the Event Inspector (F4).